trailer MERCEDES-BENZ GLC COUPE 2016 Workshop Manual
[x] Cancel search | Manufacturer: MERCEDES-BENZ, Model Year: 2016, Model line: GLC COUPE, Model: MERCEDES-BENZ GLC COUPE 2016Pages: 389, PDF Size: 7.34 MB
Page 356 of 389
Towing the vehicle with both axles on
the ground
The automatic transmission automatically shifts to position Pwhen you open the driver's or front-
passenger door or when you remove the key
from the ignition lock. In order to ensure that the
automatic transmission stays in position N
when the vehicle is being towed, you must
observe the following points:
X Make sure that the vehicle is stationary.
X Turn the key to position 2in the ignition lock.
X Depress the brake pedal and keep it
depressed.
X Shift the automatic transmission to position
N.
X Leave the key in position 2in the ignition lock.
X Release the brake pedal.
X Release the electric parking brake.
X Switch on the hazard warning lamps
(Y page 117).
In order to signal a change of direction when
towing the vehicle with the hazard warning
lamps switched on, use the combination switch
as usual. In this case, only the turn signals for
the desired direction flash. When you reset the
combination switch, the hazard warning lamps
start flashing again. Transporting the vehicle
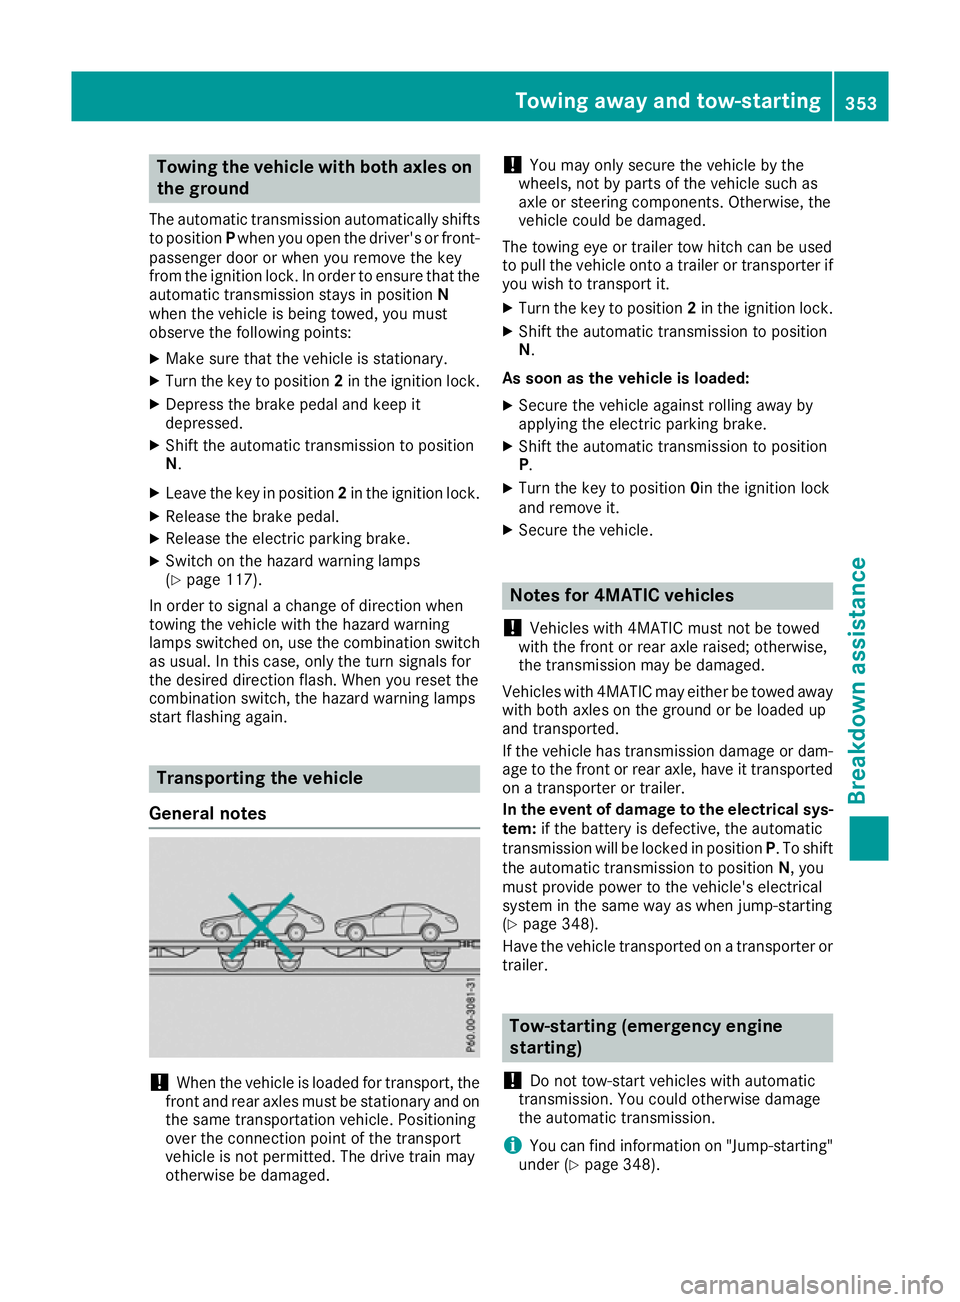
General notes !
When the vehicle is loaded for transport, the
front and rear axles must be stationary and on
the same transportation vehicle. Positioning
over the connection point of the transport
vehicle is not permitted. The drive train may
otherwise be damaged. !
You may only secure the vehicle by the
wheels, not by parts of the vehicle such as
axle or steering components. Otherwise, the
vehicle could be damaged.
The towing eye or trailer tow hitch can be used
to pull the vehicle onto a trailer or transporter if
you wish to transport it.
X Turn the key to position 2in the ignition lock.
X Shift the automatic transmission to position
N.
As soon as the vehicle is loaded:
X Secure the vehicle against rolling away by
applying the electric parking brake.
X Shift the automatic transmission to position
P.
X Turn the key to position 0in the ignition lock
and remove it.
X Secure the vehicle. Notes for 4MATIC vehicles
! Vehicles with 4MATIC must not be towed
with the front or rear axle raised; otherwise,
the transmission may be damaged.
Vehicles with 4MATIC may either be towed away
with both axles on the ground or be loaded up
and transported.
If the vehicle has transmission damage or dam- age to the front or rear axle, have it transportedon a transporter or trailer.
In the event of damage to the electrical sys-
tem: if the battery is defective, the automatic
transmission will be locked in position P. To shift
the automatic transmission to position N, you
must provide power to the vehicle's electrical
system in the same way as when jump-starting
(Y page 348).
Have the vehicle transported on a transporter or
trailer. Tow-starting (emergency engine
starting)
! Do not tow-start vehicles with automatic
transmission. You could otherwise damage
the automatic transmission.
i You can find information on "Jump-starting"
under (Y page 348). Towing away and tow-starting
353Breakdown assistance Z
Page 363 of 389
If you are unable to rectify the damage, con-
tact a qualified specialist workshop. H
Environmental note
Check the tyre pressure regularly, at least
every 14 days.
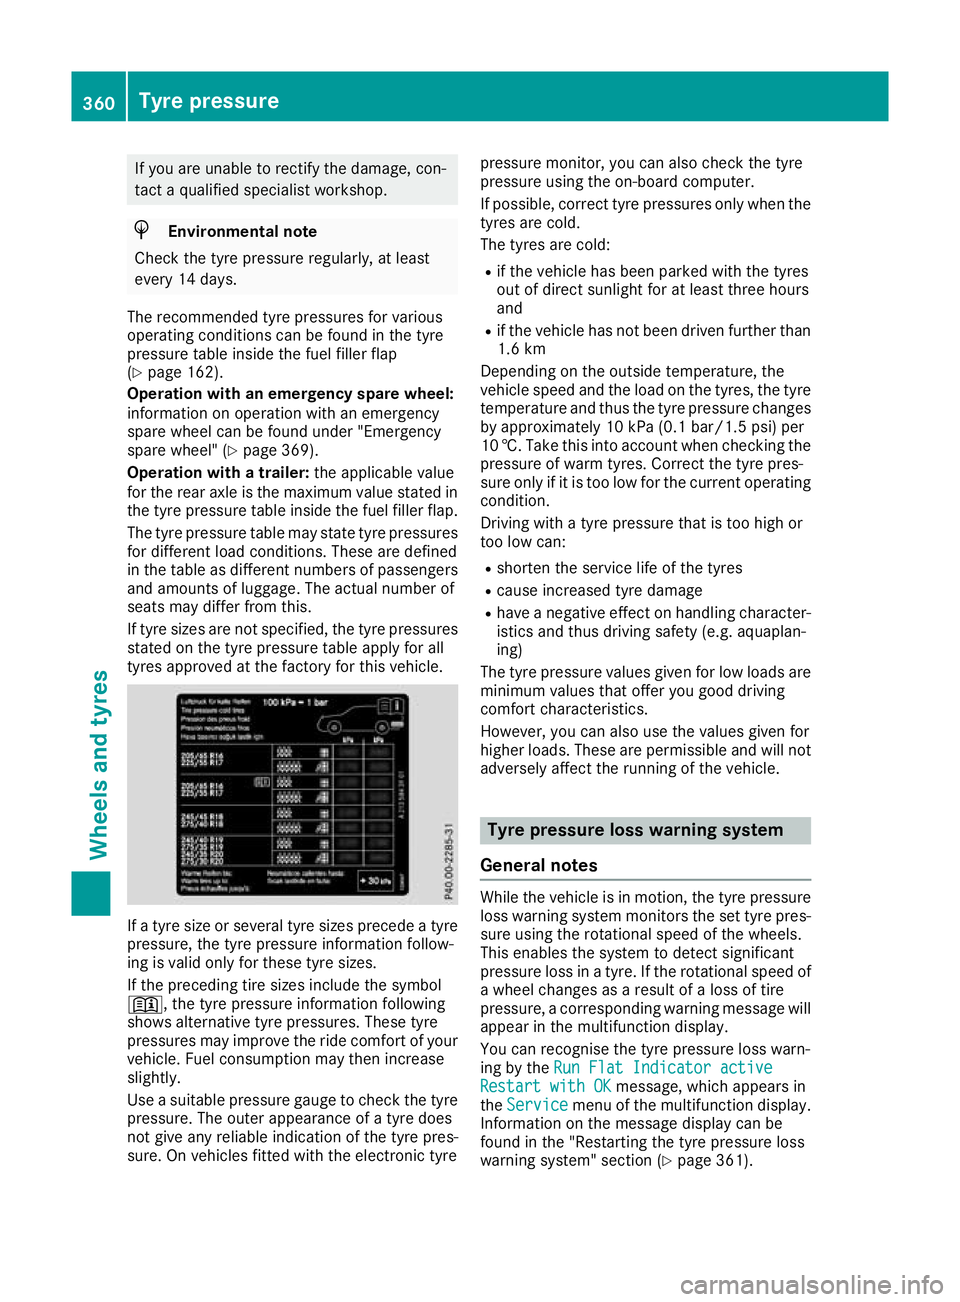
The recommended tyre pressures for various
operating conditions can be found in the tyre
pressure table inside the fuel filler flap
(Y page 162).
Operation with an emergency spare wheel:
information on operation with an emergency
spare wheel can be found under "Emergency
spare wheel" (Y page 369).
Operation with a trailer: the applicable value
for the rear axle is the maximum value stated in the tyre pressure table inside the fuel filler flap.
The tyre pressure table may state tyre pressures for different load conditions. These are defined
in the table as different numbers of passengers and amounts of luggage. The actual number of
seats may differ from this.
If tyre sizes are not specified, the tyre pressures
stated on the tyre pressure table apply for all
tyres approved at the factory for this vehicle. If a tyre size or several tyre sizes precede a tyre
pressure, the tyre pressure information follow-
ing is valid only for these tyre sizes.
If the preceding tire sizes include the symbol
+, the tyre pressure information following
shows alternative tyre pressures. These tyre
pressures may improve the ride comfort of your
vehicle. Fuel consumption may then increase
slightly.
Use a suitable pressure gauge to check the tyre
pressure. The outer appearance of a tyre does
not give any reliable indication of the tyre pres-
sure. On vehicles fitted with the electronic tyre pressure monitor, you can also check the tyre
pressure using the on-board computer.
If possible, correct tyre pressures only when the
tyres are cold.
The tyres are cold:
R if the vehicle has been parked with the tyres
out of direct sunlight for at least three hours
and
R if the vehicle has not been driven further than
1.6 km
Depending on the outside temperature, the
vehicle speed and the load on the tyres, the tyre temperature and thus the tyre pressure changes by approximately 10 kPa (0.1 bar/1.5 psi) per
10 †. Take this into account when checking the
pressure of warm tyres. Correct the tyre pres-
sure only if it is too low for the current operating
condition.
Driving with a tyre pressure that is too high or
too low can:
R shorten the service life of the tyres
R cause increased tyre damage
R have a negative effect on handling character-
istics and thus driving safety (e.g. aquaplan-
ing)
The tyre pressure values given for low loads are
minimum values that offer you good driving
comfort characteristics.
However, you can also use the values given for
higher loads. These are permissible and will not
adversely affect the running of the vehicle. Tyre pressure loss warning system
General notes While the vehicle is in motion, the tyre pressure
loss warning system monitors the set tyre pres-
sure using the rotational speed of the wheels.
This enables the system to detect significant
pressure loss in a tyre. If the rotational speed of
a wheel changes as a result of a loss of tire
pressure, a corresponding warning message will appear in the multifunction display.
You can recognise the tyre pressure loss warn-
ing by the Run Flat Indicator active Run Flat Indicator active
Restart with OK
Restart with OK message, which appears in
the Service
Service menu of the multifunction display.
Information on the message display can be
found in the "Restarting the tyre pressure loss
warning system" section (Y page 361).360
Tyre pressureWheels and tyres
Page 364 of 389
Important safety notes
The tyre pressure warning system does not warn
you of an incorrectly set tyre pressure. Observe
the notes on the recommended tyre pressure
(Y page 359).
The tyre pressure loss warning system does not
replace the need to regularly check the tyre
pressure. An even loss of pressure on several
tyres at the same time cannot be detected by
the tyre pressure loss warning system.
The tyre pressure loss warning system is not
able to warn you of a sudden loss of air, e.g. if the
tyre is penetrated by a foreign object. In the
event of a sudden loss of air, bring the vehicle to
a halt by braking carefully. Avoid abrupt steering manoeuvres.
The function of the tyre pressure loss warning
system is limited or delayed if:
R snow chains are fitted on your vehicle
R road conditions are wintry
R you are driving on a loose surface (e.g. sand or
gravel)
R you adopt a very sporty driving style (corner-
ing at high speeds or driving with high rates of
acceleration)
R you are towing a very heavy or large trailer
R you are driving with a heavy load (in the vehi-
cle or on the roof)
Restarting the tyre pressure loss warn-
ing system Restart the tyre pressure loss warning system if
you have:
R changed the tyre pressure
R changed the wheels or tyres
R fitted new wheels or tyres
X Before restarting, make sure that the tyre
pressures are set properly on all four tyres for
the respective operating conditions. The rec-
ommended tyre pressures can be found in the
tyre pressure table on the fuel filler flap.
The tyre pressure loss warning system can
only give reliable warnings if you have set the correct tyre pressure. If an incorrect tyre
pressure is set, this incorrect value will be
monitored.
X Observe the notes in the section on tyre pres-
sure (Y page 359). X
Make sure that the key is in position 2in the
ignition lock (Y page 144).
X Press òon the steering wheel to call up
the menu list.
X Press 9or: on the steering wheel to
select the Service
Service menu.
X Confirm by pressing aon the steering
wheel.
X Select Tyre pressure Tyre pressure with9 or:.
X Press ato confirm.
The Run
Run Flat
Flat Indicator
Indicator active
activeRestart
Restart
with OK
with OK message is shown in the multifunc-
tion display.
If you wish to confirm the restart: X Press the abutton.
The Tyre pressure now OK?
Tyre pressure now OK? message is
shown in the multifunction display.
X Select Yes
Yes with 9 or:.
X Press ato confirm.
The Run Flat Indicator restarted
Run Flat Indicator restarted mes-
sage is shown in the multifunction display.
After a teach-in period, the tyre pressure loss
warning system will monitor the set tyre pres- sures of all four tyres.
If you wish to cancel the restart:
X Press the %button.
or
X If the Tyre pressure now OK? Tyre pressure now OK? message
appears, select Cancel
Cancelwith9 or:.
X Press ato confirm.
The tyre pressure values stored at the last
restart will continue to be monitored. Tyre pressure monitor
General notes If a tyre pressure monitor system is fitted, the
vehicle's wheels have sensors fitted that moni-
tor the tyre pressures in all four tyres. The tyre
pressure monitor warns you if the pressure
drops in one or more of the tyres. The tyre pres- sure monitor functions only if the corresponding
sensors are fitted to all wheels.
Information on tyre pressures is shown on the
multifunction display. After a few minutes of
driving, the current tyre pressure of each tyre is
shown in the Service Servicemenu of the multifunction
display; see illustration (example). Tyre pressure
361Wheels and tyres Z
Page 376 of 389
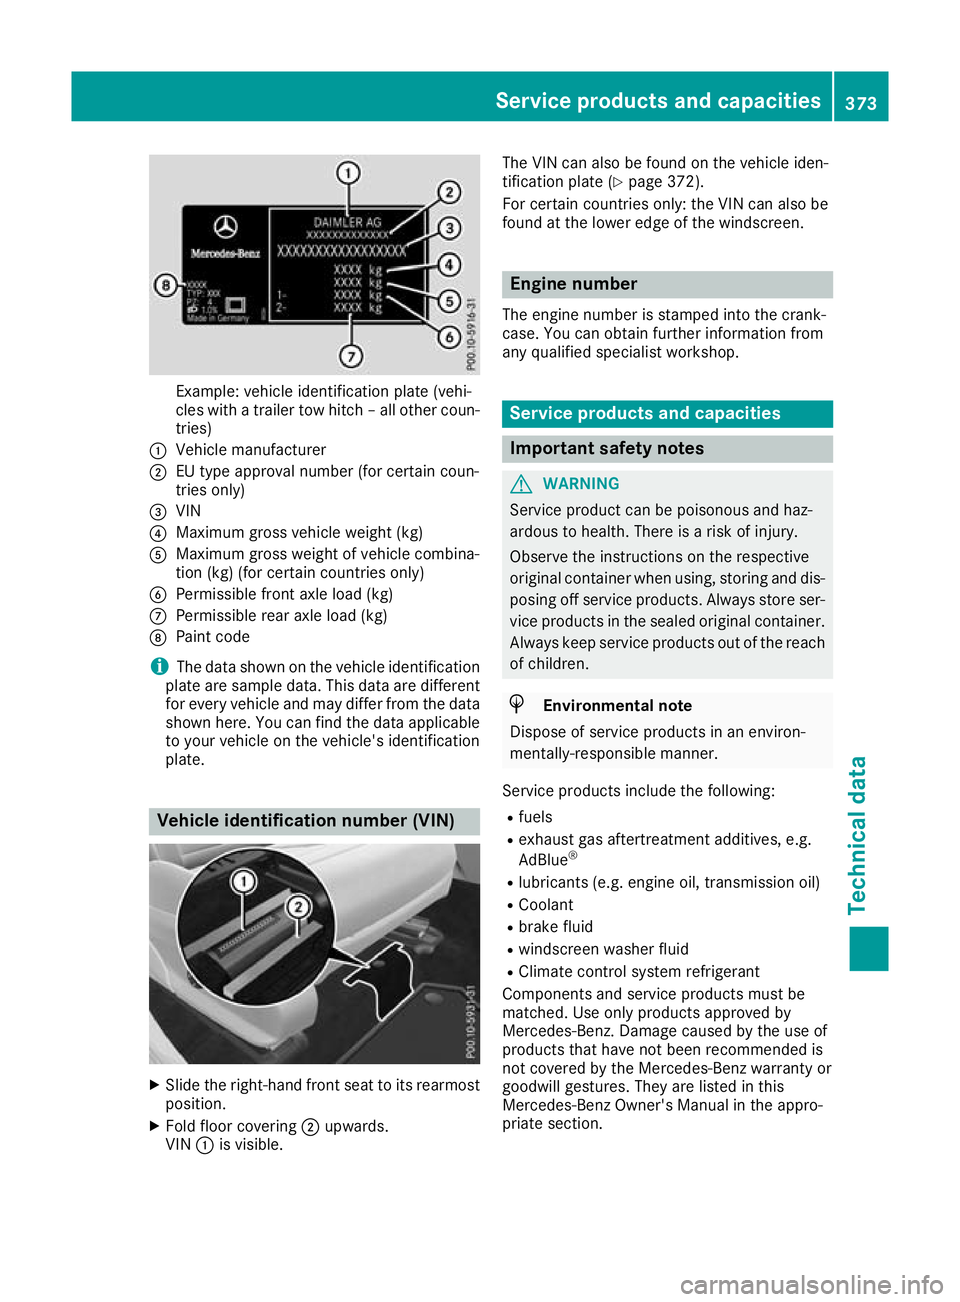
Example: vehicle identification plate (vehi-
cles with a trailer tow hitch – all other coun- tries)
: Vehicle manufacturer
; EU type approval number (for certain coun-
tries only)
= VIN
? Maximum gross vehicle weight (kg)
A Maximum gross weight of vehicle combina-
tion (kg) (for certain countries only)
B Permissible front axle load (kg)
C Permissible rear axle load (kg)
D Paint code
i The data shown on the vehicle identification
plate are sample data. This data are different for every vehicle and may differ from the data
shown here. You can find the data applicable to your vehicle on the vehicle's identification
plate. Vehicle identification number (VIN)
X
Slide the right-hand front seat to its rearmost
position.
X Fold floor covering ;upwards.
VIN :is visible. The VIN can also be found on the vehicle iden-
tification plate (Y
page 372).
For certain countries only: the VIN can also be
found at the lower edge of the windscreen. Engine number
The engine number is stamped into the crank-
case. You can obtain further information from
any qualified specialist workshop. Service products and capacities
Important safety notes
G
WARNING
Service product can be poisonous and haz-
ardous to health. There is a risk of injury.
Observe the instructions on the respective
original container when using, storing and dis- posing off service products. Always store ser-
vice products in the sealed original container. Always keep service products out of the reach
of children. H
Environmental note
Dispose of service products in an environ-
mentally-responsible manner.
Service products include the following:
R fuels
R exhaust gas aftertreatment additives, e.g.
AdBlue ®
R lubricants (e.g. engine oil, transmission oil)
R Coolant
R brake fluid
R windscreen washer fluid
R Climate control system refrigerant
Components and service products must be
matched. Use only products approved by
Mercedes-Benz. Damage caused by the use of
products that have not been recommended is
not covered by the Mercedes-Benz warranty or
goodwill gestures. They are listed in this
Mercedes-Benz Owner's Manual in the appro-
priate section. Service products and capacities
373Technical data Z
Page 383 of 389
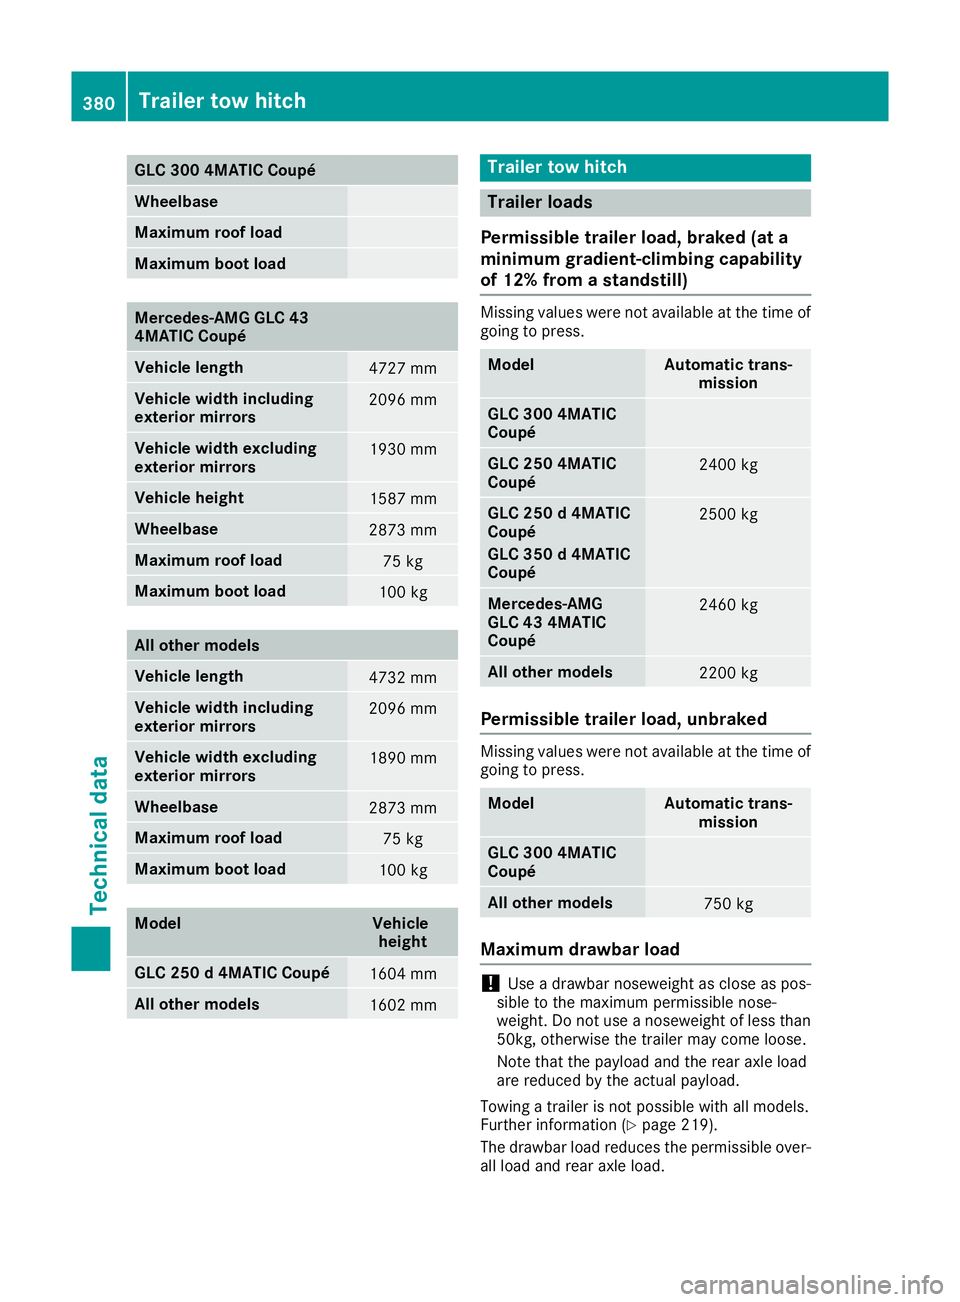
GLC 300 4MATIC Coupé
Wheelbase
Maximum roof load
Maximum boot load
Mercedes-AMG GLC 43
4MATIC Coupé
Vehicle length
4727 mm
Vehicle width including
exterior mirrors
2096 mm
Vehicle width excluding
exterior mirrors
1930 mm
Vehicle height
1587 mm
Wheelbase
2873 mm
Maximum roof load
75 kg
Maximum boot load
100 kg
All other models
Vehicle length
4732 mm
Vehicle width including
exterior mirrors
2096 mm
Vehicle width excluding
exterior mirrors
1890 mm
Wheelbase
2873 mm
Maximum roof load
75 kg
Maximum boot load
100 kg
Model Vehicle
height GLC 250 d 4MATIC Coupé
1604 mm
All other models
1602 mm Trailer tow hitch
Trailer loads
Permissible trailer load, braked (at a
minimum gradient-climbing capability
of 12% from a standstill) Missing values were not available at the time of
going to press. Model Automatic trans-
mission GLC 300 4MATIC
Coupé
GLC 250 4MATIC
Coupé
2400 kg
GLC 250 d 4MATIC
Coupé
GLC 350 d 4MATIC
Coupé
2500 kg
Mercedes-AMG
GLC 43 4MATIC
Coupé
2460 kg
All other models
2200 kg
Permissible trailer load, unbraked
Missing values were not available at the time of
going to press. Model Automatic trans-
mission GLC 300 4MATIC
Coupé
All other models
750 kg
Maximum drawbar load
!
Use a drawbar noseweight as close as pos-
sible to the maximum permissible nose-
weight. Do not use a noseweight of less than
50kg, otherwise the trailer may come loose.
Note that the payload and the rear axle load
are reduced by the actual payload.
Towing a trailer is not possible with all models.
Further information (Y page 219).
The drawbar load reduces the permissible over- all load and rear axle load. 380
Trailer tow hitchTechnical data
Page 384 of 389
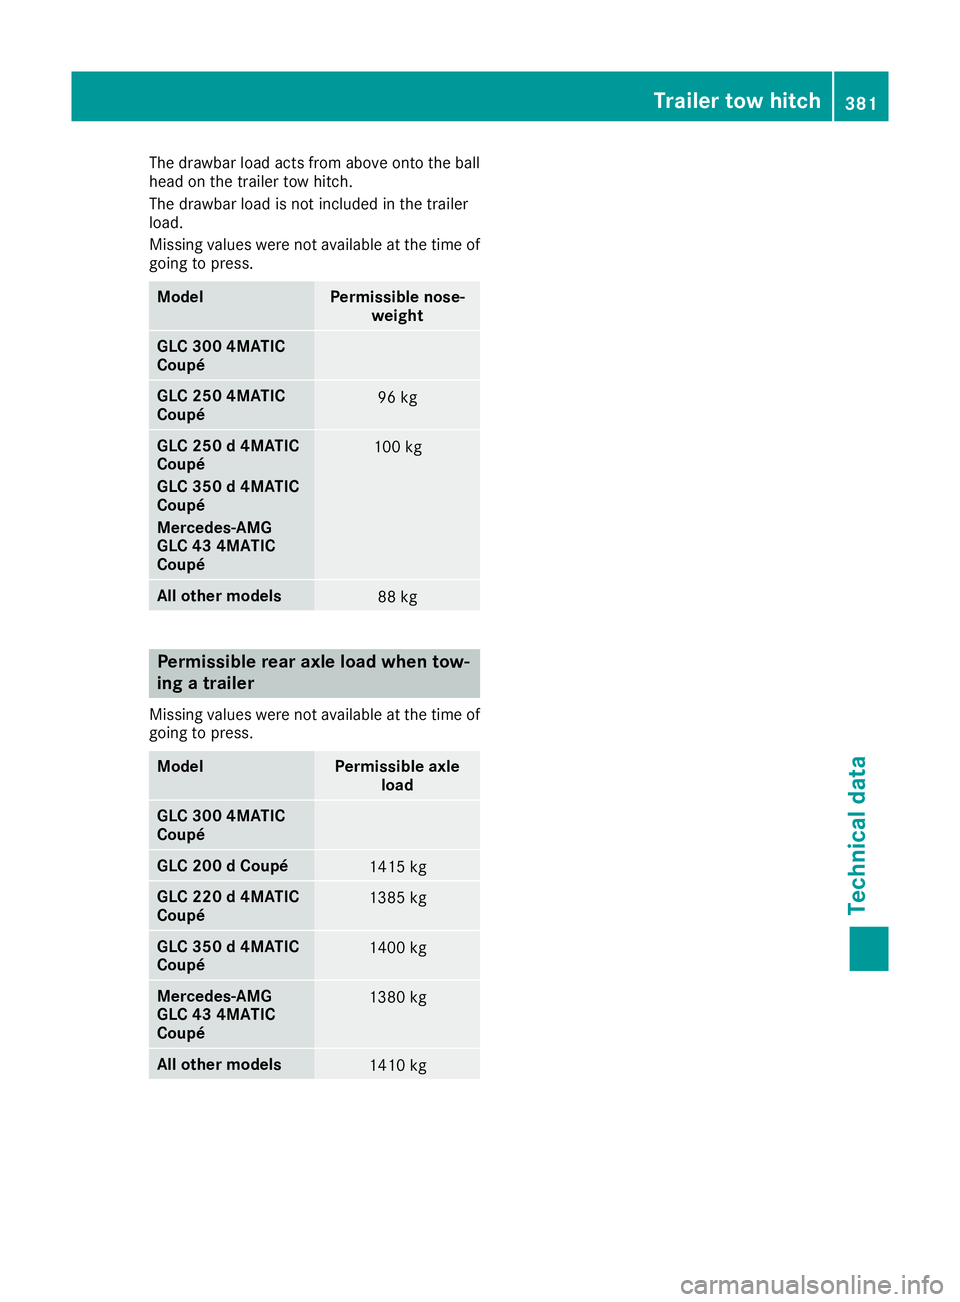
The drawbar load acts from above onto the ball
head on the trailer tow hitch.
The drawbar load is not included in the trailer
load.
Missing values were not available at the time of
going to press. Model Permissible nose-
weight GLC 300 4MATIC
Coupé
GLC 250 4MATIC
Coupé
96 kg
GLC 250 d 4MATIC
Coupé
GLC 350 d 4MATIC
Coupé
Mercedes-AMG
GLC 43 4MATIC
Coupé
100 kg
All other models
88 kg
Permissible rear axle load when tow-
ing a trailer
Missing values were not available at the time of
going to press. Model Permissible axle
load GLC 300 4MATIC
Coupé
GLC 200 d Coupé
1415 kg
GLC 220 d 4MATIC
Coupé
1385 kg
GLC 350 d 4MATIC
Coupé
1400 kg
Mercedes-AMG
GLC 43 4MATIC
Coupé
1380 kg
All other models
1410 kg Trailer tow hitch
381Technical data Z