trailer MERCEDES-BENZ GLC COUPE 2016 Service Manual
[x] Cancel search | Manufacturer: MERCEDES-BENZ, Model Year: 2016, Model line: GLC COUPE, Model: MERCEDES-BENZ GLC COUPE 2016Pages: 389, PDF Size: 7.34 MB
Page 229 of 389
R
Always attach the bicycle rack correctly by
clamping onto the ball head and, if possible,
to the guide pin on the ball coupling as well.
R To transport four bicycles, always use bicy-
cle racks with additional support on the ball
coupling's guide pin.
R Use only bicycle racks approved by
Mercedes-Benz.
R Always comply with the bicycle rack's oper-
ating manual.
! Using unsuitable bicycle racks or using
them incorrectly can cause damage to and
fractures in the trailer tow hitch.
Use only bicycle racks approved by
Mercedes-Benz. Bicycle racks cause your vehicle's driving char-
acteristics to change. The vehicle
R is heavier
R is restricted in its acceleration and gradient-
climbing capability
R has an increased braking distance
This can impair the vehicle's handling charac-
teristics. Adapt your driving style accordingly.
Maintain a safe distance and drive carefully.
When using bicycle racks, set the tyre pressure on the rear axle of the vehicle for the maximum
load. Further information on tyre pressure can
be found on the tyre pressure table
(Y page 359). Loading instructions
The greater the distance between the load's centre of gravity and the ball head, the higher the load exerted on the trailer tow hitch.
Therefore, observe the following notes:
R Attach heavy bicycles as close as possible to the vehicle.
R Always distribute the load on the bicycle rack as symmetrically as possible to the vehicle longi-
tudinal axis.
Before loading the bicycle rack, Mercedes-Benz advises you to remove all add-on parts from the
bicycles, e.g. bicycle baskets, child seats or batteries. This will allow you to improve the aerody-
namic resistance and the bicycle rack's centre of gravity.
Always secure bicycles against slipping and check that they are firmly seated at regular intervals.
Do not use tarpaulins or other covers. This could impair the driving characteristics and rear visibility. The aerodynamic resistance would also rise, and so would the load exerted on the trailer tow hitchas a result. 226
Bicycle rackDriving an
d parking
Page 230 of 389
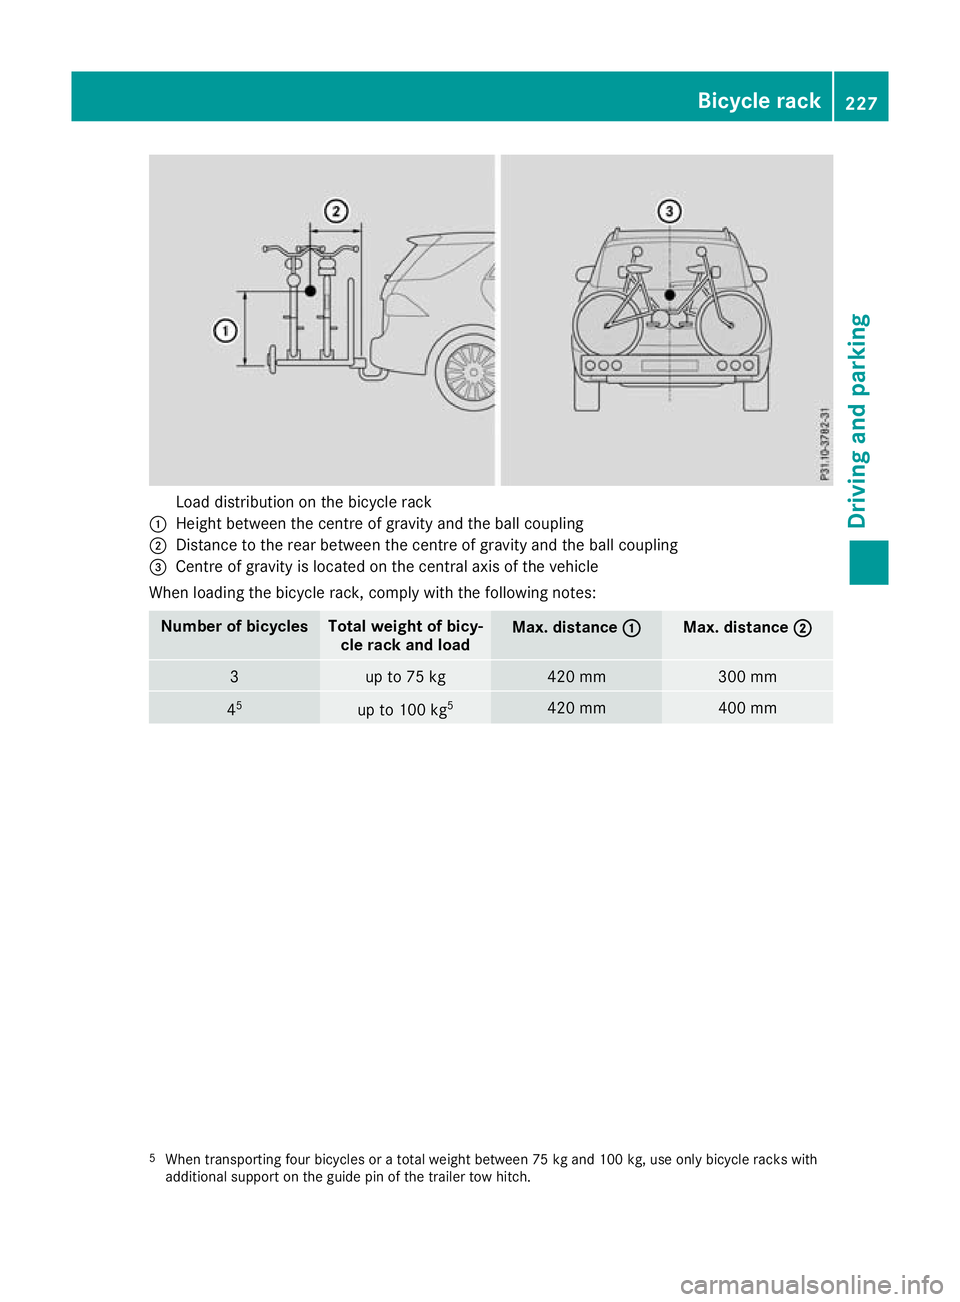
Load distribution on the bicycle rack
: Height between the centre of gravity and the ball coupling
; Distance to the rear between the centre of gravity and the ball coupling
= Centre of gravity is located on the central axis of the vehicle
When loading the bicycle rack, comply with the following notes: Number of bicycles Total weight of bicy-
cle rack and load Max. distance
:
: Max. distance
;
; 3 up to 75 kg 420 mm 300 mm
4
5 up to 100 kg
5 420 mm 400 mm
5
When transporting four bicycles or a total weight between 75 kg and 100 kg, use only bicycle racks with
additional support on the guide pin of the trailer tow hitch. Bicycle rack
227Driving and parking Z
Page 264 of 389
Display messages
Possible causes/consequences and
M
MSolutions X
Consult a qualified specialist workshop immediately.
Further information on the automatic front-passenger front airbag
deactivation system (Y page 49).Lights
Display messages
Possible causes/consequences and
M
MSolutions b
Left dipped beam Left dipped beam
(Example) The bulb in question is faulty.
X Consult a qualified specialist workshop.
or X Check whether you are permitted to replace the bulb yourself
(Y page 122).
i LED light bulbs: the display message for the corresponding lamp
only appears when all the LEDs in the lamp have failed. b
Active Active
Light
LightSystem
System
inoperative
inoperative The active light function is malfunctioning.
X Consult a qualified specialist workshop. b
Intell. Light Sys‐ Intell. Light Sys‐
tem inoperative tem inoperative The Intelligent Light System is malfunctioning. The lighting system
continues to function properly without the functions of the Intelligent
Light System.
X Consult a qualified specialist workshop. b
Malfunction Malfunction
See
SeeOwn‐
Own‐
er's Manual
er's Manual The exterior lighting is faulty.
X Consult a qualified specialist workshop. Vehicles with trailer tow hitch: a fuse may have blown.
X Stop the vehicle, paying attention to road and traffic conditions.
X Secure the vehicle against rolling (Y page 167).
X Check the fuses (Y page 354).
X If necessary, replace the blown fuse. Observe the warning notes as
you do so.
If the display message remains on show:
X Consult a qualified specialist workshop. b
AUTO lights inoper‐ AUTO lights inoper‐
ative ative The light sensor is malfunctioning.
X Consult a qualified specialist workshop. b
Switch off lights Switch off lights You are leaving the vehicle and the lights are switched on. A warning
tone also sounds.
X Turn the light switch to the Ãposition. Display
messages
261On-board computer and displays Z
Page 270 of 389
Display messages
Possible causes/consequences and
M
MSolutions Á
Stop vehicle Vehi‐ Stop vehicle Vehi‐
cle too low cle too low You have pulled away while the vehicle level was too low.
AIR BODY CONTROL sets the vehicle to the selected level after a short
period.
X Stop the vehicle, paying attention to road and traffic conditions.
X Secure the vehicle against rolling away (Y page 167).
X Wait until the display message disappears before pulling away. AIR BODY CONTROL is faulty. A warning tone also sounds.
X Do not drive at speeds greater than 80 km/h.
X Make only slight steering movements. Otherwise, the front wings or
the tyres could be damaged if the steering input is too great.
X Listen for scraping sounds.
X Stop the vehicle, paying attention to road and traffic conditions, and
set a higher vehicle level.
Depending on the fault, it may be possible to raise the vehicle.
X Consult a qualified specialist workshop. Á
Please reduce speed Please reduce speed You cannot change the vehicle level. Possible causes:
R You are driving too quickly for the selected vehicle level.
R You are driving too quickly with a trailer or the trailer tow hitch
socket is being used, e.g. for a rear-mounted bicycle rack
X Drive more slowly and then select the desired vehicle level again
(Y page 188).
X Observe the notes on towing a trailer (Y page 219).Á
Compressor is cool‐ Compressor is cool‐
ing ing You have selected a higher vehicle level. The compressor first needs
to cool down because of frequent level changes within a short space of time.
X Drive in a manner appropriate for the current vehicle level.
X Ensure sufficient ground clearance.
X Allow the compressor to cool down.
When the compressor has cooled down, the display message dis-
appears. The vehicle then continues rising to the selected vehicle
level. Á
Malfunction Malfunction AIR BODY CONTROL is malfunctioning. The vehicle's handling char-
acteristics may be impaired.
X Drive as appropriate for the current vehicle level, but do not exceed
80 km/h.
X Ensure sufficient ground clearance.
X Consult a qualified specialist workshop. Á
Malfunction Malfunction DYNAMIC BODY CONTROL is malfunctioning. The vehicle's handling
characteristics may be impaired.
X Do not drive at speeds greater than 80 km/h.
X Consult a qualified specialist workshop. Display
messages
267On-board computer and displays Z
Page 271 of 389
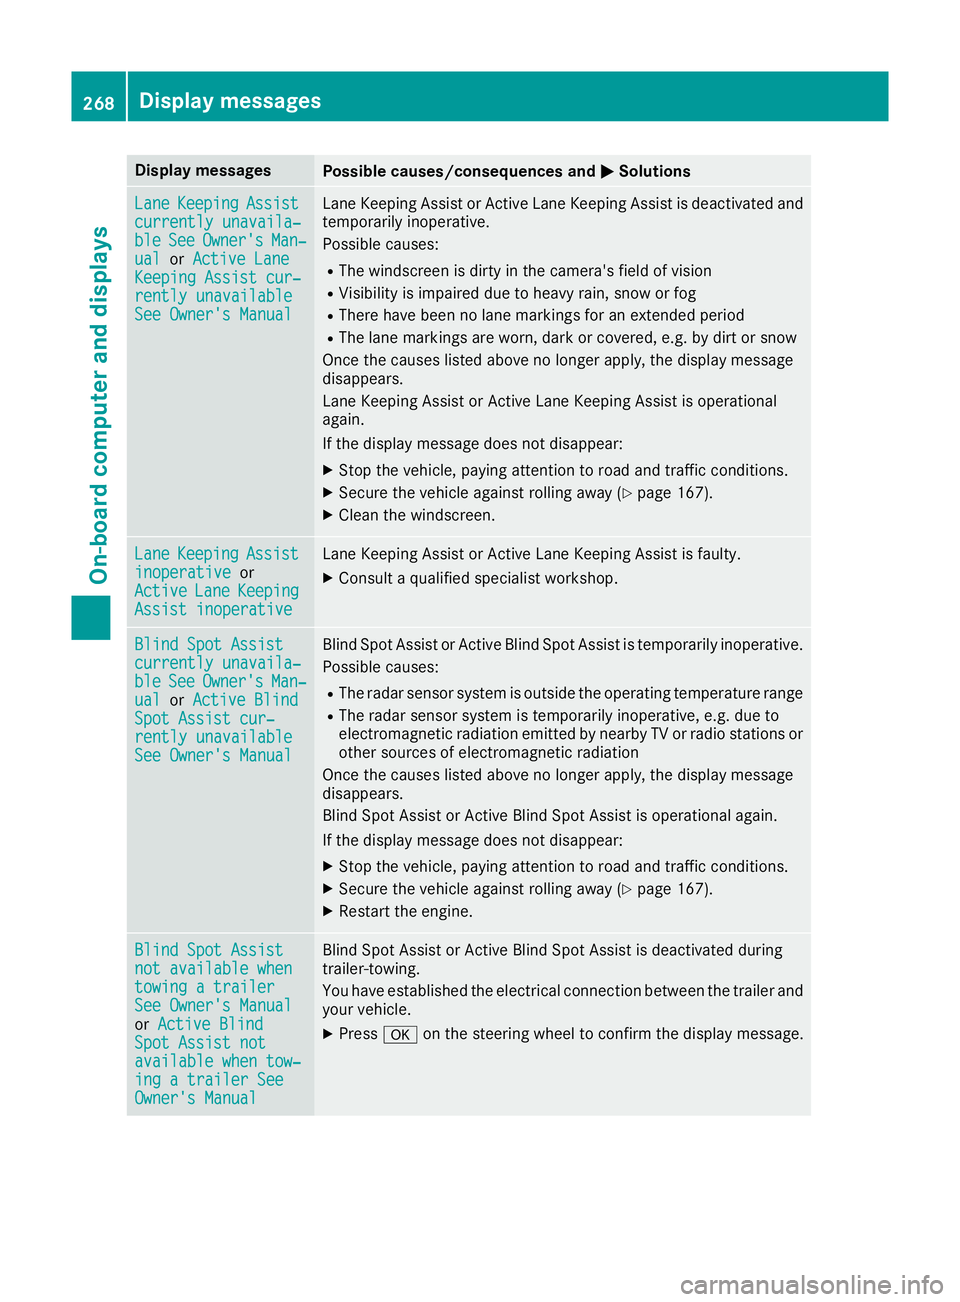
Display messages
Possible causes/consequences and
M
MSolutions Lane
Lane
Keeping
Keeping Assist
Assist
currently unavaila‐
currently unavaila‐
ble ble See
SeeOwner's
Owner's Man‐
Man‐
ual
ual orActive Lane
Active Lane
Keeping Assist cur‐
Keeping Assist cur‐
rently unavailable rently unavailable
See Owner's Manual See Owner's Manual Lane Keeping Assist or Active Lane Keeping Assist is deactivated and
temporarily inoperative.
Possible causes:
R The windscreen is dirty in the camera's field of vision
R Visibility is impaired due to heavy rain, snow or fog
R There have been no lane markings for an extended period
R The lane markings are worn, dark or covered, e.g. by dirt or snow
Once the causes listed above no longer apply, the display message
disappears.
Lane Keeping Assist or Active Lane Keeping Assist is operational
again.
If the display message does not disappear:
X Stop the vehicle, paying attention to road and traffic conditions.
X Secure the vehicle against rolling away (Y page 167).
X Clean the windscreen. Lane Lane
Keeping
Keeping Assist
Assist
inoperative
inoperative or
Active
Active Lane
LaneKeeping
Keeping
Assist inoperative
Assist inoperative Lane Keeping Assist or Active Lane Keeping Assist is faulty.
X Consult a qualified specialist workshop. Blind Spot Assist
Blind Spot Assist
currently unavaila‐ currently unavaila‐
ble ble
See
SeeOwner's
Owner's Man‐
Man‐
ual
ual orActive Blind
Active Blind
Spot Assist cur‐
Spot Assist cur‐
rently unavailable rently unavailable
See Owner's Manual See Owner's Manual Blind Spot Assist or Active Blind Spot Assist is temporarily inoperative.
Possible causes:
R The radar sensor system is outside the operating temperature range
R The radar sensor system is temporarily inoperative, e.g. due to
electromagnetic radiation emitted by nearby TV or radio stations or
other sources of electromagnetic radiation
Once the causes listed above no longer apply, the display message
disappears.
Blind Spot Assist or Active Blind Spot Assist is operational again.
If the display message does not disappear:
X Stop the vehicle, paying attention to road and traffic conditions.
X Secure the vehicle against rolling away (Y page 167).
X Restart the engine. Blind Spot Assist Blind Spot Assist
not available when not available when
towing a trailer towing a trailer
See Owner's Manual See Owner's Manual
or
Active Blind Active Blind
Spot Assist not
Spot Assist not
available when tow‐ available when tow‐
ing a trailer See ing a trailer See
Owner's Manual Owner's Manual Blind Spot Assist or Active Blind Spot Assist is deactivated during
trailer-towing.
You have established the electrical connection between the trailer and
your vehicle.
X Press aon the steering wheel to confirm the display message. 268
Display
messagesOn-board computer and displays
Page 280 of 389
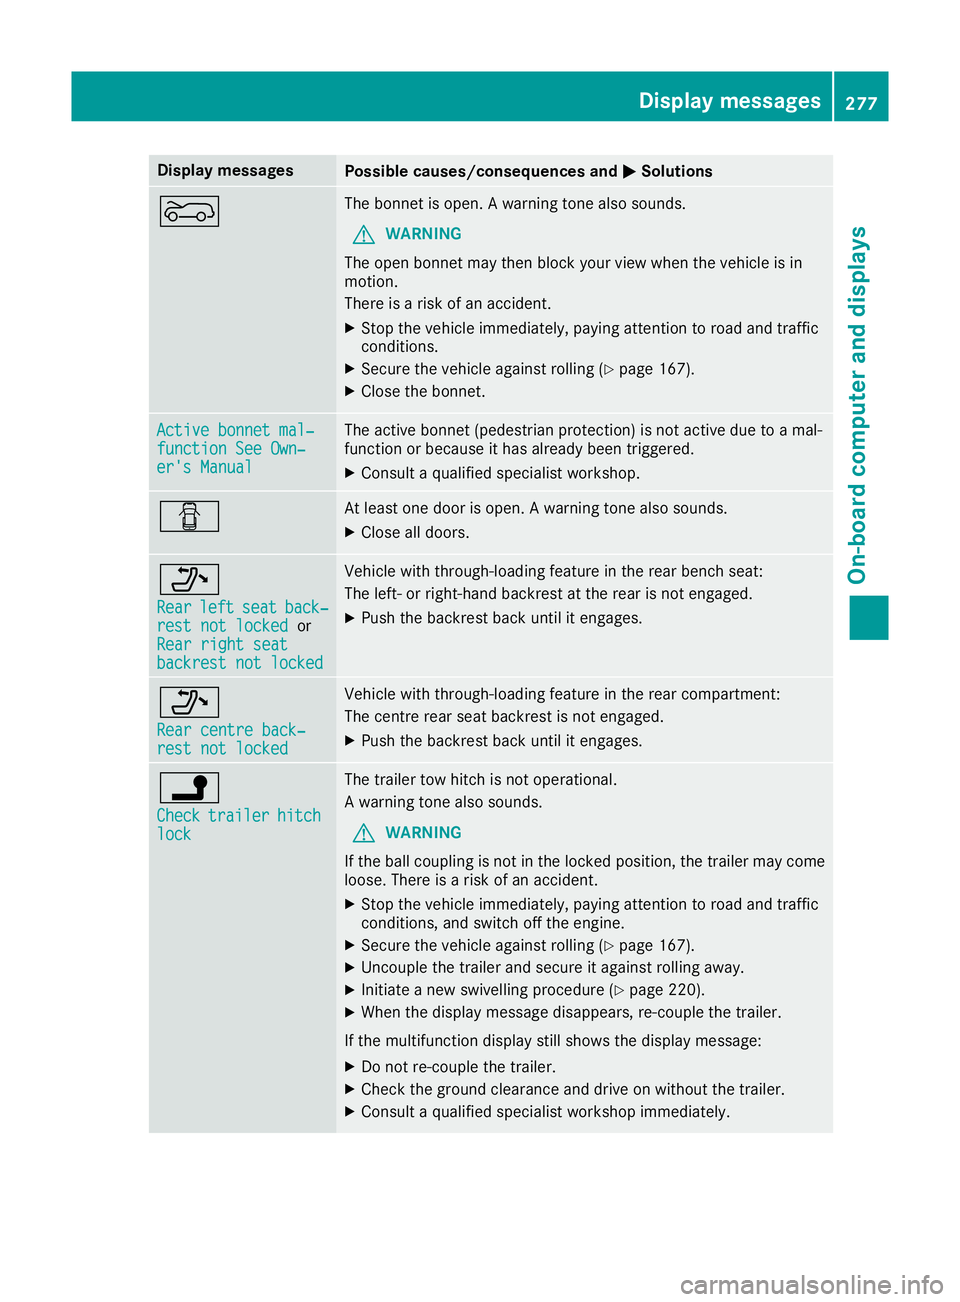
Display messages
Possible causes/consequences and
M
MSolutions ? The bonnet is open. A warning tone also sounds.
G WARNING
The open bonnet may then block your view when the vehicle is in
motion.
There is a risk of an accident.
X Stop the vehicle immediately, paying attention to road and traffic
conditions.
X Secure the vehicle against rolling (Y page 167).
X Close the bonnet. Active bonnet mal‐ Active bonnet mal‐
function See Own‐ function See Own‐
er's Manual er's Manual The active bonnet (pedestrian protection) is not active due to a mal-
function or because it has already been triggered.
X Consult a qualified specialist workshop. C At least one door is open. A warning tone also sounds.
X Close all doors. _
Rear Rear
left
leftseat
seatback‐
back‐
rest not locked
rest not locked or
Rear right seat
Rear right seat
backrest not locked backrest not locked Vehicle with through-loading feature in the rear bench seat:
The left- or right-hand backrest at the rear is not engaged.
X Push the backrest back until it engages. _
Rear centre back‐ Rear centre back‐
rest not locked rest not locked Vehicle with through-loading feature in the rear compartment:
The centre rear seat backrest is not engaged.
X Push the backrest back until it engages. j
Check Check
trailer
trailer hitch
hitch
lock
lock The trailer tow hitch is not operational.
A warning tone also sounds.
G WARNING
If the ball coupling is not in the locked position, the trailer may come
loose. There is a risk of an accident.
X Stop the vehicle immediately, paying attention to road and traffic
conditions, and switch off the engine.
X Secure the vehicle against rolling (Y page 167).
X Uncouple the trailer and secure it against rolling away.
X Initiate a new swivelling procedure (Y page 220).
X When the display message disappears, re-couple the trailer.
If the multifunction display still shows the display message: X Do not re-couple the trailer.
X Check the ground clearance and drive on without the trailer.
X Consult a qualified specialist workshop immediately. Display
messages
277On-board computer and displays Z
Page 281 of 389
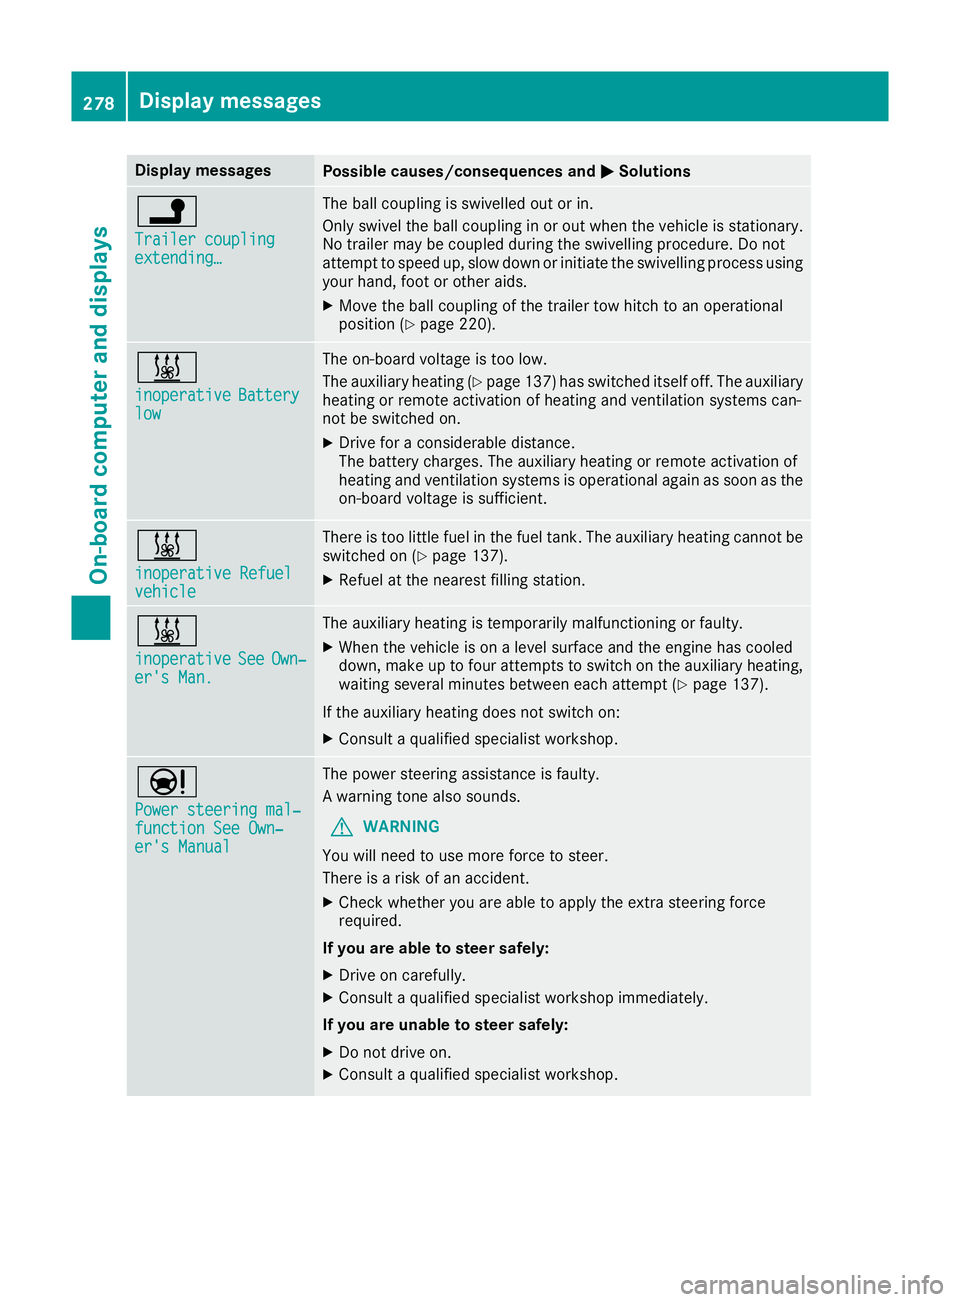
Display messages
Possible causes/consequences and
M
MSolutions j
Trailer coupling Trailer coupling
extending… extending… The ball coupling is swivelled out or in.
Only swivel the ball coupling in or out when the vehicle is stationary.
No trailer may be coupled during the swivelling procedure. Do not
attempt to speed up, slow down or initiate the swivelling process using your hand, foot or other aids.
X Move the ball coupling of the trailer tow hitch to an operational
position (Y page 220). &
inoperative inoperative
Battery
Battery
low
low The on-board voltage is too low.
The auxiliary heating (Y
page 137) has switched itself off. The auxiliary
heating or remote activation of heating and ventilation systems can-
not be switched on.
X Drive for a considerable distance.
The battery charges. The auxiliary heating or remote activation of
heating and ventilation systems is operational again as soon as the
on-board voltage is sufficient. &
inoperative Refuel inoperative Refuel
vehicle vehicle There is too little fuel in the fuel tank. The auxiliary heating cannot be
switched on (Y page 137).
X Refuel at the nearest filling station. &
inoperative inoperative
See
SeeOwn‐
Own‐
er's Man.
er's Man. The auxiliary heating is temporarily malfunctioning or faulty.
X When the vehicle is on a level surface and the engine has cooled
down, make up to four attempts to switch on the auxiliary heating,
waiting several minutes between each attempt (Y page 137).
If the auxiliary heating does not switch on: X Consult a qualified specialist workshop. Ð
Power steering mal‐ Power steering mal‐
function See Own‐ function See Own‐
er's Manual er's Manual The power steering assistance is faulty.
A warning tone also sounds.
G WARNING
You will need to use more force to steer.
There is a risk of an accident.
X Check whether you are able to apply the extra steering force
required.
If you are able to steer safely:
X Drive on carefully.
X Consult a qualified specialist workshop immediately.
If you are unable to steer safely:
X Do not drive on.
X Consult a qualified specialist workshop. 278
Display
messagesOn-board computer and displays
Page 339 of 389
flash rust to form on the surface. You can
restore the original shine of the exhaust pipe by cleaning it regularly, especially in winter and
after washing the vehicle.
X Clean the exhaust pipe with a care product
tested and approved by Mercedes-Benz.
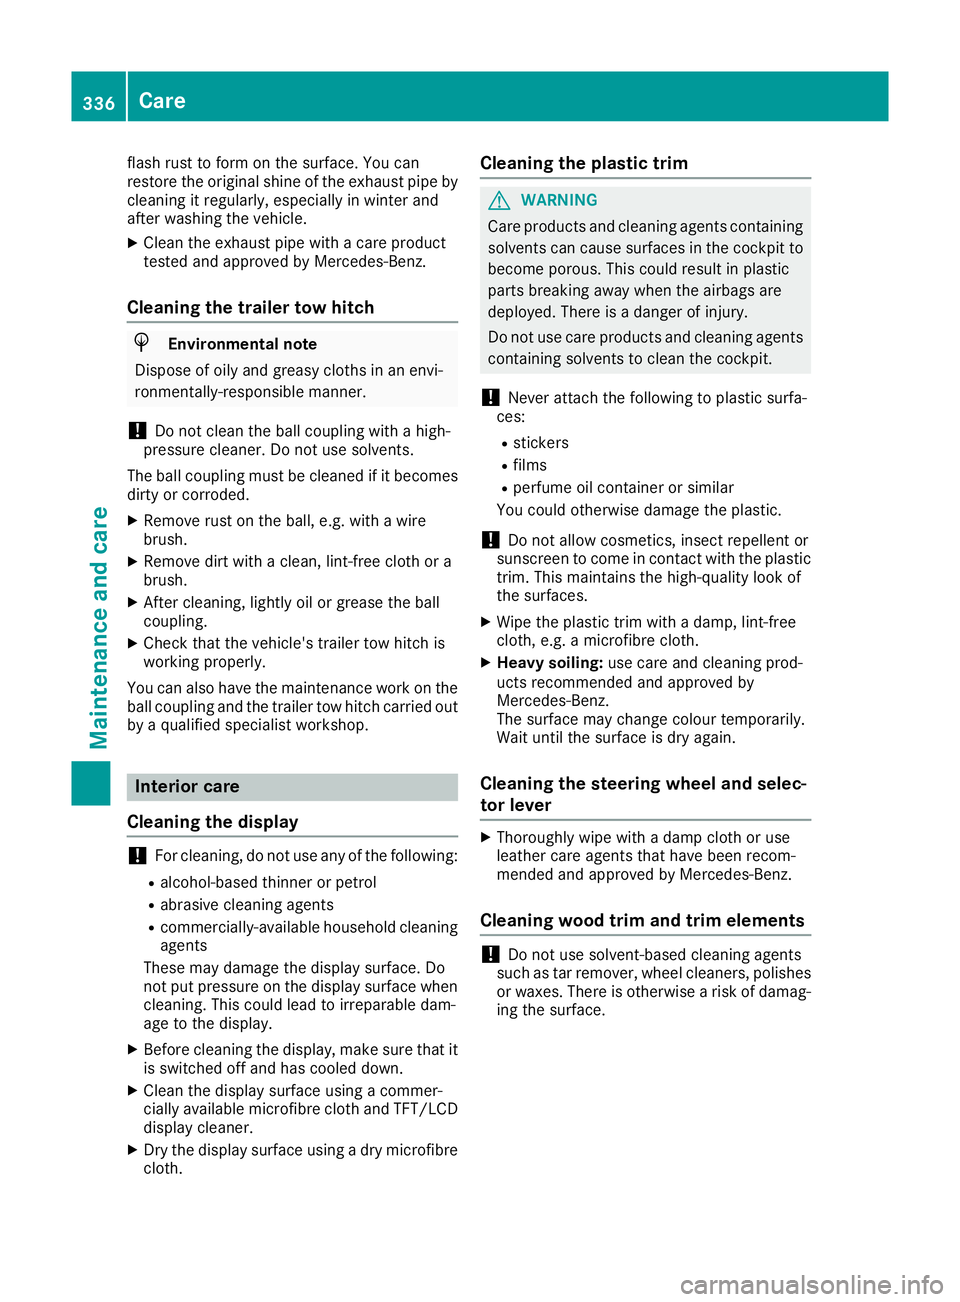
Cleaning the trailer tow hitch H
Environmental note
Dispose of oily and greasy cloths in an envi-
ronmentally-responsible manner.
! Do not clean the ball coupling with a high-
pressure cleaner. Do not use solvents.
The ball coupling must be cleaned if it becomes
dirty or corroded.
X Remove rust on the ball, e.g. with a wire
brush.
X Remove dirt with a clean, lint-free cloth or a
brush.
X After cleaning, lightly oil or grease the ball
coupling.
X Check that the vehicle's trailer tow hitch is
working properly.
You can also have the maintenance work on the
ball coupling and the trailer tow hitch carried out
by a qualified specialist workshop. Interior care
Cleaning the display !
For cleaning, do not use any of the following:
R alcohol-based thinner or petrol
R abrasive cleaning agents
R commercially-available household cleaning
agents
These may damage the display surface. Do
not put pressure on the display surface when cleaning. This could lead to irreparable dam-
age to the display.
X Before cleaning the display, make sure that it
is switched off and has cooled down.
X Clean the display surface using a commer-
cially available microfibre cloth and TFT/LCD
display cleaner.
X Dry the display surface using a dry microfibre
cloth. Cleaning the plastic trim G
WARNING
Care products and cleaning agents containing solvents can cause surfaces in the cockpit to
become porous. This could result in plastic
parts breaking away when the airbags are
deployed. There is a danger of injury.
Do not use care products and cleaning agents containing solvents to clean the cockpit.
! Never attach the following to plastic surfa-
ces:
R stickers
R films
R perfume oil container or similar
You could otherwise damage the plastic.
! Do not allow cosmetics, insect repellent or
sunscreen to come in contact with the plastic trim. This maintains the high-quality look of
the surfaces.
X Wipe the plastic trim with a damp, lint-free
cloth, e.g. a microfibre cloth.
X Heavy soiling: use care and cleaning prod-
ucts recommended and approved by
Mercedes-Benz.
The surface may change colour temporarily.
Wait until the surface is dry again.
Cleaning the steering wheel and selec-
tor lever X
Thoroughly wipe with a damp cloth or use
leather care agents that have been recom-
mended and approved by Mercedes-Benz.
Cleaning wood trim and trim elements !
Do not use solvent-based cleaning agents
such as tar remover, wheel cleaners, polishes
or waxes. There is otherwise a risk of damag- ing the surface. 336
CareMaintenance and care
Page 354 of 389
When your vehicle is towed away or towed
started, you may require considerably more
effort to steer and brake. There is a risk of an
accident.
In such cases use a rigid towing bar. Before
being towed away or tow started, make sure
the steering moves freely. G
WARNING
If the steering wheel lock is engaged, the vehi- cle can no longer be steered. There is a risk of
an accident.
Always switch on the ignition when towing
with a tow rope or a towing bar. G
WARNING
When towing or tow-starting another vehicle
and its weight is greater than the permissible gross weight of your vehicle, the:
R towing eye may be torn off
R car/trailer combination may swerve or
even overturn
There is a risk of an accident.
When towing or tow-starting another vehicle,
its weight should not be greater than the per- missible gross weight of your vehicle.
Details on the permissible gross vehicle weight
of your vehicle can be found on the vehicle iden-
tification plate (Y page 372).
! When Active Brake Assist, Distance Pilot
DISTRONIC or the HOLD function is activated, the vehicle brakes automatically in certain
situations.
To avoid damage to the vehicle, deactivate
these systems in the following or similar sit-
uations:
R when towing away
R in a car wash
! Make sure that the electric parking brake is
released. If the electric parking brake is faulty, visit a qualified specialist workshop.
! Only secure the tow cable or tow bar to the
towing eyes or, if available, to the trailer tow
hitch. You could otherwise damage the vehi-
cle. !
Observe the following points when towing
with a tow rope:
R Secure the tow rope on the same side on
both vehicles.
R Make sure that the tow rope is not longer
than legally permitted. Mark the tow rope in
the middle, e.g. with a white cloth
(30 x 30 cm). This will make other road
users aware that a vehicle is being towed.
R Only secure the tow cable to the towing
eyes or, if available, to the trailer tow hitch.
R Observe the brake lamps of the towing
vehicle while driving. Always maintain a dis-
tance a distance so that the tow rope does not sag.
R Do not use steel cables or chains to tow
your vehicle. You could otherwise damage
the vehicle.
! Do not use the trailer tow hitch for recovery
or towing. Do not use the towing eye for
recovery. This could damage the vehicle. If in
doubt, have the vehicle recovered using a
crane.
! When towing, pull away slowly and
smoothly. If the tractive power is too high, the
vehicles could be damaged.
! Shift the automatic transmission to
Nand
do not open the driver's or front passenger's
door during towing. The automatic transmis-
sion may otherwise shift to position P, which
could damage the transmission.
! You may tow the vehicle for a maximum of
50km. A towing speed of 50 km/h must not
be exceeded.
For towing distances over 50 km, the entire
vehicle must be lifted up and transported.
Observe the legal requirements in each individ-
ual country when towing.
It is better to have the vehicle transported than
to have it towed.
If the vehicle has suffered transmission damage, have it transported on a transporter or trailer.
The automatic transmission must be in position
N when the vehicle is being towed. If the auto-
matic transmission cannot be shifted to position
N, have the vehicle transported on a transporter
or trailer. Towing away and tow-starting
351Breakdown assistance Z
Page 355 of 389
The battery must be connected and charged.
Otherwise, you:
R cannot turn the key to position 2in the igni-
tion lock
R cannot release the electric parking brake
R cannot shift the automatic transmission to
position N
Deactivate the automatic locking feature before towing the vehicle (Y page 89). You could oth-
erwise be locked out when pushing or towing
the vehicle.
Deactivate tow-away protection before the vehi-
cle is towed away (Y page 80).Fitting/removing the towing eye
Fitting the towing eye G
WARNING
The exhaust tail pipe may be extremely hot.
There is a risk of burning when removing the
rear cover.
Do not touch the exhaust tail pipe. Use
extreme caution when removing the rear
cover. Mercedes-AMG vehicles All other vehicles
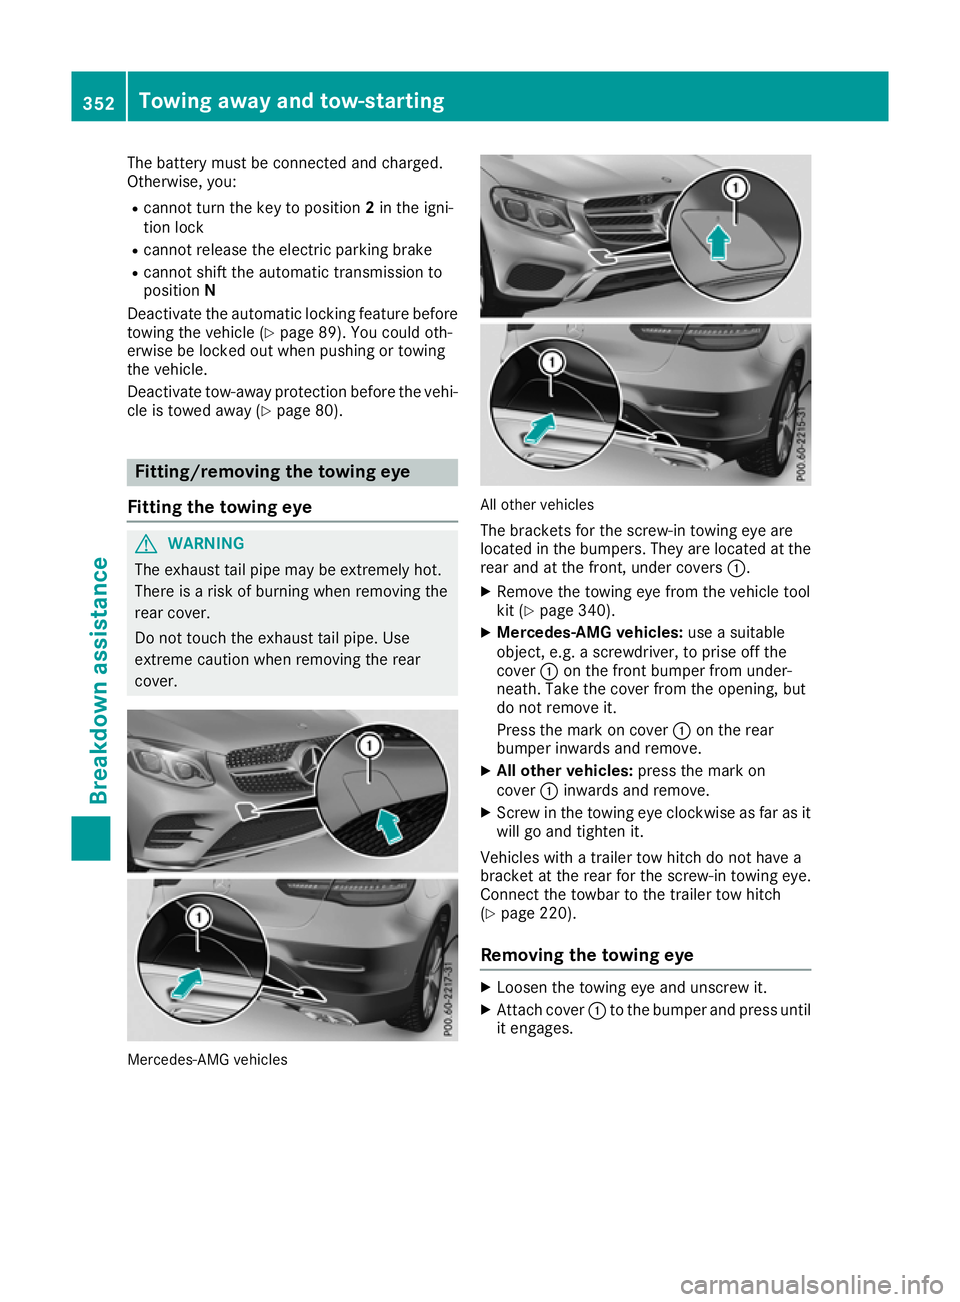
The brackets for the screw-in towing eye are
located in the bumpers. They are located at therear and at the front, under covers :.
X Remove the towing eye from the vehicle tool
kit (Y page 340).
X Mercedes-AMG vehicles: use a suitable
object, e.g. a screwdriver, to prise off the
cover :on the front bumper from under-
neath. Take the cover from the opening, but
do not remove it.
Press the mark on cover :on the rear
bumper inwards and remove.
X All other vehicles: press the mark on
cover :inwards and remove.
X Screw in the towing eye clockwise as far as it
will go and tighten it.
Vehicles with a trailer tow hitch do not have a
bracket at the rear for the screw-in towing eye.
Connect the towbar to the trailer tow hitch
(Y page 220).
Removing the towing eye X
Loosen the towing eye and unscrew it.
X Attach cover :to the bumper and press until
it engages. 352
Towing away and tow-startingBreakdown assistance