brake fluid MERCEDES-BENZ GLC COUPE 2016 Owners Manual
[x] Cancel search | Manufacturer: MERCEDES-BENZ, Model Year: 2016, Model line: GLC COUPE, Model: MERCEDES-BENZ GLC COUPE 2016Pages: 389, PDF Size: 7.34 MB
Page 9 of 389
Gliding mod
e................................. 157
Kickdown ....................................... 157
Manual shifting .............................. 158
Oil temperature (on-board com-
puter, Mercedes-AMG vehicles) ..... 245
Overview ........................................ 153
Problem (fault) ............................... 161
Pulling away ................................... 146
Starting the engine ........................ 146
Steering wheel gearshift paddle s... 158
Trailer towing ................................. 157
Transmission position display
(DIRECT SELECT lever) ................... 155
Transmission positions .................. 156
Automatic transmission emer-
gency running mode ......................... 161
Auxiliary heating/ventilation
Display message ............................ 278
Important safety notes .................. 137
Problem (display message) ............ 141
Remote control .............................. 139
Setting the departure time ............. 140
Switching on/off (on the centre
console) ......................................... 138
Axle load, permissible (trailer tow-
ing) ...................................................... 381 B
Back button ....................................... 293
Bag hook ............................................ 311
Ball coupling
Swinging out .................................. 220
BAS (Brake Assist System) ................. 69
BAS PLUS with Cross-Traffic Assist (Brake Assist PLUS with Cross-
Traffic Assist)
Function/note s................................ 69
Important safety notes .................... 69
Battery (key)
Checking .......................................... 85
Important safety notes .................... 85
Replacing ......................................... 85
Battery (vehicle)
Charging ........................................ 347
Display message ............................ 264
Important safety notes .................. 345
Jump starting ................................. 348 Belt tensioner
Activation ......................................... 53
Blind Spot Assist
Activating/deactivating (on-
board computer) ............................ 241
Display message ............................ 268
Notes/function .............................. 210
see Active Blind Spot Assist
BlueTEC
see AdBlue ®
Bluetooth ®
Connecting a different mobile
phone ............................................ 300
Searching for a mobile phone ........ 299
See also Digital Owner's Manua l... 292
Telephony ...................................... 299
Bonnet
Active bonnet (pedestrian protec-tion) ............................................... 325
Closing ........................................... 326
Display message ............................ 277
Important safety notes .................. 325
Opening ......................................... 326
Boot load (maximum) ........................ 379
Brake
EBD .................................................. 77
Brake Assist
see BAS (Brake Assist System)
Brake fluid
Display message ............................ 254
Notes ............................................. 377
Brake force distribution
see EBD (electronic brake force
distribution)
Brake lamps
Adaptive ........................................... 73
Brakes
ABS .................................................. 68
Adaptive Brake Assist ...................... 72
BAS .................................................. 69
BAS PLUS with Cross-Traffic
Assist ............................................... 69
Brake fluid (notes) ......................... 377
Display message ............................ 250
Driving tips .................................... 171
Hill start assist ............................... 147
HOLD function ............................... 186 6
Index
Page 22 of 389
wide-angle function ......................
.202
Reversing feature
Side windows ................................... 95
Sliding sunroof ................................. 99
Tailgate ............................................ 91
Reversing lamps
Display message ............................ 261
Roof carrier ........................................ 315
Roof lining and carpets (cleaning
instructions) ...................................... 337
Roof load (maximum) ........................ 379
Route guidance
See also Digital Owner's Manual ... 292 S
Safety Children in the vehicle ..................... 56
see Occupant safety
see Operating safety
SD card
Inserting/removing ........................ 303
SD memory card
See also Digital Owner's Manual ... 292
Selecting ........................................ 237
Seat
Adjusting (Performance Seat) ....... .106
Folding the backrest (rear com-
partment) forwards/back .............. 308
Seat belt
Centre rear-compartment sea t........ 45
Correct usage .................................. 44
Seat belts
Adjusting the driver's and front-
passenger seat belt ......................... 45
Adjusting the height ......................... 45
Cleaning ......................................... 337
Fastening ......................................... 45
Important safety guidelines ............. 43
Introduction ..................................... 43
Rear seat belt status indicator ......... 46
Releasing ......................................... 45
Warning lamp ................................. 280
Warning lamp (function) ................... 46
Seats
Adjusting (electrically) ................... 103
Adjusting (manually and electri-
cally) .............................................. 103 Adjusting the 4-way lumbar sup-
port ................................................ 106
Adjusting the head restraint .......... 104
Calling up a stored setting (mem-
ory function) .................................. 114
Cleaning the cover ......................... 337
Correct driver's seat position ........ 101
Important safety notes .................. 101
Seat heating .................................. 106
Seat heating problem .................... 108
Seat ventilation .............................. 107
Seat ventilation problem ................ 108
Storing settings (memory func-
tion) ............................................... 113
Switching seat heating on/of f....... 106
Switching the seat ventilation on/ off .................................................. 107
Securing a load .................................. 310
Securing luggage ............................... 310
Selector lever
Cleaning ......................................... 336
see Automatic transmission
Sensors (cleaning instructions) ....... 335
Service Centre
see Qualified specialist workshop
Service menu (on-board com-
puter) .................................................. 240
Service message
see ASSYST PLUS
Service products
AdBlue ®
special additive s.............. 376
Brake fluid ..................................... 377
Coolant (engine) ............................ 378
Engine oil ....................................... 377
Fuel ................................................ 373
Important safety notes .................. 373
Washer fluid ................................... 378
Setting the date/time format
See also Digital Owner's Manua l... 292
Setting the language
See also Digital Owner's Manua l... 292
Setting the time
See also Digital Owner's Manua l... 292
Settings
Factory (on-board computer) ......... 245
On-board compute r....................... 240
SETUP (on-board computer) ............. 246 Index
19
Page 27 of 389
Vehicle identification plate
.............. 372
Vehicle level
AIR BODY CONTROL ...................... 188
Display message ............................ 266
Video
Operating the DVD ......................... 237
See also Digital Owner's Manua l... 292
VIN
Seat ............................................... 373
Type plate ...................................... 372 W
Warning and indicator lamps ABS ................................................ 283
Brakes ........................................... 282
Distance warning signal ................. 289
ESP ®
.............................................. 283
ESP ®
OFF ....................................... 285
Fuel tank ........................................ 286
General notes ................................ 280
LIM (cruise control) ........................ 174
LIM (DISTRONIC PLUS) .................. 179
LIM (variable SPEEDTRONIC) ......... 176
Overview .......................................... 34
Parking brake ................................ 286
PASSENGER AIR BAG ...................... 42
Reserve fue l................................... 286
Seat belt ........................................ 280
Steering ......................................... 291
Tyre pressure monitor ................... 290
Warning triangle ................................ 339
Washer fluid
Display message ............................ 279
Weather display (COMAND Online)
See also Digital Owner's Manua l... 292
Wheel and tyre combinations
Tyres .............................................. 368
Wheel bolt tightening torque ........... 368
Wheel chock ...................................... 365
Wheels
Changing a whee l.......................... 364
Changing/replacing ....................... 364
Checking ........................................ 356
Cleaning ......................................... 334
Emergency spare whee l................. 369
Fitting a new wheel ........................ 367
Fitting a wheel ............................... 365 Important safety notes .................. 356
Information on driving .................... 356
Removing a whee l.......................... 367
Snow chains .................................. 359
Storing ........................................... 365
Tightening torque ........................... 368
Wheel size/tyre size ...................... 368
Windowbag
Display message ............................ 258
Operation ......................................... 48
Windows
Cleaning ......................................... 334
see Side windows
Windscreen
Demisting ...................................... 132
Windscreen washer fluid
see Windscreen washer system
Windscreen washer system
Important safety notes .................. 378
Topping up ..................................... 329
Windscreen wipers
Problem (malfunction) ................... 126
Replacing the wiper blades ............ 124
Switching on/of f........................... 123
Winter operation
Important safety notes .................. 358
Radiator cover ............................... 326
Slippery road surfaces ................... 173
Snow chains .................................. 359
Summer tyres ................................ 358
Winter tyres
Limiting the speed (on-board com-
puter) ............................................. 244
M+S tyres ...................................... 358
Wiper blades
Cleaning ......................................... 334
Important safety notes .................. 124
Replacing ....................................... 124
Wooden trim (cleaning instruc-
tions) .................................................. 336
Workshop
see Qualified specialist workshop 24
Index
Page 127 of 389
For this reason, you should always switch off
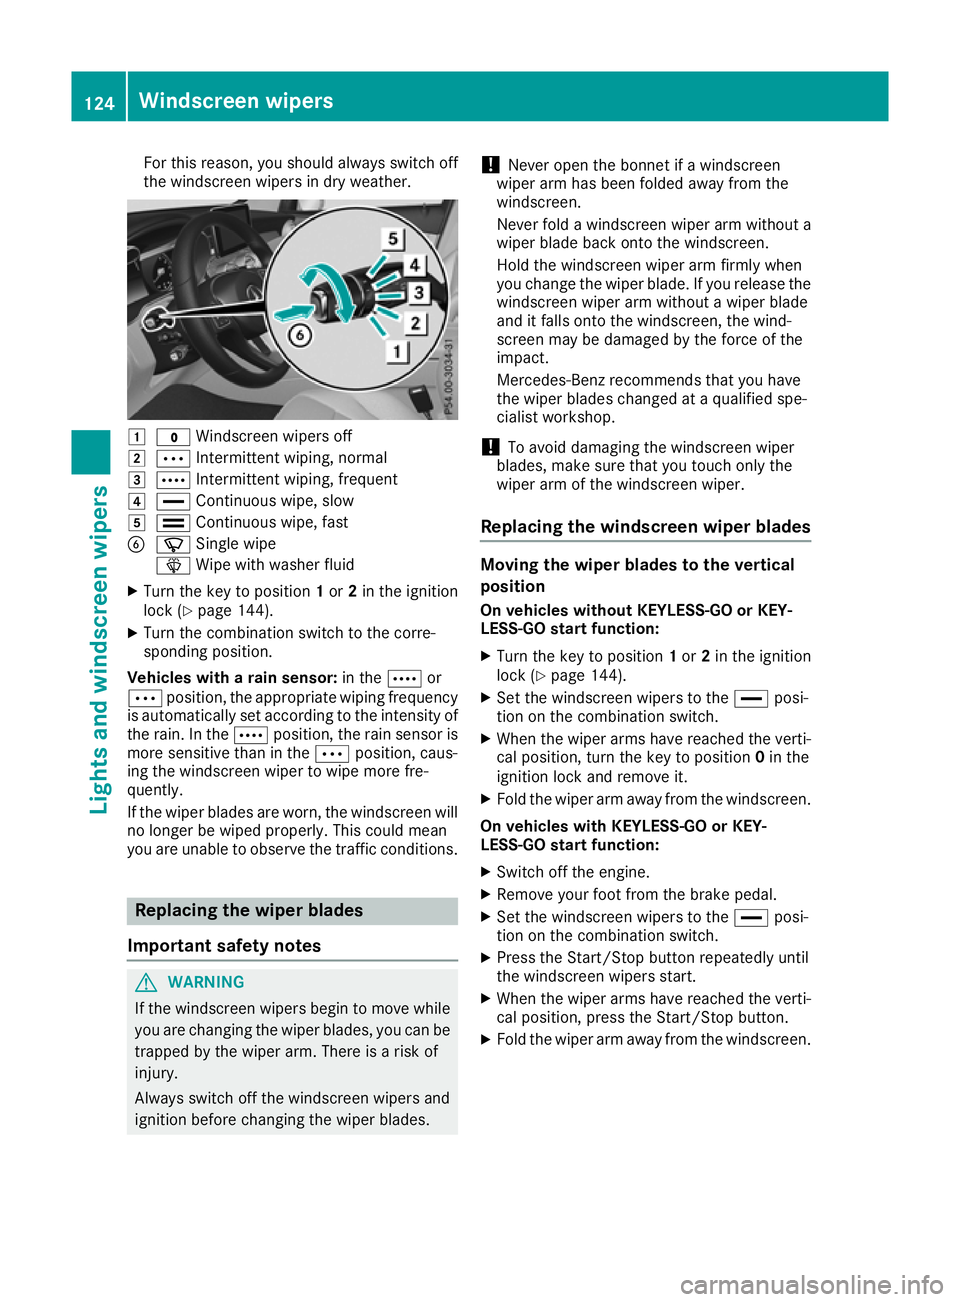
the windscreen wipers in dry weather. 1
$ Windscreen wipers off
2 Ä Intermittent wiping, normal
3 Å Intermittent wiping, frequent
4 ° Continuous wipe, slow
5 ¯ Continuous wipe, fast
B í Single wipe
î Wipe with washer fluid
X Turn the key to position 1or 2in the ignition
lock (Y page 144).
X Turn the combination switch to the corre-
sponding position.
Vehicles with a rain sensor: in theÅor
Ä position, the appropriate wiping frequency
is automatically set according to the intensity of
the rain. In the Åposition, the rain sensor is
more sensitive than in the Äposition, caus-
ing the windscreen wiper to wipe more fre-
quently.
If the wiper blades are worn, the windscreen will no longer be wiped properly. This could mean
you are unable to observe the traffic conditions. Replacing the wiper blades
Important safety notes G
WARNING
If the windscreen wipers begin to move while
you are changing the wiper blades, you can be trapped by the wiper arm. There is a risk of
injury.
Always switch off the windscreen wipers and
ignition before changing the wiper blades. !
Never open the bonnet if a windscreen
wiper arm has been folded away from the
windscreen.
Never fold a windscreen wiper arm without a
wiper blade back onto the windscreen.
Hold the windscreen wiper arm firmly when
you change the wiper blade. If you release the
windscreen wiper arm without a wiper blade
and it falls onto the windscreen, the wind-
screen may be damaged by the force of the
impact.
Mercedes-Benz recommends that you have
the wiper blades changed at a qualified spe-
cialist workshop.
! To avoid damaging the windscreen wiper
blades, make sure that you touch only the
wiper arm of the windscreen wiper.
Replacing the windscreen wiper blades Moving the wiper blades to the vertical
position
On vehicles without KEYLESS-GO or KEY-
LESS‑GO start function:
X Turn the key to position 1or 2in the ignition
lock (Y page 144).
X Set the windscreen wipers to the °posi-
tion on the combination switch.
X When the wiper arms have reached the verti-
cal position, turn the key to position 0in the
ignition lock and remove it.
X Fold the wiper arm away from the windscreen.
On vehicles with KEYLESS-GO or KEY-
LESS‑GO start function:
X Switch off the engine.
X Remove your foot from the brake pedal.
X Set the windscreen wipers to the °posi-
tion on the combination switch.
X Press the Start/Stop button repeatedly until
the windscreen wipers start.
X When the wiper arms have reached the verti-
cal position, press the Start/Stop button.
X Fold the wiper arm away from the windscreen. 124
Windscreen wipersLights and windscreen wipers
Page 257 of 389
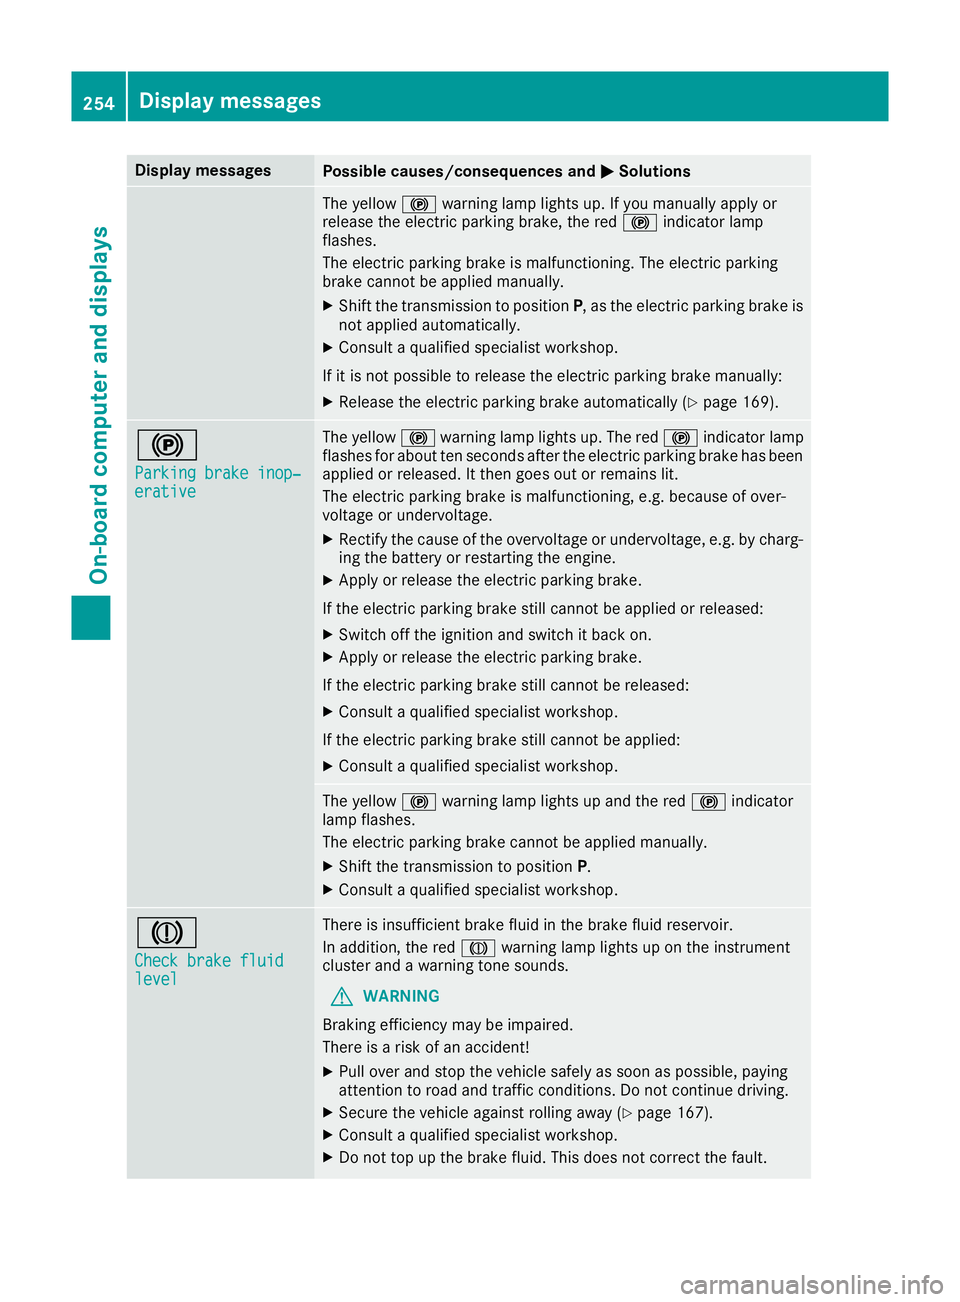
Display messages
Possible causes/consequences and
M
MSolutions The yellow
!warning lamp lights up. If you manually apply or
release the electric parking brake, the red !indicator lamp
flashes.
The electric parking brake is malfunctioning. The electric parking
brake cannot be applied manually.
X Shift the transmission to position P, as the electric parking brake is
not applied automatically.
X Consult a qualified specialist workshop.
If it is not possible to release the electric parking brake manually:
X Release the electric parking brake automatically (Y page 169).!
Parking brake inop‐ Parking brake inop‐
erative erative The yellow
!warning lamp lights up. The red !indicator lamp
flashes for about ten seconds after the electric parking brake has been applied or released. It then goes out or remains lit.
The electric parking brake is malfunctioning, e.g. because of over-
voltage or undervoltage.
X Rectify the cause of the overvoltage or undervoltage, e.g. by charg-
ing the battery or restarting the engine.
X Apply or release the electric parking brake.
If the electric parking brake still cannot be applied or released: X Switch off the ignition and switch it back on.
X Apply or release the electric parking brake.
If the electric parking brake still cannot be released: X Consult a qualified specialist workshop.
If the electric parking brake still cannot be applied:
X Consult a qualified specialist workshop. The yellow
!warning lamp lights up and the red !indicator
lamp flashes.
The electric parking brake cannot be applied manually.
X Shift the transmission to position P.
X Consult a qualified specialist workshop. J
Check brake fluid Check brake fluid
level level There is insufficient brake fluid in the brake fluid reservoir.
In addition, the red Jwarning lamp lights up on the instrument
cluster and a warning tone sounds.
G WARNING
Braking efficiency may be impaired.
There is a risk of an accident!
X Pull over and stop the vehicle safely as soon as possible, paying
attention to road and traffic conditions. Do not continue driving.
X Secure the vehicle against rolling away (Y page 167).
X Consult a qualified specialist workshop.
X Do not top up the brake fluid. This does not correct the fault. 254
Display
messagesOn-board computer and displays
Page 285 of 389
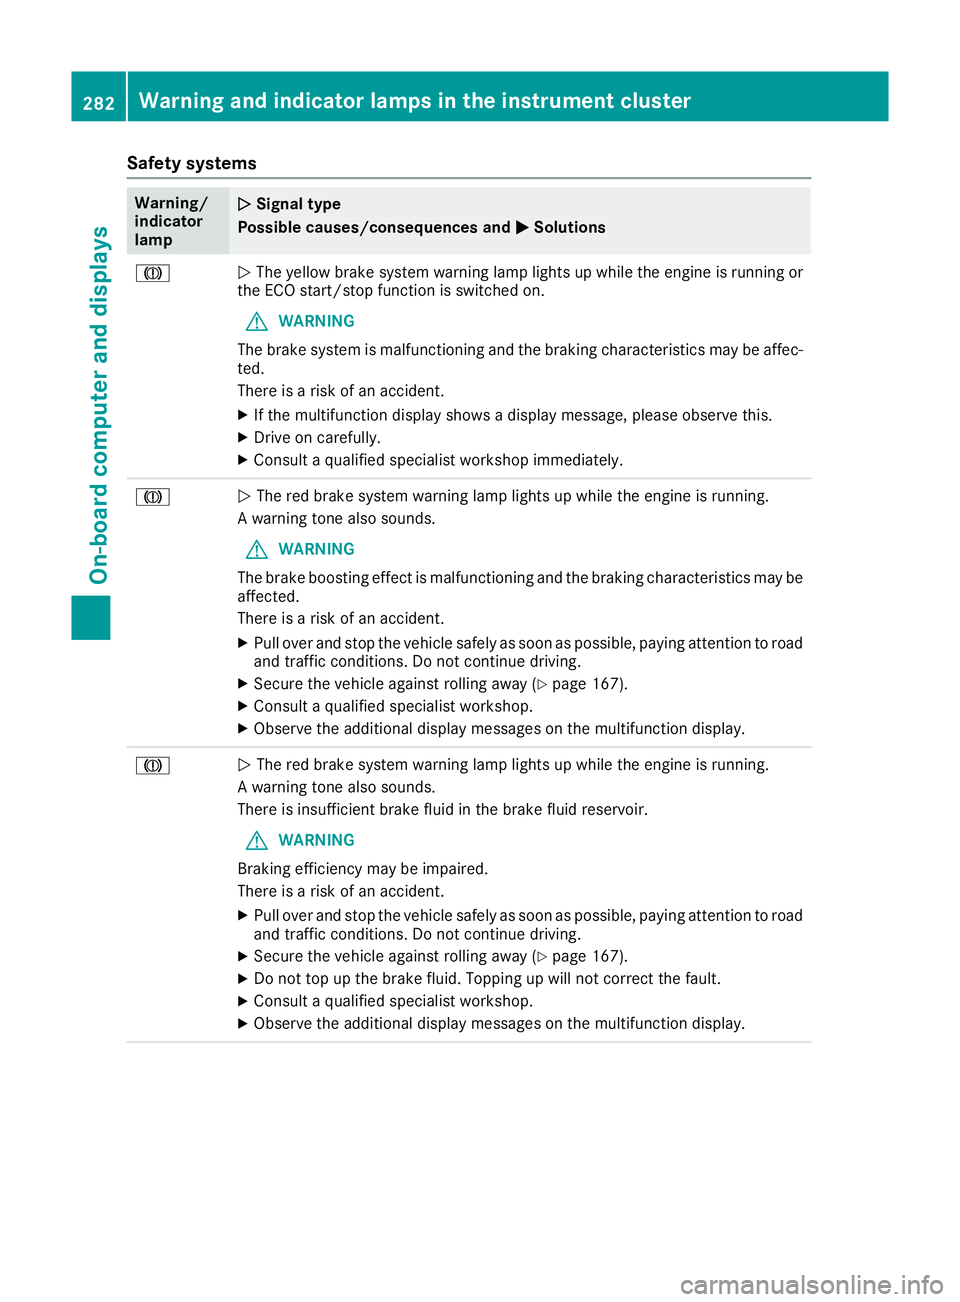
Safety systems
Warning/
indicator
lamp
N N
Signal type
Possible causes/consequences and M
MSolutions J
N
The yellow brake system warning lamp lights up while the engine is running or
the ECO start/stop function is switched on.
G WARNING
The brake system is malfunctioning and the braking characteristics may be affec- ted.
There is a risk of an accident.
X If the multifunction display shows a display message, please observe this.
X Drive on carefully.
X Consult a qualified specialist workshop immediately. J
N
The red brake system warning lamp lights up while the engine is running.
A warning tone also sounds.
G WARNING
The brake boosting effect is malfunctioning and the braking characteristics may be
affected.
There is a risk of an accident.
X Pull over and stop the vehicle safely as soon as possible, paying attention to road
and traffic conditions. Do not continue driving.
X Secure the vehicle against rolling away (Y page 167).
X Consult a qualified specialist workshop.
X Observe the additional display messages on the multifunction display. J
N
The red brake system warning lamp lights up while the engine is running.
A warning tone also sounds.
There is insufficient brake fluid in the brake fluid reservoir.
G WARNING
Braking efficiency may be impaired.
There is a risk of an accident.
X Pull over and stop the vehicle safely as soon as possible, paying attention to road
and traffic conditions. Do not continue driving.
X Secure the vehicle against rolling away (Y page 167).
X Do not top up the brake fluid. Topping up will not correct the fault.
X Consult a qualified specialist workshop.
X Observe the additional display messages on the multifunction display. 282
Warning and indicator lamps in the instrument clusterOn-board computer and displays
Page 336 of 389
aged tyres or chassis components replaced
immediately.
! Always maintain a distance of at least 30 cm
between the vehicle and the high-pressure
cleaner nozzle. Information about the correct
distance is available from the equipment
manufacturer.
Move the high-pressure cleaner nozzle
around when cleaning your vehicle.
Do not aim directly at any of the following:
R tyres
R door gaps, roof gaps, joints etc.
R electrical components
R battery
R plug connectors
R lamps
R seals
R trim elements
R ventilation slots
Damage to seals or electrical components
can lead to leaks or failures.
! Vehicles with decorative film: parts of your
vehicle are covered with a decorative film.
Maintain a distance of at least 70 cm between the parts of the vehicle covered with the film
and the nozzle of the high pressure cleaner.
Information about the correct distance is
available from the equipment manufacturer.
Move the high-pressure cleaner nozzle
around whilst cleaning.
! If the key is within the rear detection range
of KEYLESS-GO, the following situations, for
example, could lead to the unintentional
opening of the tailgate:
R using a car wash
R using a high-pressure cleaner
Make sure that the key is at least 3 m away
from the vehicle.
Cleaning the paintwork !
Do not affix:
R stickers
R films
R magnetic plates or similar items
to painted surfaces. You could otherwise
damage the paintwork. Scratches, corrosive deposits, areas affected by
corrosion and damage caused by inadequate
care cannot always be completely repaired. In
such cases, visit a qualified specialist workshop.
X Remove impurities immediately, where pos-
sible, whilst avoiding rubbing too hard.
X Soak insect remains with insect remover and
rinse off the treated areas afterwards.
X Soak bird droppings with water and rinse off
the treated areas afterwards.
X Remove coolant, brake fluid, tree resins, oils,
fuels and greases by rubbing gently with a
cloth soaked in petroleum ether or lighter
fluid.
X Use tar remover to remove tar stains.
X Use silicone remover to remove wax.
Care and treatment of matt paintwork !
Never polish the vehicle or the light alloy
wheels. Polishing makes the paintwork shiny.
! The following may cause the paint to
become shiny and thus reduce the matt
effect:
R vigorous rubbing with unsuitable materials
R frequent use of car washes
R washing the vehicle in direct sunlight
! Never use paint cleaner, buffing or polishing
products, or gloss preserver, e.g. wax, for the purpose of paintwork care. These products
are only suitable for high-gloss surfaces. Their
use on vehicles with matt paintwork leads to
considerable surface damage or, more spe-
cifically, to shiny, spotted areas.
Always have paintwork repairs carried out at a
qualified specialist workshop.
! Do not use wash programs with a hot wax
treatment under any circumstances.
Observe these notes if your vehicle has a clear, matt finish. This will help you to avoid damage to the paintwork due to incorrect treatment.
These notes also apply to light-alloy wheels with
a clear matt finish.
The vehicle should preferably be washed by
hand using a soft sponge, car shampoo and
plenty of water.
Use only insect remover and car shampoo from the range of approved Mercedes-Benz care
products. Care
333Maintenance and care Z
Page 376 of 389
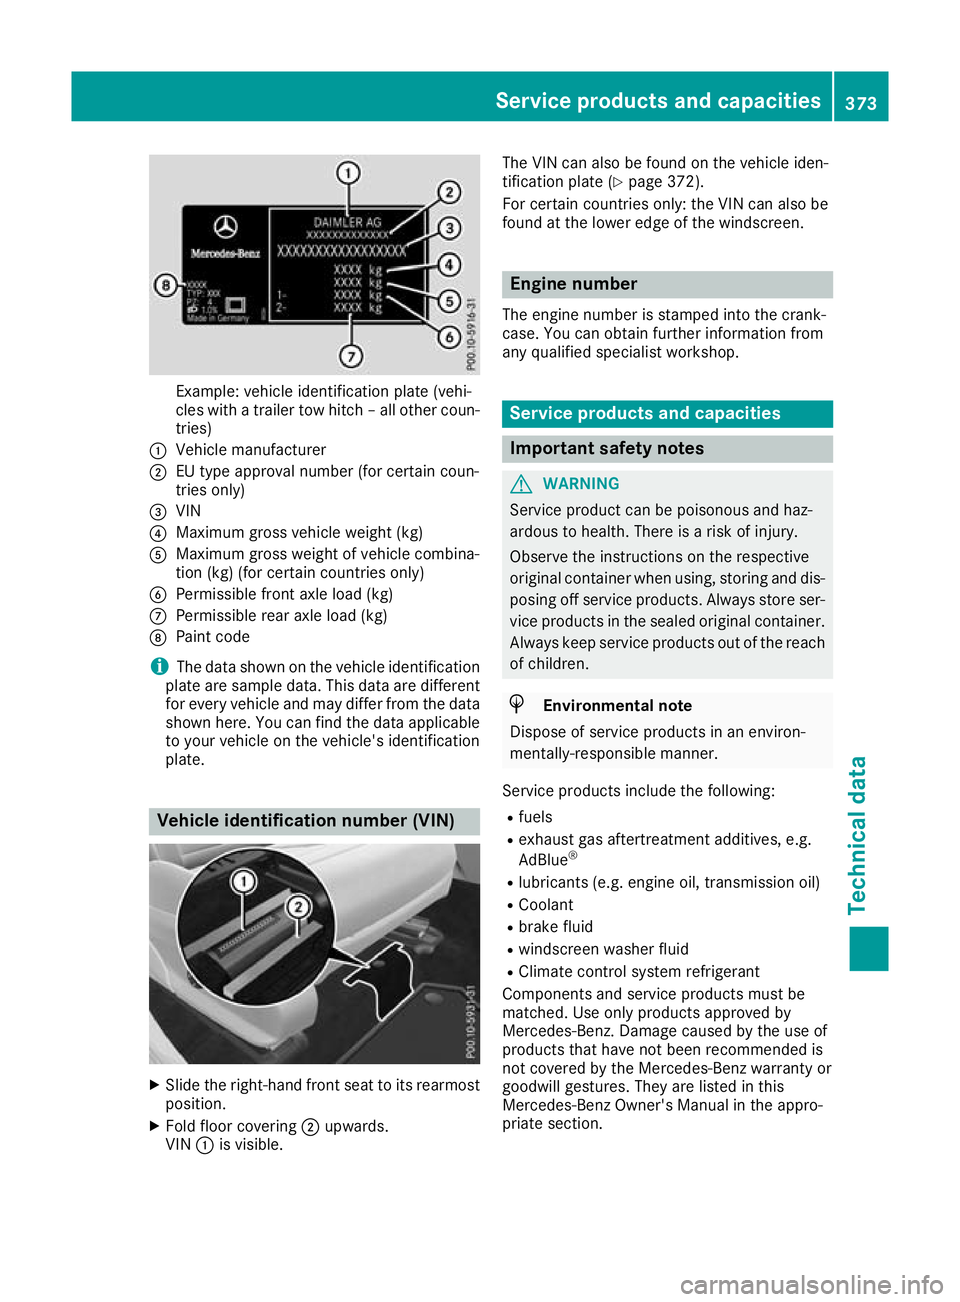
Example: vehicle identification plate (vehi-
cles with a trailer tow hitch – all other coun- tries)
: Vehicle manufacturer
; EU type approval number (for certain coun-
tries only)
= VIN
? Maximum gross vehicle weight (kg)
A Maximum gross weight of vehicle combina-
tion (kg) (for certain countries only)
B Permissible front axle load (kg)
C Permissible rear axle load (kg)
D Paint code
i The data shown on the vehicle identification
plate are sample data. This data are different for every vehicle and may differ from the data
shown here. You can find the data applicable to your vehicle on the vehicle's identification
plate. Vehicle identification number (VIN)
X
Slide the right-hand front seat to its rearmost
position.
X Fold floor covering ;upwards.
VIN :is visible. The VIN can also be found on the vehicle iden-
tification plate (Y
page 372).
For certain countries only: the VIN can also be
found at the lower edge of the windscreen. Engine number
The engine number is stamped into the crank-
case. You can obtain further information from
any qualified specialist workshop. Service products and capacities
Important safety notes
G
WARNING
Service product can be poisonous and haz-
ardous to health. There is a risk of injury.
Observe the instructions on the respective
original container when using, storing and dis- posing off service products. Always store ser-
vice products in the sealed original container. Always keep service products out of the reach
of children. H
Environmental note
Dispose of service products in an environ-
mentally-responsible manner.
Service products include the following:
R fuels
R exhaust gas aftertreatment additives, e.g.
AdBlue ®
R lubricants (e.g. engine oil, transmission oil)
R Coolant
R brake fluid
R windscreen washer fluid
R Climate control system refrigerant
Components and service products must be
matched. Use only products approved by
Mercedes-Benz. Damage caused by the use of
products that have not been recommended is
not covered by the Mercedes-Benz warranty or
goodwill gestures. They are listed in this
Mercedes-Benz Owner's Manual in the appro-
priate section. Service products and capacities
373Technical data Z
Page 380 of 389
Engine oil
General notes When handling engine oil, observe the important
safety notes on service products (Y page 373).
The quality of the engine oil is decisive for the
function and service life of an engine. After
extensive tests, Mercedes-Benz approves
engine oils that correspond to the current tech-
nical standard.
Therefore, only Mercedes-Benz-approved
engine oils may be used in Mercedes-Benz
engines.
Further information on tested and approved
engine oils can be obtained from any Mercedes-
Benz Service Centre. Mercedes-Benz recom-
mends that you have the oil change carried out
at a qualified specialist workshop. Mercedes-
Benz approval is indicated on the oil container
by the inscription "MB-Freigabe" or "MB-
Approval" and the corresponding designation,
e.g. MB-Freigabe or MB-Approval 229.51.
You can call up an overview of approved engine oils on the internet at
http://bevo.mercedes-benz.com by entering
the designation, e.g. 229.5.
The table shows which engine oils have been
approved for your vehicle.
Petrol engines: for certain countries, different
engine oils can be used, provided that the main-
tenance intervals are reduced. For more infor-
mation, please contact a qualified specialist
workshop. Petrol engines MB-Freigabe or
MB-Approval All models
229.5 Diesel engines MB-Freigabe or
MB-Approval All models
228.51, 229.31,
229.51, 229.52 i
If the engine oils listed on the table are not
available, you may top up with the following
engine oils until the next oil change:
R Petrol engines: MB-Freigabe or MB-
Approval 229.3 or ACEA A3/B3
R Diesel engines: MB-Freigabe or MB-
Approval 229.3, 229.5 or ACEA C3
It may be used only once and the topping-up
quantity must not exceed 1.0 l.
Filling capacities The following values refer to an oil change,
including the oil filter.
Missing values were not available at the time of
going to press. Model Replacement
amount GLC 300 4MATIC
Coupé
GLC 250 4MATIC
Coupé
Mercedes-AMG
GLC 43 4MATIC
Coupé
6.5 l
GLC 350 d 4MATIC
Coupé
8.0 l
All other models
6.0 l
Additives
!
Do not use any additives with the engine oil.
This could damage the engine. Brake fluid
G
WARNING
The brake fluid continuously absorbs mois-
ture from the air. This results in the boiling
point of the brake fluid lowering. If the boiling
point of the brake fluid is too low, vapour Service products and capacities
377Technical data
Z
Page 381 of 389
pockets may form when the brakes are sub-
jected to a heavy load. This would impair brak-
ing efficiency. There is a risk of an accident.
Have the brake fluid renewed at the prescri-
bed intervals.
When handling brake fluid, observe the impor-
tant safety notes on service products
(Y page 373).
The brake fluid change intervals can be found in the Service Booklet.
Only use brake fluid approved by Mercedes-
Benz in accordance with MB-Freigabe or MB-
Approval 331.0.
Information about approved brake fluid can be
obtained at any qualified specialist workshop or on the Internet at
http://bevo.mercedes-benz.com.
i Have the brake fluid regularly replaced at a
qualified specialist workshop in accordance
with the replacement intervals and the
replacement confirmed in the Service Book-
let. Coolant
Important safety notes G
WARNING
If antifreeze comes into contact with hot com- ponents in the engine compartment, it may
ignite. There is a risk of fire and injury.
Let the engine cool down before you top up
the antifreeze. Make sure that antifreeze is
not spilled next to the filler neck. Thoroughly
clean the antifreeze from components before
starting the engine.
! Only add coolant that has been premixed
with the desired antifreeze protection. You
could otherwise damage the engine.
Further information on coolants can be found in the Mercedes-Benz Specifications for Ser-
vice Products, MB Specifications for Service
Products 310.1, e.g. on the Internet at
http://bevo.mercedes-benz.com. Or contact
a qualified specialist workshop.
! Always use a suitable coolant mixture, even
in countries where high temperatures prevail. Otherwise, the engine cooling system is not
sufficiently protected from corrosion and
overheating.
i Have the coolant regularly replaced at a
qualified specialist workshop and the replace-
ment confirmed in the Service Booklet.
Comply with the important safety notes for ser- vice products when handling coolant
(Y page 373).
The coolant is a mixture of water and anti-
freeze/anti-corrosion additive. It is responsible
for the following:
R anti-corrosion protection
R antifreeze protection
R raising the boiling point
If antifreeze/anti-corrosion additive is present
at the correct concentration, the boiling point of
the coolant during operation will be approx-
imately 130 †.
The antifreeze concentrate/anti-corrosion addi-
tive concentration in the engine cooling system should:
R be at least 50%. This will protect the engine
cooling system against freezing down to
approximately -37 †.
R not exceed 55% (antifreeze protection down
to -45 †). Heat will otherwise not be dissipa-
ted as effectively.
Mercedes-Benz recommends an antifreeze/
anti-corrosion additive concentration in accord-
ance with MB Specifications for Service Prod-
ucts 310.1.
i When the vehicle is first delivered, it is filled
with a coolant mixture that ensures adequate
antifreeze and corrosion protection.
i The coolant is checked at every mainte-
nance interval at a qualified specialist work-
shop. Windscreen washer system
Important safety notes G
WARNING
If windscreen washer concentrate comes into contact with hot components of the engine or
the exhaust system, it can ignite. There is a
risk of fire and injury. 378
Service products and capacitiesTechnical data