low beam MERCEDES-BENZ GLC COUPE 2016 Owners Manual
[x] Cancel search | Manufacturer: MERCEDES-BENZ, Model Year: 2016, Model line: GLC COUPE, Model: MERCEDES-BENZ GLC COUPE 2016Pages: 389, PDF Size: 7.34 MB
Page 7 of 389
1, 2, 3 ...
4ETS (Electronic Traction System) see ETS/4ETS (Electronic Trac-
tion System)
4MATIC (permanent four-wheel
drive) .................................................. 190
4MATIC off-road system ...................190
12 V socket
see Socket (12 V)
230 V power socket .......................... 319
360° camera
Cleaning ......................................... 335
Display in the multimedia system .. 204
Function/notes ............................ .202 A
ABS (Anti-lock Braking System) Display message ............................ 250
Function/notes ................................ 68
Warning lamp ................................. 283
Accident
Automatic measures after an acci-
dent ................................................. 56
Activating media mode
General notes ................................ 303
Activating/deactivating air-recir-
culation mode ................................... .134
Activating/deactivating cooling
with air dehumidification ................. 130
Active Blind Spot Assist
Activating/deactivating (on-
board computer) ............................ 241
Display message ............................ 268
Function/notes ............................ .213
Active Lane Keeping Assist
Activating/deactivating (on-
board computer) ............................ 242
Display message ............................ 268
Function/notes ............................ .216
Active light function ......................... 118
Active Light System
Display message ............................ 261
Active Parking Assist
Cancelling ...................................... 197
Detecting parking spaces .............. 194
Display message ............................ 269 Exiting a parking space .................. 197
Function/notes ............................
.194
Important safety notes .................. 194
Parking .......................................... 196
Towing a trailer .............................. 194
ADAPTIVE BRAKE ................................. 77
Adaptive Brake Assist
Function/notes ................................ 72
Adaptive brake lights .......................... 73
Adaptive Damping System
Function/notes ............................ .190
Adaptive Damping System (ADS) ..... 188
Adaptive Highbeam Assist
Display message ............................ 262
Function/notes ............................ .119
Switching on/off ........................... 119
Adaptive Highbeam Assist Plus
Display message ............................ 262
Function/notes ............................ .119
Switching on/off ........................... 120
AdBlue ®
Additive ......................................... 376
Display message ............................ 265
Displaying level and range ............. 240
Filling capacity ............................... 376
Important safety notes .................. 376
Low outside temperatures ............. 376
Purity ............................................. 376
Topping up ..................................... 164
Additional speedometer ................... 244
Additives (engine oil) ........................ 377
Address book
See also Digital Owner's Manual ... 292
Adjusting the headlamp range ......... 117
Adjusting the volume
Multimedia system ........................ 293
AIR BODY CONTROL
Display message ............................ 266
Function/notes ............................ .187
Lowering the rear of the vehicle .... 189
Raising the rear of the vehicle ....... 189
Air conditioning
General notes ................................ 127
Air filter (white display message) .... 265
Air vents
Important safety notes .................. 141
Rear ............................................... 141 4
Index
Page 21 of 389
Tow-away protection ........................ 80
Protection of the environment
General notes ..................................26
Pulling away
Automatic transmission ................. 146
General notes ................................ 146
Hill start assist ...............................1 47
Trailer ............................................ 147 Q
QR code Mercedes-Benz Guide App ................. 1
Rescue card ..................................... 30
Qualified specialist workshop ........... 30
Quick access for audio and tele-
phone
Changing the station/music
track .............................................. 295 R
RACETIMER (on-board computer) .... 247
Radiator cover ................................... 326
Radio
Selecting a station ......................... 236
Radio mode
See also Digital Owner's Manual ... 292
Radio-based vehicle components
Declaration of conformity ................ 28
Rain closing feature
Sliding sunroof ................................. 99
Reading lamp ..................................... 121
Rear compartment
Setting the air vents ..................... .141
Setting the airflow ......................... 132
Setting the temperature ................ 131
Rear foglamp
Display message ............................ 261
Switching on/off ........................... 116
Rear seat
Display message ............................ 277
Rear window heating
Problem (fault) ............................... 133
Switching on/off ........................... 133
Rear-compartment seat belt sta-
tus indicator ........................................ 46 Rear-view mirror
Anti-dazzle mode (automatic) ....... .112
Dipping (manual) ........................... 110
Recuperation display ........................ 233
Reflective safety vest ....................... 338
Refuelling
AdBlue ®
......................................... 164
Fuel gauge ....................................... 34
Important safety notes .................. 161
Refuelling process ......................... 162
see Fuel
Remote control
Auxiliary heating/ventilation .......... 139
Changing the batteries (auxiliary
heating) ......................................... 140
Replacing bulbs
Dipped-beam headlamps .............. .122
Fitting/removing the cover (front
wheel arch) ................................... .123
Important safety notes .................. 121
Main-beam headlamps ................... 122
Overview of bulb types .................. 122
Turn signals (front) ......................... 123
Replacing the battery (auxiliary
heating remote control) .................... 140
Rescue card ......................................... 30
Reserve (fuel tank)
see Fuel
Reserve fuel
Display message ............................ 265
Warning lamp ................................. 286
Residual heat (climate control) ........135
Restraint system
Display message ............................ 257
Introduction ..................................... 41
Warning lamp ................................. 286
Warning lamp (function) ................... 42
Rev counter ........................................ 229
Reversing camera
"Reverse parking" function ............ 200
Cleaning instructions ..................... 335
Coupling up a trailer function ....... .201
Display in the multimedia system .. 199
General notes ................................ 198
Object detection (function/
notes) ............................................ 202
Switching on/off ........................... 198 18
Index
Page 37 of 389
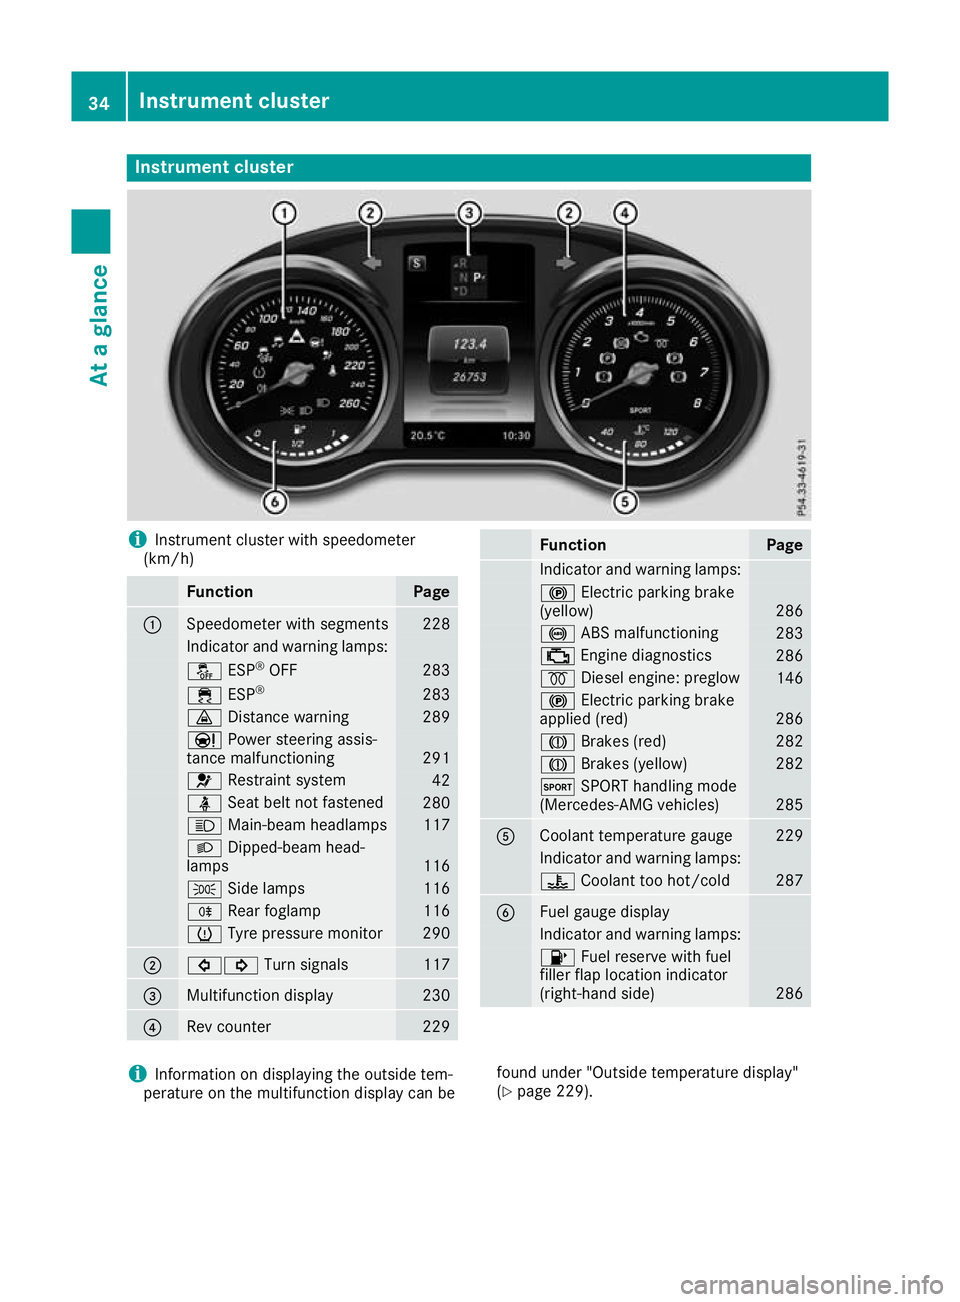
Instrument cluster
i
Instrument cluster with speedometer
(km/h) Function Page
:
Speedometer with segments 228
Indicator and warning lamps:
å
ESP®
OFF 283
÷
ESP® 283
·
Distance warning 289
Ð
Power steering assis-
tance malfunctioning 291
6
Restraint system 42
ü
Seat belt not fastened 280
K
Main-beam headlamps 117
L
Dipped-beam head-
lamps 116
T
Side lamps 116
R
Rear foglamp 116
h
Tyre pressure monitor 290
;
#!
Turn signals 117
=
Multifunction display 230
?
Rev counter 229 Function Page
Indicator and warning lamps:
!
Electric parking brake
(yellow) 286
!
ABS malfunctioning 283
;
Engine diagnostics 286
%
Diesel engine: preglow 146
!
Electric parking brake
applied (red) 286
J
Brakes (red) 282
J
Brakes (yellow) 282
M
SPORT handling mode
(Mercedes-AMG vehicles) 285
A
Coolant temperature gauge 229
Indicator and warning lamps:
?
Coolant too hot/cold 287
B
Fuel gauge display
Indicator and warning lamps:
8
Fuel reserve with fuel
filler flap location indicator
(right-hand side) 286
i
Information on displaying the outside tem-
perature on the multifunction display can be found under "Outside temperature display"
(Y
page 229). 34
Instrument clusterAt a glance
Page 119 of 389
The light setting is automatically selected
according to the brightness of the ambient light,
but not in the event of poor visibility due to
weather conditions such as fog, snow or spray.
R With the key in position 1in the ignition lock,
the side lamps are switched on or off auto-
matically depending on the brightness of the
ambient light.
R The daytime driving lights or the side lamps
and dipped-beam headlamps are switched on
or off automatically while the engine is run-
ning depending on the ambient light condi-
tions.
X To switch on the automatic headlamps:
turn the light switch to the Ãposition.
The daytime driving lights improve the visibility
of your vehicle during the day.
When the side lamps and dipped-beam head-
lamps are switched on, the green Tside
lamps and Ldipped-beam headlamps indi-
cator lamps on the instrument cluster light up.
Dipped-beam headlamps G
WARNING
When the light switch is set to Ã, the
dipped-beam headlamps may not be switched on automatically if there is fog, snow or othercauses of poor visibility due to the weather
conditions such as spray. There is a risk of an
accident.
In such situations, turn the light switch to
L.
When the ignition is switched on and the light
switch is in the Lposition, the side lamps
and dipped-beam headlamps are switched on
even if the light sensor does not sense dark
ambient light conditions. This is advantageous
when there is fog or rain.
X To switch on the dipped-beam headlamps:
turn the key in the ignition lock to position 2
or start the engine.
X Turn the light switch to the Lposition.
The green Lindicator lamp on the instru-
ment cluster lights up.
Rear fog lamp The rear fog lamp improves the visibility of your
vehicle for the traffic behind in the event of
heavy fog. You must observe the legal require- ments for the country in which you are currently
driving when operating the rear fog lamp.
X To switch on the rear fog lamp: turn the key
in the ignition lock to position 2or start the
engine.
X Turn the light switch to the LorÃ
position.
X Press the Rbutton.
The yellow Rindicator lamp on the instru-
ment cluster lights up.
Side lamps ! When the battery is discharged heavily, the
side lamps or parking lamps are automatically
switched off to facilitate an engine start.
Always park your vehicle safely and in a well lit area, in accordance with the relevant legal
stipulations. Avoid using the Tside lamps
for periods lasting several hours. Where pos-
sible, switch on the right Xor left W
parking lamp.
X To switch on the side lamp: turn the light
switch to the Tposition.
The green Tindicator lamp on the instru-
ment cluster lights up.
Parking lamps Switching on the parking lamps ensures that the
corresponding side of the vehicle is illuminated.
X To switch on the parking lamp: turn the key
to position 0in the ignition lock or remove the
key.
X Turn the light switch to the W(left-hand
side of the vehicle) or X(right-hand side of
the vehicle) position. 116
Exterior lightingLights and windscreen wipers
Page 120 of 389
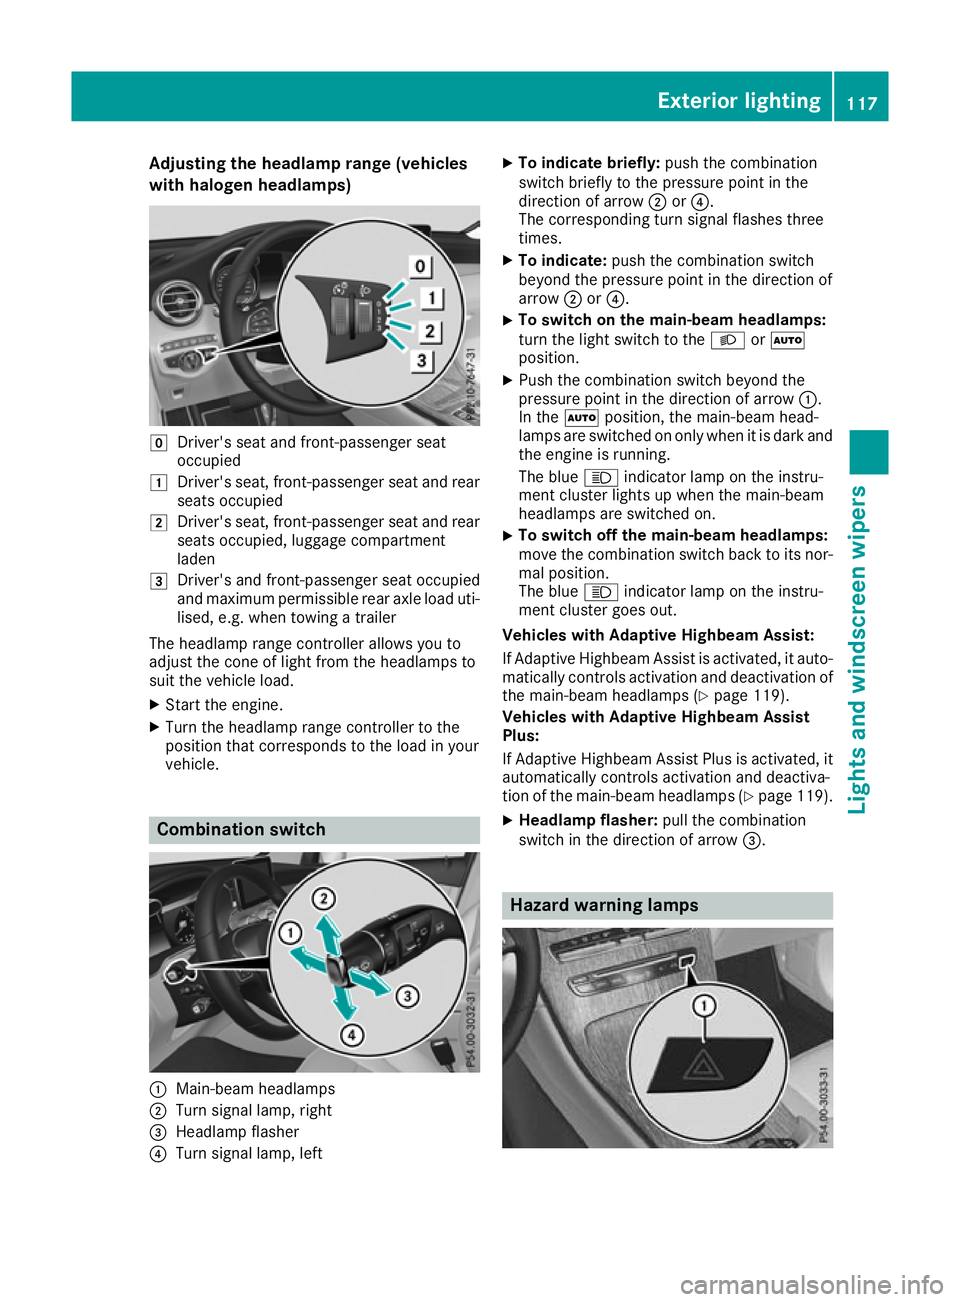
Adjusting the headlamp range (vehicles
with halogen headlamps) g
Driver's seat and front-passenger seat
occupied
1 Driver's seat, front-passenger seat and rear
seats occupied
2 Driver's seat, front-passenger seat and rear
seats occupied, luggage compartment
laden
3 Driver's and front-passenger seat occupied
and maximum permissible rear axle load uti-
lised, e.g. when towing a trailer
The headlamp range controller allows you to
adjust the cone of light from the headlamps to
suit the vehicle load.
X Start the engine.
X Turn the headlamp range controller to the
position that corresponds to the load in your
vehicle. Combination switch
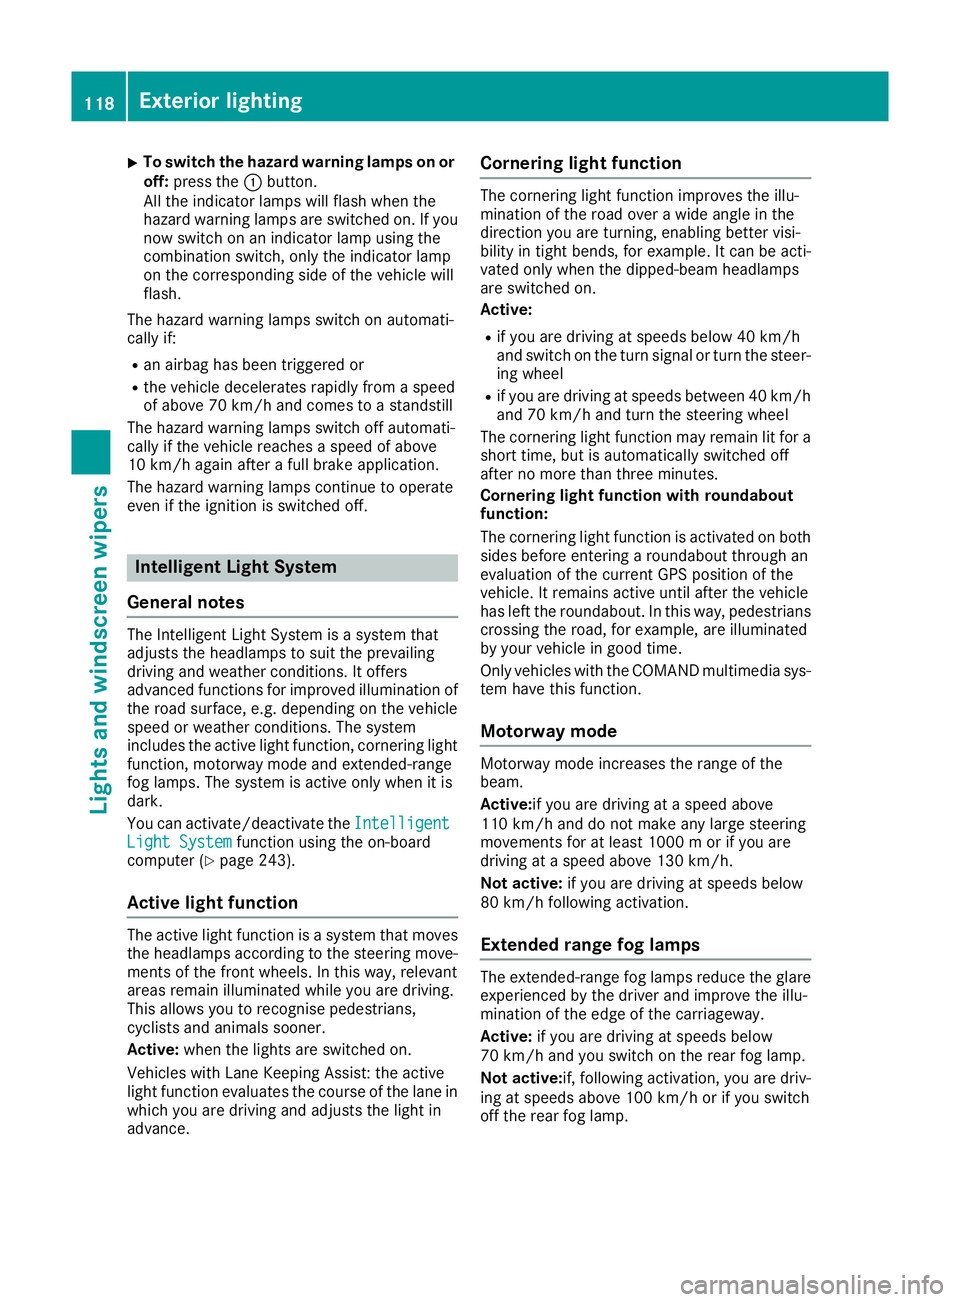
:
Main-beam headlamps
; Turn signal lamp, right
= Headlamp flasher
? Turn signal lamp, left X
To indicate briefly: push the combination
switch briefly to the pressure point in the
direction of arrow ;or?.
The corresponding turn signal flashes three
times.
X To indicate: push the combination switch
beyond the pressure point in the direction of
arrow ;or?.
X To switch on the main-beam headlamps:
turn the light switch to the LorÃ
position.
X Push the combination switch beyond the
pressure point in the direction of arrow :.
In the Ãposition, the main-beam head-
lamps are switched on only when it is dark and
the engine is running.
The blue Kindicator lamp on the instru-
ment cluster lights up when the main-beam
headlamps are switched on.
X To switch off the main-beam headlamps:
move the combination switch back to its nor- mal position.
The blue Kindicator lamp on the instru-
ment cluster goes out.
Vehicles with Adaptive Highbeam Assist:
If Adaptive Highbeam Assist is activated, it auto- matically controls activation and deactivation of
the main-beam headlamps (Y page 119).
Vehicles with Adaptive Highbeam Assist
Plus:
If Adaptive Highbeam Assist Plus is activated, it
automatically controls activation and deactiva-
tion of the main-beam headlamps (Y page 119).
X Headlamp flasher: pull the combination
switch in the direction of arrow =. Hazard warning lamps Exterior lighting
117Lights and windscreen wipers Z
Page 121 of 389
X
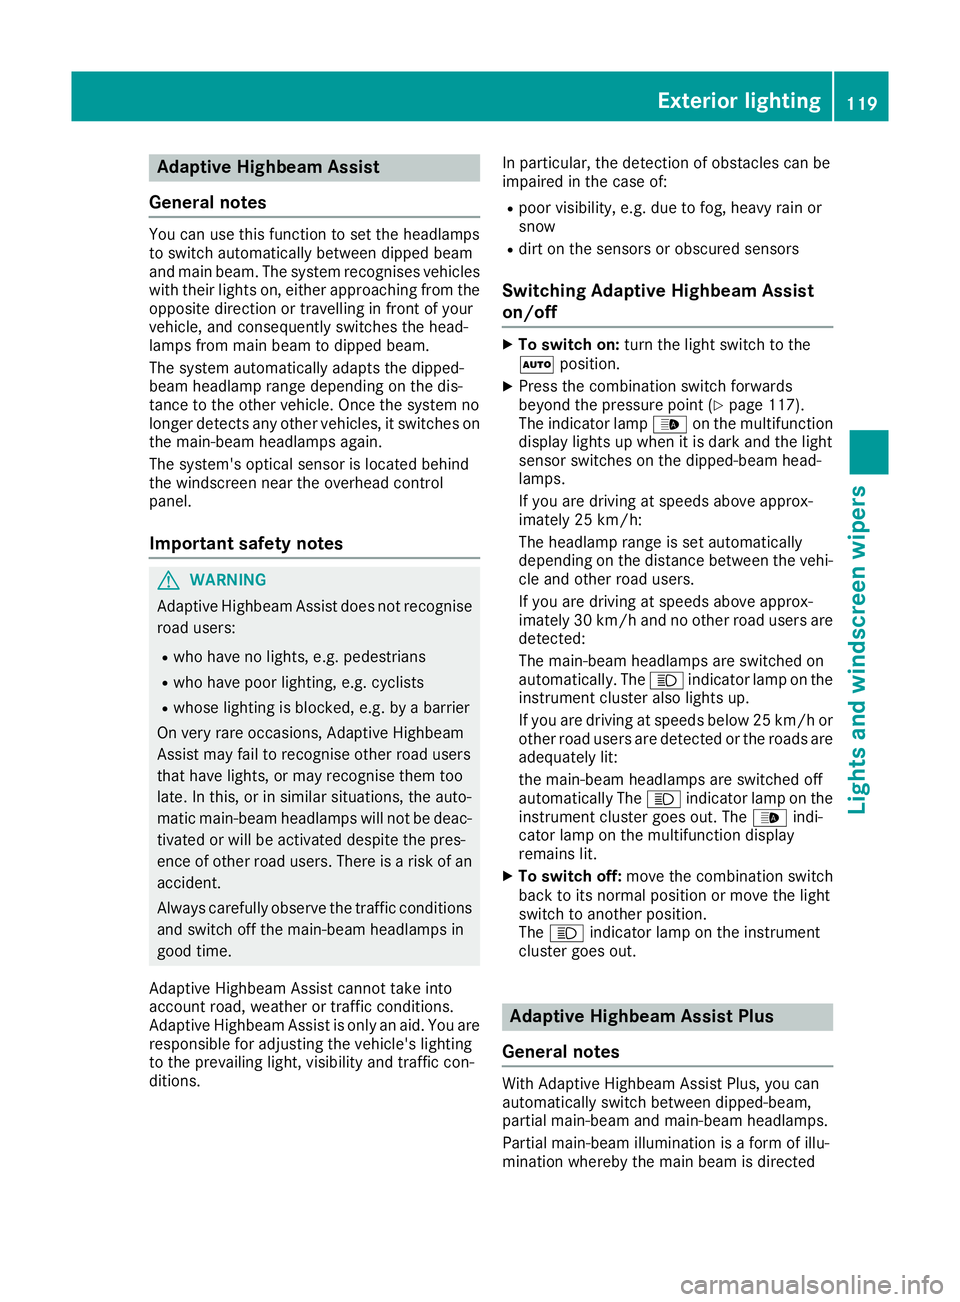
To switch the hazard warning lamps on or
off: press the :button.
All the indicator lamps will flash when the
hazard warning lamps are switched on. If you
now switch on an indicator lamp using the
combination switch, only the indicator lamp
on the corresponding side of the vehicle will
flash.
The hazard warning lamps switch on automati-
cally if:
R an airbag has been triggered or
R the vehicle decelerates rapidly from a speed
of above 70 km/h and comes to a standstill
The hazard warning lamps switch off automati-
cally if the vehicle reaches a speed of above
10 km/h again after a full brake application.
The hazard warning lamps continue to operate
even if the ignition is switched off. Intelligent Light System
General notes The Intelligent Light System is a system that
adjusts the headlamps to suit the prevailing
driving and weather conditions. It offers
advanced functions for improved illumination of the road surface, e.g. depending on the vehicle
speed or weather conditions. The system
includes the active light function, cornering light
function, motorway mode and extended-range
fog lamps. The system is active only when it is
dark.
You can activate/deactivate the Intelligent
Intelligent
Light System Light System function using the on-board
computer (Y page 243).
Active light function The active light function is a system that moves
the headlamps according to the steering move-
ments of the front wheels. In this way, relevant
areas remain illuminated while you are driving.
This allows you to recognise pedestrians,
cyclists and animals sooner.
Active: when the lights are switched on.
Vehicles with Lane Keeping Assist: the active
light function evaluates the course of the lane in which you are driving and adjusts the light in
advance. Cornering light function The cornering light function improves the illu-
mination of the road over a wide angle in the
direction you are turning, enabling better visi-
bility in tight bends, for example. It can be acti-
vated only when the dipped-beam headlamps
are switched on.
Active:
R if you are driving at speeds below 40 km/h
and switch on the turn signal or turn the steer-
ing wheel
R if you are driving at speeds between 40 km/h
and 70 km/h and turn the steering wheel
The cornering light function may remain lit for a short time, but is automatically switched off
after no more than three minutes.
Cornering light function with roundabout
function:
The cornering light function is activated on both
sides before entering a roundabout through an
evaluation of the current GPS position of the
vehicle. It remains active until after the vehicle
has left the roundabout. In this way, pedestrians crossing the road, for example, are illuminated
by your vehicle in good time.
Only vehicles with the COMAND multimedia sys-
tem have this function.
Motorway mode Motorway mode increases the range of the
beam.
Active:if you are driving at a speed above
110 km/h and do not make any large steering
movements for at least 1000 m or if you are
driving at a speed above 130 km/h.
Not active: if you are driving at speeds below
80 km/h following activation.
Extended range fog lamps The extended-range fog lamps reduce the glare
experienced by the driver and improve the illu-
mination of the edge of the carriageway.
Active: if you are driving at speeds below
70 km/h and you switch on the rear fog lamp.
Not active: if, following activation, you are driv-
ing at speeds above 100 km/h or if you switch
off the rear fog lamp. 118
Exterior lightingLights and
windscreen wipers
Page 122 of 389
Adaptive Highbeam Assist
General notes You can use this function to set the headlamps
to switch automatically between dipped beam
and main beam. The system recognises vehicles
with their lights on, either approaching from the opposite direction or travelling in front of your
vehicle, and consequently switches the head-
lamps from main beam to dipped beam.
The system automatically adapts the dipped-
beam headlamp range depending on the dis-
tance to the other vehicle. Once the system no
longer detects any other vehicles, it switches on
the main-beam headlamps again.
The system's optical sensor is located behind
the windscreen near the overhead control
panel.
Important safety notes G
WARNING
Adaptive Highbeam Assist does not recognise road users:
R who have no lights, e.g. pedestrians
R who have poor lighting, e.g. cyclists
R whose lighting is blocked, e.g. by a barrier
On very rare occasions, Adaptive Highbeam
Assist may fail to recognise other road users
that have lights, or may recognise them too
late. In this, or in similar situations, the auto-
matic main-beam headlamps will not be deac-
tivated or will be activated despite the pres-
ence of other road users. There is a risk of an accident.
Always carefully observe the traffic conditionsand switch off the main-beam headlamps in
good time.
Adaptive Highbeam Assist cannot take into
account road, weather or traffic conditions.
Adaptive Highbeam Assist is only an aid. You are
responsible for adjusting the vehicle's lighting
to the prevailing light, visibility and traffic con-
ditions. In particular, the detection of obstacles can be
impaired in the case of:
R poor visibility, e.g. due to fog, heavy rain or
snow
R dirt on the sensors or obscured sensors
Switching Adaptive Highbeam Assist
on/off X
To switch on: turn the light switch to the
à position.
X Press the combination switch forwards
beyond the pressure point (Y page 117).
The indicator lamp _on the multifunction
display lights up when it is dark and the light
sensor switches on the dipped-beam head-
lamps.
If you are driving at speeds above approx-
imately 25 km/h:
The headlamp range is set automatically
depending on the distance between the vehi- cle and other road users.
If you are driving at speeds above approx-
imately 30 km/h and no other road users are
detected:
The main-beam headlamps are switched on
automatically. The Kindicator lamp on the
instrument cluster also lights up.
If you are driving at speeds below 25 km/h or
other road users are detected or the roads are adequately lit:
the main-beam headlamps are switched off
automatically The Kindicator lamp on the
instrument cluster goes out. The _indi-
cator lamp on the multifunction display
remains lit.
X To switch off: move the combination switch
back to its normal position or move the light
switch to another position.
The K indicator lamp on the instrument
cluster goes out. Adaptive Highbeam Assist Plus
General notes With Adaptive Highbeam Assist Plus, you can
automatically switch between dipped-beam,
partial main-beam and main-beam headlamps.
Partial main-beam illumination is a form of illu-
mination whereby the main beam is directed Exterior lighting
119Lights and windscreen wipers Z
Page 123 of 389
past other road users. Other road users are kept
out of the main beam. This prevents glare. If
there is a vehicle in front, for example, the main- beam headlamps illuminate the areas to its right
and left, and the vehicle in front is illuminated by the dipped-beam headlamps.
The system automatically adapts the dipped-
beam headlamp range depending on the dis-
tance to the other vehicle. Once the system no
longer detects any other vehicles, it switches on
the main-beam headlamps again.
If the main-beam or partial main-beam head-
lamps are causing too much reflection from traf- fic signs, the lights are automatically dimmed
and glare for the driver caused by the reflectionsis thus avoided.
The system's optical sensor is located behind
the windscreen near the overhead control
panel.
Important safety notes G
WARNING
Adaptive Highbeam Assist Plus does not rec-
ognise road users:
R who have no lights, e.g. pedestrians
R who have poor lighting, e.g. cyclists
R whose lighting is blocked, e.g. by a barrier
In very rare cases, Adaptive Highbeam Assist
Plus may not recognise road users who do
have lights, or may recognise them too late. In this, or in similar situations, the automatic
main-beam headlamps will not be deactivated
or will be activated despite the presence of
other road users. There is a risk of an acci-
dent.
Always carefully observe the traffic conditions and switch off the main-beam headlamps in
good time.
Adaptive Highbeam Assist Plus cannot take into
account road, weather or traffic conditions.
Adaptive Highbeam Assist Plus is only an aid.
You are responsible for adjusting the vehicle's
lighting to the prevailing light, visibility and traf-
fic conditions. In particular, the detection of obstacles can be
impaired in the case of:
R poor visibility, e.g. due to fog, heavy rain or
snow
R dirt on the sensors or obscured sensors
Switching Adaptive Highbeam Assist
Plus on/off X
To switch on: turn the light switch to the
à position.
X Press the combination switch forwards
beyond the pressure point (Y page 117).
The _ indicator lamp on the multifunction
display lights up when it is dark and the light
sensor switches on the dipped-beam head-
lamps.
At speeds above approx. 25 km/ h:the head-
lamp range is automatically controlled
according to the distance to other road users.
At speeds above approximately 30 km/h:
R if no other road users are detected, the
main-beam headlamps are automatically
switched on
R if other road users are detected, the partial
main-beam headlamps are automatically
switched on
The K indicator lamp on the instrument
cluster also lights up.
At speeds below approx. 25 km/h or when
there is sufficient street lighting:
R the partial main-beam headlamps are
switched off automatically
R the main-beam headlamps are switched off
automatically
The K indicator lamp on the instrument
cluster goes out. The _indicator lamp on
the multifunction display remains lit.
X To switch off:move the combination switch
back to its normal position or move the light
switch to another position.
The _ indicator lamp on the multifunction
display goes out. Headlamps misted up on the inside
Certain climatic and physical conditions may
cause moisture to form in the headlamp. This
moisture does not affect the functionality of the headlamp. 120
Exterior lightingLights and
windscreen wipers
Page 125 of 389
Protect bulbs from moisture during operation.
Do not allow bulbs to come into contact with
liquids.
Replace only the bulbs listed (Y page 122).
Have the bulbs that you cannot change yourself replaced at a qualified specialist workshop.
If you require assistance replacing bulbs, con-
sult a qualified specialist workshop.
If the new bulb still does not light up, consult a
qualified specialist workshop.
Headlamps and lights are an important aspect of
vehicle safety. You must therefore make sure
that these function correctly at all times. Have
the headlamp setting checked regularly.
Vehicles with LED headlamps: the front and
rear lamp clusters of your vehicle are equipped
with LED bulbs. Do not replace the bulbs your-
self. Contact a qualified specialist workshop
with the necessary specialist knowledge and
tools to carry out the work required. Overview of bulb types
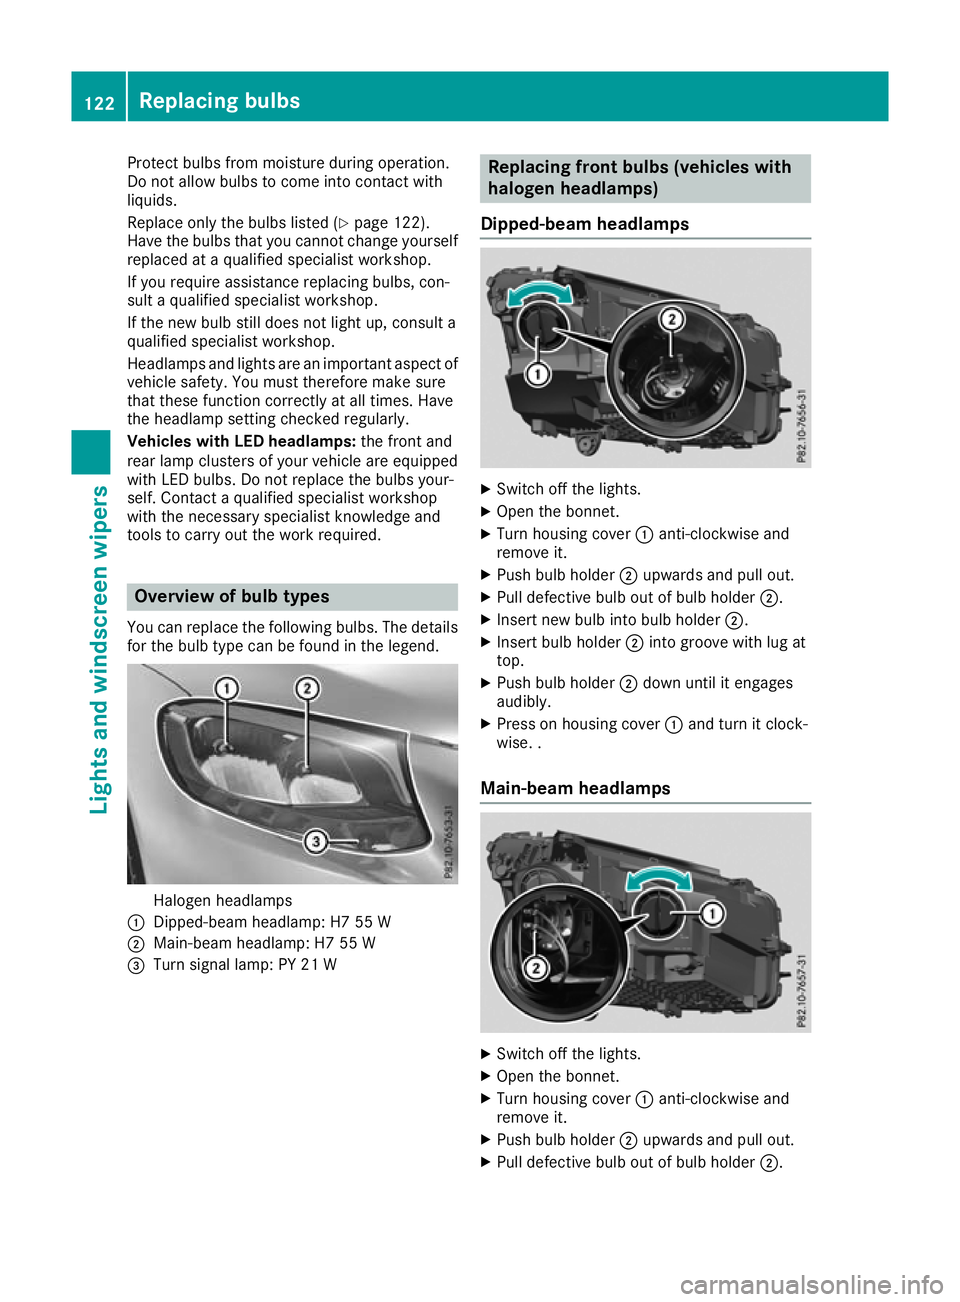
You can replace the following bulbs. The details for the bulb type can be found in the legend. Halogen headlamps
: Dipped-beam headlamp: H7 55 W
; Main-beam headlamp: H7 55 W
= Turn signal lamp: PY 21 W Replacing front bulbs (vehicles with
halogen headlamps)
Dipped-beam headlamps X
Switch off the lights.
X Open the bonnet.
X Turn housing cover :anti-clockwise and
remove it.
X Push bulb holder ;upwards and pull out.
X Pull defective bulb out of bulb holder ;.
X Insert new bulb into bulb holder ;.
X Insert bulb holder ;into groove with lug at
top.
X Push bulb holder ;down until it engages
audibly.
X Press on housing cover :and turn it clock-
wise. .
Main-beam headlamps X
Switch off the lights.
X Open the bonnet.
X Turn housing cover :anti-clockwise and
remove it.
X Push bulb holder ;upwards and pull out.
X Pull defective bulb out of bulb holder ;.122
Replacing bulbsLights and windscreen wipers
Page 234 of 389
R
È SPEEDTRONIC (Y page 176)
R ¯ Cruise control (Y page 174)
R a DISTRONIC PLUS Steering Assist and
Stop&Go Pilot (Y page 184)
R _ Adaptive Highbeam Assist
(Y page 119)
R _ Adaptive Highbeam Assist Plus
(Y page 119)
R è ECO start/stop function (Y page 148)
R ë HOLD function (Y page 186)
R ð Maximum permissible speed exceeded
(for certain countries only) Head-up display
General notes The Head-up Display projects information from
the navigation system and the driver assistance
systems above the dashboard into the driver's
field of vision. This way, the Head-up Display
enables drivers to see information without hav-
ing to take their eyes off the road.
A requirement for the display of the content is
that the following functions are available in the
vehicle and are switched on:
R Cruise control
R SPEEDTRONIC
R DISTRONIC PLUS
R Traffic Sign Assist
R Navigation
Important safety notes The head-up display is only an aid and is not a
substitute for attentive driving.
Speed limits and overtaking restrictions are not
always correctly displayed. Traffic signs always
have priority over the Traffic Sign Assist display.
The visibility of the head-up display is influenced by the following conditions:
R the driver's seat position
R the positioning of the display image
R the general light conditions
R sunglasses with polarisation filters
R wet road surfaces
R blocking of sunlight by objects on the display
cover In the event of extreme sunlight, sections of the
display may fade. This can be reversed by
switching the head-up display off and on again.
i Vehicles with the head-up display are equip-
ped with a special windscreen. Should repairs
be necessary, have the windscreen replaced
at a qualified specialist workshop.
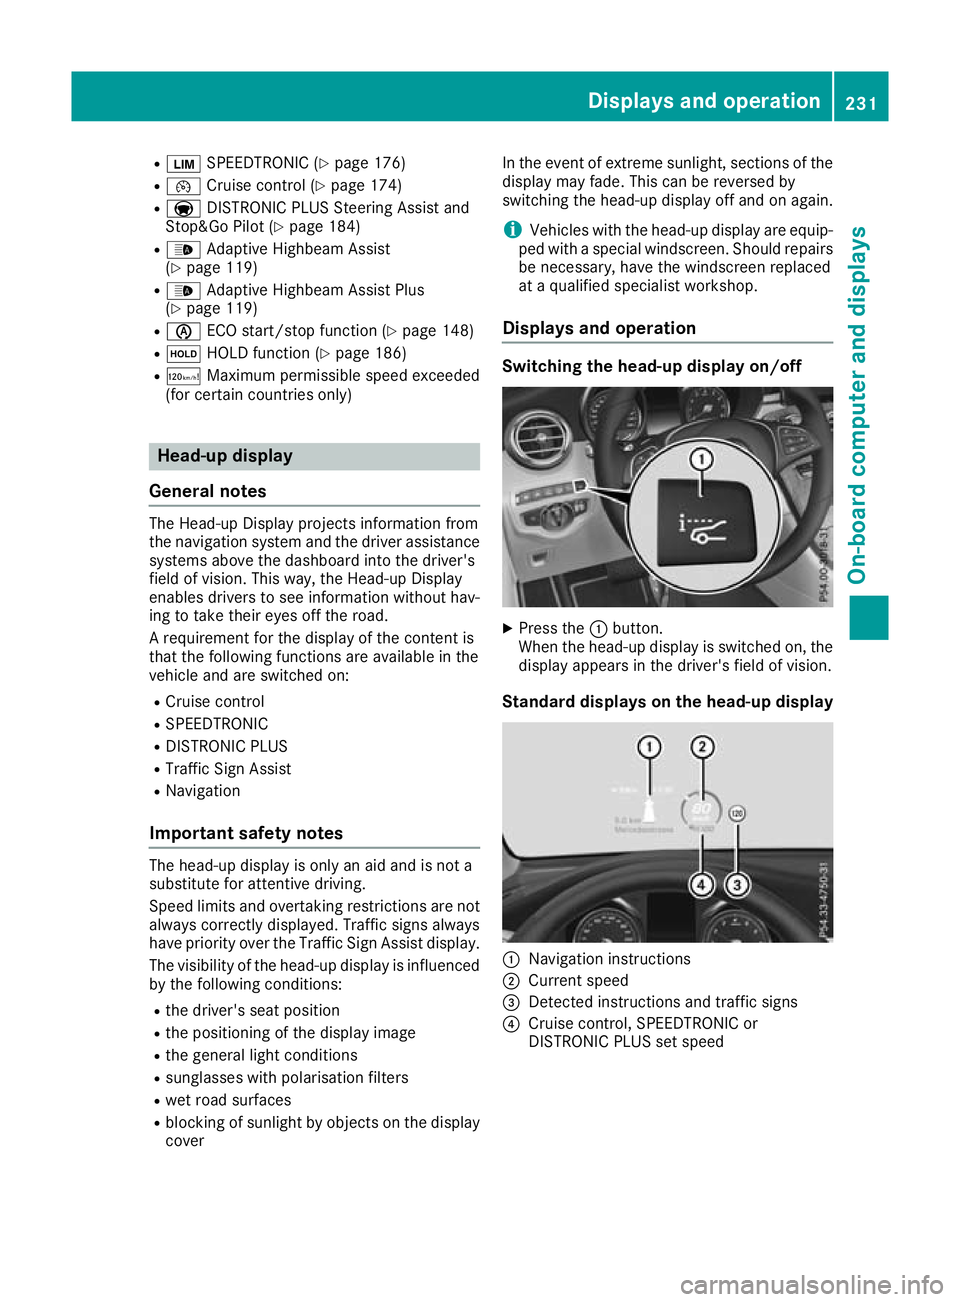
Displays and operation Switching the head-up display on/off
X
Press the :button.
When the head-up display is switched on, the display appears in the driver's field of vision.
Standard displays on the head-up display :
Navigation instructions
; Current speed
= Detected instructions and traffic signs
? Cruise control, SPEEDTRONIC or
DISTRONIC PLUS set speed Displays and operation
231On-board computer and displays Z