sat nav MERCEDES-BENZ GLC COUPE 2016 Owners Manual
[x] Cancel search | Manufacturer: MERCEDES-BENZ, Model Year: 2016, Model line: GLC COUPE, Model: MERCEDES-BENZ GLC COUPE 2016Pages: 389, PDF Size: 7.34 MB
Page 234 of 389

R
È SPEEDTRONIC (Y page 176)
R ¯ Cruise control (Y page 174)
R a DISTRONIC PLUS Steering Assist and
Stop&Go Pilot (Y page 184)
R _ Adaptive Highbeam Assist
(Y page 119)
R _ Adaptive Highbeam Assist Plus
(Y page 119)
R è ECO start/stop function (Y page 148)
R ë HOLD function (Y page 186)
R ð Maximum permissible speed exceeded
(for certain countries only) Head-up display
General notes The Head-up Display projects information from
the navigation system and the driver assistance
systems above the dashboard into the driver's
field of vision. This way, the Head-up Display
enables drivers to see information without hav-
ing to take their eyes off the road.
A requirement for the display of the content is
that the following functions are available in the
vehicle and are switched on:
R Cruise control
R SPEEDTRONIC
R DISTRONIC PLUS
R Traffic Sign Assist
R Navigation
Important safety notes The head-up display is only an aid and is not a
substitute for attentive driving.
Speed limits and overtaking restrictions are not
always correctly displayed. Traffic signs always
have priority over the Traffic Sign Assist display.
The visibility of the head-up display is influenced by the following conditions:
R the driver's seat position
R the positioning of the display image
R the general light conditions
R sunglasses with polarisation filters
R wet road surfaces
R blocking of sunlight by objects on the display
cover In the event of extreme sunlight, sections of the
display may fade. This can be reversed by
switching the head-up display off and on again.
i Vehicles with the head-up display are equip-
ped with a special windscreen. Should repairs
be necessary, have the windscreen replaced
at a qualified specialist workshop.
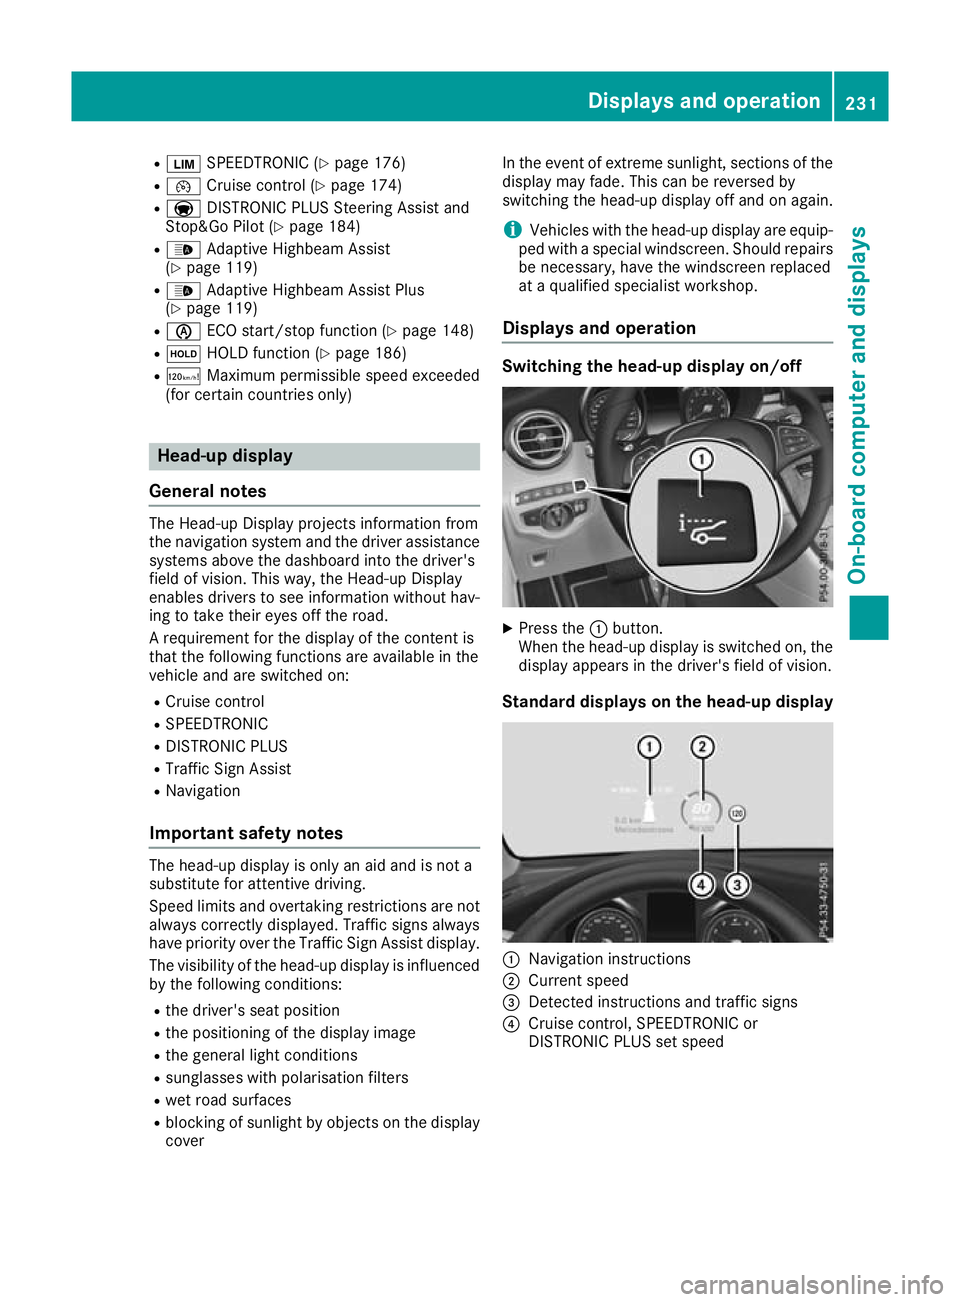
Displays and operation Switching the head-up display on/off
X
Press the :button.
When the head-up display is switched on, the display appears in the driver's field of vision.
Standard displays on the head-up display :
Navigation instructions
; Current speed
= Detected instructions and traffic signs
? Cruise control, SPEEDTRONIC or
DISTRONIC PLUS set speed Displays and operation
231On-board computer and displays Z
Page 246 of 389

X
Press :or9 to select the desired dis-
play.
X Press the abutton to confirm the selec-
tion.
You can find more information on the navigation
displays in the multimedia system (see Digital
Owner's Manual).
Information on Traffic Sign Assist displays
(Y page 208).
Setting the position
You can adjust the position of the head-up dis-
play on the windscreen. You can compensate for height differences if the seat positions are
changed, for example.
X Switch on the head-up display (Y page 231).
X Press òon the steering wheel to open the
menu list.
X Press :or9 on the steering wheel to
select the Settings
Settings menu.
X Confirm by pressing aon the steering
wheel.
X Press :or9 to select the Head-up Head-up
display
display submenu.
X Press ato confirm.
X Press :or9 to select the Position
Position
function.
X Press ato change the setting.
X Press :or9 to adjust the position to a
level from Level
Level+5
+5(up) to Level
Level -5
-5(down).
X Press aor% to save the setting.
Using the Memory function, you can save and
call up the set position of the head-up display as a preset position (Y page 113).
Adjusting the brightness
The brightness of the head-up display is auto-
matically adjusted to the surrounding light con-
ditions. You can also individually adjust the
brightness of the head-up display.
X Switch on the head-up display (Y page 231).
X Press òon the steering wheel to open the
menu list.
X Press :or9 on the steering wheel to
select the Settings
Settings menu.
X Confirm by pressing aon the steering
wheel.
X Use : or9 to select the Head-up Head-up
display
display submenu.
X Press ato confirm. X
Press :or9 to select the Brightness
Brightness
function.
X Press the abutton to change the setting.
X Press :or9 to adjust the brightness
to a level from Level
Level+5
+5(bright) to Level
Level-5
-5
(dark).
X Press the aor% button to save the
setting.
Light submenu Switching the Intelligent Light System
on/off
X Press òon the steering wheel to open the
menu list.
X Press :or9 on the steering wheel to
select the Settings
Settings menu.
X Confirm by pressing aon the steering
wheel.
X Press :or9 to select the Lights
Lights
submenu.
X Press ato confirm.
X Press :or9 to select the Intelli‐ Intelli‐
gent Light System
gent Light System function.
If the Intelligent Light System
Intelligent Light System function
has been switched on, the cone of light and
the L symbol are shown in white and yel-
low respectively in the multifunction display.
X Press the abutton to change the setting.
If you switch on the Intelligent
IntelligentLight
LightSys‐
Sys‐
tem
tem function, the following functions are activa-
ted:
R Motorway mode
R Active light function
R Cornering light function
R Extended range foglamps
If you set the dipped-beam headlamps for driv-
ing on the right/left, the multifunction display
shows the Inactive Inactive for
forleft-side
left-side traffic
traffic
or Inactive for right-side traffic
Inactive for right-side traffic dis-
play message in the Lights
Lightssubmenu instead of
the Intelligent Light System
Intelligent Light System function
(Y page 244). This display message will only
appear if the setting for driving on the left/right is set opposite to your vehicle's country version.
Further information on the Intelligent Light Sys-
tem (Y page 118). Menus and submenus
243On-board computer and displays Z
Page 300 of 389

Switching the ionisation on/off
The ionisation has a cleansing effect on the air in the vehicle interior. For further information, see (Y page 137).
X Call up the climate control menu
(Y page 296).
X To select Ionisation Ionisation: turn and press the
controller.
The setting element is active.
X To switch the ionisation on or off: turn the
controller.
X To exit the menu: press the%button.
Activating or deactivating pre-entry cli-
mate control via the key
This function is available for PLUG ‑IN HYBRID
vehicles.
Before getting in, the driver's seat area or the
whole vehicle interior is briefly warmed or ven-
tilated. The air from the vents is pre-cooled.
X Call up the climate control menu
(Y page 296).
X To select Pre-entry climate control
Pre-entry climate control
via key via key: turn and press the controller.
X To activate or deactivate: turn the control-
ler.
X To exit the menu: press the%button.
Activating or deactivating pre-entry cli-
mate control at departure time
This function is available for PLUG ‑IN HYBRID
vehicles.
The driver's seat and the vehicle interior are
heated or cooled prior to the set departure time.
X Call up the climate control menu
(Y page 296).
X To select Pre-entry climate control Pre-entry climate control
at depart. time
at depart. time: turn and press the con-
troller.
A rotary menu appears.
X To select the setting: turn the controller.
X To exit the menu: press the%button. Settings in the bottom bar of the cli-
mate control menu Activating/deactivating cooling with air
dehumidification
X Call up the climate control menu
(Y page 296).
X Slide 6the controller repeatedly until the
bottom bar is activated.
X To select O OA/C
A/C: turn and press the control-
ler.
X Switch cooling with air dehumidification on
O or off ª.
i The current status of the cooling function is
displayed in the climate control bar: A/C ON
– activated, A/C OFF – deactivated.
i Deactivating the cooling with air dehumidi-
fication function reduces fuel consumption.
Synchronising the climate control set-
tings Use O
O Sync. Sync. (synchronisation) to select the
climate control setting for all zones together O
or separately ª.
X Call up the climate control menu
(Y page 296).
X Slide 6the controller repeatedly until the
bottom bar is activated.
X To select O OSync. Sync.: turn and press the con-
troller.
X Switch the synchronisation function on Oor
off ª.
For further information on synchronising cli-
mate control settings, see (Y page 132). Navigation mode
Important safety notes G
WARNING
Operating the integrated information systems and communications equipment in the vehicle
while driving will distract you from traffic con-
ditions. You could then lose control of the
vehicle. There is a risk of an accident.
Only operate these devices if road traffic con-
ditions permit. If you are unsure about the Operating system
297Multimedia system
Z