towing MERCEDES-BENZ GLC SUV 2015 User Guide
[x] Cancel search | Manufacturer: MERCEDES-BENZ, Model Year: 2015, Model line: GLC SUV, Model: MERCEDES-BENZ GLC SUV 2015Pages: 497, PDF Size: 15.27 MB
Page 67 of 497
Important safety notes
!
Make sure that there are no objects in the
footwell or behind the seats. There is a risk that the seats and/or the objects could be
damaged when PRE-SAFE ®
is activated.
Although your vehicle is equipped with a PRE-
SAFE ®
system, the possibility of injury in the
event of an accident cannot be ruled out.
Always adapt your driving style to suit the
prevailing road and weather conditions and
maintain a safe distance from the vehicle in
front. Drive carefully.
Function PRE-SAFE
®
intervenes:
R in emergency braking situations, e.g. when
BAS is activated
R in critical driving situations, e.g. when phys-
ical limits are exceeded and the vehicle
understeers or oversteers severely
R vehicles with the Driving Assistance pack-
age: when a driver assistance system inter-
venes powerfully or the radar sensor sys-
tem detects an imminent danger of colli-
sion in certain situations
PRE-SAFE ®
takes the following measures
depending on the hazardous situation detec-
ted:
R the front seat belts are pre-tensioned.
R if the vehicle skids, the side windows and
the panorama sliding sunroof are closed.
R vehicles with the memory function for the
front-passenger seat: the front-passenger
seat is adjusted if it is in an unfavourable
position.
If the hazardous situation passes without
resulting in an accident, PRE-SAFE ®
slackens
the belt pre-tensioning. All settings made by
PRE-SAFE ®
can then be reversed. If the seat belt pre-tensioning is not reduced:
X Move the seat backrest or seat back
slightly when the vehicle is stationary.
Seat belt pre-tensioning is reduced and the
locking mechanism is released.
The seat-belt adjustment is an integral part of
the PRE-SAFE ®
convenience function. Infor-
mation about the convenience function can
be found under "Belt adjustment"
(Y page 52). PRE-SAFE
®
PLUS (anticipatory occu-
pant protection PLUS)
Introduction PRE-SAFE
®
PLUS is only available in vehicles
with the Driving Assistance package.
Using the radar sensor system, PRE-SAFE ®
PLUS is able to detect that a head-on or rear- end collision is imminent. In certain hazard-
ous situations, PRE-SAFE ®
PLUS takes pre-
emptive measures to protect the vehicle
occupants.
Important safety notes The intervention of PRE-SAFE
®
PLUS cannot
prevent an imminent collision.
The driver is not warned before the interven-
tion of PRE-SAFE ®
PLUS.
PRE-SAFE ®
PLUS does not intervene:
R if the vehicle is reversing
R when the vehicle is towing a trailer and
there is a risk of a rear-end collision
When driving, or when parking or exiting a
parking space with assistance from Active
Parking Assist, PRE-SAFE ®
PLUS will not
apply the brakes.
Function PRE-SAFE
®
PLUS intervenes in certain situa-
tions if the radar sensor system detects an
imminent head-on or rear-end collision. 64
Occupant safetySafety
Page 69 of 497
When leaving the vehicle, always take the key
with you and lock the vehicle. Never leave
children unattended in the vehicle. G
WARNING
If persons (particularly children) are exposed
to heat or cold for a prolonged period, there is a risk of serious or even fatal injuries. Never
leave persons (particularly children) unatten-
ded in the vehicle. G
WARNING
If the child restraint system is placed in direct sunlight, the parts could become very hot.
Children could be suffer burns by touching
these parts, in particular on the metallic parts
of the child restraint system. There is a risk of injury.
If you and your child leave the vehicle, always
make sure that the child restraint system is
not in direct sunlight. Cover it with a blanket, for example. If the child restraint system has
been exposed to direct sunlight, leave it to
cool down before securing the child in it.
Never leave children unattended in the vehi-
cle.
Always ensure that all vehicle occupants have their seat belts fastened correctly and are sit-
ting properly. Particular attention must be
paid to children.
Observe the safety notes on the seat belt
(Y page 49) and the information on the cor-
rect use of the seat belt (Y page 50).Child restraint system
Observe the instructions for correct use of
the child restraint system (Y page 71).
For safety reasons, Mercedes-Benz recom-
mends that you only use a child restraint sys-
tem recommended by Mercedes-Benz
(Y page 75). G
WARNING
If the child restraint system is incorrectly fit-
ted on the seat position suitable for this pur-
pose, it cannot perform its intended protec-
tive function. In the event of an accident,
sharp braking or a sudden change in direction, the child may not be held securely. There is an
increased risk of serious or even fatal injuries.
Observe the manufacturer's installation
instructions and the correct use for the child
restraint system. Make sure that the entire
surface of the child restraint system is resting
on the seat surface. Never place objects
under or behind the child restraint system,
e.g. cushions. Only use child restraint sys-
tems with the original cover designed for
them. Only replace damaged covers with gen- uine covers. G
WARNING
If the child restraint system is fitted incor-
rectly or is not secured, it can come loose in
the event of an accident, heavy braking or a
sudden change in direction. The child
restraint system could be thrown about, strik- ing vehicle occupants. There is an increased
risk of injury, possibly even fatal.
Always fit child restraint systems properly,
even if they are not being used. Make sure
that you observe the child restraint system
manufacturer's installation instructions.
You will find further information on stowing
objects, luggage and loads securely under
"Loading guidelines" (Y page 390). G
WARNING
Child restraint systems or their securing sys-
tems that have been damaged or subjected to a load in an accident cannot perform their
intended protective function. In the event of
an accident, sharp braking or a sudden
change in direction, the child may not be held securely. There is an increased risk of serious
or even fatal injuries.
Immediately replace child restraint systems
that have been damaged or subjected to a 66
Children in the vehicleSafety
Page 143 of 497
Side lamps
! If the battery has been excessively dis-
charged, the side lamps or parking lamps
are automatically switched off to enable
the next engine start. Always park your
vehicle safely and sufficiently lit according
to legal standards. Avoid the continuous
use of the Tside lamps for several
hours. If possible, switch on the Xright
or the Wleft parking lamp.
X To switch on: turn the light switch to the
T position.
The green Tindicator lamp in the instru-
ment cluster lights up.
Parking lamps
Switching on the parking lamps ensures that
the corresponding side of the vehicle is illu-
minated.
X To switch on the parking lamps: the key
should not be in the ignition lock or it
should be in position 0.
X Turn the light switch to the W(left-hand
side of the vehicle) or X(right-hand side
of the vehicle) position.
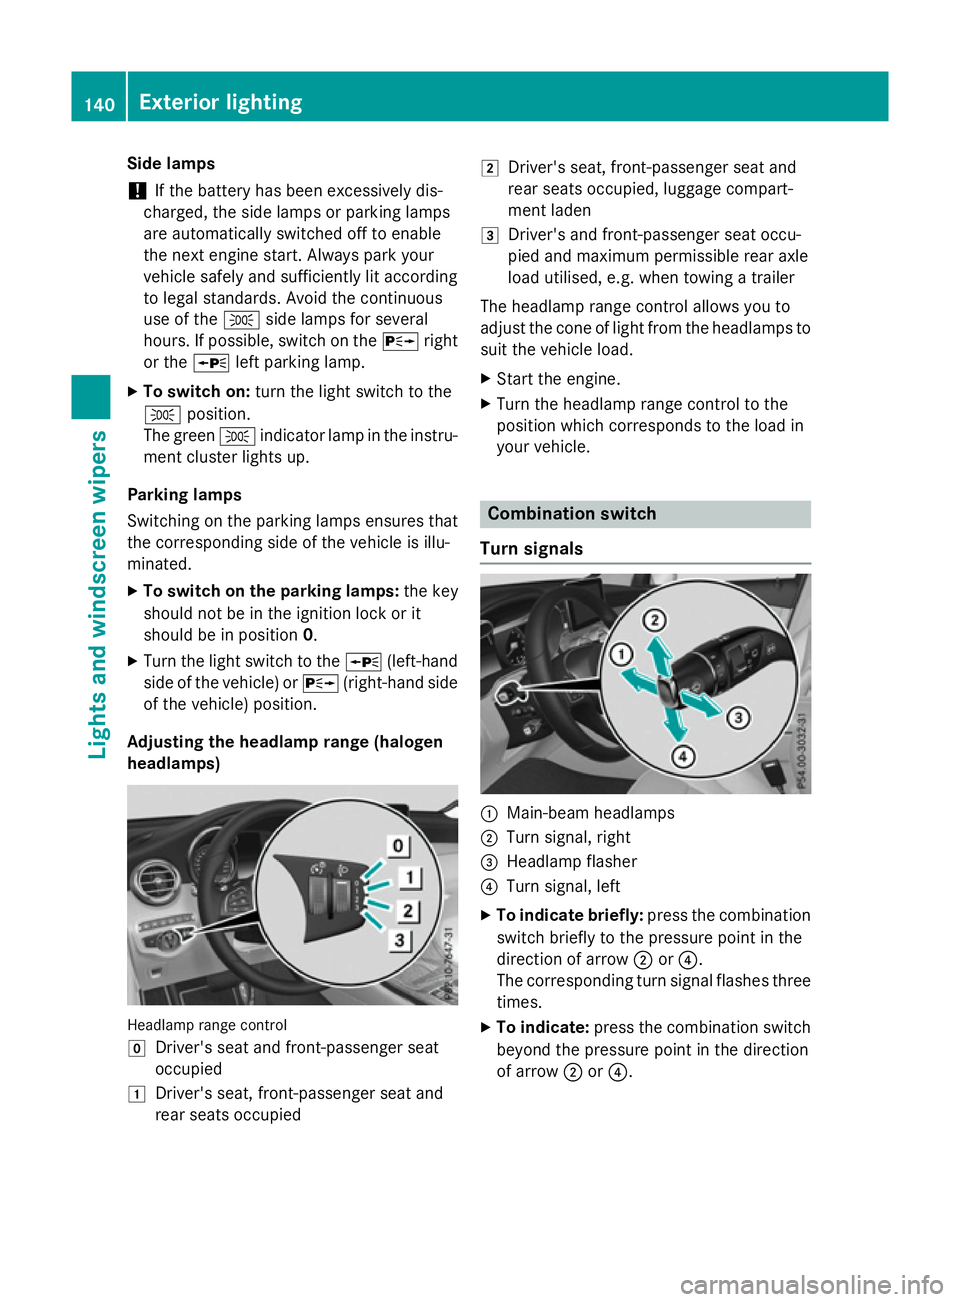
Adjusting the headlamp range (halogen
headlamps) Headlamp range control
g
Driver's seat and front-passenger seat
occupied
1 Driver's seat, front-passenger seat and
rear seats occupied 2
Driver's seat, front-passenger seat and
rear seats occupied, luggage compart-
ment laden
3 Driver's and front-passenger seat occu-
pied and maximum permissible rear axle
load utilised, e.g. when towing a trailer
The headlamp range control allows you to
adjust the cone of light from the headlamps to suit the vehicle load.
X Start the engine.
X Turn the headlamp range control to the
position which corresponds to the load in
your vehicle. Combination switch
Turn signals :
Main-beam headlamps
; Turn signal, right
= Headlamp flasher
? Turn signal, left
X To indicate briefly: press the combination
switch briefly to the pressure point in the
direction of arrow ;or?.
The corresponding turn signal flashes three
times.
X To indicate: press the combination switch
beyond the pressure point in the direction
of arrow ;or?. 140
Exterior lightingLights and windscreen wipers
Page 188 of 497
Useful information
............................186
Running-in notes ............................... 186
Driving ............................................... 186
DYNAMIC SELECT switch .................195
Automatic transmission ...................196
Refuelling ........................................... 203
Charging the high-voltage battery
(PLUG-IN HYBRID vehicles) ..............210
Parking ............................................... 219
Driving tips ........................................ 222
Driving systems ................................ 230
PLUG‑IN HYBRID operation ..............286
Towing a trailer ................................. 302 185Driving and parking
Page 201 of 497
When leaving the vehicle, always take the key
with you and lock the vehicle. Never leave
children unattended in the vehicle. Always
keep the key out of reach of children.
X If the transmission is in position Dor R:
push the DIRECT SELECT lever up or down
to the first point of resistance.
X If the transmission is in position P: depress
the brake pedal and push the DIRECT
SELECT lever up or down to the first point of resistance.
If you switch the engine off with the trans-
mission in position Ror D, the automatic
transmission shifts to Nautomatically.
With the key: if you then open the driver's
door or the front-passenger door or remove
the key from the ignition, the automatic trans-
mission shifts to Pautomatically.
With the Start/Stop button: if you then
open the driver's door or the front-passenger door, the automatic transmission shifts to P
automatically.
If you want the automatic transmission to
remain in neutral N, e.g. when having the
vehicle cleaned in an automatic car wash with a towing system:
With the key:
X Switch the ignition on.
X Depress the brake pedal and keep it
depressed.
X Shift to neutral N.
X Release the brake pedal.
X Release the electric parking brake.
X Switch off the ignition and leave the key in
the ignition lock.
With the Start/Stop button:
X Remove the Start/Stop button from the
ignition lock.
X Insert the key into the ignition lock.
X Switch the ignition on.
X Depress the brake pedal and keep it
depressed. X
Shift to neutral N.
X Release the brake pedal.
X Release the electric parking brake.
X Switch off the ignition and leave the key in
the ignition lock.
Engaging drive position D X
If the transmission is in position Ror N:
push the DIRECT SELECT lever down past
the first point of resistance.
X If the transmission is in position P: depress
the brake pedal and push the DIRECT
SELECT lever down past the first point of
resistance. Transmission position and drive pro-
gram display
The current transmission position and drive
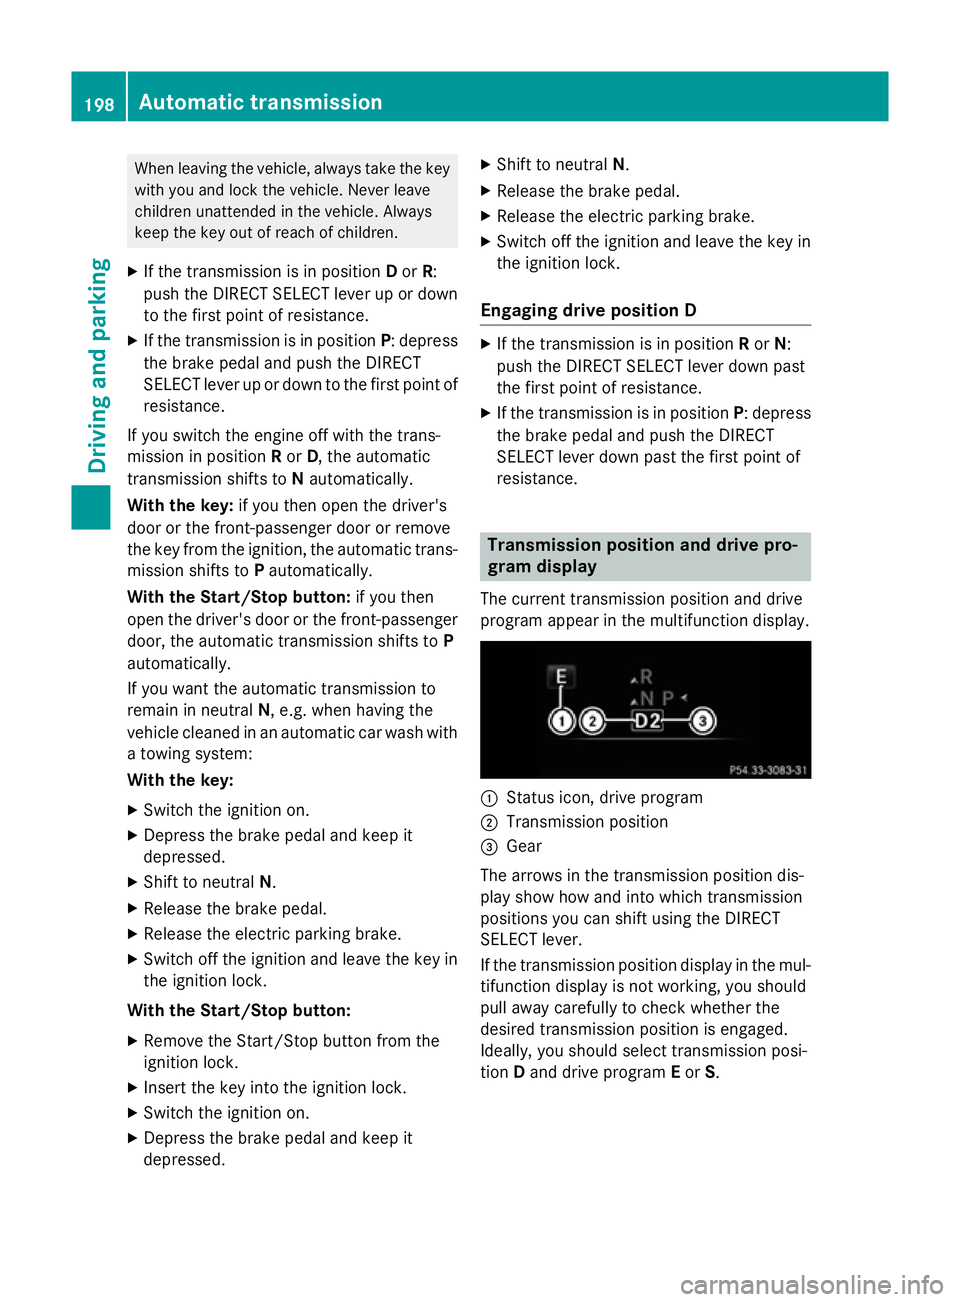
program appear in the multifunction display. :
Status icon, drive program
; Transmission position
= Gear
The arrows in the transmission position dis-
play show how and into which transmission
positions you can shift using the DIRECT
SELECT lever.
If the transmission position display in the mul-
tifunction display is not working, you should
pull away carefully to check whether the
desired transmission position is engaged.
Ideally, you should select transmission posi-
tion Dand drive program Eor S. 198
Automatic transmissionDriving and parking
Page 203 of 497
Double-clutch function
When shifting down, the double-clutch func-
tion is active regardless of the currently selec-
ted drive program. The double-clutch function reduces load change reactions and is condu-cive to a sporty driving style. The sound gen-
erated by the double-clutch function depends
on the drive program selected.
Kickdown Use kickdown for maximum acceleration:
X Depress the accelerator pedal beyond the
pressure point.
The transmission shifts to a lower gear
depending on the engine speed.
X Ease off the accelerator pedal once the
desired speed is reached.
The automatic transmission shifts back up.
Rocking the vehicle free Rocking the vehicle free by shifting the trans-
mission repeatedly between transmission
positions Dand Rmay help to free the vehicle
if it has become stuck in mud or snow.
The vehicle's engine management restricts
repeated shifting between transmission posi- tions Dand Rup to a maximum speed of
9 km/h.
To shift back and forth between transmission
positions Dand R, move the DIRECT SELECT
lever up and down past the point of resist-
ance.
Towing a trailer Towing a trailer is not possible with all mod-
els. For further information, see
(Y page 303).
X Drive in the middle of the engine speed
range on uphill gradients.
X Manual shifting: depending on the uphill
or downhill gradient, shift into a gear
(Y page 201) in which the engine will run in
the middle of the engine speed range. This also applies if cruise control,
DISTRONIC PLUS or SPEEDTRONIC are
activated. Drive programs
Drive program I (Individual) In drive program
Ithe following properties of
the drive program can be selected:
R the drive (engine and transmission man-
agement)
R the suspension
R the steering
R the availability of the ECO start/stop func-
tion
R the climate control
i To permanently select the gears in drive
program Iusing the steering wheel pad-
dles, select the M(manual) setting for the
drive.
Drive program S+ (Sport Plus) Drive program
S+is characterised by the fol-
lowing:
R the vehicle exhibits particularly sporty driv-
ing characteristics.
R the vehicle pulling away in first gear.
R the automatic transmission shifting up
later.
R As a result of the later automatic transmis-
sion shift points, the fuel consumption pos-sibly being higher.
R the suspension exhibits particularly stiff
springing and damping settings (vehicles
with AIR BODY CONTROL)
R the ECO start/stop function is not availa-
ble. 200
Automatic transmissionDriving and pa
rking
Page 216 of 497
Reset the building's circuit breaker. Other-
wise, the charging process cannot be contin- ued.
General information on the charging
process Observe the "Important safety notes"
(Y page 210).
The vehicle socket is located in the rear
bumper on the right below the tail lamp.
The charge socket flap and the vehicle are
centrally locked or unlocked simultaneously. Charging the high-voltage battery via
the mains socket
Charging cable for mains sockets Important safety notes
! Only use the charging cable to charge the
high-voltage battery. Do not use the charg-
ing cable for other purposes. It may other-
wise be damaged.
The vehicle is supplied with a charging cable
for connection to a mains socket. Only use
the charging cable supplied with the vehicle
or a charging cable approved for the vehicle.
i The charging process can vary depending
on the mains power supply. Therefore,
always observe the local information.
i For short charge times (charging with 16
A), connect the fast-charging cable to the
wallbox or charging station. You can also
use the optionally available charging cable
with the CE plug.
Information about charging from a wallbox
can be found at (Y page 216).
Information about charging at a charging sta-
tion can be found at (Y page 217).
Stowing the charging cable
The charging cable can be stowed in the bag
supplied in the luggage compartment of the vehicle and held in place with the Velcro fas-
tener.
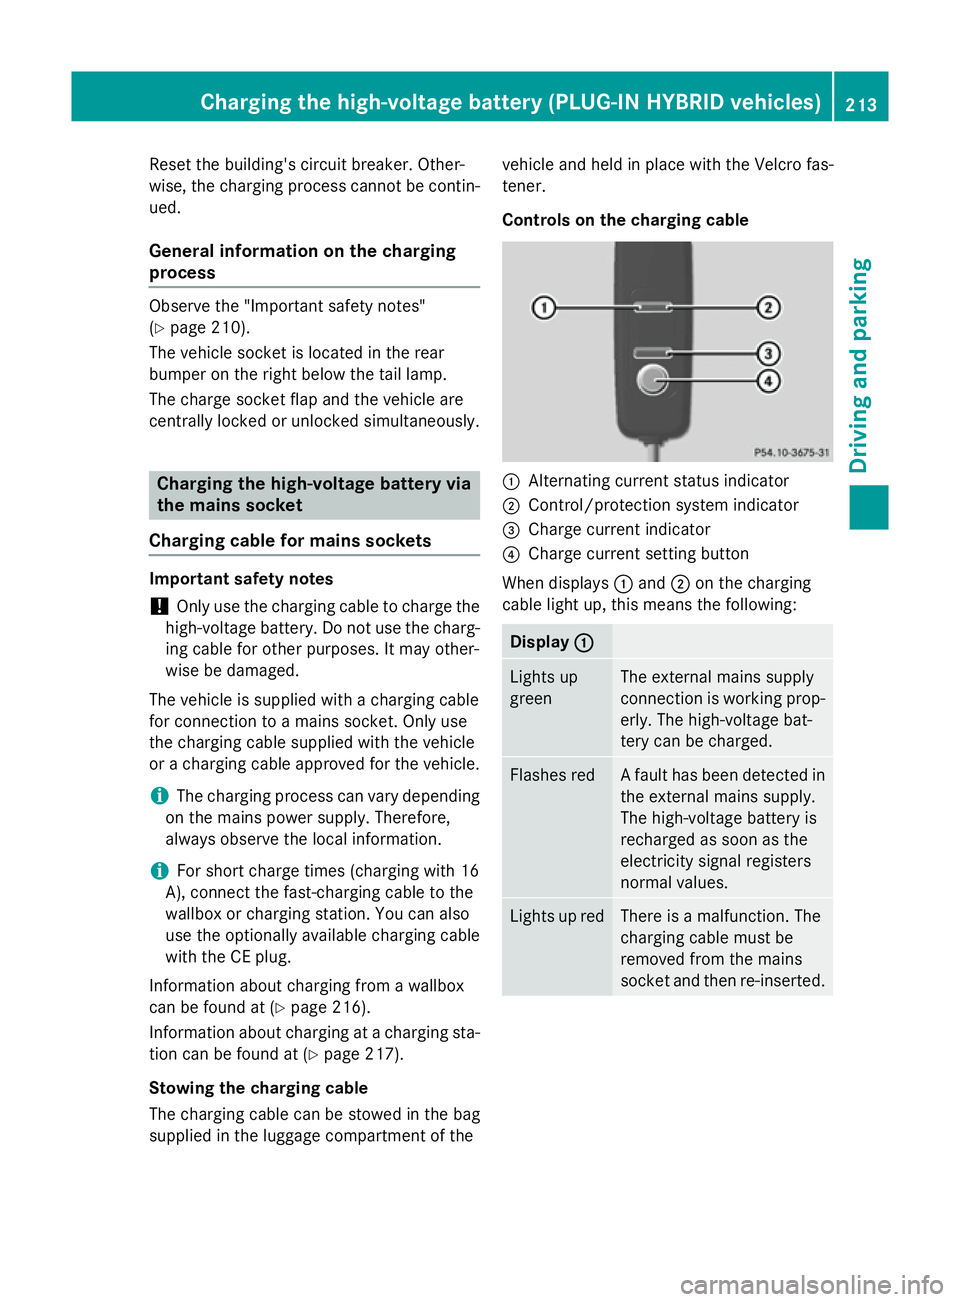
Controls on the charging cable
:
Alternating current status indicator
; Control/protection system indicator
= Charge current indicator
? Charge current setting button
When displays :and ;on the charging
cable light up, this means the following: Display
:
: Lights up
green The external mains supply
connection is working prop-
erly. The high-voltage bat-
tery can be charged. Flashes red A fault has been detected in
the external mains supply.
The high-voltage battery is
recharged as soon as the
electricity signal registers
normal values. Lights up red There is a malfunction. The
charging cable must be
removed from the mains
socket and then re-inserted.Cha
rging the high-voltage battery (PLUG-IN HYBRI D vehicles)
213Driving and parking Z
Page 223 of 497
Switching off the engine
Important safety notes G
WARNING
The automatic transmission switches to neu-
tral position Nwhen you switch off the engine.
The vehicle may roll away. There is a risk of an
accident.
After switching off the engine, always switch
to parking position P. Prevent the parked vehi-
cle from rolling away by applying the parking
brake.
Vehicles with automatic transmission X
Apply the electric parking brake.
X Shift the transmission to position P.
X With the key: turn the key to position 0in
the ignition lock and remove it.
The immobiliser is activated.
X With the Start/Stop button: press the
Start/Stop button (Y page 187).
The engine stops and all the indicator
lamps in the instrument cluster go out.
When the driver's door is closed, this cor-
responds to key position 1. When the driv-
er's door is open, this corresponds to key
position 0: "key removed".
If you switch the engine off with the trans-
mission in position Ror D, the automatic
transmission shifts to Nautomatically.
With the key: if you then open the driver's
door or the front-passenger door or remove
the key from the ignition, the automatic trans- mission shifts to Pautomatically.
With the Start/Stop button: if you then
open the driver's door or the front-passenger
door, the automatic transmission shifts to P
automatically.
If you want the automatic transmission to
remain in neutral N, e.g. when having the
vehicle cleaned in an automatic car wash with a towing system: With the key:
X Switch the ignition on.
X Depress the brake pedal and keep it
depressed.
X Shift to neutral N.
X Release the brake pedal.
X Release the electric parking brake.
X Switch off the ignition and leave the key in
the ignition lock.
With the Start/Stop button:
X Switch the ignition on.
X Depress the brake pedal and keep it
depressed.
X Remove the Start/Stop button from the
ignition lock.
X Insert the key into the ignition lock.
X Shift to neutral N.
X Release the brake pedal.
X Release the electric parking brake.
X Switch off the ignition and leave the key in
the ignition lock.
The engine can be switched off while the vehi-
cle is in motion by pressing and holding the
Start/Stop button for about three seconds.
This function operates independently of the
ECO start/stop automatic engine switch-off
function. Electric parking brake
General notes G
WARNING
If you leave children unattended in the vehi-
cle, they may be able to set the vehicle in
motion if, for example, they:
R release the parking brake
R shift the automatic transmission out of park
position P
R start the engine 220
ParkingDriving and parking
Page 227 of 497
time, the driver has adopted the most eco-
nomical driving style for the selected settings
and prevailing conditions. The ECO display
border lights up.
The ECO display does not indicate the actual fuel consumption. The additionally achieved
range displayed under Bonus fr. start
Bonus fr. start
does not indicate a fixed consumption reduc-
tion.
In addition to driving style, the actual con-
sumption is affected by other factors, such
as:
R load
R tyre pressure
R cold start
R choice of route
R the use of electrical consumers
These factors are not included in the ECO dis-
play.
An economical driving style involves driving at a moderate engine speed.
To achieve a higher value in the categories
"acceleration" and "smooth driving":
R observe the gearshift recommendation
R drive the vehicle in drive program E
On long journeys at a constant speed, e.g. on the motorway, only the outer area for "con-
stant" will change.
The ECO display summarises the driving style
from the start of the journey to its completion. Therefore, there are more marked changes in
the outer areas at the start of a journey. Dur- ing a prolonged driving time, these changes
are smaller. For more marked changes, per-
form a manual reset (Y page 319).
Further information on the ECO display
(Y page 318). Brakes
Important safety notes G
WARNING
If you shift down on a slippery road surface in an attempt to increase the engine's braking
effect, the drive wheels could lose their grip.
This increases the risk of skidding and having
an accident.
Do not shift down for additional engine brak-
ing on a slippery road surface.
Downhill gradients Change into a lower gear in good time on long
and steep downhill gradients. Take particular note of this when driving a laden vehicle and
when towing a trailer.
This also applies if cruise control, DISTRONIC
PLUS or SPEEDTRONIC are activated.
This will use the braking effect of the engine,
so less braking will be required to maintain
vehicle speed. This relieves the load on the
brake system and prevents the brakes from
overheating and wearing too quickly.
Heavy and light loads G
WARNING
The braking system can overheat if you leave your foot on the brake pedal while driving.
This increases the braking distance and could
even cause the braking system to fail. There is
a risk of an accident.
Never use the brake pedal as a footrest. Do
not simultaneously depress both the brake
pedal and the accelerator pedal while driving.
! Depressing the brake pedal constantly
results in excessive and premature wear to
the brake pads.
If heavy demands are made on the brakes, do not park the vehicle immediately. Drive on for
a short while. This allows the airflow to cool
the brakes more quickly. 224
Driving
tipsDriving an d parking
Page 233 of 497
Hill start assist will aid you when pulling away
on a hill. For further information about hill
start assist, see (Y page 191).
Do not shift into transmission position N
when driving off-road. You could lose control
of the vehicle if you attempt to brake the
vehicle using the service brake. If the gradient
is too steep for your vehicle, back up in
reverse gear.
Always observe the approach/departure
angle values (Y page 489).
Maximum gradient-climbing capability Always observe the maximum gradient climb-
ing ability values (Y page 489).
Hilltops When driving up an uphill gradient, slightly
reduce pressure on the accelerator immedi-
ately before reaching the brow of the hill.
Make use of the vehicle's own impetus to
travel over the brow.
This style of driving prevents:
R the vehicle from lifting off the ground on the
brow of a hill
R the vehicle from travelling too quickly down
the other side
Driving downhill R
Drive slowly.
R Do not drive at an angle down steep
inclines. Steer into the line of fall and drive with the front wheels aligned straight. Oth-erwise, the vehicle could slip sideways, tip
and overturn.
R Before tackling steep downhill gradients,
use the left-hand steering wheel gearshift
paddle to shift to a lower gear.
R Activate DSR. If this is not sufficient, brake
gently. When doing so, make sure that the
vehicle is facing in the direction of the line
of fall.
R Check that the brakes are working normally
after a long downhill stretch. Off-road ABS is activated when the off-road
program is selected.
At speeds below 30 km/h the front wheels
lock cyclically during braking. The digging-in
effect achieved in the process reduces the
stopping distance when driving off-road. The
steerability of the vehicle is considerably
reduced if the wheels lock.
Driving systems
Mercedes-Benz Intelligent Drive
Mercedes-Benz Intelligent Drive stands for
innovative driver assistance and safety sys-
tems which enhance comfort and support the
driver in critical situations. With these intelli-
gent co-ordinated systems Mercedes-Benz
has set a milestone on the path towards
autonomous driving.
Mercedes-Benz Intelligent Drive embraces all elements of active and passive safety in one
well thought-out system – for the safety of the vehicle occupants and that of other road
users.
Further information on driving safety systems (Y page 78). Cruise control
General notes Cruise control maintains a constant road
speed for you. It brakes automatically in order to avoid exceeding the set speed. Change into
a lower gear in good time on long and steep
downhill gradients. Take particular note of
this when driving a laden vehicle and when
towing a trailer. By doing so, you will make
use of the braking effect of the engine. This
relieves the load on the brake system and
prevents the brakes from overheating and
wearing too quickly.
Use cruise control only if road and traffic con- ditions are appropriate for maintaining a
steady speed for a prolonged period. You canstore any road speed above 30 km/h. 230
Driving systemsDriving and parking