start stop button MERCEDES-BENZ GLC SUV 2018 Owner's Manual
[x] Cancel search | Manufacturer: MERCEDES-BENZ, Model Year: 2018, Model line: GLC SUV, Model: MERCEDES-BENZ GLC SUV 2018Pages: 390, PDF Size: 6.54 MB
Page 13 of 390
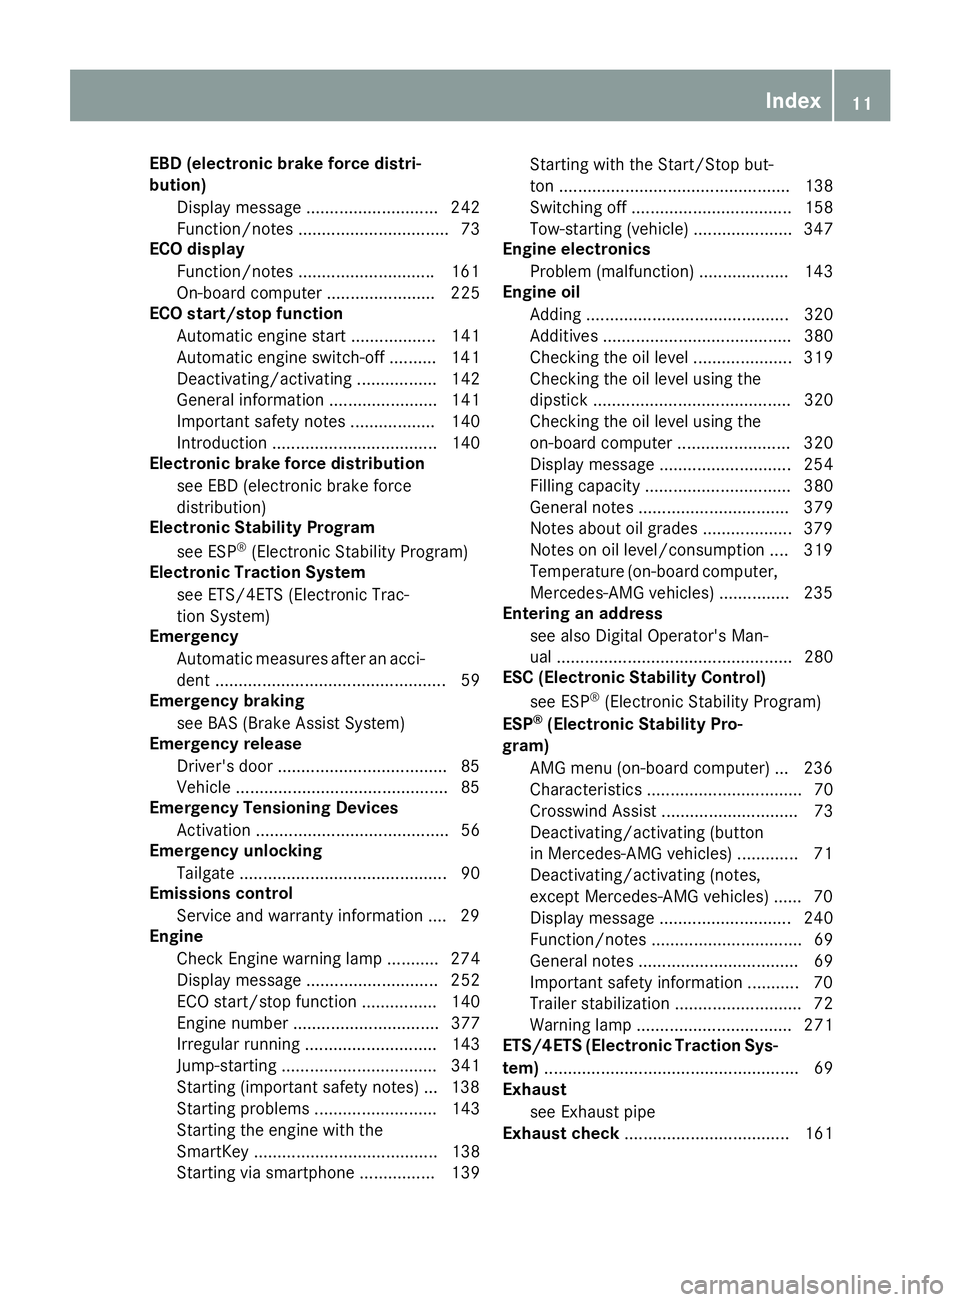
EBD (electronic brake force distri-
bution)Display message ............................ 242
Function/notes ................................ 73
ECO display
Function/notes ............................ .161
On-board computer ....................... 225
ECO start/stop function
Automatic engine start .................. 141
Automatic engine switch-off .......... 141
Deactivating/activating ................. 142
General information ....................... 141
Important safety notes .................. 140
Introduction ................................... 140
Electronic brake force distribution
see EBD (electronic brake force
distribution)
Electronic Stability Program
see ESP
®(Electronic Stability Program)
Electronic Traction System
see ETS/4ETS (Electronic Trac-
tion System)
Emergency
Automatic measures after an acci-
dent ................................................. 59
Emergency braking
see BAS (Brake Assist System)
Emergency release
Driver's door ....................................8 5
Vehicle .............................................8 5
Emergency Tensioning Devices
Activation ......................................... 56
Emergency unlocking
Tailgate ............................................ 90
Emissions control
Service and warranty information .... 29
Engine
Check Engine warning lamp ........... 274
Display message ............................ 252
ECO start/stop function ................ 140
Engine number ............................... 377
Irregular running ............................ 143
Jump-starting ................................. 341
Starting (important safety notes) ... 138
Starting problems .......................... 143
Starting the engine with the
SmartKey ....................................... 138
Starting via smartphone ................ 139 Starting with the Start/Stop but-
ton ................................................. 138
Switching off .................................. 158
Tow-starting (vehicle) ..................... 347
Engine el ectro
nics
Problem (malfunction) ................... 143
Engine oil
Adding ........................................... 320
Additives ........................................ 380
Checking the oil level ..................... 319
Checking the oil level using the
dipstick .......................................... 320
Checking the oil level using the
on-board computer ........................ 320
Display message ............................ 254
Filling capacity ............................... 380
General notes ................................ 379
Notes about oil grades ................... 379
Notes on oil level/consumption .... 319
Temperature (on-board computer,
Mercedes-AMG vehicles) ............... 235
Entering an address
see also Digital Operator's Man-
ual .................................................. 280
ESC (Electronic Stability Control)
see ESP
®(Electronic Stability Program)
ESP®(Electronic Stability Pro-
gram)
AMG menu (on-board computer) ... 236
Characteristics ................................. 70
Crosswind Assist ............................. 73
Deactivating/activating (button
in Mercedes-AMG vehicles) ............. 71
Deactivating/activating (notes,
except Mercedes-AMG vehicles) ...... 70
Display message ............................ 240
Function/notes ................................ 69
General notes .................................. 69
Important safety information ........... 70
Trailer stabilization ........................... 72
Warning lamp ................................. 271
ETS/4ETS (Electronic Traction Sys-
tem) ...................................................... 69
Exhaust
see Exhaust pipe
Exhaust check ................................... 161
Index11
Page 15 of 390

HANDS-FREE ACCESS..........................88
Handwriting recognition
Switching text reader function
on/off ............................................ 283
Touchpad ....................................... 282
Hazard warning lamps ...................... 114
Head restraints
Adjusting (electrically) ................... 102
Adjusting (manually) ...................... 102
Adjusting (rear) .............................. 102
Adjusting the fore-and-aft posi-
tion manually ................................. 102
General notes ................................ 102
Important safety notes .................. 101
Installing/removing (rear) .............. 103
Head-up display
Adjusting the brightness ................2 34
Displays and operating .................. 223
Function/notes .............................2 23
Important safety notes .................. 223
Selecting displays .......................... 233
Setting the position ....................... 234
Storing settings (memory func-
tion) ............................................... 110
Switching on or off ......................... 223
Headlamps
Display message ............................ 251
Fogging up ..................................... 115
see Automatic headlamp mode
Heating
see Climate control
High beam flasher .............................1 13
High-beam headlamps
Adaptive Highbeam Assist ............. 114
Display message ............................ 251
Replacing bulbs .............................1 18
Switching on/off ........................... 113
Hill start assist .................................. 140
HOLD function
Activating ....................................... 179
Activation conditions ..................... 179
Deactivating ................................... 179
Display message ............................ 259
Function/notes .............................1 78
General notes ................................ 178
Home address
see also Digital Operator's Man-
ual ..................................................2 80Hood
Closing ...........................................3 19
Display message ............................ 266
Important safety notes .................. 318
Opening ......................................... 318
Ho
rn ...................................................... 36
HUD
see Head-up display
Hydroplaning ..................................... 164
I
Ignition lock
see Key positions
Immobilizer .......................................... 76
Indicator lamps
see Warning and indicator lamps
Indicators
see Turn signals
Insect protection on the radiator .... 319
Instrument cluster
Overview .......................................... 37
Warning and indicator lamps ........... 37
Instrument cluster lighting .............. 220
Interior lighting
Automatic control .......................... 116
Control ...........................................1 16
Overview ........................................ 116
Reading lamp ................................. 116
iPod
®
see also Digital Operator's Man-
ual ..................................................2 80
J
Jack
Using ............................................. 370
Jump starting (engine) ......................341
K
Key positions
SmartKey ....................................... 136
Start/Stop button .......................... 137
KEYLESS-GO
Activating ......................................... 79
Convenience closing feature ............ 93
Deactivation ..................................... 79
Locking ............................................ 79
Index13
Page 23 of 390
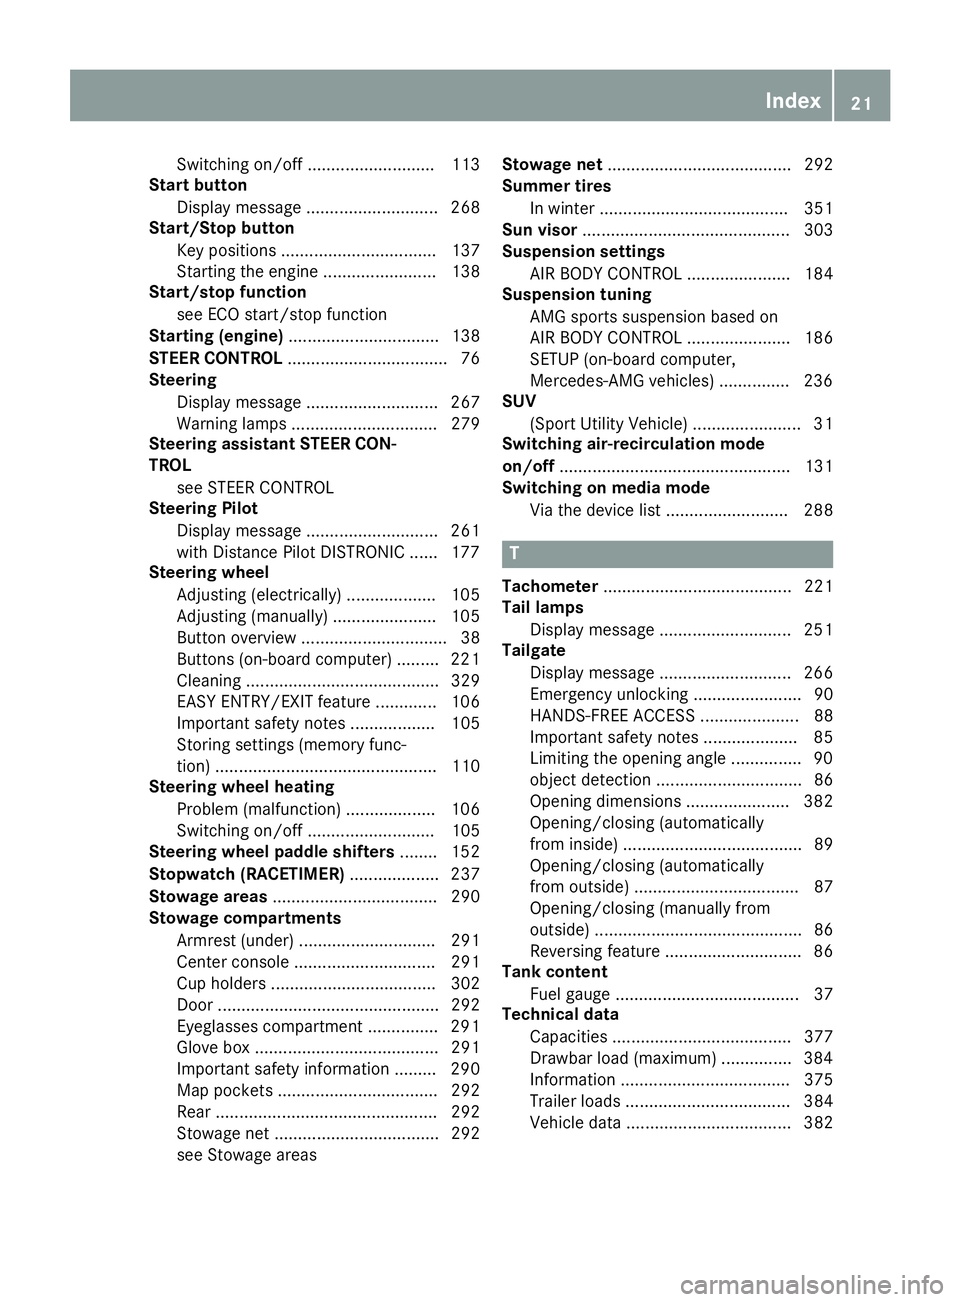
Switching on/off ........................... 113
Start button
Display message ............................ 268
Start/Stop button
Key positions ................................. 137
Starting the engine ........................ 138
Start/stop function
see ECO start/stop function
Starting (engine) ................................ 138
STEER CONTROL .................................. 76
Steering
Display message ............................ 267
Warning lamps ............................... 279
Steering assistant STEER CON-
TROL
see STEER CONTROL
Steering Pilot
Display message ............................ 261
with Distance Pilot DISTRONIC ...... 177
Steering wheel
Adjusting (electrically) ................... 105
Adjusting (manually) ...................... 105
Button overview ............................... 38
Buttons (on-board computer) ......... 221
Cleaning ......................................... 329
EASY ENTRY/EXIT feature ............. 106
Important safety notes .................. 105
Storing settings (memory func-
tion) ............................................... 110
Steering wheel heating
Problem (malfunction) ................... 106
Switching on/off ........................... 105
Steering wheel paddle shifters ........ 152
Stopwatch (RACETIMER) ................... 237
Stowage areas ................................... 290
Stowage compartments
Armrest (under) ............................. 291
Center console .............................. 291
Cup holders ................................... 302
Door ............................................... 292
Eyeglasses compartment ............... 291
Glove box ....................................... 291
Important safety information ......... 290
Map pockets .................................. 292
Rear ............................................... 292
Stowage net ................................... 292
see Stowage areas Stowage net
....................................... 292
Summer tires
In winter ........................................ 351
Sun visor ............................................ 303
Suspension settings
AIR BODY CONTROL ...................... 184
Suspension tuning
AMG sports suspension based on
AIR BODY CONTROL ...................... 186
SETUP (on-board computer,
Mercedes-AMG vehicles) ............... 236
SUV
(Sport Utility Vehicle) ....................... 31
Switc hing ai
r-recirculation mode
on/off ................................................. 131
Switching on media mode
Via the device list .......................... 288
T
Tachometer ........................................ 221
Tail lamps
Display message ............................ 251
Tailgate
Display message ............................ 266
Emergency unlocking ....................... 90
HANDS-FREE ACCESS ..................... 88
Important safety notes .................... 85
Limiting the opening angle ............... 90
object detection ............................... 86
Opening dimensions ...................... 382
Opening/closing (automatically
from inside) ...................................... 89
Opening/closing (automatically
from outside) ................................... 87
Opening/closing (manually from
outside) ............................................ 86
Reversing feature ............................. 86
Tank content
Fuel gauge ....................................... 37
Technical data
Capacities ...................................... 377
Drawbar load (maximum) ............... 384
Information .................................... 375
Trailer loads ................................... 384
Vehicle data ................................... 382
Index21
Page 38 of 390
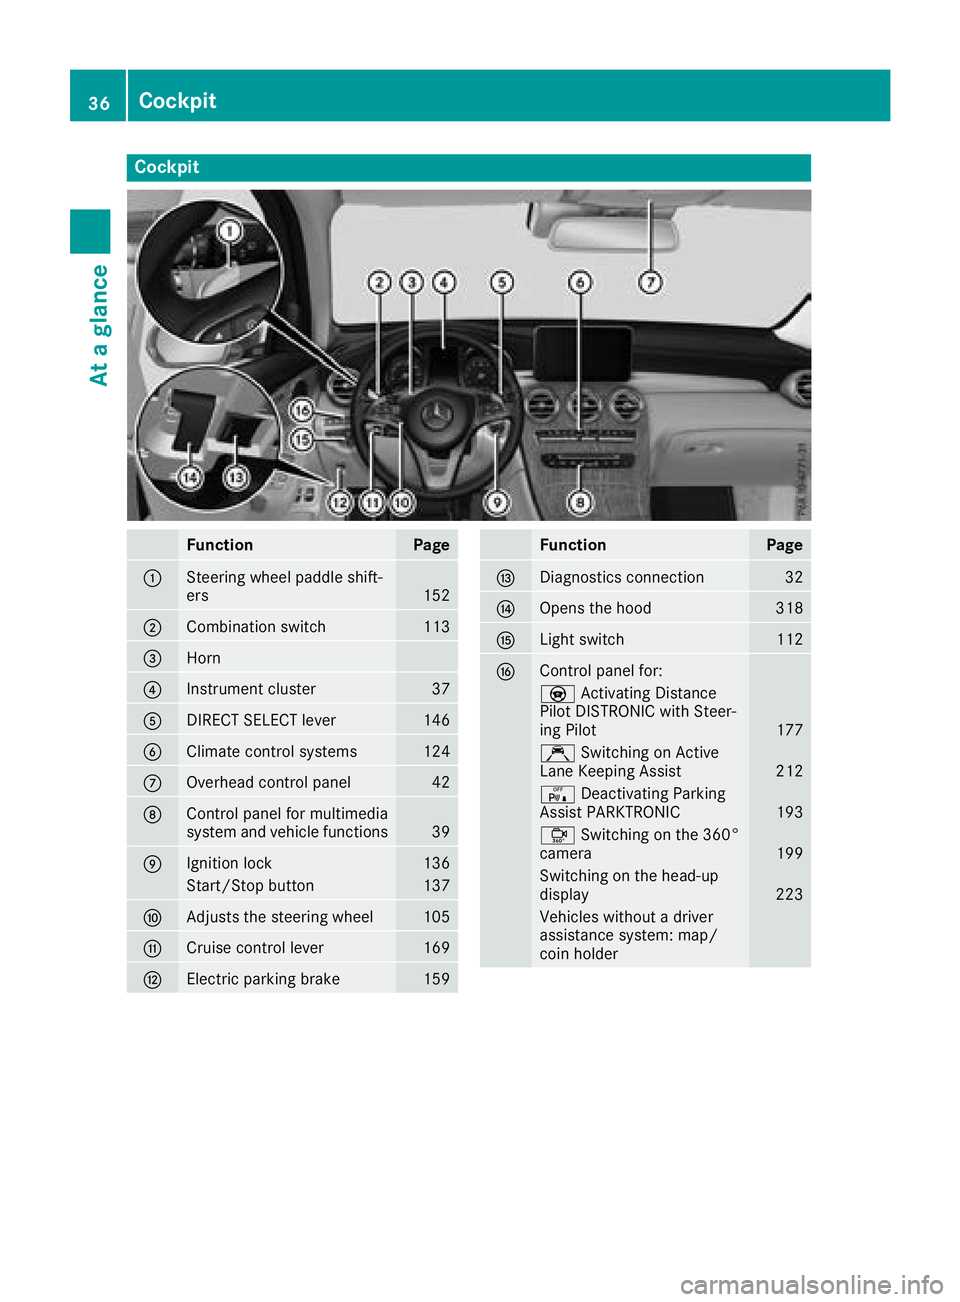
Cockpit
FunctionPage
:Steering wheel paddle shift-
ers152
;Combination switch113
=Horn
?Instrument cluster37
ADIRECT SELECT lever146
BClimate control systems124
COverhead control panel42
DControl panel for multimedia
system and vehicle functions39
EIgnition lock136
Start/Stop button137
FAdjusts the steering wheel105
GCruise control lever169
HElectric parking brake159
FunctionPage
IDiagnostics connection32
JOpens the hood318
KLight switch112
LControl panel for:
YActivating Distance
Pilot DISTRONIC with Steer-
ing Pilot
177
Ç Switching on Active
Lane Keeping Assist212
c Deactivating Parking
Assist PARKTRONIC193
Ô Switching on the 360°
camera199
Switching on the head-up
display223
Vehicles without a driver
assistance system: map/
coin holder
36Cockpit
At a glance
Page 42 of 390
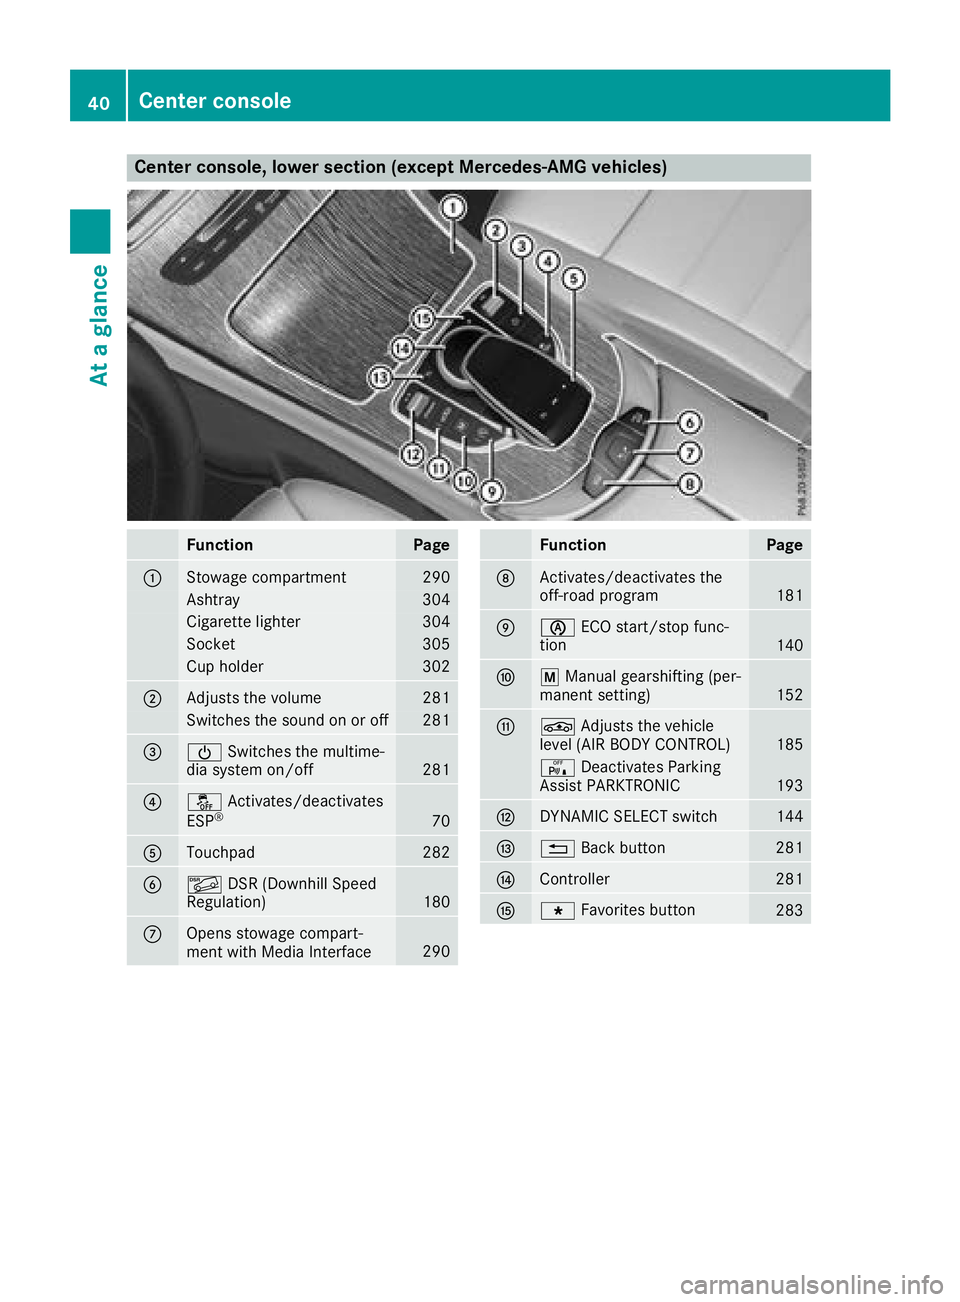
Center console, lower section (except Mercedes-AMG vehicles)
FunctionPage
:Stowage compartment290
Ashtray304
Cigarette lighter304
Socket305
Cup holder302
;Adjusts the volume281
Switches the sound on or off281
=ÜSwitches the multime-
dia system on/off281
?å Activates/deactivates
ESP®70
ATouchpad282
BÃ DSR (Downhill Speed
Regulation)180
COpens stowage compart-
ment with Media Interface290
FunctionPage
DActivates/deactivates the
off-road program181
Eè ECO start/stop func-
tion140
Fp Manual gearshifting (per-
manent setting)152
GÉ Adjusts the vehicle
level (AIR BODY CONTROL)185
c Deactivates Parking
Assist PARKTRONIC193
HDYNAMIC SELECT switch144
I% Back button281
JController281
KgFavorites button283
40Center console
At a glance
Page 43 of 390
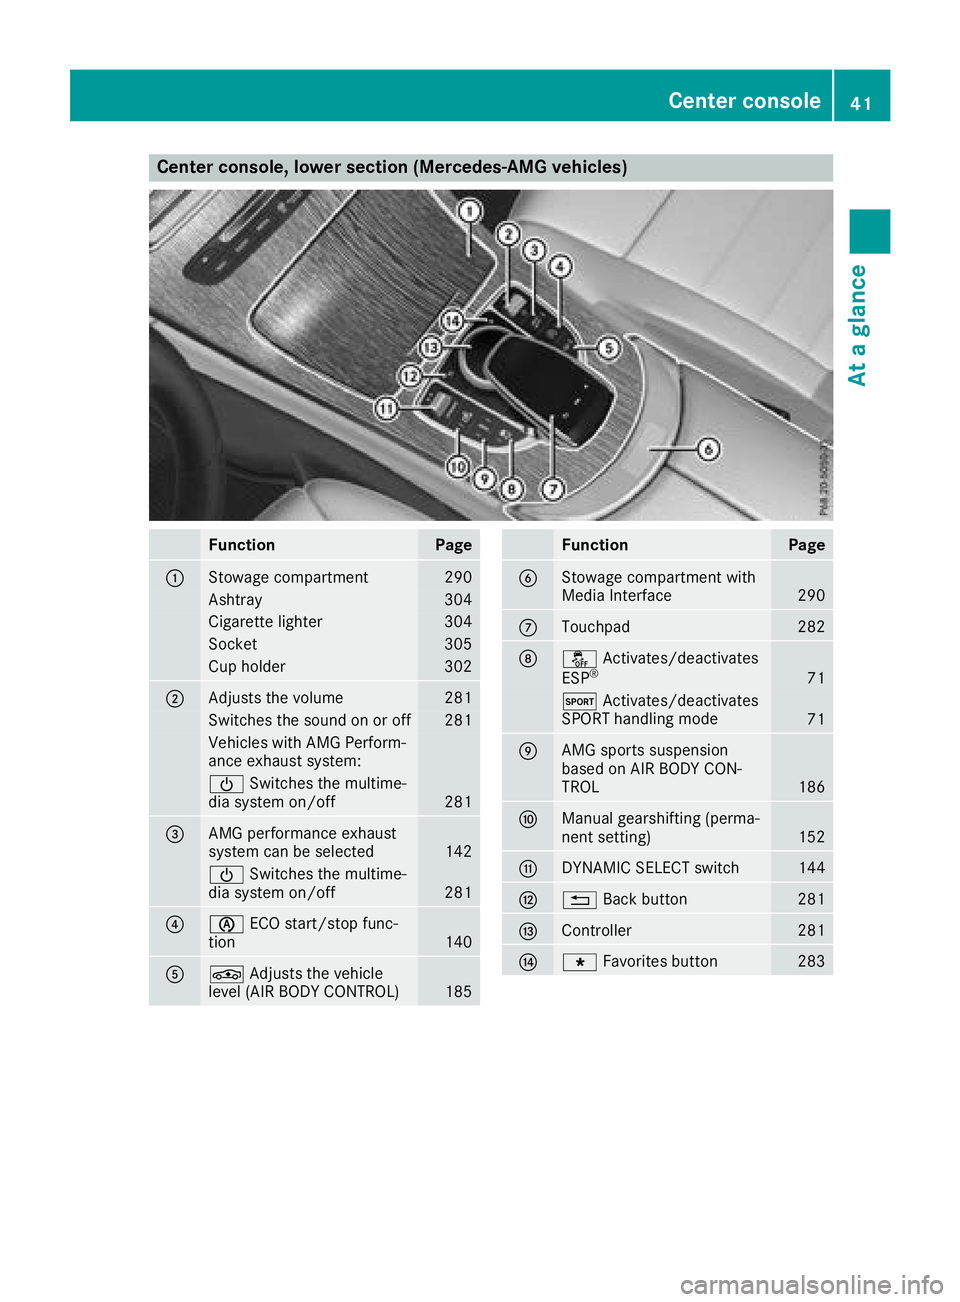
Center console, lower section (Mercedes-AMG vehicles)
FunctionPage
:Stowage compartment290
Ashtray304
Cigarette lighter304
Socket305
Cup holder302
;Adjusts the volume281
Switches the sound on or off281
Vehicles with AMG Perform-
ance exhaust system:
ÜSwitches the multime-
dia system on/off281
=AMG performance exhaust
system can be selected142
Ü Switches the multime-
dia system on/off281
?è ECO start/stop func-
tion140
AÉ Adjusts the vehicle
level (AIR BODY CONTROL)185
FunctionPage
BStowage compartment with
Media Interface290
CTouchpad282
Då Activates/deactivates
ESP®71
M Activates/deactivates
SPORT handling mode71
EAMG sports suspension
based on AIR BODY CON-
TROL
186
FManual gearshifting (perma-
nent setting)152
GDYNAMIC SELECT switch144
H% Back button281
IController281
JgFavorites button283
Center console41
At a glance
Page 46 of 390
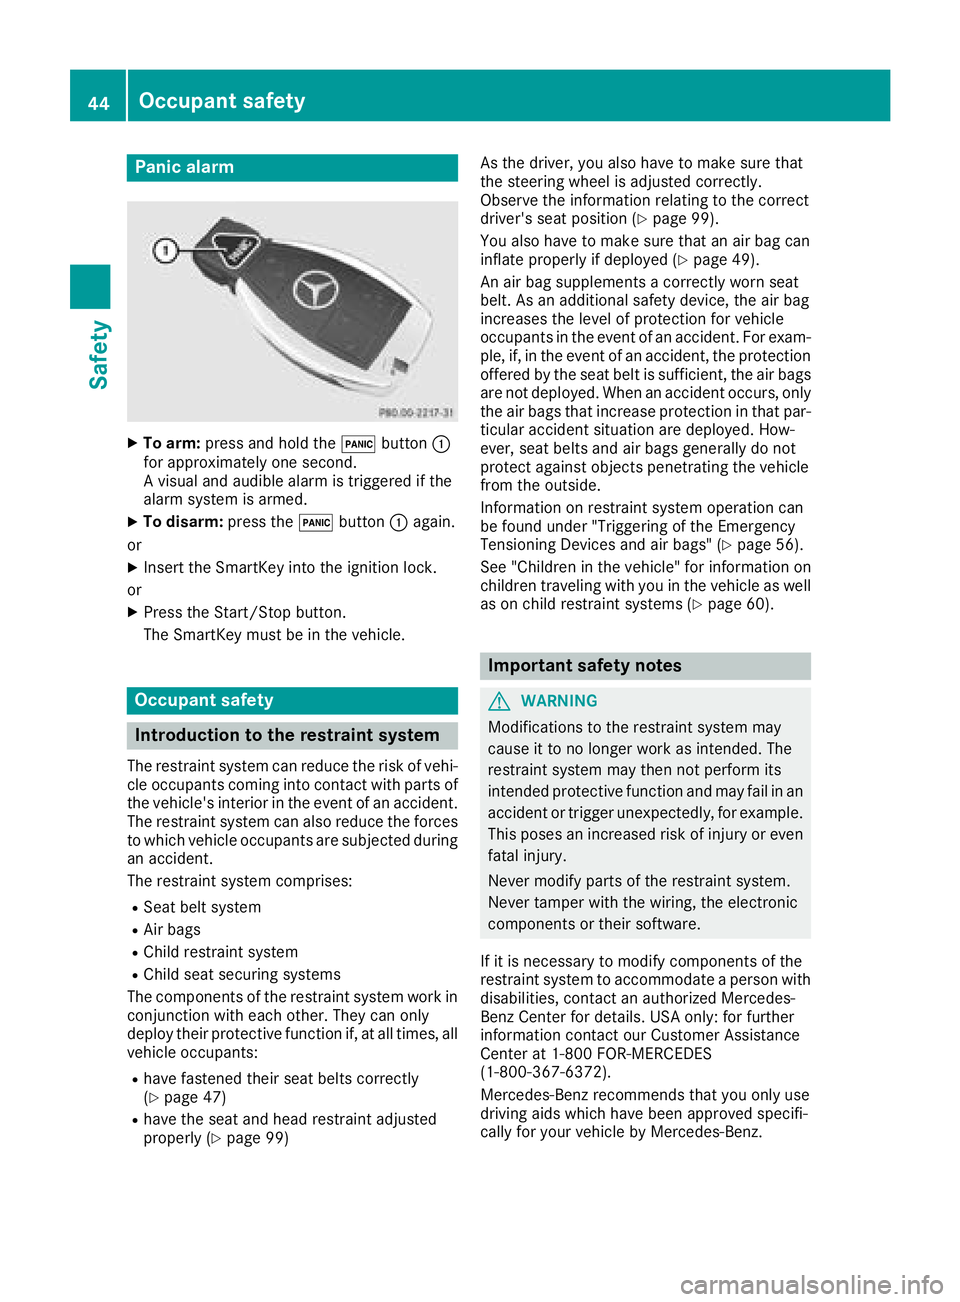
Panic alarm
XTo arm:press and hold the !button :
for approximately one second.
A visual and audible alarm is triggered if the
alarm system is armed.
XTo disarm: press the!button :again.
or
XInsert the SmartKey into the ignition lock.
or
XPress the Start/Stop button.
The SmartKey must be in the vehicle.
Occupant safety
Introduction to the restraint system
The restraint system can reduce the risk of vehi- cle occupants coming into contact with parts of
the vehicle's interior in the event of an accident.
The restraint system can also reduce the forces to which vehicle occupants are subjected during
an accident.
The restraint system comprises:
RSeat belt system
RAir bags
RChild restraint system
RChild seat securing systems
The components of the restraint system work in
conjunction with each other. They can only
deploy their protective function if, at all times, all
vehicle occupants:
Rhave fastened their seat belts correctly
(Ypage 47)
Rhave the seat and head restraint adjusted
properly (Ypage 99) As the driver, you also have to make sure that
the steering wheel is adjusted correctly.
Observe the information relating to the correct
driver's seat position (
Ypage 99).
You also have to make sure that an air bag can
inflate properly if deployed (
Ypage 49).
An air bag supplements a correctly worn seat
belt. As an additional safety device, the air bag
increases the level of protection for vehicle
occupants in the event of an accident. For exam-
ple, if, in the event of an accident, the protection
offered by the seat belt is sufficient, the air bags
are not deployed. When an accident occurs, only
the air bags that increase protection in that par- ticular accident situation are deployed. How-
ever, seat belts and air bags generally do not
protect against objects penetrating the vehicle
from the outside.
Information on restraint system operation can
be found under "Triggering of the Emergency
Tensioning Devices and air bags" (
Ypage 56).
See "Children in the vehicle" for information on
children traveling with you in the vehicle as well
as on child restraint systems (
Ypage 60).
Important safety notes
GWARNING
Modifications to the restraint system may
cause it to no longer work as intended. The
restraint system may then not perform its
intended protective function and may fail in an
accident or trigger unexpectedly, for example.
This poses an increased risk of injury or even fatal injury.
Never modify parts of the restraint system.
Never tamper with the wiring, the electronic
components or their software.
If it is necessary to modify components of the
restraint system to accommodate a person with
disabilities, contact an authorized Mercedes-
Benz Center for details. USA only: for further
information contact our Customer Assistance
Center at 1-800 FOR-MERCEDES
(1‑800‑367‑6372).
Mercedes-Benz recommends that you only use
driving aids which have been approved specifi-
cally for your vehicle by Mercedes-Benz.
44Occupant safety
Safety
Page 54 of 390
Window curtain air bags:are integrated into
the side of the roof frame and deployed in the
area from the A-pillar to the C-pillar.
When deployed, the window curtain air bag
enhances the level of protection for the head.
However, it does not protect the chest or arms.
If the restraint system control unit detects a side
impact, the window curtain air bag is deployed
on the side on which the impact occurs.
If the system determines that they can offer
additional protection to that provided by the
seat belt, a window curtain air bag may be
deployed in other accident situations
(
Ypage 56).
Occupant Classification System
(OCS)
Introduction
The Occupant Classification System (OCS) cat-
egorizes the person in the front-passenger seat.
Depending on that result, the front-passenger
front air bag is either enabled or deactivated.
The system does not deactivate:
Rthe side impact air bag
Rthe window curtain air bag
Rthe Emergency Tensioning Devices
Requirements
To be classified correctly, the front passenger
must sit:
Rwith the seat belt fastened correctly
Rin an almost upright position with their back
against the seat backrest
Rwith their feet resting on the floor, if possible
If the front passenger does not observe these
conditions, OCS may produce a false classifica-
tion, e.g. because the front passenger:
Rtransfers their weight by supporting them-
selves on a vehicle armrest
Rsits in such a way that their weight is raised
from the seat cushion
If it is absolutely necessary to install a child
restraint system on the front-passenger seat, be
sure to observe the correct positioning of the
child restraint system. Never place objects
under or behind the child restraint system, e.g. a
cushion. Fully retract the seat cushion length.
The entire base of the child restraint system must always rest on the seat cushion of the
front-passenger seat. The backrest of the
forward-facing child restraint system must lie as
flat as possible against the backrest of the front-
passenger seat.
The child restraint system must not touch the
roof or be subjected to a load by the head
restraint. Adjust the angle of the seat backrest
and the head restraint position accordingly.
Only then can OCS be guaranteed to function
correctly. Always observe the child restraint sys-
tem manufacturer's installation and operating
instructions.
Occupant Classification System opera-
tion (OCS)
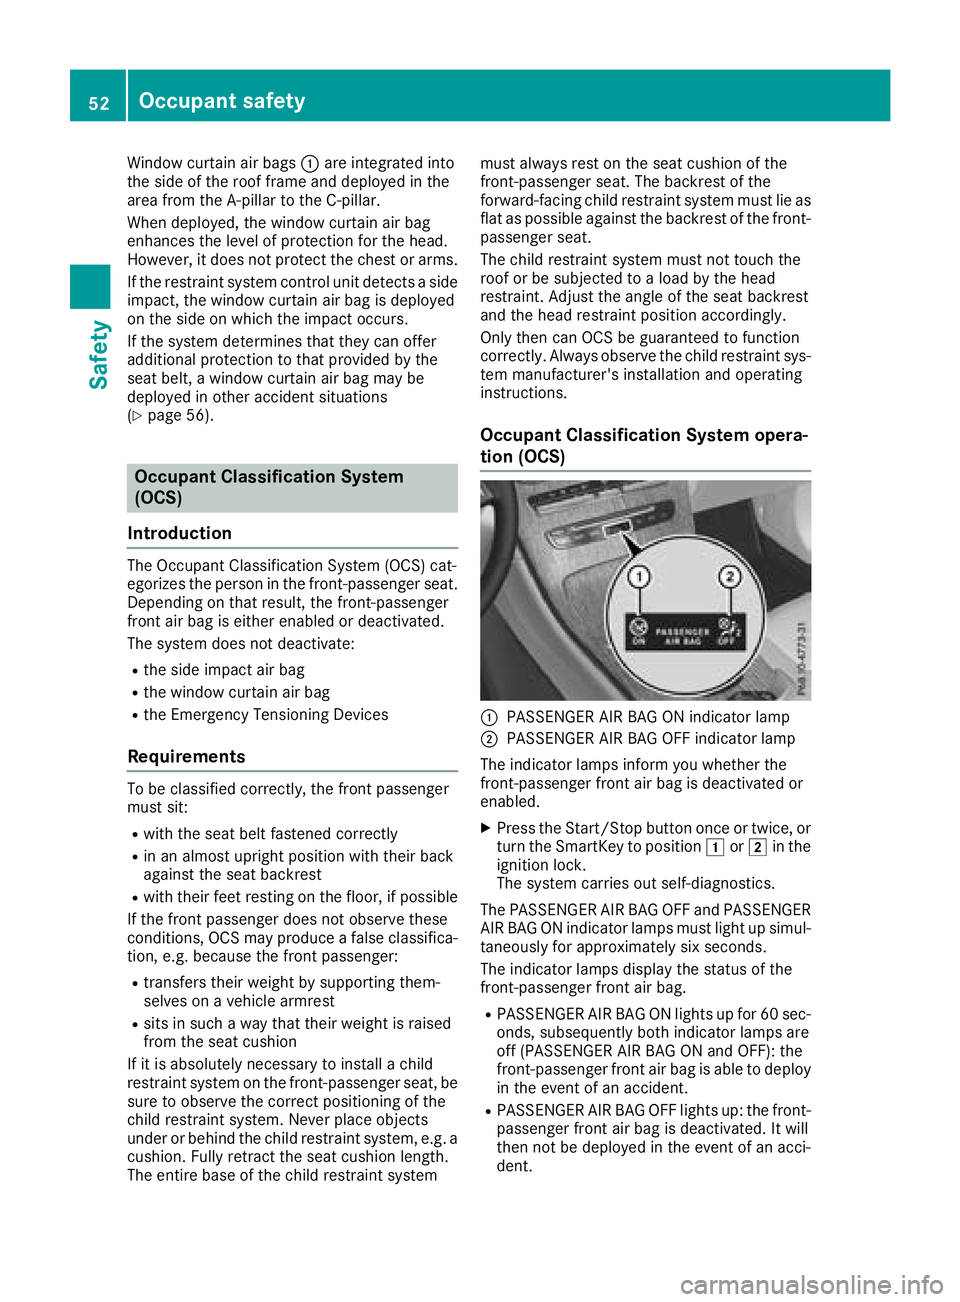
:PASSENGER AIR BAG ON indicator lamp
;PASSENGER AIR BAG OFF indicator lamp
The indicator lamps inform you whether the
front-passenger front air bag is deactivated or
enabled.
XPress the Start/Stop button once or twice, or turn the SmartKey to position 1or2 in the
ignition lock.
The system carries out self-diagnostics.
The PASSENGER AIR BAG OFF and PASSENGER
AIR BAG ON indicator lamps must light up simul-
taneously for approximately six seconds.
The indicator lamps display the status of the
front-passenger front air bag.
RPASSENGER AIR BAG ON lights up for 60 sec-
onds, subsequently both indicator lamps are
off (PASSENGER AIR BAG ON and OFF): the
front-passenger front air bag is able to deploy
in the event of an accident.
RPASSENGER AIR BAG OFF lights up: the front-
passenger front air bag is deactivated. It will
then not be deployed in the event of an acci-
dent.
52Occupant safety
Safety
Page 79 of 390
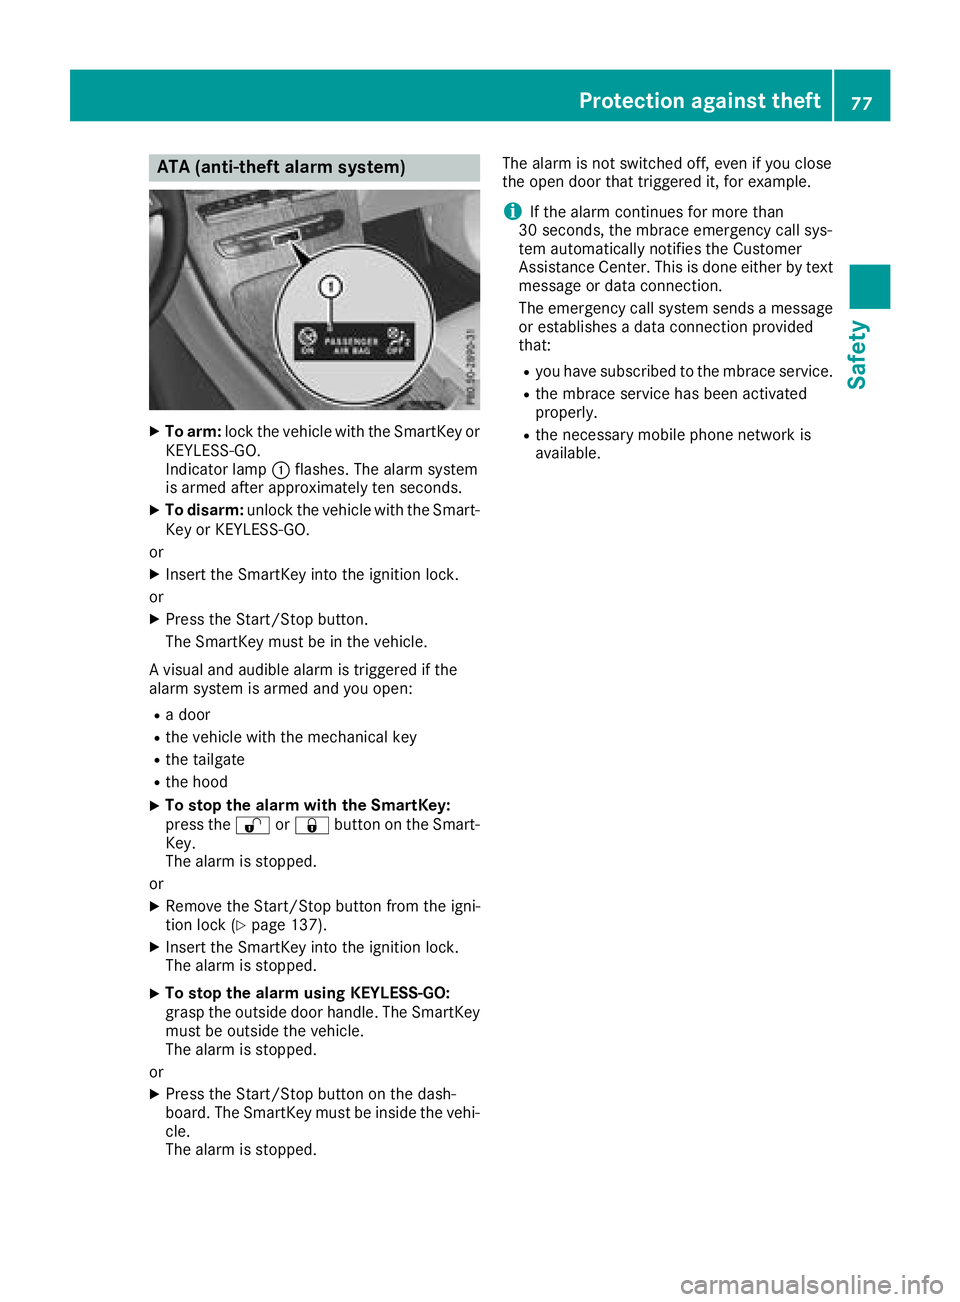
ATA (anti-theft alarmsystem)
XTo arm: lockth evehicl ewit hth eSmartKey or
KEYLESS-GO .
Indicato rlamp :flashes .The alarm system
is armed after approximately te nseconds.
XTo disarm: unlockth evehicl ewit hth eSmart -
Key or KEYLESS-GO .
or
XInser tth eSmartKey int oth eignition lock.
or
XPress th eStart/Sto pbutton.
The SmartKey mus tbe in th evehicle.
A visual and audible alarm is triggered if th e
alarm system is armed and you open :
Radoor
Rth evehicl ewit hth emechanical ke y
Rthetailgat e
Rthehoo d
XTo stop th ealarm wit hth eSmartKey :
press th e% or& buttonon th eSmart -
Key.
The alarm is stopped.
or
XRemove th eStart/Sto pbutto nfrom th eigni-
tion loc k (Ypage 137).
XInsertth eSmartKey int oth eignition lock.
The alarm is stopped.
XTo stop th ealarm using KEYLESS-GO:
gras pth eoutside door handle. The SmartKey
mus tbe outside th evehicle.
The alarm is stopped.
or
XPress th eStart/Sto pbutto non th edash -
board. The SmartKey mus tbe inside th evehi-
cle .
The alarm is stopped. The alarm is no
tswitched off ,eve nif you close
th eopen door that triggered it ,for example.
iIf th ealarm continues for mor ethan
30 secon ds, thembrace emergenc ycall sys-
te m automatically notifie sth eCustome r
Assistance Center. This is don eeither by text
message or dat aconnection .
The emergenc ycall system sends amessage
or establishes adat aconnection provided
that:
Ryou hav esubscribed to th embrace service.
Rth embrace servic ehas been activated
properly.
Rth enecessar ymobile phone network is
available.
Protection against theft77
Safety
Z
Page 80 of 390
SmartKey
Important safety notes
GWARNING
If children are left unsupervised in the vehicle,
they could:
Ropen the doors, thus endangering other
people or road users.
Rget out and disrupt traffic.
Roperate the vehicle's equipment.
Additionally, children could set the vehicle in
motion if, for example, they:
Rrelease the parking brake.
Rshifting the automatic transmission out of
park position P
RStart the engine.
There is a risk of an accident and injury.
When leaving the vehicle, always take the
SmartKey with you and lock the vehicle. Never
leave children or animals unattended in the
vehicle. Always keep the SmartKey out of
reach of children.
GWARNING
If you attach heavy or large objects to the
SmartKey, the SmartKey could be uninten-
tionally turned in the ignition lock. This could
cause the engine to be switched off. There is a risk of an accident.
Do not attach any heavy or large objects to the
SmartKey. Remove any bulky key rings before
inserting the SmartKey into the ignition lock.
!Keep the SmartKey away from strong mag-
netic fields. Otherwise, the remote control
function could be affected.
Strong magnetic fields can occur in the vicin-
ity of powerful electrical installations.
Do not keep the SmartKey:
Rwith electronic devices, e.g. a mobile phone
or another SmartKey.
Rwith metallic objects, e.g. coins or metal foil.
Rinside metallic objects, e.g. a metal case.
This can affect the functionality of the Smart- Key. Vehicles with KEYLESS-GO start function:
do
not keep the SmartKey in the cargo compart-
ment. Otherwise, the SmartKey may not be
detected, e.g. when starting the engine using
the Start/Stop button.
A brief radio connection between the vehicle
and the SmartKey determines whether a valid
SmartKey is in, or in the direct vicinity of, the
vehicle. This occurs, for example:
Rwhen starting the engine
Rwhile driving
Rwhen using HANDS-FREE ACCESS
Rwhen the external door handles are touched
Rduring convenience closing
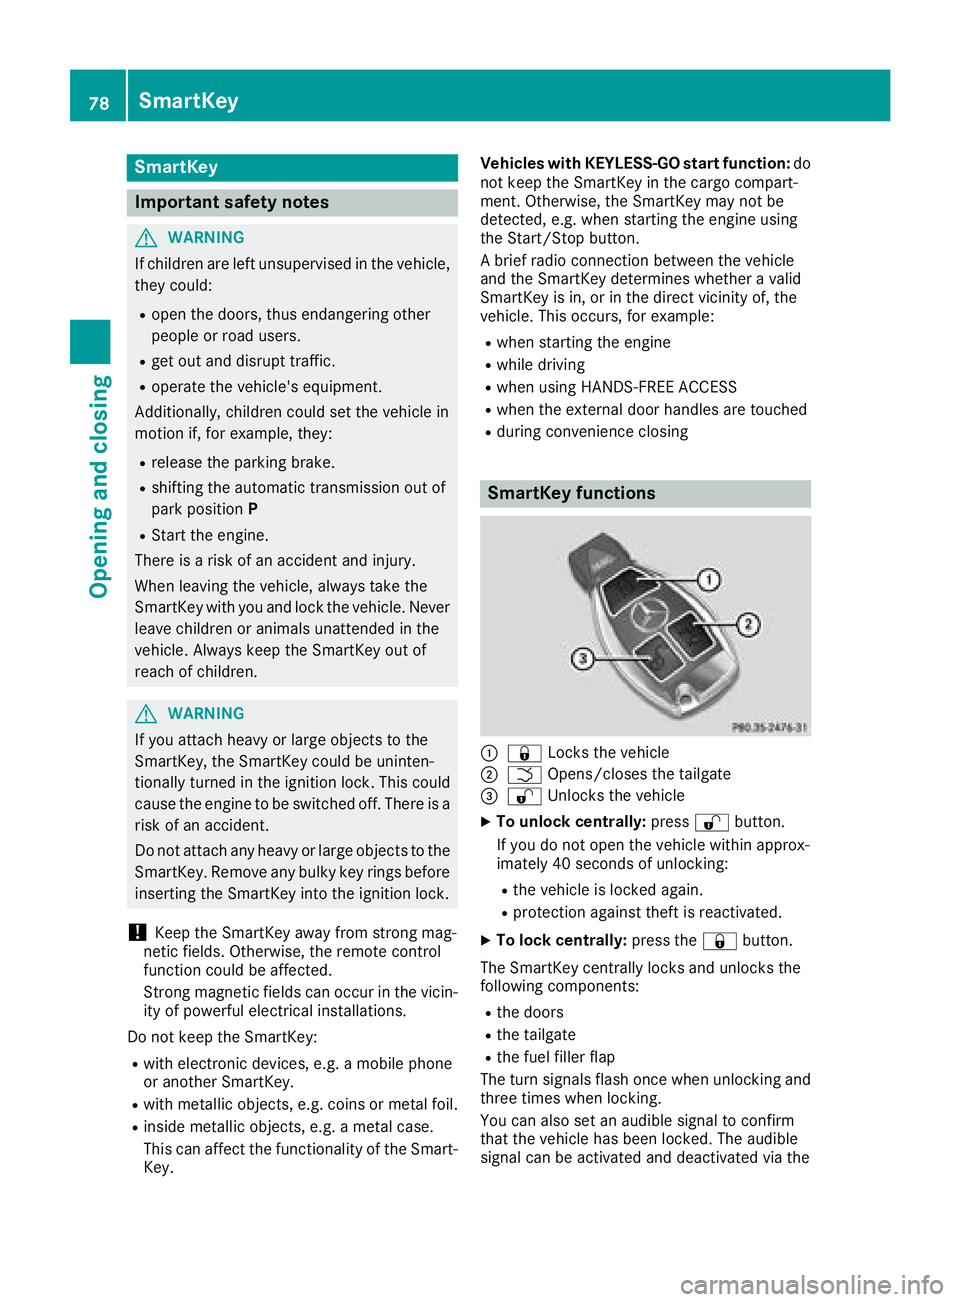
SmartKey functions
:& Locks the vehicle
;FOpens/closes the tailgate
=%Unlocks the vehicle
XTo unlock centrally: press%button.
If you do not open the vehicle within approx-
imately 40 seconds of unlocking:
Rthe vehicle is locked again.
Rprotection against theft is reactivated.
XTo lock centrally: press the&button.
The SmartKey centrally locks and unlocks the
following components:
Rthe doors
Rthe tailgate
Rthe fuel filler flap
The turn signals flash once when unlocking and
three times when locking.
You can also set an audible signal to confirm
that the vehicle has been locked. The audible
signal can be activated and deactivated via the
78SmartKey
Opening and closing