steering wheel MERCEDES-BENZ GLE 2019 Owner's Guide
[x] Cancel search | Manufacturer: MERCEDES-BENZ, Model Year: 2019, Model line: GLE, Model: MERCEDES-BENZ GLE 2019Pages: 398, PDF Size: 12.25 MB
Page 109 of 398
Exterior mirror pushed out of position
If an exterior mirror has been pushed out of
position, proceed as follows:
X
Vehicles without electrically folding exte-
rior mirrors: move the exterior mirror into
the correct position manually.
X Vehicles with electrically folding exterior
mirrors: press and hold mirror-folding but-
ton 0043until you hear a click and the mirror
engages in position audibly.
The mirror housing is engaged again and you can adjust the exterior mirrors as usual
(Y page 105). Automatic anti-glare mirrors
G
WARNING
Electrolyte may escape if the glass in an auto- matic anti-glare mirror breaks. The electrolyte
is harmful and causes irritation. It must not
come into contact with your skin, eyes, res-
piratory organs or clothing or be swallowed.
There is a risk of injury.
If you come into contact with the electrolyte,
observe the following:
R Rinse off the electrolyte from your skin
immediately with water.
R Immediately rinse the electrolyte out of
your eyes thoroughly with clean water.
R If the electrolyte is swallowed, immediately
rinse your mouth out thoroughly. Do not
induce vomiting.
R If electrolyte comes into contact with your
skin or hair or is swallowed, seek medical
attention immediately.
R Immediately change out of clothing which
has come into contact with electrolyte.
R If an allergic reaction occurs, seek medical
attention immediately. The rear-view mirror and the exterior mirror on
the driver's side automatically go into anti-glare
mode if the following conditions are met simul-
taneously:
R the ignition is switched on and
R incident light from headlamps strikes the sen-
sor in the rear-view mirror
The mirrors do not go into anti-glare mode if
reverse gear is engaged or if the interior lighting
is switched on. Parking position for the exterior mir-
ror on the front-passenger side
Setting and storing the parking position You can position the front-passenger side exte-
rior mirror in such a way that you can see the
rear wheel on that side as soon as you engage
reverse gear. You can store this position.
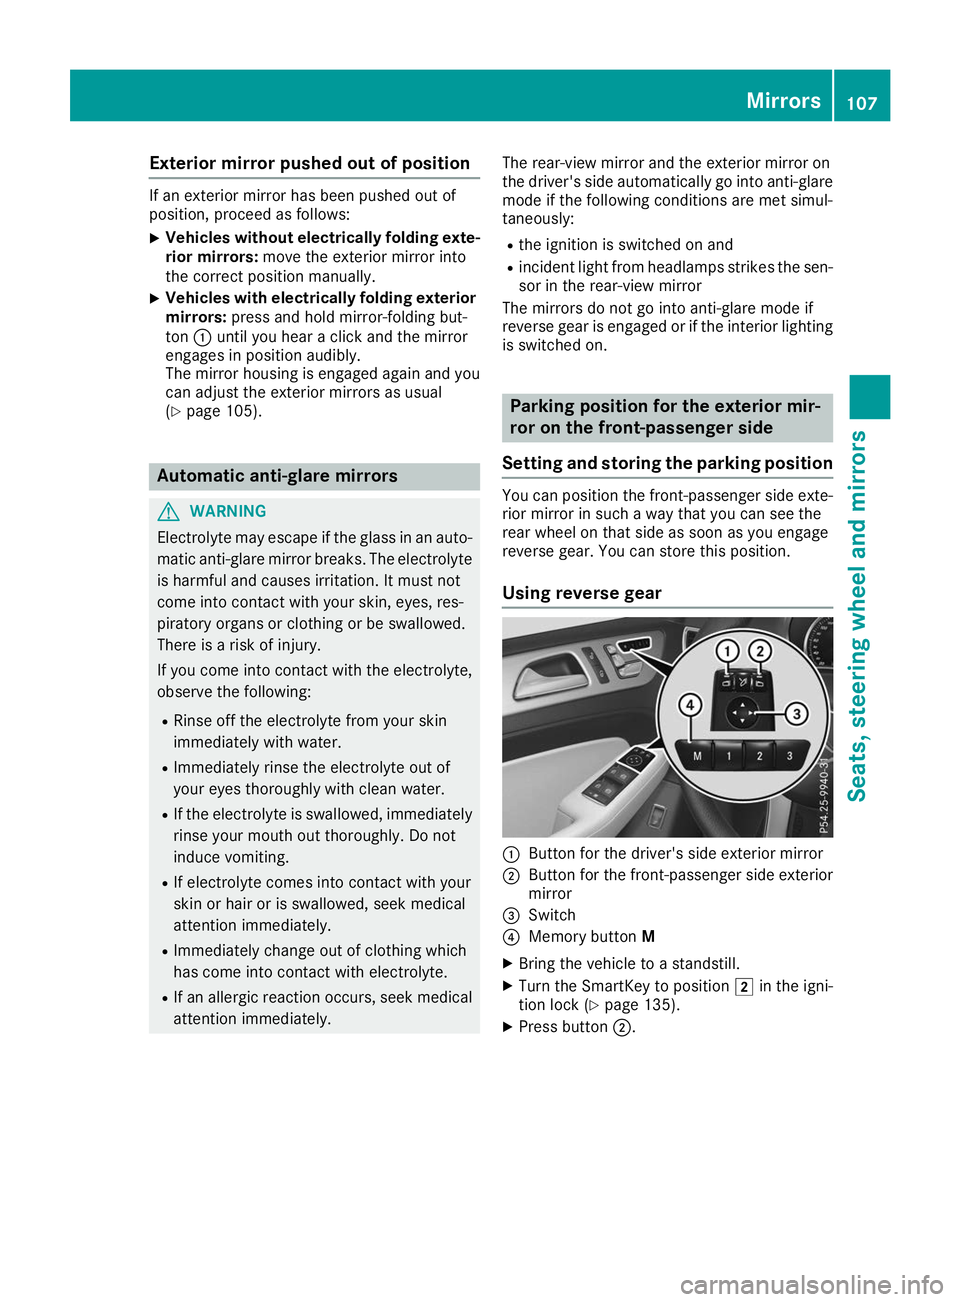
Using reverse gear 0043
Button for the driver's side exterior mirror
0044 Button for the front-passenger side exterior
mirror
0087 Switch
0085 Memory button M
X Bring the vehicle to a standstill.
X Turn the SmartKey to position 0048in the igni-
tion lock (Y page 135).
X Press button 0044. Mirrors
107Seats, steering wheel and mirrors Z
Page 110 of 398
X
Engage reverse gear.
The exterior mirror on the front-passenger
side moves to the default setting parking posi-
tion.
X Use button 0087to adjust the exterior mirror to
a position that allows you to see the rear
wheel and the curb.
The parking position is stored.
i If you shift the transmission to another posi-
tion, the exterior mirror on the front-
passenger side returns to the driving position.
Using the memory button You can store the parking position of the exte-
rior mirror on the front-passenger side using
memory button
M0085. The reverse gear must not
be engaged during the process.
X Turn the SmartKey to position 0048in the igni-
tion lock (Y page 135).
X Press button 0044.
X Use button 0087to adjust the exterior mirror to
a position that allows you to see the rear
wheel and the curb.
X Press memory button M0085 and one of the
arrows on button 0087within three seconds.
The parking position is stored if the exterior
mirror does not move.
X If the mirror moves out of position, repeat the
steps.
Calling up a stored parking position set- ting X
Turn the SmartKey to position 0048in the igni-
tion lock (Y page 135).
X Adjust the exterior mirror on the front-
passenger side using button 0044.
X Engage reverse gear.
The exterior mirror on the front-passenger
side moves to the stored parking position.
The exterior mirror on the front-passenger side
moves back to its original position:
R as soon as you exceed a speed of 9 mph
(15 km/h)
R when you use button 0043to select the exterior
mirror on the driver's side Memory function
Storing settings
G
WARNING
If you use the memory function on the driver's side while driving, you could lose control of
the vehicle as a result of the adjustments
being made. There is a risk of an accident.
Only use the memory function on the driver's
side when the vehicle is stationary. G
WARNING
When the memory function adjusts the seat or steering wheel, you and other vehicle occu-
pants – particularly children – could become
trapped. There is a risk of injury.
While the memory function is making adjust-
ments, make sure that no one has any body
parts in the sweep of the seat or steering
wheel. If somebody becomes trapped, imme-
diately release the memory function position
button. The adjustment process is stopped. G
WARNING
Children could become trapped if they acti-
vate the memory function, particularly when
unattended. There is a risk of injury.
When leaving the vehicle, always take the
SmartKey with you and lock the vehicle. Never leave children unsupervised in the vehicle.
The memory function can be used at any time,
e.g. even when the SmartKey isn't in the ignition
lock.
With the memory function, you can store up to
three different settings, e.g. for three different
people.
The following settings are stored as a single
memory preset:
R position of the seat, backrest and head
restraint
R driver's side: steering wheel position
R driver's side: position of the exterior mirrors
on the driver's and front-passenger sides 108
Memory functionSeats, steering
wheel and mirrors
Page 111 of 398
X
Adjust the seat (Y page 98).
X On the driver's side, adjust the steering wheel
(Y page 104) and the exterior mirrors
(Y page 105).
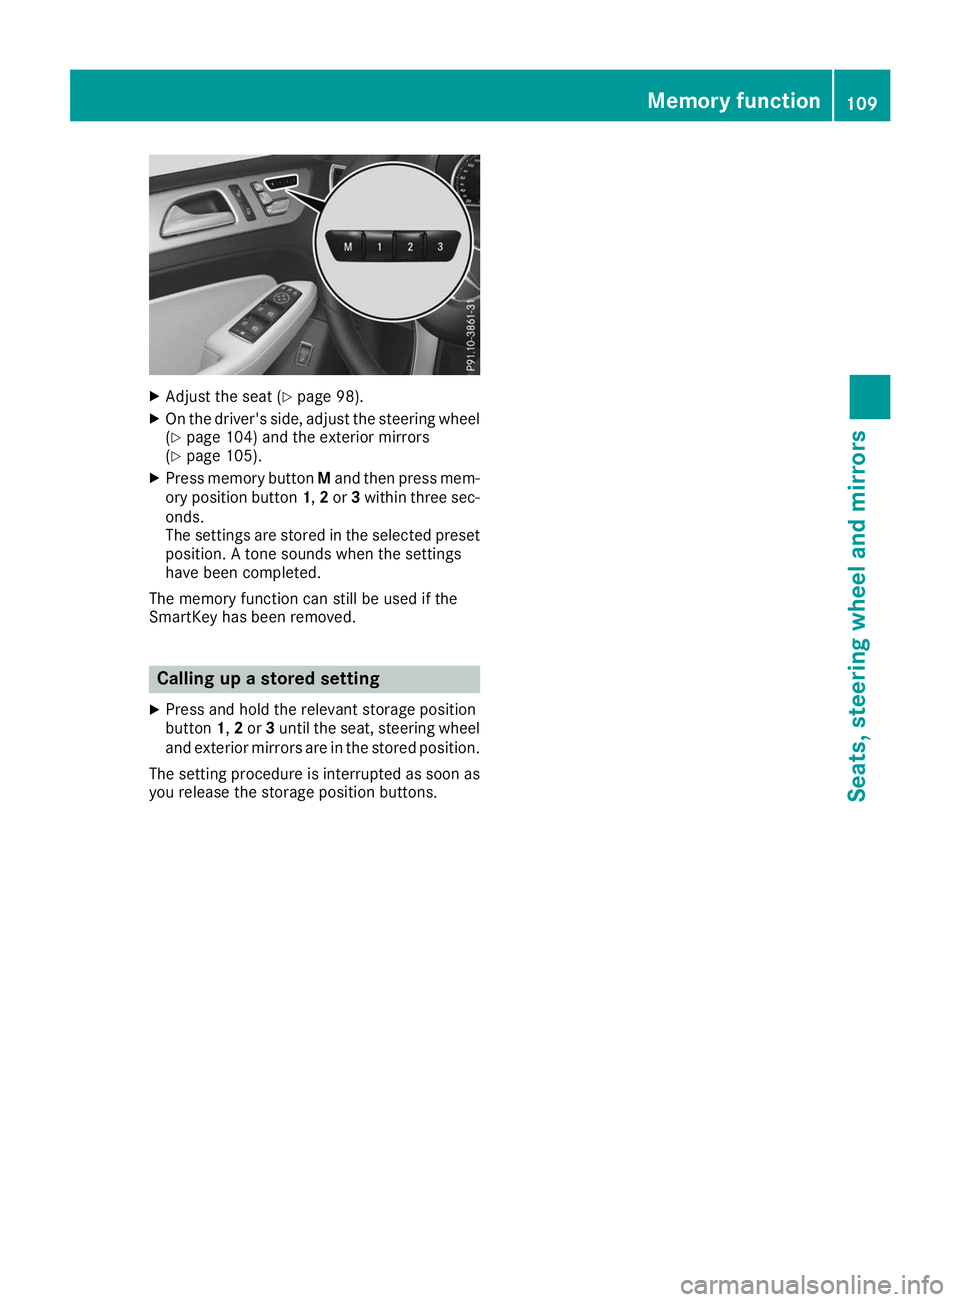
X Press memory button Mand then press mem-
ory position button 1,2or 3within three sec-
onds.
The settings are stored in the selected preset position. A tone sounds when the settings
have been completed.
The memory function can still be used if the
SmartKey has been removed. Calling up a stored setting
X Press and hold the relevant storage position
button 1,2or 3until the seat, steering wheel
and exterior mirrors are in the stored position.
The setting procedure is interrupted as soon as you release the storage position buttons. Memory function
109Seats, steeringwheel and mirrors Z
Page 114 of 398
The blue
0057indicator lamp in the instru-
ment cluster lights up when the high-beam
headlamps are switched on.
X To switch off the high-beam headlamps:
move the combination switch back to its nor- mal position.
The blue 0057indicator lamp in the instru-
ment cluster goes out.
Vehicles with Adaptive Highbeam Assist: if
Adaptive Highbeam Assist is activated, it auto-
matically controls activation and deactivation of
the high-beam headlamps (Y page 113).Hazard warning lamps
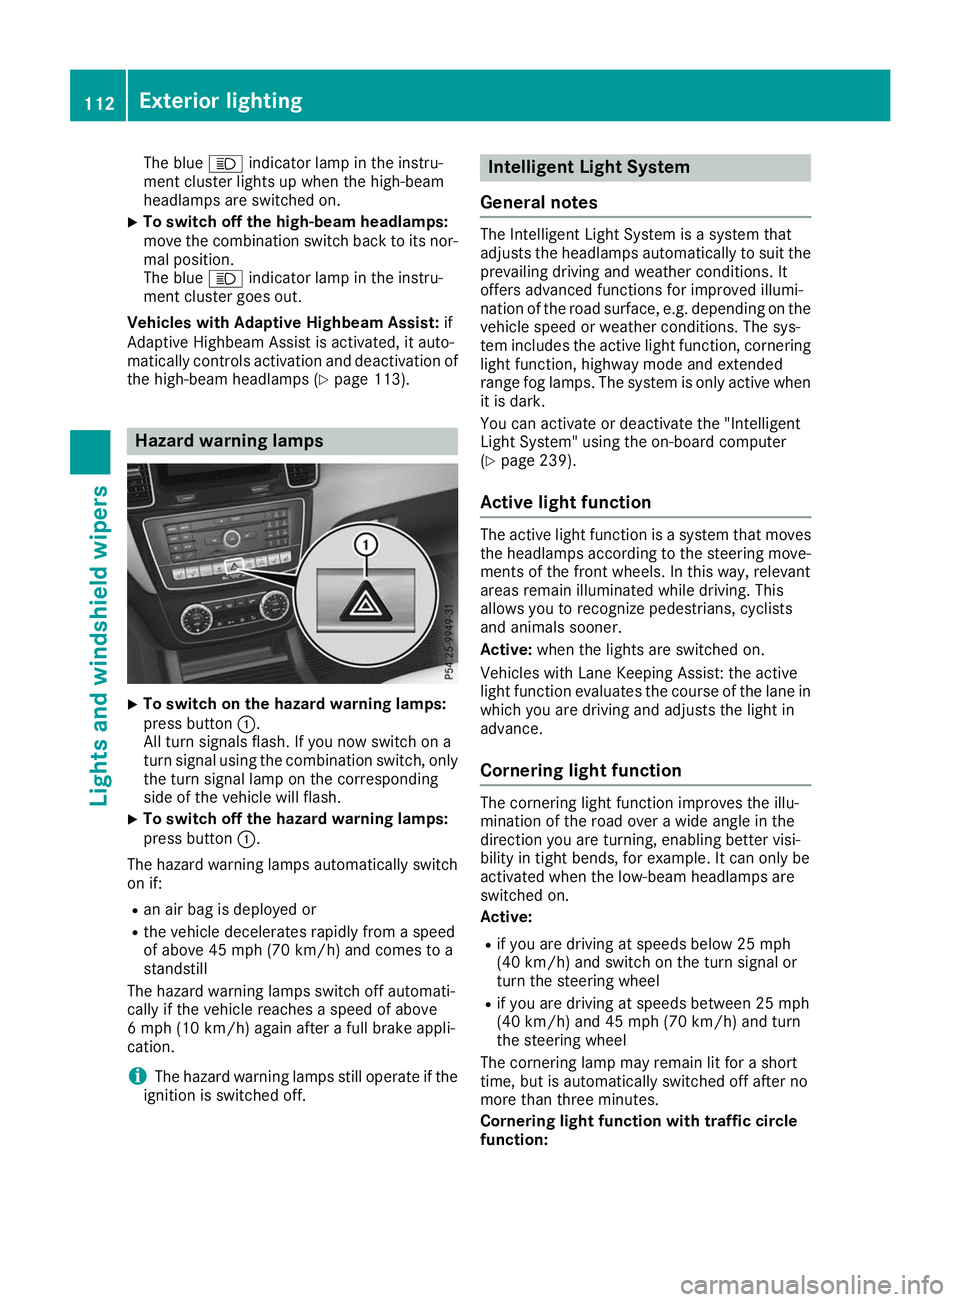
X
To switch on the hazard warning lamps:
press button
0043.
All turn signals flash. If you now switch on a
turn signal using the combination switch, only the turn signal lamp on the corresponding
side of the vehicle will flash.
X To switch off the hazard warning lamps:
press button
0043.
The hazard warning lamps automatically switch
on if:
R an air bag is deployed or
R the vehicle decelerates rapidly from a speed
of above 45 mph (70 km/h) and comes to a
standstill
The hazard warning lamps switch off automati-
cally if the vehicle reaches a speed of above
6 mph (10 km/h) again after a full brake appli-
cation.
i The hazard warning lamps still operate if the
ignition is switched off. Intelligent Light System
General notes The Intelligent Light System is a system that
adjusts the headlamps automatically to suit the
prevailing driving and weather conditions. It
offers advanced functions for improved illumi-
nation of the road surface, e.g. depending on the vehicle speed or weather conditions. The sys-
tem includes the active light function, corneringlight function, highway mode and extended
range fog lamps. The system is only active when it is dark.
You can activate or deactivate the "Intelligent
Light System" using the on-board computer
(Y page 239).
Active light function The active light function is a system that moves
the headlamps according to the steering move- ments of the front wheels. In this way, relevant
areas remain illuminated while driving. This
allows you to recognize pedestrians, cyclists
and animals sooner.
Active: when the lights are switched on.
Vehicles with Lane Keeping Assist: the active
light function evaluates the course of the lane in which you are driving and adjusts the light in
advance.
Cornering light function The cornering light function improves the illu-
mination of the road over a wide angle in the
direction you are turning, enabling better visi-
bility in tight bends, for example. It can only be
activated when the low-beam headlamps are
switched on.
Active:
R if you are driving at speeds below 25 mph
(40 km/h) and switch on the turn signal or
turn the steering wheel
R if you are driving at speeds between 25 mph
(40 km/h) and 45 mph (70 km/h) and turn
the steering wheel
The cornering lamp may remain lit for a short
time, but is automatically switched off after no
more than three minutes.
Cornering light function with traffic circle
function: 112
Exterior lightingLights and windshield wipers
Page 115 of 398
The cornering light function is activated on both
sides before entering a traffic circle through an
evaluation of the current GPS position of the
vehicle. It remains active until after the vehicle
has left the traffic circle. In this way, pedestrians
crossing the road, for example, are illuminated
by your vehicle in good time.
Highway mode Highway mode increases the range of the beam.
Active: if you are driving at a speed above
110 km/h and do not make any large steering
movements for at least 1,000 m or if you are
driving at a speed above 130 km/h.
Not active: if you are driving at speeds below
80 km/h following activation.
Extended range fog lamps The extended range fog lamps reduce the glare
experienced by the driver and improve the illu-
mination of the edge of the road.
Active: if you are driving at speeds below
40 mph (70 km/ h)and you switch on the rear
fog lamp.
Not active: if, following activation, you are driv-
ing at speeds above 60 mph (100 km/h)or if you
switch off the rear fog lamp
Off-road lights The off-road lights facilitate the early recogni-
tion of objects/obstacles when driving off-road thanks to a symmetrical, wider and brighter dis-
tribution of light from the low-beam headlamps.
Active: when driving at speeds no faster than
30 mph (50 km/h) and the off-road program
selector wheel is in position 1 or 2.
Not active: when driving at speeds above
30 mph (50 km/h).
When the off-road lights are switched on, the
cornering light function is permanently activa-
ted, the active light function is deactivated and
the headlamp range control is set to static
mode. Adaptive Highbeam Assist
General notes You can use this function to set the headlamps
to change between low beam and high beam
automatically. The system recognizes vehicles
with their lights on, either approaching from the
opposite direction or traveling in front of your
vehicle, and consequently switches the head-
lamps from high beam to low beam.
The system automatically adapts the low-beam
headlamp range depending on the distance to
the other vehicle. Once the system no longer
detects any other vehicles, it reactivates the
high-beam headlamps.
The system's optical sensor is located behind
the windshield near the overhead control panel.
Important safety notes G
WARNING
Adaptive Highbeam Assist does not recognize road users:
R who have no lights, e.g. pedestrians
R who have poor lighting, e.g. cyclists
R whose lighting is blocked, e.g. by a barrier
On very rare occasions, Adaptive Highbeam
Assist may fail to recognize other road users
that have lights, or may recognize them too
late. In this, or in similar situations, the auto-
matic high-beam headlamps will not be deac-
tivated or will be activated regardless. There is a risk of an accident.
Always carefully observe the traffic conditionsand switch off the high-beam headlamps in
good time.
Adaptive Highbeam Assist cannot take into
account road, weather or traffic conditions.
Adaptive Highbeam Assist is only an aid. You are responsible for adjusting the vehicle's lighting
to the prevailing light, visibility and traffic con-
ditions.
In particular, the detection of obstacles can be
impaired if:
R poor visibility, e.g. due to fog, heavy rain or
snow
R dirt on the sensors or the sensors are
obscured Exterior lighting
113Lights and windshield wipers Z
Page 137 of 398
!
Do not warm up the engine while stationary.
Pull away immediately. Avoid high engine
speeds and full throttle until the engine has
reached its operating temperature.
In vehicles with automatic transmission,
engage positions P and R only when the vehi-
cle is stationary.
Where possible, avoid spinning the drive
wheels when pulling away on slippery roads.
You could otherwise damage the drive train.
! Mercedes-AMG vehicles:
at low engine oil
temperatures below 68 ‡ (+20 †), the max-
imum engine speed is restricted in order to
protect the engine. To protect the engine and
maintain smooth engine operation, avoid driv-
ing at full throttle when the engine is cold.
Plug-in hybrid: be sure to read the separate
Operator's Manual. Otherwise, you may not rec-
ognize dangers. Key positions
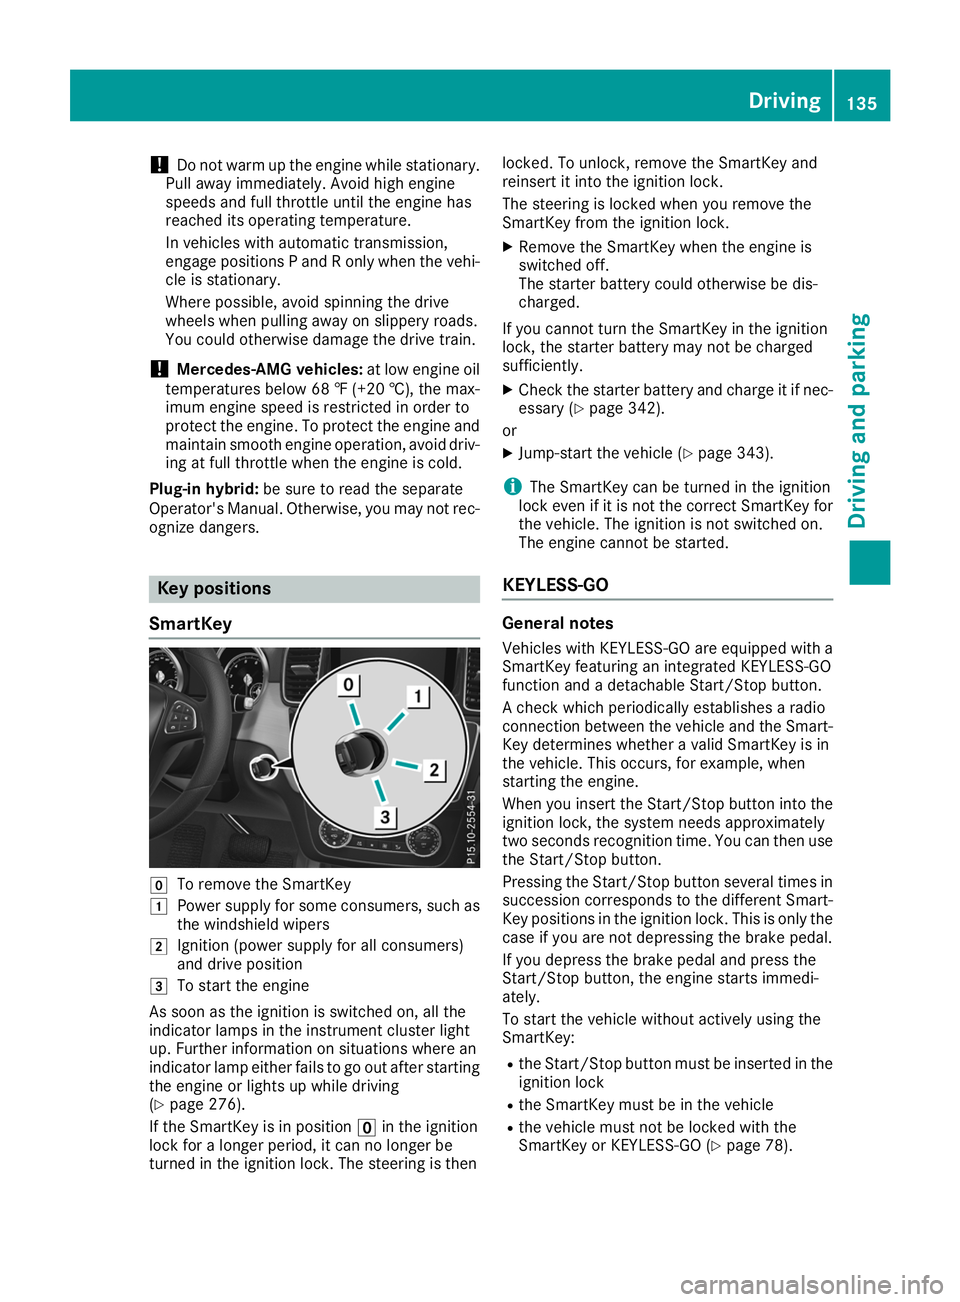
SmartKey 005A
To remove the SmartKey
0047 Power supply for some consumers, such as
the windshield wipers
0048 Ignition (power supply for all consumers)
and drive position
0049 To start the engine
As soon as the ignition is switched on, all the
indicator lamps in the instrument cluster light
up. Further information on situations where an
indicator lamp either fails to go out after starting the engine or lights up while driving
(Y page 276).
If the SmartKey is in position 0092in the ignition
lock for a longer period, it can no longer be
turned in the ignition lock. The steering is then locked. To unlock, remove the SmartKey and
reinsert it into the ignition lock.
The steering is locked when you remove the
SmartKey from the ignition lock.
X Remove the SmartKey when the engine is
switched off.
The starter battery could otherwise be dis-
charged.
If you cannot turn the SmartKey in the ignition
lock, the starter battery may not be charged
sufficiently.
X Check the starter battery and charge it if nec-
essary (Y page 342).
or
X Jump-start the vehicle (Y page 343).
i The SmartKey can be turned in the ignition
lock even if it is not the correct SmartKey for
the vehicle. The ignition is not switched on.
The engine cannot be started.
KEYLESS-GO General notes
Vehicles with KEYLESS-GO are equipped with a
SmartKey featuring an integrated KEYLESS-GO
function and a detachable Start/Stop button.
A check which periodically establishes a radio
connection between the vehicle and the Smart-
Key determines whether a valid SmartKey is in
the vehicle. This occurs, for example, when
starting the engine.
When you insert the Start/Stop button into the ignition lock, the system needs approximately
two seconds recognition time. You can then usethe Start/Stop button.
Pressing the Start/Stop button several times in
succession corresponds to the different Smart-
Key positions in the ignition lock. This is only the
case if you are not depressing the brake pedal.
If you depress the brake pedal and press the
Start/Stop button, the engine starts immedi-
ately.
To start the vehicle without actively using the
SmartKey:
R the Start/Stop button must be inserted in the
ignition lock
R the SmartKey must be in the vehicle
R the vehicle must not be locked with the
SmartKey or KEYLESS-GO (Y page 78). Driving
135Driving and parking Z
Page 148 of 398
0044 Neutral
Do not shift the transmission to
005C
while driving. The automatic trans-
mission could otherwise be dam-
aged.
No power is transmitted from the
engine to the drive wheels.
Releasing the brakes will allow you to
move the vehicle freely, e.g. to push
it or tow it.
If ESP ®
is deactivated or faulty: shift
the transmission to position 005Cif the
vehicle is in danger of skidding, e.g.
on icy roads.
If you switch the engine off with the
transmission in position 005Eor005B,
the automatic transmission will shift
to 005C automatically.
! Coasting in neutral
005Cmay
cause damage to the drive train. 003A Drive
The automatic transmission changes
gear automatically. All forward gears
are available. Driving tips
Changing gear The automatic transmission shifts through the
individual gears automatically when it is in trans-
mission position 005B. This automatic gear shift-
ing behavior is determined by:
R the selected drive program
R the position of the accelerator pedal
R the road speed
Accelerator pedal position Your style of driving influences how the auto-
matic transmission shifts gear:
R little throttle: early upshifts
R more throttle: late upshifts Kickdown Use kickdown for maximum acceleration.
X Depress the accelerator pedal beyond the
pressure point.
The automatic transmission shifts to a lower
gear depending on the engine speed.
X Ease off the accelerator pedal once the
desired speed is reached.
The automatic transmission shifts back up.
Rocking the vehicle free Shifting back and forth between transmission
positions
005Band 005Ecan help to free up the
vehicle if it gets stuck in mud or snow. The vehi- cle's engine management system limits the
speed to a maximum of 5 mph (9 km/h) when
shifting back and forth. To shift repeatedly
between transmission positions 005Band 005E,
move the DIRECT SELECT lever up and down
beyond the pressure point.
Towing a trailer X
Drive in the middle of the engine speed range
on uphill gradients.
X Depending on the uphill or downhill gradient,
use the left-hand steering wheel paddle
shifter (Y page 147) to select a lower gear,
even if cruise control or Active Distance
Assist DISTRONIC is activated. Drive programs
Slippery drive program The
Slippery drive program has the following
characteristics:
R reduced engine and transmission settings for
optimum propulsion on slippery or snow-cov-
ered roads.
R optimized ESP ®
stability control on slippery or
snow-covered roads.
R the vehicle has improved driving stability on
slippery or snow-covered roads, for example. 146
Automatic transmissionDriving an
d parking
Page 149 of 398
Comfort drive program
The
Comfort drive program has the following
characteristics:
R comfort-oriented engine and transmission
settings.
R optimal fuel consumption resulting from the
automatic transmission shifting up sooner.
R the vehicle pulls away more gently in forward
and reverse gears, unless the accelerator
pedal is depressed fully.
R the automatic transmission shifting up
sooner. This results in the vehicle being driven
at lower engine speeds and the wheels being less likely to spin.
Sport drive program The
Sport drive program has the following char-
acteristics:
R sporty engine and transmission settings.
R the automatic transmission shifts up later.
The fuel consumption possibly being higher
as a result of the later automatic transmission
shift points.
R the suspension exhibits sporty damping (vehi-
cles with AIRMATIC).
Drive program Sport Plus (Mercedes-
AMG vehicles) The
Sport Plus drive program has the following
characteristics:
R the vehicle exhibits particularly sporty driving
characteristics.
R the vehicle pulls away in first gear.
R the automatic transmission shifts up later.
The fuel consumption possibly being higher
as a result of the later automatic transmission
shift points.
R the suspension exhibits particularly firm
springing and damping settings (vehicles with AIRMATIC).
R the ECO start/stop function is deactivated, it
can, however, be activated again using the
ECO button (Y page 140). Individual drive program In the
Individual drive program, the following
properties of the drive program can be selected:
R the drive (engine and transmission manage-
ment)
R the transmission
R the suspension (vehicles with AIRMATIC)
R all vehicles (except Mercedes-AMG vehicles):
the steering
To select the gears in the Individualdrive pro-
gram permanently using the steering wheel pad- dle shifters, select the permanent manual gear-
shift program.
Information about configuring the Individual
drive program with the multimedia system can
be found in the Digital Operator's Manual. Manual gear shifting
General notes You can change gear yourself using the steering
wheel paddle shifters. The transmission must be
in position 005Bto do this.
Depending on which steering wheel paddle
shifter is pulled, the automatic transmission
immediately shifts into the next gear down or
up, if permitted.
To use manual shifting, you have two options:
R temporary setting
R permanent setting
If you activate manual gearshifting, the current
gear appears in the multifunction display
instead of transmission position 005B.
If manual gearshifting is deactivated, the gears
will be selected automatically. Automatic transmission
147Driving and parking Z
Page 150 of 398
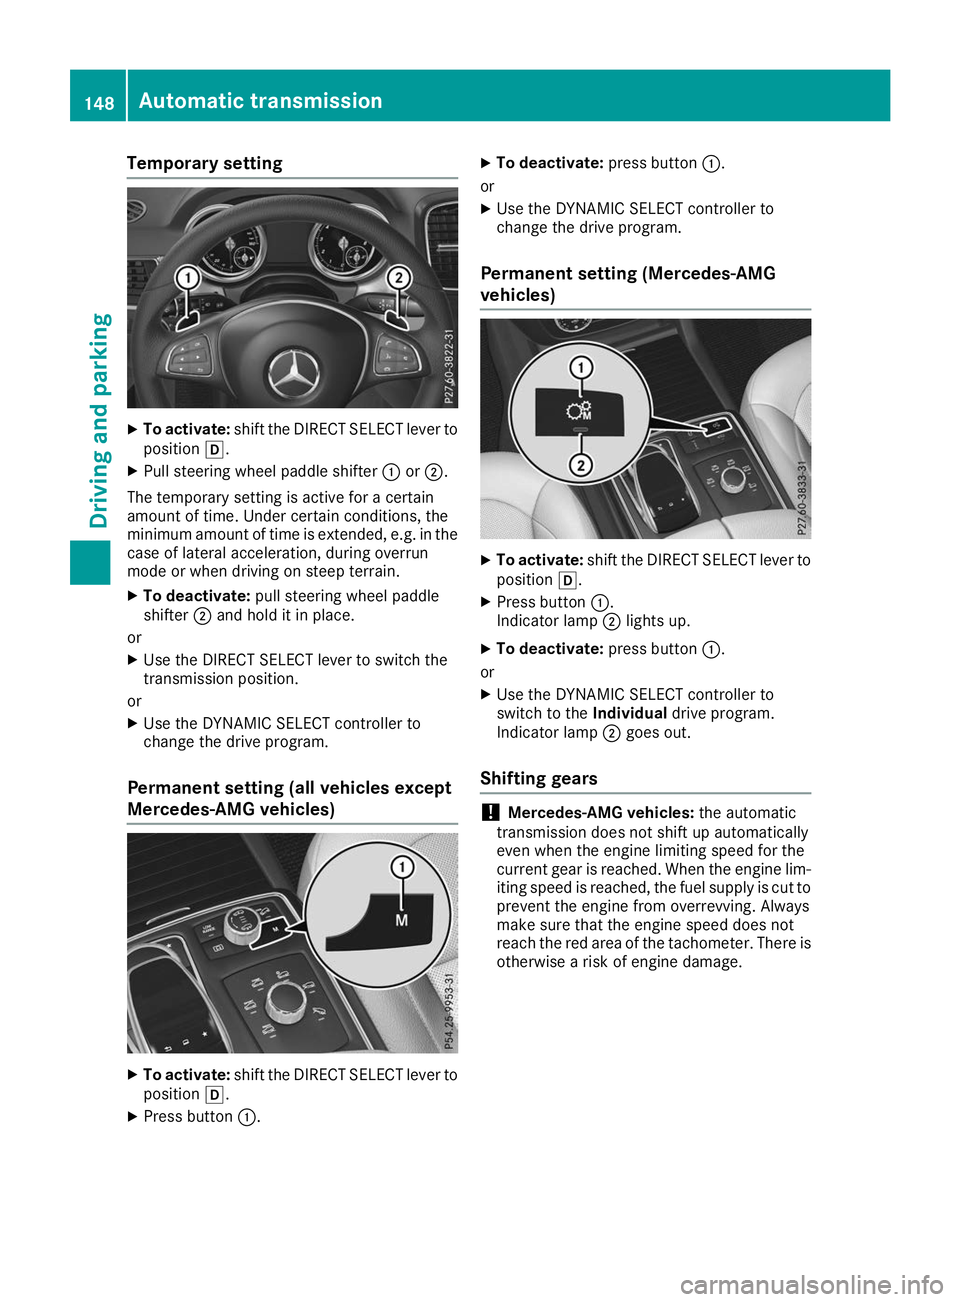
Temporary setting
X
To activate: shift the DIRECT SELECT lever to
position 005B.
X Pull steering wheel paddle shifter 0043or0044.
The temporary setting is active for a certain
amount of time. Under certain conditions, the
minimum amount of time is extended, e.g. in the
case of lateral acceleration, during overrun
mode or when driving on steep terrain.
X To deactivate: pull steering wheel paddle
shifter 0044and hold it in place.
or
X Use the DIRECT SELECT lever to switch the
transmission position.
or X Use the DYNAMIC SELECT controller to
change the drive program.
Permanent setting (all vehicles except
Mercedes-AMG vehicles) X
To activate: shift the DIRECT SELECT lever to
position 005B.
X Press button 0043. X
To deactivate: press button0043.
or
X Use the DYNAMIC SELECT controller to
change the drive program.
Permanent setting (Mercedes-AMG
vehicles) X
To activate: shift the DIRECT SELECT lever to
position 005B.
X Press button 0043.
Indicator lamp 0044lights up.
X To deactivate: press button0043.
or X Use the DYNAMIC SELECT controller to
switch to the Individualdrive program.
Indicator lamp 0044goes out.
Shifting gears !
Mercedes-AMG vehicles:
the automatic
transmission does not shift up automatically
even when the engine limiting speed for the
current gear is reached. When the engine lim- iting speed is reached, the fuel supply is cut to
prevent the engine from overrevving. Always
make sure that the engine speed does not
reach the red area of the tachometer. There is
otherwise a risk of engine damage. 148
Automatic transmissionDriving an
d parking
Page 151 of 398
X
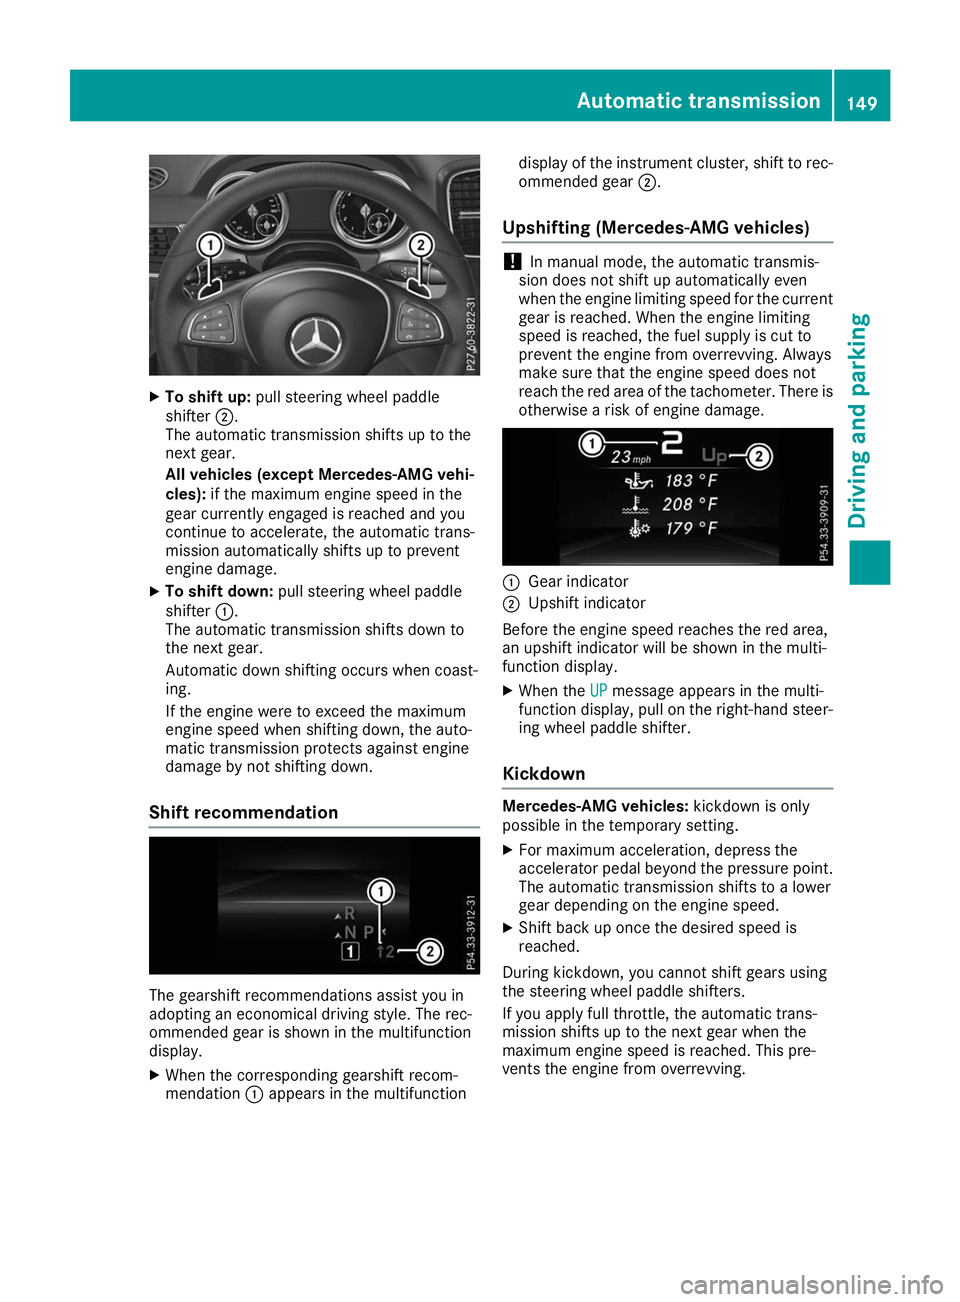
To shift up: pull steering wheel paddle
shifter 0044.
The automatic transmission shifts up to the
next gear.
All vehicles (except Mercedes-AMG vehi-
cles): if the maximum engine speed in the
gear currently engaged is reached and you
continue to accelerate, the automatic trans-
mission automatically shifts up to prevent
engine damage.
X To shift down: pull steering wheel paddle
shifter 0043.
The automatic transmission shifts down to
the next gear.
Automatic down shifting occurs when coast-
ing.
If the engine were to exceed the maximum
engine speed when shifting down, the auto-
matic transmission protects against engine
damage by not shifting down.
Shift recommendation The gearshift recommendations assist you in
adopting an economical driving style. The rec-
ommended gear is shown in the multifunction
display.
X When the corresponding gearshift recom-
mendation 0043appears in the multifunction display of the instrument cluster, shift to rec-
ommended gear 0044.
Upshifting (Mercedes-AMG vehicles) !
In manual mode, the automatic transmis-
sion does not shift up automatically even
when the engine limiting speed for the current
gear is reached. When the engine limiting
speed is reached, the fuel supply is cut to
prevent the engine from overrevving. Always
make sure that the engine speed does not
reach the red area of the tachometer. There is
otherwise a risk of engine damage. 0043
Gear indicator
0044 Upshift indicator
Before the engine speed reaches the red area,
an upshift indicator will be shown in the multi-
function display. X When the UP UPmessage appears in the multi-
function display, pull on the right-hand steer- ing wheel paddle shifter.
Kickdown Mercedes-AMG vehicles:
kickdown is only
possible in the temporary setting.
X For maximum acceleration, depress the
accelerator pedal beyond the pressure point.
The automatic transmission shifts to a lower
gear depending on the engine speed.
X Shift back up once the desired speed is
reached.
During kickdown, you cannot shift gears using
the steering wheel paddle shifters.
If you apply full throttle, the automatic trans-
mission shifts up to the next gear when the
maximum engine speed is reached. This pre-
vents the engine from overrevving. Automatic transmission
149Driving and parking Z