warning lights MERCEDES-BENZ GLE-CLASS SUV 2016 User Guide
[x] Cancel search | Manufacturer: MERCEDES-BENZ, Model Year: 2016, Model line: GLE-CLASS SUV, Model: MERCEDES-BENZ GLE-CLASS SUV 2016Pages: 450, PDF Size: 10.52 MB
Page 68 of 450
Drivingsafet ysystems
Overview of drivin gsafet ysystems
In this section ,you will fin dinformation about
th efollowin gdrivin gsafet ysystems :
RABS (Anti-loc kBrakin gSystem)
(Ypage 66)
RBA S (B rakeAssist System) (Ypage 67)
RBASPLU Swit hCross-Traffic Assis t (Brak e
Assist System PLU Swit hCross-Traffic Assist)
(
Ypage 67)
RCOLLISION PREVENTION ASSIST PLU S
(Ypage 69 )
RESP®(Electronic StabilityProgram)
(Ypage 72)
REB D (Electroni cBrak eforc eDistribution )
(Ypage 74 )
RADAPTIV EBRAKE (Ypage 74 )
RPRE-SAF E®Brake (Ypage 74 )
RSTEERCONTROL (Ypage 76)
Important safet ynotes
If you fail to adapt your drivin gstyle or if you are
inattentive ,th edrivin gsafet ysystems can nei-
ther reduce th eris kof an acciden tno roverride
th elaws of physics. Driving safet ysystems are
merely aids designed to assist driving. You are
responsible fo rmaintainin gth edistanc eto th e
vehicle in front, fo rvehicle speed, fo rbraking in
goo dtime, and fo rstayin gin lane. Always adapt
your drivin gstyle to suit th eprevailin groad and
weather condition sand maintain asaf edistanc e
from th evehicle in front. Drive carefully.
The drivin gsafet ysystems described only wor k
as effectively as possible when there is ade-
quat econtact between th etires and th eroad
surface. Pay particular attention to th einforma-
tion regardin gtires ,recommended minimum
tire tread depths etc. in th e"Wheels and tires "
section (
Ypage 387).
In wintr ydrivin gconditions, always use winte r
tires (M+ Stires )and ,if necessary, snow chains.
Only in this way will th edrivin gsafet ysystems
described in this section wor kas effectively as
possible.
ABS (Anti-lock Braking System)
General information
AB Sregulates brake pressure in suc h away that
th ewheels do no tloc kwhen you brake .Thi s
allow syou to continue steerin gth evehicle when
braking .
The ! ABSwarnin glamp in th einstrumen t
cluster lights up when th eignition is switched
on .It goe sout when th eengin eis running .
AB Sworks from aspeed of about 5mph
(8 km/h), regardles sof road-surfac econditions.
AB Sworks on slipper ysurfaces, eve nwhen you
only brake gently.
Important safet ynotes
iObserv eth e"Important safet ynotes" sec -
tion (Ypage 66).
GWARNING
If AB Sis faulty, th ewheels could loc kwhen
braking .The steerability and braking charac -
teristics may be severely impaired. Addition -
ally, further drivin gsafet ysystems are deac -
tivated. There is an increase ddanger of skid-
din gand accidents .
Drive on carefully. Hav eAB Schecke dimme-
diately at aqualified specialis tworkshop .
Whe nAB Sis malfunctioning, other systems ,
includin gdrivin gsafet ysystems ,will also
becom einoperative .Observ eth einformation
on th eAB Swarnin glamp (
Ypage 319) and dis -
play messages whic hmay be shown in th e
instrumen tcluster (
Ypage 281).
Braking
XIf ABS intervenes: continue to depress th e
brake peda lvigorousl yuntil th ebraking sit -
uation is over.
XTo make afull brak eapplication: depress
th ebrake peda lwit hfull force.
If AB Sintervenes when braking ,you will feel a
pulsin gin th ebrake pedal.
The pulsatin gbrake peda lcan be an indication
of hazardous road conditions, and function sas a
reminder to take extr acar ewhil edriving.
66Driving safety systems
Safety
Page 75 of 450
iActivate ESP®as soon as the situations
described above no longer apply. ESP®will
otherwise not be able to stabilize the vehicle if
the vehicle starts to skid or a wheel starts to
spin.
!Avoid spinning the driven wheels for an
extended period with ESP®deactivated. You
could otherwise damage the drivetrain.
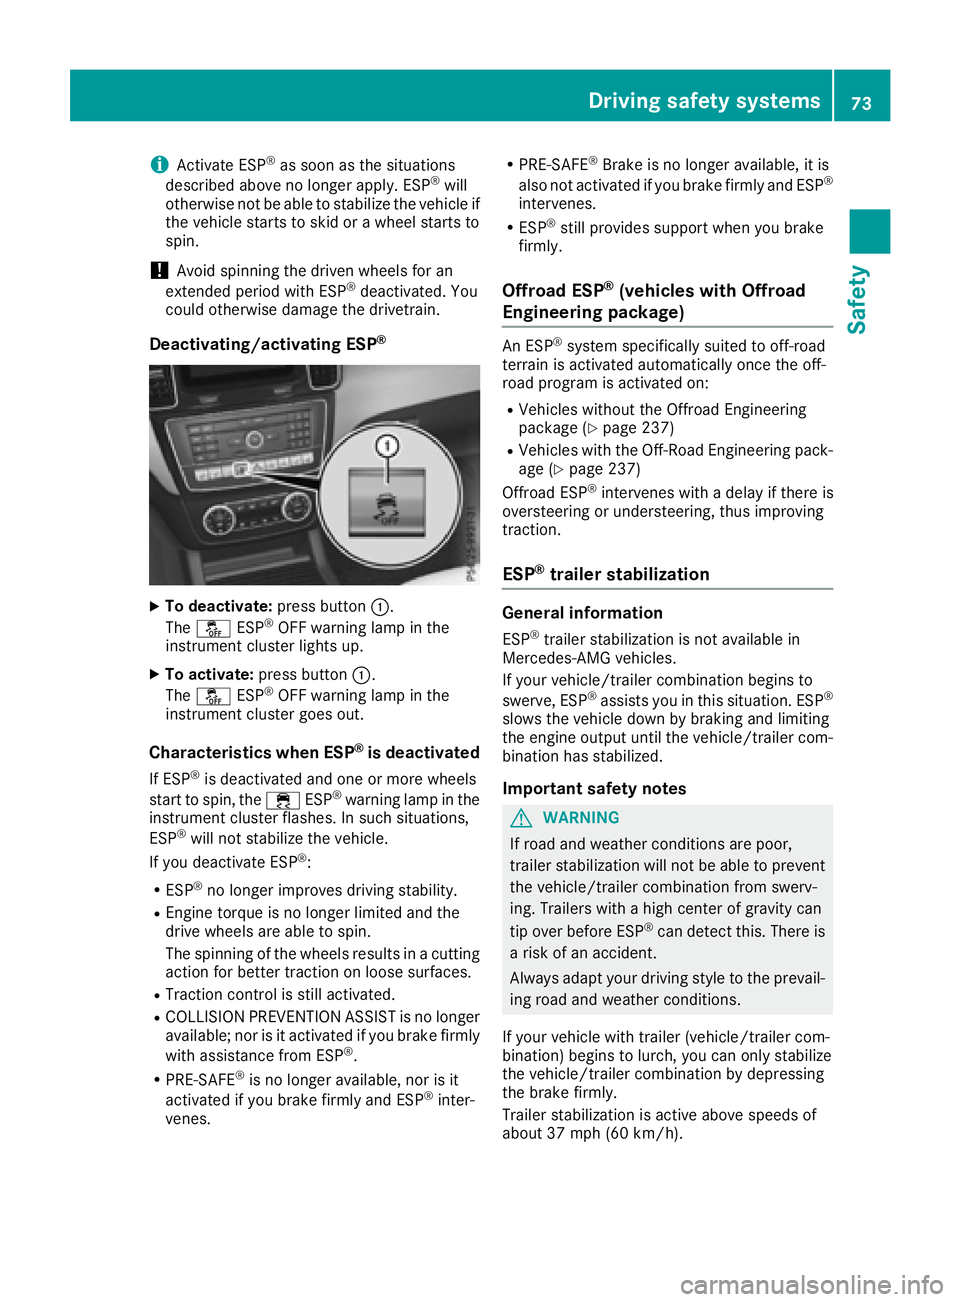
Deactivating/activating ESP®
XTo deactivate: press button:.
The å ESP®OFF warning lamp in the
instrument cluster lights up.
XTo activate: press button :.
The å ESP®OFF warning lamp in the
instrument cluster goes out.
Characteristics when ESP®is deactivated
If ESP®is deactivated and one or more wheels
start to spin, the ÷ESP®warning lamp in the
instrument cluster flashes. In such situations,
ESP
®will not stabilize the vehicle.
If you deactivate ESP®:
RESP®no longer improves driving stability.
REngine torque is no longer limited and the
drive wheels are able to spin.
The spinning of the wheels results in a cutting
action for better traction on loose surfaces.
RTraction control is still activated.
RCOLLISION PREVENTION ASSIST is no longer
available; nor is it activated if you brake firmly
with assistance from ESP
®.
RPRE-SAFE®is no longer available, nor is it
activated if you brake firmly and ESP®inter-
venes.
RPRE-SAFE®Brake is no longer available, it is
also not activated if you brake firmly and ESP®
intervenes.
RESP®still provides support when you brake
firmly.
Offroad ESP®(vehicles with Offroad
Engineering package)
An ESP®system specifically suited to off-road
terrain is activated automatically once the off-
road program is activated on:
RVehicles without the Offroad Engineering
package (Ypage 237)
RVehicles with the Off-Road Engineering pack-
age (Ypage 237)
Offroad ESP®intervenes with a delay if there is
oversteering or understeering, thus improving
traction.
ESP®trailer stabilization
General information
ESP®trailer stabilization is not available in
Mercedes-AMG vehicles.
If your vehicle/trailer combination begins to
swerve, ESP
®assists you in this situation. ESP®
slows the vehicle down by braking and limiting
the engine output until the vehicle/trailer com-
bination has stabilized.
Important safety notes
GWARNING
If road and weather conditions are poor,
trailer stabilization will not be able to prevent
the vehicle/trailer combination from swerv-
ing. Trailers with a high center of gravity can
tip over before ESP
®can detect this. There is
a risk of an accident.
Always adapt your driving style to the prevail-
ing road and weather conditions.
If your vehicle with trailer (vehicle/trailer com-
bination) begins to lurch, you can only stabilize
the vehicle/trailer combination by depressing
the brake firmly.
Trailer stabilization is active above speeds of
about 37 mph (60 km/h).
Driving safety systems73
Safety
Z
Page 83 of 450
XPush release catch:in the direction of the
arrow and at the same time remove mechan- ical key ;from the SmartKey.
For further information about:
Runlocking the driver's door (Ypage 86)
Runlocking the cargo compartment
(Ypage 90)
Rlocking the vehicle (Ypage 86)
Inserting the mechanical key
XPush mechanical key ;completely into the
SmartKey until it engages and release
catch :is back in its basic position.
SmartKey battery
Important safety notes
GWARNING
Batteries contain toxic and corrosive substan- ces. If batteries are swallowed, it can result in
severe health problems. There is a risk of fatalinjury.
Keep batteries out of the reach of children. If
a battery is swallowed, seek medical attention immediately.
The SmartKey batteries contain perchlorate
material, which may require special handling
and regard for the environment. National guide-
lines must be observed during disposal. In Cal-
ifornia, see www.dtsc.ca.gov/
HazardousWaste/Perchlorate/index.cfm .
Mercedes-Benz recommends that you have the
batteries replaced at a qualified specialist work-
shop.
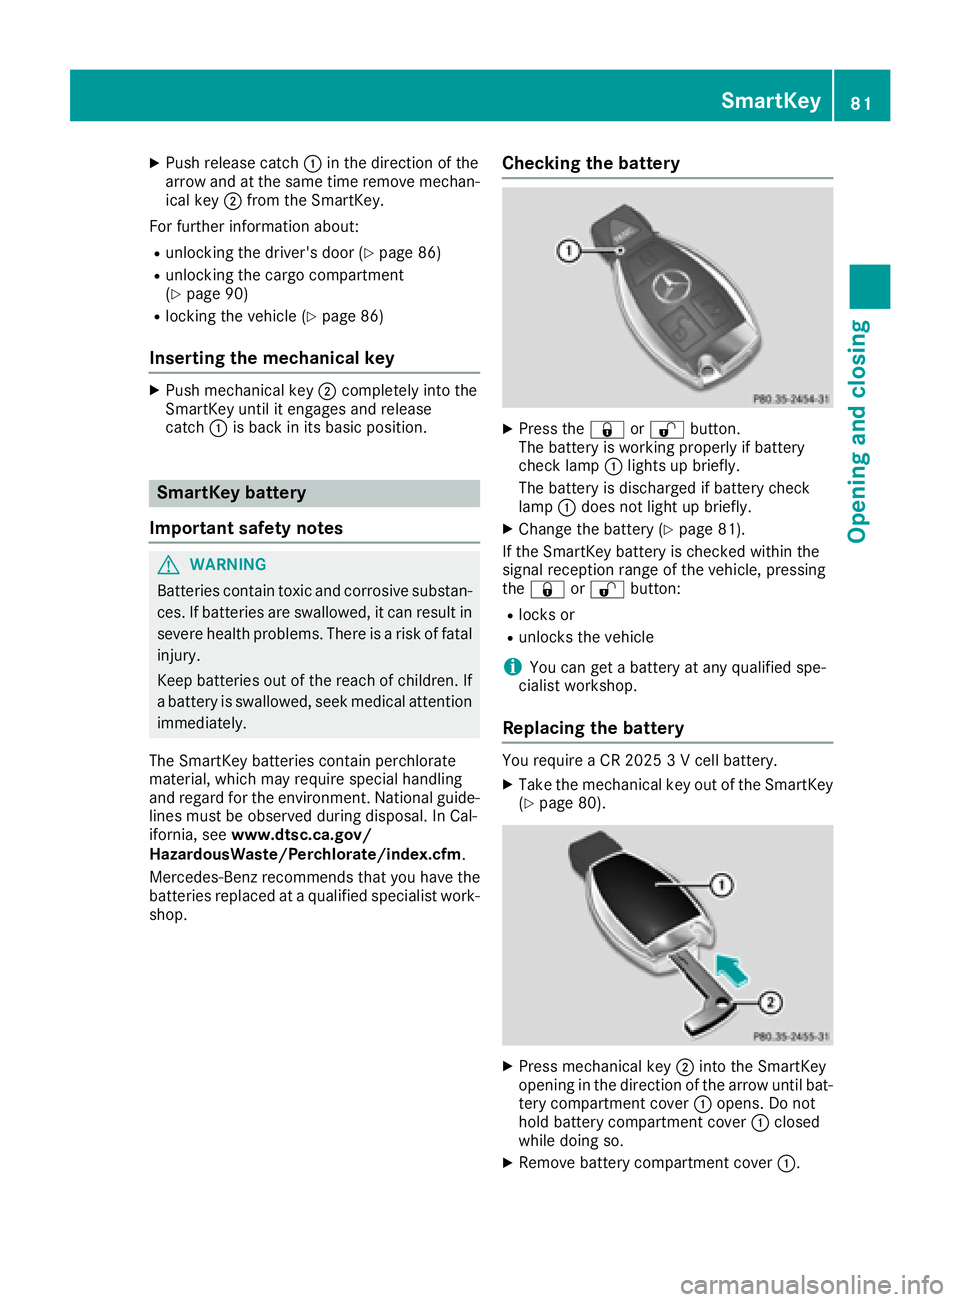
Checking the battery
XPress the &or% button.
The battery is working properly if battery
check lamp :lights up briefly.
The battery is discharged if battery check
lamp :does not light up briefly.
XChange the battery (Ypage 81).
If the SmartKey battery is checked within the
signal reception range of the vehicle, pressing
the & or% button:
Rlocks or
Runlocks the vehicle
iYou can get a battery at any qualified spe-
cialist workshop.
Replacing the battery
You require a CR 2025 3 V cell battery.
XTake the mechanical key out of the SmartKey
(Ypage 80).
XPress mechanical key ;into the SmartKey
opening in the direction of the arrow until bat-
tery compartment cover :opens. Do not
hold battery compartment cover :closed
while doing so.
XRemove battery compartment cover :.
SmartKey81
Opening and closing
Z
Page 112 of 450
Crash-responsive EASY-EXIT feature
If the crash-responsive EASY-EXIT feature is trig-
gered in an accident, the steering column will
move upwards when the driver's door is opened.
This occurs irrespective of the position of the
SmartKey in the ignition lock. This makes it eas-ier to exit the vehicle and rescue the occupants.
The crash-responsive EASY-EXIT feature is only
operational if the EASY-EXIT/ENTRY feature is
activated in the on-board computer
(
Ypage 275).
Mirrors
Rear-view mirror
XAnti-glare mode: flick anti-glare lever :for-
wards or back.
Exterior mirrors
Adjusting the exterior mirrors
GWARNING
You could lose control of your vehicle if you do the following while driving:
Radjust the driver's seat, head restraint,
steering wheel or mirrors
Rfasten the seat belt
There is a risk of an accident.
Adjust the driver's seat, head restraint, steer-
ing wheel and mirror and fasten your seat belt before starting the engine.
GWARNING
The exterior mirror on the front-passenger
side reduces the size of the image. Visible
objects are actually closer than they appear.
This means that you could misjudge the dis-
tance from road users traveling behind, e.g.
when changing lane. There is a risk of an acci-
dent.
For this reason, always make sure of the
actual distance from the road users traveling
behind by glancing over your shoulder.
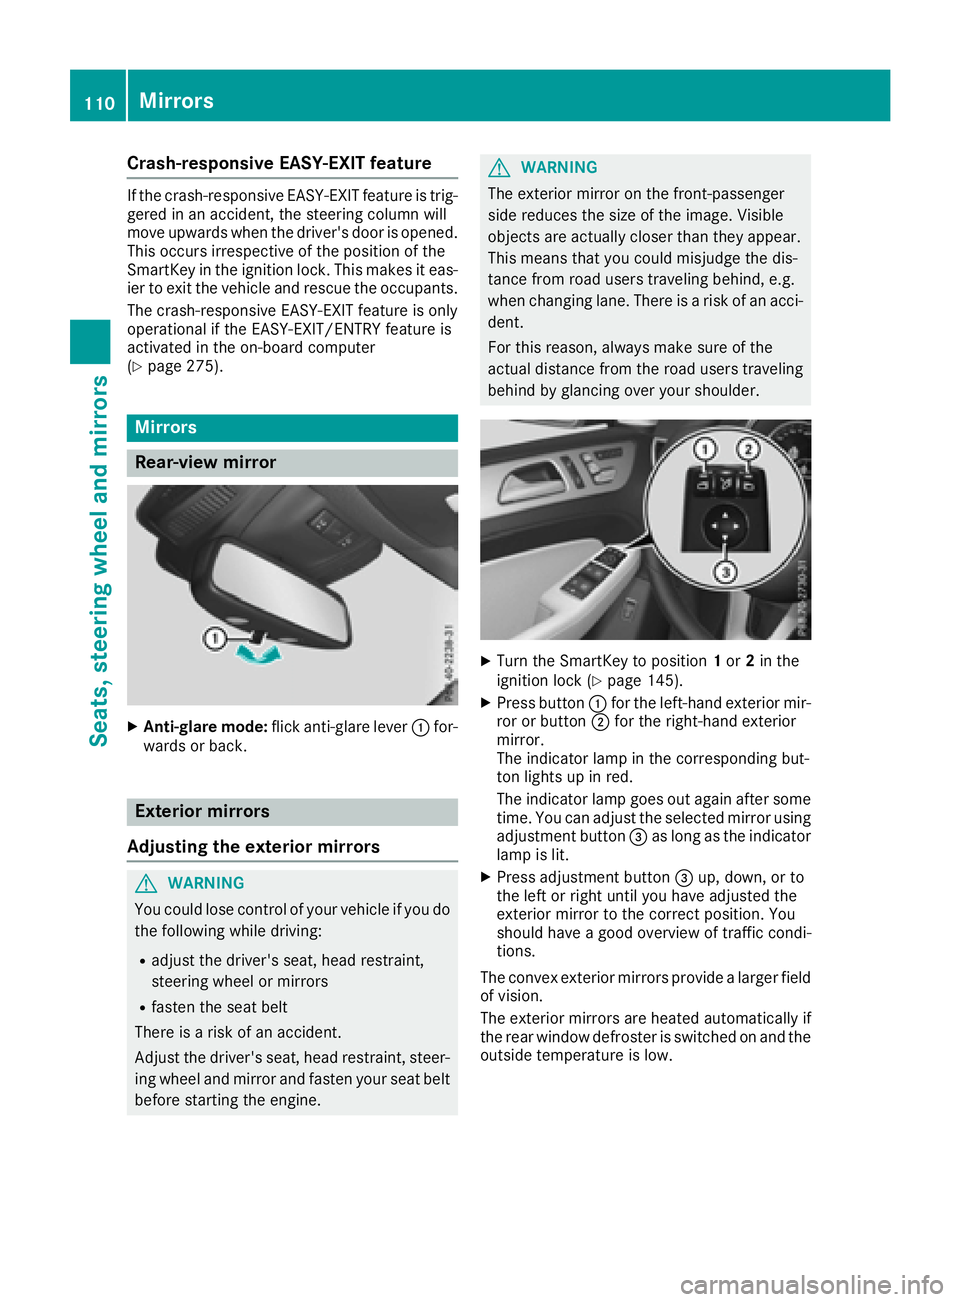
XTurn the SmartKey to position 1or 2in the
ignition lock (Ypage 145).
XPress button :for the left-hand exterior mir-
ror or button ;for the right-hand exterior
mirror.
The indicator lamp in the corresponding but-
ton lights up in red.
The indicator lamp goes out again after some
time. You can adjust the selected mirror using
adjustment button =as long as the indicator
lamp is lit.
XPress adjustment button =up, down, or to
the left or right until you have adjusted the
exterior mirror to the correct position. You
should have a good overview of traffic condi-
tions.
The convex exterior mirrors provide a larger field
of vision.
The exterior mirrors are heated automatically if
the rear window defroster is switched on and the
outside temperature is low.
110Mirrors
Seats, steering wheel and mirrors
Page 116 of 450
Useful information
i
This Operator's Manual describes all models
and all standard and optional equipment of
your vehicle available at the time of publica-
tion of the Operator's Manual. Country-spe-
cific differences are possible. Please note
that your vehicle may not be equipped with all
features described. This also applies to
safety-related systems and functions.
iRead the information on qualified specialist
workshops (Ypage 29).
Exterior lighting
General notes
For reasons of safety, Mercedes-Benz recom-
mends that you drive with the lights switched on
even during the daytime. In some countries,
operation of the headlamps varies due to legal
requirements and self-imposed obligations.
Setting the exterior lighting
Setting options
Exterior lighting can be set using:
Rthe light switch
Rthe combination switch (Ypage 116)
Rthe on-board computer (Ypage 275)
Light switch
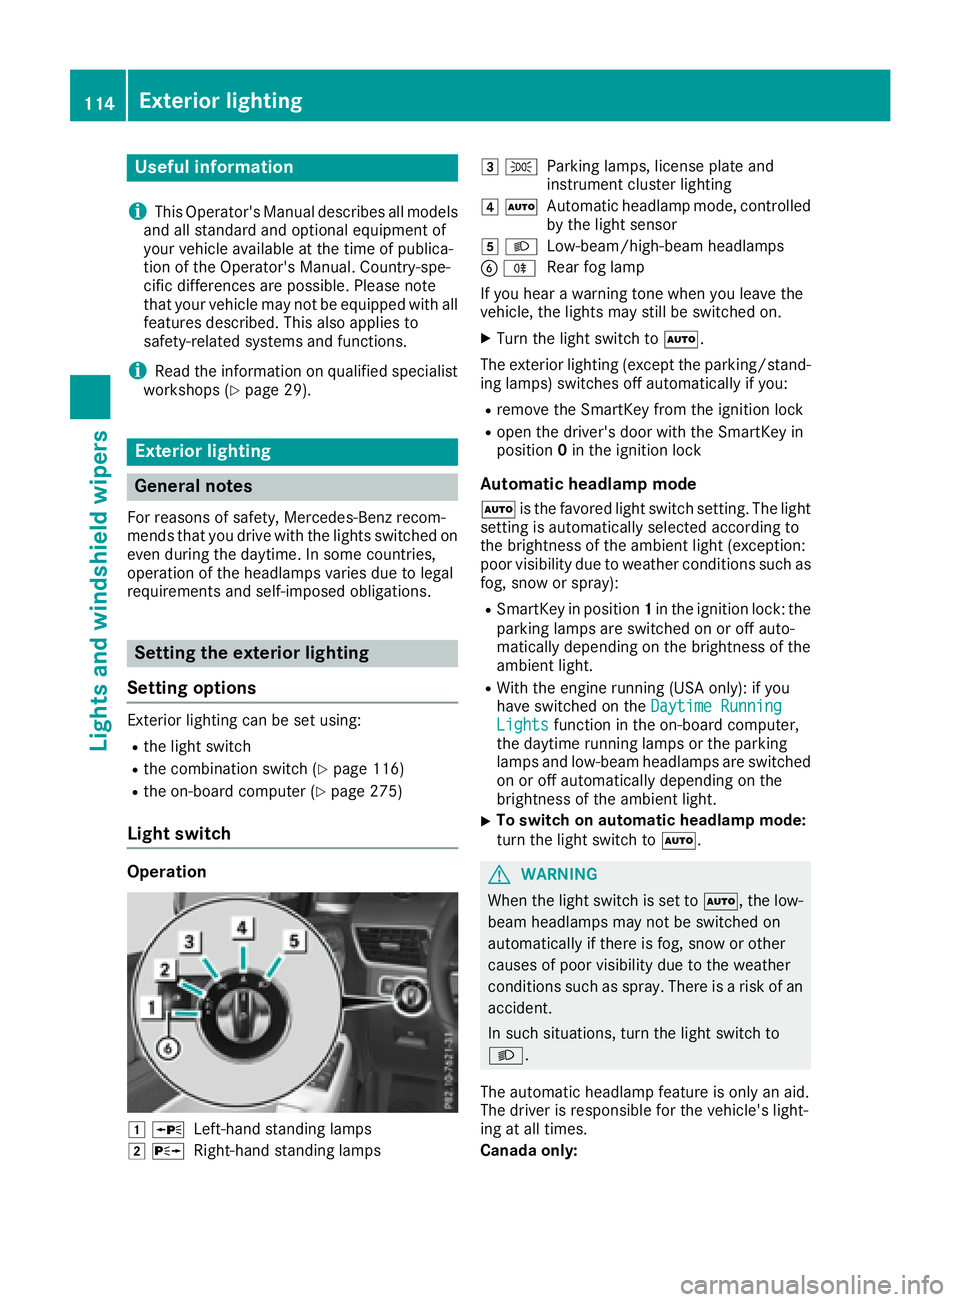
Operation
1 WLeft-hand standing lamps
2XRight-hand standing lamps
3TParking lamps, license plate and
instrument cluster lighting
4ÃAutomatic headlamp mode, controlled
by the light sensor
5 LLow-beam/high-beam headlamps
BRRear fog lamp
If you hear a warning tone when you leave the
vehicle, the lights may still be switched on.
XTurn the light switch to Ã.
The exterior lighting (except the parking/stand-
ing lamps) switches off automatically if you:
Rremove the SmartKey from the ignition lock
Ropen the driver's door with the SmartKey in
position 0in the ignition lock
Automatic headlamp mode
à is the favored light switch setting. The light
setting is automatically selected according to
the brightness of the ambient light (exception:
poor visibility due to weather conditions such as
fog, snow or spray):
RSmartKey in position 1in the ignition lock: the
parking lamps are switched on or off auto-
matically depending on the brightness of the
ambient light.
RWith the engine running (USA only): if you
have switched on the Daytime Running
Lightsfunction in the on-board computer,
the daytime running lamps or the parking
lamps and low-beam headlamps are switched
on or off automatically depending on the
brightness of the ambient light.
XTo switch on automatic headlamp mode:
turn the light switch to Ã.
GWARNING
When the light switch is set to Ã, the low-
beam headlamps may not be switched on
automatically if there is fog, snow or other
causes of poor visibility due to the weather
conditions such as spray. There is a risk of an
accident.
In such situations, turn the light switch to
L.
The automatic headlamp feature is only an aid.
The driver is responsible for the vehicle's light-
ing at all times.
Canada only:
114Exterior lighting
Lights and windshield wipers
Page 118 of 450
Combination switch
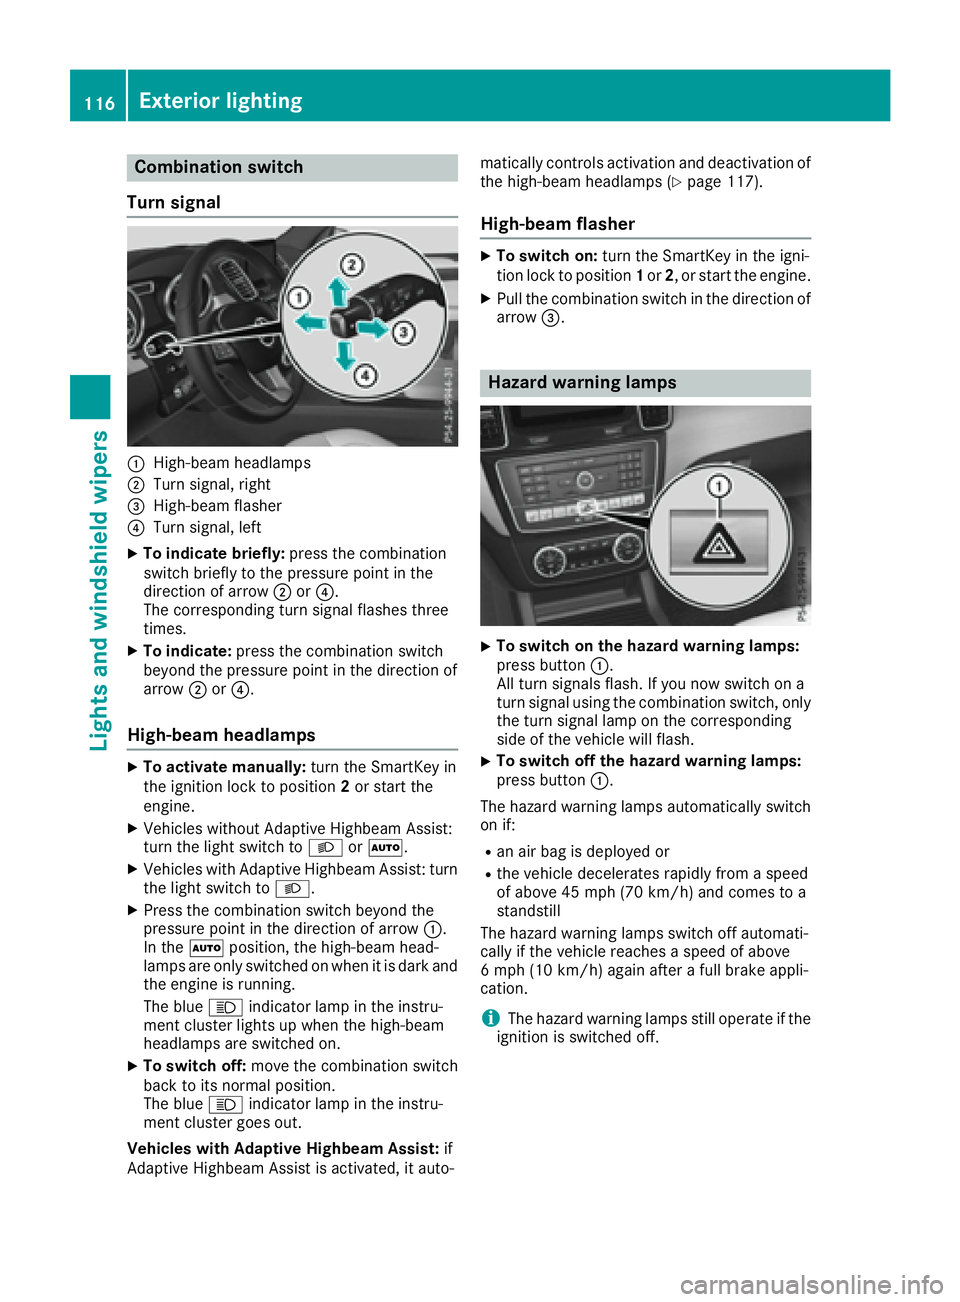
Turn signal
:High-beam headlamps
;Turn signal, right
=High-beam flasher
?Turn signal, left
XTo indicate briefly: press the combination
switch briefly to the pressure point in the
direction of arrow ;or?.
The corresponding turn signal flashes three
times.
XTo indicate: press the combination switch
beyond the pressure point in the direction of
arrow ;or?.
High-beam headlamps
XTo activate manually: turn the SmartKey in
the ignition lock to position 2or start the
engine.
XVehicles without Adaptive Highbeam Assist:
turn the light switch to LorÃ.
XVehicles with Adaptive Highbeam Assist: turn
the light switch to L.
XPress the combination switch beyond the
pressure point in the direction of arrow :.
In the Ãposition, the high-beam head-
lamps are only switched on when it is dark and the engine is running.
The blue Kindicator lamp in the instru-
ment cluster lights up when the high-beam
headlamps are switched on.
XTo switch off: move the combination switch
back to its normal position.
The blue Kindicator lamp in the instru-
ment cluster goes out.
Vehicles with Adaptive Highbeam Assist: if
Adaptive Highbeam Assist is activated, it auto- matically controls activation and deactivation of
the high-beam headlamps (
Ypage 117).
High-beam flasher
XTo switch on: turn the SmartKey in the igni-
tion lock to position 1or 2, or start the engine.
XPull the combination switch in the direction of
arrow =.
Hazard warning lamps
XTo switch on the hazard warning lamps:
press button :.
All turn signals flash. If you now switch on a
turn signal using the combination switch, only
the turn signal lamp on the corresponding
side of the vehicle will flash.
XTo switch off the hazard warning lamps:
press button :.
The hazard warning lamps automatically switch
on if:
Ran air bag is deployed or
Rthe vehicle decelerates rapidly from a speed
of above 45 mph (70 km/h) and comes to a
standstill
The hazard warning lamps switch off automati-
cally if the vehicle reaches a speed of above
6 mph (10 km/h) again after a full brake appli-
cation.
iThe hazard warning lamps still operate if the
ignition is switched off.
116Exterior lighting
Lights and windshield wipers
Page 119 of 450
Cornering light function
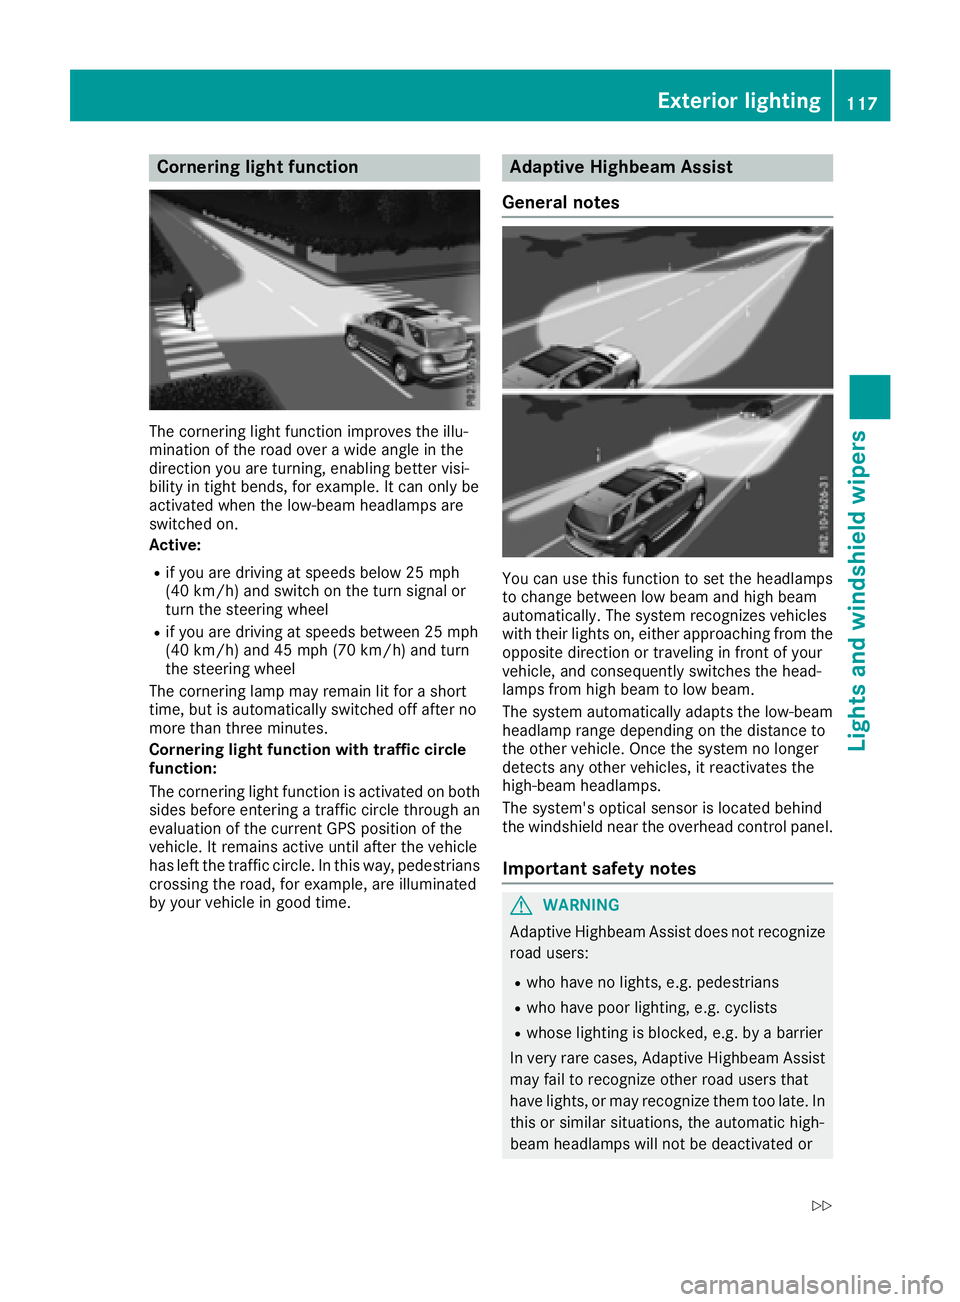
The cornering light function improves the illu-
mination of the road over a wide angle in the
direction you are turning, enabling better visi-
bility in tight bends, for example. It can only be
activated when the low-beam headlamps are
switched on.
Active:
Rif you are driving at speeds below 25 mph
(40 km/h) and switch on the turn signal or
turn the steering wheel
Rif you are driving at speeds between 25 mph
(40 km/h) and 45 mph (70 km/h) and turn
the steering wheel
The cornering lamp may remain lit for a short
time, but is automatically switched off after no
more than three minutes.
Cornering light function with traffic circle
function:
The cornering light function is activated on both
sides before entering a traffic circle through an
evaluation of the current GPS position of the
vehicle. It remains active until after the vehicle
has left the traffic circle. In this way, pedestrians
crossing the road, for example, are illuminated
by your vehicle in good time.
Adaptive Highbeam Assist
General notes
You can use this function to set the headlamps
to change between low beam and high beam
automatically. The system recognizes vehicles
with their lights on, either approaching from the
opposite direction or traveling in front of your
vehicle, and consequently switches the head-
lamps from high beam to low beam.
The system automatically adapts the low-beam
headlamp range depending on the distance to
the other vehicle. Once the system no longer
detects any other vehicles, it reactivates the
high-beam headlamps.
The system's optical sensor is located behind
the windshield near the overhead control panel.
Important safety notes
GWARNING
Adaptive Highbeam Assist does not recognize
road users:
Rwho have no lights, e.g. pedestrians
Rwho have poor lighting, e.g. cyclists
Rwhose lighting is blocked, e.g. by a barrier
In very rare cases, Adaptive Highbeam Assist
may fail to recognize other road users that
have lights, or may recognize them too late. In this or similar situations, the automatic high-
beam headlamps will not be deactivated or
Exterior lighting117
Lights and windshield wipers
Z
Page 121 of 450
except when the SmartKey is in position2in the
ignition lock.
The color and brightness for the ambient lighting may be set via the multimedia system (see the
separate operating instructions).
Automatic interior lighting control
XTo switch on: set the switch to center posi-
tion B.
XTo switch off: set the switch to the |
position.
The interior lighting automatically switches on if
you:
Runlock the vehicle
Ropen a door
Rremove the SmartKey from the ignition lock
The interior light is activated for a short while
when the SmartKey is removed from the ignition
lock. This delayed switch-off can be adjusted via
the multimedia system (see the separate oper-
ating instructions).
Manual interior lighting control
XTo switch the front interior lighting on: set
the switch to the cposition.
XTo switch the front interior lighting off: set
the switch to the |position or (if the door
is closed) to the center position.
XTo switch the rear compartment interior
lighting on/off: press theubutton.
XTo switch the reading lamps on/off: press
the p button.
Crash-responsive emergency lighting
The interior lighting is activated automatically if
the vehicle is involved in an accident.
XTo switch off the crash-responsive emer-
gency lighting: press the hazard warning
lamp button.
or
XLock and then unlock the vehicle using the
SmartKey.
Replacing bulbs (vehicles with LED
headlamps)
The front and rear light clusters of your vehicle
are equipped with LED light bulbs. Do not
replace the bulbs yourself. Contact a qualified
specialist workshop which has the necessary
specialist knowledge and tools to carry out the
work required.
Lamps are an important aspect of vehicle safety.
You must therefore make sure that these func-
tion correctly at all times. Have the headlamp
setting checked regularly.
Changing bulbs (vehicles with halo-
gen headlamps)
Important safety notes
GWARNING
Bulbs, lamps and connectors can get very hot
when operating. If you change a bulb, you
could burn yourself on these components.
There is a risk of injury.
Allow these components to cool down before
changing a bulb.
Do not use a bulb that has been dropped or if its
glass tube has been scratched.
The bulb may explode if:
Ryou touch it
Rit is hot
Ryou drop it
Ryou scratch it
Only operate bulbs in enclosed lamps designed
for that purpose. Only install spare bulbs of the same type and the specified voltage.
Marks on the glass tube reduce the service life
of the bulbs. Do not touch the glass tube with
your bare hands. If necessary, clean the glass
tube when cold with alcohol or spirit and rub it
off with a lint-free cloth.
Protect bulbs from moisture during operation.
Do not allow bulbs to come into contact with
liquids.
Only replace the bulbs listed (
Ypage 120).
Have the bulbs that you cannot replace yourself
replaced at a qualified specialist workshop.
Changing bulbs (vehicles with halogen headlamps)119
Lights and windshield wipers
Z
Page 124 of 450
theÄ position, causing the windshield wiper
to wipe more frequently.
Vehicles with MAGIC VISION CONTROL: the
washer fluid is fed through the wiper blades and
when wiping with washer fluid îthe washer
fluid is emitted directly from the blades.
If the wiper blades are worn, the windshield will
no longer be wiped properly. This could prevent
you from observing the traffic conditions.
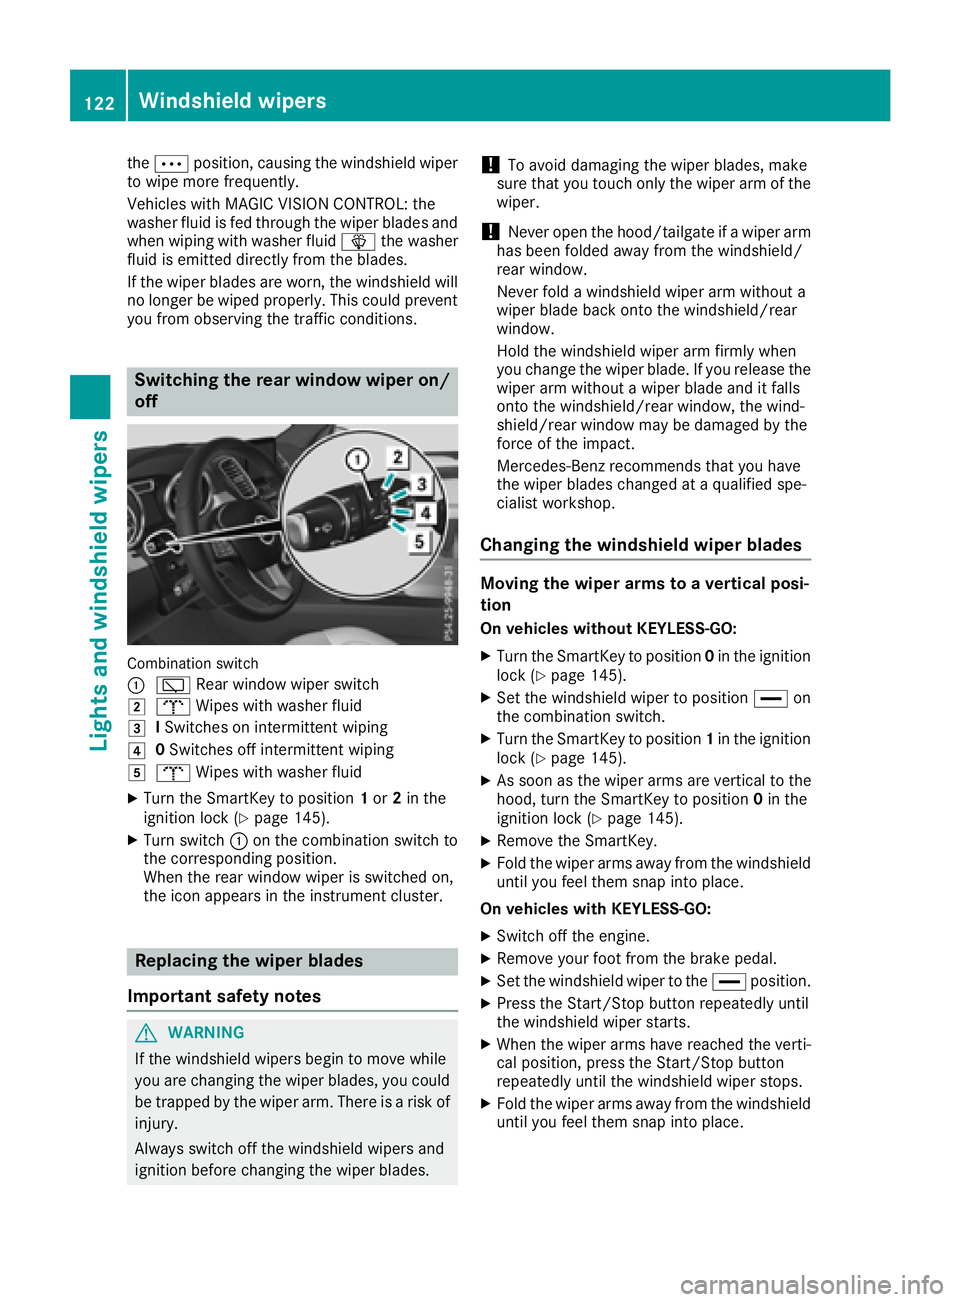
Switching the rear window wiper on/
off
Combination switch
:
è Rear window wiper switch
2bWipes with washer fluid
3ISwitches on intermittent wiping
40 Switches off intermittent wiping
5b Wipes with washer fluid
XTurn the SmartKey to position 1or 2in the
ignition lock (Ypage 145).
XTurn switch :on the combination switch to
the corresponding position.
When the rear window wiper is switched on,
the icon appears in the instrument cluster.
Replacing the wiper blades
Important safety notes
GWARNING
If the windshield wipers begin to move while
you are changing the wiper blades, you could be trapped by the wiper arm. There is a risk of
injury.
Always switch off the windshield wipers and
ignition before changing the wiper blades.
!To avoid damaging the wiper blades, make
sure that you touch only the wiper arm of the
wiper.
!Never open the hood/tailgate if a wiper arm
has been folded away from the windshield/
rear window.
Never fold a windshield wiper arm without a
wiper blade back onto the windshield/rear
window.
Hold the windshield wiper arm firmly when
you change the wiper blade. If you release the
wiper arm without a wiper blade and it falls
onto the windshield/rear window, the wind-
shield/rear window may be damaged by the
force of the impact.
Mercedes-Benz recommends that you have
the wiper blades changed at a qualified spe-
cialist workshop.
Changing the windshield wiper blades
Moving the wiper arms to a vertical posi-
tion
On vehicles without KEYLESS-GO:
XTurn the SmartKey to position 0in the ignition
lock (Ypage 145).
XSet the windshield wiper to position °on
the combination switch.
XTurn the SmartKey to position 1in the ignition
lock (Ypage 145).
XAs soon as the wiper arms are vertical to the
hood, turn the SmartKey to position 0in the
ignition lock (
Ypage 145).
XRemove the SmartKey.
XFold the wiper arms away from the windshield
until you feel them snap into place.
On vehicles with KEYLESS-GO:
XSwitch off the engine.
XRemove your foot from the brake pedal.
XSet the windshield wiper to the °position.
XPress the Start/Stop button repeatedly until
the windshield wiper starts.
XWhen the wiper arms have reached the verti-
cal position, press the Start/Stop button
repeatedly until the windshield wiper stops.
XFold the wiper arms away from the windshield
until you feel them snap into place.
122Windshield wipers
Lights and windshield wiper s
Page 143 of 450
Setting the departure time
You can set the departure time using the on-
board computer or via the online access to the
vehicle. The activation of the "Pre-entry climate
control at departure time" function can be linked
to this departure time. Your vehicle will then be
cooled or heated until the desired temperature
is reached in time for the set departure time.
"Pre-entry climate control at departure time" will
be activated a maximum of 55 minutes before
departure. If the departure is delayed, the vehi-
cle will be heated or cooled for another five
minutes.
XTo set the departure time:set the departure
time using the on-board computer
(
Ypage 274). Set the departure time via the
online access to the vehicle (Ypage 178).
XTo activate or deactivate "Pre-entry cli-
mate control at departure time": activate
or deactivate "Pre-entry climate control at
departure time" using the on-board com-
puter. Activate or deactivate "Pre-entry cli-
mate control at departure time" via the online
access to the vehicle (
Ypage 178).
The "Pre-entry climate control at departure
time" function switches off automatically when
the vehicle is started. The following functions
remain active:
RSeat heating
RSeat ventilation
RIonization
To deactivate "Pre-entry climate control at
departure time": the activated "Pre-entry cli-
mate control at departure time" can be deacti-
vated using the button (
Ypage 141).
Activating/deactivating "Immediate
pre-entry climate control" via the but-
ton
You can activate "Immediate pre-entry climate
control" even if the vehicle interior is already at
the desired temperature. This means, for exam-
ple, that the vehicle interior continues to be
cooled or heated if the journey is interrupted for
up to 50 minutes and the interior temperature is
kept constant.
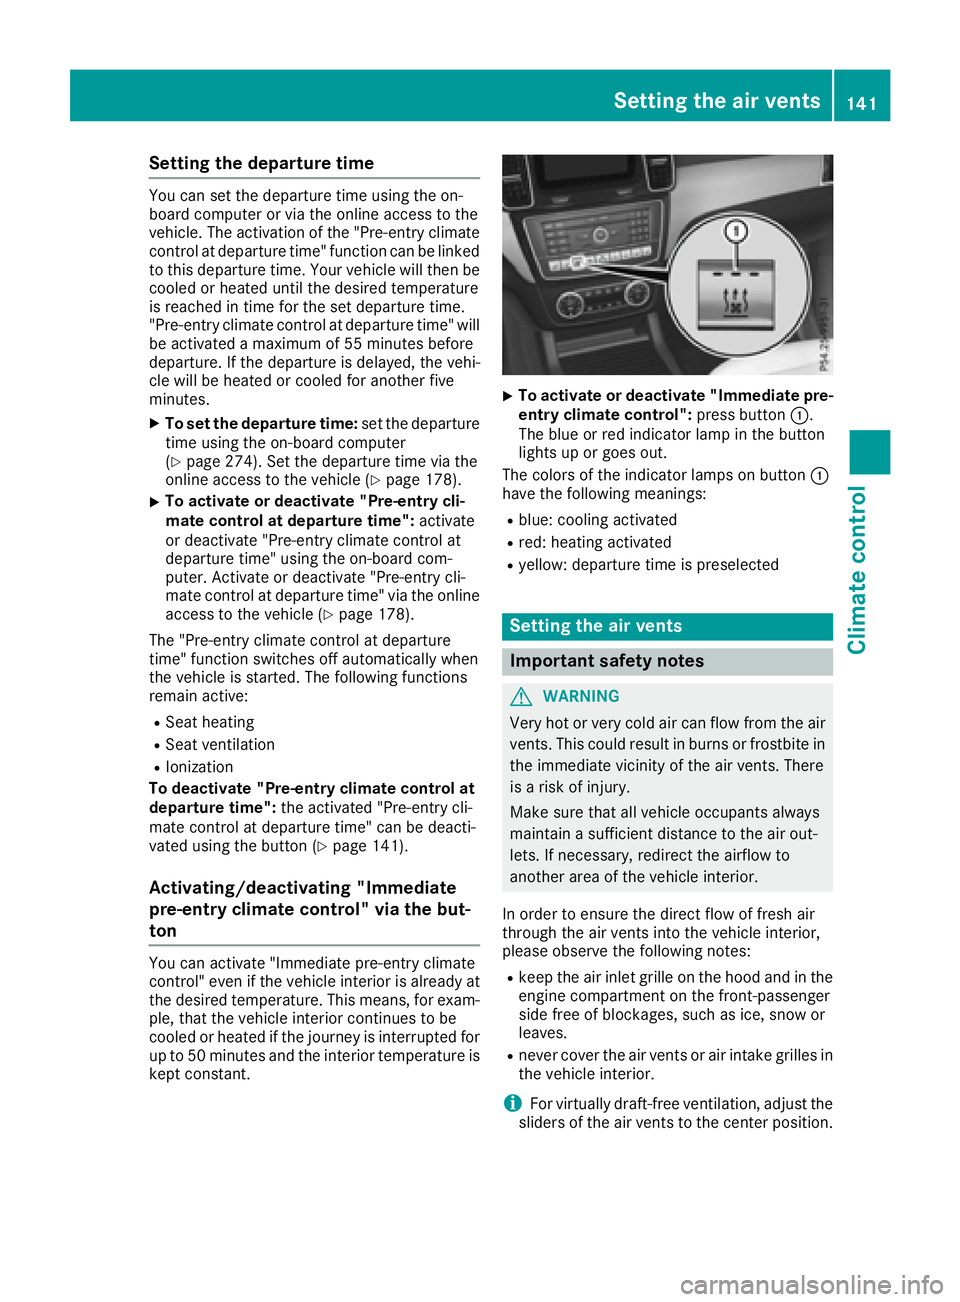
XTo activate or deactivate "Immediate pre-
entry climate control": press button:.
The blue or red indicator lamp in the button
lights up or goes out.
The colors of the indicator lamps on button :
have the following meanings:
Rblue: cooling activated
Rred: heating activated
Ryellow: departure time is preselected
Setting the air vents
Important safety notes
GWARNING
Very hot or very cold air can flow from the air
vents. This could result in burns or frostbite in
the immediate vicinity of the air vents. There
is a risk of injury.
Make sure that all vehicle occupants always
maintain a sufficient distance to the air out-
lets. If necessary, redirect the airflow to
another area of the vehicle interior.
In order to ensure the direct flow of fresh air
through the air vents into the vehicle interior,
please observe the following notes:
Rkeep the air inlet grille on the hood and in the
engine compartment on the front-passenger
side free of blockages, such as ice, snow or
leaves.
Rnever cover the air vents or air intake grilles in
the vehicle interior.
iFor virtually draft-free ventilation, adjust the
sliders of the air vents to the center position.
Setting the air vents141
Climate control
Z