MERCEDES-BENZ GLE COUPE 2015 Owners Manual
Manufacturer: MERCEDES-BENZ, Model Year: 2015, Model line: GLE COUPE, Model: MERCEDES-BENZ GLE COUPE 2015Pages: 393, PDF Size: 12.71 MB
Page 251 of 393
G
WARNING
When the auxiliary heating is switched on,
parts of the vehicle can become very hot.
Flammable materials such as leaves, grass or twigs may ignite if they come into contact
with:
R hot parts of the exhaust system
R the exhaust gas itself
There is a risk of fire.
When the auxiliary heating is switched on,
make sure that:
R no flammable materials come into contact
with hot vehicle components
R the exhaust gas can escape from the
exhaust pipe unhindered
R the exhaust gas does not come into contact
with flammable materials.
! Operating the auxiliary heating/ventilation
draws on the vehicle battery. After you have
heated or ventilated the vehicle a maximum of two times, drive for a longer distance.
Only vehicles with auxiliary heating have this
function.
In the Heating Heating submenu, you can select a
stored departure time or change a departure
time.
The auxiliary heating timer function calculates
the switch-on time according to the outside
temperature so that the vehicle is preheated by the departure time. When the departure time isreached, the auxiliary heating continues to heat
for a further five minutes and then switches off. The auxiliary heating adopts the THERMATIC orTHERMOTRONIC temperature setting.
You can switch off the auxiliary heating by using
the remote control or the auxiliary heating but-
ton on the centre console.
i Switch the auxiliary heating on regularly
once a month for about ten minutes.
Further information on auxiliary heating
(Y page 138). Selecting the departure time or deactivat-
ing a selected departure time
X Press the =or; button on the steering
wheel to select the Settings Settingsmenu.
X Press the :or9 button to select the
Heating
Heating submenu.
X Press ato confirm.
You will see the selected setting.
X Press ato confirm.
X Press the :or9 button to select one
of the three departure times or Timer
Timeroff
off(no
timer active).
X Press ato confirm.
If a departure time is selected, the yellow
indicator lamp lights up on the auxiliary heat- ing button.
Changing the departure time
X Press the =or; button on the steering
wheel to select the Settings
Settingsmenu.
X Press the :or9 button to select the
Heating
Heating submenu.
X Press ato confirm.
You will see the selected setting.
X Press the :or9 button to select A
A, B
B
or Change C
Change C.
X Press ato confirm.
You can now change the departure time.
X Press the =or; button to select the
display to be changed: hours, minutes.
X Press the :or9 button to set the
selected display.
X Press the abutton to store the entry.
The yellow indicator lamp on the auxiliary
heating button lights up.
Convenience submenu Activating/deactivating the EASY-
ENTRY/EXIT feature
G
WARNING
When the EASY-ENTRY/EXIT feature adjusts
the steering wheel, you and other vehicle
occupants – particularly children – could
become trapped. There is a risk of injury.
While the EASY-ENTRY/EXIT feature is mak-
ing adjustments, make sure that no one has
any body parts in the sweep of the steering
wheel. 248
Menus and submenusOn-board computer and displays
Page 252 of 393
If someone is trapped:
R press one of the memory function position
buttons, or
R move the switch for steering wheel adjust-
ment in the opposite direction to that in
which the steering wheel is moving.
The adjustment process is stopped.
X Press the =or; button on the steering
wheel to select the Settings
Settings menu.
X Press the :or9 button to select the
Convenience
Convenience submenu.
X Press ato confirm.
X Using :or9, select the Easy EasyEntry/
Entry/
Exit
Exit function.
If the Easy
Easy Entry/Exit
Entry/Exit function is activated,
the vehicle steering wheel is displayed in
orange in the multifunction display.
X Press the abutton to save the setting.
Further information on the EASY-ENTRY/EXIT
feature (Y page 110).
Switching belt adjustment on/off
X Press the =or; button on the steering
wheel to select the Settings
Settings menu.
X Press the :or9 button to select the
Convenience
Convenience submenu.
X Press ato confirm.
X Press the :or9 button to select the
Belt adjustment Belt adjustment function.
If the Belt
Belt adjustment
adjustment function is activated,
the vehicle seat belt is shown in orange in the multifunction display.
X Press the abutton to save the setting.
For further information on belt adjustment, see
(Y page 41).
Switching the fold mirrors in when lock-
ing function on/off This function is only available when the vehicle is
equipped with the electrical fold-in function.
When you activate the Auto. fold-in mir‐ Auto. fold-in mir‐
rors
rors function, the exterior mirrors are folded in
when the vehicle is locked. The exterior mirrors fold out automatically again as soon as you
unlock the vehicle. X
Press the =or; button on the steering
wheel to select the Settings
Settings menu.
X Press the :or9 button to select the
Convenience Convenience submenu.
X Press ato confirm.
X Press the :or9 button to select the
Auto. fold-in mirrors
Auto. fold-in mirrors function.
If the Auto. fold-in mirrors
Auto. fold-in mirrors function is
switched on, the multifunction display shows
the exterior mirror in orange.
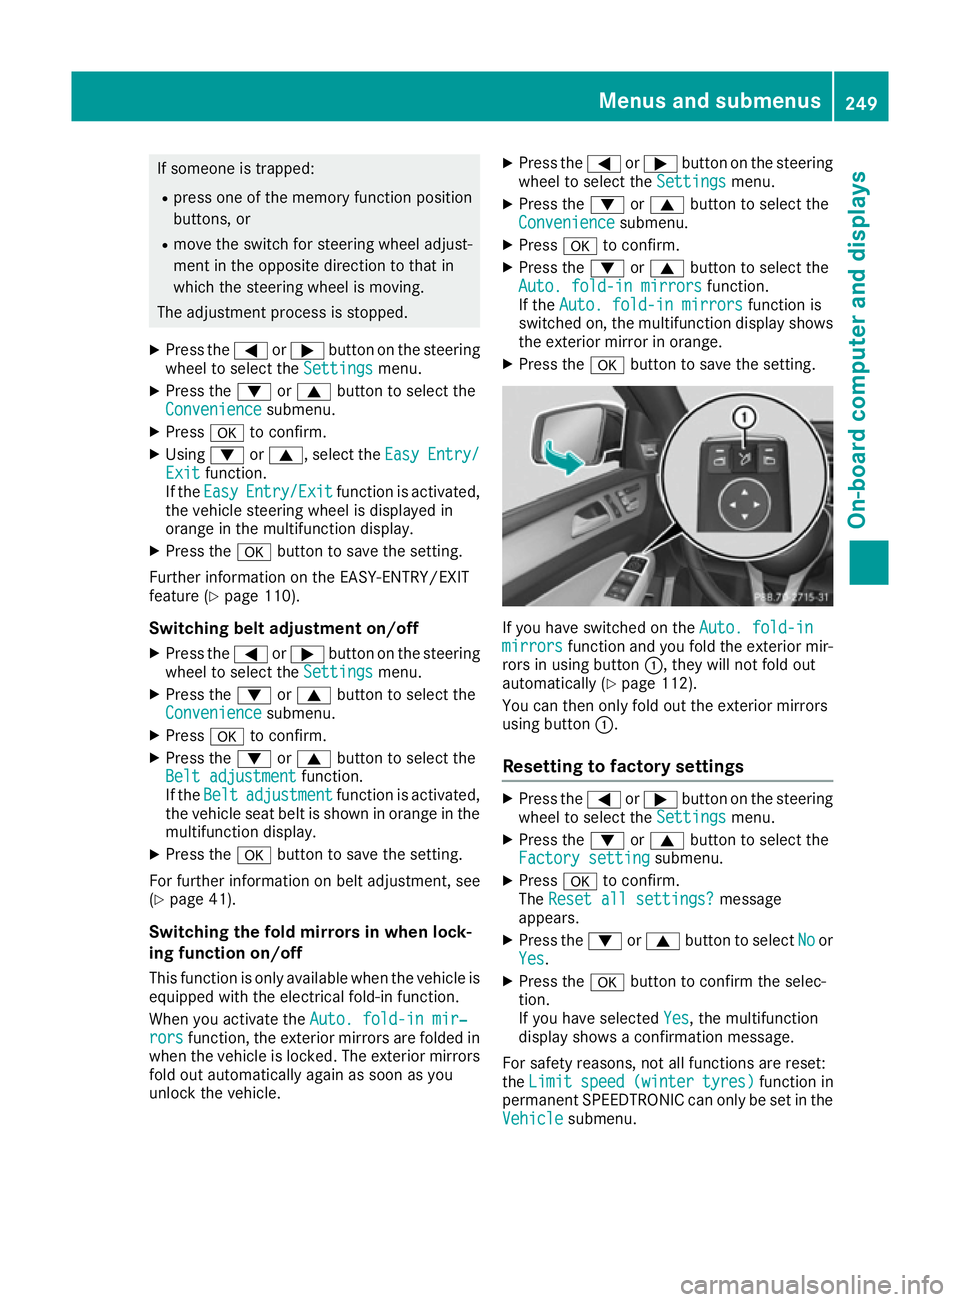
X Press the abutton to save the setting. If you have switched on the
Auto. fold-in
Auto. fold-in
mirrors
mirrors function and you fold the exterior mir-
rors in using button :, they will not fold out
automatically (Y page 112).
You can then only fold out the exterior mirrors
using button :.
Resetting to factory settings X
Press the =or; button on the steering
wheel to select the Settings Settingsmenu.
X Press the :or9 button to select the
Factory setting
Factory setting submenu.
X Press ato confirm.
The Reset all settings?
Reset all settings? message
appears.
X Press the :or9 button to select No
Noor
Yes
Yes.
X Press the abutton to confirm the selec-
tion.
If you have selected Yes Yes, the multifunction
display shows a confirmation message.
For safety reasons, not all functions are reset:
the Limit Limit speed
speed(winter
(winter tyres)
tyres)function in
permanent SPEEDTRONIC can only be set in the
Vehicle
Vehicle submenu. Menus and submenus
249On-board computer and displays Z
Page 253 of 393
AMG menu (Mercedes-AMG vehicles)
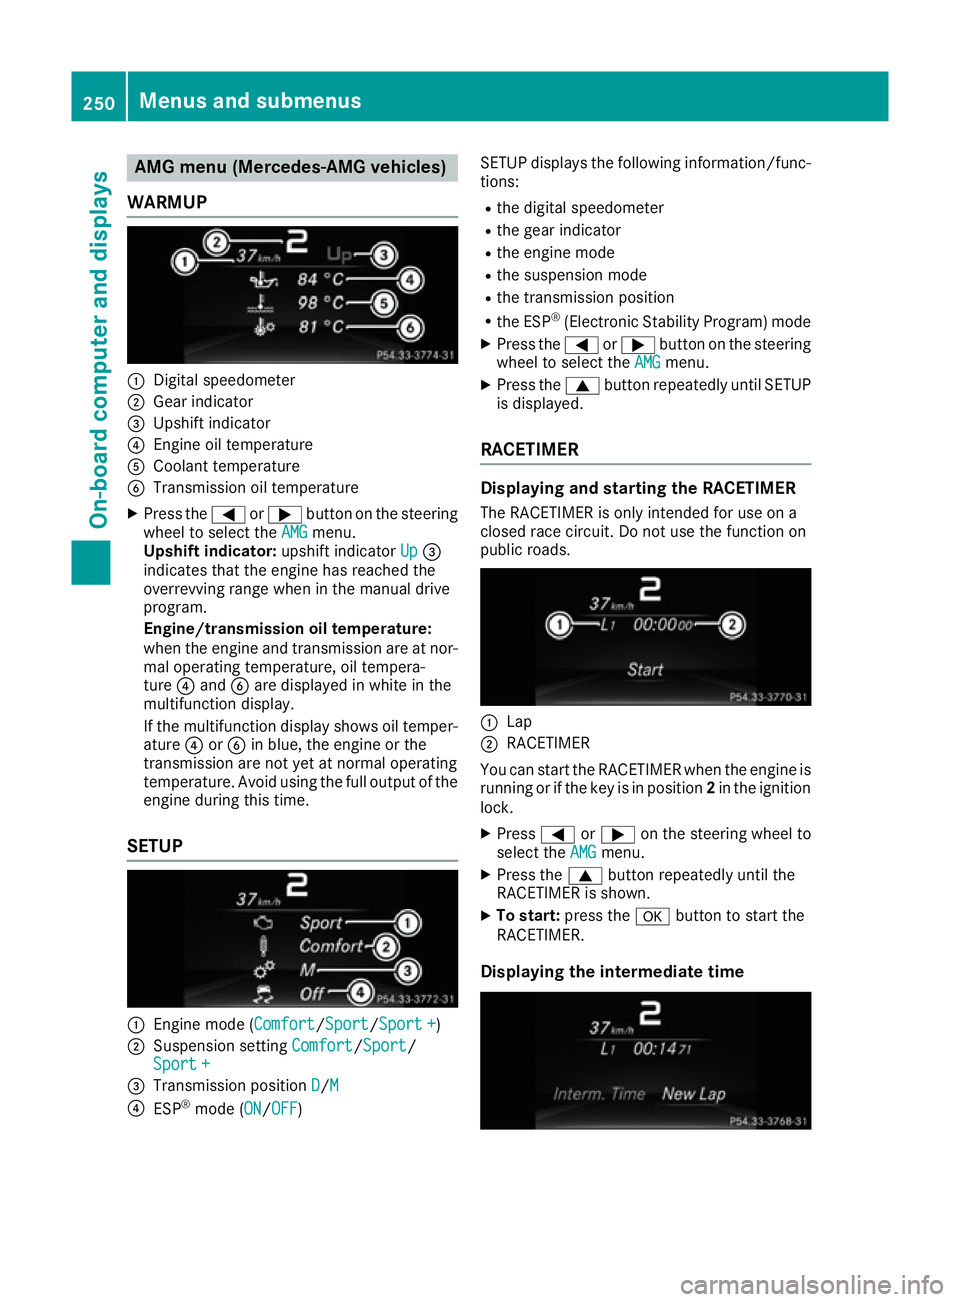
WARMUP :
Digital speedometer
; Gear indicator
= Upshift indicator
? Engine oil temperature
A Coolant temperature
B Transmission oil temperature
X Press the =or; button on the steering
wheel to select the AMG
AMGmenu.
Upshift indicator: upshift indicatorUp
Up=
indicates that the engine has reached the
overrevving range when in the manual drive
program.
Engine/transmission oil temperature:
when the engine and transmission are at nor- mal operating temperature, oil tempera-
ture ?and Bare displayed in white in the
multifunction display.
If the multifunction display shows oil temper- ature ?orB in blue, the engine or the
transmission are not yet at normal operating
temperature. Avoid using the full output of the
engine during this time.
SETUP :
Engine mode (Comfort Comfort/SportSport/Sport + Sport +)
; Suspension setting Comfort
Comfort/Sport
Sport/
Sport +
Sport +
= Transmission position D
D/M
M
? ESP ®
mode ( ON
ON/OFFOFF) SETUP displays the following information/func-
tions:
R the digital speedometer
R the gear indicator
R the engine mode
R the suspension mode
R the transmission position
R the ESP ®
(Electronic Stability Program) mode
X Press the =or; button on the steering
wheel to select the AMG
AMGmenu.
X Press the 9button repeatedly until SETUP
is displayed.
RACETIMER Displaying and starting the RACETIMER
The RACETIMER is only intended for use on a
closed race circuit. Do not use the function on
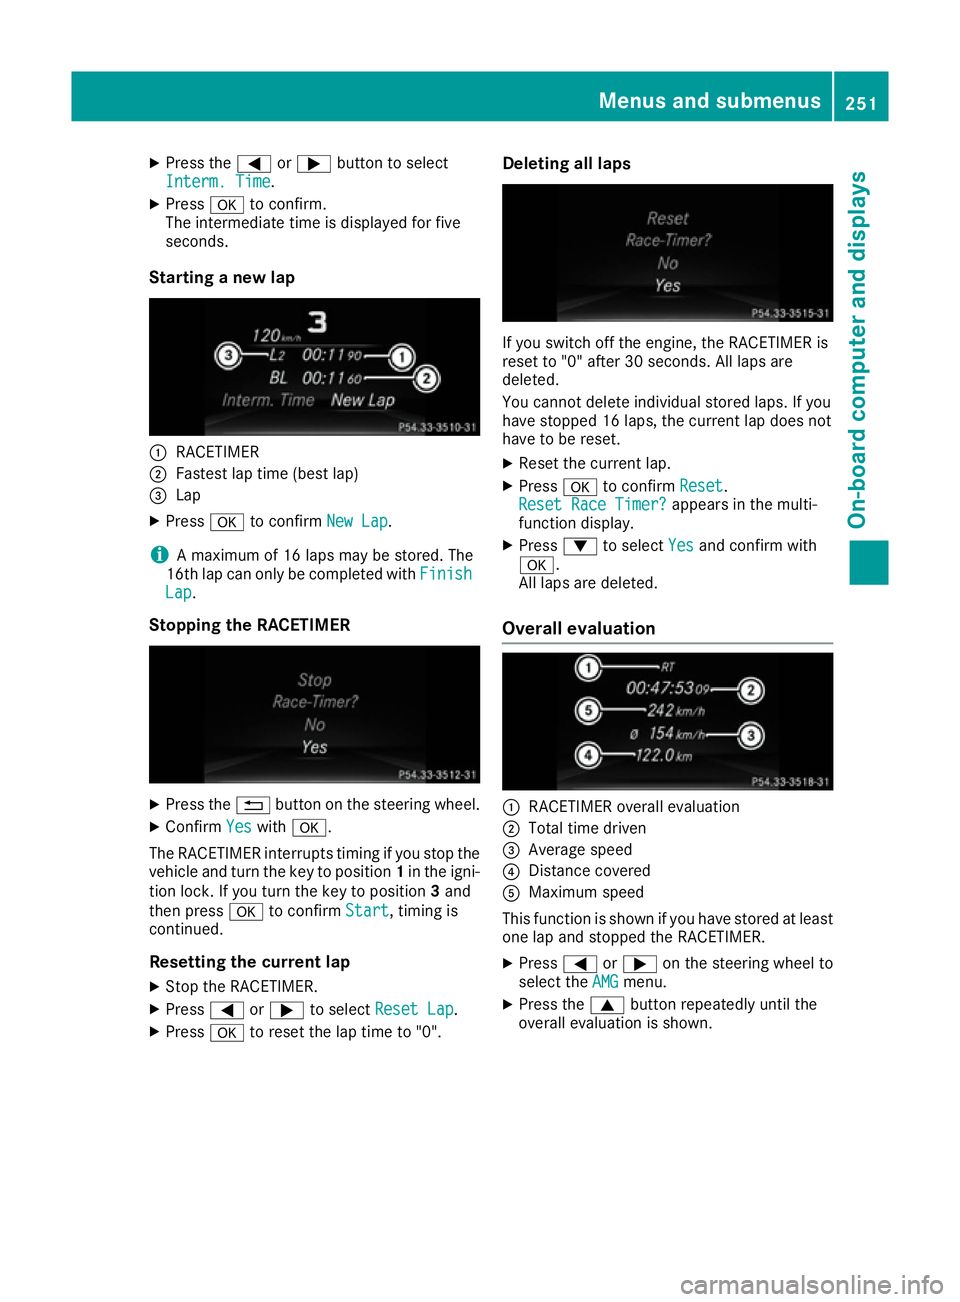
public roads. :
Lap
; RACETIMER
You can start the RACETIMER when the engine is running or if the key is in position 2in the ignition
lock.
X Press =or; on the steering wheel to
select the AMG AMGmenu.
X Press the 9button repeatedly until the
RACETIMER is shown.
X To start: press the abutton to start the
RACETIMER.
Displaying the intermediate time 250
Menus and sub
menusOn-board computer and displays
Page 254 of 393
X
Press the =or; button to select
Interm. Time
Interm. Time.
X Press ato confirm.
The intermediate time is displayed for five
seconds.
Starting a new lap :
RACETIMER
; Fastest lap time (best lap)
= Lap
X Press ato confirm New Lap
New Lap.
i A maximum of 16 laps may be stored. The
16th lap can only be completed with Finish
Finish
Lap
Lap.
Stopping the RACETIMER X
Press the %button on the steering wheel.
X Confirm Yes
Yes with a.
The RACETIMER interrupts timing if you stop the
vehicle and turn the key to position 1in the igni-
tion lock. If you turn the key to position 3and
then press ato confirm Start
Start, timing is
continued.
Resetting the current lap
X Stop the RACETIMER.
X Press =or; to select Reset Lap
Reset Lap.
X Press ato reset the lap time to "0". Deleting all laps If you switch off the engine, the RACETIMER is
reset to "0" after 30 seconds. All laps are
deleted.
You cannot delete individual stored laps. If you
have stopped 16 laps, the current lap does not
have to be reset.
X Reset the current lap.
X Press ato confirm Reset Reset.
Reset Race Timer?
Reset Race Timer? appears in the multi-
function display.
X Press :to select Yes
Yesand confirm with
a.
All laps are deleted.
Overall evaluation :
RACETIMER overall evaluation
; Total time driven
= Average speed
? Distance covered
A Maximum speed
This function is shown if you have stored at least one lap and stopped the RACETIMER.
X Press =or; on the steering wheel to
select the AMG AMGmenu.
X Press the 9button repeatedly until the
overall evaluation is shown. Menus and submenus
251On-board computer and displays Z
Page 255 of 393
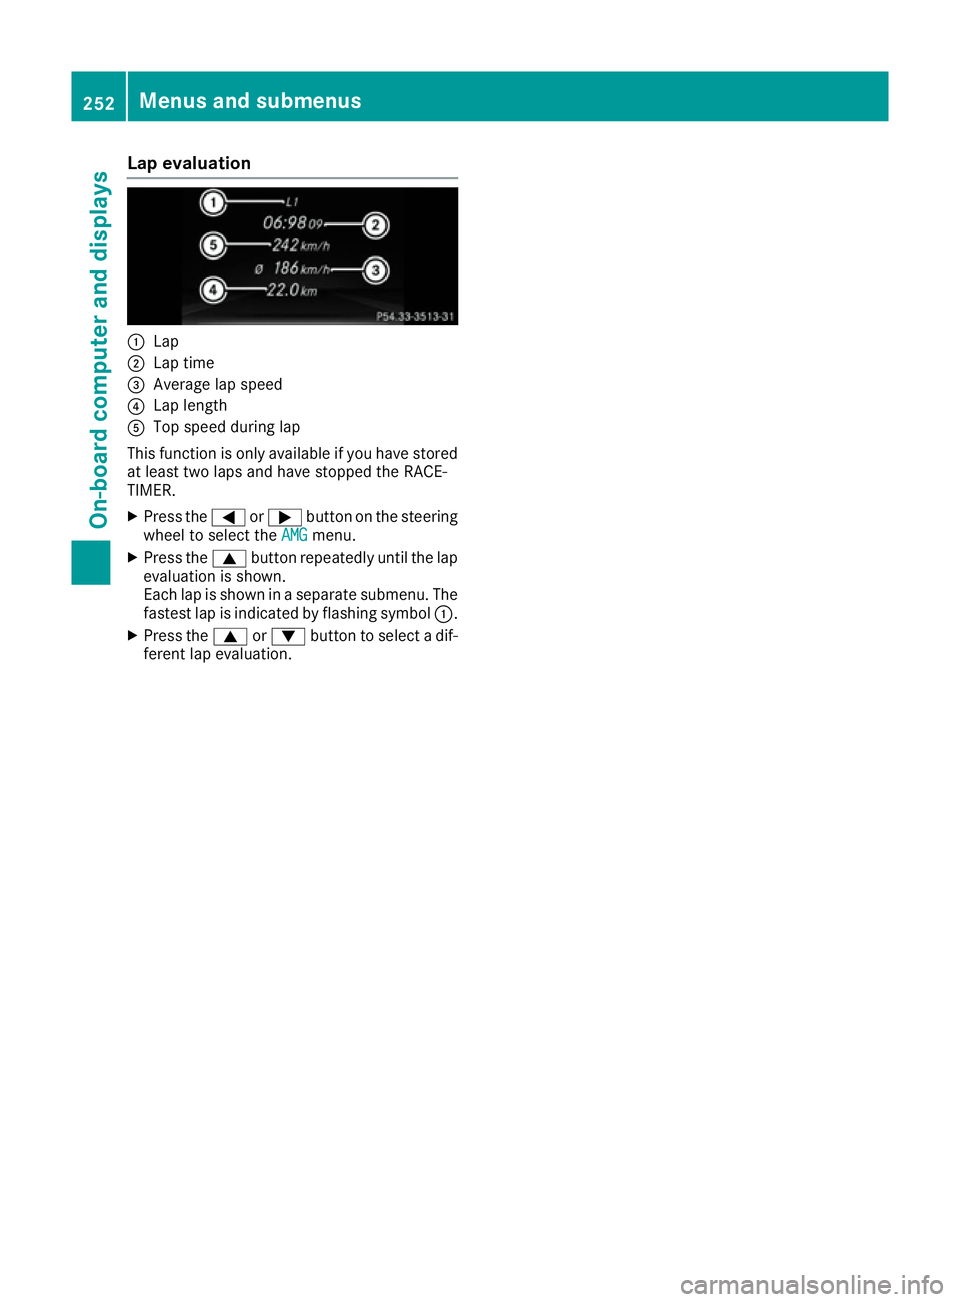
Lap evaluation
:
Lap
; Lap time
= Average lap speed
? Lap length
A Top speed during lap
This function is only available if you have stored at least two laps and have stopped the RACE-
TIMER.
X Press the =or; button on the steering
wheel to select the AMG
AMGmenu.
X Press the 9button repeatedly until the lap
evaluation is shown.
Each lap is shown in a separate submenu. The fastest lap is indicated by flashing symbol :.
X Press the 9or: button to select a dif-
ferent lap evaluation. 252
Menus and submenusOn-board computer and displays
Page 256 of 393
Display messages
Introduction
General notes Display messages appear in the multifunction display.
Display messages with graphic symbols are simplified in the Owner's Manual and may differ from
the symbols in the multifunction display.
Please respond in accordance with the display messages and follow the additional notes in this
Owner's Manual.
Certain display messages are accompanied by an audible warning tone or a continuous tone.
When you stop and park the vehicle, please observe the notes on:
R HOLD function (Y page 191)
R Parking (Y page 167)
Hiding display messages X
Press the aor% button on the steering wheel.
The multifunction display fades the display message out.
High-priority display messages are shown by the multifunction display in red. Some high-priority
display messages cannot be hidden.
The multifunction display shows these messages continuously until the causes for the messages
have been remedied.
Message memory The on-board computer saves certain display messages in the
message memory. You can call up
the display messages:
X Press =or; on the steering wheel to select the Serv.
Serv. menu.
If there are display messages, the multifunction display shows 2 messages 2 messages, for example.
X Press the 9or: button to select the entry, e.g. 2 messages
2 messages.
X Press ato confirm.
X Press the 9or: button to scroll through the display messages.
When the ignition is switched off, all display messages are deleted apart from some high-priority
display messages. Once the causes of the high-priority display messages have been rectified, these display messages are deleted as well. Display
messages
253On-board computer and displays Z
Page 257 of 393
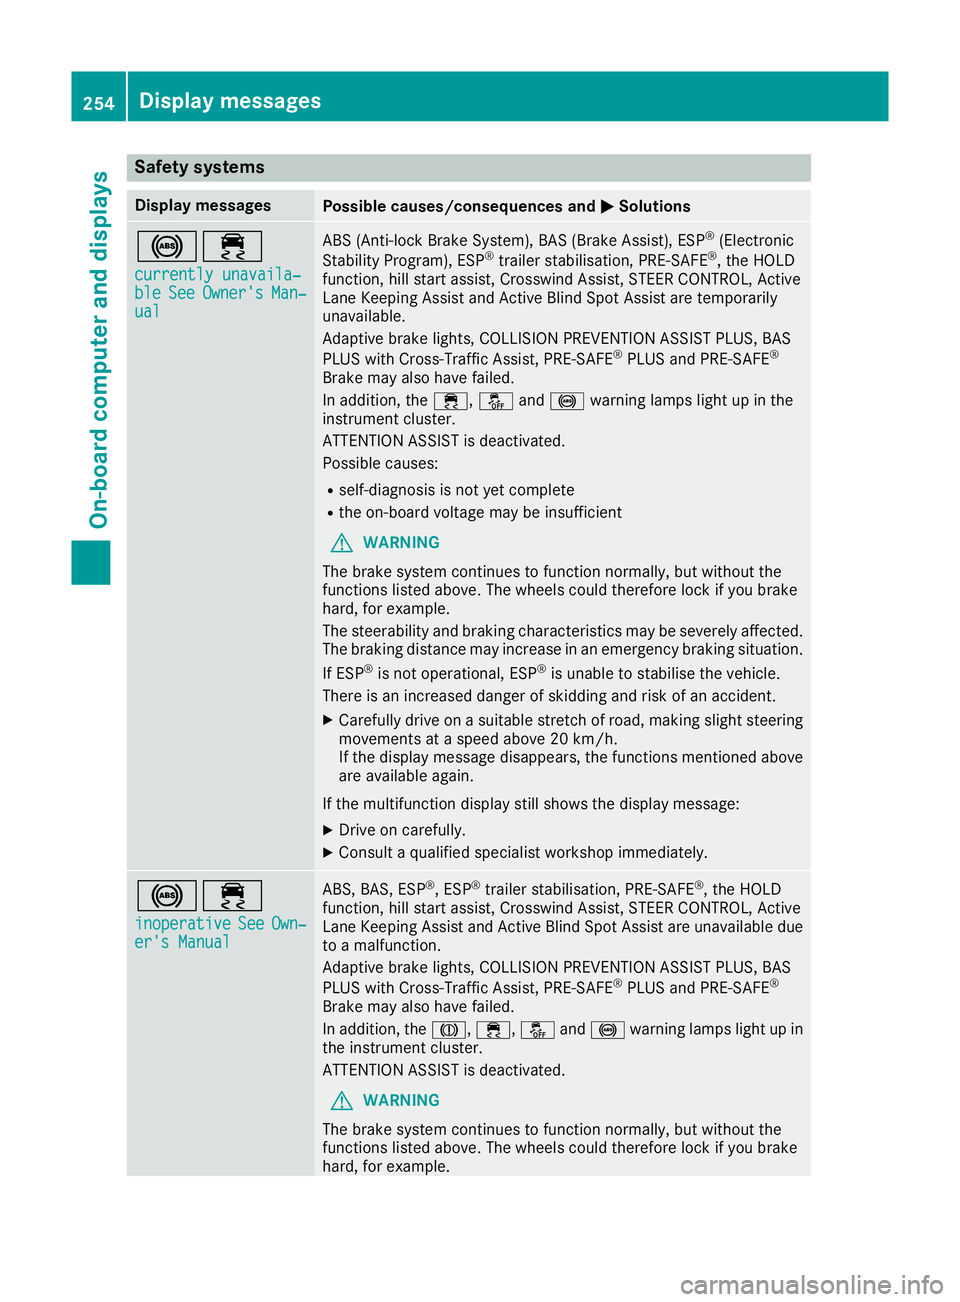
Safety systems
Display messages
Possible causes/consequences and
M
MSolutions !÷
currently unavaila‐
currently unavaila‐
ble ble See
SeeOwner's
Owner's Man‐
Man‐
ual
ual ABS (Anti-lock Brake System), BAS (Brake Assist), ESP
®
(Electronic
Stability Program), ESP ®
trailer stabilisation, PRE ‑SAFE®
, the HOLD
function, hill start assist, Crosswind Assist, STEER CONTROL, Active
Lane Keeping Assist and Active Blind Spot Assist are temporarily
unavailable.
Adaptive brake lights, COLLISION PREVENTION ASSIST PLUS, BAS
PLUS with Cross-Traffic Assist, PRE‑SAFE ®
PLUS and PRE‑SAFE ®
Brake may also have failed.
In addition, the ÷,åand! warning lamps light up in the
instrument cluster.
ATTENTION ASSIST is deactivated.
Possible causes:
R self-diagnosis is not yet complete
R the on-board voltage may be insufficient
G WARNING
The brake system continues to function normally, but without the
functions listed above. The wheels could therefore lock if you brake
hard, for example.
The steerability and braking characteristics may be severely affected. The braking distance may increase in an emergency braking situation.
If ESP ®
is not operational, ESP ®
is unable to stabilise the vehicle.
There is an increased danger of skidding and risk of an accident.
X Carefully drive on a suitable stretch of road, making slight steering
movements at a speed above 20 km/h.
If the display message disappears, the functions mentioned above
are available again.
If the multifunction display still shows the display message: X Drive on carefully.
X Consult a qualified specialist workshop immediately. !÷
inoperative inoperative See
SeeOwn‐
Own‐
er's Manual
er's Manual ABS, BAS, ESP
®
, ESP ®
trailer stabilisation, PRE ‑SAFE®
, the HOLD
function, hill start assist, Crosswind Assist, STEER CONTROL, Active
Lane Keeping Assist and Active Blind Spot Assist are unavailable due to a malfunction.
Adaptive brake lights, COLLISION PREVENTION ASSIST PLUS, BAS
PLUS with Cross-Traffic Assist, PRE‑SAFE ®
PLUS and PRE‑SAFE ®
Brake may also have failed.
In addition, the J,÷,åand! warning lamps light up in
the instrument cluster.
ATTENTION ASSIST is deactivated.
G WARNING
The brake system continues to function normally, but without the
functions listed above. The wheels could therefore lock if you brake
hard, for example. 254
Display messagesOn-board computer and displays
Page 258 of 393
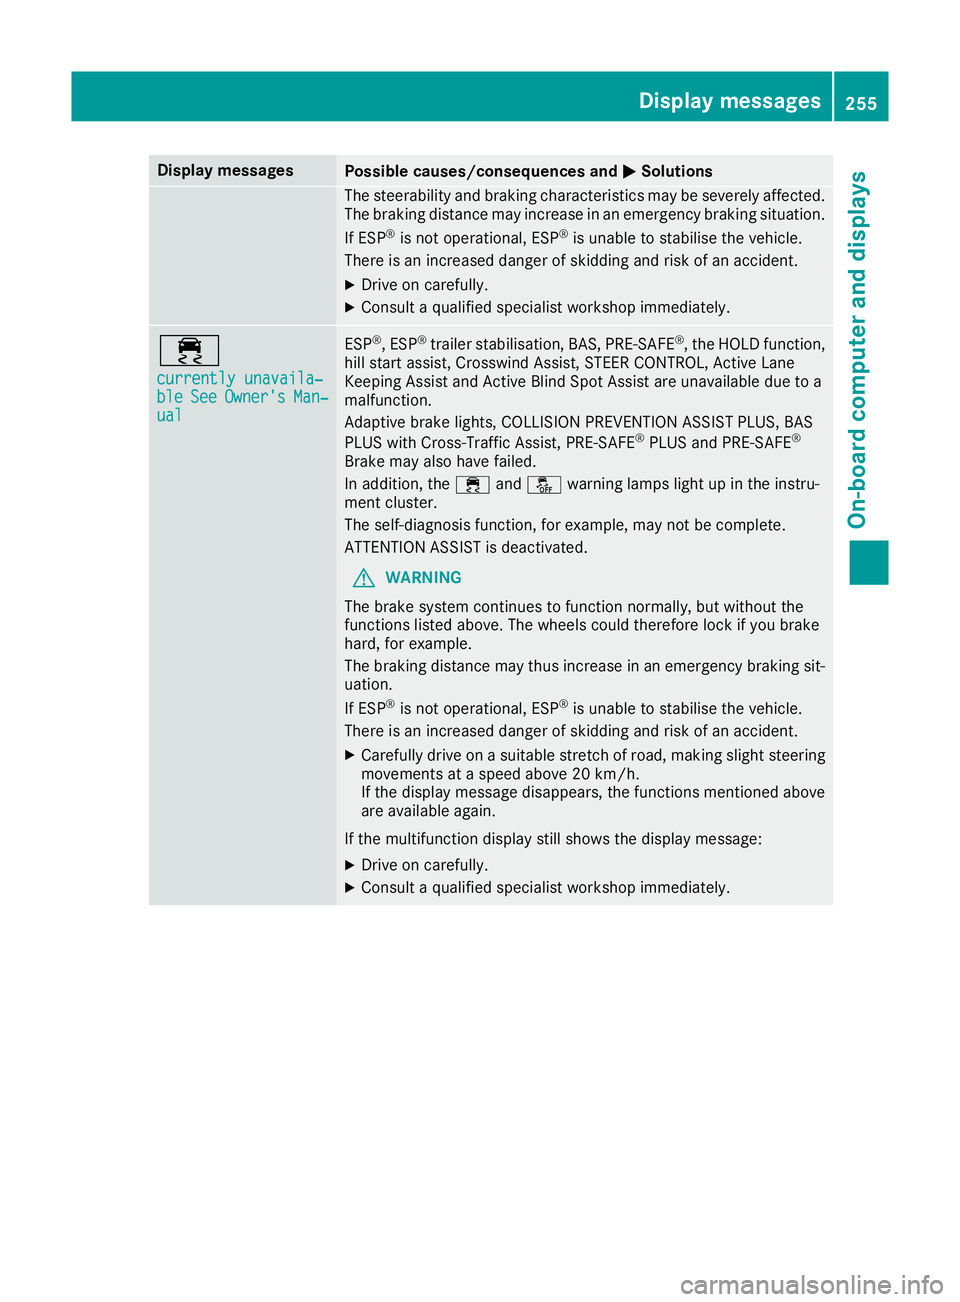
Display messages
Possible causes/consequences and
M
MSolutions The steerability and braking characteristics may be severely affected.
The braking distance may increase in an emergency braking situation.
If ESP ®
is not operational, ESP ®
is unable to stabilise the vehicle.
There is an increased danger of skidding and risk of an accident.
X Drive on carefully.
X Consult a qualified specialist workshop immediately. ÷
currently unavaila‐ currently unavaila‐
ble ble
See
SeeOwner's
Owner's Man‐
Man‐
ual
ual ESP
®
, ESP ®
trailer stabilisation, BAS, PRE ‑SAFE®
, the HOLD function,
hill start assist, Crosswind Assist, STEER CONTROL, Active Lane
Keeping Assist and Active Blind Spot Assist are unavailable due to a
malfunction.
Adaptive brake lights, COLLISION PREVENTION ASSIST PLUS, BAS
PLUS with Cross-Traffic Assist, PRE ‑SAFE®
PLUS and PRE ‑SAFE®
Brake may also have failed.
In addition, the ÷andå warning lamps light up in the instru-
ment cluster.
The self-diagnosis function, for example, may not be complete.
ATTENTION ASSIST is deactivated.
G WARNING
The brake system continues to function normally, but without the
functions listed above. The wheels could therefore lock if you brake
hard, for example.
The braking distance may thus increase in an emergency braking sit-
uation.
If ESP ®
is not operational, ESP ®
is unable to stabilise the vehicle.
There is an increased danger of skidding and risk of an accident.
X Carefully drive on a suitable stretch of road, making slight steering
movements at a speed above 20 km/h.
If the display message disappears, the functions mentioned above are available again.
If the multifunction display still shows the display message:
X Drive on carefully.
X Consult a qualified specialist workshop immediately. Display
messages
255On-board computer and displays Z
Page 259 of 393
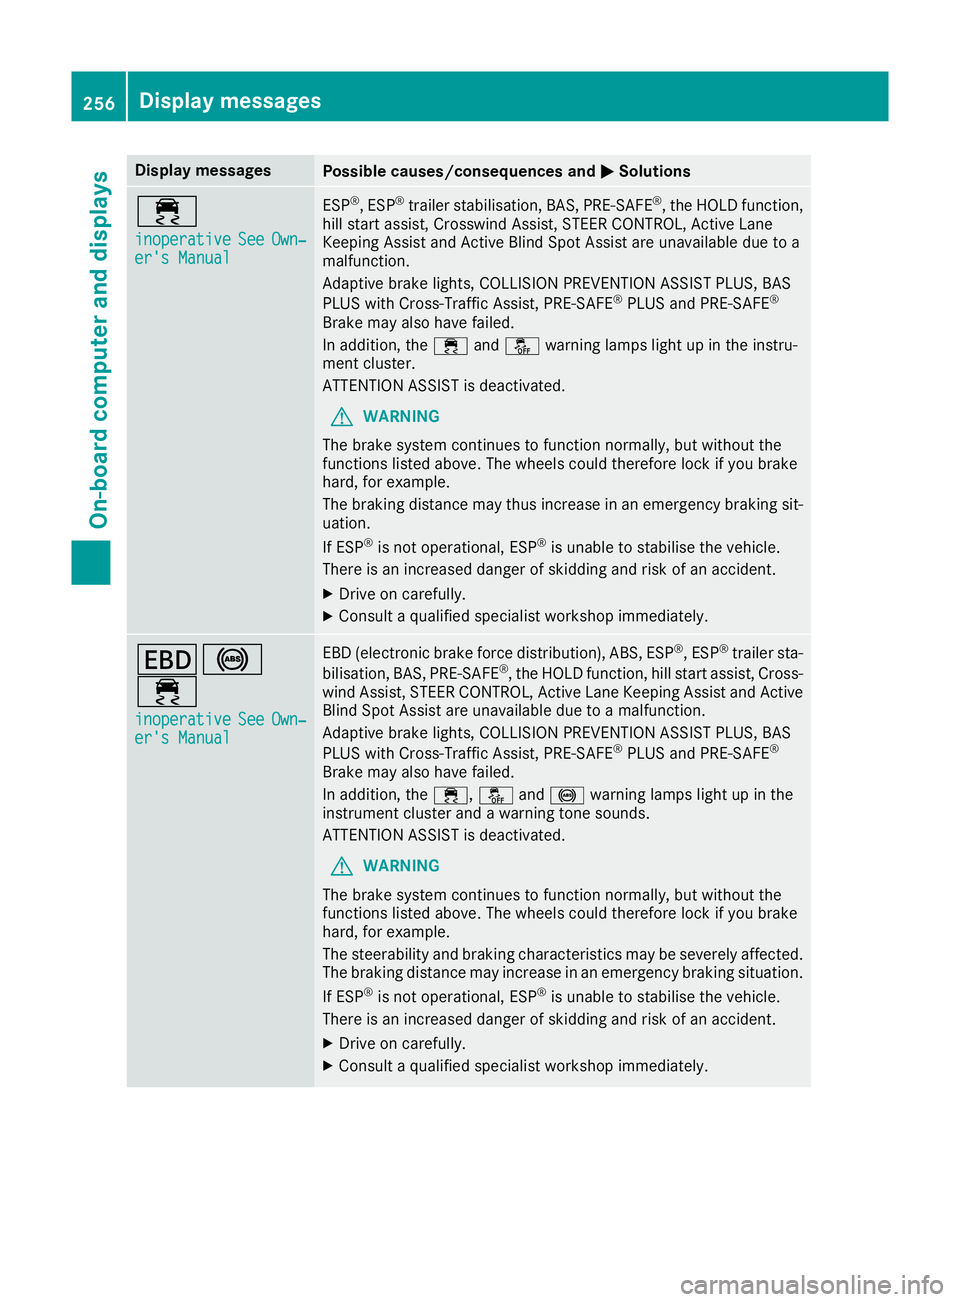
Display messages
Possible causes/consequences and
M
MSolutions ÷
inoperative inoperative
See
SeeOwn‐
Own‐
er's Manual
er's Manual ESP
®
, ESP ®
trailer stabilisation, BAS, PRE ‑SAFE®
, the HOLD function,
hill start assist, Crosswind Assist, STEER CONTROL, Active Lane
Keeping Assist and Active Blind Spot Assist are unavailable due to a
malfunction.
Adaptive brake lights, COLLISION PREVENTION ASSIST PLUS, BAS
PLUS with Cross-Traffic Assist, PRE ‑SAFE®
PLUS and PRE ‑SAFE®
Brake may also have failed.
In addition, the ÷andå warning lamps light up in the instru-
ment cluster.
ATTENTION ASSIST is deactivated.
G WARNING
The brake system continues to function normally, but without the
functions listed above. The wheels could therefore lock if you brake
hard, for example.
The braking distance may thus increase in an emergency braking sit-
uation.
If ESP ®
is not operational, ESP ®
is unable to stabilise the vehicle.
There is an increased danger of skidding and risk of an accident.
X Drive on carefully.
X Consult a qualified specialist workshop immediately. T!
÷
inoperative inoperative See
SeeOwn‐
Own‐
er's Manual
er's Manual EBD (electronic brake force distribution), ABS, ESP
®
, ESP ®
trailer sta-
bilisation, BAS, PRE ‑SAFE®
, the HOLD function, hill start assist, Cross-
wind Assist, STEER CONTROL, Active Lane Keeping Assist and Active
Blind Spot Assist are unavailable due to a malfunction.
Adaptive brake lights, COLLISION PREVENTION ASSIST PLUS, BAS
PLUS with Cross-Traffic Assist, PRE‑ SAFE®
PLUS and PRE ‑SAFE®
Brake may also have failed.
In addition, the ÷,åand! warning lamps light up in the
instrument cluster and a warning tone sounds.
ATTENTION ASSIST is deactivated.
G WARNING
The brake system continues to function normally, but without the
functions listed above. The wheels could therefore lock if you brake
hard, for example.
The steerability and braking characteristics may be severely affected. The braking distance may increase in an emergency braking situation.
If ESP ®
is not operational, ESP ®
is unable to stabilise the vehicle.
There is an increased danger of skidding and risk of an accident.
X Drive on carefully.
X Consult a qualified specialist workshop immediately. 256
Display
messagesOn-board computer and displays
Page 260 of 393
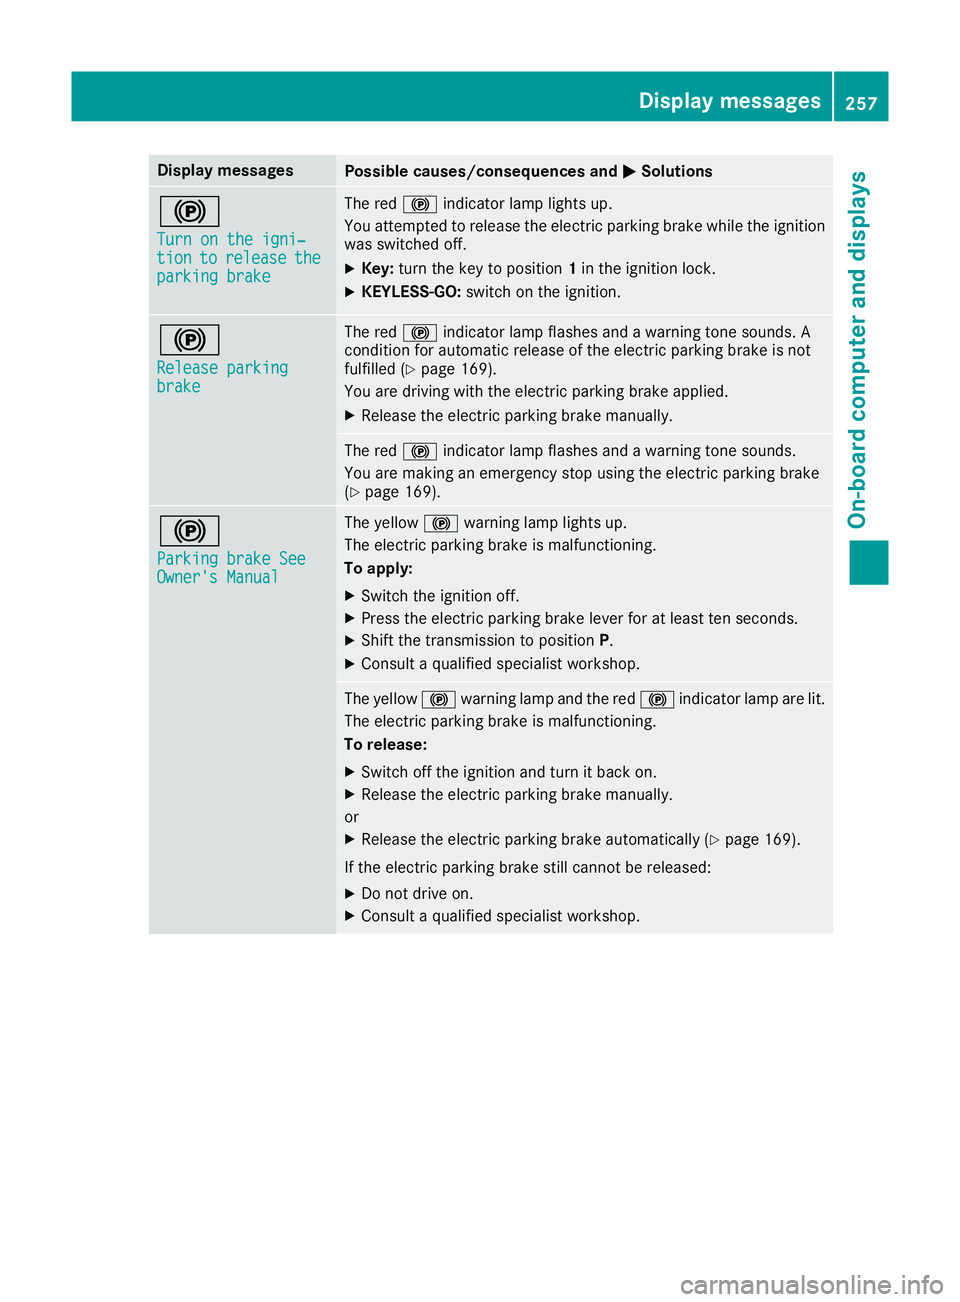
Display messages
Possible causes/consequences and
M
MSolutions !
Turn on the igni‐ Turn on the igni‐
tion tion
to
torelease
release the
the
parking brake
parking brake The red
!indicator lamp lights up.
You attempted to release the electric parking brake while the ignition
was switched off.
X Key: turn the key to position 1in the ignition lock.
X KEYLESS-GO: switch on the ignition. !
Release parking Release parking
brake brake The red
!indicator lamp flashes and a warning tone sounds. A
condition for automatic release of the electric parking brake is not
fulfilled (Y page 169).
You are driving with the electric parking brake applied.
X Release the electric parking brake manually. The red
!indicator lamp flashes and a warning tone sounds.
You are making an emergency stop using the electric parking brake
(Y page 169). !
Parking brake See Parking brake See
Owner's Manual Owner's Manual The yellow
!warning lamp lights up.
The electric parking brake is malfunctioning.
To apply:
X Switch the ignition off.
X Press the electric parking brake lever for at least ten seconds.
X Shift the transmission to position P.
X Consult a qualified specialist workshop. The yellow
!warning lamp and the red !indicator lamp are lit.
The electric parking brake is malfunctioning.
To release:
X Switch off the ignition and turn it back on.
X Release the electric parking brake manually.
or X Release the electric parking brake automatically (Y page 169).
If the electric parking brake still cannot be released: X Do not drive on.
X Consult a qualified specialist workshop. Display
messages
257On-board computer and displays Z