instrument cluster MERCEDES-BENZ GLE COUPE 2015 Owner's Manual
[x] Cancel search | Manufacturer: MERCEDES-BENZ, Model Year: 2015, Model line: GLE COUPE, Model: MERCEDES-BENZ GLE COUPE 2015Pages: 393, PDF Size: 12.71 MB
Page 77 of 393
Following damage to the windscreen, have the
configuration and operation of the camera sys-
tem checked at a qualified specialist workshop.
Function X
To activate/deactivate: activate or deacti-
vate PRE-SAFE ®
Brake in the on-board com-
puter (Y page 244).
If the PRE-SAFE ®
Brake is not activated, the
æ symbol appears in the multifunction dis-
play.
If you have activated DSR (Y page 193), PRE-
SAFE ®
Brake is also deactivated.
This function will issue a warning if:
R at a speed of approximately 30 km/h or
higher, the distance maintained to the vehicle
travelling in front is insufficient for several
seconds.
The · distance warning lamp then lights
up in the instrument cluster.
R at a speed of around 7 km/h or more, you
rapidly approach a vehicle in front or a pedes-
trian
An intermittent warning tone will then sound
and the ·distance warning lamp lights up
in the instrument cluster.
X Brake immediately to defuse the situation.
or X Take evasive action provided it is safe to do
so.
The PRE-SAFE ®
Brake function can also brake
the vehicle automatically under the following
conditions:
R the driver and front passenger have their seat
belts fastened
and
R the vehicle speed is between approximately
7 km/h and 200 km/h
At a speed of up to approximately 70 km/h,
PRE-SAFE ®
Brake can also detect:
R stationary objects in the path of your vehicle,
e.g. stopped or parked vehicles
R pedestrians in the path of your vehicle
i If there is an increased risk of a collision,
preventive passenger protection measures
(PRE-SAFE ®
) are triggered (Y page 51).
If the risk of a collision with the vehicle in front
remains and you do not brake, take evasive action or accelerate significantly, the vehicle
may perform automatic emergency braking, up
to the point of full brake application. Automatic
emergency braking is not performed until imme- diately prior to an imminent accident.
You can prevent the intervention of PRE-SAFE ®
Brake at any time by:
R depressing the accelerator pedal further
R activating kickdown
R releasing the brake pedal
The braking action of PRE-SAFE ®
Brake is ended
automatically if:
R you manoeuvre to avoid the obstacle
R there is no longer any danger of a collision
R there is no longer an obstacle detected in
front of your vehicle STEER CONTROL
General notes STEER CONTROL helps you by transmitting a
noticeable steering force to the steering wheel
in the direction required for vehicle stabilisation.
This steering support is provided in particular if:
R both right wheels or both left wheels are on a
wet or slippery road surface when you brake
R the vehicle starts to skid
Important safety notes i
Observe the "Important safety notes" sec-
tion (Y page 64).
No steering support is provided from STEER
CONTROL, if: R ESP ®
is deactivated
R ESP ®
is malfunctioning
R the steering is faulty
If ESP ®
is malfunctioning, you will be assisted
further by the electrical power steering. 74
Driving safety systemsSafety
Page 104 of 393

Useful information
i This Owner's Manual describes all models,
series and optional equipment for your vehi-
cle that were available at the time of going to
press. National variations are possible. Note
that your vehicle may not be equipped with all
of the functions described. This is also the
case for systems and functions relevant to
safety.
i Read the information on qualified specialist
workshops: (Y page 25). Correct driver's seat position
G
WARNING
You could lose control of the vehicle while
driving if you:
R adjust the driver's seat, steering wheel or
mirrors
R fasten the seat belt
There is a risk of an accident.
Adjust the driver's seat, head restraint, steer-
ing wheel and mirrors and fasten your seat
belt before starting the engine. X
Observe the safety guidelines on seat adjust-
ment (Y page 102).
X Make sure that seat =is correctly adjusted
(Y page 103). When adjusting the seat, make sure that:
R you are as far away from the driver's airbag as
possible
R you are sitting in a normal upright position
R you can fasten the seat belt properly
R you have moved the backrest to an almost
vertical position
R you have set the seat angle so that your thighs
are gently supported
R you can depress the pedals properly
X Check whether the head restraint is adjusted
correctly (Y page 103).
When doing so, make sure that you have
adjusted the head restraint so that the back of
your head is supported at eye level by the
centre of the head restraint.
X Observe the safety notes on steering column
adjustment (Y page 108).
X Make sure that steering wheel :is adjusted
correctly.
Adjusting the steering wheel manually
(Y page 108)
Adjusting the steering wheel electrically
(Y page 109)
When adjusting the steering wheel column,
make sure that:
R you can hold the steering wheel with your
arms slightly bent
R you can move your legs freely
R you can see all the displays in the instrument
cluster clearly
X Observe the safety guidelines for seat belts
(Y page 39).
X Check whether you have fastened seat
belt ;properly (Y page 41).
The seat belt should:
R fit snugly across your body
R be routed across the middle of your shoulder
R be routed across your hips in the pelvic area
X Before starting off, adjust the rear-view mirror
and the exterior mirrors so that you have a
good view of road and traffic conditions
(Y page 111).
X Vehicles with a memory function: save the
seat, steering wheel and exterior mirror set-
tings with the memory function (Y page 114). Correct driver's seat position
101Seats, steering wheel and mirrors Z
Page 119 of 393
depending on the brightness of the ambient
light
R With the engine running: depending on the
ambient light conditions, the daytime driving
lights or the side lamps and dipped-beam
headlamps are switched on or off automati-
cally
X To switch on automatic headlamp mode:
turn the light switch to Ã.G
WARNING
When the light switch is set to Ã, the
dipped-beam headlamps may not be switched on automatically if there is fog, snow or othercauses of poor visibility due to the weather
conditions such as spray. There is a risk of an
accident.
In such situations, turn the light switch to
L.
The automatic headlamp feature is only an aid.
The driver is responsible for the vehicle lighting at all times.
The daytime driving lights improve the detecta-
bility of your vehicle during the day.
When the side lamps and dipped-beam head-
lamps are switched on, the green T(side
lamps) and L(dipped-beam headlamps)
indicator lamps in the instrument cluster light
up.
Dipped-beam headlamps When the ignition is switched on and the light
switch is in the Lposition, the side lamps
and dipped-beam headlamps are switched on
even if the light sensor does not sense dark
ambient light conditions. This is advantageous
when there is fog or rain.
X To switch on the dipped-beam headlamps:
turn the key in the ignition lock to position 2
or start the engine.
X Turn the light switch to L.
The green Lindicator lamp in the instru-
ment cluster lights up.
Rear fog lamp The rear foglamp improves the visibility of your
vehicle in heavy fog for the following traffic.
Please observe the country-specific laws on the
use of rear foglamps. X
To switch on the rear foglamp: turn the key
in the ignition lock to position 2or start the
engine.
X Turn the light switch to LorÃ.
X Press the Rbutton.
The yellow Rindicator lamp in the instru-
ment cluster lights up.
X To switch off the rear foglamp: press the
R button.
The yellow Rindicator lamp in the instru-
ment cluster goes out.
Side lamps ! If the battery has been excessively dis-
charged, the side lamps or parking lamps are
automatically switched off to enable the next engine start. Always park your vehicle safely
and sufficiently lit according to legal stand-
ards. Avoid the continuous use of the T
side lamps for several hours. If possible,
switch on the Xright or the Wleft
parking lamp.
X To switch on: turn the light switch to T.
The green Tindicator lamp in the instru-
ment cluster lights up.
Parking lamps Switches on the parking lamps ensures that the
corresponding side of the vehicle is illuminated.
X To switch on the parking lamps: the key
should not be in the ignition lock or it should
be in position 0.
X Turn the light switch to W(left-hand side of
the vehicle) or X(right-hand side of the
vehicle). 116
Exterior lightingLights and windscreen wipers
Page 123 of 393
Important safety notes
G
WARNING
Adaptive Highbeam Assist Plus does not rec-
ognise road users:
R who have no lights, e.g. pedestrians
R who have poor lighting, e.g. cyclists
R whose lighting is blocked, e.g. by a barrier
In very rare cases, Adaptive Highbeam Assist
Plus may not recognise road users who do
have lights, or may recognise them too late. In this, or in similar situations, the automatic
main-beam headlamps will not be deactivated
or will be activated despite the presence of
other road users. There is a risk of an acci-
dent.
Always carefully observe the traffic conditions and switch off the main-beam headlamps in
good time.
Adaptive Highbeam Assist Plus cannot take into
account road, weather or traffic conditions.
Adaptive Highbeam Assist Plus is only an aid.
You are responsible for adjusting the vehicle's
lighting to the prevailing light, visibility and traf-
fic conditions.
In particular, the detection of obstacles can be
restricted if there is:
R poor visibility, e.g. due to fog, heavy rain or
snow
R dirt on the sensors or if the sensors are
obscured
Switching Adaptive Highbeam Assist
Plus on/off X
To switch on: turn the light switch to Ã.
X Press the combination switch beyond the
pressure point in the direction of arrow :.
The _ indicator lamp in the multifunction
display lights up when it is dark and the light
sensor switches on the dipped-beam head-
lamps.
At speeds above approx. 25 km/h: the
headlamp range is automatically controlled
according to the distance to other road users. At speeds above approx. 30 km/h:
R If no other road users are detected, the
main-beam headlamps are automatically
switched on.
R If other road users are detected, the partial
main-beam headlamps are automatically
switched on.
The K indicator lamp in the instrument
cluster also lights up.
At speeds below approx. 25 km/h or
when there is sufficient street lighting:
R The partial main-beam headlamps are
switched off automatically.
R The main-beam headlamps are switched off
automatically.
The K indicator lamp in the instrument
cluster goes out. The _indicator lamp in
the multifunction display remains lit.
X To switch off: move the combination switch
back to its normal position or move the light
switch to another position.
The _ indicator lamp in the multifunction
display goes out. Headlamps misted up on the inside
Under certain climatic and physical conditions,
moisture may form in the headlamp. This mois-
ture will not impair the function of the headlamp. Interior lighting
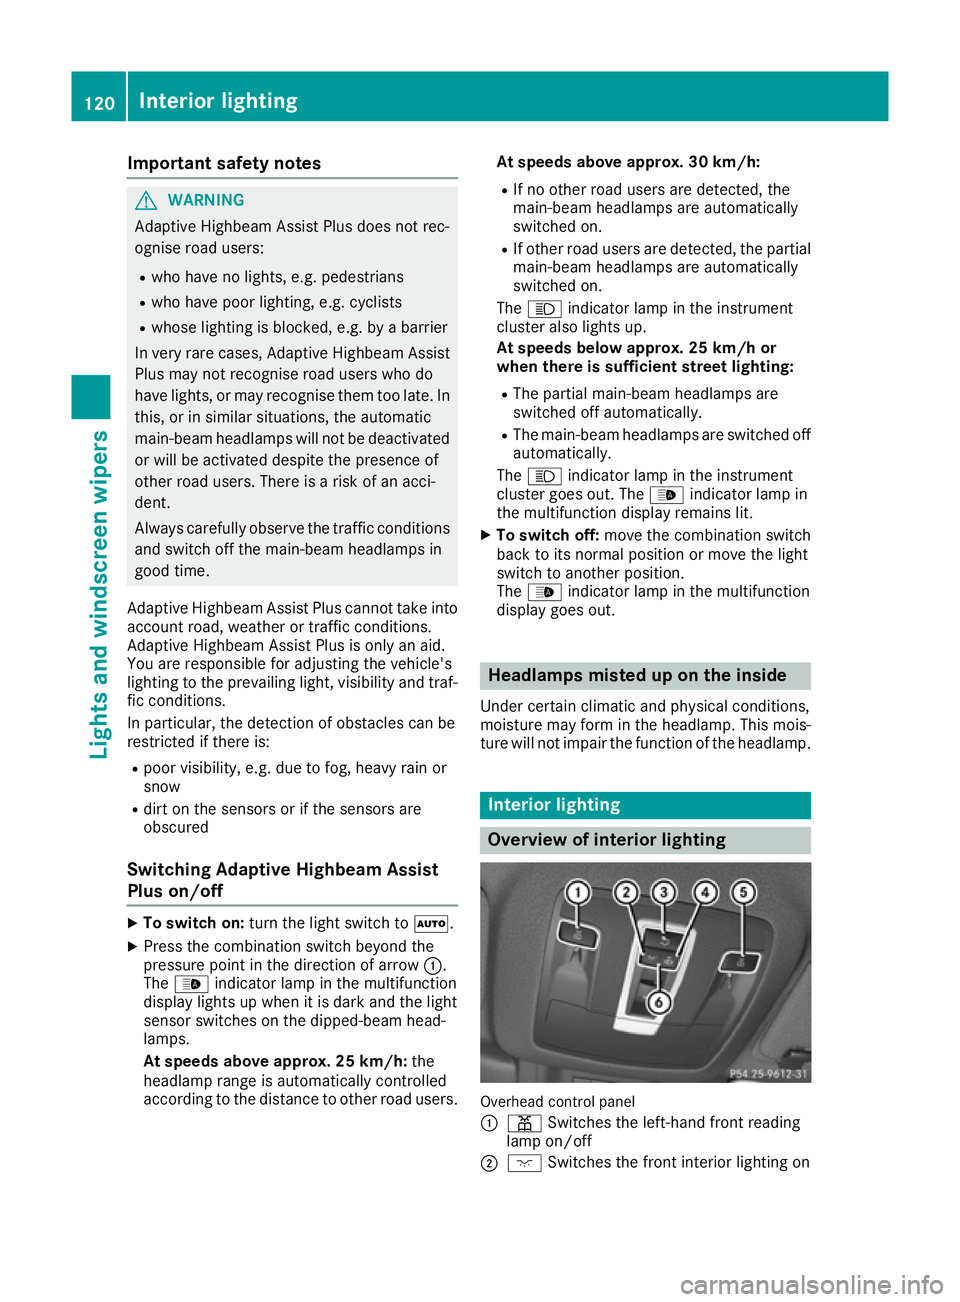
Overview of interior lighting
Overhead control panel
:
p Switches the left-hand front reading
lamp on/off
; c Switches the front interior lighting on 120
Interior lightingLights and windscreen wipers
Page 150 of 393
To start the vehicle without actively using the
key:
R the Start/Stop button must be inserted in the
ignition lock
R the key must be in the vehicle
R the vehicle must not be locked with the key or
KEYLESS-GO (Y page 79)
Do not keep the key:
R with electronic devices, e.g. a mobile phone
or another key
R with metallic objects, e.g. coins or metal film
R inside metallic objects, e.g. a metal case
This can affect the key's functionality.
Do not keep the key in the temperature-control- led cup holder (Y page 307). Otherwise, the key
is not detected.
If you lock the vehicle with the key's remote
control or with KEYLESS-GO, after a short time:
R you will not be able to switch on the ignition
with the Start/Stop button
R you will not be able to start the engine with the
Start/Stop button until the vehicle is
unlocked again
If you lock the vehicle centrally using the button
on the front door (Y page 85), you can continue
to start the engine with the Start/Stop button.
The engine can be switched off while the vehicle is in motion by pressing and holding the Start/
Stop button for three seconds. This function
operates independently of the ECO start/stop
automatic engine switch-off function.
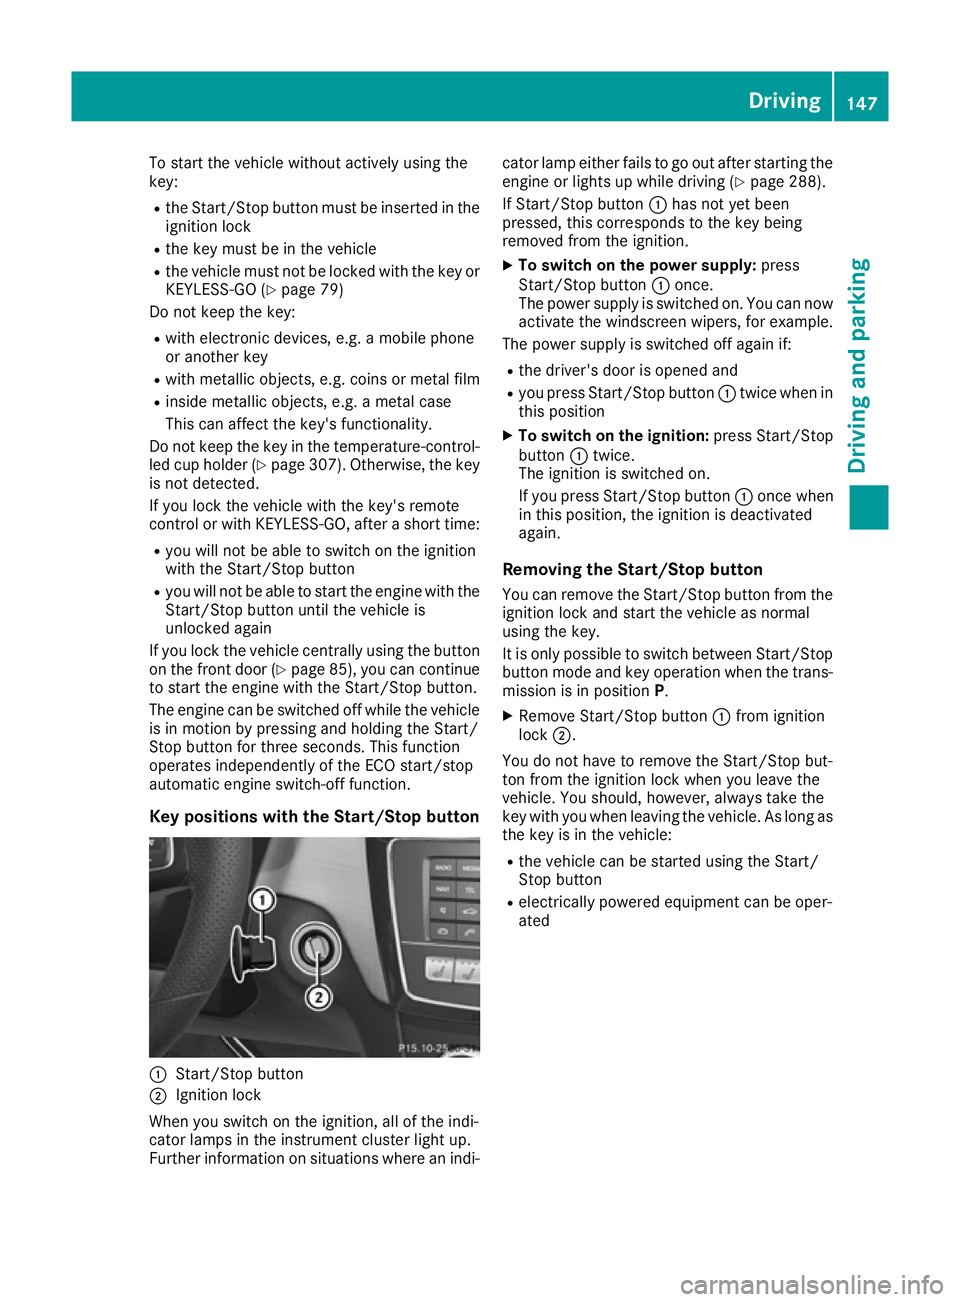
Key positions with the Start/Stop button :
Start/Stop button
; Ignition lock
When you switch on the ignition, all of the indi-
cator lamps in the instrument cluster light up.
Further information on situations where an indi- cator lamp either fails to go out after starting the
engine or lights up while driving (Y page 288).
If Start/Stop button :has not yet been
pressed, this corresponds to the key being
removed from the ignition.
X To switch on the power supply: press
Start/Stop button :once.
The power supply is switched on. You can now activate the windscreen wipers, for example.
The power supply is switched off again if:
R the driver's door is opened and
R you press Start/Stop button :twice when in
this position
X To switch on the ignition: press Start/Stop
button :twice.
The ignition is switched on.
If you press Start/Stop button :once when
in this position, the ignition is deactivated
again.
Removing the Start/Stop button
You can remove the Start/Stop button from the ignition lock and start the vehicle as normal
using the key.
It is only possible to switch between Start/Stop
button mode and key operation when the trans-
mission is in position P.
X Remove Start/Stop button :from ignition
lock ;.
You do not have to remove the Start/Stop but-
ton from the ignition lock when you leave the
vehicle. You should, however, always take the
key with you when leaving the vehicle. As long as
the key is in the vehicle:
R the vehicle can be started using the Start/
Stop button
R electrically powered equipment can be oper-
ated Driving
147Driving and parking Z
Page 152 of 393
Pulling away
General notes G
WARNING
If the engine speed is above the idling speed
and you engage transmission position Dor R,
the vehicle could pull away suddenly. There is a risk of an accident.
When engaging transmission position Dor R,
always firmly depress the brake pedal and do not simultaneously accelerate.
Depress the accelerator carefully when pulling
away.
The vehicle locks centrally once you have pulled
away. The locking knobs in the doors drop down.
You can open the doors from the inside at any
time.
You can also deactivate the automatic locking
feature (Y page 247).
It is only possible to shift the transmission from position Pto the desired position if you depress
the brake pedal. Only then is the parking lock
released. If you do not depress the brake pedal,
the DIRECT SELECT lever can still be moved but the parking lock remains engaged.
i Upshifts take place at higher engine speeds
after a cold start. This helps the catalytic con- verter to reach its operating temperature
more quickly.
Information on automatically releasing the elec-
trical parking brake (Y page 169).
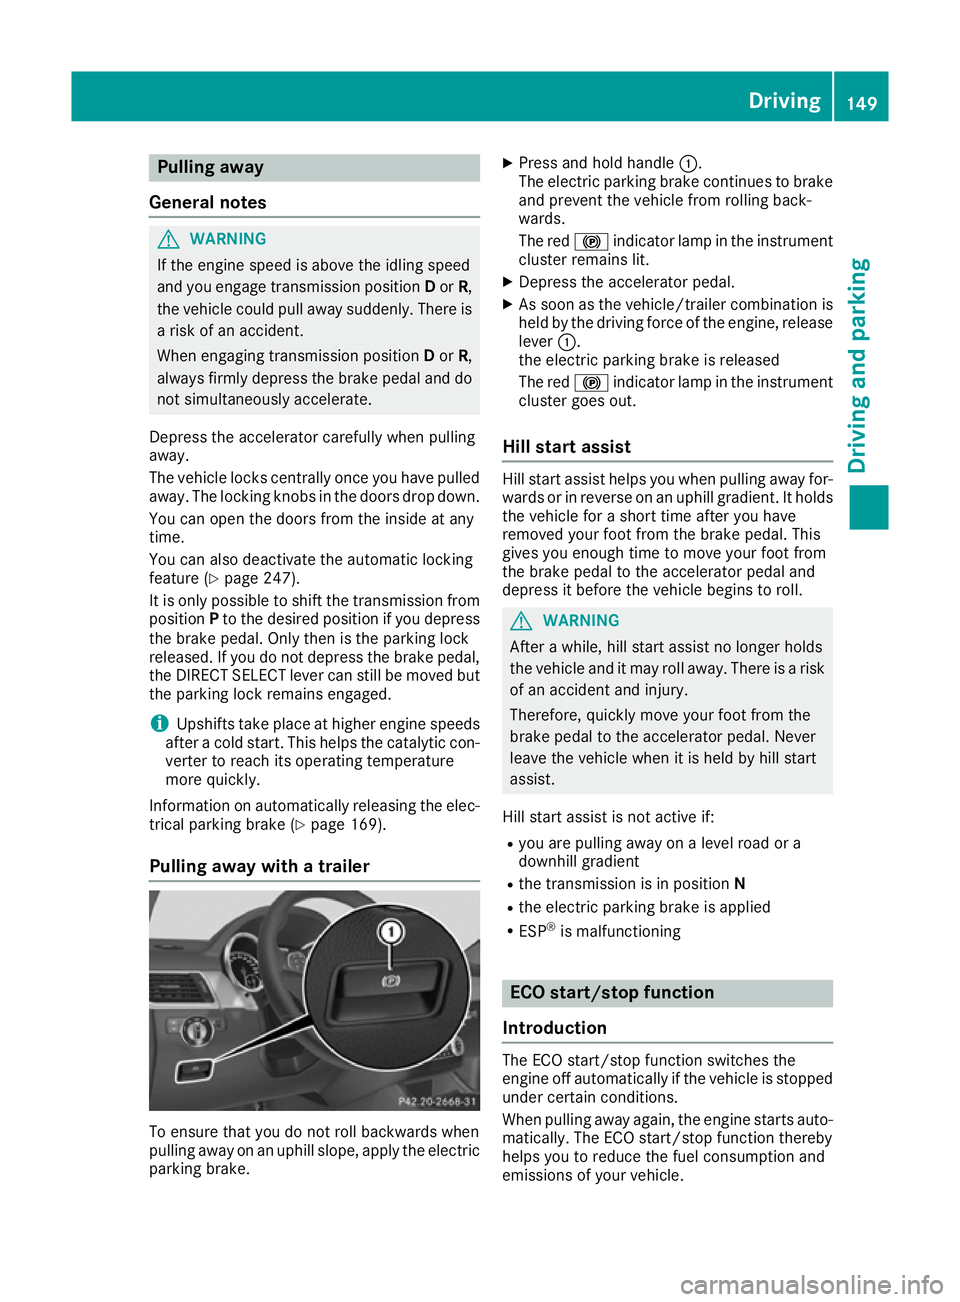
Pulling away with a trailer To ensure that you do not roll backwards when
pulling away on an uphill slope, apply the electric
parking brake. X
Press and hold handle :.
The electric parking brake continues to brake
and prevent the vehicle from rolling back-
wards.
The red !indicator lamp in the instrument
cluster remains lit.
X Depress the accelerator pedal.
X As soon as the vehicle/trailer combination is
held by the driving force of the engine, release
lever :.
the electric parking brake is released
The red !indicator lamp in the instrument
cluster goes out.
Hill start assist Hill start assist helps you when pulling away for-
wards or in reverse on an uphill gradient. It holds the vehicle for a short time after you have
removed your foot from the brake pedal. This
gives you enough time to move your foot from
the brake pedal to the accelerator pedal and
depress it before the vehicle begins to roll. G
WARNING
After a while, hill start assist no longer holds
the vehicle and it may roll away. There is a risk of an accident and injury.
Therefore, quickly move your foot from the
brake pedal to the accelerator pedal. Never
leave the vehicle when it is held by hill start
assist.
Hill start assist is not active if:
R you are pulling away on a level road or a
downhill gradient
R the transmission is in position N
R the electric parking brake is applied
R ESP ®
is malfunctioning ECO start/stop function
Introduction The ECO start/stop function switches the
engine off automatically if the vehicle is stopped
under certain conditions.
When pulling away again, the engine starts auto-
matically. The ECO start/stop function thereby
helps you to reduce the fuel consumption and
emissions of your vehicle. Driving
149Driving and parking Z
Page 155 of 393
Problems with the engine
Problem
Possible causes/consequences and
M
MSolutions The engine does not
start. The starter motor
can be heard. R
There is a malfunction in the engine electronics.
R There is a malfunction in the fuel supply.
Before attempting to start the engine again:
X Turn the key back to position 0in the ignition lock.
or X Press the Start/Stop button repeatedly until all indicator lamps in
the instrument cluster go out.
X Try to start the engine again (Y page 148). Avoid excessively long
and frequent attempts to start the engine, as this will drain the
battery.
If the engine does not start after several attempts:
X Consult a qualified specialist workshop. The engine does not
start. The starter motor
can be heard. The
reserve fuel warning
lamp is lit and the fuel
gauge display shows
0. The fuel tank is empty.
X Refuel the vehicle. The engine does not
start. You cannot hear
the starter motor. The on-board voltage is too low because the battery is too weak or
discharged.
X Jump-start the vehicle (Y page 341).
If the engine does not start despite attempts to jump-start it:
X Consult a qualified specialist workshop. The starter motor was exposed to a thermal load that was too high.
X Allow the starter motor to cool down for approximately two minutes.
X Try to start the engine again.
If the engine still does not start: X Consult a qualified specialist workshop. Vehicles with a petrol
engine:
The engine is not running
smoothly and is misfir-
ing. There is a malfunction in the engine electronics or in a mechanical
component of the engine management system.
X Only depress the accelerator pedal slightly.
Otherwise, non-combusted fuel may get into the catalytic converter
and damage it.
X Have the cause rectified immediately at a qualified specialist work-
shop. 152
DrivingDriving and parking
Page 163 of 393
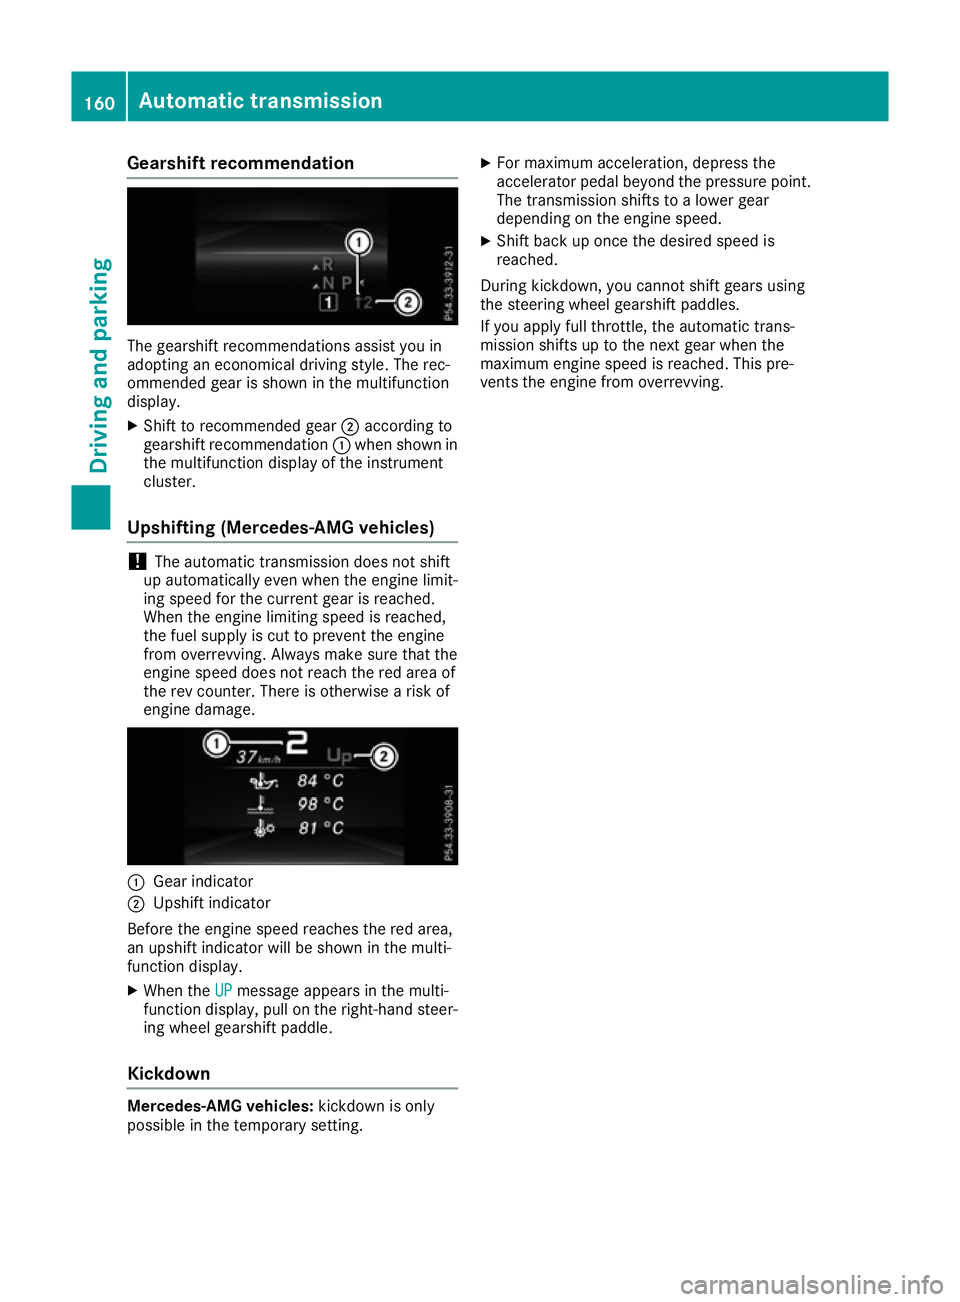
Gearshift recommendation
The gearshift recommendations assist you in
adopting an economical driving style. The rec-
ommended gear is shown in the multifunction
display.
X Shift to recommended gear ;according to
gearshift recommendation :when shown in
the multifunction display of the instrument
cluster.
Upshifting (Mercedes-AMG vehicles) !
The automatic transmission does not shift
up automatically even when the engine limit-
ing speed for the current gear is reached.
When the engine limiting speed is reached,
the fuel supply is cut to prevent the engine
from overrevving. Always make sure that the
engine speed does not reach the red area of
the rev counter. There is otherwise a risk of
engine damage. :
Gear indicator
; Upshift indicator
Before the engine speed reaches the red area,
an upshift indicator will be shown in the multi-
function display.
X When the UP
UP message appears in the multi-
function display, pull on the right-hand steer- ing wheel gearshift paddle.
Kickdown Mercedes-AMG vehicles:
kickdown is only
possible in the temporary setting. X
For maximum acceleration, depress the
accelerator pedal beyond the pressure point.
The transmission shifts to a lower gear
depending on the engine speed.
X Shift back up once the desired speed is
reached.
During kickdown, you cannot shift gears using
the steering wheel gearshift paddles.
If you apply full throttle, the automatic trans-
mission shifts up to the next gear when the
maximum engine speed is reached. This pre-
vents the engine from overrevving. 160
Automatic transmissionDriving and parking
Page 165 of 393
G
WARNING
Electrostatic charge can cause sparks and
thereby ignite fuel vapours. There is a risk of
fire and explosion.
Always touch the vehicle body before opening the fuel filler flap or touching the fuel pump
nozzle. This discharges any electrostatic
charge that may have built up. G
WARNING
Vehicles with a diesel engine:
If you mix diesel fuel with petrol, the flash
point of this fuel mixture is lower than that of pure diesel fuel. When the engine is running,
components in the exhaust system may over-
heat unnoticed. There is a risk of fire.
Never refuel with petrol. Never add petrol to
diesel fuel.
! Do not use petrol to refuel vehicles with a
diesel engine. Do not switch on the ignition if you accidentally refuel with the wrong fuel.
Otherwise, fuel can enter the fuel system.
Even small amounts of the wrong fuel could
result in damage to the fuel system and the
engine. The repair costs are high. Notify a
qualified specialist workshop and have the
fuel tank and fuel lines drained completely.
! Do not use diesel to refuel vehicles with a
petrol engine. Do not switch on the ignition if you accidentally refuel with the wrong fuel.
Otherwise, the fuel will enter the fuel system.
Even small amounts of the wrong fuel can
result in damage to the fuel system and the
engine. Notify a qualified specialist workshop
and have the fuel tank and fuel lines drained
completely.
! Overfilling the fuel tank could damage the
fuel system.
! Take care not to spill any fuel on painted
surfaces. You could otherwise damage the
paintwork.
! Use a filter when adding fuel from a fuel can.
The fuel lines and/or the fuel injection system could otherwise be blocked by particles fromthe fuel can. Do not get into the vehicle again during the refu-
elling process. Otherwise, electrostatic charge
could build up again.
If you overfill the fuel tank, some fuel may spray out when you remove the fuel pump nozzle.
Further information on fuel and fuel quality
(Y page 375). Refuelling
General notes Observe the important safety notes
(Y
page 161).
The fuel filler flap is unlocked or locked auto-
matically when you unlock or lock the vehicle
with the key or using KEYLESS-GO.
The position of the 8fuel filler cap is dis-
played in the instrument cluster. The arrow next to the filling pump indicates the side of the vehi-
cle.
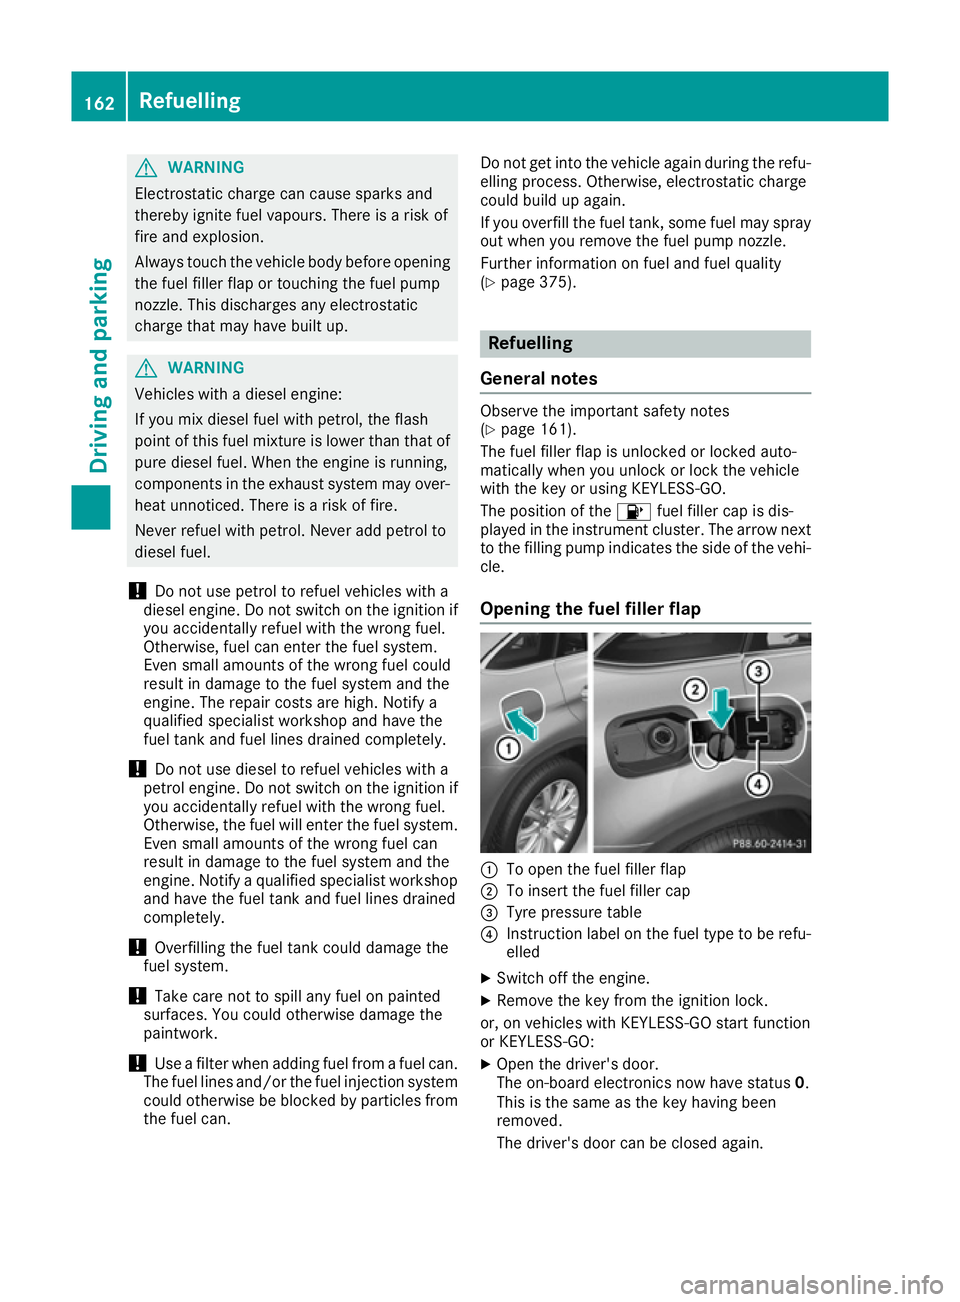
Opening the fuel filler flap :
To open the fuel filler flap
; To insert the fuel filler cap
= Tyre pressure table
? Instruction label on the fuel type to be refu-
elled
X Switch off the engine.
X Remove the key from the ignition lock.
or, on vehicles with KEYLESS-GO start function
or KEYLESS ‑GO:
X Open the driver's door.
The on-board electronics now have status 0.
This is the same as the key having been
removed.
The driver's door can be closed again. 162
RefuellingDriving and parking
Page 171 of 393
G
WARNING
If you leave children unattended in the vehi-
cle, they may be able to set the vehicle in
motion if, for example, they:
R release the parking brake
R shift the automatic transmission out of park
position P
R start the engine
In addition, they may operate vehicle equip-
ment and become trapped. There is a risk of
an accident and injury.
When leaving the vehicle, always take the key
with you and lock the vehicle. Never leave
children unattended in the vehicle.
! Always secure the vehicle correctly against
rolling away. Otherwise, the vehicle or its driv-
etrain could be damaged.
To ensure that the vehicle is safeguarded
against rolling away unintentionally:
R the electric parking brake must be applied.
R the transmission must be in position Pand the
key must be removed from the ignition lock
R the front wheels must be turned towards the
kerb on steep uphill or downhill gradients
R the empty vehicle must be secured at the
front axle with a wheel chock or similar
object, for example, on uphill or downhill gra- dients
R a laden vehicle must also be secured at the
rear axle with a wheel chock or similar object,
for example, on uphill or downhill gradients Switching off the engine
Important safety notes G
WARNING
The automatic transmission switches to neu-
tral position Nwhen you switch off the engine.
The vehicle may roll away. There is a risk of an
accident.
After switching off the engine, always switch
to parking position P. Prevent the parked vehi-
cle from rolling away by applying the parking
brake. Using the key X
Apply the electric parking brake.
X Shift the transmission to position P.
X Turn the key to position 0in the ignition lock
and remove it.
The immobiliser is activated.
If you switch the engine off with the transmis-
sion in position Ror D, the automatic transmis-
sion shifts to Nautomatically.
If you then open the driver's door or the front-
passenger door or remove the key from the igni- tion, the automatic transmission shifts to P.
If you want the automatic transmission to
remain in neutral N, e.g. when having the vehicle
cleaned in an automatic car wash with a towing
system:
X Switch the ignition on.
X Depress the brake pedal and keep it
depressed.
X Shift to neutral N.
X Release the brake pedal.
X Release the electric parking brake.
X Switch off the ignition and leave the key in the
ignition lock.
Using KEYLESS-GO X
Apply the electric parking brake.
X Shift the transmission to position P.
X Press the Start/Stop button (Y page 146).
The engine stops and all the indicator lamps in the instrument cluster go out.
If you switch the engine off with the transmis-
sion in position Ror D, the automatic transmis-
sion shifts to Nautomatically.
If you then open the driver's or front-passenger door, the automatic transmission shifts to P.
If you want the automatic transmission to
remain in neutral N, e.g. when having the vehicle
cleaned in an automatic car wash with a towing
system:
X Remove the Start/Stop button from the igni-
tion lock.
X Insert the key into the ignition lock.
X Switch the ignition on.
X Depress the brake pedal and keep it
depressed.
X Shift to neutral N.168
ParkingDriving and parking