trunk MERCEDES-BENZ GLE COUPE 2019 Owner's Manual
[x] Cancel search | Manufacturer: MERCEDES-BENZ, Model Year: 2019, Model line: GLE COUPE, Model: MERCEDES-BENZ GLE COUPE 2019Pages: 370, PDF Size: 11.22 MB
Page 24 of 370
Installing the towing eye ................ 322
Notes for 4MATIC vehicles ............ 324
Removing the towing eye ............... 322
Transporting the vehicle ................ 323
With both axles on the ground ....... 322
Towing eye .........................................3 10
Traffic reports
see also Digital Operator's Man-
ual ................................................. .264
Traffic Sign Assist
Activating/deactivating the warn-ing function ................................... .216
Display message ............................ 240
Function/notes ............................ .190
Important safety notes .................. 190
Instrument cluster display ............. 190
Trailer coupling
see Towing a trailer
Trailer loads and drawbar nose-
weights ............................................... 204
Trailer towing
Active Blind Spot Assist ................. 197
Active Lane Keeping Assist ............ 199
Blind Spot Assist ............................ 193
Permissible trailer loads and
drawbar noseweights ..................... 204
Transfer case ..................................... 141
Transmission
see Automatic transmission
Transmission position display ......... 136
Transporting the vehicle .................. 323
Traveling uphill
Brow of hill ..................................... 155
Driving downhill ............................ .155
Maximum gradient-climbing capa-
bility ............................................... 155
Trim pieces (cleaning instruc-
tions) ................................................. .307
Trip computer (on-board com-
puter) ................................................. .211
Trip odometer
Calling up ....................................... 211
Resetting (on-board computer) ...... 212
Trunk
see Tailgate
Trunk load (maximum) ......................364 Turn signals
Display message ............................ 235
Switching on/off ........................... 107
Two-way radio
Frequencies ................................... 357
Installation ..................................... 357
Transmission output (maximum ).... 357
TWR (Tongue Weight Rating) (defi-
nition) ................................................. 347
Type identification plate
see Vehicle identification plate U
Unlocking Emergency unlocking ....................... 81
From inside the vehicle (central
unlocking button) ............................. 80
Upshift indicator (on-board com-
puter, Mercedes-AMG vehicles) ....... 220
USB devices
Connecting to the Media Inter-
face ............................................... 271 V
Vanity mirror (in the sun visor) ........ 282
Vehicle
Correct use ...................................... 30
Data acquisition ............................... 31
Display message ............................ 247
Equipment ....................................... 27
Individual settings .......................... 217
Limited Warranty ............................. 31
Loading .......................................... 337
Locking (in an emergency) ............... 81
Locking (SmartKey) .......................... 74
Lowering ........................................ 351
Maintenance .................................... 28
Operating safety .............................. 29
Parking .......................................... 144
Parking for a long period ................ 147
Pulling away ................................... 130
Raising ........................................... 349
REACH Regulation ........................... 30
Reporting problems ......................... 31
Securing from rolling away ............ 349
Towing away .................................. 321 22
Index
Page 25 of 370
Transporting ..................................3
23
Unlocking (in an emergency) ........... 81
Unlocking (SmartKey) ..................... .74
Vehicle data ................................... 364
Vehicle data
Roof load (maximum) .....................3 64
Trunk load (maximum) ................... 364
Vehicle data (off-road driving)
Approach/departure angle ............ 366
Maximum gradient climbing abil-
ity ................................................. .367
Maximum water depth ................... 366
Vehicle dimensions ........................... 364
Vehicle emergency locking ................ 81
Vehicle identification number
see VIN
Vehicle identification plate .............. 358
Vehicle level
AIRMATIC ...................................... 170
Vehicle level (display message) ....... 239
Vehicle tool kit .................................. 310
Video
Operating the DVD ......................... 214
see also Digital Operator's Man-
ual ................................................. .264
VIN ...................................................... 358
Seat ............................................... 359
Type plate ...................................... 358 W
Warning and indicator lamps ABS ................................................ 254
Brakes .......................................... .253
Coolant .......................................... 260
Distance warning ........................... 262
Engine diagnostics ......................... 259
ESP ®
.............................................. 256
ESP ®
OFF ....................................... 257
Fuel tank ........................................ 259
Overview .......................................... 36
Parking brake ................................ 259
PASSENGER AIR BAG ..................... .43
Reserve fuel .................................. .259
Restraint system ............................ 259
Seat belt ........................................ 251
Tire pressure monitor .................... 263
Warranty .............................................. 27 Washer fluid
Display message ............................ 249
Weather display (COMAND)
see also Digital Operator's Man-
ual.................................................. 264
Wheel and tire combinations
Tires ............................................... 352
Wheel bolt tightening torque ........... 351
Wheel chock ...................................... 349
Wheels
Changing a whee l.......................... 347
Checking ........................................ 327
Cleaning ......................................... 304
Emergency spare wheel ................. 353
Important safety notes .................. 327
Information on driving .................... 327
Interchanging/changing ................ 347
Mounting a new whee l................... 351
Mounting a whee l.......................... 348
Overview ........................................ 327
Removing a whee l.......................... 350
Snow chains .................................. 329
Storing ........................................... 348
Tightening torque ........................... 351
Wheel size/tire size ....................... 352
Window curtain air bag
Display message ............................ 232
Operation ......................................... 49
Windows
see Side windows
Windshield
Defrosting ...................................... 122
Windshield washer fluid
see Windshield washer system
Windshield washer system
Adding washer fluid ....................... 299
Important safety notes .................. 363
Windshield wipers
Problem (malfunction) ................... 114
Replacing the wiper blades ............ 111
Replacing the wiper blades
(MAGIC VISION CONTROL) ............ 113
Switching on/of f........................... 111
Winter driving
Slippery road surfaces ................... 151
Winter operation
Overview ........................................ 329
Radiator cover ............................... 297 Index
23
Page 148 of 370
To ensure that you do not roll backwards when
pulling away on an uphill slope, engage the elec-
tric parking brake (Y page 130).
Applying automatically The electric parking brake is automatically
applied when the transmission is in position 005D
and
R the engine is switched off or
R the driver is not wearing a seat belt and the
driver's door is opened
To prevent the electric parking brake from being automatically applied, pull handle 0043.
The electric parking brake is also applied auto-
matically if:
R Active Distance Assist DISTRONIC brings the
vehicle to a standstill or
R the HOLD function is keeping the vehicle sta-
tionary
R Active Parking Assist or the Parking Package
with rear view camera is keeping the vehicle
stationary
In addition, at least one of the following condi-
tions must be fulfilled:
R the engine is switched off
R the driver is not wearing a seat belt and the
driver's door is opened
R there is a system malfunction
R the power supply is insufficient
R the vehicle is stationary for a lengthy period
The red 0049(USA only) or 0024(Canada only)
indicator lamp in the instrument cluster lights
up.
The electric parking brake is not automatically
applied if the engine is switched off by the ECO
start/stop function.
Releasing automatically The electric parking brake is released automat-
ically when all of the following conditions are
fulfilled:
R
The engine is running.
R The seat belt tongue is engaged in the belt
buckle.
R The transmission is in position 005Bor005E and
you depress the accelerator pedal or, on a level surface, you shift from transmission
position
005Dto005B or005E.
R If the transmission is in position 005E, the trunk
lid must be closed.
If the seat belt tongue is not engaged in the seat belt buckle, the following conditions must be
fulfilled:
R The driver's door is closed.
R You are shifting from transmission position
005D or have previously driven at speeds
greater than 2 mph (3 km/h).
R If the transmission is in position 005E, the trunk
lid must be closed.
When the electric parking brake is released,
the 0024 indicator lamp goes out in the instru-
ment cluster.
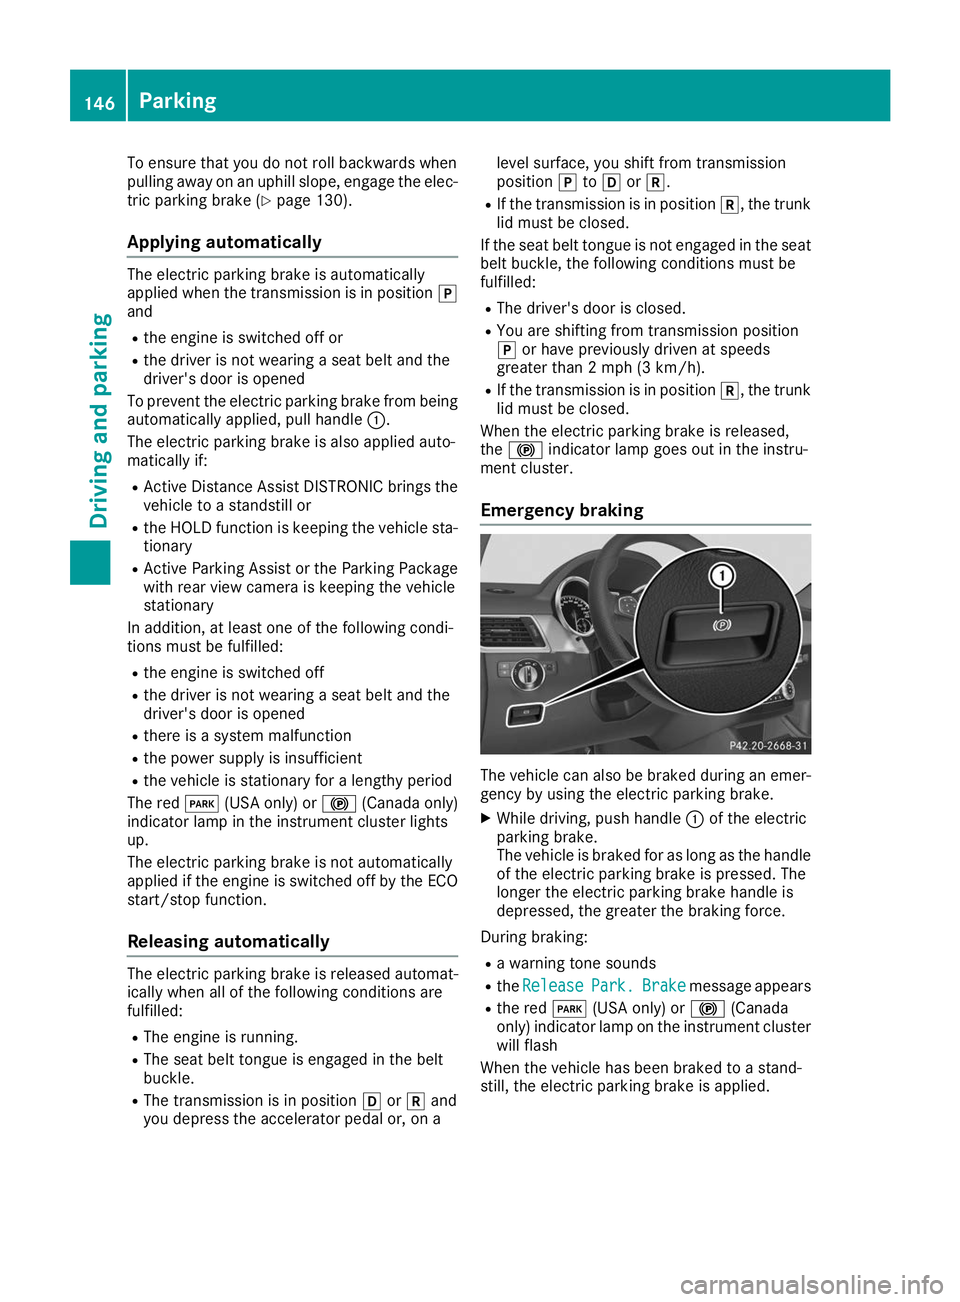
Emergency braking The vehicle can also be braked during an emer-
gency by using the electric parking brake.
X While driving, push handle 0043of the electric
parking brake.
The vehicle is braked for as long as the handle
of the electric parking brake is pressed. The
longer the electric parking brake handle is
depressed, the greater the braking force.
During braking: R a warning tone sounds
R the Release Release Park.
Park.Brake
Brakemessage appears
R the red 0049(USA only) or 0024(Canada
only) indicator lamp on the instrument cluster will flash
When the vehicle has been braked to a stand-
still, the electric parking brake is applied. 146
ParkingDriving and parking
Page 182 of 370
the vehicle has exited the parking space com-
pletely. This is useful, for example when you
recognize that it is already possible to pull out of
the parking space.
Canceling Active Parking Assist X
Stop the movement of the multifunction
steering wheel or steer yourself.
Active Parking Assist will be canceled at once.
The Active Parking Assist Canceled
Active Parking Assist Canceled
message appears on the multifunction dis-
play.
or X Press the Parking Assist PARKTRONIC button
(Y page 175).
Parking Assist PARKTRONIC is switched off
and Active Parking Assist is immediately can-
celed. The Active Parking Assist Can‐
Active Parking Assist Can‐
celed celed message appears on the multifunction
display.
Active Parking Assist is canceled automatically
if: R the electric parking brake is engaged
R transmission position 005Dis selected
R parking using Active Parking Assist is no lon-
ger possible
R you are driving faster than 6 mph (10 km/h)
R a wheel spins, ESP ®
intervenes or fails. The
00E5 warning lamp lights up in the instrument
cluster
A warning tone sounds. The parking symbol dis-
appears and the multifunction display shows the
Active
Active Parking Parking Assist
AssistCanceled
Canceled message.
When Active Parking Assist is canceled, you
must steer and brake again yourself.
If a system malfunction occurs, the vehicle is
braked to a standstill. To drive on, depress the
accelerator again. Rear view camera
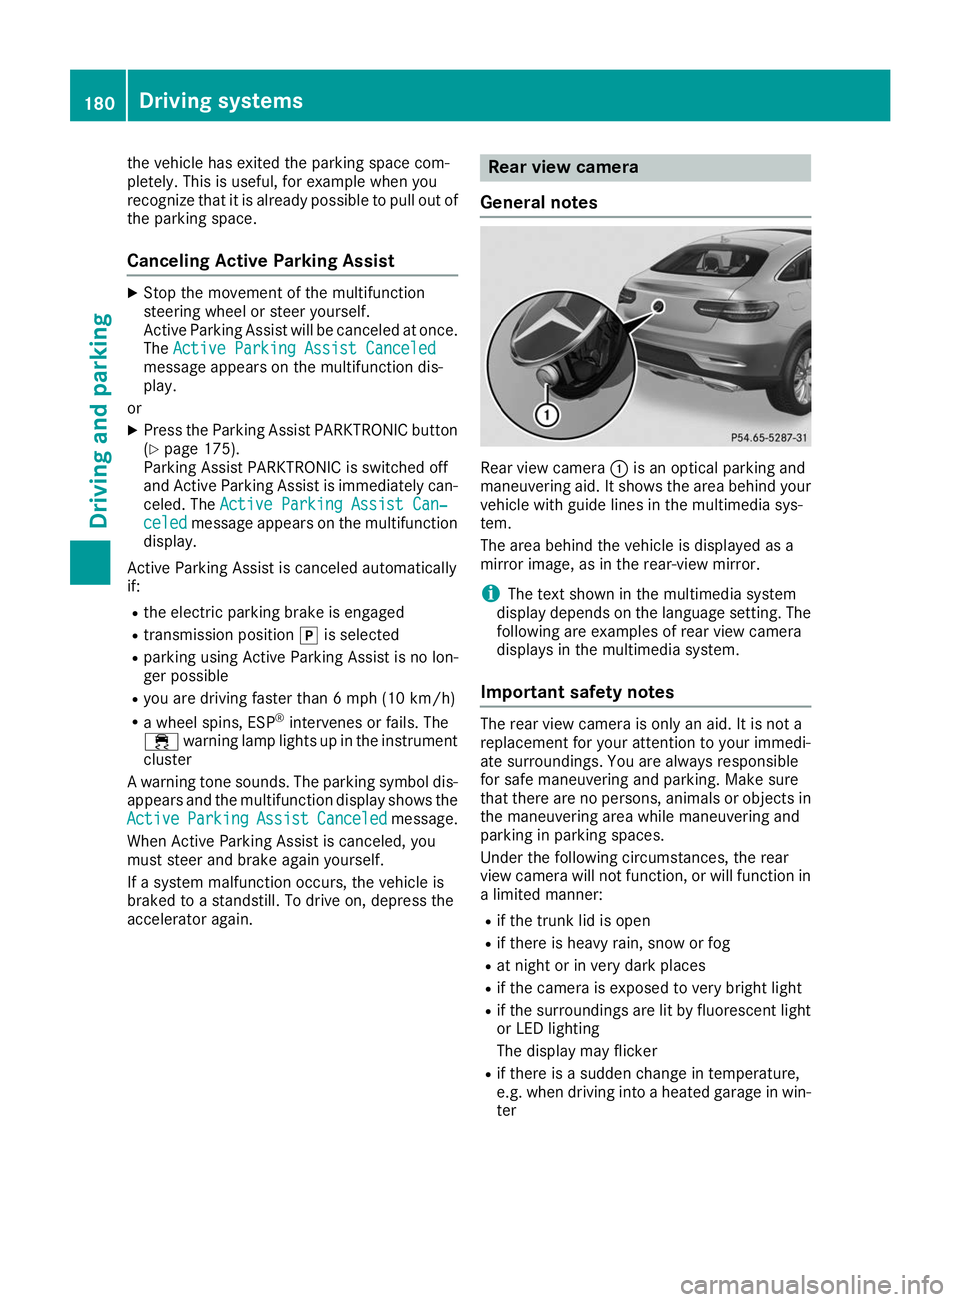
General notes Rear view camera
0043is an optical parking and
maneuvering aid. It shows the area behind your
vehicle with guide lines in the multimedia sys-
tem.
The area behind the vehicle is displayed as a
mirror image, as in the rear-view mirror.
i The text shown in the multimedia system
display depends on the language setting. The
following are examples of rear view camera
displays in the multimedia system.
Important safety notes The rear view camera is only an aid. It is not a
replacement for your attention to your immedi-
ate surroundings. You are always responsible
for safe maneuvering and parking. Make sure
that there are no persons, animals or objects in
the maneuvering area while maneuvering and
parking in parking spaces.
Under the following circumstances, the rear
view camera will not function, or will function in
a limited manner:
R if the trunk lid is open
R if there is heavy rain, snow or fog
R at night or in very dark places
R if the camera is exposed to very bright light
R if the surroundings are lit by fluorescent light
or LED lighting
The display may flicker
R if there is a sudden change in temperature,
e.g. when driving into a heated garage in win-
ter 180
Driving systemsDriving an
d parking
Page 183 of 370
R
if the camera lens is dirty or obstructed.
Observe the notes on cleaning
(Y page 305)
R if the rear of your vehicle is damaged. In this
event, have the camera position and setting
checked at a qualified specialist workshop
The field of vision and other functions of the rear
view camera may be restricted due to additional
accessories on the rear of the vehicle (e.g.
license plate holder, bicycle rack).
On vehicles with height-adjustable chassis,
leaving the standard height can result in inac-
curacies in the guide lines, depending on tech-
nical conditions.
i The contrast of the display may be affected
by the sudden presence of sunlight or other
light sources, e.g. when exiting a garage. Pay
particular attention in this situation.
i If usability is severely restricted, e.g. due to
pixel errors, have the display repaired or
replaced.
i The rear view camera is protected from rain-
drops and dust. When the rear view camera is
switched on, the Mercedes emblem opens
with the rear view camera in the cover on the tailgate.
The emblem closes again when:
R you have finished the maneuvering process
R you switch off the engine
R you open the trunk
Observe the notes on cleaning (Y page 305).
For technical reasons, the emblem may
remain open briefly after the rear view camera
has been deactivated.
Activating/deactivating the rear view
camera X
To activate: make sure that the SmartKey is
in position 0048in the ignition lock.
X Make sure that the Activation by R gear
Activation by R gear
function is selected on the multimedia system (see the Digital Operator's Manual).
X Engage reverse gear.
The rear view camera flap opens. The multi-
media system shows the area behind the vehi-
cle with guide lines.
The image from the rear view camera is avail- able throughout the maneuvering process. X
To switch the function mode for vehicles
with trailer tow hitch: using the controller,
select symbol 0043for the "Reverse parking"
function or symbol 0044for "Coupling up a
trailer".
The symbol of the selected function is high-
lighted.
To deactivate: shift the transmission to posi-
tion 005Dor drive forwards.
Displays in the multimedia system The rear view camera may show a distorted view
of obstacles, show them incorrectly or not at all.
The rear view camera does not show objects in
the following positions:
R very close to the rear bumper
R under the rear bumper
R in the area immediately above the tailgate
handle
! Objects not at ground level may appear to
be further away than they actually are, e.g.:
R the bumper of a parked vehicle
R the drawbar of a trailer
R the ball coupling of a trailer tow hitch
R the rear section of an HGV
R a slanted post
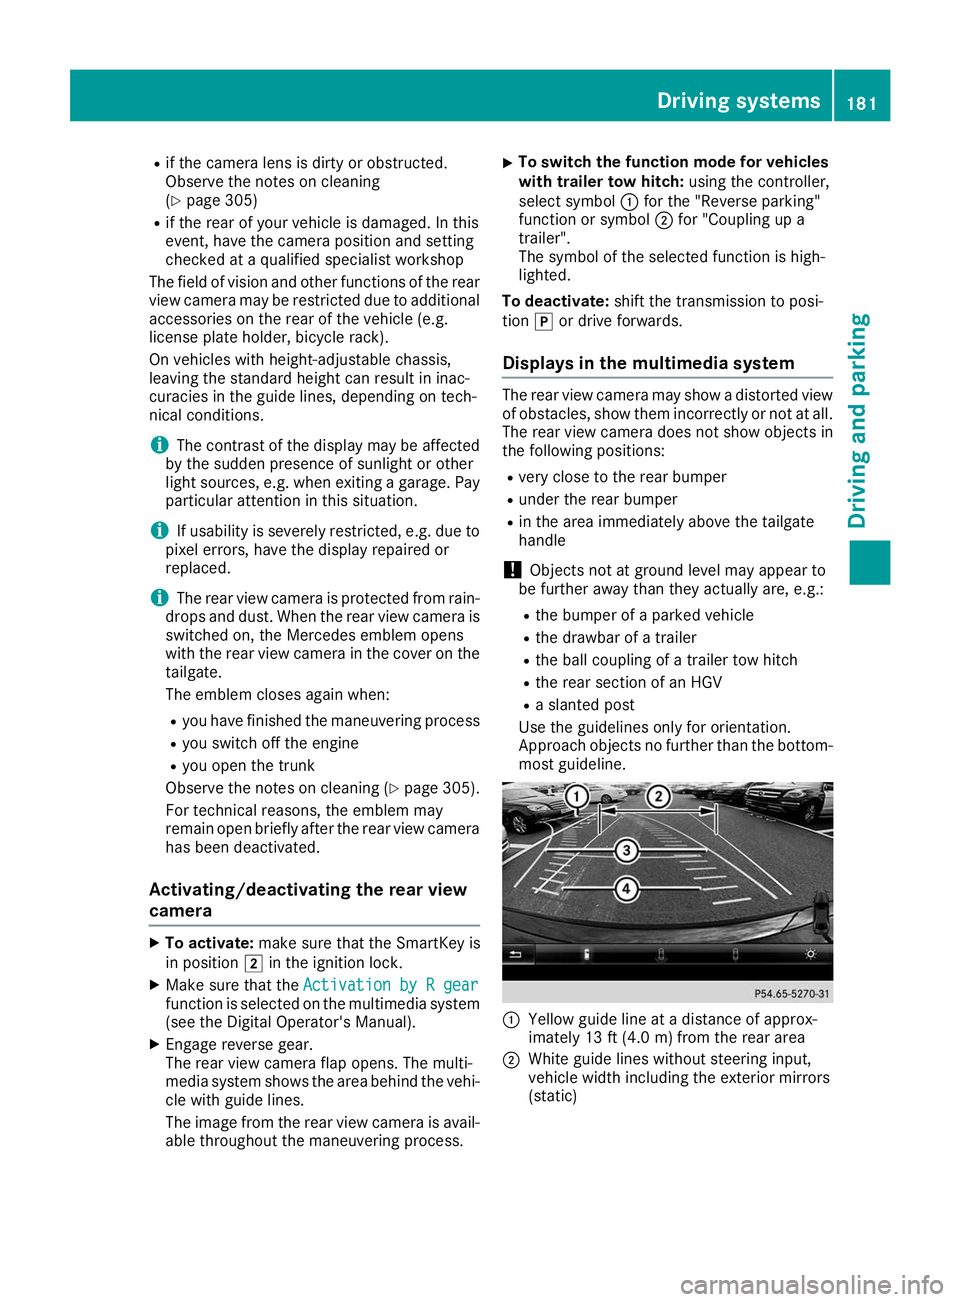
Use the guidelines only for orientation.
Approach objects no further than the bottom-
most guideline. 0043
Yellow guide line at a distance of approx-
imately 13 ft (4.0 m) from the rear area
0044 White guide lines without steering input,
vehicle width including the exterior mirrors
(static) Driving systems
181Driving and parking Z
Page 277 of 370
R
parcel nets on the right-hand side of the cargo
compartment
R folding coat hooks next to the grab handles in
the rear
Observe the loading guidelines (Y page 272)
and the safety notes regarding stowage spaces
(Y page 272). Through-loading facility in the rear
passenger compartment
There is a through-loading facility above the
armrest in the rear for transporting longer
objects. You can continue to use both of the
outer rear seats.
If objects or loads are not secured when being
transported in the through-loading facility, they
could slip or be thrown around and thereby hit
vehicle occupants.
Observe the loading guidelines (Y page 272)
and the safety notes regarding stowage spaces
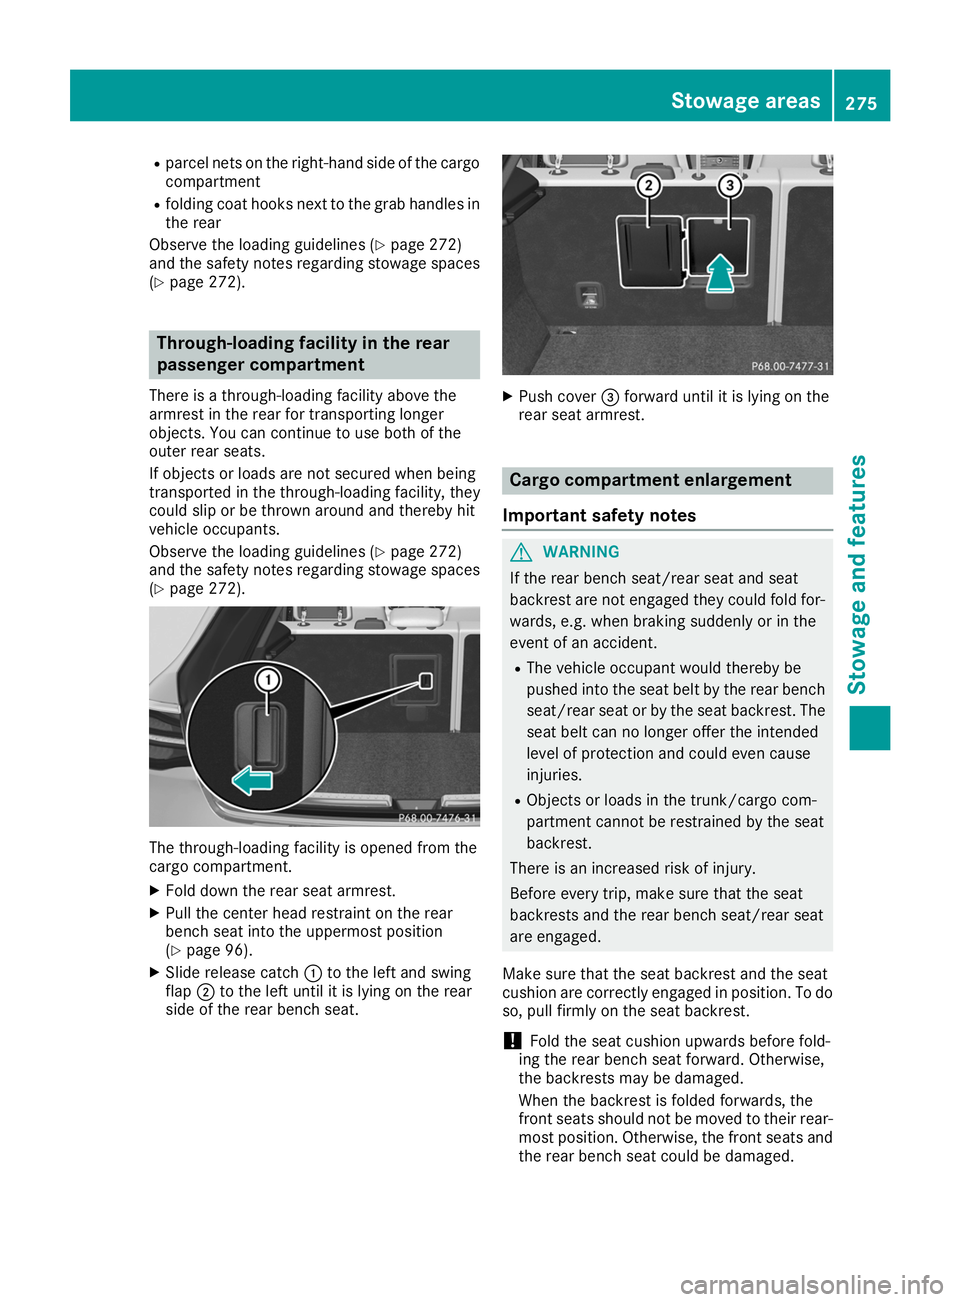
(Y page 272). The through-loading facility is opened from the
cargo compartment.
X Fold down the rear seat armrest.
X Pull the center head restraint on the rear
bench seat into the uppermost position
(Y page 96).
X Slide release catch 0043to the left and swing
flap 0044to the left until it is lying on the rear
side of the rear bench seat. X
Push cover 0087forward until it is lying on the
rear seat armrest. Cargo compartment enlargement
Important safety notes G
WARNING
If the rear bench seat/rear seat and seat
backrest are not engaged they could fold for- wards, e.g. when braking suddenly or in the
event of an accident.
R The vehicle occupant would thereby be
pushed into the seat belt by the rear bench
seat/rear seat or by the seat backrest. The
seat belt can no longer offer the intended
level of protection and could even cause
injuries.
R Objects or loads in the trunk/cargo com-
partment cannot be restrained by the seat
backrest.
There is an increased risk of injury.
Before every trip, make sure that the seat
backrests and the rear bench seat/rear seat
are engaged.
Make sure that the seat backrest and the seat
cushion are correctly engaged in position. To do
so, pull firmly on the seat backrest.
! Fold the seat cushion upwards before fold-
ing the rear bench seat forward. Otherwise,
the backrests may be damaged.
When the backrest is folded forwards, the
front seats should not be moved to their rear-
most position. Otherwise, the front seats and
the rear bench seat could be damaged. Stowage areas
275Stowage and features Z
Page 360 of 370
The maximum transmission output (PEAK) at the
base of the antenna must not exceed the fol-
lowing values: Frequency band Maximum
transmission output Short wave
3 - 54 MHz 100 W
4 m waveband
74 - 88 MHz 30 W
2 m waveband
144 - 174 MHz 50 W
Trunked radio system/
Tetra
380 - 460 MHz 10 W
70 cm waveband
400 - 460 MHz 35 W
Mobile communications
(2G/3G/4G) 10 W
The following can be used in the vehicle without
restrictions:
R Two-way radios with a maximum transmission
output of up to 100 mW
R Two-way radios with transmitter frequencies
in the 380 - 410 MHz waveband and a maxi-
mum transmission output of up to 2 W
(trunked radio/Tetra)
R Mobile phones (2G/3G/4G)
There are no restrictions when positioning the
antenna on the outside of the vehicle for the
following wavebands:
R Trunked radio system/Tetra
R 70 cm waveband
R 2G/3G/4G Identification plates
Vehicle identification plate with vehi-
cle identification number (VIN)
X
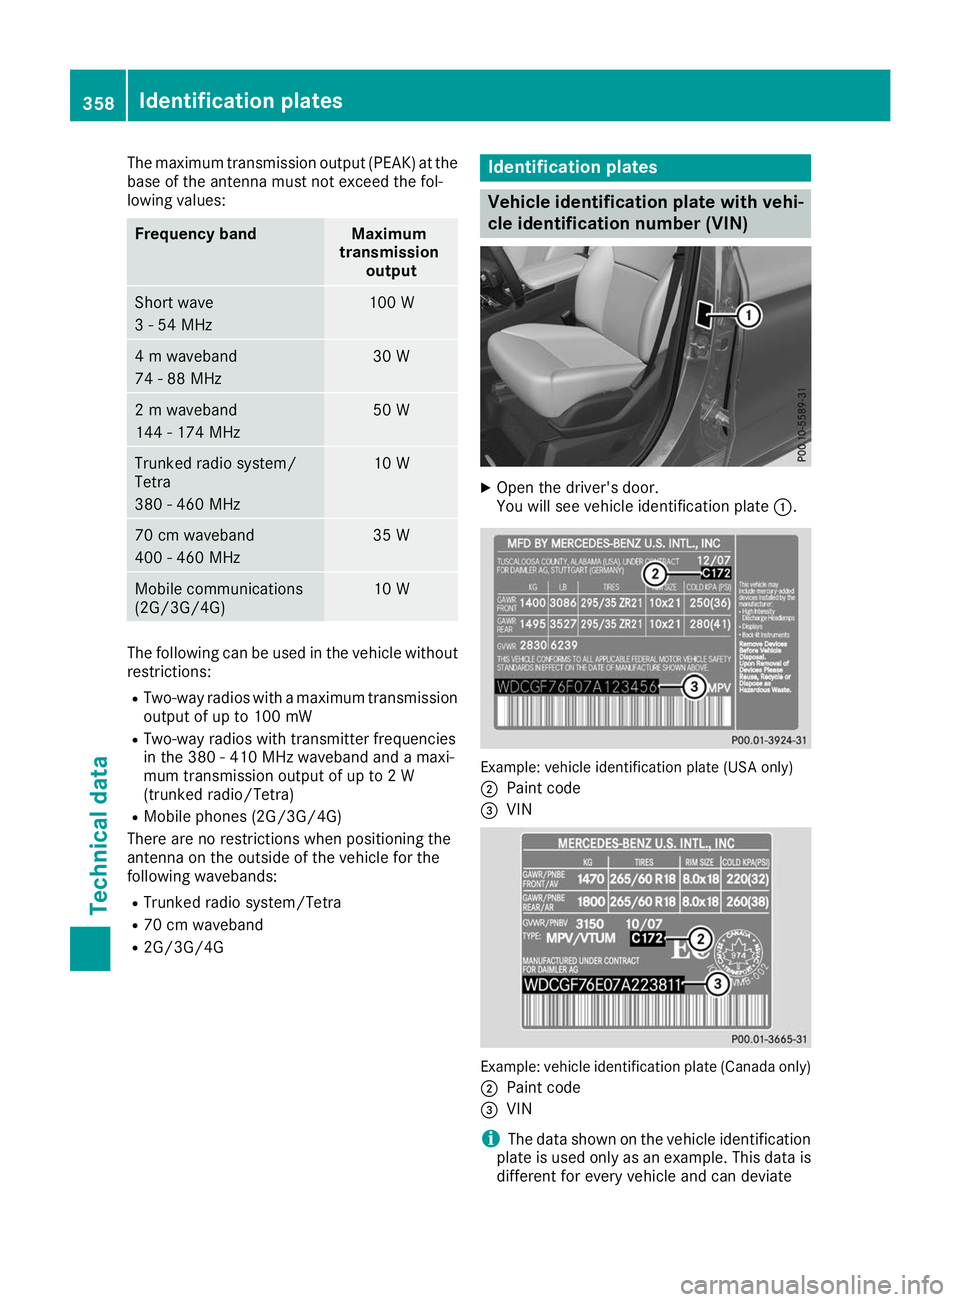
Open the driver's door.
You will see vehicle identification plate 0043. Example: vehicle identification plate (USA only)
0044 Paint code
0087 VIN Example: vehicle identification plate (Canada only)
0044 Paint code
0087 VIN
i The data shown on the vehicle identification
plate is used only as an example. This data is
different for every vehicle and can deviate 358
Identification platesTechnical data