MERCEDES-BENZ GLE COUPE 2020 Owners Manual
Manufacturer: MERCEDES-BENZ, Model Year: 2020, Model line: GLE COUPE, Model: MERCEDES-BENZ GLE COUPE 2020Pages: 757, PDF Size: 11.84 MB
Page 511 of 757
MBUX
Rear Entertainment Sy stem Operating saf
ety&
WARNING Risk of inju ryfrom unsecu red
items in theve hicle
If objects such as headphones/headsets or
ex tern al audio/video sources are not
secured in theve hicle interior, they can be
fl ung around and hit vehicle occupants. #
Alw aysstow these items or similar
objects carefully so that they cannot be
fl ung around, forex ample in a loc kable
ve hicle stowage compartment. Obse
rveth e no tes on loading theve hicle.
% Ventilation mu stnot be impeded bycovering
th eve ntilation openings wi thitems (such as
ne ws paper, table-clo ths, clo thes, cur tains,
et c).
% No naked flame sources (such as lighted
candles), shall be placed on apparatus. Re
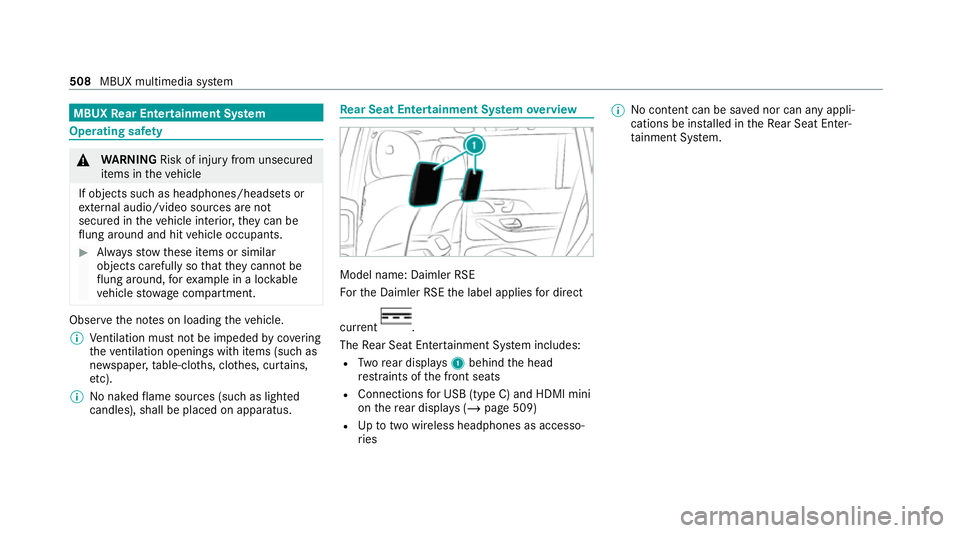
ar Seat Entertainment Sy stem overview Model name: Daimler RSE
Fo
rth e Daimler RSE the label applies for direct
cur rent .
The Rear Seat En tertainment Sy stem includes:
R Twore ar displa ys1 behind the head
re stra ints of the front seats
R Connections for USB (type C) and HDMI mini
on there ar displa ys (/page 509)
R Uptotwo wi reless headphones as accesso‐
ri es %
No conte nt can be sa ved nor can any appli‐
cations be ins talled in theRe ar Seat En ter‐
ta inment Sy stem. 508
MBUX multimedia sy stem
Page 512 of 757
Re
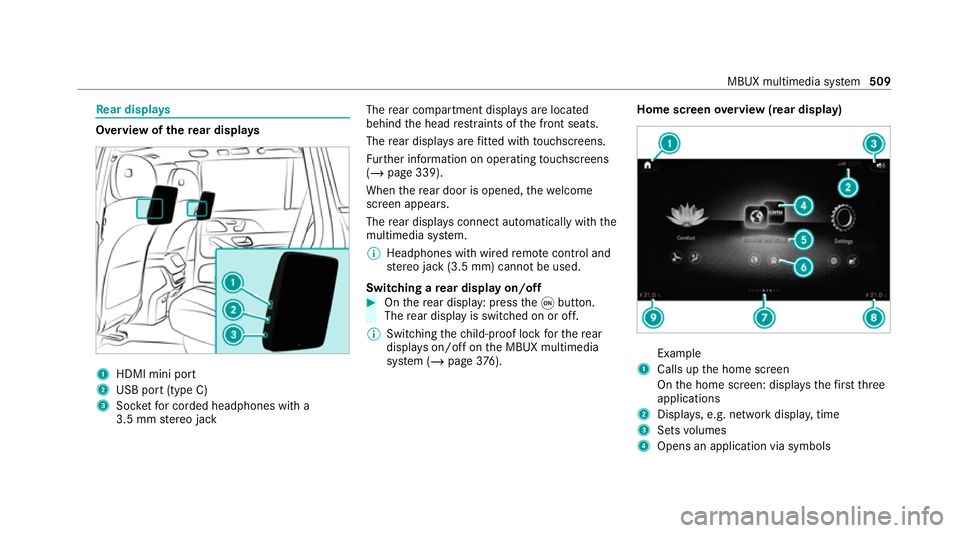
ar displa ys Overview of
there ar displa ys 1
HDMI mini port
2 USB port (type C)
3 Socketfo r corded headphones with a
3.5 mm stereo jack The
rear compartment displa ysare located
behind the head restra ints of the front seats.
The rear displa ysare fitted wi thtouchsc reens.
Fu rther information on operating touchsc reens
(/ page 339).
When there ar door is opened, thewe lcome
screen appears.
The rear displa ysconnect au tomatical lywith the
multimedia sy stem.
% Headphones with wired remo tecontrol and
st ereo jack (3.5 mm) cann otbe used.
Switching a rear display on/off #
Onthere ar display: press the0043 button.
The rear display is swit ched on or off.
% Switching thech ild-proof lock forth ere ar
displa yson/off on the MBUX multimedia
sy stem (/ page376). Home screen
overview (rear display) Example
1 Calls up the home screen
On the home screen: displa ys thefirs tth ree
applications
2 Displa ys, e.g. network displa y,time
3 Sets volumes
4 Opens an application via symbols MBUX multimedia sy
stem 509
Page 513 of 757
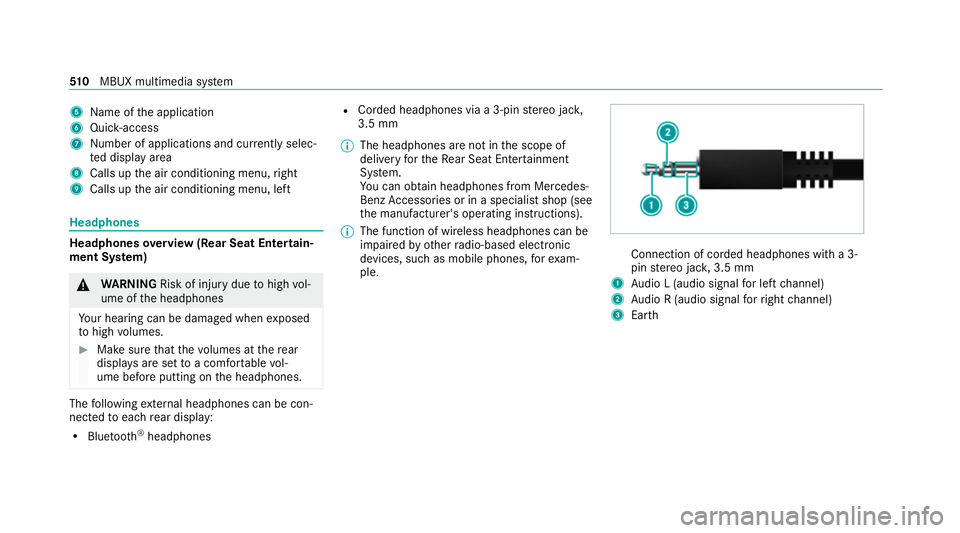
5
Name of the application
6 Quic k-access
7 Numb er of applications and cur rently selec‐
te d display area
8 Calls up the air conditioning menu, right
9 Calls up the air conditioning menu, left Headphones
Headphones
overview (Rear Seat Entertain‐
ment Sy stem) &
WARNING Risk of inju rydue tohigh vol‐
ume of the headphones
Yo ur hearing can be damaged when exposed
to high volumes. #
Make sure that thevo lumes at there ar
displa ysare set toa com fortable vol‐
ume before putting on the headphones. The
following extern al headphones can be con‐
nec tedto each rear display:
R Blue tooth ®
headphones R
Corded headphones via a 3-pin stereo jac k,
3.5 mm
% The headphones are not in the scope of
delivery forth eRe ar Seat En tertainment
Sy stem.
Yo u can obtain headphones from Mercedes-
Benz Accessories or in a speciali stshop (see
th e manufacturer's operating instructions).
% The function of wireless headphones can be
impaired by otherradio-based elect ronic
devices, su chas mobile phones, forex am‐
ple. Connection of corded headphones with a 3-
pin
stereo jac k,3.5 mm
1 Audio L (audio signal for left channel)
2 Audio R (audio signal forright channel)
3 Earth 51 0
MBUX multimedia sy stem
Page 514 of 757
Re
ar seats Ad
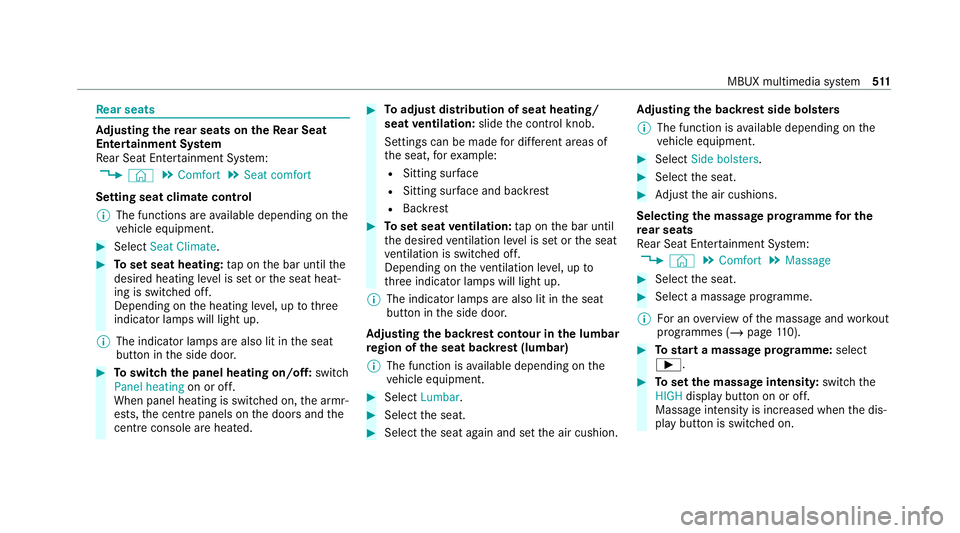
justing the rear seats on theRe ar Seat
Entertainment Sy stem
Re ar Seat En tertainment Sy stem:
4 © 5
Comfort 5
Seat comfort
Setting seat climate control % The functions are available depending on the
ve hicle equipment. #
Select Seat Climate. #
Toset seat heating: tap on the bar until the
desired heating le vel is set or the seat heat‐
ing is switched off.
Depending on the heating le vel, up tothree
indicator lamps will light up.
% The indicator lamps are also lit in the seat
button in the side door. #
Toswitch the panel heating on/off: switch
Panel heating on or off.
When panel heating is switched on, the armr‐
ests, the cent repanels on the doors and the
centre console are hea ted. #
Toadjust distribution of seat heating/
seat ventilation: slidethe control knob.
Settings can be made for dif fere nt areas of
th e seat, forex ample:
R Sitting sur face
R Sitting su rface and backrest
R Backrest #
Toset seat ventilation: tap on the bar until
th e desired ventilation le vel is set or the seat
ve ntilation is switched off.
Depending on theve ntilation le vel, up to
th re e indicator lamps will light up.
% The indicator lamps are also lit in the seat
button in the side door.
Ad justing the backrest contour in the lumbar
re gion of the seat backrest (lumbar)
% The function is available depending on the
ve hicle equipment. #
Select Lumbar. #
Select the seat. #
Select the seat again and set the air cushion. Ad
justing the backrest side bols ters
% The function is available depending on the
ve hicle equipment. #
Select Side bolsters. #
Select the seat. #
Adjust the air cushions.
Selecting the massage prog ramme for the
re ar seats
Re ar Seat En tertainment Sy stem:
4 © 5
Comfort 5
Massage #
Select the seat. #
Select a massage programme.
% For an overview of the massage and workout
programmes (/ page110). #
Tostart a massage prog ramme: select
00D0. #
Toset the massage intensit y:switch the
HIGH display button on or off.
Massage intensity is increased when the dis‐
play button is switched on. MBUX multimedia sy
stem 511
Page 515 of 757
Setting climate control
for the rear
passenger comp artment (Rear Seat Enter‐
tainment Sy stem) Setting
thetemp erature
% The function is available depending on the
ve hicle equipment. #
Select thete mp erature display at the lo wer
edge of there ar displa y. #
Select Second row of seats orThird row of
seats. #
For Mayba chvehicles: selectSecond row
of seats.
% Mayba chvehicles are fitted wi thone and
two rows of seats. #
Set thete mp erature.
Setting the airflow
% The function is available depending on the
ve hicle equipment. #
Select thete mp erature display at the lo wer
edge of there ar displa y. #
Select Second row of seats orThird row of
seats. #
For Mayba chvehicles: selectSecond row
of seats.
% Mayba chvehicles are fitted wi thone and
two rows of seats. #
Set the air flow.
Setting the air distribution
% The function is available depending on the
ve hicle equipment.
The air distribution can be set forth e seats in
th e second row. #
Select thete mp erature display at the lo wer
edge of there ar displa y. #
Select Second row of seats . #
Select 009Cor009B forth e left or right seat.
009C The air is routed thro ugh the cent re
and side air vents.
009B The air is routed thro ugh thefo ot we ll
and side air vents. Controlling the
rear climate control automat‐
ical ly
% The function is available depending on the
ve hicle equipment. #
Select REAR AUTO.
Re ar climate control is controlled automati‐
call y.
Deactivating rear climate control
% The function is available depending on the
ve hicle equipment. #
Select REAR OFF.
Re ar climate control is deactivated. Setting
the ambience light in there ar
passenger comp artment Re
ar Seat En tertainment Sy stem:
4 © 5
Comfort 5
Ambient lighting
Setting the colour #
Select the colour of the light from thech ro‐
matic circle. 512
MBUX multimedia sy stem
Page 516 of 757
Ac
tivating multi-coloured lighting #
Select Multi-colour. #
Select a colour programme.
Ac tivating multi-coloured animation #
Activate Multi-colour animat..
The chosen colour programme will change at
predefined inter vals.
Ad justing the brightness #
Select Brightness . #
Toactivate brightness for zones: switch
Brightness zones on or off.
If Brightness zones is switched on,the zones
can be set individually. #
Set the zones.
Setting the colour ef fects #
Select Effects. #
Swit chWelcome orClimate on or off.
% Further information on theto pic of setting
ambiance light (/ page149). Setting
the language in there ar passenger
comp artment Re
ar Seat En tertainment Sy stem:
4 © 5
Settings 5
System
5 Language #
Set the language. Selecting sy
stem settings in there ar com‐
partment Re
ar Seat En tertainment Sy stem:
4 © 5
Settings 5
System
Ad justing the brightness #
Select Display. #
Adjust the brightness.
Connecting a device in the device manager #
Select Device Manager. #
Select a device that is tobe connec ted.
Headphones and headsets are connec ted
with there ar displa y. Mobile phones and
other devices are con‐
nected with the multimedia sy stem. Na
vigation Switching on navigation in
there ar comp art‐
ment
Re ar Seat En tertainment Sy stem:
4 © 5
Navigation (Navigation)
The map appears and sho ws the current vehicle
position. #
Select an option in the navigation menu.
The following options are available on there ar
displa y,forex ample:
R Entering the destination and transfer ring this
to the multimedia sy stem using Send to Car
Navigation
R Setting the map scale.
R Moving the map and rotating the map.
R Showing route information.
R Installing the online map update forre gions.
This option is not available in all countries. MBUX multimedia sy
stem 513
Page 517 of 757
We
b br owser We
b br owser overview (Rear Seat Entertain‐
ment Sy stem)
Depending on the count ryand theve hicle equip‐
ment, a web br ows er can be called up on the
re ar displa y.The rear display uses a web
br ows er from the manufacturer.
Yo u cannot download any content.
Calling up thewe b br owser (Rear Seat Enter‐
tainment Sy stem)
Re quirements:
R The vehicle is equipped with a permanently
ins talled communication module
(/ page 474).
Re ar Seat En tertainment Sy stem:
4 © 5
Browser & Connectivity
5 Browser #
Select an application. Media
Information about media mode in
there ar
comp artment
There is one USB port and one HDMI connection
in theRe ar Seat En tertainment Sy stem
(/ page 509).
Data storage media suppor tedby theRe ar Seat
En tertainment Sy stem:
R MTP devices
R Android devices that are used as MTP devi‐
ces
R Mass storage devices, e.g. USB storage
media
The data storage medium is connected with
th ere ar display via the USB port (type C)
(/ page 509).
The data storage medium is connected with
th e multimedia sy stem using the multimedia
connection unit in thestow age compartment
under the armrest (/ page 488).
R Apple devices, e.g. iPhone ®
or iPod ®
Apple CarPlay ®
is not suppor ted. R
Blue tooth ®
audio equipment
Auth orisation of a Blue tooth®
audio device is
car ried out on the multimedia sy stem
(/ page 488).
% The following devices are not suppor ted:
R USB hubs
R Computer mice
R Keyboards
R Audio accessories
The Rear Seat En tertainment Sy stem can access
th efiles on the multimedia sy stem.
Fu rther information about media mode
(/ page 484). 514
MBUX multimedia sy stem
Page 518 of 757
The
term s HDMI and HDMI High-Definition Multi‐
media Inter face, and the HDMI Logo are trade‐
mar ksorregis tere d trademar ksof HDMI Licens‐
ing LLC in theUn ited States and other countries.
Switching on media mode in there ar
passenger comp artment
Re quirements:
R A data storage medium is connected with the
re ar display or the multimedia sy stem.
R A Blue tooth®
audio device is connec ted with
th e multimedia sy stem. Re
ar Seat En tertainment Sy stem:
4 © 5
Media #
Select USB,Bluetooth orMy USB.
% If a USB storage device is connected with a
re ar display (/ page 509),theMy USB
option is available.
The following functions are available:
R Controlling media playback (/ page515)
R ª Using theke yword sear ch
( / page 492)
R 5 Searching for media files using catego‐
ri es (/ page 491)
% Selecting sound settings in there ar com‐
partment (/ page516).
Con trolling media playba ckintheRe ar Seat
Entertainment Sy stem
Re ar Seat En tertainment Sy stem:
4 © 5
Media #
Select USB,Bluetooth orMy USB. %
If a USB storage device is connected with a
re ar display (/ page 509),theMy USB
option is available. #
Topause or continue playback: select
00CF or0065. #
Toselect the next or pr evious track:
select 00F6or00F5. #
Toscroll through trac ksquickl y:press and
hold 00F5 or00F6. #
Towind a track forw ards or backwards:
ta p on the desired point on the timeline. #
Toplay back trac ksinrandom order:
select 9. #
Torepeat a track: select:.
Fo rth ere peat function there are thefo llow‐
ing options:
R Tap once: the active pla ylist is repeated.
R Tap twice: the cur rent track is repeated.
R Tapth re e times: there peat function is
deactivated. #
Toshow the cur rent track lis t:select the
co ver. MBUX multimedia sy
stem 515
Page 519 of 757
TV
mode Switching
toTV mode in the rear passenger
comp artment
Re ar Seat En tertainment Sy stem:
4 © 5
Media 5
TV #
Select a channel with 0047or0048.
The station is selec ted on the multimedia sys‐
te m. #
Toshow full screen: tap on the pr eview pic‐
ture. #
Toshow theTV menu: selectG.
The following functions are available:
R ª Searching for a TV chan‐
nel(/ page 499)
R Õ Show ing cur rent programme information
fo rth e selected TVchannel (EPG)
(/ page 500)
R Storing and managing TVchannels
(/ page 501)
R Z Setting options:
Setting Audio/subtitles Swit
ching Station fix on or off
Displaying Teletext
Selecting Video settings Sound
Overview of sound settings in
there ar com‐
partment
The sound settings depend on whi chsound sys‐
te m is available.
Depending on the equipment ins talled, one of
th efo llowing sy stems is suppor ted:
R Sound sy stem (/ page 504)
R Burmes ter®
sur round sound sy stem
(/ page 505)
R Burmes ter®
high-end 3D sur round sound sys‐
te m (/ page 506)
Selecting sound settings in there ar comp art‐
ment
Re ar Seat En tertainment Sy stem:
4 © 5
Settings 5
System #
Select Sound. #
Select Equaliser . #
Adjust theto ne settings.
Switching Cabin Audio on/o ffand setting
vo lumes #
Select ©. #
Select Media. #
Select USBorMy USB . #
Swit chthe display button with the loud‐
speaker symbol on or off. #
Toset thevo lumes: movethe control knob
to the left or right on one of the scales.
The volume forth eve hicle interior or forthe
headphones is set. 516
MBUX multimedia sy stem
Page 520 of 757
ASS
YST PLUS se rvice inter val display Fu
nction of the ASS YST PLUS se rvice inter val
displ ay The ASS
YST PLUS service inter val display on the
instrument display pr ovides information on the
re maining time or dis tance be fore the next
service due date.
Yo u can hide this service display using the back
button on the left-hand side of thesteering
wheel.
Depending on how theve hicle is used, the
ASS YST PLUS service inter val display may
shor tenth e service inter val, e.g. in thefo llowing
cases:
R mainly short-dis tance driving
R when the engine is of ten le ftidling for long
periods
R intheeve nt of frequent cold start phases
R vehicles with a diesel particulate filter: in
th eev ent of frequently inter rupted rege nera‐
tion of the diesel particulate filter Mercedes-Benz
recommends avoiding such
operating conditions.
Yo u can obtain information concerning the serv‐
icing of your vehicle from a qualified specialist
wo rkshop, e.g. a Mercedes-Benz Service Centre. Displaying
the service due da te On-board computer:
4 Service 5
ASSYST PLUS
The next service due date is displa yed. #
Toexitth e displa y:press the back button
on the left-hand side of thesteering wheel.
Be sure toalso pay attention tothefo llowing
re lated topic:
R Operating the on-board computer
(/ page 301). Information on
regular maintenance work *
NO
TEPremature wearthro ugh failure to
obser veservice due dates Service
workwhich is not car ried out at the
ri ght time or incomple tely can lead to
inc reased wear and damage totheve hicle. #
Alw ays obser vethe prescribed service
inter vals. #
Alw ays ha vethe prescribed service
wo rkcar ried out at a qualified specialist
wo rkshop. Special service
requ irements The prescribed service inter
val is based on nor‐
mal operation of theve hicle. Maintenance work
will need tobe per form ed more of ten if theve hi‐
cle is operated under arduous conditions or
increased loads.
The ASS YST PLUS service inter val display is only
an aid. The driver of theve hicle bears responsi‐
bility as rega rdsto whe ther maintenance work
needs tobe per form ed more of tenth an speci‐ Main
tenance and care 517