buttons MERCEDES-BENZ GLK-Class 2011 X204 Owner's Manual
[x] Cancel search | Manufacturer: MERCEDES-BENZ, Model Year: 2011, Model line: GLK-Class, Model: MERCEDES-BENZ GLK-Class 2011 X204Pages: 304, PDF Size: 13.08 MB
Page 15 of 304
Service productsBrake fluid ..................................... 298
Capacities ...................................... 295
Coolant (engine) ............................ 298
Engine oil ....................................... 297
Fuel ................................................ 296
Important safety notes ..................294
Notes ............................................. 294
Refrigerant (air-conditioning
system) .......................................... 298
Washer fluid ................................... 299
Settings
Factory (on-board computer) .........174
On-board computer .......................171
Shift ranges ....................................... 137
Side impact air bag ............................. 39
Side marker lamp (display
message) ............................................ 185
Side windows Convenience closing feature ............83
Convenience opening feature ..........83
Important safety information ...........81
Opening/closing .............................. 82
Resetting ......................................... 84
Troubleshooting ............................... 84
Sliding sunroof
Important safety information ...........85
Troubleshooting ............................... 88
see Panorama roof with power
tilt/sliding panel
SmartKey
Changing the battery .......................72
Changing the programming .............71
Checking the battery .................68, 72
Convenience closing feature ............83
Convenience opening feature ..........83
Display message ............................ 193
Important safety notes ....................68
Malfunction ...................................... 74
Starting the engine ........................131
Snow chains ...................................... 148
Socket ................................................ 217
Dashboard ..................................... 217
Luggage compartment ...................217
Rear compartment .........................217
SOS
see mbrace Spare wheel
Notes/data .................................... 289
Storage location ............................ 246
Stowing .......................................... 246
see Emergency spare wheel
Speedometer
Additional speedometer (on-
board computer) ............................ 166
Segments ...................................... 163
Setting the unit (on-board
computer) ...................................... 171
SRS (Supplemental Restraint
System) Display message ............................ 177
Introduction ..................................... 34
Warning lamp ................................. 199
Warning lamp (function) ................... 34
Standard display (on-board
computer) .......................................... 166
Starting the engine Important safety notes ..................130
Station
see Radio
Steering (display message) .............. 193
Steering wheel Adjusting (electrically) .....................96
Adjusting (manually) ........................96
Buttons (on-board computer) ......... 163
Cleaning ......................................... 241
Important safety notes ....................95
Memory function (storing
settings) ........................................... 96
Storing settings (memory
function) ........................................ 100
Stowage compartments
Armrest (under) ............................. 207
Glove box ....................................... 207
Stowage space
Cup holders ................................... 214
Important safety information .........206
Submenu (on-board computer)
Convenience .................................. 173
Factory setting ............................... 174
Instrument cluster .........................171
Lights ............................................. 172
Standard display ............................ 166
Time/Date ..................................... 171
Vehicle ........................................... 173Index13BA 204.9 USA, CA Edition A 2011; 1; 6, en-USd2mwentsVersion: 3.0.3.62010-06-15T08:58:39+02:00 - Seite 13
Page 32 of 304
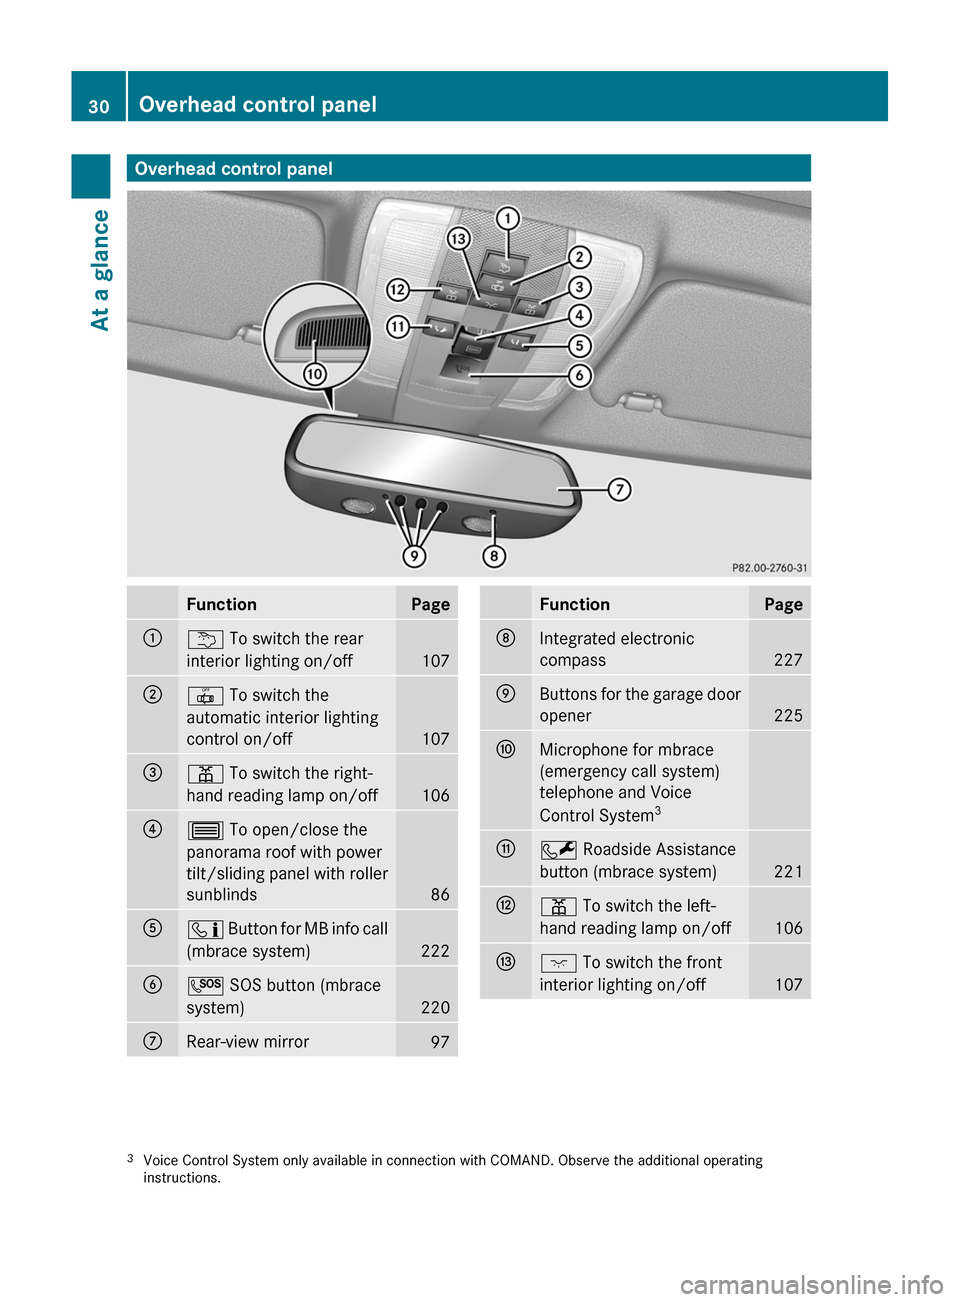
Overhead control panelFunctionPage:u To switch the rear
interior lighting on/off
107
;| To switch the
automatic interior lighting
control on/off
107
=p To switch the right-
hand reading lamp on/off
106
?3 To open/close the
panorama roof with power
tilt/sliding panel with roller
sunblinds
86
Aï Button for MB info call
(mbrace system)
222
BG SOS button (mbrace
system)
220
CRear-view mirror97FunctionPageDIntegrated electronic
compass
227
EButtons for the garage door
opener
225
FMicrophone for mbrace
(emergency call system)
telephone and Voice
Control System 3GF
Roadside Assistance
button (mbrace system)
221
Hp To switch the left-
hand reading lamp on/off
106
Ic To switch the front
interior lighting on/off
1073 Voice Control System only available in connection with COMAND. Observe the additional operating
instructions.30Overhead control panelAt a glance
BA 204.9 USA, CA Edition A 2011; 1; 6, en-USd2mwentsVersion: 3.0.3.62010-06-15T08:58:39+02:00 - Seite 30
Page 73 of 304
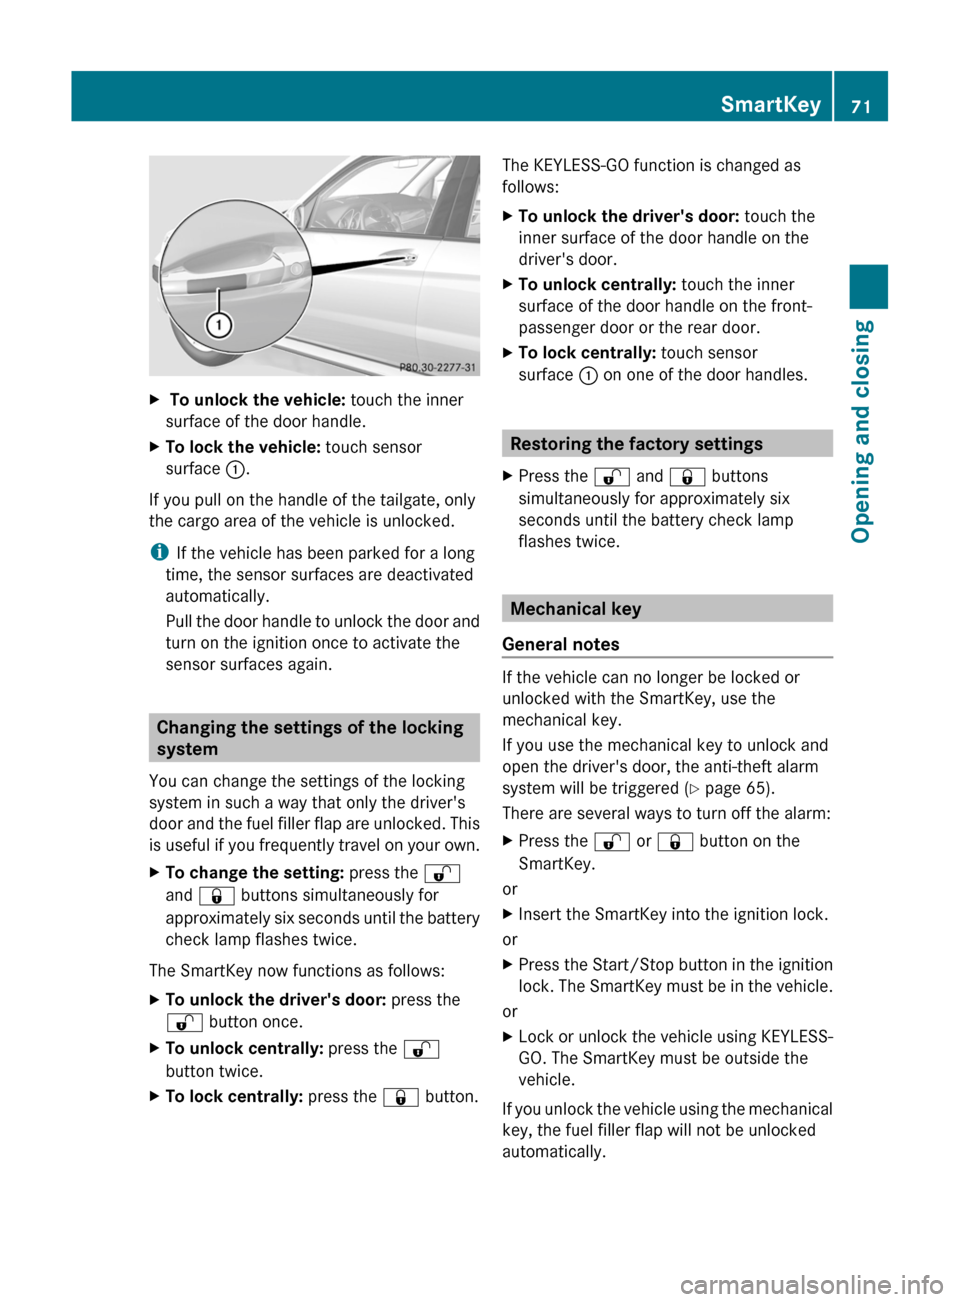
X To unlock the vehicle: touch the inner
surface of the door handle.
XTo lock the vehicle: touch sensor
surface :.
If you pull on the handle of the tailgate, only
the cargo area of the vehicle is unlocked.
iIf the vehicle has been parked for a long
time, the sensor surfaces are deactivated
automatically.
Pull the door handle to unlock the door and
turn on the ignition once to activate the
sensor surfaces again.
Changing the settings of the locking
system
You can change the settings of the locking
system in such a way that only the driver's
door and the fuel filler flap are unlocked. This
is useful if you frequently travel on your own.
XTo change the setting: press the %
and & buttons simultaneously for
approximately six seconds until the battery
check lamp flashes twice.
The SmartKey now functions as follows:
XTo unlock the driver's door: press the
% button once.
XTo unlock centrally: press the %
button twice.
XTo lock centrally: press the & button.The KEYLESS-GO function is changed as
follows:
XTo unlock the driver's door: touch the
inner surface of the door handle on the
driver's door.
XTo unlock centrally: touch the inner
surface of the door handle on the front-
passenger door or the rear door.
XTo lock centrally: touch sensor
surface : on one of the door handles.
Restoring the factory settings
XPress the % and & buttons
simultaneously for approximately six
seconds until the battery check lamp
flashes twice.
Mechanical key
General notes
If the vehicle can no longer be locked or
unlocked with the SmartKey, use the
mechanical key.
If you use the mechanical key to unlock and
open the driver's door, the anti-theft alarm
system will be triggered (Y page 65).
There are several ways to turn off the alarm:
XPress the % or & button on the
SmartKey.
or
XInsert the SmartKey into the ignition lock.
or
XPress the Start/Stop button in the ignition
lock. The SmartKey must be in the vehicle.
or
XLock or unlock the vehicle using KEYLESS-
GO. The SmartKey must be outside the
vehicle.
If you unlock the vehicle using the mechanical
key, the fuel filler flap will not be unlocked
automatically.
SmartKey71Opening and closingBA 204.9 USA, CA Edition A 2011; 1; 6, en-USd2mwentsVersion: 3.0.3.62010-06-15T08:58:39+02:00 - Seite 71Z
Page 75 of 304
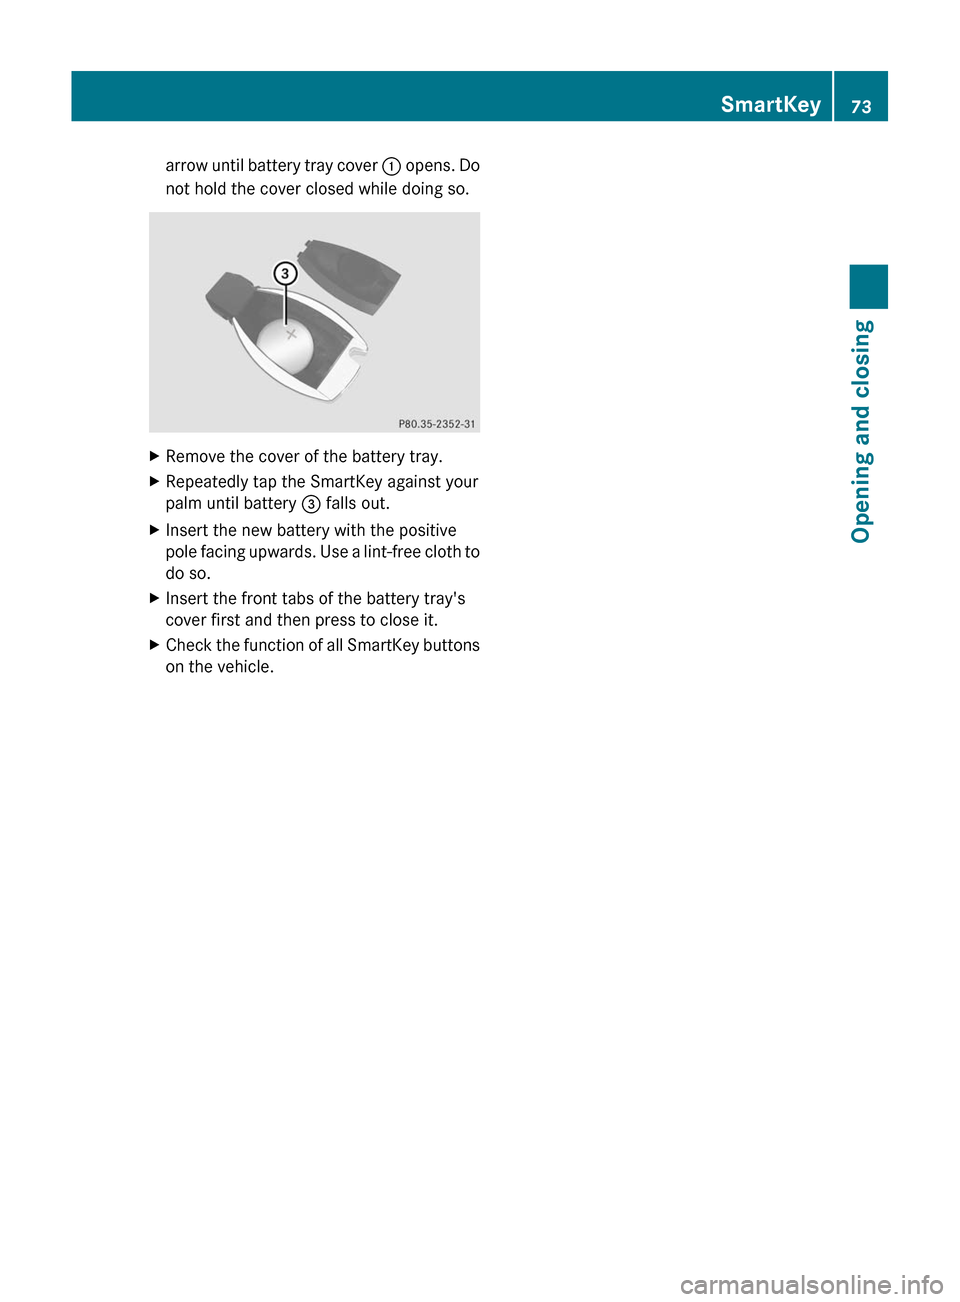
arrow until battery tray cover : opens. Do
not hold the cover closed while doing so.XRemove the cover of the battery tray.XRepeatedly tap the SmartKey against your
palm until battery = falls out.XInsert the new battery with the positive
pole facing upwards. Use a lint-free cloth to
do so.XInsert the front tabs of the battery tray's
cover first and then press to close it.XCheck the function of all SmartKey buttons
on the vehicle.SmartKey73Opening and closingBA 204.9 USA, CA Edition A 2011; 1; 6, en-USd2mwentsVersion: 3.0.3.62010-06-15T08:58:39+02:00 - Seite 73Z
Page 78 of 304
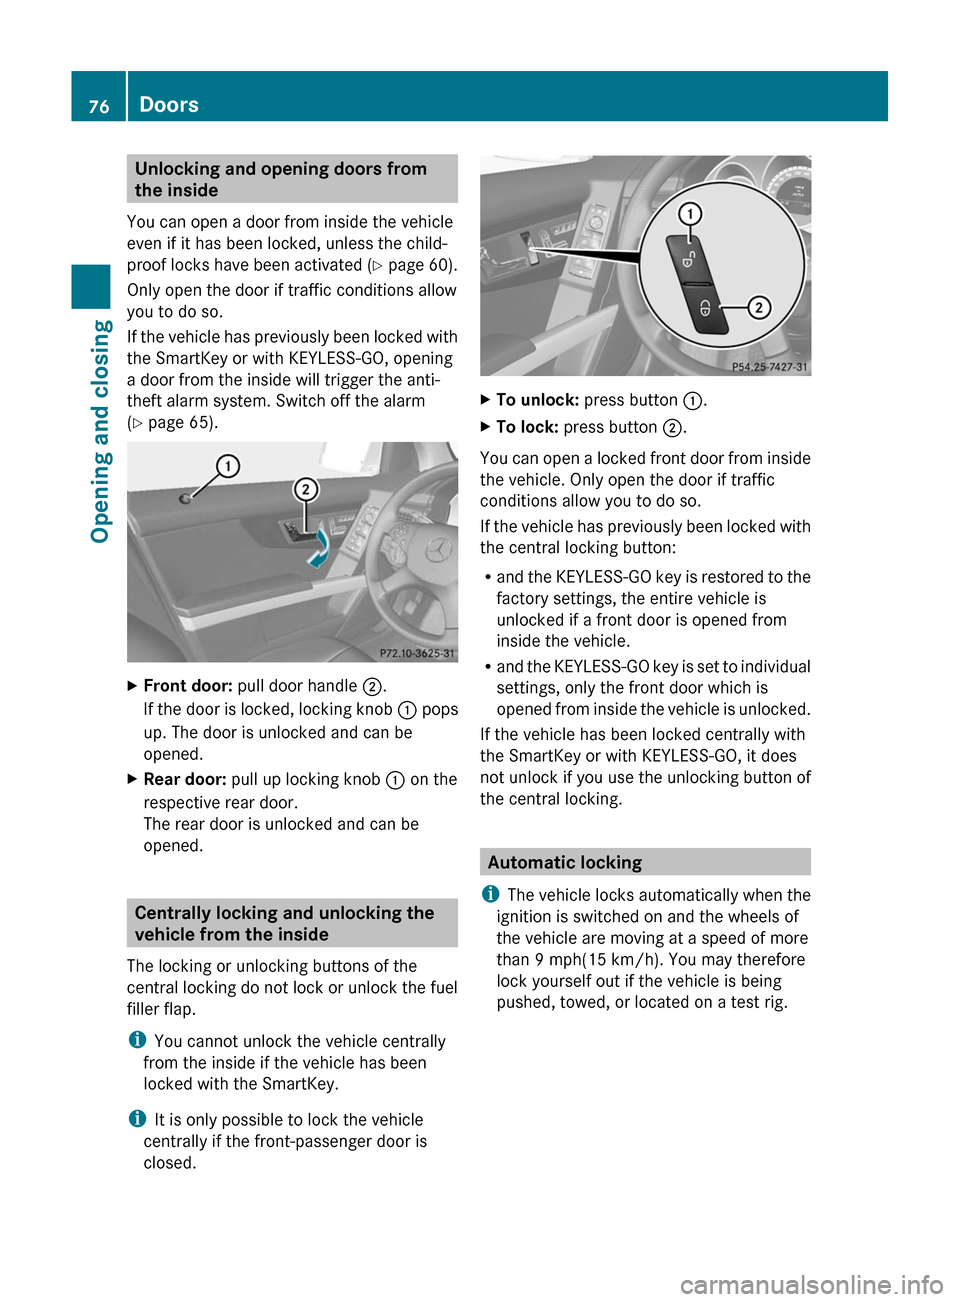
Unlocking and opening doors from
the inside
You can open a door from inside the vehicle
even if it has been locked, unless the child-
proof locks have been activated (Y page 60).
Only open the door if traffic conditions allow
you to do so.
If the vehicle has previously been locked with
the SmartKey or with KEYLESS-GO, opening
a door from the inside will trigger the anti-
theft alarm system. Switch off the alarm
(Y page 65).
XFront door: pull door handle ;.
If the door is locked, locking knob : pops
up. The door is unlocked and can be
opened.
XRear door: pull up locking knob : on the
respective rear door.
The rear door is unlocked and can be
opened.
Centrally locking and unlocking the
vehicle from the inside
The locking or unlocking buttons of the
central locking do not lock or unlock the fuel
filler flap.
iYou cannot unlock the vehicle centrally
from the inside if the vehicle has been
locked with the SmartKey.
iIt is only possible to lock the vehicle
centrally if the front-passenger door is
closed.
XTo unlock: press button :.XTo lock: press button ;.
You can open a locked front door from inside
the vehicle. Only open the door if traffic
conditions allow you to do so.
If the vehicle has previously been locked with
the central locking button:
Rand the KEYLESS-GO key is restored to the
factory settings, the entire vehicle is
unlocked if a front door is opened from
inside the vehicle.
Rand the KEYLESS-GO key is set to individual
settings, only the front door which is
opened from inside the vehicle is unlocked.
If the vehicle has been locked centrally with
the SmartKey or with KEYLESS-GO, it does
not unlock if you use the unlocking button of
the central locking.
Automatic locking
iThe vehicle locks automatically when the
ignition is switched on and the wheels of
the vehicle are moving at a speed of more
than 9 mph(15 km/h). You may therefore
lock yourself out if the vehicle is being
pushed, towed, or located on a test rig.
76DoorsOpening and closing
BA 204.9 USA, CA Edition A 2011; 1; 6, en-USd2mwentsVersion: 3.0.3.62010-06-15T08:58:39+02:00 - Seite 76
Page 79 of 304
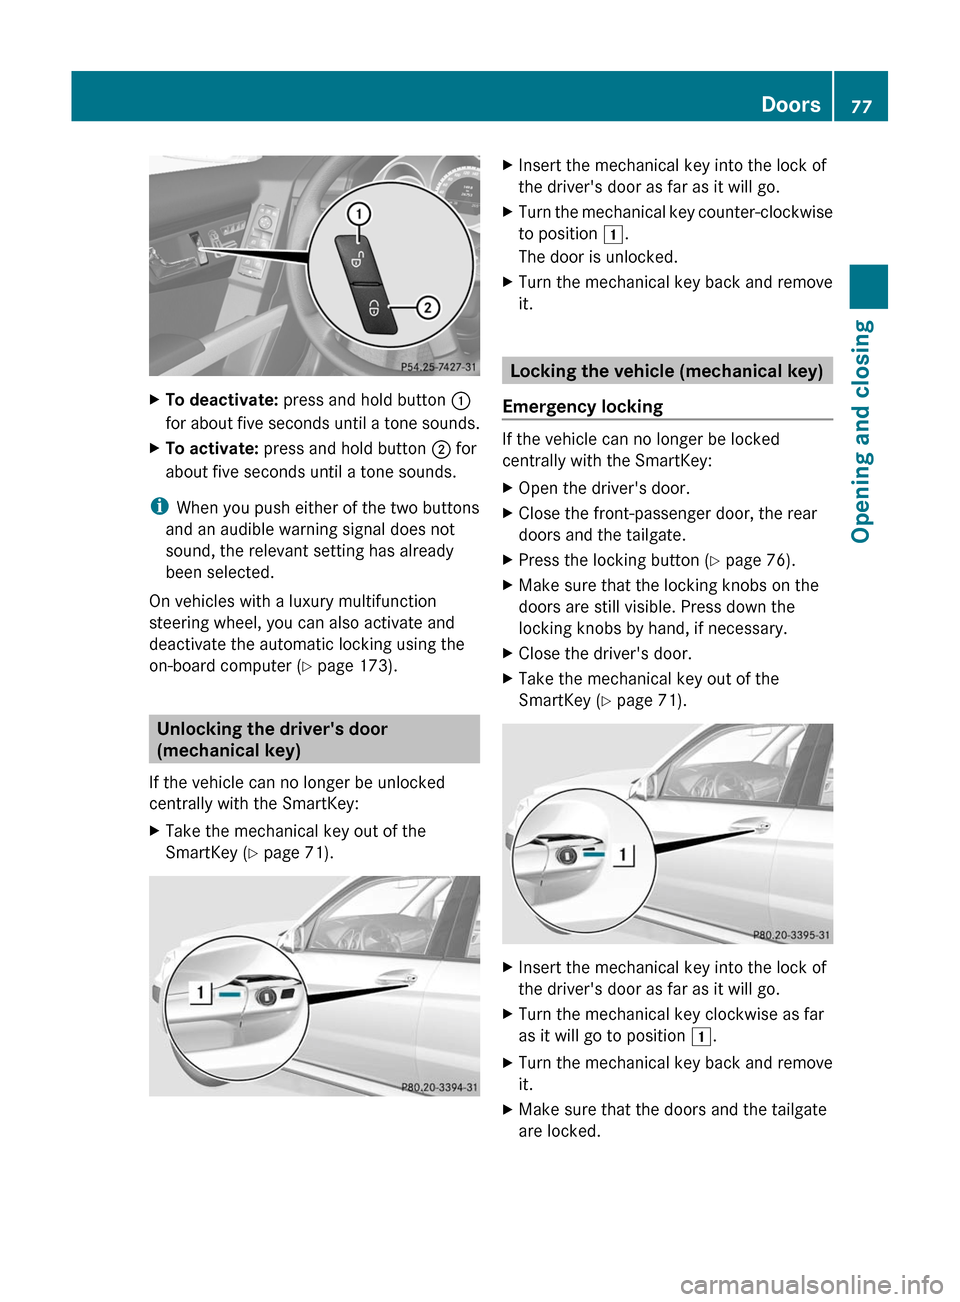
XTo deactivate: press and hold button :
for about five seconds until a tone sounds.
XTo activate: press and hold button ; for
about five seconds until a tone sounds.
iWhen you push either of the two buttons
and an audible warning signal does not
sound, the relevant setting has already
been selected.
On vehicles with a luxury multifunction
steering wheel, you can also activate and
deactivate the automatic locking using the
on-board computer (Y page 173).
Unlocking the driver's door
(mechanical key)
If the vehicle can no longer be unlocked
centrally with the SmartKey:
XTake the mechanical key out of the
SmartKey (Y page 71).
XInsert the mechanical key into the lock of
the driver's door as far as it will go.
XTurn the mechanical key counter-clockwise
to position 1.
The door is unlocked.
XTurn the mechanical key back and remove
it.
Locking the vehicle (mechanical key)
Emergency locking
If the vehicle can no longer be locked
centrally with the SmartKey:
XOpen the driver's door.XClose the front-passenger door, the rear
doors and the tailgate.
XPress the locking button (Y page 76).XMake sure that the locking knobs on the
doors are still visible. Press down the
locking knobs by hand, if necessary.
XClose the driver's door.XTake the mechanical key out of the
SmartKey (Y page 71).
XInsert the mechanical key into the lock of
the driver's door as far as it will go.
XTurn the mechanical key clockwise as far
as it will go to position 1.
XTurn the mechanical key back and remove
it.
XMake sure that the doors and the tailgate
are locked.
Doors77Opening and closingBA 204.9 USA, CA Edition A 2011; 1; 6, en-USd2mwentsVersion: 3.0.3.62010-06-15T08:58:39+02:00 - Seite 77Z
Page 102 of 304
Memory functions
Storing settings
With the memory function, you can store up
to three different settings, e.g. for three
different people.
The following settings are stored as a single
memory preset:
Rposition of the seat, backrest and head
restraint
Rdriver's side: steering wheel position
Rdriver's side: position of the exterior
mirrors on the driver's and front-passenger
sides
GWarning!
The memory function can still be used when
the key has been removed. For this reason,
children should never be left unsupervised in
the vehicle. They could otherwise become
trapped when adjusting the seat or the
steering wheel.
GWarning!
Only use the memory function on the driver's
side when the vehicle is stationary. You could
otherwise be distracted from the traffic
conditions by the steering wheel and seat
moving of their own accord, and as a result
cause an accident.
XAdjust the seat (Y page 92).XOn the driver's side, adjust the steering
wheel (Y page 96) and the exterior mirrors
(Y page 97).
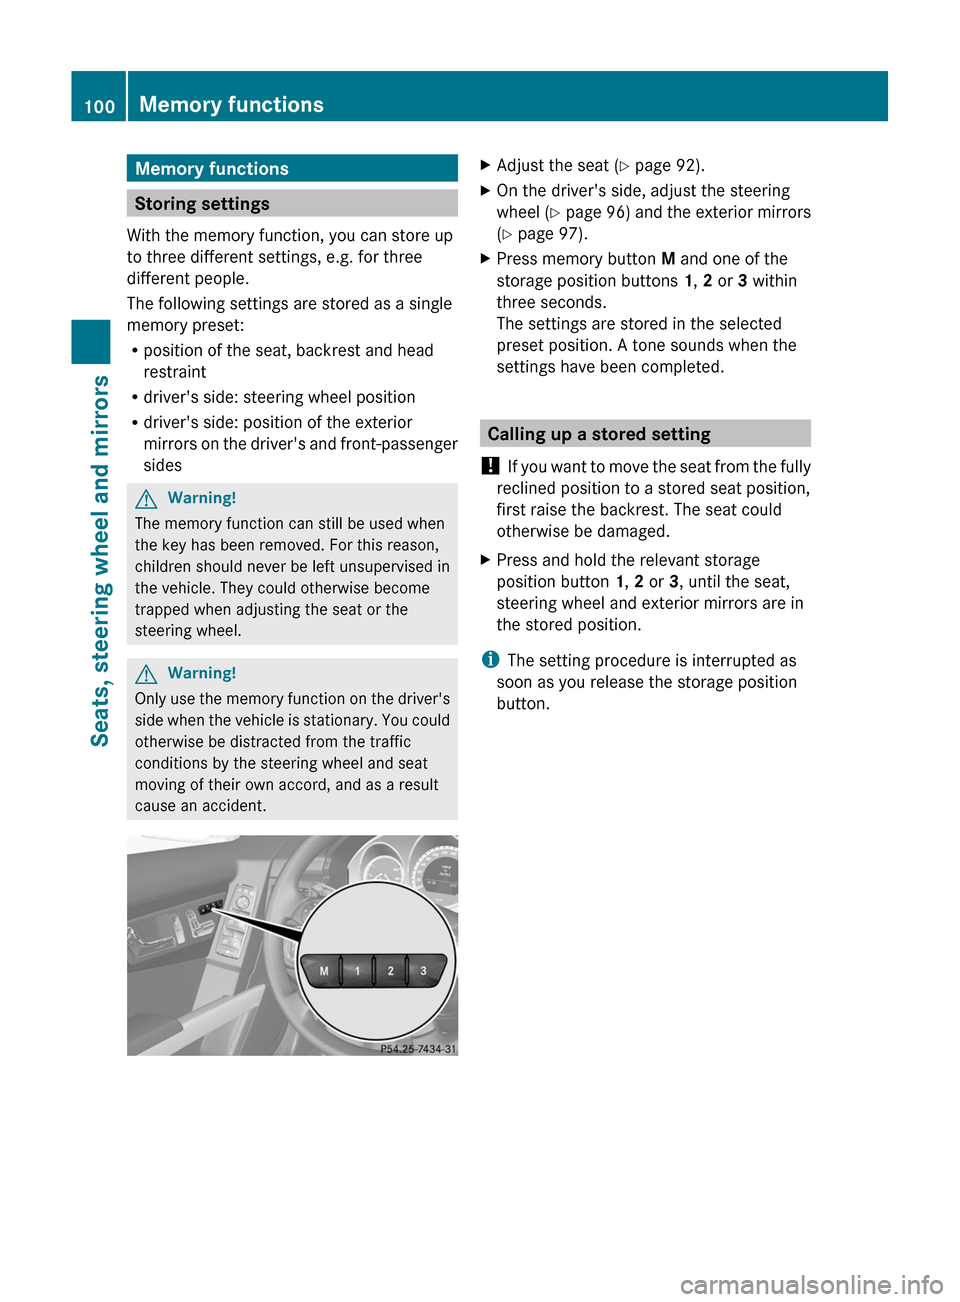
XPress memory button M and one of the
storage position buttons 1, 2 or 3 within
three seconds.
The settings are stored in the selected
preset position. A tone sounds when the
settings have been completed.
Calling up a stored setting
! If you want to move the seat from the fully
reclined position to a stored seat position,
first raise the backrest. The seat could
otherwise be damaged.
XPress and hold the relevant storage
position button 1, 2 or 3, until the seat,
steering wheel and exterior mirrors are in
the stored position.
iThe setting procedure is interrupted as
soon as you release the storage position
button.
100Memory functionsSeats, steering wheel and mirrors
BA 204.9 USA, CA Edition A 2011; 1; 6, en-USd2mwentsVersion: 3.0.3.62010-06-15T08:58:39+02:00 - Seite 100
Page 121 of 304
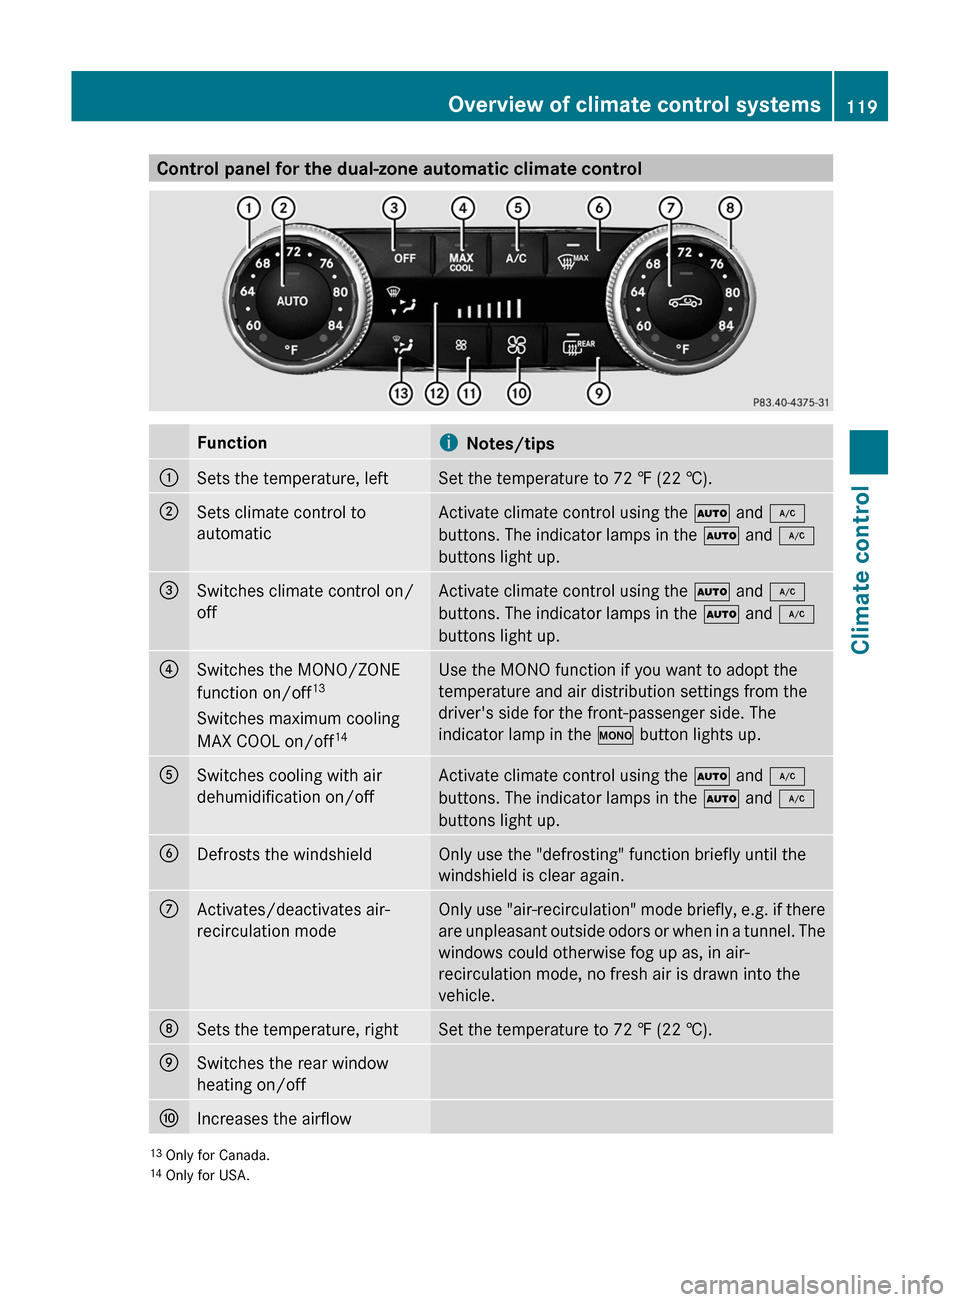
Control panel for the dual-zone automatic climate controlFunctioniNotes/tips:Sets the temperature, leftSet the temperature to 72 ‡ (22 †).;Sets climate control to
automaticActivate climate control using the à and ¿
buttons. The indicator lamps in the à and ¿
buttons light up.=Switches climate control on/
offActivate climate control using the à and ¿
buttons. The indicator lamps in the à and ¿
buttons light up.?Switches the MONO/ZONE
function on/off 13
Switches maximum cooling
MAX COOL on/off 14Use the MONO function if you want to adopt the
temperature and air distribution settings from the
driver's side for the front-passenger side. The
indicator lamp in the º button lights up.ASwitches cooling with air
dehumidification on/offActivate climate control using the à and ¿
buttons. The indicator lamps in the à and ¿
buttons light up.BDefrosts the windshieldOnly use the "defrosting" function briefly until the
windshield is clear again.CActivates/deactivates air-
recirculation modeOnly use "air-recirculation" mode briefly, e.g. if there
are unpleasant outside odors or when in a tunnel. The
windows could otherwise fog up as, in air-
recirculation mode, no fresh air is drawn into the
vehicle.DSets the temperature, rightSet the temperature to 72 ‡ (22 †).ESwitches the rear window
heating on/offFIncreases the airflow13 Only for Canada.
14 Only for USA.Overview of climate control systems119Climate controlBA 204.9 USA, CA Edition A 2011; 1; 6, en-USd2mwentsVersion: 3.0.3.62010-06-15T08:58:39+02:00 - Seite 119Z
Page 165 of 304
If the coolant temperature rises above
248 ‡(120 †), do not drive any further as
this could damage the engine.
Tachometer
The red band in the tachometer indicates the
engine's overrevving range.
! Do not drive in the overrevving range, as
this could damage the engine.
The fuel supply is interrupted to protect the
engine when the red band is reached.
Outside temperature display
The outside temperature display is in the
multifunction display.
GWarning!
The outside temperature indicator is not
designed to serve as an ice-warning device
and is therefore unsuitable for that purpose.
Indicated temperatures just above the
freezing point do not guarantee that the road
surface is free of ice. The road may still be icy,
especially in wooded areas or on bridges.
Changes in the outside temperature are
displayed after a short delay.
Speedometer with segments
The segments in the speedometer indicate
which speed range is available.
Cruise control mode:
The segments light up from the stored speed
to the maximum speed.
Operating the on-board computer
The on-board computer is activated as soon
as you turn the SmartKey to position 1 in the
ignition lock.
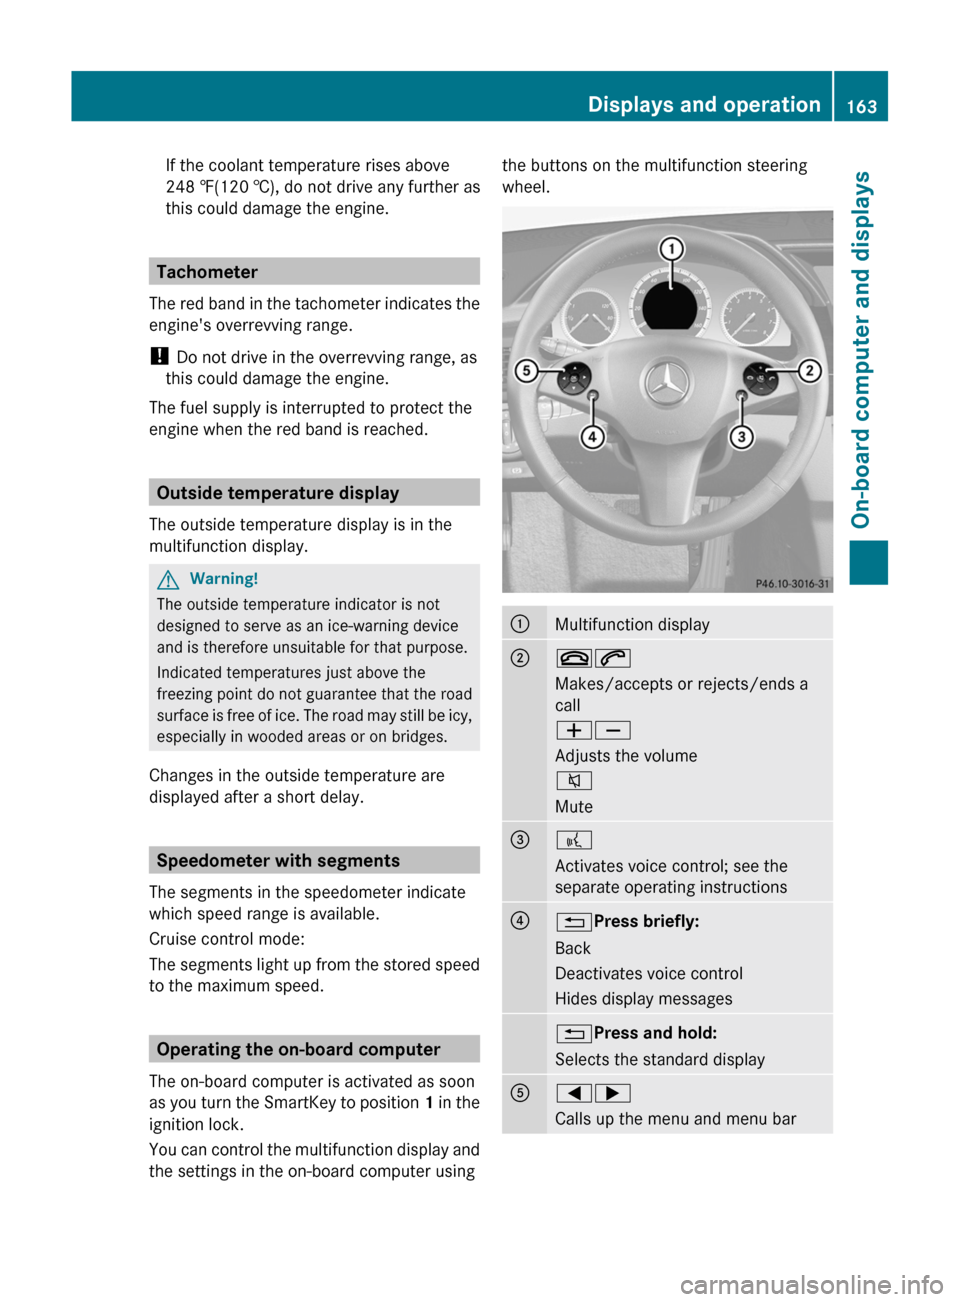
You can control the multifunction display and
the settings in the on-board computer using
the buttons on the multifunction steering
wheel.:Multifunction display;~6
Makes/accepts or rejects/ends a
call
WX
Adjusts the volume
8
Mute=?
Activates voice control; see the
separate operating instructions?% Press briefly:
Back
Deactivates voice control
Hides display messages% Press and hold:
Selects the standard displayA=;
Calls up the menu and menu barDisplays and operation163On-board computer and displaysBA 204.9 USA, CA Edition A 2011; 1; 6, en-USd2mwentsVersion: 3.0.3.62010-06-15T08:58:39+02:00 - Seite 163Z
Page 175 of 304
Activating/deactivating the interior
lighting delayed switch-off
If the Interior Lighting Delay: function
is activated and you pull the SmartKey out of
the ignition lock, the interior lighting remains
on for around 10 seconds. XPress the = or ; button on the
steering wheel to select the Settings
menu.XPress the : or 9 button to select the
Lights submenu.XPress the a button to confirm.XPress the : or 9 button to select the
Interior Lighting Delay: function.
You will see the selected setting: Enabled
or Disabled .XPress the a button to save the setting.
Vehicle
Activating/deactivating the automatic
locking feature
If you select the Automatic Door Lock:
function, the vehicle is centrally locked above
a speed of around 9 mph (15 km/h).
i Further information on the automatic
locking feature ( Y page 76).
XPress the = or ; button on the
steering wheel to select the Settings
menu.XPress the : or 9 button to select the
Vehicle submenu.XPress the a button to confirm.XPress the : or 9 button to select the
Automatic Door Lock: function.
You will see the selected setting: Enabled
or Disabled .XPress the a button to save the setting.
Activating/deactivating the acoustic
locking confirmation
If you switch on the Acoustic Lock
Feedback: function, an acoustic signal
sounds when you lock or unlock the vehicle.
When unlocking, the signal sounds once.
When locking, it sounds three times.XPress the = or ; button on the
steering wheel to select the Settings
menu.XPress the : or 9 button to select the
Vehicle submenu.XPress the a button to confirm.XPress the : or 9 button to select the
Acoustic Lock Feedback: function.
You will see the selected setting: Enabled
or Disabled .XPress the a button to save the setting.
Convenience
Activating/deactivating the EASY-
ENTRY/EXIT feature
You can use the Easy Entry/Exit: function
to activate or deactivate the easy-entry/exit
feature ( Y page 96).
GWarning!
You must make sure no one can become
trapped or injured by the moving steering
wheel when the easy-entry/exit feature is
activated.
To stop steering wheel movement, move
steering wheel adjustment lever or press one
of the memory position buttons.
Do not leave children unattended in the
vehicle, or with access to an unlocked vehicle.
Children could open the driver's door and
unintentionally activate the easy-entry/exit
feature, which could result in an accident
and/or serious personal injury.
XPress the = or ; button on the
steering wheel to select the Settings
menu.XPress the : or 9 button to select the
Convenience submenu.XPress the a button to confirm.Menus and submenus173On-board computer and displaysBA 204.9 USA, CA Edition A 2011; 1; 6, en-USd2mwentsVersion: 3.0.3.62010-06-15T08:58:39+02:00 - Seite 173Z