low beam MERCEDES-BENZ GLK-Class 2015 X204 User Guide
[x] Cancel search | Manufacturer: MERCEDES-BENZ, Model Year: 2015, Model line: GLK-Class, Model: MERCEDES-BENZ GLK-Class 2015 X204Pages: 386, PDF Size: 7.16 MB
Page 122 of 386
The active light function is a system that
moves the headlamps according to the steer-
ing movements of the front wheels. In this
way, relevant areas remain illuminated while
driving. This allows you to recognize pedes-
trians, cyclists and animals.
Active: when the lights are switched on. Cornering light function
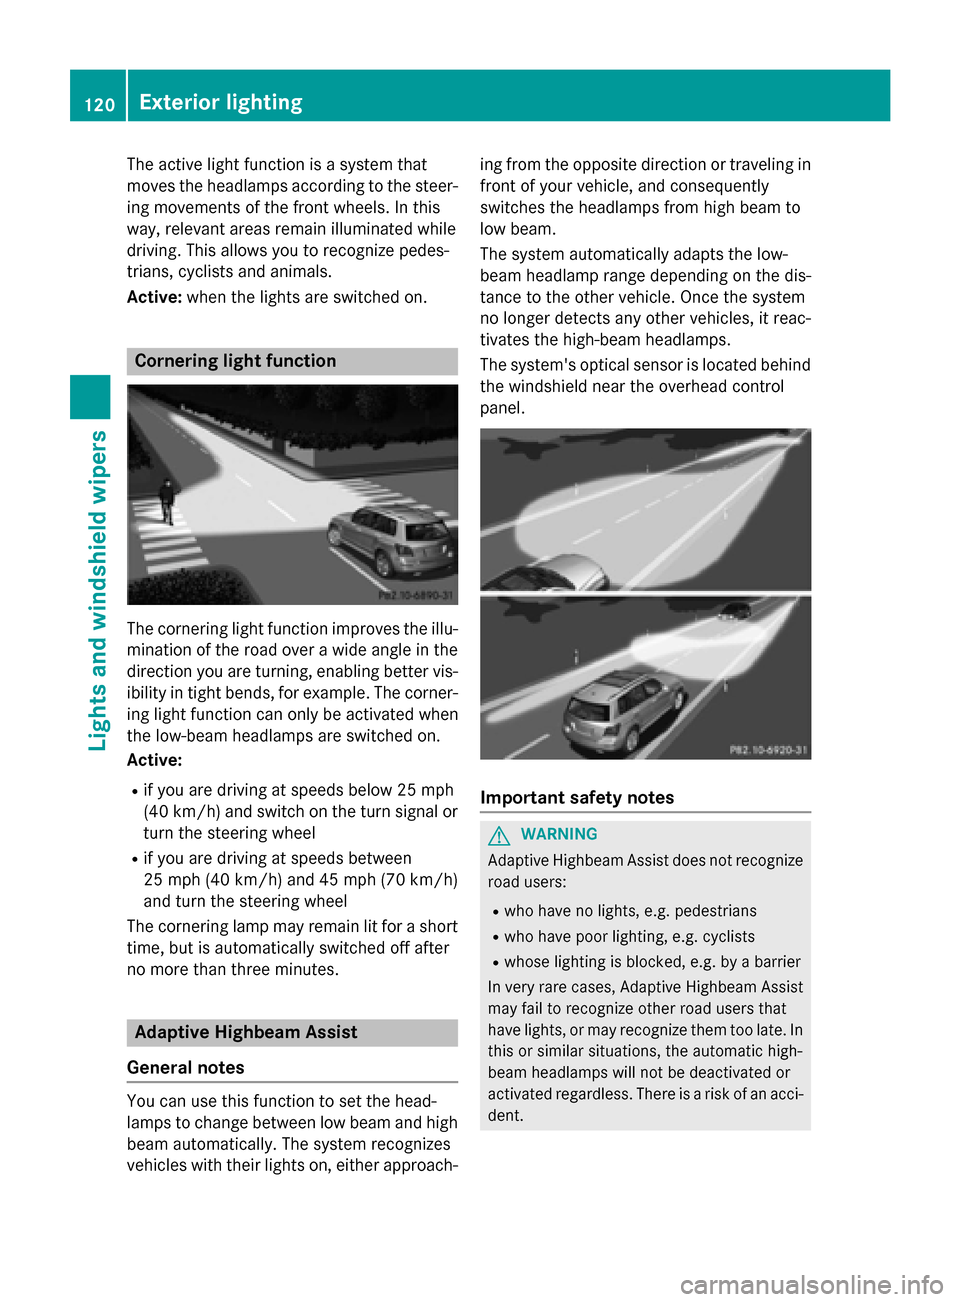
The cornering light function improves the illu-
mination of the road over a wide angle in the direction you are turning, enabling better vis-
ibility in tight bends, for example. The corner- ing light function can only be activated when
the low-beam headlamps are switched on.
Active:
R if you are driving at speeds below 25 mph
(40 km/h) and switch on the turn signal or
turn the steering wheel
R if you are driving at speeds between
25 mph (40 km/h) and 45 mph (70 km/h)
and turn the steering wheel
The cornering lamp may remain lit for a short
time, but is automatically switched off after
no more than three minutes. Adaptive Highbeam Assist
General notes You can use this function to set the head-
lamps to change between low beam and high beam automatically. The system recognizes
vehicles with their lights on, either approach- ing from the opposite direction or traveling in
front of your vehicle, and consequently
switches the headlamps from high beam to
low beam.
The system automatically adapts the low-
beam headlamp range depending on the dis-
tance to the other vehicle. Once the system
no longer detects any other vehicles, it reac-
tivates the high-beam headlamps.
The system's optical sensor is located behind
the windshield near the overhead control
panel. Important safety notes
G
WARNING
Adaptive Highbeam Assist does not recognize road users:
R who have no lights, e.g. pedestrians
R who have poor lighting, e.g. cyclists
R whose lighting is blocked, e.g. by a barrier
In very rare cases, Adaptive Highbeam Assist
may fail to recognize other road users that
have lights, or may recognize them too late. In this or similar situations, the automatic high-
beam headlamps will not be deactivated or
activated regardless. There is a risk of an acci-
dent. 120
Exterior lightingLights and windshield wipers
Page 123 of 386
Always carefully observe the traffic conditions
and switch off the high-beam headlamps in
good time.
Adaptive Highbeam Assist cannot take into
account road, weather or traffic conditions.
Adaptive Highbeam Assist is only an aid. You
are responsible for adjusting the vehicle's
lighting to the prevailing light, visibility and
traffic conditions.
In particular, the detection of obstacles can
be restricted if there is:
R poor visibility, e.g. due to fog, heavy rain or
snow
R dirt on the sensors or the sensors are
obscured
Switching Adaptive Highbeam Assist
on/off X
To activate: turn the light switch to 0058.
X Press the combination switch beyond the
pressure point in the direction of arrow 0043
(Y page 118).
The 00CE indicator lamp in the multifunc-
tion display lights up if it is dark and the
light sensor activates the low-beam head-
lamps.
If you are driving at speeds above approx-
imately 28 mph (45 km/h):
The headlamp range is set automatically
depending on the distance between the
vehicle and other road users.
If you are driving at speeds above approx-
imately 35 mph (55 km/h) and no other
road users have been detected:
The high-beam headlamps are switched on
automatically. The 0057indicator lamp in
the instrument cluster also lights up.
If you are driving at speeds below approx-
imately 30 mph (45 km/h) or other road
users have been detected or the roads are adequately lit:
The high-beam headlamps are switched off
automatically. The 0057indicator lamp in
the instrument cluster goes out. The 00CEindicator lamp in the multifunction display
remains lit.
X To deactivate: move the combination
switch back to its normal position.
The 00CE indicator lamp in the multifunc-
tion display goes out. Headlamps fogged up on the inside
Certain climatic and physical conditions may
cause moisture to form in the headlamp. This moisture does not affect the functionality of
the headlamp. Interior lighting
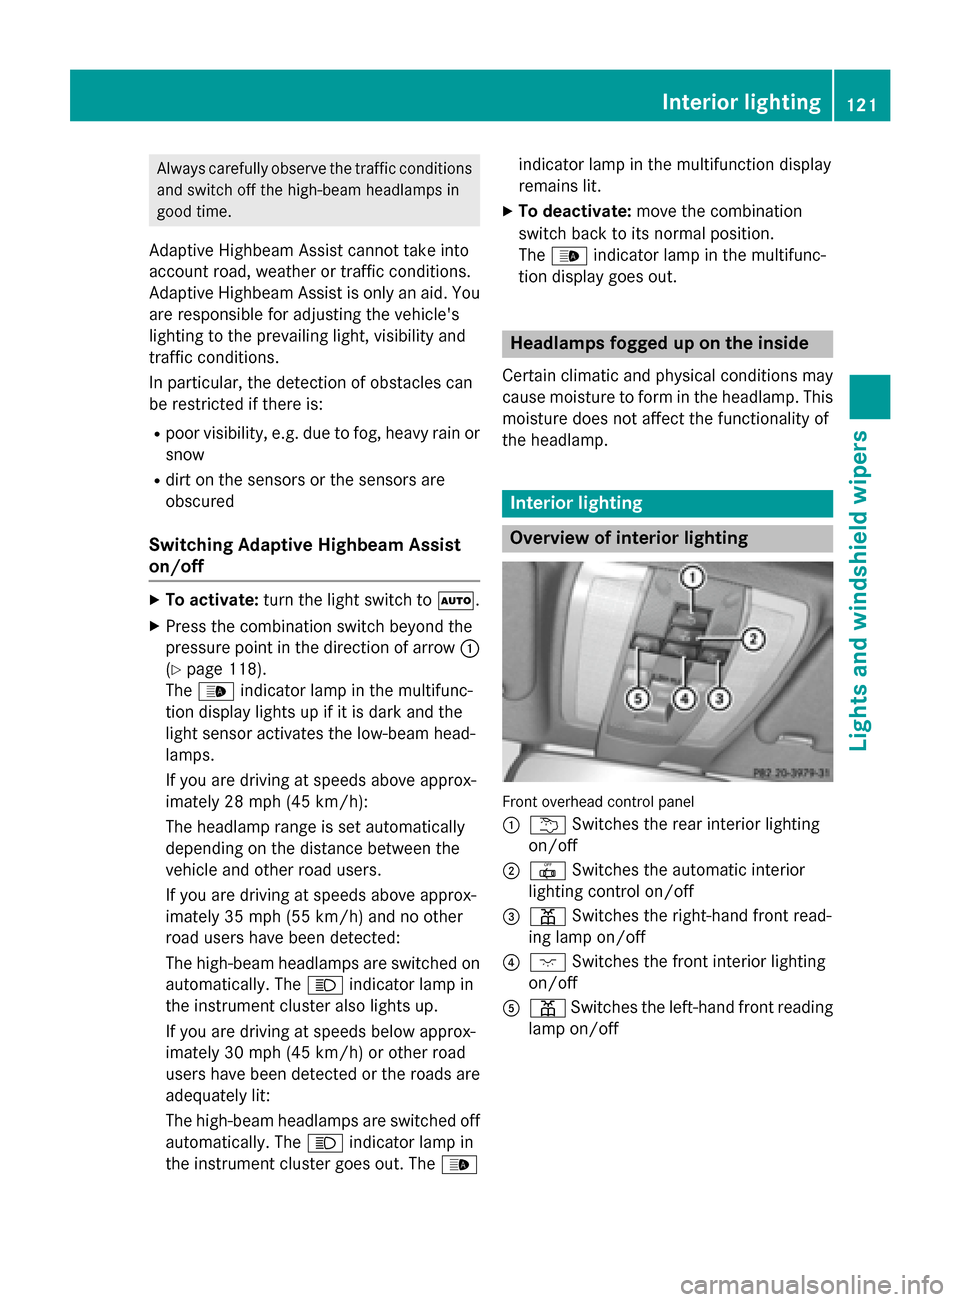
Overview of interior lighting
Front overhead control panel
0043
0042 Switches the rear interior lighting
on/off
0044 0033 Switches the automatic interior
lighting control on/off
0087 003D Switches the right-hand front read-
ing lamp on/off
0085 004A Switches the front interior lighting
on/off
0083 003D Switches the left-hand front reading
lamp on/off Interior lighting
121Lights andwindshield wipers Z
Page 125 of 386
that these function correctly at all times.
Have the headlamp setting checked regularly.
Other bulbs G
WARNING
Bulbs, lamps and connectors can get very hot when operating. If you change a bulb, you
could burn yourself on these components.
There is a risk of injury.
Allow these components to cool down before changing a bulb.
Do not use a bulb that has been dropped or if
its glass tube has been scratched.
The bulb may explode if:
R you touch it
R it is hot
R you drop it
R you scratch it
Only operate bulbs in enclosed lamps
designed for that purpose. Only install spare
bulbs of the same type and the specified volt- age.
Marks on the glass tube reduce the service
life of the bulbs. Do not touch the glass tube
with your bare hands. If necessary, clean the
glass tube when cold with alcohol or spirit and
rub it off with a lint-free cloth.
Protect bulbs from moisture during opera-
tion. Do not allow bulbs to come into contact
with liquids.
There are bulbs other than the Xenon bulbs
that you cannot replace. Replace only the
bulbs listed (Y page 123). Have the bulbs that
you cannot replace yourself changed at a
qualified specialist workshop.
If you require assistance changing bulbs, con- sult a qualified specialist workshop.
If the new bulb still does not light up, consult
a qualified specialist workshop.
Bulbs and lamps are an important aspect of
vehicle safety. You must therefore make sure that these function correctly at all times.
Have the headlamp setting checked regularly. Overview: changing bulbs/bulb types
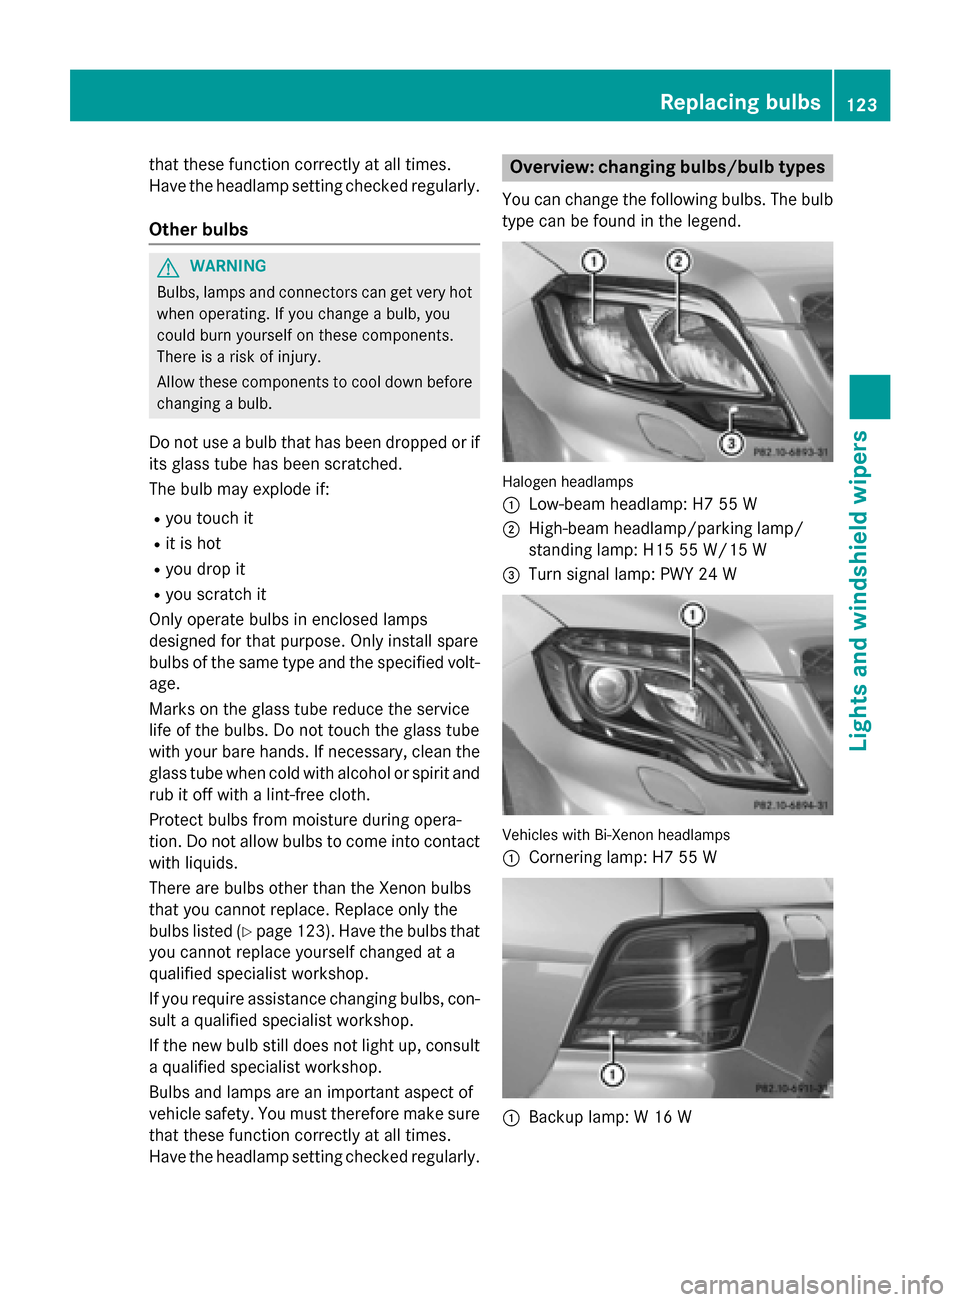
You can change the following bulbs. The bulb type can be found in the legend. Halogen headlamps
0043
Low-beam headlamp: H7 55 W
0044 High-beam headlamp/parking lamp/
standing lamp: H15 55 W/15 W
0087 Turn signal lamp: PWY 24 W Vehicles with Bi-Xenon headlamps
0043
Cornering lamp: H7 55 W 0043
Backup lamp: W 16 W Replacing bulbs
123Lights andwindshield wipers Z
Page 126 of 386

Changing the front bulbs
Low-beam headlamps (halogen head-
lamps) X
Switch off the lights.
X Open the hood.
X Turn housing cover 0043counter-clockwise
and pull it out.
X At the bulb holder, push the bulb upwards,
disconnect it and pull it out of bulb
holder 0044.
X Insert the new bulb into bulb holder 0044,
push it down and secure it in place.
X Attach housing cover 0043and turn it clock-
wise until it engages.
High-beam headlamps, standing
lamps/parking lamps (halogen head-
lamps) X
Switch off the lights.
X Open the hood.
X Turn housing cover 0043counter-clockwise
and pull it out. X
Turn bulb counter-clockwise and pull it out.
X Insert the new bulb into bulb holder 0044and
turn it clockwise.
X Align housing cover 0043and turn it clock-
wise until it engages.
Cornering light function (Bi-Xenon
headlamps) X
Switch off the lights.
X Open the hood.
X Turn housing cover 0043counter-clockwise
and pull it out.
X Push the lever of holder 0044upwards until
holder 0044is released.
X Pull out bulb holder 0044.
X Take the bulb out of bulb holder 0044.
X Insert the new bulb into bulb holder 0044.
X Insert holder 0044from above and press it
until it engages.
X Align housing cover 0043and turn it clock-
wise until it engages.
Turn signal 124
Replacing bulbsLights and windshield wipers
Page 225 of 386
i
You can set the time using the audio sys-
tem or COMAND, see the separate operat-
ing instructions.
The following messages may appear in the
multifunction display:
0097 Gearshift recommendation, when
shifting manually (Y page 160)
0095005D0096 Active Parking Assist (Y page 189)
CRUISE
CRUISE Cruise control (Y
page 175)
00CE Adaptive Highbeam Assist
(Ypage 120)
00A7 ECO start/stop function
(Ypage 152)
00D9 HOLD function (Y page 184) Menus and submenus
Menu overview
Operating the on-board computer
(Y page 221).
Depending on the equipment installed in the
vehicle, you can call up the following menus:
R Trip
Trip menu (Y page 223)
R Navi Navi menu (navigation instructions)
(Y page 225)
R Audio
Audio menu (Y page 226)
R Tel
Tel menu (telephone) (Y page 227)
R DriveAssist
DriveAssist menu (assistance)
(Y page 228)
R Service
Service menu (Ypage 230)
R Settings
Settings menu (settings) (Y page 230)
The Audio
Audio, Navi
NaviandTel
Tel menus differ slightly
in vehicles with an audio system and in vehi-
cles with COMAND. The examples given in
this Operator's Manual apply to vehicles
equipped with COMAND. Trip menu
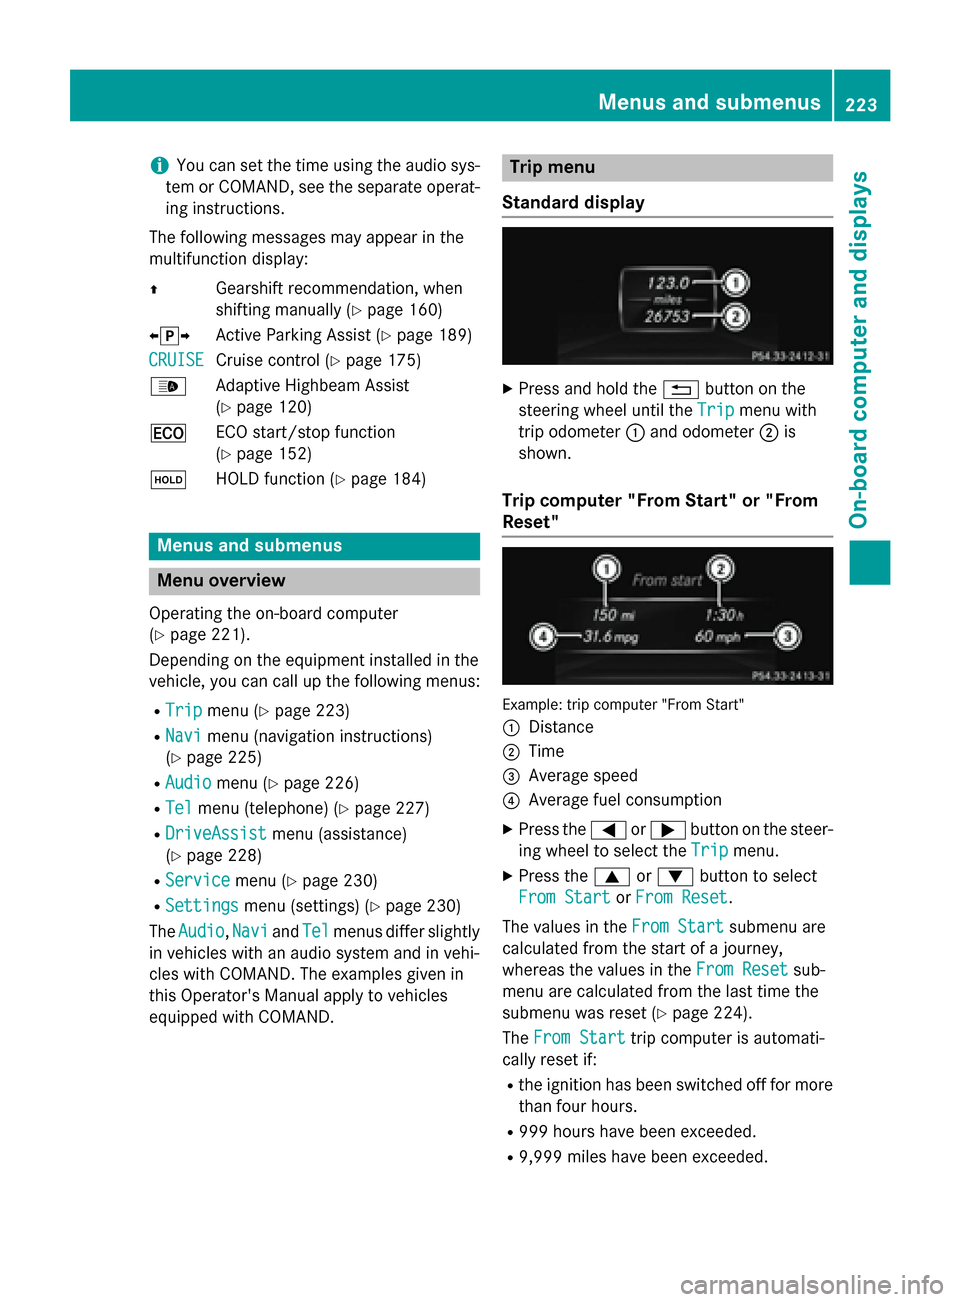
Standard display X
Press and hold the 0038button on the
steering wheel until the Trip
Tripmenu with
trip odometer 0043and odometer 0044is
shown.
Trip computer "From Start" or "From
Reset" Example: trip computer "From Start"
0043 Distance
0044 Time
0087 Average speed
0085 Average fuel consumption
X Press the 0059or0065 button on the steer-
ing wheel to select the Trip Tripmenu.
X Press the 0063or0064 button to select
From Start From Start orFrom Reset
From Reset.
The values in the From Start
From Startsubmenu are
calculated from the start of a journey,
whereas the values in the From Reset From Resetsub-
menu are calculated from the last time the
submenu was reset (Y page 224).
The From Start From Start trip computer is automati-
cally reset if:
R the ignition has been switched off for more
than four hours.
R 999 hours have been exceeded.
R 9,999 miles have been exceeded. Menus and submenus
223On-board computer and displays Z
Page 234 of 386
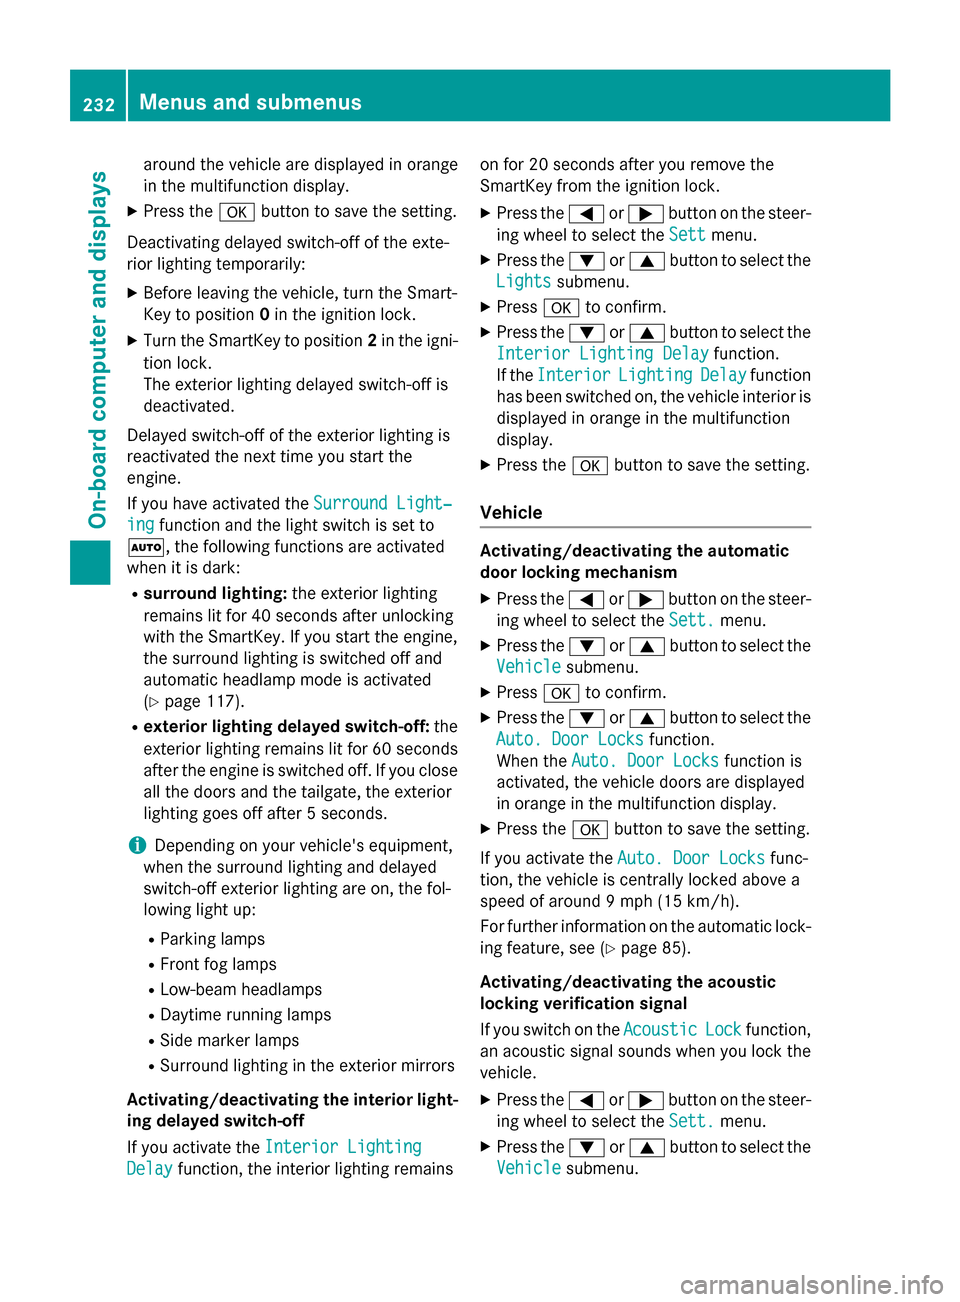
around the vehicle are displayed in orange
in the multifunction display.
X Press the 0076button to save the setting.
Deactivating delayed switch-off of the exte-
rior lighting temporarily:
X Before leaving the vehicle, turn the Smart-
Key to position 0in the ignition lock.
X Turn the SmartKey to position 2in the igni-
tion lock.
The exterior lighting delayed switch-off is
deactivated.
Delayed switch-off of the exterior lighting is
reactivated the next time you start the
engine.
If you have activated the Surround Light‐
Surround Light‐
ing
ing function and the light switch is set to
0058, the following functions are activated
when it is dark:
R surround lighting: the exterior lighting
remains lit for 40 seconds after unlocking
with the SmartKey. If you start the engine,
the surround lighting is switched off and
automatic headlamp mode is activated
(Y page 117).
R exterior lighting delayed switch-off: the
exterior lighting remains lit for 60 seconds
after the engine is switched off. If you close all the doors and the tailgate, the exterior
lighting goes off after 5 seconds.
i Depending on your vehicle's equipment,
when the surround lighting and delayed
switch-off exterior lighting are on, the fol-
lowing light up:
R Parking lamps
R Front fog lamps
R Low-beam headlamps
R Daytime running lamps
R Side marker lamps
R Surround lighting in the exterior mirrors
Activating/deactivating the interior light-
ing delayed switch-off
If you activate the Interior Lighting
Interior Lighting
Delay
Delay function, the interior lighting remains on for 20 seconds after you remove the
SmartKey from the ignition lock.
X Press the 0059or0065 button on the steer-
ing wheel to select the Sett Settmenu.
X Press the 0064or0063 button to select the
Lights
Lights submenu.
X Press 0076to confirm.
X Press the 0064or0063 button to select the
Interior Lighting Delay
Interior Lighting Delay function.
If the Interior
Interior Lighting
Lighting Delay
Delayfunction
has been switched on, the vehicle interior is
displayed in orange in the multifunction
display.
X Press the 0076button to save the setting.
Vehicle Activating/deactivating the automatic
door locking mechanism
X Press the 0059or0065 button on the steer-
ing wheel to select the Sett. Sett.menu.
X Press the 0064or0063 button to select the
Vehicle
Vehicle submenu.
X Press 0076to confirm.
X Press the 0064or0063 button to select the
Auto. Door Locks
Auto. Door Locks function.
When the Auto. Door Locks
Auto. Door Locks function is
activated, the vehicle doors are displayed
in orange in the multifunction display.
X Press the 0076button to save the setting.
If you activate the Auto. Door Locks Auto. Door Locks func-
tion, the vehicle is centrally locked above a
speed of around 9 mph (15 km/h).
For further information on the automatic lock-
ing feature, see (Y page 85).
Activating/deactivating the acoustic
locking verification signal
If you switch on the Acoustic AcousticLock
Lockfunction,
an acoustic signal sounds when you lock the
vehicle.
X Press the 0059or0065 button on the steer-
ing wheel to select the Sett. Sett.menu.
X Press the 0064or0063 button to select the
Vehicle Vehicle submenu. 232
Menus and submenusOn-board computer and displays
Page 245 of 386
Display messages
Possible causes/consequences and
0050
0050Solutions X
Wait for a period of at least 60 seconds until the necessary sys-
tem checks have been completed.
X Make sure that the display messages do not appear in the mul-
tifunction display.
If these conditions are fulfilled, the front-passenger seat can be
occupied again. Whether the PASSENGER AIR BAG OFF indicator
lamp remains lit or goes out depends on how OCS classifies the
occupant.
If the conditions are not fulfilled, the system is not operating cor- rectly.
X Visit a qualified specialist workshop immediately.
For further information about the Occupant Classification System, see (Y page 49). Lights
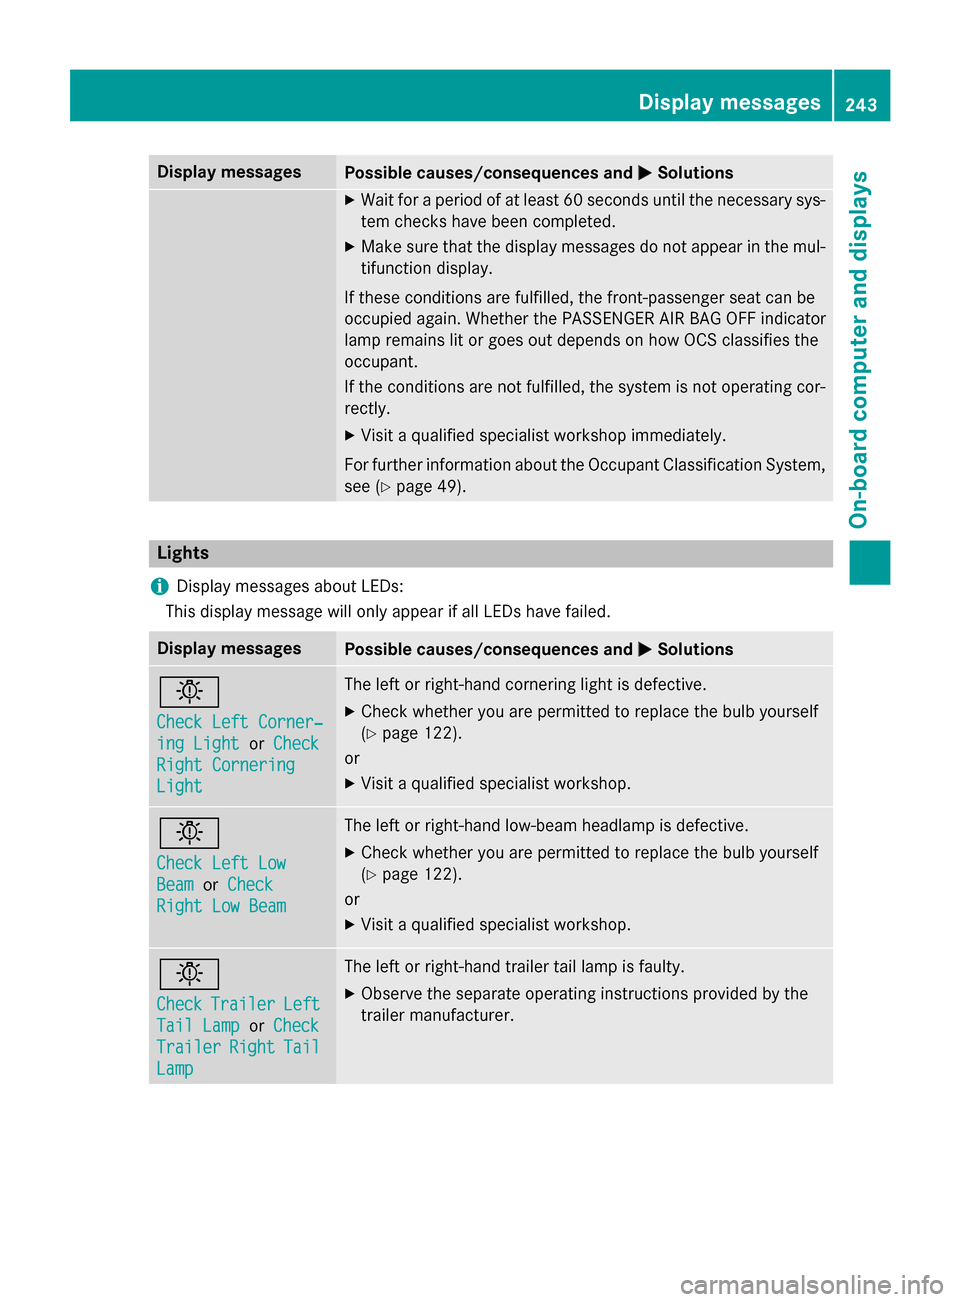
i Display messages about LEDs:
This display message will only appear if all LEDs have failed. Display messages
Possible causes/consequences and
0050 0050Solutions 0049
Check Left Corner‐ Check Left Corner‐
ing Light ing Light
orCheck
Check
Right Cornering
Right Cornering
Light Light The left or right-hand cornering light is defective.
X Check whether you are permitted to replace the bulb yourself
(Y page 122).
or
X Visit a qualified specialist workshop. 0049
Check Left Low Check Left Low
Beam Beam
orCheck
Check
Right Low Beam
Right Low Beam The left or right-hand low-beam headlamp is defective.
X Check whether you are permitted to replace the bulb yourself
(Y page 122).
or
X Visit a qualified specialist workshop. 0049
Check Check
Trailer
Trailer Left
Left
Tail Lamp
Tail Lamp orCheck
Check
Trailer
Trailer Right
RightTail
Tail
Lamp
Lamp The left or right-hand trailer tail lamp is faulty.
X Observe the separate operating instructions provided by the
trailer manufacturer. Display
messages
243On-board computer and displays Z
Page 249 of 386
Display messages
Possible causes/consequences and
0050
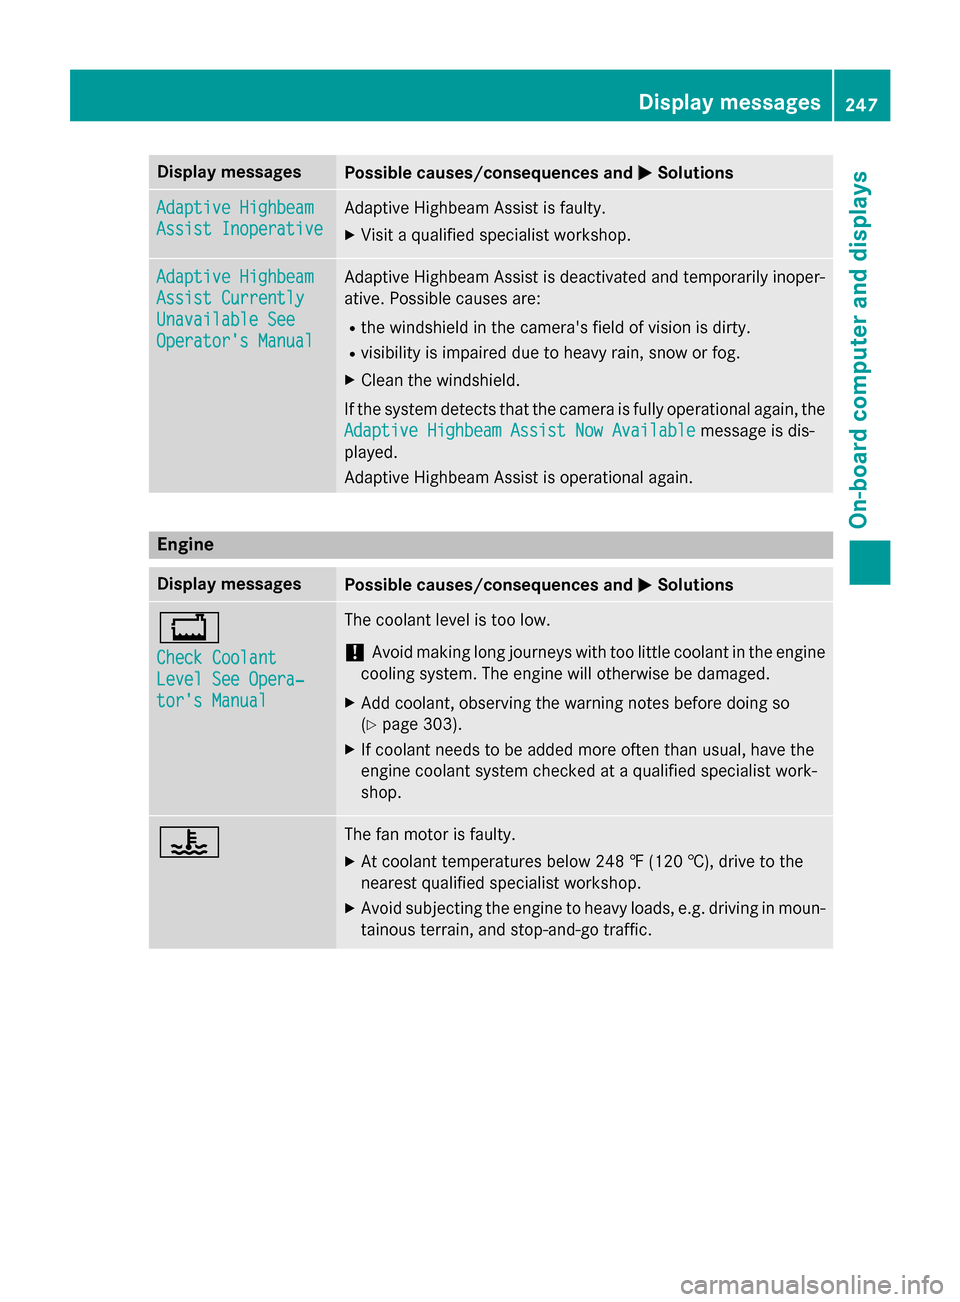
0050Solutions Adaptive Highbeam
Adaptive Highbeam
Assist Inoperative Assist Inoperative Adaptive Highbeam Assist is faulty.
X
Visit a qualified specialist workshop. Adaptive Highbeam Adaptive Highbeam
Assist Currently Assist Currently
Unavailable See Unavailable See
Operator's Manual Operator's Manual Adaptive Highbeam Assist is deactivated and temporarily inoper-
ative. Possible causes are:
R the windshield in the camera's field of vision is dirty.
R visibility is impaired due to heavy rain, snow or fog.
X Clean the windshield.
If the system detects that the camera is fully operational again, the
Adaptive Highbeam Assist Now Available
Adaptive Highbeam Assist Now Available message is dis-
played.
Adaptive Highbeam Assist is operational again. Engine
Display messages
Possible causes/consequences and
0050 0050Solutions 00BD
Check Coolant Check Coolant
Level See Opera‐ Level See Opera‐
tor's Manual tor's Manual The coolant level is too low.
! Avoid making long journeys with too little coolant in the engine
cooling system. The engine will otherwise be damaged.
X Add coolant, observing the warning notes before doing so
(Y page 303).
X If coolant needs to be added more often than usual, have the
engine coolant system checked at a qualified specialist work-
shop. 00AC The fan motor is faulty.
X At coolant temperatures below 248 ‡ (120 †), drive to the
nearest qualified specialist workshop.
X Avoid subjecting the engine to heavy loads, e.g. driving in moun-
tainous terrain, and stop-and-go traffic. Display
messages
247On-board computer and displays Z