buttons MERCEDES-BENZ GLK-Class 2015 X204 Owner's Manual
[x] Cancel search | Manufacturer: MERCEDES-BENZ, Model Year: 2015, Model line: GLK-Class, Model: MERCEDES-BENZ GLK-Class 2015 X204Pages: 386, PDF Size: 7.16 MB
Page 19 of 386
Snow chains
...................................... 335
Sockets Center console .............................. 285
General notes ................................ 284
Rear compartment .........................2 85
Spare wheel
Storage location ............................ 366
Stowing .......................................... 367
Specialist workshop ............................ 27
Special seat belt retractor .................. 64
Speed, controlling see Cruise control
Speedometer
Digital ............................................ 224
In the Instrument cluster ................. 33
Segments ...................................... 221
Selecting the unit of measure-
ment .............................................. 230
see Instrument cluster
SRS (Supplemental Restraint Sys-
tem)
Display message ............................ 239
Introduction ..................................... 43
Warning lamp ................................. 266
Warning lamp (function) ................... 43
Standing lamps
Changing bulbs .............................. 124
Display message ............................ 245
Switching on/off ........................... 118
Start/stop function
see ECO start/stop function
Starting (engine) ................................ 150
Steering (display message) .............. 259
Steering wheel Adjusting (electrically) ................... 107
Adjusting (manually) ...................... 106
Button overview ............................... 35
Buttons (on-board computer) ......... 221
Cleaning ......................................... 311
Important safety notes .................. 106
Paddle shifters ............................... 160
Steering wheel heating .................. 107
Storing settings (memory func-
tion) ............................................... 112
Steering wheel heating
Problem (malfunction) ................... 108
Switching on/of f........................... 107 Steering wheel paddle shifters
........ 160
Stowage areas ................................... 275
Stowage compartments Armrest (under) ............................. 275
Cup holders ................................... 282
Glove box ....................................... 275
Important safety information ......... 275
Rear ............................................... 276
Stowage net ................................... 276
Stowage net ....................................... 276
Summer opening see Convenience opening feature
Summer tires ..................................... 334
Sun visor ............................................ 283
Supplemental Restraint System see SRS (Supplemental Restraint
System)
Surround lighting (on-board com-
puter) .................................................. 231
SUV (Sport Utility Vehicle) ....................... 25
Switching air-recirculation mode
on/off ................................................. 143 T
Tachometer ........................................ 220
Tailgate Display message ............................ 258
Emergency unlocking ....................... 90
Important safety notes .................... 86
Limiting the opening angle ............... 89
Opening/closing (automatically
from inside) ...................................... 89
Opening/closing (automatically
from outside) ................................... 87
Opening/closing (from outside) ....... 87
Opening dimensions ...................... 380
Tail lamps
Display message ............................ 244
Tank
see Fuel tank
Tank content
Fuel gauge ....................................... 33
Technical data
Capacities ...................................... 373
Emergency spare wheel ................. 369 Index
17
Page 40 of 386
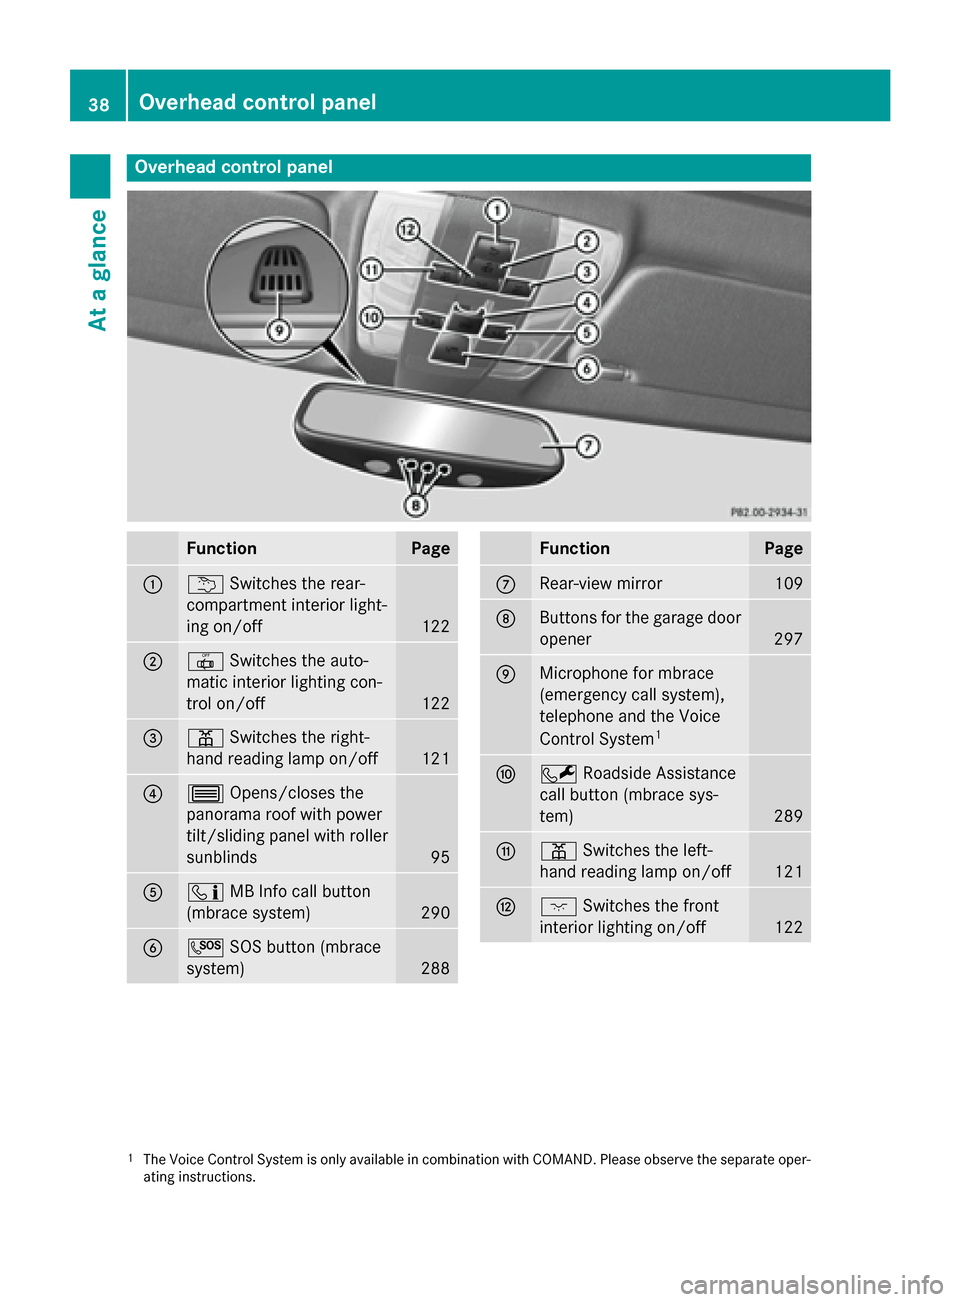
Overhead control panel
Function Page
0043
0042
Switches the rear-
compartment interior light-
ing on/off 122
0044
0033
Switches the auto-
matic interior lighting con-
trol on/off 122
0087
003D
Switches the right-
hand reading lamp on/off 121
0085
0057
Opens/closes the
panorama roof with power
tilt/sliding panel with roller sunblinds 95
0083
00D9
MB Info call button
(mbrace system) 290
0084
0053
SOS button (mbrace
system) 288 Function Page
006B
Rear-view mirror 109
006C
Buttons for the garage door
opener 297
006D
Microphone for mbrace
(emergency call system),
telephone and the Voice
Control System
1 006E
0052
Roadside Assistance
call button (mbrace sys-
tem) 289
006F
003D
Switches the left-
hand reading lamp on/off 121
0070
004A
Switches the front
interior lighting on/off 122
1
The Voice Control System is only available in combination with COMAND. Please observe the separate oper-
ating instructions. 38
Overhead control panelAt a glance
Page 69 of 386

G
WARNING
If the child restraint system is subjected to
direct sunlight, parts may get very hot. Chil-
dren may burn themselves on these parts,
particularly on the metal parts of the child
restraint system. There is a risk of injury.
If you leave the vehicle, taking the child with
you, always ensure that the child restraint
system is not exposed to direct sunlight. Pro- tect it with a blanket, for example. If the child
restraint system has been exposed to direct
sunlight, let it cool down before securing the
child in it. Never leave children unattended in the vehicle.
Child-proof locks for the rear doors You secure each door individually with the
child-proof locks on the rear doors. A door
secured with a child-proof lock cannot be
opened from inside the vehicle. When the
vehicle is unlocked, the door can be opened
from the outside.
X To activate: press the child-proof lock
lever up in the direction of arrow 0043.
X Make sure that the child-proof locks are
working properly.
X To deactivate: press the child-proof lock
lever down in the direction of arrow 0044.Override feature for the rear side win-
dows
X
To activate/deactivate: press button0044.
If indicator lamp 0043is lit, operation of the
rear side windows is disabled. Operation is
only possible using the switches in the driv- er's door. If indicator lamp 0043is off, oper-
ation is possible using the switches in the
rear compartment. Pets in the vehicle
G
WARNING
If you leave animals unattended or unsecured in the vehicle, they could press buttons or
switches, for example.
As a result, they could:
R activate vehicle equipment and become
trapped, for example
R activate or deactivate systems, thereby
endangering other road users
Unsecured animals could also be flung around
the vehicle in the event of an accident or sud- den steering or braking, thereby injuring vehi-
cle occupants. There is a risk of an accident
and injury.
Never leave animals unattended in the vehi-
cle. Always secure animals properly during
the journey, e.g. use a suitable animal trans-
port box. Pets in the vehicle
67Safety Z
Page 81 of 386
The turn signals flash once when unlocking
and three times when locking.
When it is dark, the surround lighting also
comes on if it is activated in the on-board
computer (Y page 231).
You can also set an audible signal to confirm that the vehicle has been locked. The audiblesignal can be activated and deactivated using
the on-board computer (Y page 232).
X To unlock centrally: press the0036but-
ton.
If you do not open the vehicle within approx-
imately 40 seconds of unlocking:
R the vehicle is locked again.
R the theft deterrent locking system is armed
again.
X To lock centrally: press the0037button. KEYLESS-GO
General notes Bear in mind that the engine can be started by
any of the vehicle occupants if there is a KEY-LESS-GO key in the vehicle.
Locking/unlocking centrally You can start, lock or unlock the vehicle using
KEYLESS-GO. To do this, you only need carry the SmartKey with you. You can combine the
functions of KEYLESS-GO with those of a con- ventional SmartKey. Unlock the vehicle by
using KEYLESS-GO, for instance, and lock it
using the 0037button on the SmartKey.
When locking or unlocking with KEYLESS-GO,
the distance between the SmartKey and the
corresponding door handle must not be
greater than 3 ft (1 m). KEYLESS-GO checks whether a valid Smart-
Key is in the vehicle by periodically establish-
ing a radio connection between the vehicle
and the SmartKey. This happens:
R when the external door handles are
touched
R when starting the engine
R while the vehicle is in motion X
To unlock the vehicle: touch the inner
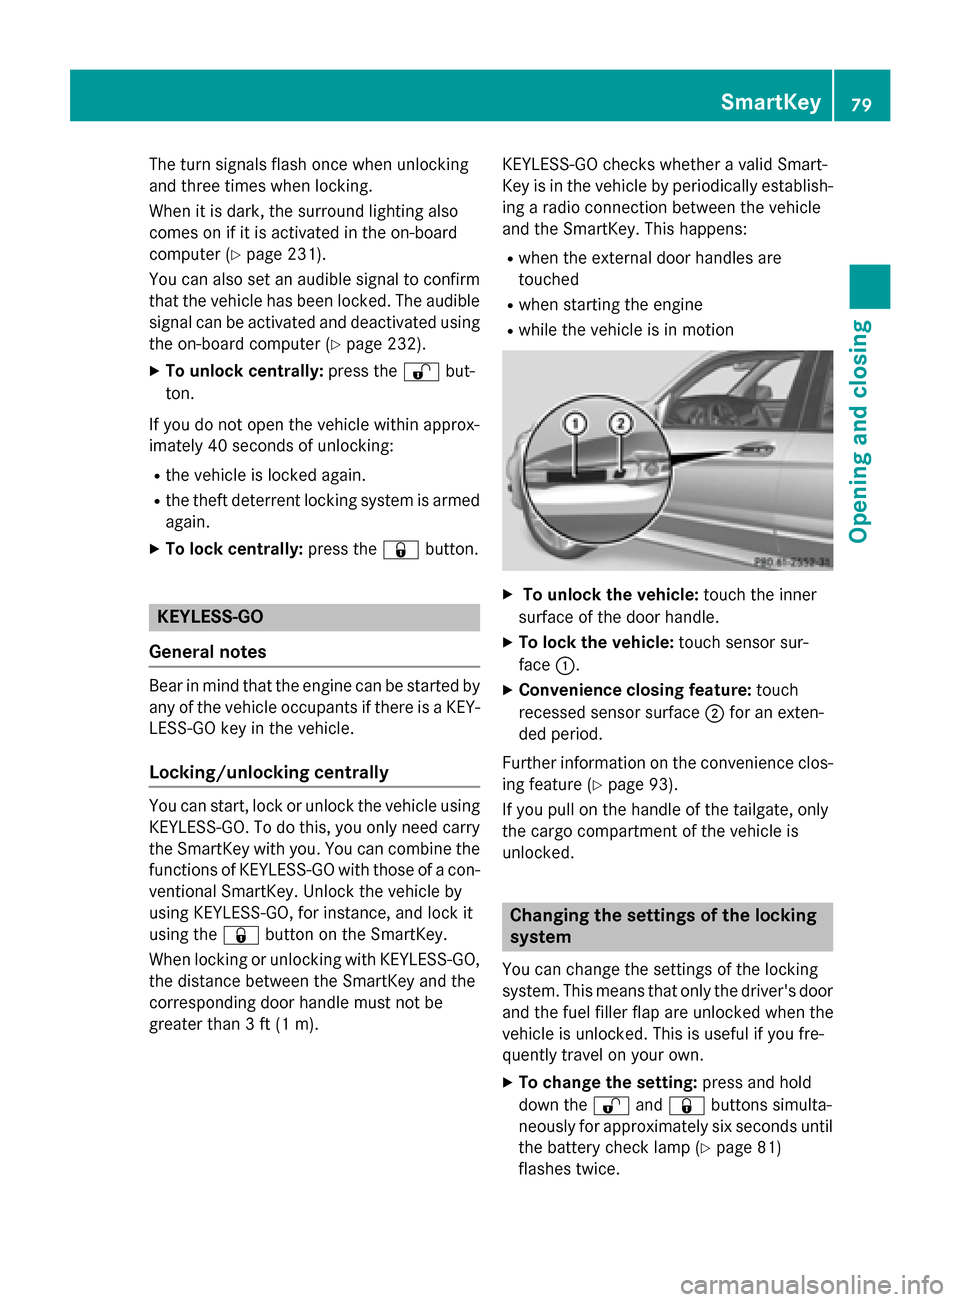
surface of the door handle.
X To lock the vehicle: touch sensor sur-
face 0043.
X Convenience closing feature: touch
recessed sensor surface 0044for an exten-
ded period.
Further information on the convenience clos-
ing feature (Y page 93).
If you pull on the handle of the tailgate, only
the cargo compartment of the vehicle is
unlocked. Changing the settings of the locking
system
You can change the settings of the locking
system. This means that only the driver's door and the fuel filler flap are unlocked when the
vehicle is unlocked. This is useful if you fre-
quently travel on your own.
X To change the setting: press and hold
down the 0036and0037 buttons simulta-
neously for approximately six seconds until
the battery check lamp (Y page 81)
flashes twice. SmartKey
79Opening and closing Z
Page 82 of 386
i
If the setting of the locking system is
changed within the signal range of the vehi- cle, pressing the 0037or0036 button:
R locks or
R unlocks the vehicle
The SmartKey now functions as follows:
X To unlock the driver's door: press the
0036 button once.
X To unlock centrally: press the0036but-
ton twice.
X To lock centrally: press the0037button.
The KEYLESS-GO function is changed as fol-
lows:
X To unlock the driver's door: touch the
inner surface of the door handle on the
driver's door.
X To unlock centrally: touch the inner sur-
face of the door handle on the front-
passenger door or the rear door.
X To lock centrally: touch the outer sensor
surface on one of the door handles
(Y page 79).
X To restore the factory settings: press
and hold down the 0036and0037 buttons
simultaneously for approximately six sec-
onds until the battery check lamp flashes
twice. Mechanical key
General notes If the vehicle can no longer be locked or
unlocked with the SmartKey or the KEYLESS- GO key, use the mechanical key.
If you use the mechanical key to unlock and
open the driver's door, the anti-theft alarm
system will be triggered (Y page 75).
X To end the alarm: insert the SmartKey into
the ignition lock.
i With KEYLESS-GO:
remove the Start/
Stop button from the ignition lock before-
hand. If you unlock the vehicle using the mechanical
key, the fuel filler flap will not be unlocked
automatically.
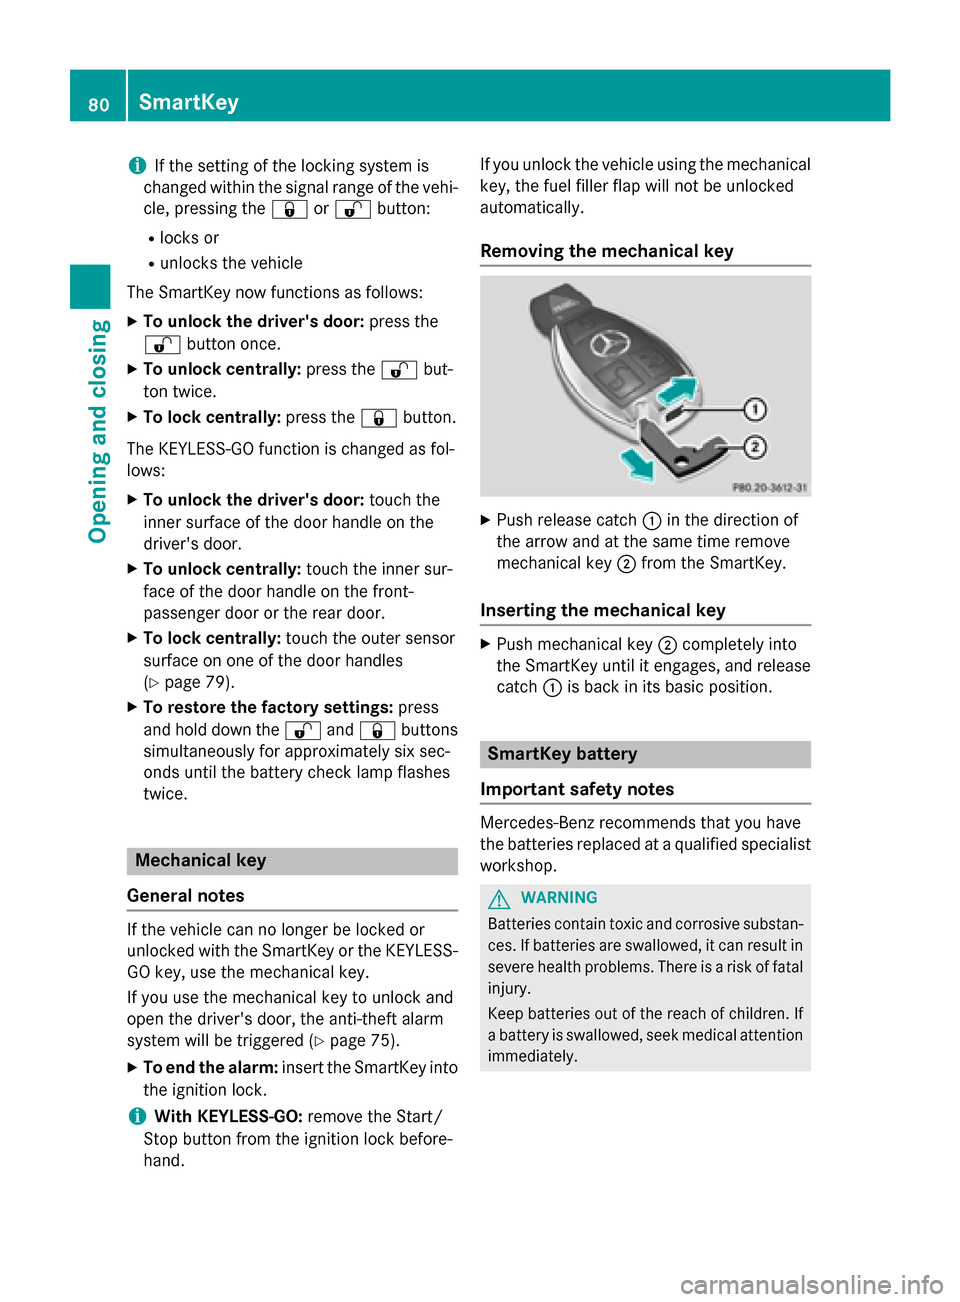
Removing the mechanical key X
Push release catch 0043in the direction of
the arrow and at the same time remove
mechanical key 0044from the SmartKey.
Inserting the mechanical key X
Push mechanical key 0044completely into
the SmartKey until it engages, and release
catch 0043is back in its basic position. SmartKey battery
Important safety notes Mercedes-Benz recommends that you have
the batteries replaced at a qualified specialist
workshop. G
WARNING
Batteries contain toxic and corrosive substan- ces. If batteries are swallowed, it can result in
severe health problems. There is a risk of fatal injury.
Keep batteries out of the reach of children. If
a battery is swallowed, seek medical attention immediately. 80
SmartKeyOpening and closing
Page 83 of 386
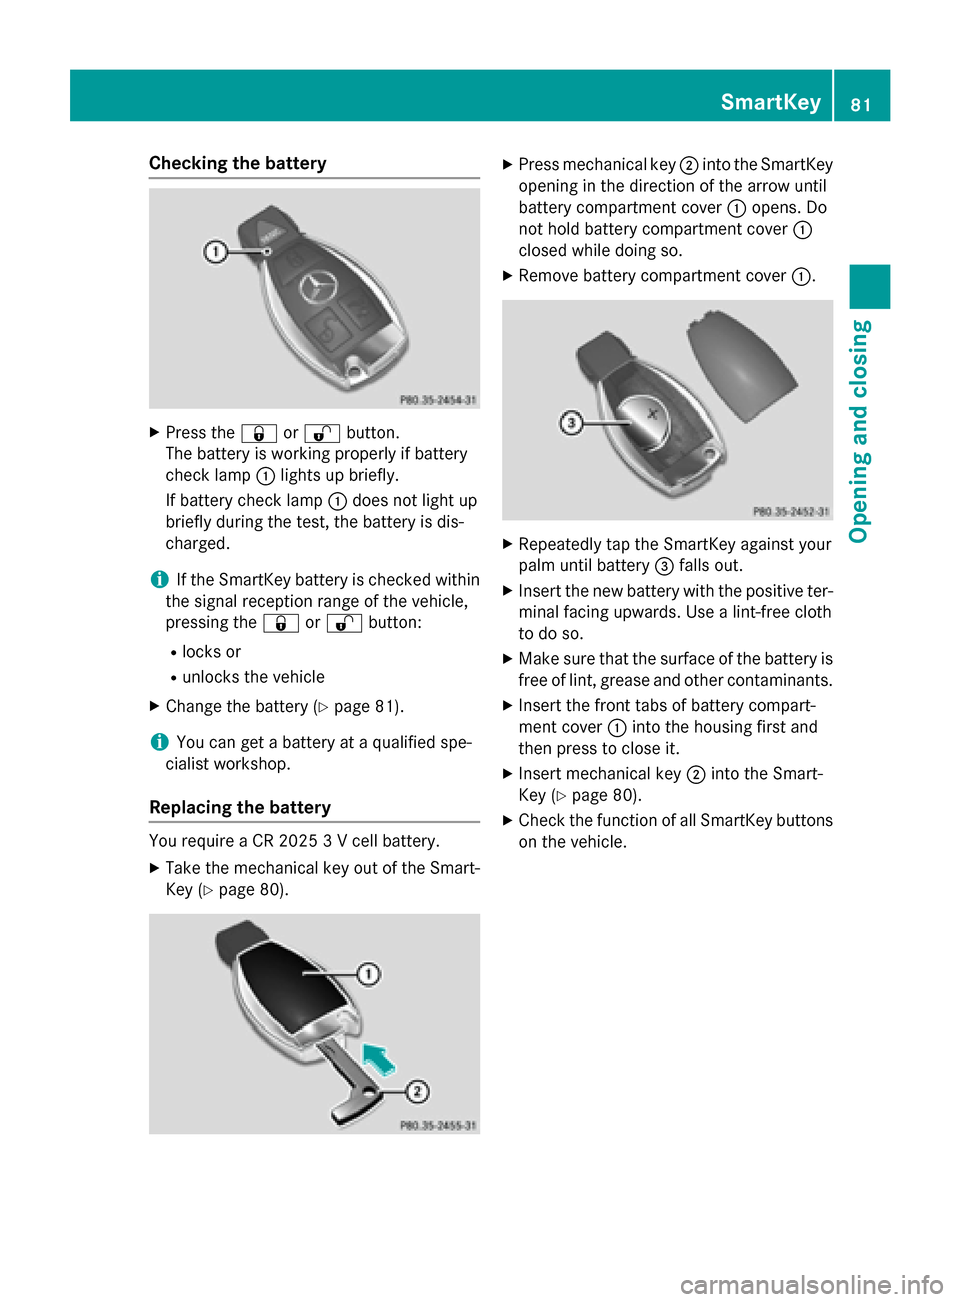
Checking the battery
X
Press the 0037or0036 button.
The battery is working properly if battery
check lamp 0043lights up briefly.
If battery check lamp 0043does not light up
briefly during the test, the battery is dis-
charged.
i If the SmartKey battery is checked within
the signal reception range of the vehicle,
pressing the 0037or0036 button:
R locks or
R unlocks the vehicle
X Change the battery (Y page 81).
i You can get a battery at a qualified spe-
cialist workshop.
Replacing the battery You require a CR 2025 3 V cell battery.
X Take the mechanical key out of the Smart-
Key (Y page 80). X
Press mechanical key 0044into the SmartKey
opening in the direction of the arrow until
battery compartment cover 0043opens. Do
not hold battery compartment cover 0043
closed while doing so.
X Remove battery compartment cover 0043. X
Repeatedly tap the SmartKey against your
palm until battery 0087falls out.
X Insert the new battery with the positive ter-
minal facing upwards. Use a lint-free cloth
to do so.
X Make sure that the surface of the battery is
free of lint, grease and other contaminants.
X Insert the front tabs of battery compart-
ment cover 0043into the housing first and
then press to close it.
X Insert mechanical key 0044into the Smart-
Key (Y page 80).
X Check the function of all SmartKey buttons
on the vehicle. SmartKey
81Opening and closing Z
Page 87 of 386
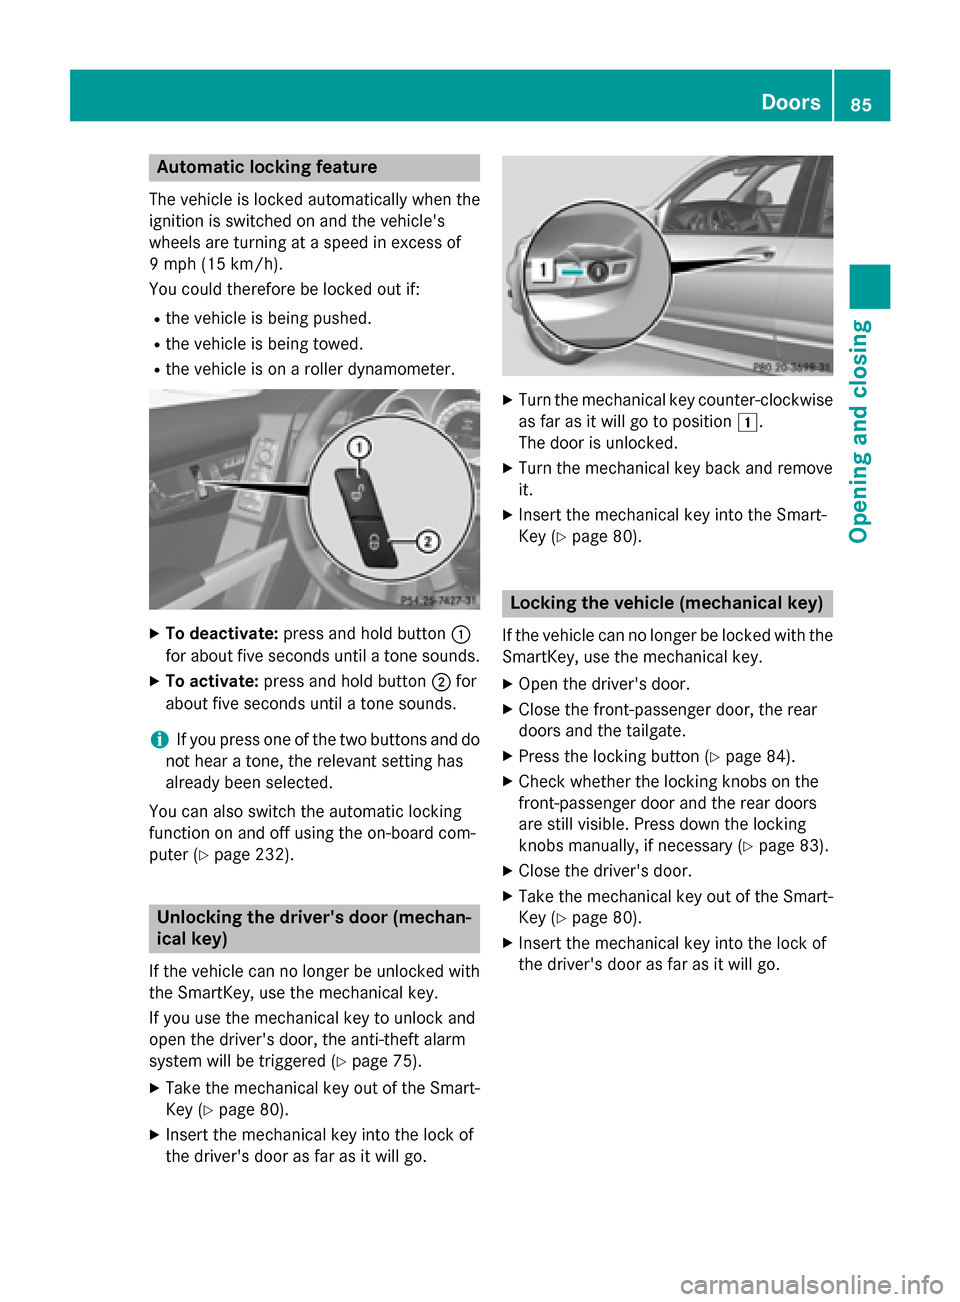
Automatic locking feature
The vehicle is locked automatically when the
ignition is switched on and the vehicle's
wheels are turning at a speed in excess of
9 mph (15 km/h).
You could therefore be locked out if:
R the vehicle is being pushed.
R the vehicle is being towed.
R the vehicle is on a roller dynamometer. X
To deactivate: press and hold button 0043
for about five seconds until a tone sounds.
X To activate: press and hold button 0044for
about five seconds until a tone sounds.
i If you press one of the two buttons and do
not hear a tone, the relevant setting has
already been selected.
You can also switch the automatic locking
function on and off using the on-board com-
puter (Y page 232). Unlocking the driver's door (mechan-
ical key)
If the vehicle can no longer be unlocked with
the SmartKey, use the mechanical key.
If you use the mechanical key to unlock and
open the driver's door, the anti-theft alarm
system will be triggered (Y page 75).
X Take the mechanical key out of the Smart-
Key (Y page 80).
X Insert the mechanical key into the lock of
the driver's door as far as it will go. X
Turn the mechanical key counter-clockwise
as far as it will go to position 0047.
The door is unlocked.
X Turn the mechanical key back and remove
it.
X Insert the mechanical key into the Smart-
Key (Y page 80). Locking the vehicle (mechanical key)
If the vehicle can no longer be locked with the
SmartKey, use the mechanical key.
X Open the driver's door.
X Close the front-passenger door, the rear
doors and the tailgate.
X Press the locking button (Y page 84).
X Check whether the locking knobs on the
front-passenger door and the rear doors
are still visible. Press down the locking
knobs manually, if necessary (Y page 83).
X Close the driver's door.
X Take the mechanical key out of the Smart-
Key (Y page 80).
X Insert the mechanical key into the lock of
the driver's door as far as it will go. Doors
85Opening and closing Z
Page 103 of 386
settings with the memory function
(Y
page 112). Seats
Important safety notes
G
WARNING
Children could become trapped if they adjust the seats, particularly when unattended.
There is a risk of injury.
When leaving the vehicle, always take the
SmartKey with you and lock the vehicle. Never leave children unsupervised in the vehicle.
The seats can still be adjusted when there is
no SmartKey in the ignition lock. G
WARNING
You could lose control of your vehicle if you do the following while driving:
R adjust the driver's seat, head restraint,
steering wheel or mirrors
R fasten the seat belt
There is a risk of an accident.
Adjust the driver's seat, head restraint, steer-
ing wheel and mirror and fasten your seat belt before starting the engine. G
WARNING
If you adjust the seat height carelessly, you or other vehicle occupants could be trapped andthereby injured. Children in particular could
accidentally press the electrical seat adjust-
ment buttons and become trapped. There is a
risk of injury.
While moving the seats, make sure that your
hands or other body parts do not get under the
lever assembly of the seat adjustment sys-
tem. G
WARNING
When you adjust a seat, you or other vehicle
occupants could become trapped, e.g. on the seat guide rail. There is a risk of injury. Make sure when adjusting a seat that no one
has any body parts in the sweep of the seat.
Observe the safety notes on "Air bags"
(Y page 44) and "Children in the vehicle"
(Y page 61).
! To avoid damage to the seats and the seat
heating, observe the following information:
R keep liquids from spilling on the seats. If
liquid is spilled on the seats, dry them as soon as possible.
R if the seat covers are damp or wet, do not
switch on the seat heating. The seat
heating should also not be used to dry
the seats.
R clean the seat covers as recommended;
see the "Interior care" section.
R do not transport heavy loads on the
seats. Do not place sharp objects on the
seat cushions, e.g. knives, nails or tools.
The seats should only be occupied by
passengers, if possible.
R when the seat heating is in operation, do
not cover the seats with insulating mate- rials, e.g. blankets, coats, bags, seat cov-
ers, child seats or booster seats.
! Make sure that there are no objects in the
footwell under or behind the seats when
moving the seats back. There is a risk that
the seats and/or the objects could be dam-
aged.
i The rear-compartment head restraints
can be removed (Y page 104).
For more information, contact a qualified
specialist workshop.
i Further related subjects:
R Cargo compartment enlargement (fold-
ing down the rear bench seat)
(Y page 276) Seats
101Seats, steering wheel and mirrors Z
Page 104 of 386
Adjusting the seats
i Vehicles without Memory function: the
seats can be adjusted within three minutes of a front door being opened.
The time period starts over again if, within
these three minutes, you:
R open or close a front door
R insert the SmartKey into the ignition lock
or remove it from the ignition lock
R switch the ignition on or off
If the SmartKey is in position 2in the igni-
tion lock (Y page 149), the seats can be
adjusted at any time.
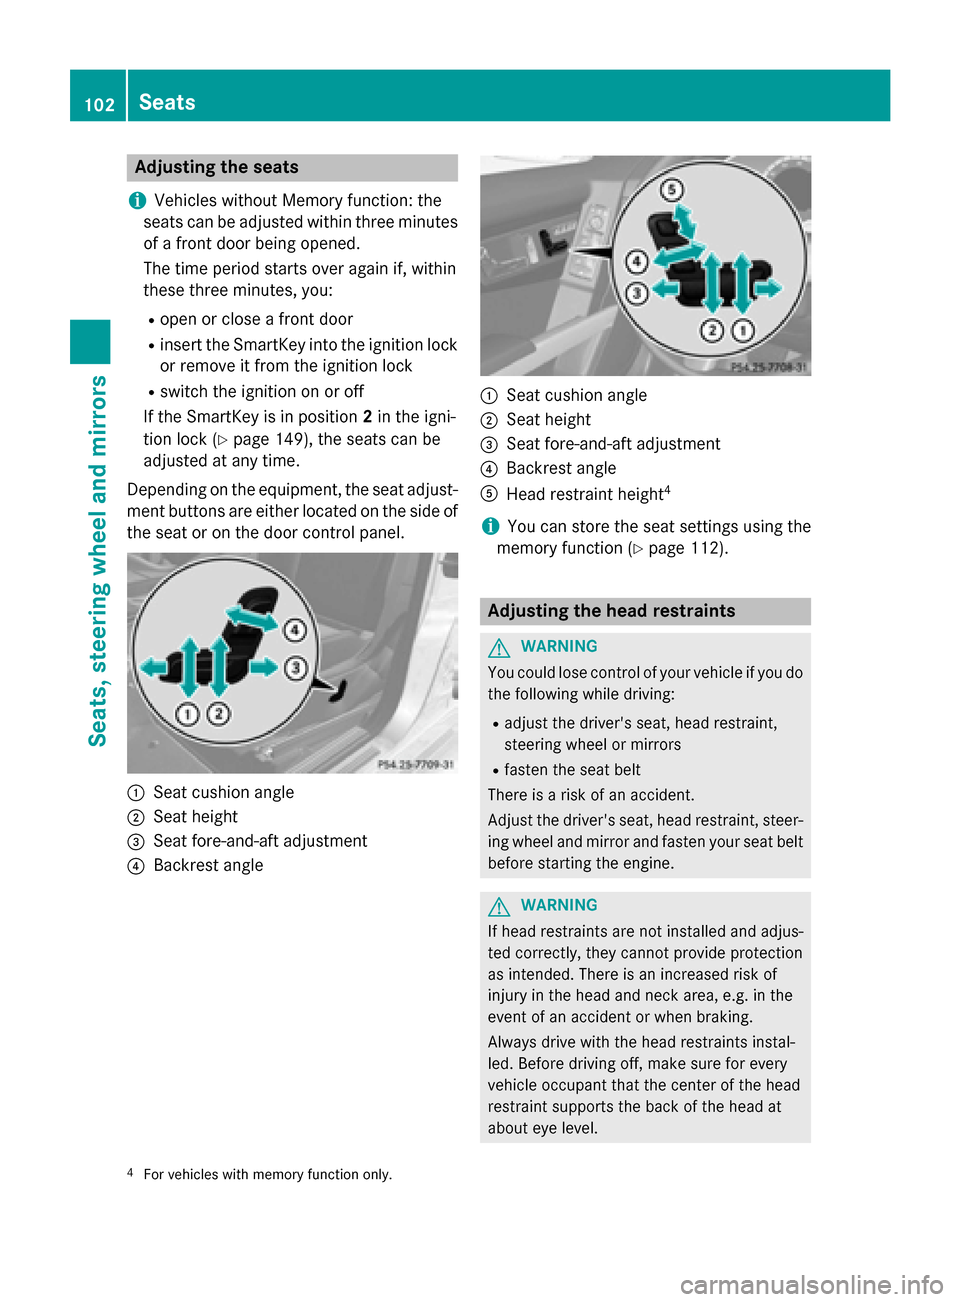
Depending on the equipment, the seat adjust- ment buttons are either located on the side of
the seat or on the door control panel. 0043
Seat cushion angle
0044 Seat height
0087 Seat fore-and-aft adjustment
0085 Backrest angle 0043
Seat cushion angle
0044 Seat height
0087 Seat fore-and-aft adjustment
0085 Backrest angle
0083 Head restraint height 4
i You can store the seat settings using the
memory function (Y page 112). Adjusting the head restraints
G
WARNING
You could lose control of your vehicle if you do the following while driving:
R adjust the driver's seat, head restraint,
steering wheel or mirrors
R fasten the seat belt
There is a risk of an accident.
Adjust the driver's seat, head restraint, steer-
ing wheel and mirror and fasten your seat belt before starting the engine. G
WARNING
If head restraints are not installed and adjus-
ted correctly, they cannot provide protection
as intended. There is an increased risk of
injury in the head and neck area, e.g. in the
event of an accident or when braking.
Always drive with the head restraints instal-
led. Before driving off, make sure for every
vehicle occupant that the center of the head
restraint supports the back of the head at
about eye level.
4 For vehicles with memory function only. 102
SeatsSeats
, steering wheel and mirrors
Page 110 of 386
Problems with the steering wheel heating
Problem
Possible causes/consequences and
0050
0050Solutions The steering wheel
heating has switched
off prematurely or can-
not be switched on. The on-board voltage is too low because too many electrical con-
sumers are switched on.
X Switch off electrical consumers that you do not need, such as
the rear window defroster or interior lighting.
Once the battery is sufficiently charged, the steering wheel
heating will switch back on automatically. EASY-ENTRY/EXIT feature
Important safety notes G
WARNING
When the EASY-ENTRY/EXIT feature adjusts
the steering wheel, you and other vehicle
occupants – particularly children – could
become trapped. There is a risk of injury.
While the EASY-ENTRY/EXIT feature is mak-
ing adjustments, make sure that no one has
any body parts in the sweep of the steering
wheel.
If somebody becomes trapped:
R press one of the memory function position
buttons, or
R move the switch for steering wheel adjust-
ment in the opposite direction to that in
which the steering wheel is moving.
The adjustment process is stopped. G
WARNING
If you drive off while the EASY-ENTRY/EXIT
feature is making adjustments, you could lose
control of the vehicle. There is a risk of an
accident.
Always wait until the adjustment process is
complete before driving off.
The EASY-ENTRY/EXIT feature makes getting in and out of your vehicle easier.
You can activate and deactivate the EASY-
ENTRY/EXIT feature in the on-board com-
puter (Y page 233). Position of the steering wheel when the
EASY-ENTRY/EXIT feature is active The steering wheel swings upwards when
you:
R remove the SmartKey from the ignition lock
R open the driver's door with KEYLESS-GO in
position 1
R open the driver's door and the SmartKey is
in position 0or 1in the ignition lock
(Y page 149)
i The steering wheel only moves upwards if
it has not already reached the upper stop.
Position of the steering wheel for driv-
ing The steering wheel is moved to the last selec-
ted position when:
R the driver's door is closed
R you insert the SmartKey into the ignition
lock
or
R you press the Start/Stop button once on
vehicles with KEYLESS-GO
When you close the driver's door with the
ignition switched on, the steering wheel is
also automatically moved to the previously
set position.
The last position of the steering wheel is
stored when you switch off the ignition or
when you store the setting with the memory
function (Y page 112).108
Steering wheelSeats, steering wheel and mirrors