door lock MERCEDES-BENZ GLK-CLASS SUV 2015 Owner's Guide
[x] Cancel search | Manufacturer: MERCEDES-BENZ, Model Year: 2015, Model line: GLK-CLASS SUV, Model: MERCEDES-BENZ GLK-CLASS SUV 2015Pages: 386, PDF Size: 26 MB
Page 104 of 386

The time period starts over again if, within
these three minutes, you:R open or close a front door
R insert the SmartKey into the ignition lock
or remove it from the ignition lock
R switch the ignition on or off
If the SmartKey is in position 2 in the igni-
tion lock ( Y page 149), the seats can be
adjusted at any time.
Depending on the equipment, the seat adjust-
ment buttons are either located on the side of the seat or on the door control panel.
:Seat cushion angle
;Seat height
=Seat fore-and-aft adjustment
?Backrest angle
:Seat cushion angle
;Seat height
=Seat fore-and-aft adjustment
?Backrest angle
AHead restraint height 4
iYou can store the seat settings using the
memory function ( Y page 112).
Adjusting the head restraints
GWARNING
You could lose control of your vehicle if you do
the following while driving:
R adjust the driver's seat, head restraint,
steering wheel or mirrors
R fasten the seat belt
There is a risk of an accident.
Adjust the driver's seat, head restraint, steer-
ing wheel and mirror and fasten your seat belt before starting the engine.
GWARNING
If head restraints are not installed and adjus-
ted correctly, they cannot provide protection
as intended. There is an increased risk of
injury in the head and neck area, e.g. in the
event of an accident or when braking.
Always drive with the head restraints instal-
led. Before driving off, make sure for every
vehicle occupant that the center of the head
restraint supports the back of the head at
about eye level.
Do not rotate the head restraints of the front and rear seats. Otherwise, you cannot adjust
the height and angle of the head restraints to
the correct position.
Using the fore-and-aft adjustment, adjust the head restraint so that it is as close as possible to your head.
Pay attention to the important safety notes
( Y page 101).
4
For vehicles with memory function only.
102Seats
Seats, steering wheel and mirrors
Page 109 of 386
wheel up or down or try to move it in the
fore-and-aft direction.
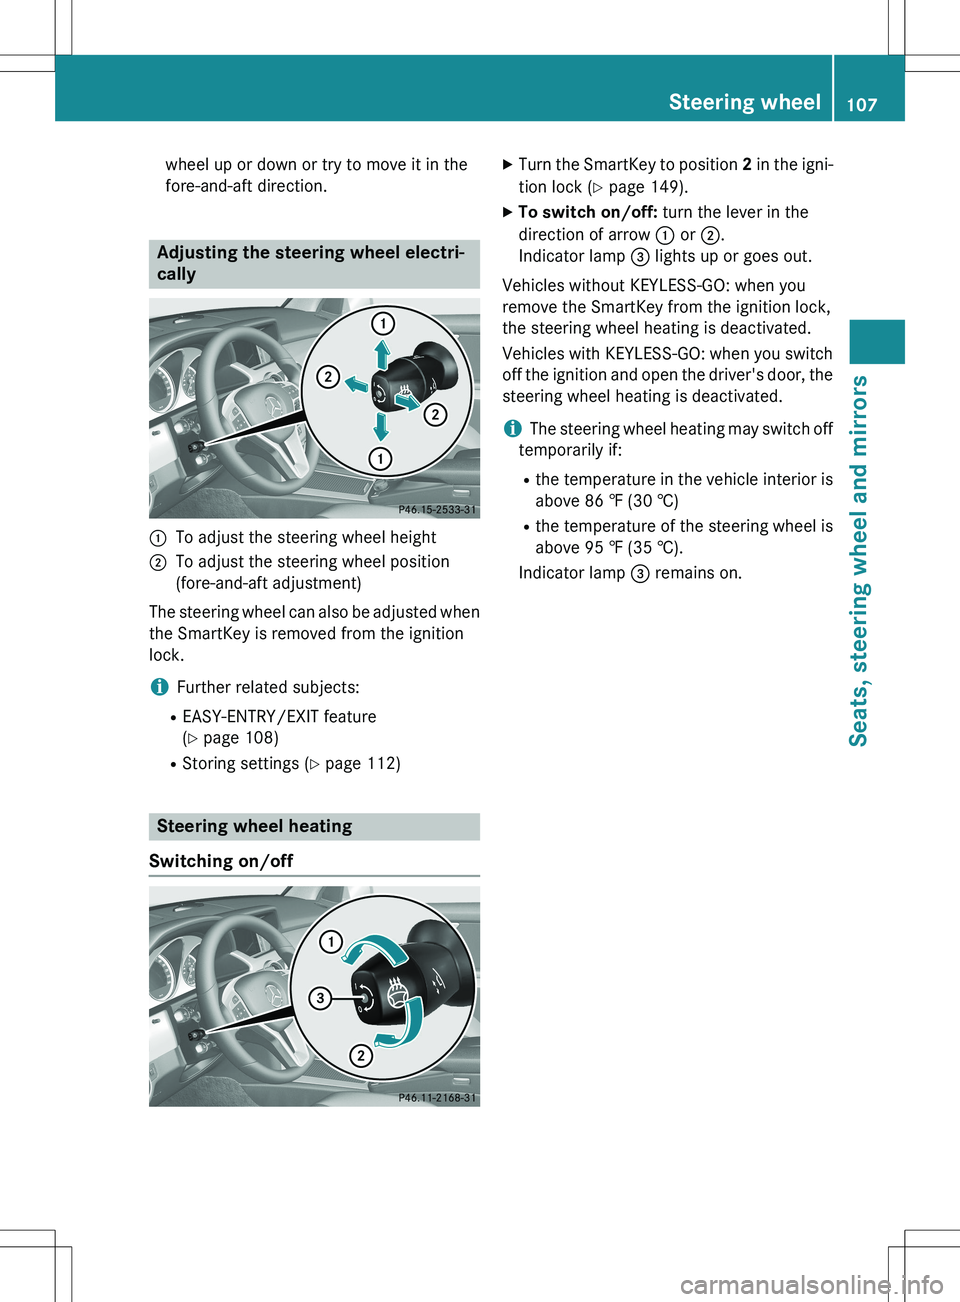
Adjusting the steering wheel electri-
cally
:To adjust the steering wheel height
;To adjust the steering wheel position
(fore-and-aft adjustment)
The steering wheel can also be adjusted when the SmartKey is removed from the ignition
lock.
iFurther related subjects:
R EASY-ENTRY/EXIT feature
(Y page 108)
R Storing settings ( Y page 112)
Steering wheel heating
Switching on/off
X Turn the SmartKey to position 2 in the igni-
tion lock ( Y page 149).
X To switch on/off: turn the lever in the
direction of arrow : or ;.
Indicator lamp = lights up or goes out.
Vehicles without KEYLESS-GO: when you
remove the SmartKey from the ignition lock,
the steering wheel heating is deactivated.
Vehicles with KEYLESS-GO: when you switch
off the ignition and open the driver's door, the steering wheel heating is deactivated.
iThe steering wheel heating may switch off
temporarily if:
R the temperature in the vehicle interior is
above 86 ‡ (30 †)
R the temperature of the steering wheel is
above 95 ‡ (35 †).
Indicator lamp = remains on.
Steering wheel107
Seats, steering wheel and mirrors
Z
Page 110 of 386

Problems with the steering wheel heating
ProblemPossible causes/consequences and M Solutions
The steering wheel
heating has switched
off prematurely or can-
not be switched on.The on-board voltage is too low because too many elect rical con-
sumers are switched on.
X Switch off electrical consumers that you do not need, such as
the rear window defroster or interior lighting.
Once the battery is sufficiently charged, the steering wheel
heating will switch back on automatically.
EASY-ENTRY/EXIT feature
Important safety notes
GWARNING
When the EASY-ENTRY/EXIT feature adjusts
the steering wheel, you and other vehicle
occupants – particularly children – could
become trapped. There is a risk of injury.
While the EASY-ENTRY/EXIT feature is mak-
ing adjustments, make sure that no one has
any body parts in the sweep of the steering
wheel.
If somebody becomes trapped: R press one of the memory function position
buttons, or
R move the switch for steering wheel adjust-
ment in the opposite direction to that in
which the steering wheel is moving.
The adjustment process is stopped.
GWARNING
If you drive off while the EASY-ENTRY/EXIT
feature is making adjustments, you could lose
control of the vehicle. There is a risk of an
accident.
Always wait until the adjustment process is
complete before driving off.
The EASY-ENTRY/EXIT feature makes getting in and out of your vehicle easier.
You can activate and deactivate the EASY-
ENTRY/EXIT feature in the on-board com-
puter ( Y page 233).
Position of the steering wheel when the
EASY-ENTRY/EXIT feature is active
The steering wheel swings upwards when
you:
R remove the SmartKey from the ignition lock
R open the driver's door with KEYLESS-GO in
position 1
R open the driver's door and the SmartKey is
in position 0 or 1 in the ignition lock
( Y page 149)
iThe steering wheel only moves upwards if
it has not already reached the upper stop.
Position of the steering wheel for driv-
ing
The steering wheel is moved to the last selec-
ted position when:
R the driver's door is closed
R you insert the SmartKey into the ignition
lock
or
R you press the Start/Stop button once on
vehicles with KEYLESS-GO
When you close the driver's door with the
ignition switched on, the steering wheel is
also automatically moved to the previously
set position.
The last position of the steering wheel is
stored when you switch off the ignition or
when you store the setting with the memory
function ( Y page 112).
108Steering wheel
Seats, steering wheel and mirrors
Page 111 of 386
Crash-responsive EASY-EXIT feature
If the crash-responsive EASY-EXIT feature is
triggered in an accident, the steering columnwill move upwards when the driver's door is
opened. This occurs irrespective of the posi-
tion of the SmartKey in the ignition lock. This
makes it easier to exit the vehicle and rescue
the occupants.
The crash-responsive EASY-EXIT feature is
only operational if the EASY-EXIT/ENTRY fea- ture is activated in the on-board computer.
Mirrors
Rear-view mirror
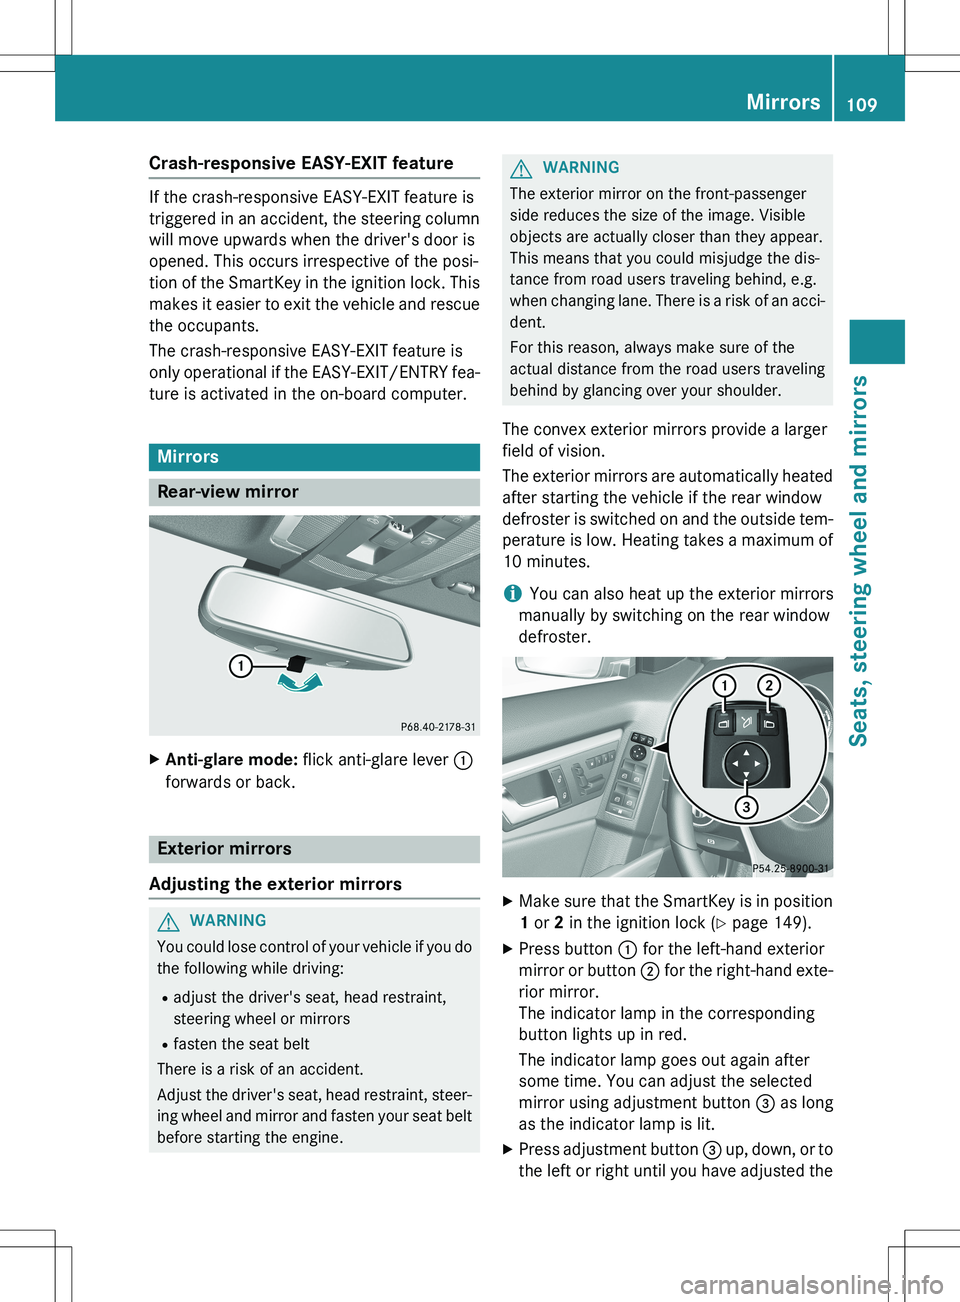
X Anti-glare mode: flick anti-glare lever :
forwards or back.
Exterior mirrors
Adjusting the exterior mirrors
GWARNING
You could lose control of your vehicle if you do the following while driving:
R adjust the driver's seat, head restraint,
steering wheel or mirrors
R fasten the seat belt
There is a risk of an accident.
Adjust the driver's seat, head restraint, steer-
ing wheel and mirror and fasten your seat belt before starting the engine.
GWARNING
The exterior mirror on the front-passenger
side reduces the size of the image. Visible
objects are actually closer than they appear.
This means that you could misjudge the dis-
tance from road users traveling behind, e.g.
when changing lane. There is a risk of an acci-
dent.
For this reason, always make sure of the
actual distance from the road users traveling
behind by glancing over your shoulder.
The convex exterior mirrors provide a larger
field of vision.
The exterior mirrors are automatically heated
after starting the vehicle if the rear window
defroster is switched on and the outside tem- perature is low. Heating takes a maximum of
10 minutes.
iYou can also heat up the exterior mirrors
manually by switching on the rear window
defroster.
X Make sure that the SmartKey is in position
1 or 2 in the ignition lock ( Y page 149).
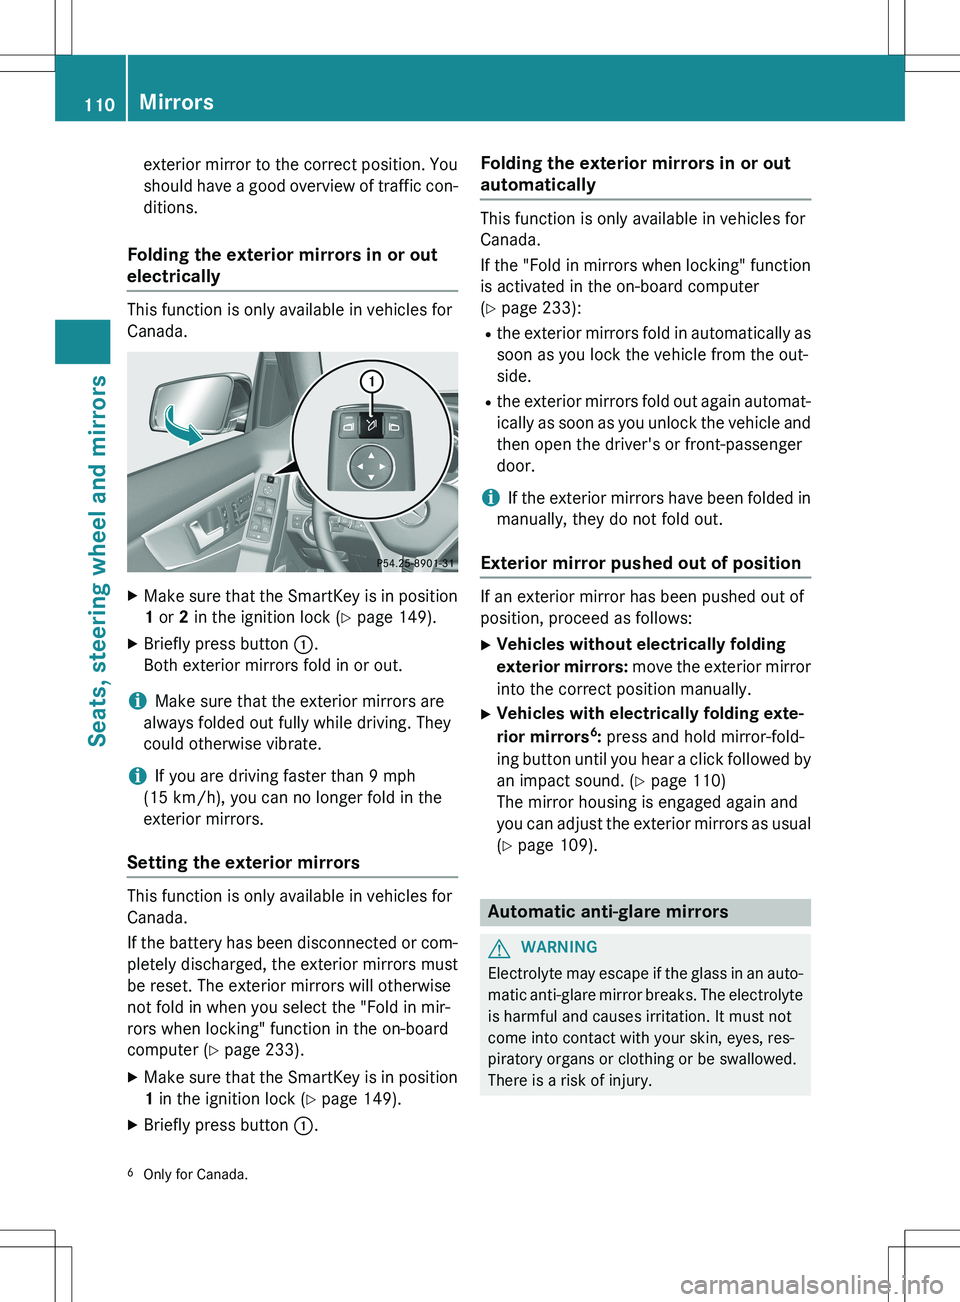
X Press button : for the left-hand exterior
mirror or button ; for the right-hand exte-
rior mirror.
The indicator lamp in the corresponding
button lights up in red.
The indicator lamp goes out again after
some time. You can adjust the selected
mirror using adjustment button = as long
as the indicator lamp is lit.
X Press adjustment button = up, down, or to
the left or right until you have adjusted the
Mirrors109
Seats, steering wheel and mirrors
Z
Page 112 of 386
exterior mirror to the correct position. You
should have a good overview of traffic con-ditions.
Folding the exterior mirrors in or out
electrically
This function is only available in vehicles for
Canada.
X Make sure that the SmartKey is in position
1 or 2 in the ignition lock ( Y page 149).
X Briefly press button :.
Both exterior mirrors fold in or out.
iMake sure that the exterior mirrors are
always folded out fully while driving. They
could otherwise vibrate.
iIf you are driving faster than 9 mph
(15 km/h), you can no longer fold in the
exterior mirrors.
Setting the exterior mirrors
This function is only available in vehicles for
Canada.
If the battery has been disconnected or com- pletely discharged, the exterior mirrors must
be reset. The exterior mirrors will otherwise
not fold in when you select the "Fold in mir-
rors when locking" function in the on-board
computer ( Y page 233).
X Make sure that the SmartKey is in position
1 in the ignition lock ( Y page 149).
X Briefly press button :.
Folding the exterior mirrors in or out
automatically
This function is only available in vehicles for
Canada.
If the "Fold in mirrors when locking" function
is activated in the on-board computer
( Y page 233):
R the exterior mirrors fold in automatically as
soon as you lock the vehicle from the out-
side.
R the exterior mirrors fold out again automat-
ically as soon as you unlock the vehicle and
then open the driver's or front-passenger
door.
iIf the exterior mirrors have been folded in
manually, they do not fold out.
Exterior mirror pushed out of position
If an exterior mirror has been pushed out of
position, proceed as follows:
X Vehicles without electrically folding
exterior mirrors: move the exterior mirror
into the correct position manually.
X Vehicles with electrically folding exte-
rior mirrors 6
: press and hold mirror-fold-
ing button until you hear a click followed by
an impact sound. ( Y page 110)
The mirror housing is engaged again and
you can adjust the exterior mirrors as usual
( Y page 109).
Automatic anti-glare mirrors
GWARNING
Electrolyte may escape if the glass in an auto-
matic anti-glare mirror breaks. The electrolyte
is harmful and causes irritation. It must not
come into contact with your skin, eyes, res-
piratory organs or clothing or be swallowed.
There is a risk of injury.
6 Only for Canada.
110Mirrors
Seats, steering wheel and mirrors
Page 118 of 386
Useful information
iThis Operator's Manual describes all
models and all standard and optional equip- ment of your vehicle available at the time of
publication of the Operator's Manual.
Country-specific differences are possible.
Please note that your vehicle may not be
equipped with all features described. This
also applies to safety-related systems and
functions.
iRead the information on qualified special-
ist workshops ( Y page 27).
Exterior lighting
General notes
For reasons of safety, Mercedes-Benz recom-
mends that you drive with the lights switchedon even during the daytime. In some coun-
tries, operation of the headlamps varies due
to legal requirements and self-imposed obli-
gations.
Setting the exterior lighting
Setting options
Exterior lighting can be set using: R the light switch
R the combination switch ( Y page 118)
R the on-board computer ( Y page 231)
Light switch
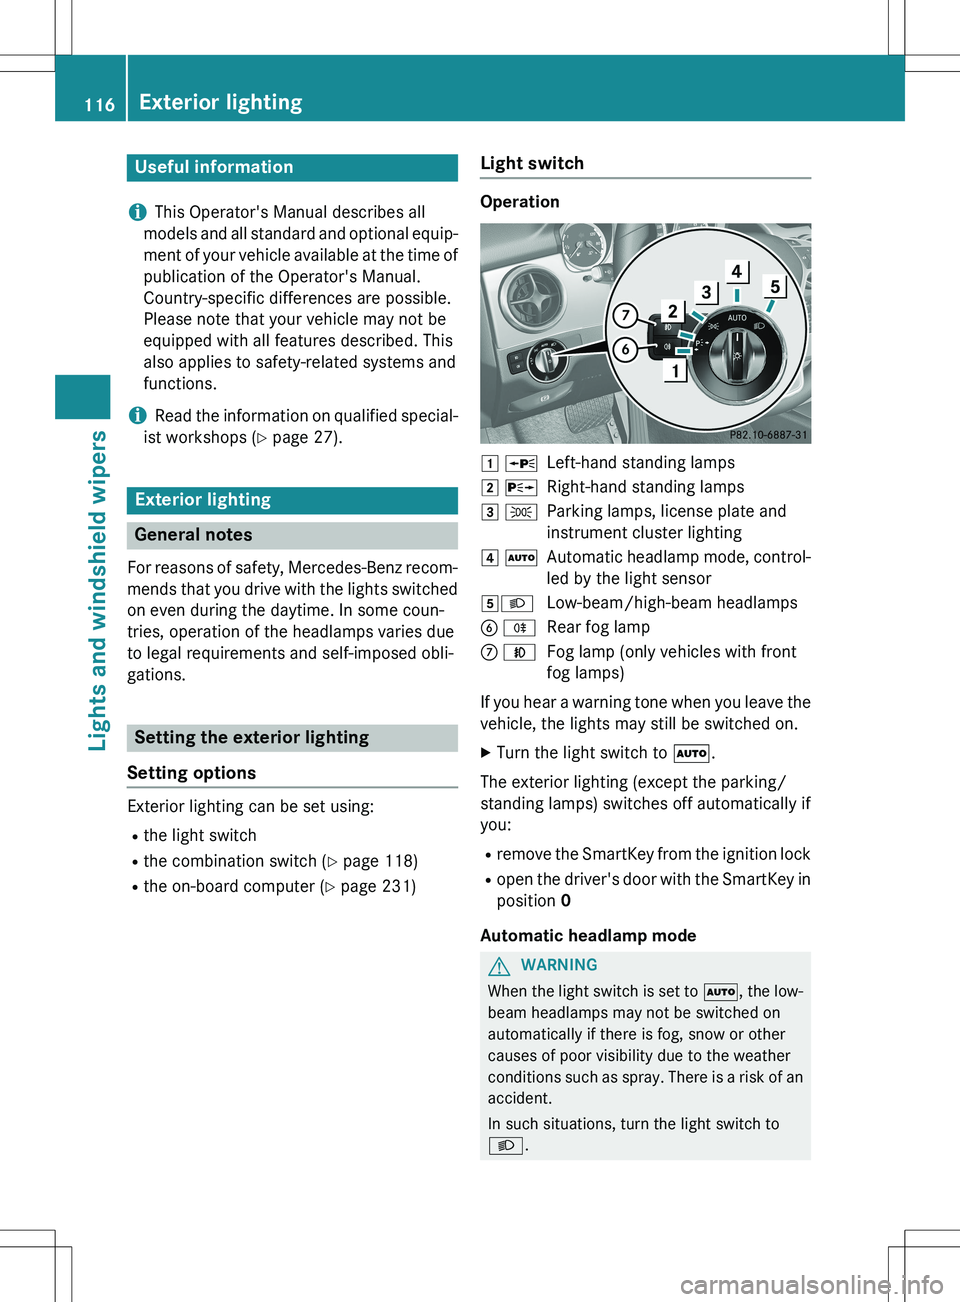
Operation
1 WLeft-hand standing lamps
2 XRight-hand standing lamps
3 TParking lamps, license plate and
instrument cluster lighting
4 ÃAutomatic headlamp mode, control-
led by the light sensor
5 LLow-beam/high-beam headlamps
B RRear fog lamp
C NFog lamp (only vehicles with front
fog lamps)
If you hear a warning tone when you leave the
vehicle, the lights may still be switched on. X Turn the light switch to Ã.
The exterior lighting (except the parking/
standing lamps) switches off automatically if
you: R remove the SmartKey from the ignition lock
R open the driver's door with the SmartKey in
position 0
Automatic headlamp mode
GWARNING
When the light switch is set to Ã, the low-
beam headlamps may not be switched on
automatically if there is fog, snow or other
causes of poor visibility due to the weather
conditions such as spray. There is a risk of an
accident.
In such situations, turn the light switch to L .
116Exterior lighting
Lights and windshield wipers
Page 124 of 386
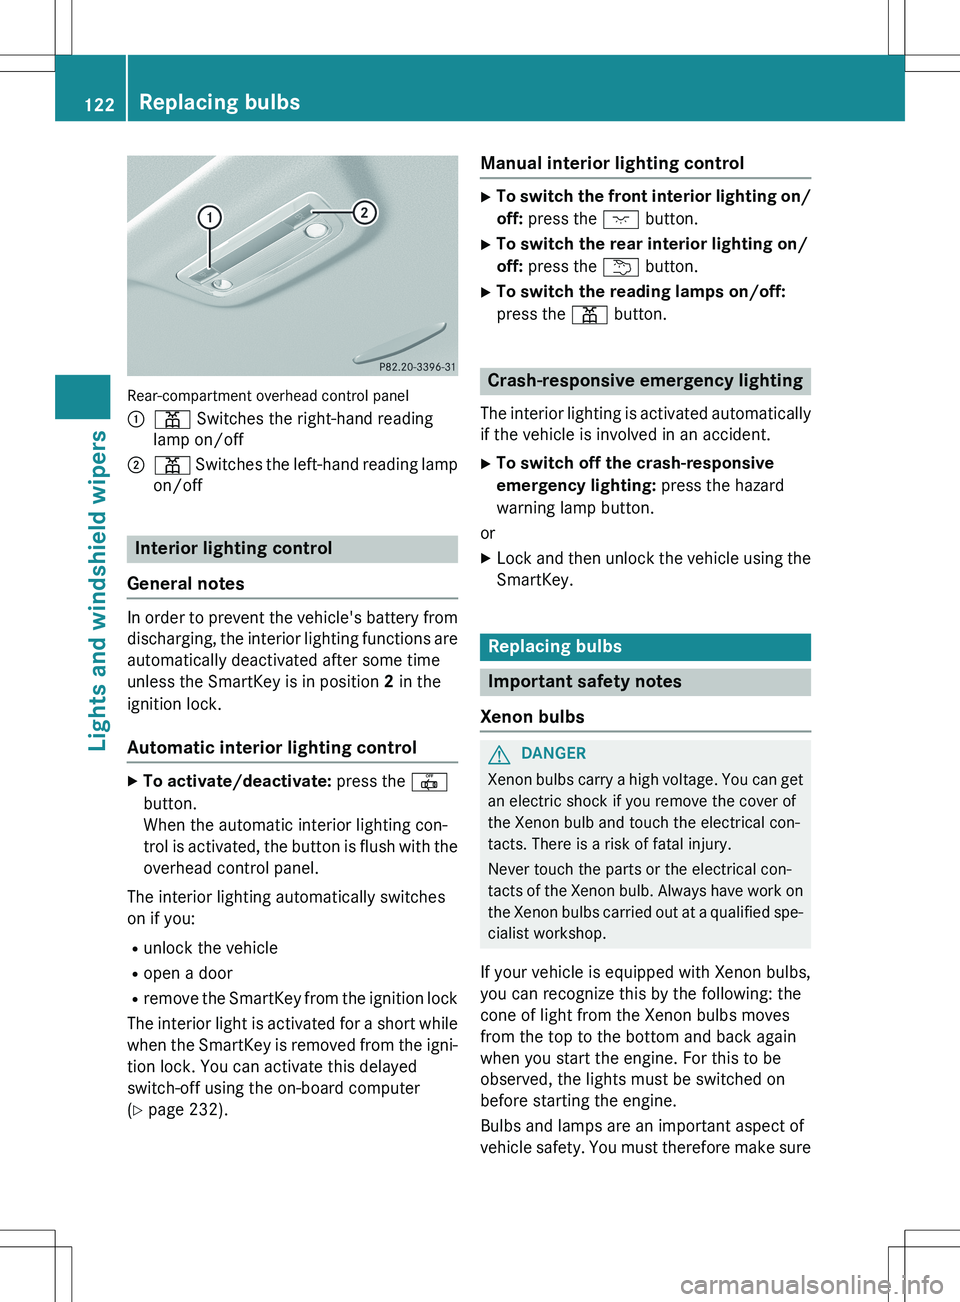
Rear-compartment overhead control panel :
p Switches the right-hand reading
lamp on/off
;p Switches the left-hand reading lamp
on/off
Interior lighting control
General notes
In order to prevent the vehicle's battery from discharging, the interior lighting functions are
automatically deactivated after some time
unless the SmartKey is in position 2 in the
ignition lock.
Automatic interior lighting control
X To activate/deactivate: press the |
button.
When the automatic interior lighting con-
trol is activated, the button is flush with the
overhead control panel.
The interior lighting automatically switches
on if you: R unlock the vehicle
R open a door
R remove the SmartKey from the ignition lock
The interior light is activated for a short while when the SmartKey is removed from the igni-
tion lock. You can activate this delayed
switch-off using the on-board computer
( Y page 232).
Manual interior lighting control
X
To switch the front interior lighting on/
off: press the c button.
X To switch the rear interior lighting on/
off: press the u button.
X To switch the reading lamps on/off:
press the p button.
Crash-responsive emergency lighting
The interior lighting is activated automatically
if the vehicle is involved in an accident.
X To switch off the crash-responsive
emergency lighting: press the hazard
warning lamp button.
or X Lock and then unlock the vehicle using the
SmartKey.
Replacing bulbs
Important safety notes
Xenon bulbs
GDANGER
Xenon bulbs carry a high voltage. You can get an electric shock if you remove the cover of
the Xenon bulb and touch the electrical con-
tacts. There is a risk of fatal injury.
Never touch the parts or the electrical con-
tacts of the Xenon bulb. Always have work on
the Xenon bulbs carried out at a qualified spe-
cialist workshop.
If your vehicle is equipped with Xenon bulbs,
you can recognize this by the following: the
cone of light from the Xenon bulbs moves
from the top to the bottom and back again
when you start the engine. For this to be
observed, the lights must be switched on
before starting the engine.
Bulbs and lamps are an important aspect of
vehicle safety. You must therefore make sure
122Replacing bulbs
Lights and windshield wipers
Page 131 of 386
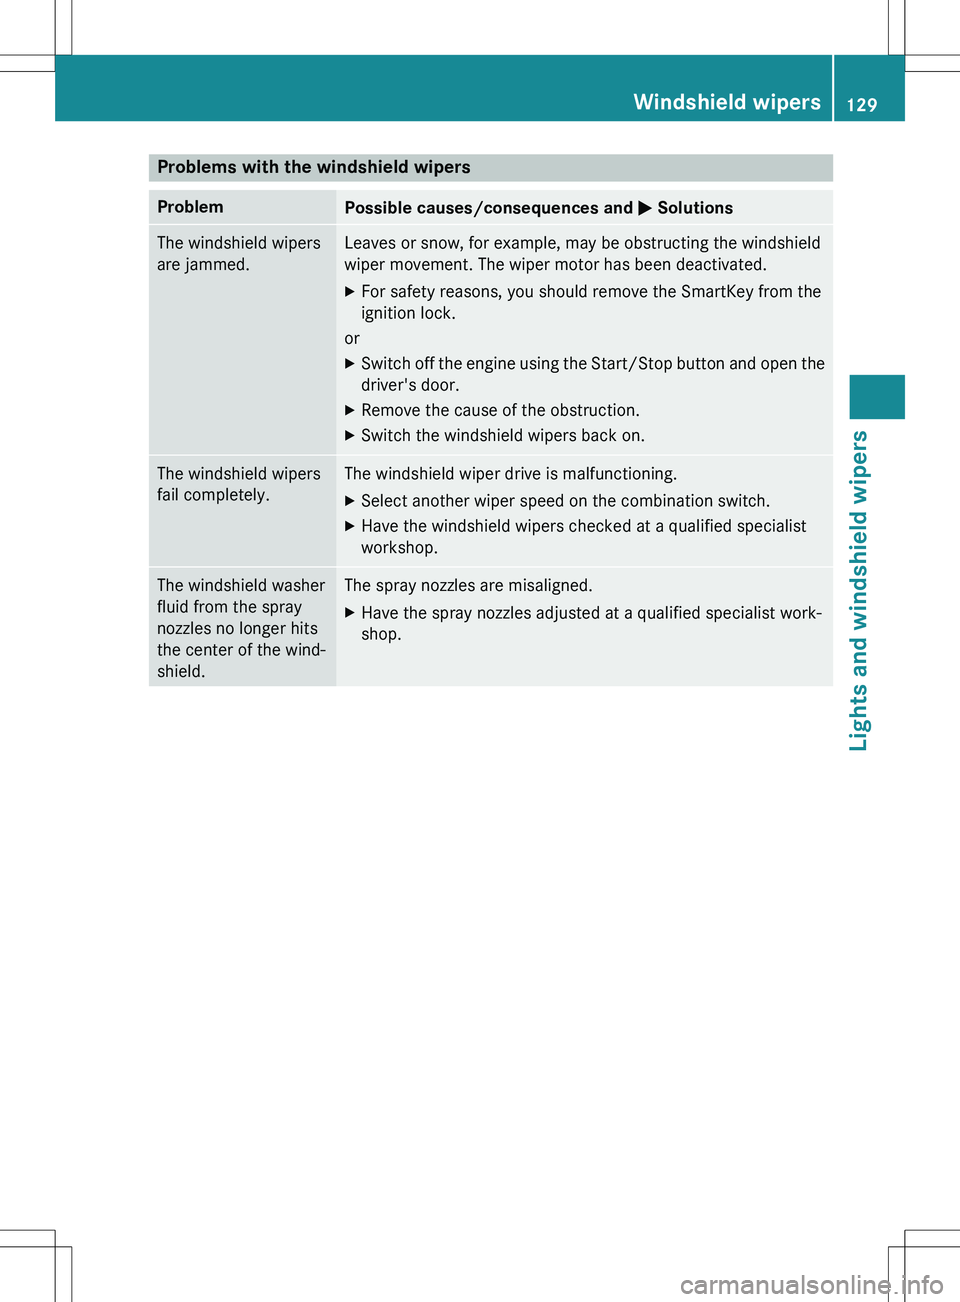
Problems with the windshield wipers
ProblemPossible causes/consequences and M Solutions
The windshield wipers
are jammed.Leaves or snow, for example, may be obstructing the windshield
wiper movement. The wiper motor has been deactivated. X
For safety reasons, you should remove the SmartKey from the
ignition lock.
or X Switch off the engine using the Start/Stop button and o pen the
driver's door.
X Remove the cause of the obstruction.
X Switch the windshield wipers back on.
The windshield wipers
fail completely.The windshield wiper drive is malfunctioning.
X Select another wiper speed on the combination switch.
X Have the windshield wipers checked at a qualified specialist
workshop.
The windshield washer
fluid from the spray
nozzles no longer hits
the center of the wind-
shield.The spray nozzles are misaligned.
X Have the spray nozzles adjusted at a qualified specialist work-
shop.
Windshield wipers129
Lights and windshield wipers
Z
Page 152 of 386
The Start/Stop button must be inserted in theignition lock and the SmartKey must be in the
vehicle.
Pressing the Start/Stop button several times
in succession corresponds to the different
SmartKey positions in the ignition lock. This is
only the case if you are not depressing the
brake pedal.
If you depress the brake pedal and press the
Start/Stop button, the engine starts immedi- ately.
The Start/Stop button can be removed from
the ignition lock. Then, you can insert the
SmartKey into the ignition lock.
iYou do not have to remove the Start/Stop
button from the ignition lock when you
leave the vehicle. You should, however,
always take the SmartKey with you when
leaving the vehicle. The vehicle can be star-
ted with the Start/Stop button if the Smart-
Key is in the vehicle. Electrically powered
equipment can be operated.
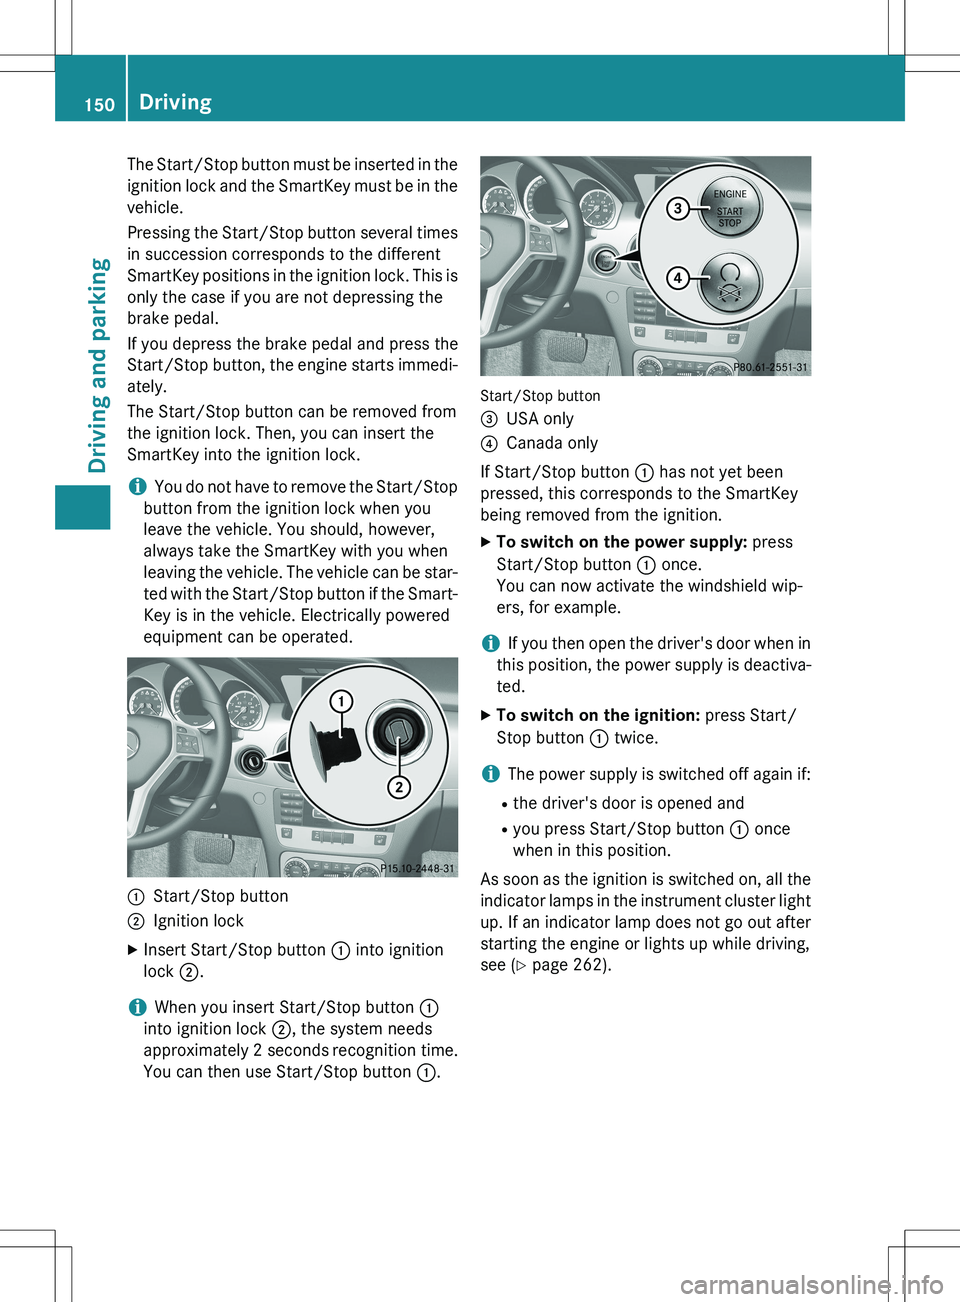
:Start/Stop button
;Ignition lock
X Insert Start/Stop button : into ignition
lock ;.
iWhen you insert Start/Stop button :
into ignition lock ;, the system needs
approximately 2 seconds recognition time.
You can then use Start/Stop button :.
Start/Stop button =
USA only
?Canada only
If Start/Stop button : has not yet been
pressed, this corresponds to the SmartKey
being removed from the ignition.
X To switch on the power supply: press
Start/Stop button : once.
You can now activate the windshield wip-
ers, for example.
iIf you then open the driver's door when in
this position, the power supply is deactiva-
ted.
X To switch on the ignition: press Start/
Stop button : twice.
iThe power supply is switched off again if:
R the driver's door is opened and
R you press Start/Stop button : once
when in this position.
As soon as the ignition is switched on, all the
indicator lamps in the instrument cluster light up. If an indicator lamp does not go out afterstarting the engine or lights up while driving,
see ( Y page 262).
150Driving
Driving and parking
Page 153 of 386
Starting the engine
Important safety notes
GWARNING
If children are left unsupervised in the vehicle, they could:
R open the doors, thus endangering other
people or road users.
R get out and disrupt traffic.
R operate the vehicle's equipment.
Additionally, children could set the vehicle in
motion if, for example, they:
R release the parking brake.
R shifting the automatic transmission out of
park position P
R Start the engine.
There is a risk of an accident and injury.
When leaving the vehicle, always take the
SmartKey with you and lock the vehicle. Never
leave children or animals unattended in the
vehicle. Always keep the SmartKey out of
reach of children.
GWARNING
Combustion engines emit poisonous exhaust
gases such as carbon monoxide. Inhaling
these exhaust gases leads to poisoning. There is a risk of fatal injury. Therefore never leave
the engine running in enclosed spaces with-
out sufficient ventilation.
GWARNING
Flammable materials introduced through
environmental influence or by animals can
ignite if in contact with the exhaust system orparts of the engine that heat up. There is a risk
of fire.
Carry out regular checks to make sure that
there are no flammable foreign materials in
the engine compartment or in the exhaust
system.
! Do not depress the accelerator when
starting the engine.
General notes
iVehicles with a gasoline engine: the
catalytic converter is preheated for up to
30 seconds after a cold start. The sound of the engine may change during this time.
Automatic transmission
X Shift the transmission to position P.
The transmission position display in the
multifunction display shows P.
iYou can also start the engine when the
transmission is in position N.
Starting procedure with the SmartKey
iTo start the engine using the SmartKey
instead of KEYLESS-GO, pull the Start/
Stop button out of the ignition lock.
X To start a gasoline engine: turn the
SmartKey to position 3 in the ignition lock
( Y page 149) and release it as soon as the
engine is running.
X To start a diesel engine: turn the Smart-
Key to position 2 in the ignition lock
( Y page 149).
The % preglow indicator lamp in the
instrument cluster lights up.
X When the % preglow indicator lamp
goes out, turn the SmartKey to position 3
( Y page 149) and release it as soon as the
engine is running.
iYou can start the engine without preglow
if the engine is warm.
Using KEYLESS-GO to start the engine
You can start the engine if a valid SmartKey
with the integrated KEYLESS-GO function is in the vehicle. Always take the SmartKey with
you when leaving the vehicle, even if you only
leave it for a short time. Pay attention to the
important safety notes.
iThe Start/Stop button can be used to
start the vehicle without inserting the
SmartKey into the ignition lock. The Start/
Driving151
Driving and parking
Z