dashboard MERCEDES-BENZ GLK SUV 2008 Owners Manual
[x] Cancel search | Manufacturer: MERCEDES-BENZ, Model Year: 2008, Model line: GLK SUV, Model: MERCEDES-BENZ GLK SUV 2008Pages: 261, PDF Size: 8.67 MB
Page 8 of 261
Selector lever positions.
...................85
Shift ranges. ..................................... 86
Trailer towing. ................................... 88
Axle load, permissible
Rear (trailer towing) ........................254 B
Bag hook............................................. 136
Ball coupling Fitting ............................................. 162
Removing....................................... .165
BAS (Brake Assist)............................... 52
Battery Changing (key).. .............................. 216
Charging. ........................................ 234
Checking (key). ............................... 216
Check lamp (key). ........................... 216
Disconnecting ................................. 233
Display message ............................. 184
Jump-starting. ................................. 234
Maintenance (vehicle)..................... 232
Reconnecting.................................. 234
Removing/fitting. ........................... 233
Vehicle battery. .............................. 232
Belt force limiters
Activation.......................................... 35
Belt height adjustment ........................72
Belt tensioners Activation.......................................... 35
Belt warning.......................................... 72
Bonnet
Bonnet catch .................................. 147
Display message ............................. 183
Opening/closing ............................ 146
Bonnet release lever
Release leve r.................................. 147
Boot
Automatic opening. ....................60, 61
Boot lid
Opening/closing. .............................. 59
Brake Assist
see BAS
Brake fluid .......................................... 248
Display message (luxury multi-
function steering wheel) .................185
Display message (multi-function
steering wheel). .............................. 180Brake lamps
Adaptive............................................ 52
Display message..................... 188, 191
Brakes
Parking brake................................... .84
Warning lamp..................................2 02
Brake system
Display message ............................. 185
Bulb
see Lamp
Bulbs
Brake lamp. .................................... 220
Display messages (multi-function
steering wheel). .............................. 194
Licence plate lamp.......................... 220
Overview. ........................................ 218
Rear foglamp. ................................. 220
Replacing. ....................................... 219
Reversing lamp. .............................. 220
Tail lamp ......................................... 220
Turn signal lamp. ....................219, 220 C
Care..................................................... 167
Automatic car wash. .......................168
Dashboard. ..................................... 170
Headlamps. .................................... 169
High-pressure cleaners. ..................168
Panorama sliding sunroo f............... 170
Parktronic. ...................................... 171
Plastic trim. .................................... 170
Rear window. .................................. 169
Reversing camera. ..........................172
Seat covers.................................... .170
Side windows ................................. 169
Steering wheel boss. ......................170
Tail pipes ........................................ 171
Trailer tow hitch. ............................. 172
Trim strips ...................................... 171
Windscreen. .................................... 169
Wiper blades.. ................................. 169
Wooden strips................................. 171
CD player/CD changer
Operating (on-board computer,
luxury multi-function steering
wheel). .............................................. 99 Index
5 X204_AKB; 1; 5, en-GB
wobuchh,
Version: 2.11.4
2008-10-15T13:20:56+02:00 - Seite 5 Dateiname: 6515_0671_02_buchblock.pdf; preflight
Page 9 of 261
Central locking
Automatic door locking feature
(on-board computer, luxury multi-
function steering wheel). ................104
Key. .................................................. 58
Central locking/unlocking button ......59
Central unlocking Key. .................................................. 58
Centre console
Overview. .......................................... 30
Changing a wheel
see Flat tyre
Checklist (off-road driving)............... 159
Child-proof locks Rear doors. ....................................... 50
Children
In the vehicle. ................................... 41
Restraint systems. ............................ 41
Child seat
Automatic recognition ......................43
Automatic recognition (malfunc-
tion). ............................................... 200
Display message ............................. 182
ISOFIX............................................... 49
Recommendations. ...........................46
Suitable positions. ............................ 44
Cigarette lighter................................. 138
Cleaning the panorama sliding
sunroof................................................ 170
Cleaning the windscreen ..................169
Collapsible wheel Technical data. ............................... 253
COMAND display
Cleaning. ........................................ 170
Constant headlamp mode
see Daytime driving lights
Convenience closing ............................82
Convenience opening ........................... 82
Coolant Checking the level. .........................149
Display message (luxury multi-
function steering wheel) .................186
Display message (multi-function
steering wheel). ......................180, 186
Mixture ratio ................................... 247
Temperature gauge ...........................90
Warning lamp.................................. 202 Cornering lights
Display message ............................. 187
Cruise control..................................... 108
Display message ............................. 182
Cup holder.......................................... 131
Current fuel consumption On-board computer (multi-func-
tion steering wheel). ...................93, 96 D
Dashboard Cleaning. ........................................ 170
see Instrument cluster
Date
Setting (on-board computer,
luxury multi-function steering
wheel). ............................................ 102
Setting (on-board computer,
multi-function steering wheel) ..........93
Daytime driving lights.......................... 75
On-board computer (luxury multi-
function steering wheel) .................102
Delayed switch-off
Exterior lighting (luxury multi-
function steering wheel) .................103
Interior lighting (on-board com-
puter, luxury multi-function steer-
ing wheel). ...................................... 103
Diesel
Low outside temperatures. .............146
Diesel engine
Winter driving. ................................ 146
Digital speedometer............................ .96
Dipped-beam headlamps Display message ............................. 188
Symmetrical. .................................. 162
Display message................................ 176
Display messages Service interval display. ..................167
Symbol messages. ..........................182
Text messages. ............................... 177
Distance recorder
see Total distance recorder
see Trip meter 6 Index
X204_AKB; 1; 5, en-GB
wobuchh,
Version: 2.11.4 2008-10-15T13:20:56+02:00 - Seite 6Dateiname: 6515_0671_02_buchblock.pdf; preflight
Page 11 of 261
Engine oil
........................................... 246
Consumption ................................. 148
Display message ............................. 195
Filler neck. ...................................... 148
Topping up. ..................................... 148
ESP ®
(Electronic Stability Program)... 52
Activating/deactivating ....................53
Display message (luxury multi-
function steering wheel) .........179, 183
Display message (multi-function
steering wheel). ......................178, 179
Trailer stabilisatio n........................... 53
Warning lamp. .......................... 52, 201
ETS (Electronic Traction Support)...... .53
Exterior lighting Delayed switch-off (luxury multi-
function steering wheel). ................103
Exterior mirrors
Adjusting .......................................... 67
Anti-dazzle mode (automatic). ..........68
Folding in/out (automatically). .........68
Folding in/out (electrically). .............68
Folding in (on-board computer,
luxury multi-function steering
wheel). ............................................ 104
Malfunction..................................... 211
Parking position. ............................... 69
Resetting. ......................................... 68
Storing settings ................................ 69
Exterior view
Overview. .......................................... 22F
Fire extinguisher................................ 174
First-aid kit ......................................... 174
Flat tyre Equipment. ..................................... 222
Preparing the vehicle. .....................222
TIREFIT kit....................................... 222
Floormat............................................. .141
Foglamps Display message ............................. 193
Fording........................................ 157, 161
Frequencies Telephone. ...................................... 244
Front airbag .......................................... 38
Front-passenger airbag ........................ 38Fuel......................................................
245
Diesel. ............................................ 145
Loss. ............................................... 206
Petrol .............................................. 145
Fuel consumption................................. 95
Current (on-board computer,
multi-function steering wheel)
................................................... 93, 96
Notes..................................... .242, 246
Vehicle data. ................................... 249
see Trip computer(on-board computer)
Fuel filler flap
Emergency release. ........................215
Opening/closing ............................ 144
Fuel filter
Display message (luxury multi-
function steering wheel) .................187
Display message (multi-function
steering wheel). .............................. 180
Fuel level
Calling up the range (on-board
computer, luxury multi-function
steering wheel). ................................ 96
Calling up the range (on-board
computer, multi-function steering
wheel). .............................................. 93
Display. ....................................... 24, 26
Fuel line
Malfunction..................................... 206
Fuel tank
Defect ............................................. 206
Fuse allocation chart......................... 239
Fuse box Dashboard. ..................................... 239
Engine compartment ......................239
Luggage compartment. ...................240
Fuses................................................... 238 G
Genuine Mercedes-Benz parts.......... 242
Glove compartment ...........................130
Gradient-climbing capability (max-
imum).................................................. 1608 Index
X204_AKB; 1; 5, en-GB
wobuchh,
Version: 2.11.4 2008-10-15T13:20:56+02:00 - Seite 8Dateiname: 6515_0671_02_buchblock.pdf; preflight
Page 40 of 261
have belt tensioners which have been trig-
gered replaced at a qualified specialist work-
shop.
Comply with safety regulations when dispos-
ing of belt tensioners. Any Mercedes-Benz
Service Centre can provide details of these
regulations.
Airbags Airbag deployment slows down and restricts
the movement of the vehicle occupant.
If the airbags are deployed, you will hear a
bang and a small amount of powder may also
be released. Only in rare cases will the bang
affect your hearing. The powder that escapes
does not generally constitute a health hazard.
The 6 warning lamp lights up.
The AIRBAG identification indicates the loca-
tion of the airbags. G
Risk of injury
Airbags provide additional protection; they
are not, however, a substitute for seat belts.
Observe the following notes to reduce the risk
of serious or even fatal injury if an airbag is
deployed:
R all vehicle occupants ― in particular preg-
nant women ― must wear their seat belt
correctly at all times and lean back against
the backrest, which should be positioned
as close to the vertical as possible. The
head restraint must support the back of the
head at about eye level.
R always secure children less than 1.50 m tall
or under 12 years of age in suitable child
restraint systems.
R all vehicle occupants must select a seat
position that is as far away from the airbag
as possible. The driver's seat position must
allow the vehicle to be driven safely. The
driver's chest should be as far away from
the middle of the driver's front airbag cover
as possible. R
move the front-passenger's seat as far
back as possible, especially if a child is
secured in a child restraint system on the
seat.
R vehicle occupants – in particular, children
– must not lean their head into the area of
the window in which the sidebag/window-
bag is deployed.
R rearward-facing child restraint systems
must not be fitted to the front-passenger's
seat unless the front-passenger front air-
bag has been disabled. The front-passenger
front airbag of a vehicle fitted with auto-
matic child seat recognition* is only disa-
bled when a child restraint system with
automatic child seat recognition is fitted to
the front-passenger's seat. The
4 PASSENGER AIRBAG OFF warning
lamp must be continuously lit.
If the front-passenger's seat of your vehicle
does not have automatic child seat recog-
nition*, or your rearward-facing child
restraint system does not have automatic
child seat recognition, children must be
secured in a child restraint system on a
suitable seat in the rear. If you secure a
forward-facing child restraint system to the
front-passenger's seat, you must move the
front-passenger's seat as far back as pos-
sible.
R make sure there are no heavy or sharp-
edged objects in pockets of clothing.
R do not lean forwards, e.g. over the cover of
the driver's/front-passenger front airbag,
particularly when the vehicle is in motion.
R do not put your feet on the dashboard.
R only hold the steering wheel by the rim. This
allows the airbag to inflate fully. You could
be injured if the airbag is deployed and you
are holding the inside of the steering wheel.
R do not lean on the doors from inside the
vehicle. Occupant safety
37Safety
* optional
X204_AKB; 1; 5, en-GB
wobuchh,
Version: 2.11.4 2008-10-15T13:20:56+02:00 - Seite 37 ZDateiname: 6515_0671_02_buchblock.pdf; preflight
Page 46 of 261
4
PASSENGER AIRBAG OFF warning
lamp is not lit.
To draw attention to this danger, a corre-
sponding warning sticker on the dashboard
and on both sides of the sun visor on the front-
passenger side.
Information about recommended child
restraint systems is available at any
Mercedes-Benz Service Centre.
Automatic child seat recognition on the
front-passenger seat*
If your vehicle does not have automatic child
seat recognition on the front-passenger seat,
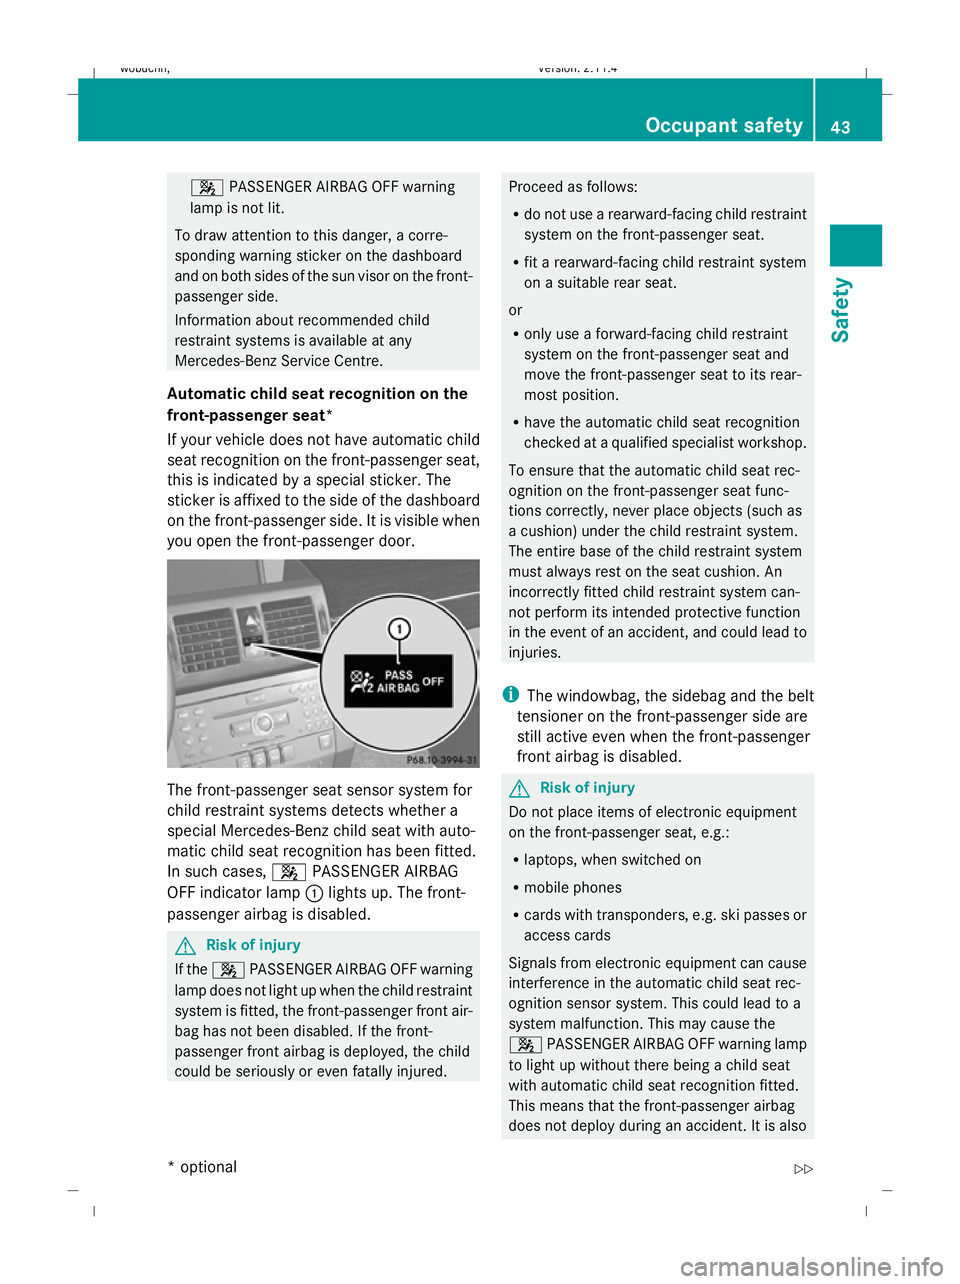
this is indicated by a special sticker. The
sticker is affixed to the side of the dashboard
on the front-passenger side. It is visible when
you open the front-passenger door. The front-passenger seat sensor system for
child restraint systems detects whether a
special Mercedes-Benz child seat with auto-
matic child seat recognition has been fitted.
In such cases, 4PASSENGER AIRBAG
OFF indicator lamp :lights up. The front-
passenger airbag is disabled. G
Risk of injury
If the 4 PASSENGER AIRBAG OFF warning
lamp does not light up when the child restraint
system is fitted, the front-passenger front air-
bag has not been disabled. If the front-
passenger front airbag is deployed, the child
could be seriously or even fatally injured. Proceed as follows:
R
do not use a rearward-facing child restraint
system on the front-passenger seat.
R fit a rearward-facing child restraint system
on a suitable rear seat.
or
R only use a forward-facing child restraint
system on the front-passenger seat and
move the front-passenger seat to its rear-
most position.
R have the automatic child seat recognition
checked at a qualified specialist workshop.
To ensure that the automatic child seat rec-
ognition on the front-passenger seat func-
tions correctly, never place objects (such as
a cushion) under the child restraint system.
The entire base of the child restraint system
must always rest on the seat cushion. An
incorrectly fitted child restraint system can-
not perform its intended protective function
in the event of an accident, and could lead to
injuries.
i The windowbag, the sidebag and the belt
tensioner on the front-passenger side are
still active even when the front-passenger
front airbag is disabled. G
Risk of injury
Do not place items of electronic equipment
on the front-passenger seat, e.g.:
R laptops, when switched on
R mobile phones
R cards with transponders, e.g. ski passes or
access cards
Signals from electronic equipment can cause
interference in the automatic child seat rec-
ognition sensor system. This could lead to a
system malfunction. This may cause the
4 PASSENGER AIRBAG OFF warning lamp
to light up without there being a child seat
with automatic child seat recognition fitted.
This means that the front-passenger airbag
does not deploy during an accident. It is also Occupant safety
43Safety
* optional
X204_AKB; 1; 5, en-GB
wobuchh,
Version: 2.11.4 2008-10-15T13:20:56+02:00 - Seite 43 ZDateiname: 6515_0671_02_buchblock.pdf; preflight
Page 117 of 261
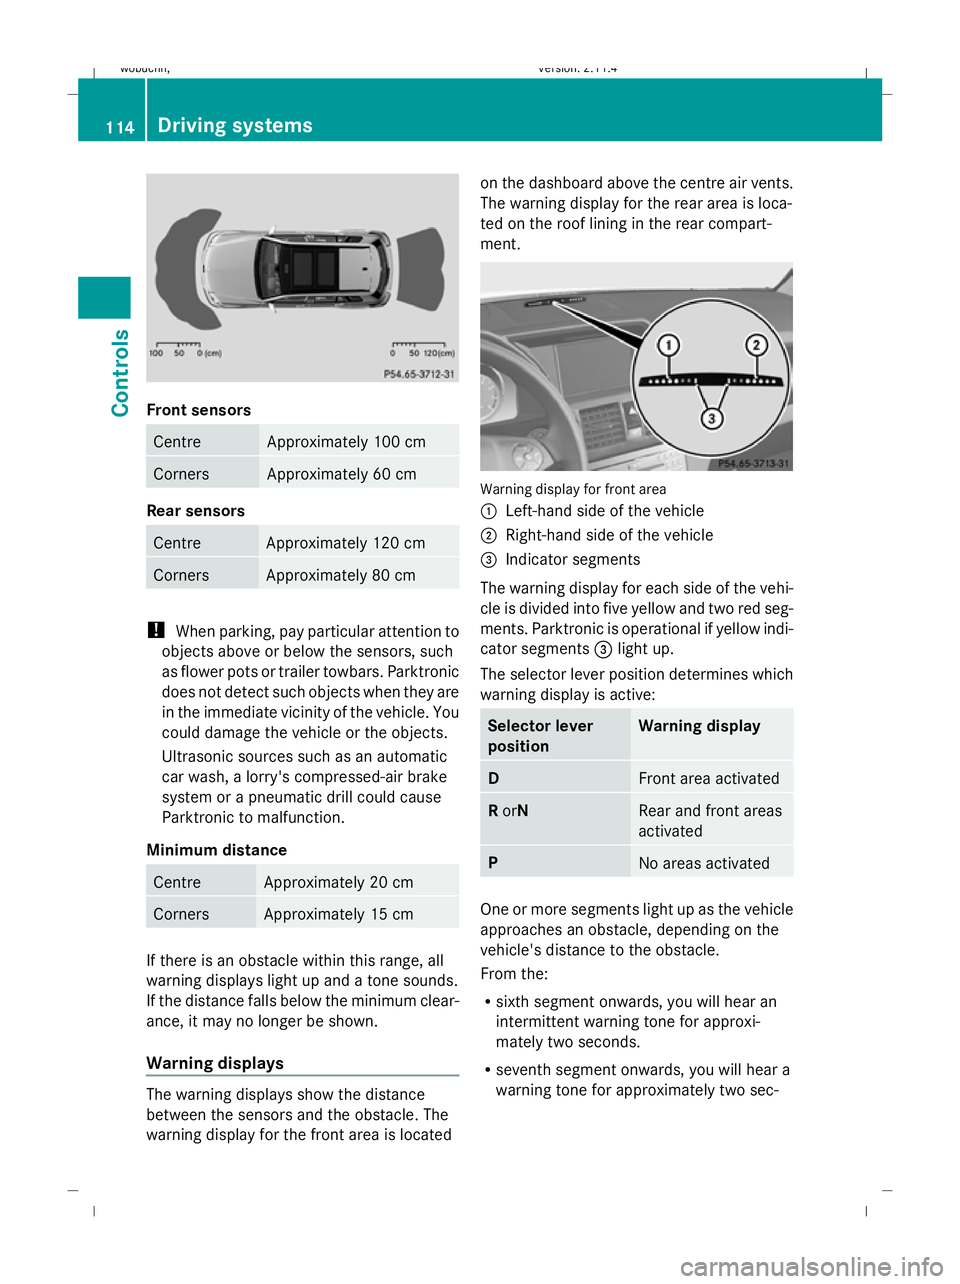
Front sensors
Centre Approximately 100 cm
Corners Approximately 60 cm
Rear sensors
Centre Approximately 120 cm
Corners Approximately 80 cm
!
When parking, pay particular attention to
objects above or below the sensors, such
as flower pots or trailer towbars. Parktronic
does not detect such objects when they are
in the immediate vicinity of the vehicle. You
could damage the vehicle or the objects.
Ultrasonic sources such as an automatic
car wash, a lorry's compressed-air brake
system or a pneumatic drill could cause
Parktronic to malfunction.
Minimum distance Centre Approximately 20 cm
Corners Approximately 15 cm
If there is an obstacle within this range, all
warning displays light up and a tone sounds.
If the distance falls below the minimum clear-
ance, it may no longer be shown.
Warning displays The warning displays show the distance
between the sensors and the obstacle. The
warning display for the front area is located on the dashboard above the centre air vents.
The warning display for the rear area is loca-
ted on the roof lining in the rear compart-
ment.
Warning display for front area
:
Left-hand side of the vehicle
; Right-hand side of the vehicle
= Indicator segments
The warning display for each side of the vehi-
cle is divided into five yellow and two red seg-
ments. Parktronic is operational if yellow indi-
cator segments =light up.
The selector lever position determines which
warning display is active: Selector lever
position Warning display
D
Front area activated
R
orN Rear and front areas
activated
P
No areas activated
One or more segments light up as the vehicle
approaches an obstacle, depending on the
vehicle's distance to the obstacle.
From the:
R
sixth segment onwards, you will hear an
intermittent warning tone for approxi-
mately two seconds.
R seventh segment onwards, you will hear a
warning tone for approximately two sec- 114 Driving systemsControls
X204_AKB; 1; 5, en-GB
wobuchh,
Version: 2.11.4 2008-10-15T13:20:56+02:00 - Seite 114Dateiname: 6515_0671_02_buchblock.pdf; preflight
Page 142 of 261
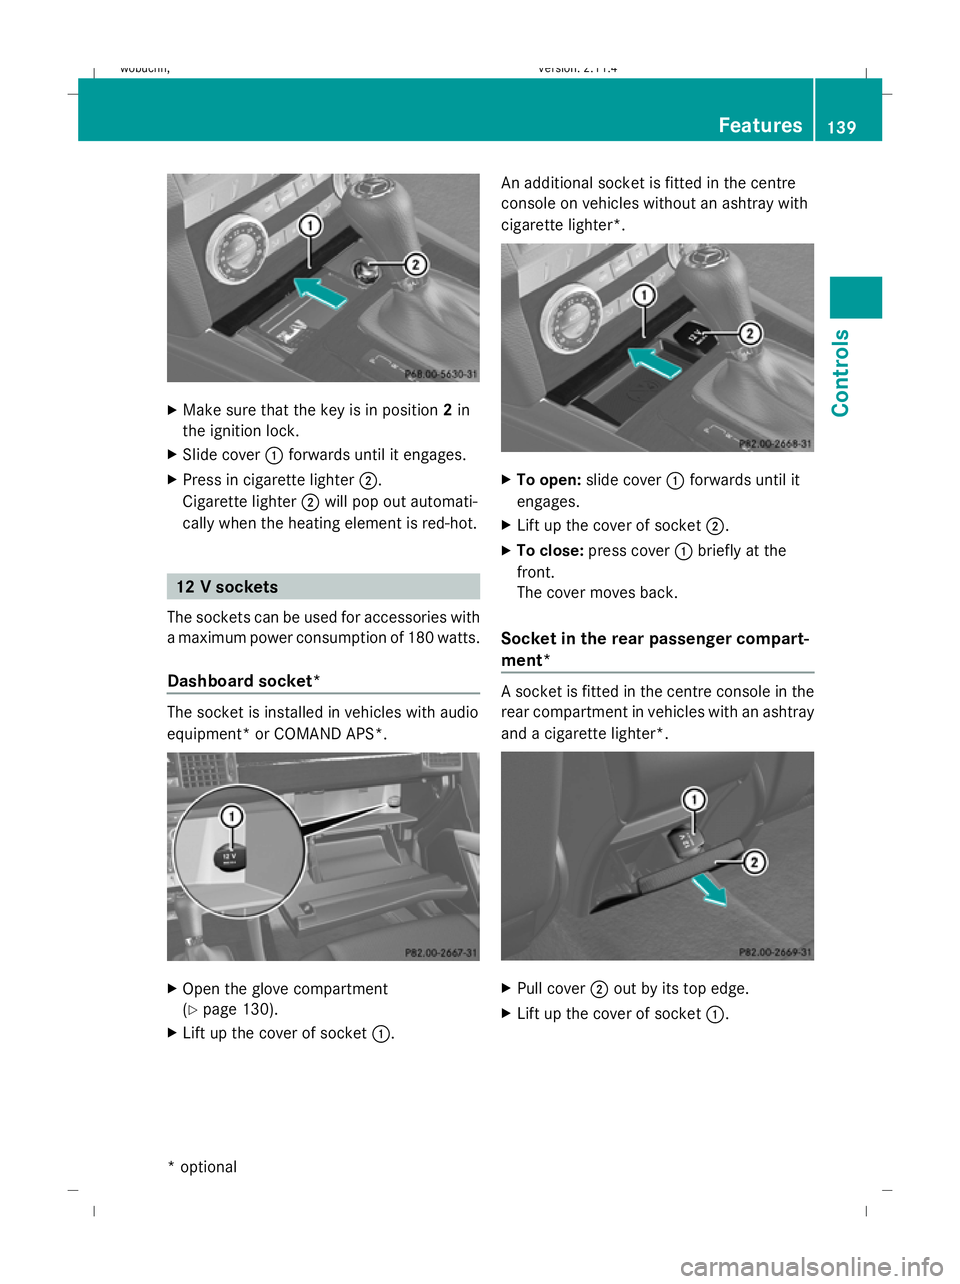
X
Make sure that the key is in position 2in
the ignition lock.
X Slide cover :forwards until it engages.
X Press in cigarette lighter ;.
Cigarette lighter ;will pop out automati-
cally when the heating element is red-hot. 12 V sockets
The sockets can be used for accessories with
a maximum power consumption of 180 watts.
Dashboard socket* The socket is installed in vehicles with audio
equipment* or COMAND APS*. X
Open the glove compartment
(Y page 130).
X Lift up the cover of socket :.An additional socket is fitted in the centre
console on vehicles without an ashtray with
cigarette lighter*.
X
To open: slide cover :forwards until it
engages.
X Lift up the cover of socket ;.
X To close: press cover :briefly at the
front.
The cover moves back.
Socket in the rear passenger compart-
ment* A socket is fitted in the centre console in the
rear compartment in vehicles with an ashtray
and a cigarette lighter*.
X
Pull cover ;out by its top edge.
X Lift up the cover of socket :. Features
139Controls
* optional
X204_AKB; 1; 5, en-GB
wobuchh,
Version: 2.11.4
2008-10-15T13:20:56+02:00 - Seite 139 ZDateiname: 6515_0671_02_buchblock.pdf; preflight
Page 173 of 261
Otherwise, you could scratch or damage
the surface of the lenses.
Cleaning the panorama sliding sun-
roof* A protective film is laminated to the rear glass
element of the panorama sliding sunroof.
! Do not use any of the following to clean
the protective film:
R dry cloths
R abrasive cleaning agents
R solvents
R cleaning agents containing solvent
Do not touch the protective film with hard
objects, e.g. ice scrapers or rings. Other-
wise, you could scratch or damage the sur-
face of the protective film.
Cleaning the plastic trim !
Do not use dry, coarse or hard cloths and
do not scrub. Doing so will scratch or dam-
age the surfaces.
! Ensure that cosmetics and suntan lotion
do not come into contact with the vehicle's
trim. This will protect the vehicle's high-
quality trim and help retain its overall
appearance.
X Wipe plastic parts with a damp, lint-free
cloth (e.g. a microfibre cloth).
X Light soiling: use a low-foaming soap (e.g.
a light liquid hand soap) diluted in water.
X Heavy soiling: use a cleaning agent that is
solvent-free and non-corrosive. Mercedes-
Benz recommends that you use a
Mercedes-Benz cleaning product for this
purpose. Cleaning the steering wheel boss and
dashboard X
Moisten a clean lint-free cloth with water.
X Clean the plastic parts and the dashboard.
X If particularly dirty, use a mild detergent. G
Risk of injury
Do not use cleaners and cockpit care sprays
containing solvents to clean the cockpit and
steering wheel boss. Cleaners containing sol-
vents cause the surface to become porous
and in the event of an airbag being triggered,
plastic parts that have become loose could
cause considerable injuries.
Cleaning the COMAND display X
When cleaning the display, make sure that
it is switched off and has cooled down.
X Clean the display's surface with a conven-
tional micro-fibre cloth and cleaning agent
for TFT/LCD displays.
X Dry the display's surface with a dry micro-
fibre cloth.
! Never use any of the following:
R alcohol-based thinner or petrol
R abrasive cleaning agents
R conventional household cleaning agents
These can damage the display's surface.
Do not press the display's surface during
cleaning: this could lead to irreversible
damage.
Cleaning the seat covers !
Do not use a microfibre cloth to clean
genuine leather and artificial leather cov-
ers, as it is too aggressive and, if used
often, may damage the cover.
! You should clean:
R genuine leather covers using a damp
cloth, then wipe the covers down using a
dry cloth. Make sure that the leather 170 CareOperation
* optional
X204_AKB; 1; 5, en-GB
wobuchh,
Version: 2.11.4 2008-10-15T13:20:56+02:00 - Seite 170Dateiname: 6515_0671_02_buchblock.pdf; preflight
Page 242 of 261
correct fuse rating for the systems con-
cerned. Do not attempt to repair or bridge
faulty fuses. Otherwise, a circuit overload
could cause a fire. Have the cause traced and
rectified at a qualified specialist workshop,
e.g. a Mercedes-Benz Service Centre.
If the newly inserted fuse also blows, have the
cause traced and rectified at a qualified spe-
cialist workshop, e.g. a Mercedes-Benz
Service Centre.
! Only use fuses that have been approved
for Mercedes-Benz vehicles and which
have the correct fuse rating for the system
concerned. Otherwise, components or sys-
tems could be damaged.
The fuses are located in various fuse boxes:
R fuse box on the driver's side of the dash-
board*
R fuse box in the engine compartment on the
driver's side
R fuse box in the stowage well under the lug-
gage compartment floor on the right-hand
side of the vehicle
Fuse allocation chart The fuse allocation chart is located with the
vehicle tool kit (Y
page 175) in the stowage
compartment under the luggage compart-
ment floor. Before changing a fuse
X Park the vehicle.
X Switch off all electrical consumers.
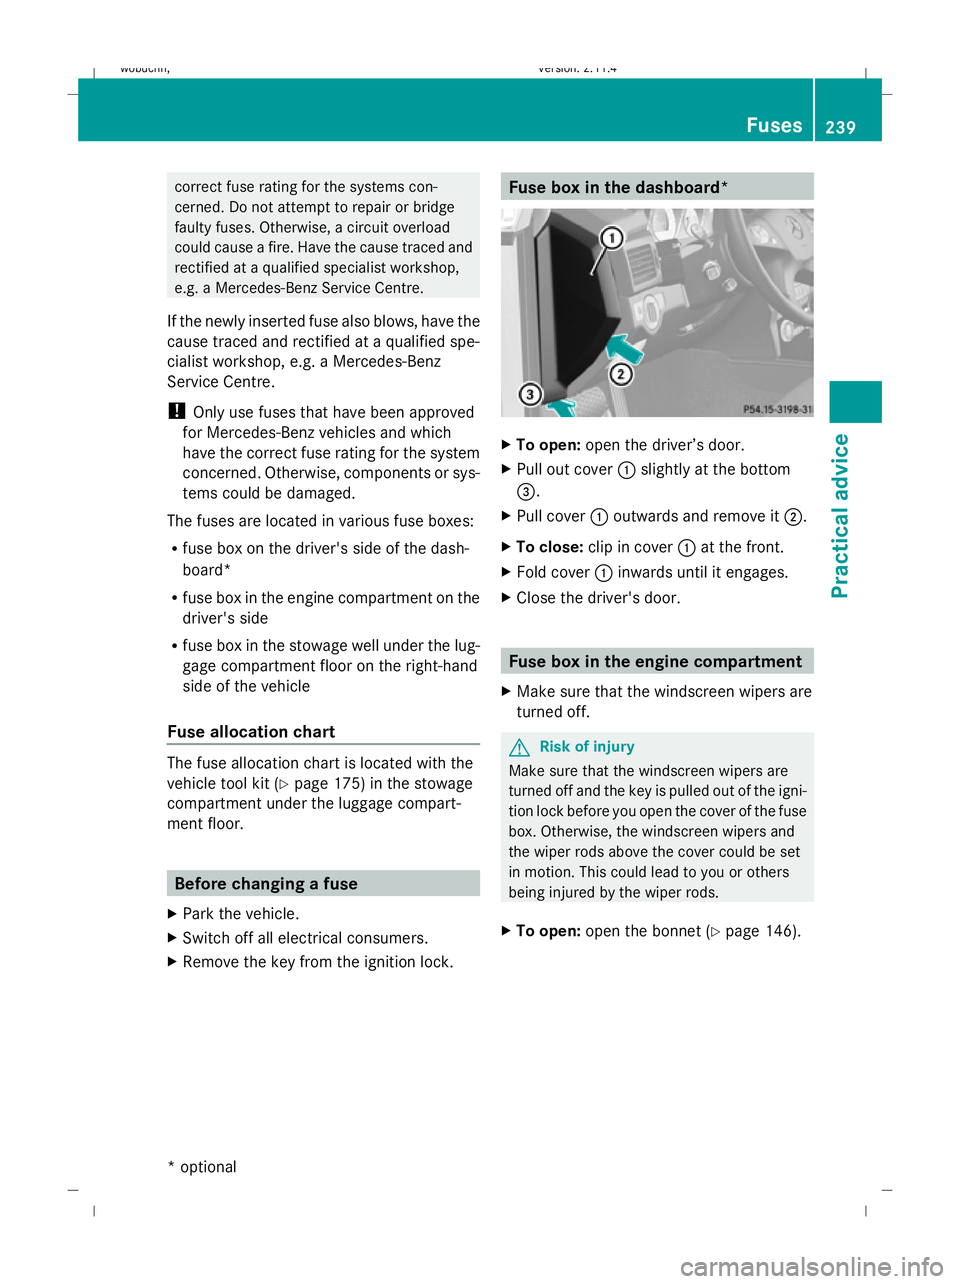
X Remove the key from the ignition lock. Fuse box in the dashboard*
X
To open: open the driver’s door.
X Pull out cover :slightly at the bottom
=.
X Pull cover :outwards and remove it ;.
X To close: clip in cover :at the front.
X Fold cover :inwards until it engages.
X Close the driver's door. Fuse box in the engine compartment
X Make sure that the windscreen wipers are
turned off. G
Risk of injury
Make sure that the windscreen wipers are
turned off and the key is pulled out of the igni-
tion lock before you open the cover of the fuse
box. Otherwise, the windscreen wipers and
the wiper rods above the cover could be set
in motion. This could lead to you or others
being injured by the wiper rods.
X To open: open the bonnet (Y page 146). Fuses
239Practical advice
* optional
X204_AKB; 1; 5, en-GB
wobuchh,
Version: 2.11.4 2008-10-15T13:20:56+02:00 - Seite 239 ZDateiname: 6515_0671_02_buchblock.pdf; preflight