brake light MERCEDES-BENZ GLK SUV 2012 Owners Manual
[x] Cancel search | Manufacturer: MERCEDES-BENZ, Model Year: 2012, Model line: GLK SUV, Model: MERCEDES-BENZ GLK SUV 2012Pages: 381, PDF Size: 12.68 MB
Page 7 of 381
1, 2, 3 ...
12-button multifunction steering
wheel Operating the on-board computer .228
Overview .......................................... 36
12 V socket
see Socket
4-button multifunction steering
wheel
Operating the on-board computer .225
Overview .......................................... 35
4ETS
see ETS/4ETS (Electronic Trac-
tion System)
4MATIC (permanent four-wheel
drive) .................................................. 213A
ABS (Anti-lock Braking System) Display message (12-button mul-
tifunction steering wheel) ..............252
Display message (4-button multi-
function steering wheel) ................247
Function/notes ................................ 65
Important safety notes ....................65
Warning lamp ................................. 286
Activating/deactivating air-recir-
culation mode .................................... 135
Activating/deactivating cooling
with air dehumidification .................131
Active Blind Spot Assist Function/notes ............................. 207
Switching on/off (on-board com-
puter, 12-button multifunction
steering wheel) .............................. 237
Towing a trailer .............................. 210
Active Driving Assistance package .207
Active Lane Keeping Assist Display message (12-button mul-
tifunction steering wheel) ..............273
Function/notes ............................. 210
Switching on/off (on-board com-
puter, 12-button multifunction
steering wheel) .............................. 238
Towing a trailer ......................207, 213
Active light function .........................114Active Park Assist
Display message ............................ 273
Active Parking Assist
Important safety notes ..................192
Towing a trailer .............................. 196
Active Service System
see ASSYST PLUS
Adaptive brake lamps .........................67
Adaptive Highbeam Assist Display message (12-button mul-
tifunction steering wheel) ..............263
Function/notes ............................. 116
Adaptive Main-beam Assist
Switching on/off (on-board com-
puter) ............................................. 240
AdBlue ®
Display message (12-button mul-
tifunction steering wheel) ..............269
Display message (4-button multi-
function steering wheel) ................266
Filling capacity ............................... 369
Notes ............................................. 368
Service indicator ............................ 313
AdBlue ®
service indicator ................313
Additional speedometer ...................239
Additives (engine oil) ........................370
Adjusting the headlamp range .........112
Airbags Front airbag (driver, front
passenger) ....................................... 46
Important safety guidelines .............44
Kneebag .......................................... .46
Pelvis airbag .................................... 47
Sidebag ............................................ 47
Triggering ......................................... 43
Windowba g...................................... 48
Air-conditioning system
see Climate control
Air filter
Display message (12-button mul-
tifunction steering wheel) ..............268
Display message (4-button multi-
function steering wheel) ................265
Air pressure
see Tyre pressure 4
Index
Page 16 of 381
Fuse box in the luggage compart-
ment
.............................................. 347
Important safety notes ..................346 G
Gear or selector lever (cleaning
instructions) ...................................... 322
Genuine Mercedes-Benz parts .........362
Glove compartment ..........................297 H
Handbrake see Parking brake
Hazard warning lamps ......................114
Headlamp Cleaning system (function) ............114
Cleaning system (notes) ................372
Headlamps
Misting up ...................................... 117
Topping up the cleaning system ....317
see Automatic headlamp mode
Head restraints
Adjusting ......................................... 98
Adjusting (electrically) .....................99
Adjusting (manually). .......................98
Adjusting (rear) ................................ 99
Fitting/removing (rear) ....................99
see NECK-PRO head restraints
see NECK-PRO head restraints/
NECK-PRO luxury head restraints
Heating
see Climate control
High-pressure cleaners ....................318
Hill start assist .................................. 150
HOLD function Display message (12-button mul-
tifunction steering wheel) ..............271
Display message (4-button multi-
function steering wheel) ................270
Function/notes ............................. 186 I
Ignition lock see Key positions
Immobiliser .......................................... 71Indicator and warning lamps
Coolant .......................................... 292
DISTRONIC PLUS ........................... 294
Engine diagnostics .........................291
Fuel tank ........................................ 292
Overview (12-button multifunc-
tion steering wheel) .........................34
Overview (4-button multifunction
steering wheel) ................................ 32
Indicator lamps
see Warning and indicator lamps
Insect protection on the radiator ....315
Inspection see ASSYST PLUS
Instrument cluster (12-button mul-
tifunction steering wheel)
Indicator and warning lamps ............34
Overview .......................................... 33
Settings ......................................... 238
Instrument cluster (4-button mul-
tifunction steering wheel)
Indicator and warning lamps ............32
Overview .......................................... 31
Instrument cluster lighting ..............239
Multifunction steering wheel with
4 buttons ....................................... 224
Intelligent Light System
Activating/deactivating (12-but-
ton multifunction steering wheel) ..240
Display message (12-button mul-
tifunction steering wheel) ..............263
Overview ........................................ 114
Interior lighting ................................. 117
Automatic control system ..............118
Delayed switch-off (12-button
multifunction steering wheel) ........241
Emergency lighting ........................118
Manual control ............................... 118
Overview ........................................ 117
Reading lamp ................................. 117
Setting brightness for display/
switches (on-board computer) .......239
Interior motion sensor ........................73
ISOFIX child seat securing system ....57 Index
13
Page 33 of 381
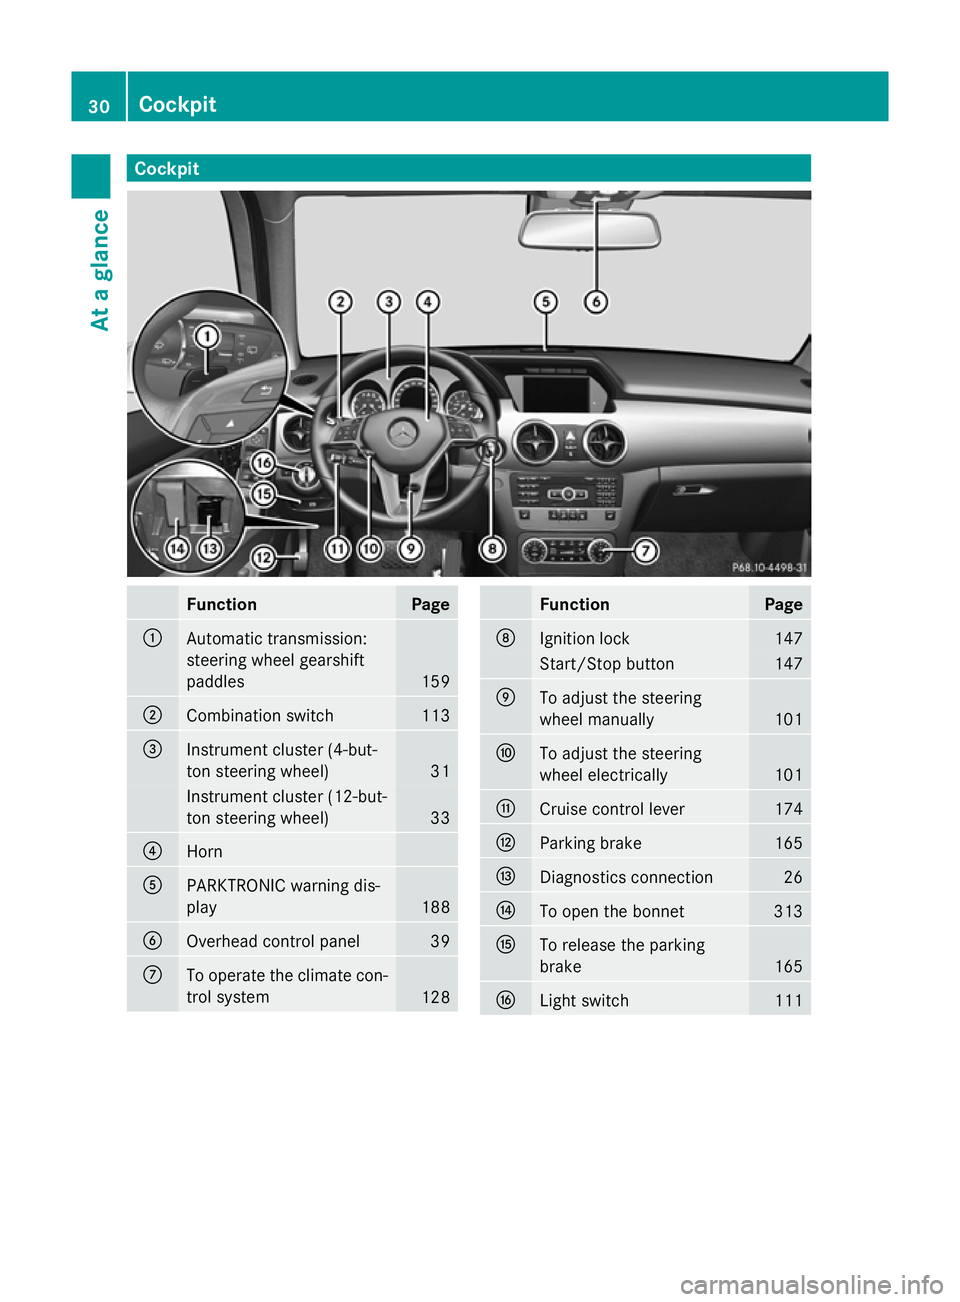
Cockpit
Function Page
:
Automatic transmission:
steering wheel gearshift
paddles
159
;
Combination switch 113
=
Instrument cluster (4-but-
ton steering wheel)
31
Instrument cluster (12-but-
ton steering wheel) 33
?
Horn
A
PARKTRONIC warning dis-
play
188
B
Overhead control panel 39
C
To operate the climate con-
trol system
128 Function Page
D
Ignition lock 147
Start/Stop button 147
E
To adjust the steering
wheel manually
101
F
To adjust the steering
wheel electrically
101
G
Cruise control lever 174
H
Parking brake 165
I
Diagnostics connection 26
J
To open the bonnet 313
K
To release the parking
brake
165
L
Light switch 11130
CockpitAt a glance
Page 68 of 381
X
To activate/deactivate: press button;.
If indicator lamp :is lit, operation of the
rear side windows is disabled. Operation is
only possible using the switches in the driv-
er's door. If indicator lamp :is off, oper-
ation is possible using the switches in the
rear compartment. Driving safety systems
Driving safety systems overview
In this section, you will find information about
the following driving safety systems:
R ABS ( Anti-lock BrakingSystem)
R BAS ( Brake Assist System)
R Adaptive brake lamps
R ESP ®
(Electronic StabilityProgram)
R EBD ( electronic brake force distribution) Important safety notes
If you fail to adapt your driving style or if you
are inattentive, the driving safety systems can
neither reduce the risk of accident nor over-
ride the laws of physics. Driving safety sys-
tems are merely aids designed to assist driv-
ing. You are responsible for the distance to
the vehicle in front, for vehicle speed and for
braking in good time. Always adapt your driv-
ing style to suit the prevailing road and
weather conditions and maintain a safe dis-
tance from the vehicle in front. Drive care-
fully.
i The driving safety systems described only
work as effectively as possible when there
is adequate contact between the tyres and
the road surface. Please pay special atten-
tion to the notes on tyres, recommended
minimum tyre tread depths, etc.
(Y page 350).
In wintry driving conditions, always use
winter tyres (M+S tyres) and, if necessary,
snow chains. Only in this way will the driv- ing safety systems described in this section
work as effectively as possible. ABS (Anti-lock Braking System)
Important safety notes i
Observe the "Important safety notes" sec-
tion (Y page 65). G
WARNING
If ABS is faulty, the wheels could lock when
braking. The steerability and braking charac-
teristics may be severely impaired. Addition-
ally, further driving safety systems are deac-
tivated. There is an increased danger of skid-
ding and accidents.
Drive on carefully. Have ABS checked imme-
diately at a qualified specialist workshop.
If ABS is malfunctioning, other systems,
including driving safety systems, will also
become inoperative. Observe the information
on the ABS warning lamp ( Ypage 286) and
any display messages that may appear in the
instrument cluster (Y page 247) or
(Y page 252).
ABS regulates brake pressure in such a way
that the wheels do not lock when you brake.
This allows you to continue steering the vehi-
cle when braking.
ABS works from a speed of about 8 km/h
upwards, regardless of road-surface condi-
tions. ABS works on slippery surfaces, even
when you only brake gently.
The yellow !ABS warning lamp in the
instrument cluster lights up when the ignition
is switched on. It goes out when the engine is
running.
Brakes X
If ABS intervenes: continue to depress the
brake pedal with force until the braking sit-
uation is over.
X To make a full brake application:
depress the brake pedal with full force. Driving safety systems
65Safety Z
Page 70 of 381
Vehicles without COMAND and a navigation
system and vehicles for Australia: the radar
sensor system and on-board computer must
be switched off in the vicinity of radio tele-
scope facilities (Y page 242).
For BAS PLUS to assist you when driving, the
radar sensor system must:
R be switched on (Y page 242)
R be operational (Y page 272)
If the radar sensor system is malfunctioning,
BAS PLUS will not be available. The brake
system is still available with complete brake
boosting effect and BAS. G
WARNING
BAS PLUS cannot always clearly identify
objects and complex traffic situations. BAS
PLUS cannot intervene in these cases. There
is a risk of an accident.
Always pay careful attention to the traffic sit-
uation and be ready to brake.
In particular, the detection of obstacles can
be impaired if there is:
R dirt on the sensors or anything else cover-
ing the sensors
R snow or heavy rain
R interference by other radar sources
R the possibility of strong radar reflections,
for example, in multi-storey car parks
R a narrow vehicle travelling in front, e.g. a
motorcycle
R a vehicle travelling in front on a different
line G
WARNING
BAS PLUS does not react:
R to people or animals
R to oncoming vehicles
R to crossing traffic
R when cornering
As a result, BAS PLUS may not intervene in all
critical situations. There is a risk of an acci-
dent. Always pay careful attention to the traffic sit-
uation and be ready to brake.
Following damage to the front end of the vehi-
cle, have the configuration and operation of
the radar sensors checked at a qualified spe-
cialist workshop. This also applies to colli-
sions at slow speeds where there is no visible
damage to the front of the vehicle. Adaptive brake lamps
i Adaptive brake lamps are only available in
certain countries.
If you brake sharply from a speed of more
than 50 km/h or if braking is assisted by BAS,
the brake lamps flash rapidly. In this way,
traffic travelling behind you is warned in an
even more noticeable manner.
If you brake sharply from a speed of more
than 70 km/h to a standstill, the hazard warn-
ing lamps are activated automatically. If the
brakes are applied again, the brake lamps
light up continuously. The hazard warning
lamps switch off automatically if you travel
faster than 10 km/h. You can also switch off
the hazard warning lamps using the hazard
warning switch button (Y page 114). ESP
®
(Electronic Stability Program)
Important safety notes i
Observe the "Important safety notes" sec-
tion (Y page 65). G
WARNING
If ESP ®
is malfunctioning, ESP ®
is unable to
stabilise the vehicle. In addition, other driving
safety systems are switched off. This increa-
ses the risk of skidding and an accident.
Drive on carefully. Have ESP ®
checked at a
qualified specialist workshop. Driving safety systems
67Safety Z
Page 71 of 381
!
Switch the ignition off when:
R the parking brake is being tested using a
dynamometer
R the vehicle is being towed with the front/
rear axle raised
Application of the brakes by ESP ®
may oth-
erwise destroy the brake system.
! Do not tow vehicles with 4MATIC with the
front or rear axle raised.
ESP ®
is deactivated if the åwarning lamp
in the instrument cluster lights up continu-
ously when the engine is running.
If the ÷ warning lamp and the åwarn-
ing lamp are lit continuously, ESP ®
is not
available due to a malfunction.
Observe the information on warning lamps
(Y page 288) and any display messages that
appear in the instrument cluster
(Y page 247) or (Y page 252).
If ESP ®
detects that the vehicle is deviating
from the direction desired by the driver, one
or more wheels are braked to stabilise the
vehicle. If necessary, the engine output is also
modified to keep the vehicle on the desired
course within physical limits. ESP ®
assists
the driver when pulling away on wet or slip-
pery roads. ESP ®
can also stabilise the vehi-
cle during braking.
If ESP ®
intervenes, the ÷ESP®
warning
lamp flashes in the instrument cluster.
If ESP ®
intervenes:
X Do not deactivate ESP ®
under any circum-
stances.
X When pulling away, only depress the accel-
erator pedal as far as is necessary.
X Adapt your driving style to suit the prevail-
ing road and weather conditions.
i Only use wheels with the recommended
tyre sizes. Only then will ESP ®
function
properly. ETS/4ETS (Electronic Traction System) i
Observe the "Important safety notes" sec-
tion (Y page 65).
Traction control is part of ESP ®
.
Traction control brakes the drive wheels indi-
vidually if they spin. This enables you to pull
away and accelerate on slippery surfaces, for
example if the road surface is slippery on one
side. On vehicles with 4MATIC, more drive
torque is also transferred to the wheel or
wheels with traction.
Traction control remains active if you deacti-
vate ESP ®
.
Deactivating/activating ESP ® i
Observe the "Important safety notes" sec-
tion (Y page 65). G
WARNING
If you deactivate ESP ®
, ESP ®
no longer sta-
bilises the vehicle. There is an increased risk
of skidding and an accident.
Only deactivate ESP ®
in the situations descri-
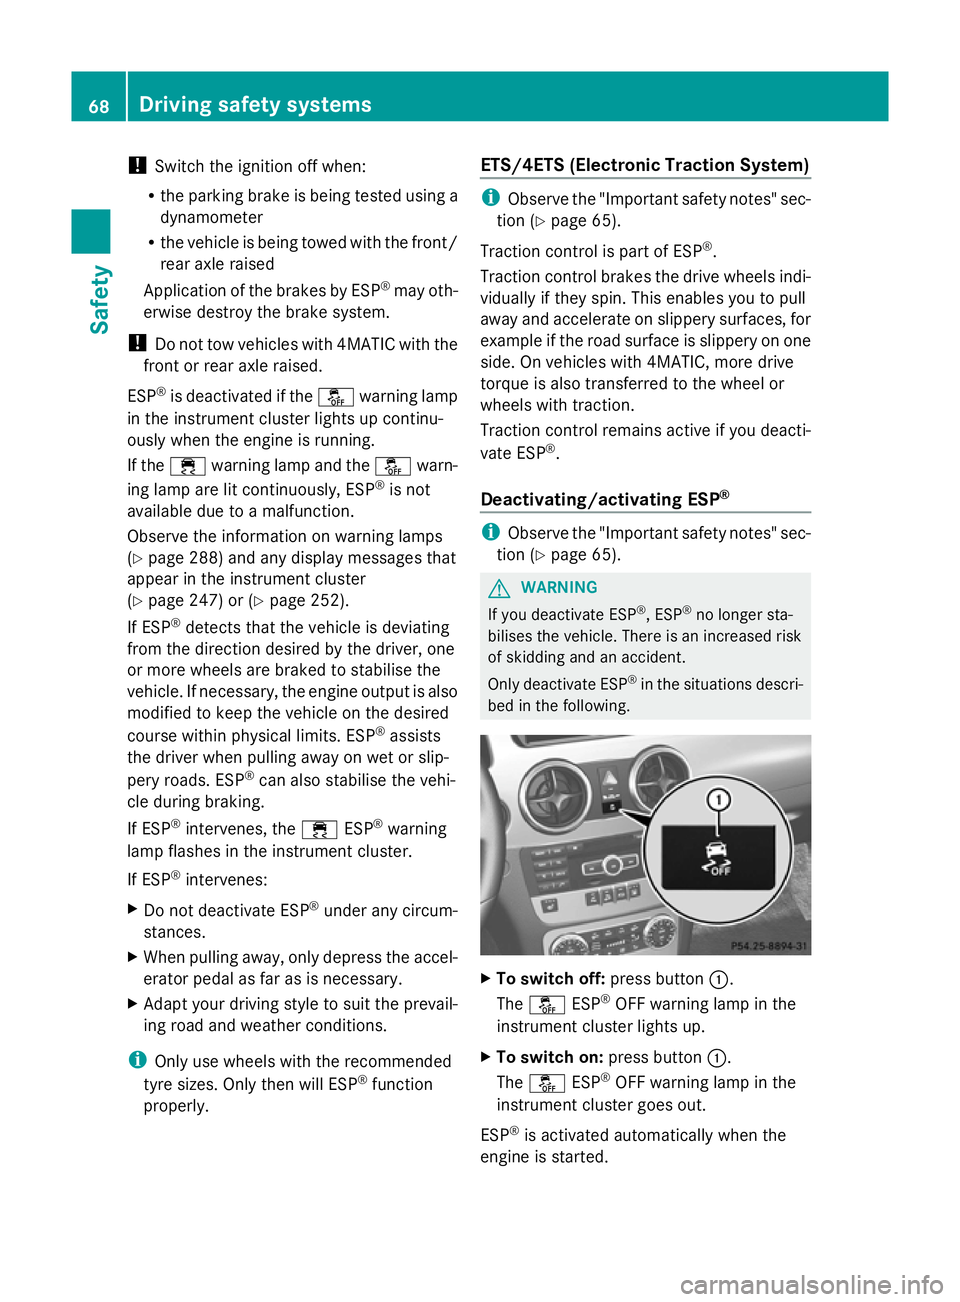
bed in the following. X
To switch off: press button:.
The å ESP®
OFF warning lamp in the
instrument cluster lights up.
X To switch on: press button:.
The å ESP®
OFF warning lamp in the
instrument cluster goes out.
ESP ®
is activated automatically when the
engine is started. 68
Driving safety systemsSafety
Page 73 of 381
SAFE
®
Brake has detected a risk of collision,
you will be warned visually and acoustically
as well as by automatic braking. PRE-SAFE ®
Brake cannot prevent a collision without your
intervention.
This function will issue a warning if:
R at speeds of around 30 km/h or more, over
several seconds, the distance maintained
to the vehicle travelling in front is insuffi-
cient.
The · distance warning lamp then lights
up in the instrument cluster.
R at a speed of approximately 7 km/h or
higher, you very quickly approach a vehicle
in front.
An intermittent warning tone will then
sound and the ·distance warning lamp
will light up in the instrument cluster.
X Brake immediately in order to increase the
distance from the vehicle in front.
or
X Take evasive action provided it is safe to do
so.
From a speed of approximately 7 km/h, if the
driver and front passenger have fastened
their seat belts, PRE-SAFE ®
Brake can brake
the vehicle automatically at speeds up to
approximately 200 km/h.
Due to the nature of the system, particularly
complicated driving conditions may cause
unnecessary warnings or the unnecessary
intervention of PRE-SAFE ®
Brake.
You can prevent the intervention of the PRE-
SAFE ®
Brake at any time by:
R depressing the accelerator pedal further
R activating kickdown
R releasing the brake pedal The braking action of PRE-SAFE
®
Brake is
ended automatically if:
R you manoeuvre to avoid the obstacle.
R there is no longer any danger of a rear-end
collision.
R there is no longer an obstacle detected in
front of your vehicle.
With the help of the radar sensor system,
PRE-SAFE ®
Brake can detect obstacles that
are in front of your vehicle for an extended
period of time.
At speeds up to approximately 70 km/h, PRE-
SAFE ®
Brake can also detect stationary
obstacles such as stopped or parked vehi-
cles.
If you approach an obstacle and PRE-SAFE ®
Brake detects a risk of a collision, the system
will alert you both visually and acoustically. If
you do not brake or take evasive action, the
system will warn you by automatically braking
the vehicle gently. If there is an increased risk
of collision, preventative passenger protec-
tion measures (PRE-SAFE ®
) are activated
(Y page 48). If the risk of collision remains
and you do not brake, take evasive action or
accelerate significantly, the vehicle may per-
form automatic emergency braking. Auto-
matic emergency braking is not performed
until immediately prior to an accident that can
no longer be avoided. G
WARNING
PRE-SAFE ®
Brake will initially brake your vehi-
cle by a partial application of the brakes if a
danger of collision is detected. There may be
a collision unless you also brake. Automatic
emergency braking cannot prevent a colli-
sion. There is a risk of an accident.
Always apply the brakes yourself and try to
take evasive action. G
WARNING
PRE-SAFE ®
Brake cannot always clearly iden-
tify objects and complex traffic conditions. 70
Driving safety systemsSafety
Page 85 of 381
Problem Possible causes/consequences and
M
MSolutions You have lost the emer-
gency key element. X
Report the loss immediately to the vehicle insurers.
X If necessary, have the locks changed as well. The engine cannot be
started using the key. The on-board voltage is too low.
X
Switch off non-essential consumers, e.g. seat heating or interior
lighting, and try to start the engine again.
If this does not work:
X Check the starter battery and charge it if necessary
(Y page 337).
or
X Jump-start the vehicle (Y page 341).
or
X Consult a qualified specialist workshop. The engine cannot be
started using KEYLESS-
GO. The key is in the
vehicle. A door is open. Therefore, the key cannot be detected as easily.
X
Close the door and try to start the vehicle again. There is interference from a powerful source of radio waves.
X
Start your vehicle with the key in the ignition lock. Doors
Important safety notes
G
WARNING
Only for the United Kingdom: if the vehicle
has been locked with the key, the double lock
function is activated as standard. It is then not
possible to open the doors from inside the
vehicle.
Therefore, do not leave any people behind in
the vehicle, particularly children, elderly peo-
ple or people in need of special assistance if
the vehicle has been locked with the key. As
a result, they may not be able to free them-
selves in the event of an emergency. As a
result, they could be seriously or even fatally
injured by prolonged exposure to extremely
high or low temperatures, for example. In this
case, rescuing people from outside the vehi-
cle is difficult.
Deactivate the interior motion sensor before
you lock the vehicle with the key. The doors can then be opened from the inside after the
vehicle has been locked from the outside with
the key.
G
WARNING
If children are left unsupervised in the vehicle,
they could:
R open a door from inside the vehicle at any
time, even if it has been locked
R start the vehicle using a key which has been
left in the vehicle
R release the parking brake
They could thereby endanger themselves and
others. Never leave children unsupervised in
the vehicle. Always take the key with you
when leaving the vehicle, even if you are only
leaving it for a short time. 82
DoorsOpening and closing
Page 117 of 381
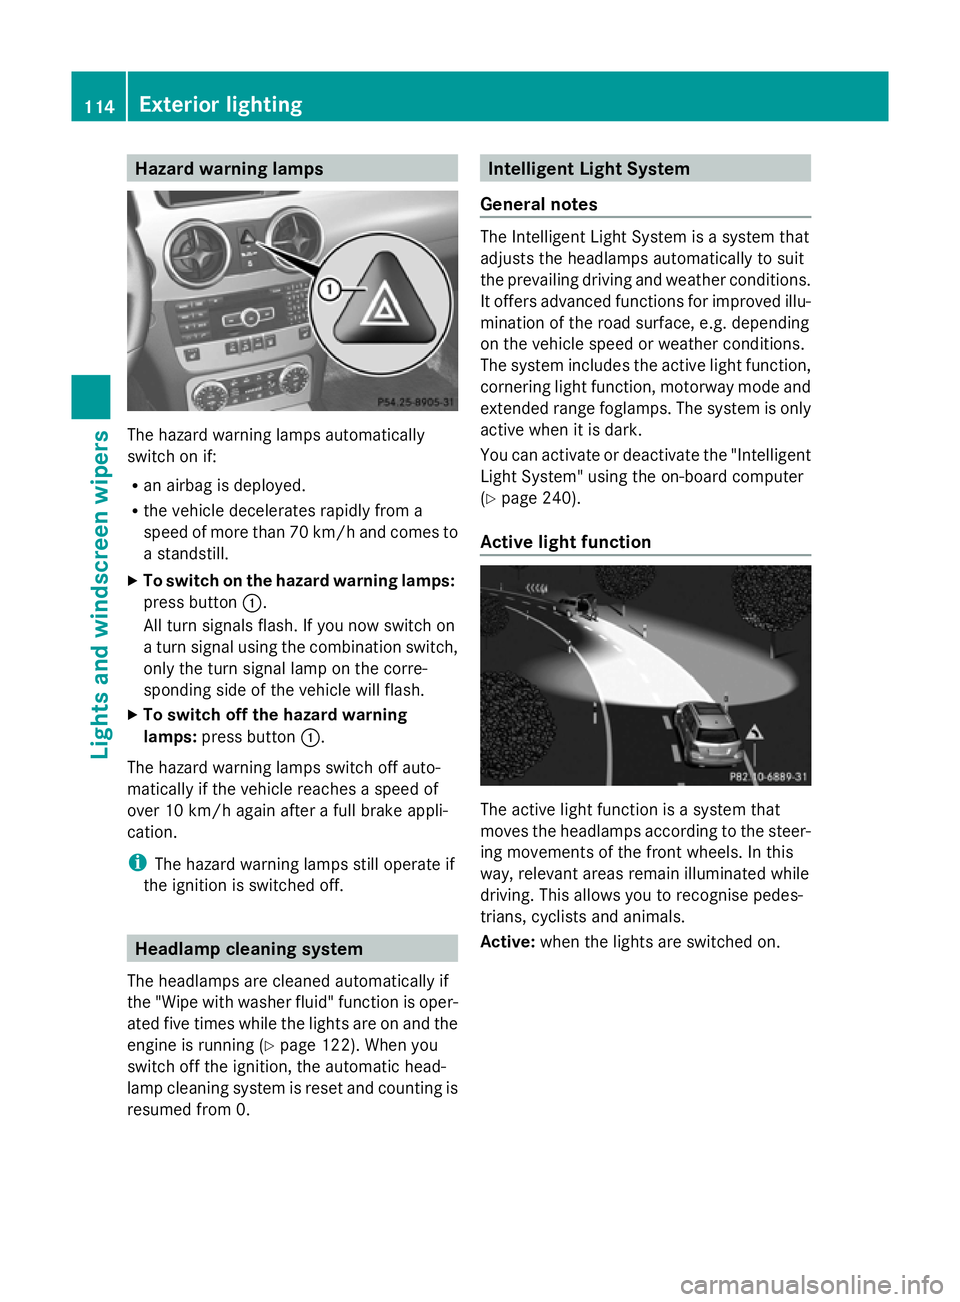
Hazard warning lamps
The hazard warning lamps automatically
switch on if:
R an airbag is deployed.
R the vehicle decelerates rapidly from a
speed of more than 70 km/h and comes to
a standstill.
X To switch on the hazard warning lamps:
press button :.
All turn signals flash. If you now switch on
a turn signal using the combination switch,
only the turn signal lamp on the corre-
sponding side of the vehicle will flash.
X To switch off the hazard warning
lamps: press button :.
The hazard warning lamps switch off auto-
matically if the vehicle reaches a speed of
over 10 km/h again after a full brake appli-
cation.
i The hazard warning lamps still operate if
the ignition is switched off. Headlamp cleaning system
The headlamps are cleaned automatically if
the "Wipe with washer fluid" function is oper-
ated five times while the lights are on and the
engine is running (Y page 122). When you
switch off the ignition, the automatic head-
lamp cleaning system is reset and counting is
resumed from 0. Intelligent Light System
General notes The Intelligent Light System is a system that
adjusts the headlamps automatically to suit
the prevailing driving and weather conditions.
It offers advanced functions for improved illu-
mination of the road surface, e.g. depending
on the vehicle speed or weather conditions.
The system includes the active light function,
cornering light function, motorway mode and
extended range foglamps. The system is only
active when it is dark.
You can activate or deactivate the "Intelligent
Light System" using the on-board computer
(Y
page 240).
Active light function The active light function is a system that
moves the headlamps according to the steer-
ing movements of the front wheels. In this
way, relevant areas remain illuminated while
driving. This allows you to recognise pedes-
trians, cyclists and animals.
Active: when the lights are switched on. 114
Exterior lightingLights and windscreen wipers
Page 126 of 381
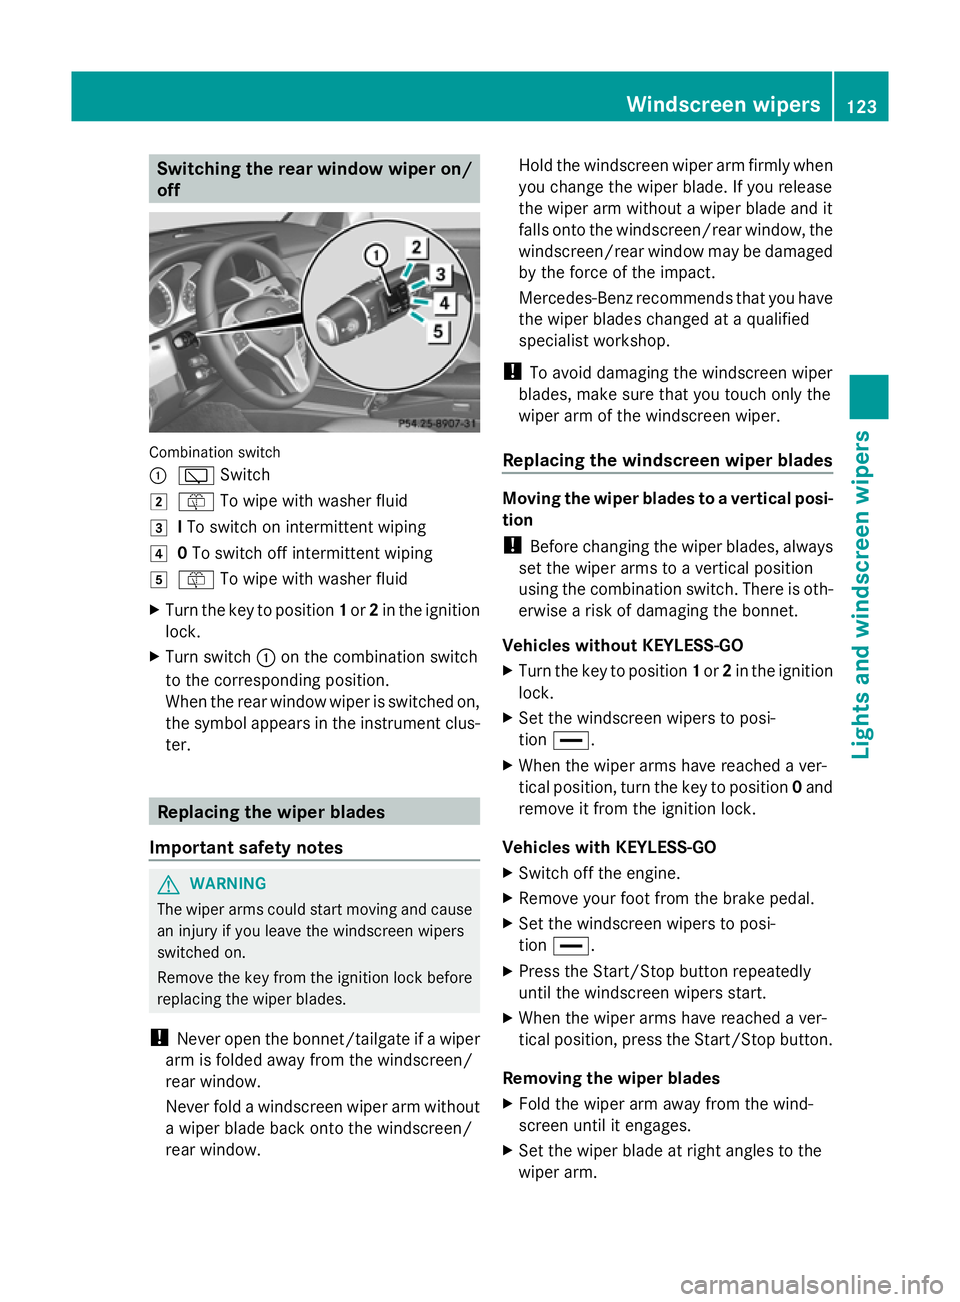
Switching the rear window wiper on/
off Combination switch
:
è Switch
2 ô To wipe with washer fluid
3 ITo switch on intermittent wiping
4 0To switch off intermittent wiping
5 ô To wipe with washer fluid
X Turn the key to position 1or 2in the ignition
lock.
X Turn switch :on the combination switch
to the corresponding position.
When the rear window wiper is switched on,
the symbol appears in the instrument clus-
ter. Replacing the wiper blades
Important safety notes G
WARNING
The wiper arms could start moving and cause
an injury if you leave the windscreen wipers
switched on.
Remove the key from the ignition lock before
replacing the wiper blades.
! Never open the bonnet/tailgate if a wiper
arm is folded away from the windscreen/
rear window.
Never fold a windscreen wiper arm without
a wiper blade back onto the windscreen/
rear window. Hold the windscreen wiper arm firmly when
you change the wiper blade. If you release
the wiper arm without a wiper blade and it
falls onto the windscreen/rear window, the
windscreen/rear window may be damaged
by the force of the impact.
Mercedes-Benz recommends that you have
the wiper blades changed at a qualified
specialist workshop.
! To avoid damaging the windscreen wiper
blades, make sure that you touch only the
wiper arm of the windscreen wiper.
Replacing the windscreen wiper blades Moving the wiper blades to a vertical posi-
tion
!
Before changing the wiper blades, always
set the wiper arms to a vertical position
using the combination switch. There is oth-
erwise a risk of damaging the bonnet.
Vehicles without KEYLESS-GO
X Turn the key to position 1or 2in the ignition
lock.
X Set the windscreen wipers to posi-
tion °.
X When the wiper arms have reached a ver-
tical position, turn the key to position 0and
remove it from the ignition lock.
Vehicles with KEYLESS-GO
X Switch off the engine.
X Remove your foot from the brake pedal.
X Set the windscreen wipers to posi-
tion °.
X Press the Start/Stop button repeatedly
until the windscreen wipers start.
X When the wiper arms have reached a ver-
tical position, press the Start/Stop button.
Removing the wiper blades
X Fold the wiper arm away from the wind-
screen until it engages.
X Set the wiper blade at right angles to the
wiper arm. Windscreen wipers
123Lights and windscreen wipers Z