fuel pressure MERCEDES-BENZ GLK SUV 2012 Owners Manual
[x] Cancel search | Manufacturer: MERCEDES-BENZ, Model Year: 2012, Model line: GLK SUV, Model: MERCEDES-BENZ GLK SUV 2012Pages: 381, PDF Size: 12.68 MB
Page 16 of 381
Fuse box in the luggage compart-
ment
.............................................. 347
Important safety notes ..................346 G
Gear or selector lever (cleaning
instructions) ...................................... 322
Genuine Mercedes-Benz parts .........362
Glove compartment ..........................297 H
Handbrake see Parking brake
Hazard warning lamps ......................114
Headlamp Cleaning system (function) ............114
Cleaning system (notes) ................372
Headlamps
Misting up ...................................... 117
Topping up the cleaning system ....317
see Automatic headlamp mode
Head restraints
Adjusting ......................................... 98
Adjusting (electrically) .....................99
Adjusting (manually). .......................98
Adjusting (rear) ................................ 99
Fitting/removing (rear) ....................99
see NECK-PRO head restraints
see NECK-PRO head restraints/
NECK-PRO luxury head restraints
Heating
see Climate control
High-pressure cleaners ....................318
Hill start assist .................................. 150
HOLD function Display message (12-button mul-
tifunction steering wheel) ..............271
Display message (4-button multi-
function steering wheel) ................270
Function/notes ............................. 186 I
Ignition lock see Key positions
Immobiliser .......................................... 71Indicator and warning lamps
Coolant .......................................... 292
DISTRONIC PLUS ........................... 294
Engine diagnostics .........................291
Fuel tank ........................................ 292
Overview (12-button multifunc-
tion steering wheel) .........................34
Overview (4-button multifunction
steering wheel) ................................ 32
Indicator lamps
see Warning and indicator lamps
Insect protection on the radiator ....315
Inspection see ASSYST PLUS
Instrument cluster (12-button mul-
tifunction steering wheel)
Indicator and warning lamps ............34
Overview .......................................... 33
Settings ......................................... 238
Instrument cluster (4-button mul-
tifunction steering wheel)
Indicator and warning lamps ............32
Overview .......................................... 31
Instrument cluster lighting ..............239
Multifunction steering wheel with
4 buttons ....................................... 224
Intelligent Light System
Activating/deactivating (12-but-
ton multifunction steering wheel) ..240
Display message (12-button mul-
tifunction steering wheel) ..............263
Overview ........................................ 114
Interior lighting ................................. 117
Automatic control system ..............118
Delayed switch-off (12-button
multifunction steering wheel) ........241
Emergency lighting ........................118
Manual control ............................... 118
Overview ........................................ 117
Reading lamp ................................. 117
Setting brightness for display/
switches (on-board computer) .......239
Interior motion sensor ........................73
ISOFIX child seat securing system ....57 Index
13
Page 28 of 381
Protection of the environment
General notes
H
Environmental note
Daimler's declared policy is one of compre-
hensive environmental protection.
The objectives are for the natural resources
which form the basis of our existence on this
planet to be used sparingly and in a manner
which takes the requirements of both nature
and humanity into account.
You too can help to protect the environment
by operating your vehicle in an environmen-
tally-responsible manner.
Fuel consumption and the rate of engine,
transmission, brake and tyre wear depend on
the following factors:
R operating conditions of your vehicle
R your personal driving style
You can influence both factors. You should
bear the following in mind:
Operating conditions:
R avoid short trips as these increase fuel con-
sumption.
R make sure that the tyre pressures are
always correct.
R do not carry any unnecessary weight.
R keep an eye on the vehicle's fuel consump-
tion.
R remove roof racks once you no longer need
them.
R a regularly serviced vehicle will contribute
to environmental protection. You should
therefore adhere to the service intervals.
R always have service work carried out at a
qualified specialist workshop.
Personal driving style:
R do not depress the accelerator pedal when
starting the engine.
R do not warm up the engine with the vehicle
stationary.
R drive carefully and maintain a safe distance
from the vehicle in front. R
avoid frequent, sudden acceleration.
R change gear in good time and use each gear
only up to Ôof its maximum engine speed.
R switch off the engine in stationary traffic. Returning an end-of-life vehicle
Mercedes-Benz will take back your
Mercedes-Benz to dispose of it in an environ-
mentally responsible manner, in accordance
the European Union (EU) End of Life Vehicles
Directive.
The End of Life Vehicles Directive applies to
vehicles with a gross vehicle weight of up to
3.5 t, in accordance with national regulations.
For several years, Mercedes-Benz has been
meeting all the legal requirements for a
design which allows for recycling and re-use.
There is a network of return points and dis-
assembly plants which can recycle your vehi-
cle in an environmentally-responsible man-
ner. The methods employed in vehicle and
parts recycling are constantly being devel-
oped and improved. This means that your
Mercedes-Benz will also continue to meet
even the increased recycling quotas in the
future in good time. You can obtain further
information from your national Mercedes-
Benz homepage or your national hotline num-
ber. Vehicle equipment
This Owner's Manual describes all models
and all standard and optional equipment
available for your vehicle at the time of pub-
lication of the Owner's Manual. Country-spe-
cific deviations are possible. Note that your
vehicle may not be fitted with all features
described. This is also the case for systems
and functions relevant to safety. Therefore,
the equipment on your vehicle may differ from
that in the descriptions and illustrations. Introduction
25 Z
Page 165 of 381
Refuelling
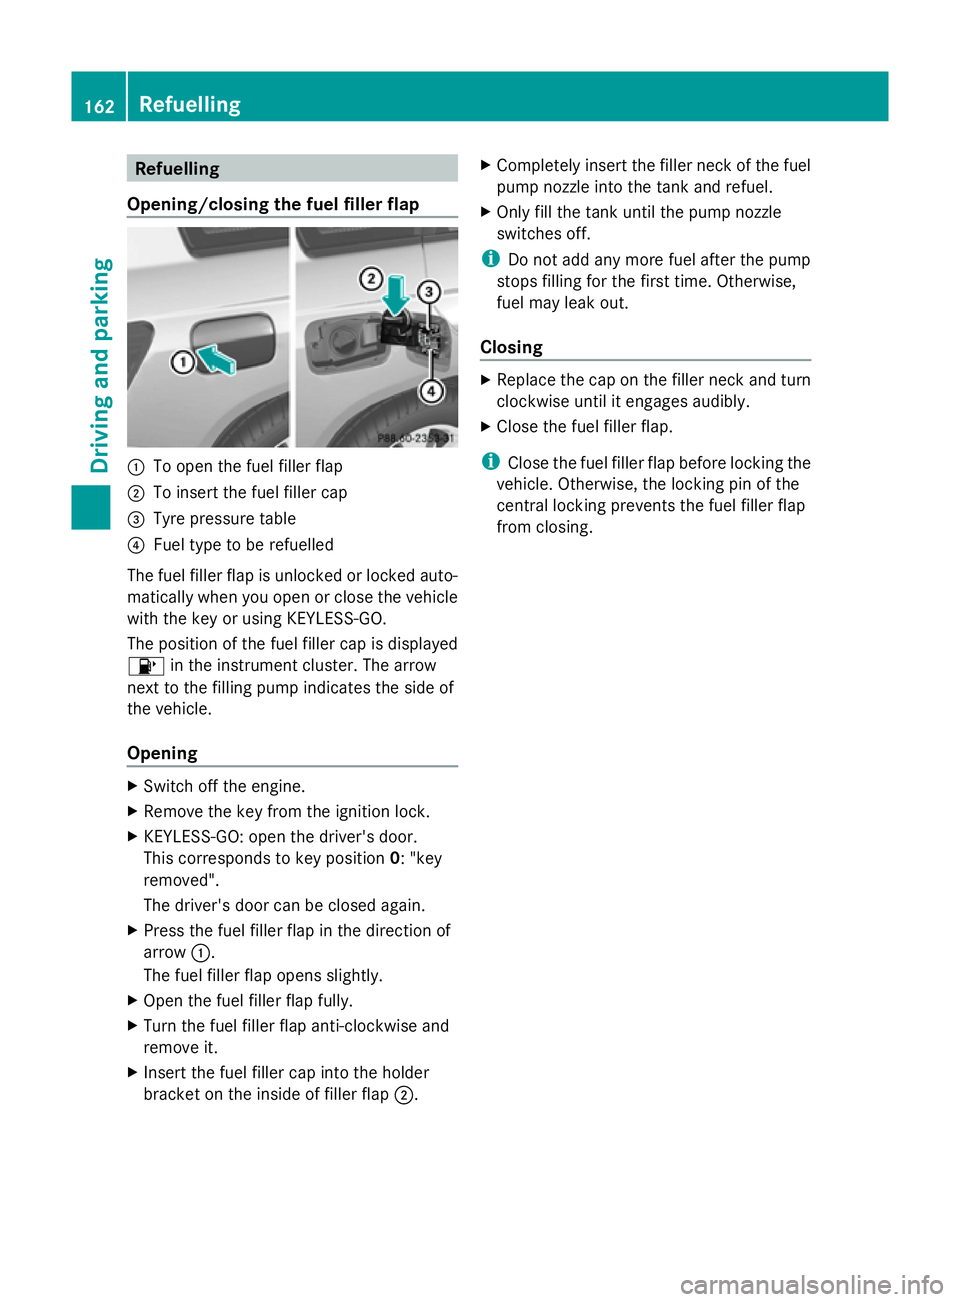
Opening/closing the fuel filler flap :
To open the fuel filler flap
; To insert the fuel filler cap
= Tyre pressure table
? Fuel type to be refuelled
The fuel filler flap is unlocked or locked auto-
matically when you open or close the vehicle
with the key or using KEYLESS-GO.
The position of the fuel filler cap is displayed
8 in the instrument cluster. The arrow
next to the filling pump indicates the side of
the vehicle.
Opening X
Switch off the engine.
X Remove the key from the ignition lock.
X KEYLESS-GO: open the driver's door.
This corresponds to key position 0: "key
removed".
The driver's door can be closed again.
X Press the fuel filler flap in the direction of
arrow :.
The fuel filler flap opens slightly.
X Open the fuel filler flap fully.
X Turn the fuel filler flap anti-clockwise and
remove it.
X Insert the fuel filler cap into the holder
bracket on the inside of filler flap ;.X
Completely insert the filler neck of the fuel
pump nozzle into the tank and refuel.
X Only fill the tank until the pump nozzle
switches off.
i Do not add any more fuel after the pump
stops filling for the first time. Otherwise,
fuel may leak out.
Closing X
Replace the cap on the filler neck and turn
clockwise until it engages audibly.
X Close the fuel filler flap.
i Close the fuel filler flap before locking the
vehicle. Otherwise, the locking pin of the
central locking prevents the fuel filler flap
from closing. 162
RefuellingDriving and parking
Page 169 of 381
with limitations, or not at all. This could affect,
for example, the power steering and the brake
boosting effect. You will require considerably
more effort to steer and brake. There is a risk
of an accident.
Do not switch off the ignition while driving. ECO display
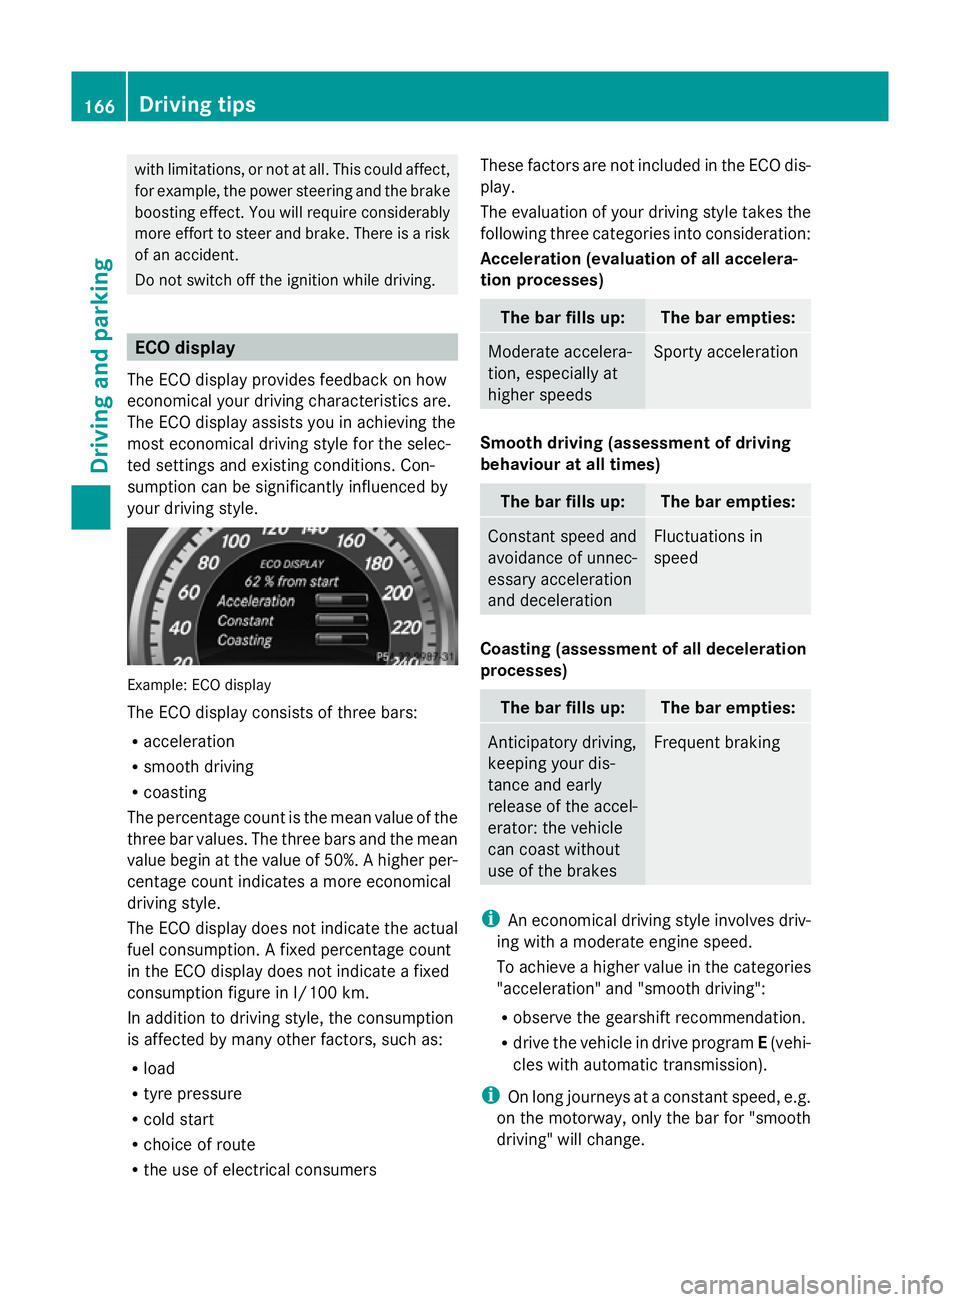
The ECO display provides feedback on how
economical your driving characteristics are.
The ECO display assists you in achieving the
most economical driving style for the selec-
ted settings and existing conditions. Con-
sumption can be significantly influenced by
your driving style. Example: ECO display
The ECO display consists of three bars:
R acceleration
R smooth driving
R coasting
The percentage count is the mean value of the
three bar values. The three bars and the mean
value begin at the value of 50%. A higher per-
centage count indicates a more economical
driving style.
The ECO display does not indicate the actual
fuel consumption. A fixed percentage count
in the ECO display does not indicate a fixed
consumption figure in l/100 km.
In addition to driving style, the consumption
is affected by many other factors, such as:
R load
R tyre pressure
R cold start
R choice of route
R the use of electrical consumers These factors are not included in the ECO dis-
play.
The evaluation of your driving style takes the
following three categories into consideration:
Acceleration (evaluation of all accelera-
tion processes) The bar fills up: The bar empties:
Moderate accelera-
tion, especially at
higher speeds Sporty acceleration
Smooth driving (assessment of driving
behaviour at all times)
The bar fills up: The bar empties:
Constant speed and
avoidance of unnec-
essary acceleration
and deceleration Fluctuations in
speed
Coasting (assessment of all deceleration
processes)
The bar fills up: The bar empties:
Anticipatory driving,
keeping your dis-
tance and early
release of the accel-
erator: the vehicle
can coast without
use of the brakes Frequent braking
i
An economical driving style involves driv-
ing with a moderate engine speed.
To achieve a higher value in the categories
"acceleration" and "smooth driving":
R observe the gearshift recommendation.
R drive the vehicle in drive program E(vehi-
cles with automatic transmission).
i On long journeys at a constant speed, e.g.
on the motorway, only the bar for "smooth
driving" will change. 166
Driving tipsDriving and parking
Page 174 of 381
R
Always keep the engine running and in gear
when driving on a downhill gradient. Acti-
vate DSR (Y page 213).
R Drive slowly and evenly, if necessary at
walking pace.
R Ensure that the wheels are in contact with
the ground at all times.
R Drive with extreme care on unknown off-
road routes where visibility is poor. For
safety reasons, get out of the vehicle first
and survey the off-road route.
R Check the depth of water before fording
rivers and streams.
R Look out for obstacles such as rocks, holes,
tree stumps and furrows.
R Always keep the side windows and the pan-
orama sliding sunroof closed during the
journey.
R Do not stray from marked routes or paths.
i Information about retrofitting special all-
terrain tyres is available from any qualified
specialist workshop.
Checklist before driving off-road X
Engine oil level: check the engine oil and
top it up if necessary.
X Tyre-change tool kit: check that the jack
is working and make sure you have the
wheelbrace, a robust tow cable and a fold-
ing spade in the vehicle.
X Wheels and tyres: check the tyre tread
depth and tyre pressure.
X Check for damage and remove any foreign
objects, e.g. small stones, from the
wheels/tyres.
X Replace any missing valve caps.
X Replace dented or damaged wheels.
Checklist after driving off-road Driving over rough terrain places greater
demands on your vehicle than driving on nor-
mal roads. After driving off-road, check the
vehicle. This allows you to detect damage promptly and reduce the risk of an accident
to yourself and other road users.
X Deactivate DSR ( Ypage 213).
X Clean the headlamps and rear lights and
check for damage.
X Clean the front and rear licence plates.
X Clean the wheels/tyres with a water jet and
remove any foreign objects.
X Clean the wheels, wheel arches and the
vehicle underside with a water jet; check
for any foreign objects and damage.
X Check whether twigs or other parts of
plants have become trapped. These
increase the risk of fire and can damage
fuel pipes, brake hoses or the rubber bel-
lows of the axle joints and propeller shafts.
X After the trip, examine without fail the
entire undercarriage, wheels, tyres, brakes,
bodywork structure, steering, chassis and
exhaust system for damage.
X After driving for extended periods across
sand, mud, gravel, water or in similarly dirty
conditions, have the brake discs, wheels,
brake pads/linings and axle joints checked
and cleaned.
X If you detect strong vibrations after off-road
travel, check for foreign objects in the
wheels and drive train and remove them if
necessary. Foreign objects can disturb the
balance and cause vibrations. Driving tips
171Driving and parking Z
Page 219 of 381
G
WARNING
You could lose control of the vehicle/trailer
combination if it begins to swerve. The vehi-
cle/trailer combination could even overturn.
There is a risk of an accident.
On no account should you attempt to
straighten out the vehicle/trailer combina-
tion by increasing speed. Decrease your
speed and do not countersteer. Brake if nec-
essary. G
WARNING
If you exceed the permissible noseweight
while carrying a load, the carrier system could
detach from the vehicle and fall on the road.
There is a risk of an accident and injury.
Always maintain the permissible noseweight
when carrying loads.
! Depressing the brake pedal constantly
results in excessive and premature wear to
the brake pads.
You can use carrier systems, e.g. bicycle
racks or load-bearing implements, on the ball
coupling. The maximum noseweight of
75 kg applies when using carrier systems on
the ball coupling.
When using a detachable trailer coupling,
make sure you observe the trailer coupling
manufacturer's operating instructions.
When reversing the vehicle towards the
trailer, make sure there is nobody between
the trailer and the vehicle.
Couple and uncouple the trailer carefully. If
you do not couple the trailer to the towing
vehicle correctly, the trailer could become
detached.
Make sure that the following values are not
exceeded:
R the permissible trailer drawbar noseweight
R the permissible trailer load R
the permissible rear axle load of the towing
vehicle
R the maximum permissible gross vehicle
weight of both the towing vehicle and the
trailer
The applicable permissible values, which
must not be exceeded, can be found:
R in the vehicle documents
R on the identification plates of the trailer tow
hitch, the trailer and the vehicle
If the values differ, the lowest value applies.
You will find the values approved by the man-
ufacturer on the vehicle identification plates
and those for the towing vehicle under "Tech-
nical data".
When towing a trailer, your vehicle's handling
characteristics will be different in comparison
to when driving without a trailer.
The vehicle/trailer combination:
R is heavier
R is restricted in its acceleration and gradi-
ent-climbing capability
R has an increased braking distance
R is affected more by strong crosswinds
R demands more sensitive steering
R has a larger turning circle
This can impair the vehicle's handling char-
acteristics. Adapt your style of driving accord-
ingly. Maintain a safe distance. Drive care-
fully.
When towing a trailer, always adjust your
speed to the current road and weather con-
ditions. Do not exceed the maximum permis-
sible speed for your vehicle/trailer combina-
tion.
General notes i
When towing a trailer, set the tyre pres-
sure on the rear axle of the towing vehicle
for a maximum load; see the tyre pressure
table in the fuel filler flap (Y page 353).
You will find fitting dimensions and loads in
the "Technical data" section (Y page 373).216
Towing a trailerDriving and parking
Page 229 of 381
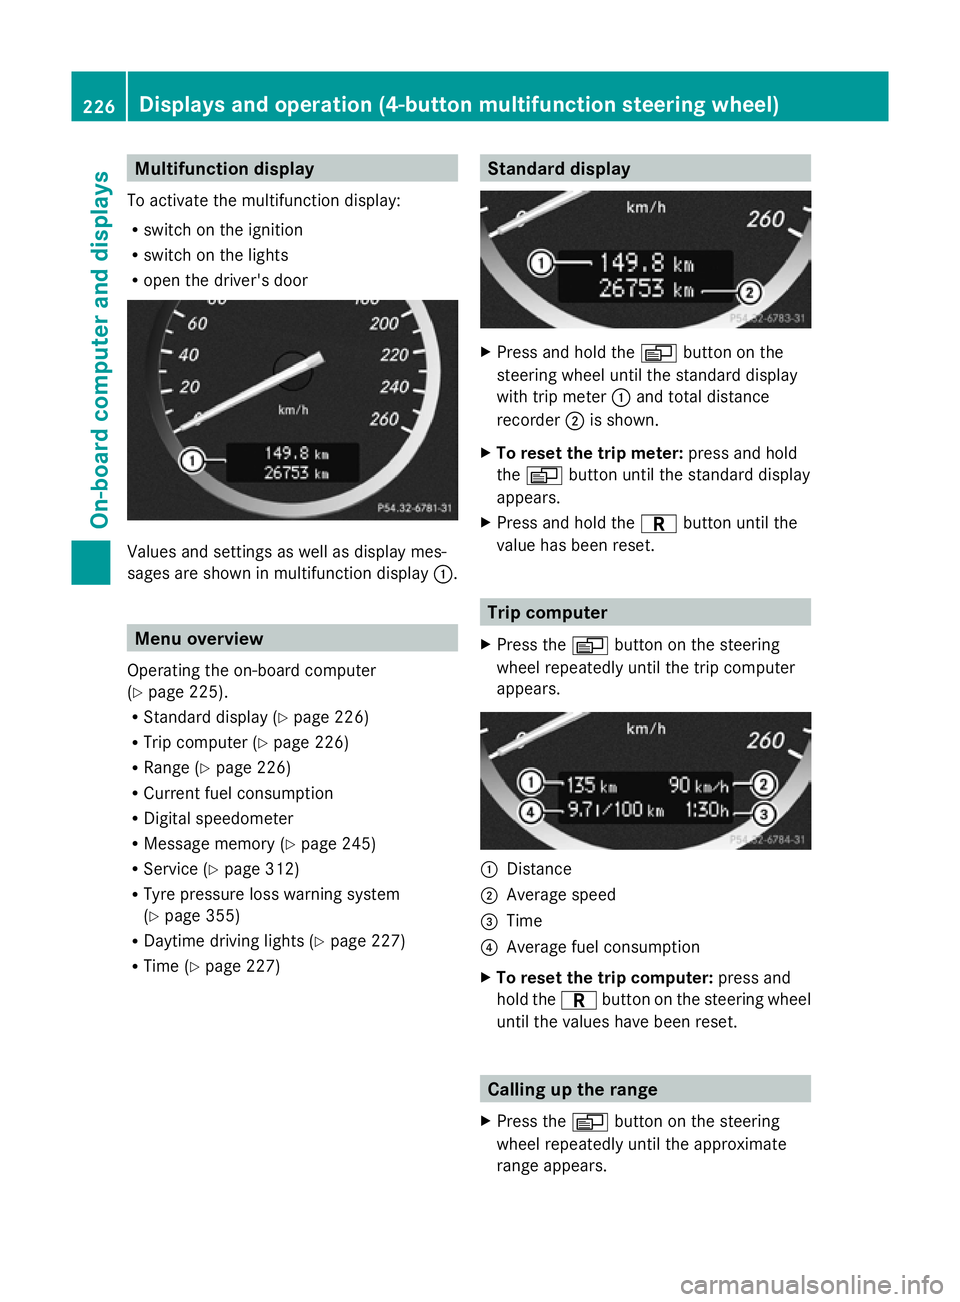
Multifunction display
To activate the multifunction display:
R switch on the ignition
R switch on the lights
R open the driver's door Values and settings as well as display mes-
sages are shown in multifunction display :.Menu overview
Operating the on-board computer
(Y page 225).
R Standard display (Y page 226)
R Trip computer (Y page 226)
R Range (Y page 226)
R Current fuel consumption
R Digital speedometer
R Message memory (Y page 245)
R Service (Y page 312)
R Tyre pressure loss warning system
(Y page 355)
R Daytime driving lights (Y page 227)
R Time (Y page 227) Standard display
X
Press and hold the Vbutton on the
steering wheel until the standard display
with trip meter :and total distance
recorder ;is shown.
X To reset the trip meter: press and hold
the V button until the standard display
appears.
X Press and hold the Cbutton until the
value has been reset. Trip computer
X Press the Vbutton on the steering
wheel repeatedly until the trip computer
appears. :
Distance
; Average speed
= Time
? Average fuel consumption
X To reset the trip computer: press and
hold the Cbutton on the steering wheel
until the values have been reset. Calling up the range
X Press the Vbutton on the steering
wheel repeatedly until the approximate
range appears. 226
Displays and operation (4-button multifunction steering wheel)On-board computer and displays
Page 322 of 381
pressure cleaner nozzle. Information about
the correct distance is available from the
equipment manufacturer.
Move the high-pressure cleaner nozzle
around when cleaning your vehicle.
Do not aim directly at any of the following:
R tyres
R door gaps, roof gaps, joints etc.
R electrical components
R battery
R connectors
R lights
R seals
R trim elements
R ventilation slots
Damaged seals or electrical components
can lead to leaks or failures.
Cleaning the wheels !
Do not use acidic wheel cleaning products
to remove brake dust. This could damage
wheel bolts and brake components.
! Do not park up the vehicle for an extended
period straight after cleaning it, particularly
after having cleaned the wheels with wheel
cleaner. Wheel cleaners could cause
increased corrosion of the brake discs and
brake pads/linings. For this reason, you
should drive for a few minutes after clean-
ing. Braking heats the brake discs and the
brake pads/linings, thus drying them. The
vehicle can then be parked up.
Cleaning the paintwork Scratches, corrosive deposits, areas affected
by corrosion and damage caused by inade-
quate care cannot always be completely
repaired. In such cases, visit a qualified spe-
cialist workshop.
X Remove impurities immediately, where
possible, whilst avoiding rubbing too hard.
X Soak insect remains with insect remover
and rinse off the treated areas afterwards. X
Soak bird droppings with water and rinse
off the treated areas afterwards.
X Remove coolant, brake fluid, tree resin,
oils, fuels and greases by rubbing gently
with a cloth soaked in petroleum ether or
lighter fluid.
X Use tar remover to remove tar stains.
X Use silicone remover to remove wax.
! Do not affix:
R stickers
R films
R magnetic plates or similar items
to painted surfaces. You could otherwise
damage the paintwork.
Care and treatment of matt paintwork If your vehicle has a clear matt finish, observe
the following instructions in order to avoid
damage to the paintwork due to incorrect
care.
These notes also apply to light-alloy wheels
with a clear matt finish.
!
Never polish the vehicle or the light alloy
wheels. Polishing makes the paintwork
shiny.
! The following may cause the paint to
become shiny and thus reduce the matt
effect:
R Vigorous rubbing with unsuitable mate-
rials.
R Frequent use of car washes.
R Washing the vehicle in direct sunlight.
! Never use paint cleaner, buffing or pol-
ishing products, or gloss preserver, e.g.
wax. These products are only suitable for
high-gloss surfaces. Their use on vehicles
with matt finish leads to considerable sur-
face damage (shiny, spotted areas).
Always have paintwork repairs carried out
at a qualified specialist workshop.
! Do not use wash programs with a hot wax
treatment under any circumstances. Care
319Maintenance and care Z
Page 335 of 381
number, e.g. on the B-pillar on the driver's
side.
X Correct the tyre pressure if it is still at least
130 kPa (1.3 ba r/19 psi) (see the fuel filler
flap for values).
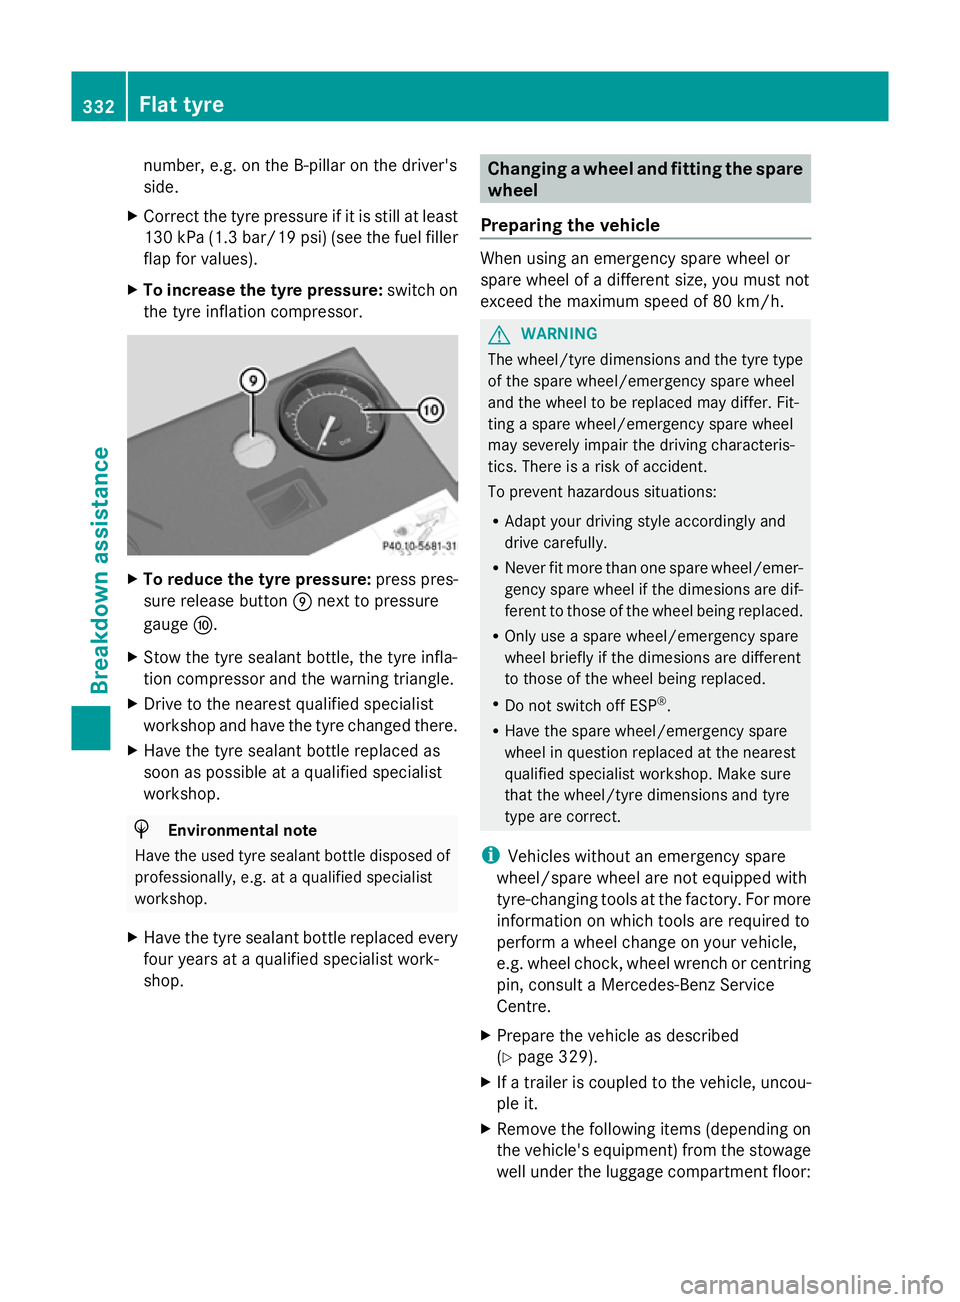
X To increase the tyre pressure: switch on
the tyre inflation compressor. X
To reduce the tyre pressure: press pres-
sure release button Enext to pressure
gauge F.
X Stow the tyre sealant bottle, the tyre infla-
tion compressor and the warning triangle.
X Drive to the nearest qualified specialist
workshop and have the tyre changed there.
X Have the tyre sealant bottle replaced as
soon as possible at a qualified specialist
workshop. H
Environmental note
Have the used tyre sealant bottle disposed of
professionally, e.g. at a qualified specialist
workshop.
X Have the tyre sealant bottle replaced every
four years at a qualified specialist work-
shop. Changing a wheel and fitting the spare
wheel
Preparing the vehicle When using an emergency spare wheel or
spare wheel of a different size, you must not
exceed the maximum speed of 80 km/h.
G
WARNING
The wheel/tyre dimensions and the tyre type
of the spare wheel/emergency spare wheel
and the wheel to be replaced may differ. Fit-
ting a spare wheel/emergency spare wheel
may severely impair the driving characteris-
tics. There is a risk of accident.
To prevent hazardous situations:
R Adapt your driving style accordingly and
drive carefully.
R Never fit more than one spare wheel/emer-
gency spare wheel if the dimesions are dif-
ferent to those of the wheel being replaced.
R Only use a spare wheel/emergency spare
wheel briefly if the dimesions are different
to those of the wheel being replaced.
R Do not switch off ESP ®
.
R Have the spare wheel/emergency spare
wheel in question replaced at the nearest
qualified specialist workshop. Make sure
that the wheel/tyre dimensions and tyre
type are correct.
i Vehicles without an emergency spare
wheel/spare wheel are not equipped with
tyre-changing tools at the factory. For more
information on which tools are required to
perform a wheel change on your vehicle,
e.g. wheel chock, wheel wrench or centring
pin, consult a Mercedes-Benz Service
Centre.
X Prepare the vehicle as described
(Y page 329).
X If a trailer is coupled to the vehicle, uncou-
ple it.
X Remove the following items (depending on
the vehicle's equipment) from the stowage
well under the luggage compartment floor: 332
Flat tyreBreakdown assistance
Page 353 of 381
Useful information
i This Owner's Manual describes all mod-
els, series and optional equipment for your
vehicle that were available at the time of
going to press. National variations are pos-
sible. Note that your vehicle may not be
equipped with all of the functions descri-
bed. This is also the case for systems and
functions relevant to safety.
i Read the information on qualified special-
ist workshops: (Y page 27). Important safety notes
G
WARNING
If wheels and tyres of the wrong size are used,
the wheel brakes or suspension components
may be damaged. There is a risk of accident.
Always replace wheels and tyres with those
that fulfil the specifications of the original part
(designation, manufacturer, model). G
WARNING
A flat tyre severely impairs the driving, steer-
ing and braking characteristics of the vehicle.
There is a risk of accident.
Tyres without run-flat characteristics:
R do not drive with a flat tyre.
R immediately replace the flat tyre with your
emergency spare wheel or spare wheel, or
consult a qualified specialist workshop.
Tyres with run-flat characteristics:
R pay attention to the information and warn-
ing notices on MOExtended tyres (tyres
with run-flat characteristics).
Accessories that are not approved for your
vehicle by Mercedes-Benz or are not being
used correctly can impair the operating
safety. Before purchasing and using non-approved
accessories, visit a qualified specialist work-
shop and enquire about:
R
suitability
R legal stipulations
R factory recommendations
Information on the dimensions and types of
wheels and tyres for your vehicle can be
found in the "Wheel/tyre combinations" sec-
tion (Y page 357).
Information on air pressure for the tyres on
your vehicle can be found:
R on the tyre pressure label on the fuel filler
flap
R in the "Tyre pressure" section
Modification work on the brake system and
wheels is not permitted, nor is the use of
spacer plates or brake dust shields. This inva-
lidates the general operating permit for the
vehicle.
Pay special attention to the country-specific
requirements for tyre approval. These
requirements can stipulate a specific tyre
type for your vehicle. Furthermore, the use of
certain tyre types in certain regions and areas
of operation can be highly beneficial. You can
find further information regarding tyres at
specialist tyre retailers, at qualified specialist
workshops or at any Mercedes-Benz Service
Centre.
i Further information on wheels and tyres
can be obtained at any qualified specialist
workshop. Operation
Notes on driving
R While driving, pay attention to vibrations,
noises and unusual handling characteris-
tics, e.g. pulling to one side. This may indi-
cate that the wheels or tyres are damaged.
If you suspect that a tyre is defective,
reduce your speed immediately. Stop the
vehicle as soon as possible to check the 350
OperationWheels and tyres