remove seats MERCEDES-BENZ GLK350 4MATIC 2010 X204 Owner's Manual
[x] Cancel search | Manufacturer: MERCEDES-BENZ, Model Year: 2010, Model line: GLK350 4MATIC, Model: MERCEDES-BENZ GLK350 4MATIC 2010 X204Pages: 344, PDF Size: 8.45 MB
Page 48 of 344
injured or even killed if the front passenger
front air bag inflates in a collision which
could occur under some circumstances,
even with the air bag technology installed
in your vehicle. The only means to
completely eliminate this risk is to never
place a child in a rear-facing child restraint
in the front seat. We therefore strongly
recommend that you always place a child
in a rear-facing child restraint in a backseat.
RIf you must install a BabySmart™
compatible rear-facing child restraint on
the front passenger seat because
circumstances require you to do so, make
sure the 45 indicator lamp is
illuminated, indicating that the front
passenger front air bag is deactivated.
Should the 45 indicator lamp not
illuminate or go out while the restraint is
installed, please check installation.
Periodically check the 45 indicator
lamp while driving to make sure the
45 indicator lamp is illuminated. If
the 45 indicator lamp goes out or
remains out, do not transport a child on the
front passenger seat until the system has
been repaired.
A child in a rear-facing child restraint on the
front passenger seat will be seriously
injured or even killed if the front passenger
front air bag inflates.
RIf you have to place a child in a forward-
facing child restraint on the front passenger
seat, move the seat as far back as possible,
use the proper child restraint
recommended for the age, size and weight
of the child, and secure child restraint with
the vehicle’s seat belt according to the child
seat manufacturer’s instructions.
GWarning!
When using a BabySmart™ compatible child
seat on the front passenger seat, the front
passenger front air bag will not deploy only if
the 45 indicator lamp remains
illuminated.
Please be sure to check the 45
indicator lamp every time you use a
BabySmart™ compatible child seat on the
front passenger seat. Should the 45
indicator lamp go out while the restraint is
installed, please check installation. If the
45 indicator lamp remains out, do not
use the BabySmart™ restraint to transport a
child on the front passenger seat until the
system has been repaired.
Special BabySmart™ compatible child seats,
designed for use with the Mercedes-Benz
system, are required for use with the
BabySmart™ air bag deactivation system.
Please contact an authorized Mercedes-Benz
Center for information on availability. With
the special child seat installed properly, the
front passenger front air bag will not deploy.
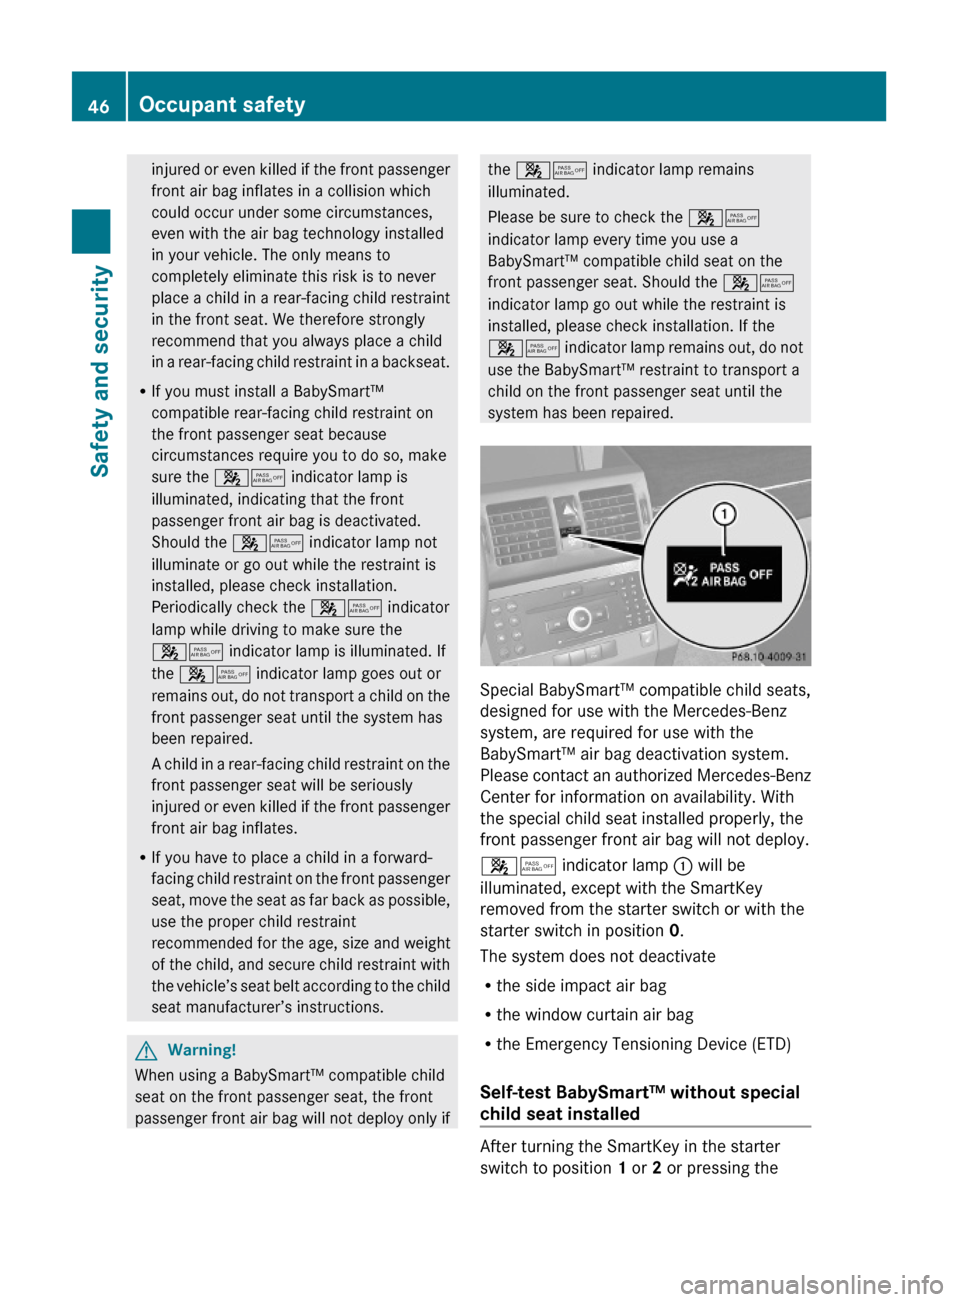
45 indicator lamp : will be
illuminated, except with the SmartKey
removed from the starter switch or with the
starter switch in position 0.
The system does not deactivate
Rthe side impact air bag
Rthe window curtain air bag
Rthe Emergency Tensioning Device (ETD)
Self-test BabySmart™ without special
child seat installed
After turning the SmartKey in the starter
switch to position 1 or 2 or pressing the
46Occupant safetySafety and security
X204_AKB; 3; 23, en-USd2ureepe,Version: 2.11.8.12009-07-16T19:16:58+02:00 - Seite 46
Page 53 of 344
If after these 6 seconds the driver’s or the
front passenger’s seat belt (with the front
passenger seat occupied) is not fastened with
front doors closed,
R the seat belt telltale 7 remains
illuminated for as long as either the driver’s
or front passenger’s seat belt is not
fastened.
R and if the vehicle speed once exceeds
15 mph (25 km/h), the seat belt telltale
7 starts flashing and a warning chime
sounds with increasing intensity for a
maximum of 60 seconds or until the
driver’s and front passenger’s seat belt are
fastened.
If you and/or your passenger release the
seat belt during driving, the seat belt
telltale 7 starts flashing and the
warning chime sounds as described before.
If the driver’s or the front passenger’s seat
belt remains unfastened after 60 seconds,
the warning chime stops sounding, the seat
belt telltale 7 stops flashing but
continues to be illuminated.
After a vehicle standstill, the warning chime
is reactivated and the seat belt telltale
7 is flashing again if the vehicle speed
once exceeds 15 mph (25 km/h).
The seat belt telltale 7 will only go out if
both the driver’s and the front passenger’s
seat belt (with the front passenger seat
occupied) are fastened, or the vehicle is
standing still and a front door is opened.
For more information, see “Practical hints”
( Y page 292).
Emergency Tensioning Device (ETD),
seat belt force limiter
The seat belts for the front seats and rear
outer seats are equipped with ETDs and seat
belt force limiters.
The ETDs are designed to activate in the
following cases:
R in frontal or rear-end impacts exceeding
the system’s preset deployment threshold
R in side impacts exceeding the system’s
preset deployment threshold on the far
side of the impact
R in certain vehicle rollovers
R if the restraint systems are operational and
functioning correctly, see “SRS indicator
lamp” ( Y page 36)
The ETDs for the front seats will only activate
if the front seat belts are fastened (latch plate
properly inserted into buckle).
The ETDs for the rear outer seats will activate
with or without the respective seat belts
fastened.
In an impact, the ETDs remove slack from the
seat belts in such a way that the seat belts fit
more snugly against the body. Seat belt force
limiters, when activated, are employed to
help reduce the peak force exerted by the
seat belts on occupants during a crash.
i The ETDs do not correct an incorrect seat
position or incorrectly worn seat belts.
The ETDs do not pull occupants back
toward the seat backrest.GWarning!
Pyrotechnic ETDs that were activated must be
replaced.
For your safety, when disposing of the
pyrotechnic ETDs always follow our safety
instructions. These are available at any
authorized Mercedes-Benz Center.
NECK-PRO active front head
restraints
The NECK-PRO active front head restraints
are intended to offer the driver and front
passenger increased protection from
whiplash-type injuries. In the event of a rear-
end collision, the NECK-PRO active front head
Occupant safety51Safety and securityX204_AKB; 3; 23, en-USd2ureepe,Version: 2.11.8.12009-07-16T19:16:58+02:00 - Seite 51Z
Page 54 of 344
restraints on the front seats are designed to
move forward in the direction of travel. They
thus provide the head with increased support
earlier on in the collision sequence. The
NECK-PRO active front head restraints will
move forward whether the seats are occupied
or not.
GWarning!
Do not attach any objects (e.g. hangers) to the
head restraint posts. Otherwise, the NECK-
PRO active front head restraints may not be
able to function properly or offer the intended
degree of protection they were designed for
in the event of a rear-end collision.
GWarning!
Only use seat or head restraint covers which
have been tested and approved by Mercedes-
Benz for your vehicle model.
Using other seat or head restraint covers may
interfere with or prevent the activation of the
NECK-PRO active front head restraints and/
or the deployment of the front side impact air
bags.
Contact an authorized Mercedes-Benz Center
for availability.
When the NECK-PRO active front head
restraints have been triggered in an accident,
the NECK-PRO active front head restraints
must be reset. Otherwise, the NECK-PRO
active front head restraints cannot offer any
additional protection in the event of another
rear-end collision.
For information on resetting the activated
NECK-PRO active front head restraints, see
“Resetting activated head restraints”
(Y page 301).
You cannot remove the NECK-PRO active
front head restraints.
GWarning!
For your protection, drive only with properly
positioned head restraints.
Adjust the head restraint so that it is as close
to the head as possible and the center of the
head restraint supports the back of the head
at eye level. This will reduce the potential for
injury to the head and neck in the event of an
accident or similar situation.
For information on head restraint adjustment,
see “Head restraint height” (Y page 79), or
see “Head restraint fore and aft adjustment”
(Y page 80).
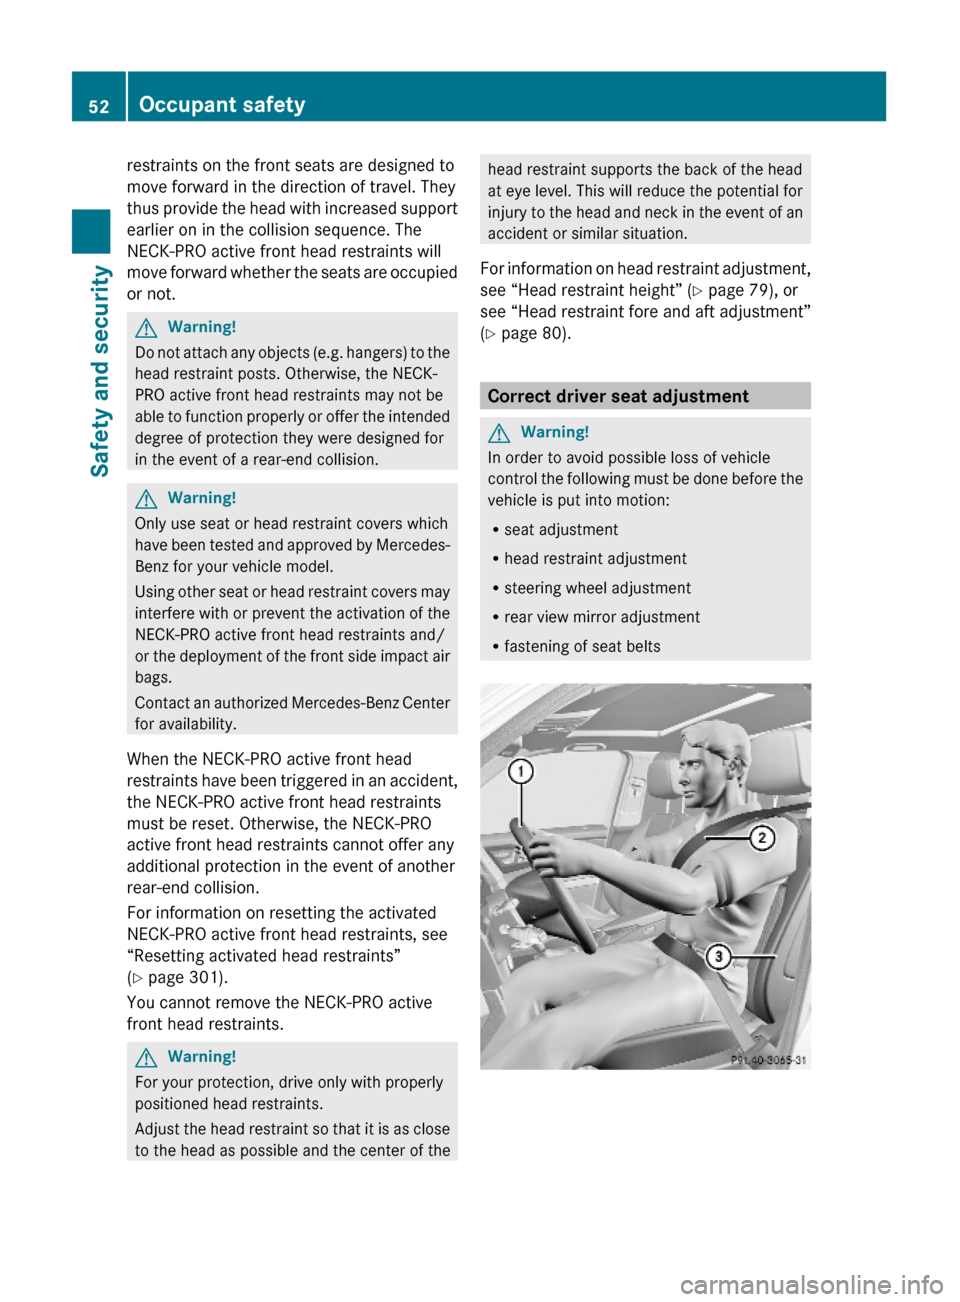
Correct driver seat adjustment
GWarning!
In order to avoid possible loss of vehicle
control the following must be done before the
vehicle is put into motion:
Rseat adjustment
Rhead restraint adjustment
Rsteering wheel adjustment
Rrear view mirror adjustment
Rfastening of seat belts
52Occupant safetySafety and security
X204_AKB; 3; 23, en-USd2ureepe,Version: 2.11.8.12009-07-16T19:16:58+02:00 - Seite 52
Page 56 of 344
GWarning!
When leaving the vehicle, always remove the
SmartKey from the starter switch. Always
take the SmartKey with you and lock the
vehicle. Do not leave children unattended in
the vehicle, even if they are secured in a child
restraint system, or with access to an
unlocked vehicle. A child’s unsupervised
access to a vehicle could result in an accident
and/or serious personal injury. The children
could
R injure themselves on parts of the vehicle
R be seriously or fatally injured through
excessive exposure to extreme heat or cold
R injure themselves or cause an accident with
vehicle equipment that can be operated
even if the SmartKey is removed from the
starter switch or removed from the vehicle,
such as seat adjustment, steering wheel
adjustment, or the memory function
If children open a door, they could injure other
persons or get out of the vehicle and injure
themselves or be injured by following traffic.
Do not expose the child restraint system to
direct sunlight. The child restraint system’s
metal parts, for example, could become very
hot, and the child could be burned by these
parts.
GWarning!
Do not carry heavy or hard objects in the
passenger or cargo compartment unless they
are firmly secured in place.
Unsecured or improperly positioned cargo
increases a child’s risk of injury in the event
of
R strong braking maneuvers
R sudden changes of direction
R an accident
Infant and child restraint systemsGObserve Safety notes, see page 53.
We recommend all infants and children be
properly restrained at all times while the
vehicle is in motion.
Canada only:
Only use a BabySmart™ compatible child
restraint for the front passenger seat in this
vehicle.
All lap/shoulder belts except the driver’s seat
belt have special seat belt retractors for
secure fastening of child restraints.
To fasten a child restraint, follow the child
restraint manufacturer’s instructions for
mounting.
To activate the special seat belt retractor:
XPull the shoulder belt out completely and
let it retract.
During seat belt retraction, a ratcheting
sound can be heard to indicate that the
special seat belt retractor is activated.
The seat belt is now locked.XPush down on child restraint to take up any
slack.
To deactivate the special seat belt retractor:
XRelease the seat belt buckle and let the
seat belt retract completely.
The seat belt can then again be used in the
usual manner.
To deactivate the special seat belt retractor
for the front passenger seat, the front
passenger seat must be in the most backward
position.
GWarning!
Never release the seat belt buckle while the
vehicle is in motion, since the special seat belt
retractor will be deactivated.
i Information on child seats with mounting
fittings for tether anchorages
( Y page 56).
For information on LATCH-type (ISOFIX)
child seat anchors ( Y page 57).
54Occupant safetySafety and security
X204_AKB; 3; 23, en-USd2ureepe,Version: 2.11.8.12009-07-16T19:16:58+02:00 - Seite 54
Page 58 of 344
RIf you must install a rear-facing child
restraint on the front passenger seat
because circumstances require you to do
so, make sure the 45 indicator lamp
is illuminated, indicating that the front
passenger front air bag is deactivated.
Should the 45 indicator lamp not
illuminate or go out while the restraint is
installed, please check installation.
Periodically check the 45 indicator
lamp while driving to make sure the
45 indicator lamp is illuminated. If
the 45 indicator lamp goes out or
remains out, do not transport a child on the
front passenger seat until the system has
been repaired.
A child in a rear-facing child restraint on the
front passenger seat will be seriously
injured or even killed if the front passenger
front air bag inflates.
RIf you have to place a child in a forward-
facing child restraint on the front passenger
seat, move the seat as far back as possible,
use the proper child restraint
recommended for the age, size and weight
of the child, and secure child restraint with
the vehicle’s seat belt according to the child
seat manufacturer’s instructions.
GWarning!
Infants and small children should never share
a seat belt with another occupant. During an
accident, they could be crushed between the
occupant and seat belt.
A child’s risk of serious or fatal injuries is
significantly increased if the child restraints
are not properly secured in the vehicle and/
or the child is not properly secured in the child
restraint.
Children too big for a toddler restraint must
ride in seats using regular seat belts. Position
shoulder belt across chest and shoulder, not
face or neck. A booster seat may be
necessary to achieve proper seat belt
positioning for children over 41 lb (18 kg) until
they reach a height where a lap/shoulder belt
fits properly without a booster.
When the child restraint is not in use, remove
it from the vehicle or secure it with the seat
belt to prevent the child restraint from
becoming a projectile in the event of an
accident.
Installation of infant and child restraint
systems
GObserve Safety notes, see page 53.GWarning!
Always lock the seat backrests in their upright
position when the rear seats are occupied by
passengers. Lock the seat backrests in their
upright position before installing top tether
straps or when the extended cargo
compartment is not in use. Make sure that
seat backrests are secured properly by
pushing and pulling on the seat backrests. If
a seat backrest is not locked properly, the
seat backrest could fold. The child seat would
no longer be supported properly or positioned
to provide its intended benefit. That could
cause serious or even fatal injuries.
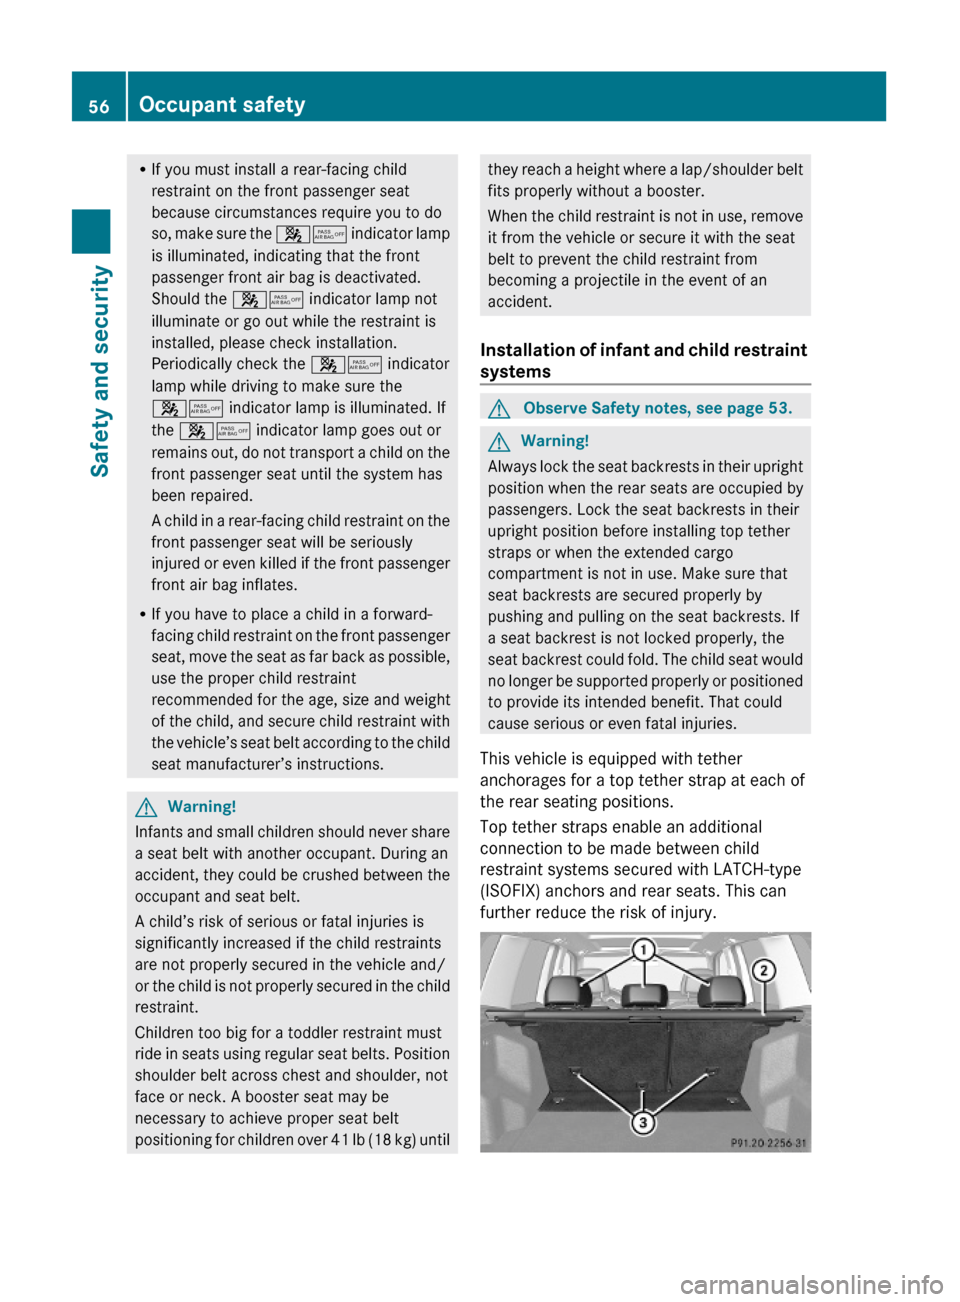
This vehicle is equipped with tether
anchorages for a top tether strap at each of
the rear seating positions.
Top tether straps enable an additional
connection to be made between child
restraint systems secured with LATCH-type
(ISOFIX) anchors and rear seats. This can
further reduce the risk of injury.
56Occupant safetySafety and security
X204_AKB; 3; 23, en-USd2ureepe,Version: 2.11.8.12009-07-16T19:16:58+02:00 - Seite 56
Page 81 of 344
Do not drive the vehicle without the seat head
restraints. Head restraints are intended to
help reduce injuries during an accident.
Seat adjustment
! When moving the seats, make sure there
are no items in the footwell or behind the
seats. Otherwise, you could damage the
seats and/or the items.
Power seats
The seat adjustment switch is located on the
entry side of each front seat base. The seat
adjustment switches for vehicles with
memory function are located on the front
doors.
iVehicles without memory function:
The seats can be adjusted within 5 minutes
after either front door has been opened.
The counter resets each time
Ryou open or close a front door
Ryou insert the SmartKey into the starter
switch
Ryou remove the SmartKey from the
starter switch
Ryou switch the ignition on or off
Just like in vehicles with memory function,
the power seats can be operated at any
time when the ignition is switched on.
iVehicles with memory function:
The memory function (Y page 86) lets you
store the settings for the seat position
together with the settings for the steering
wheel and the exterior rear view mirrors.
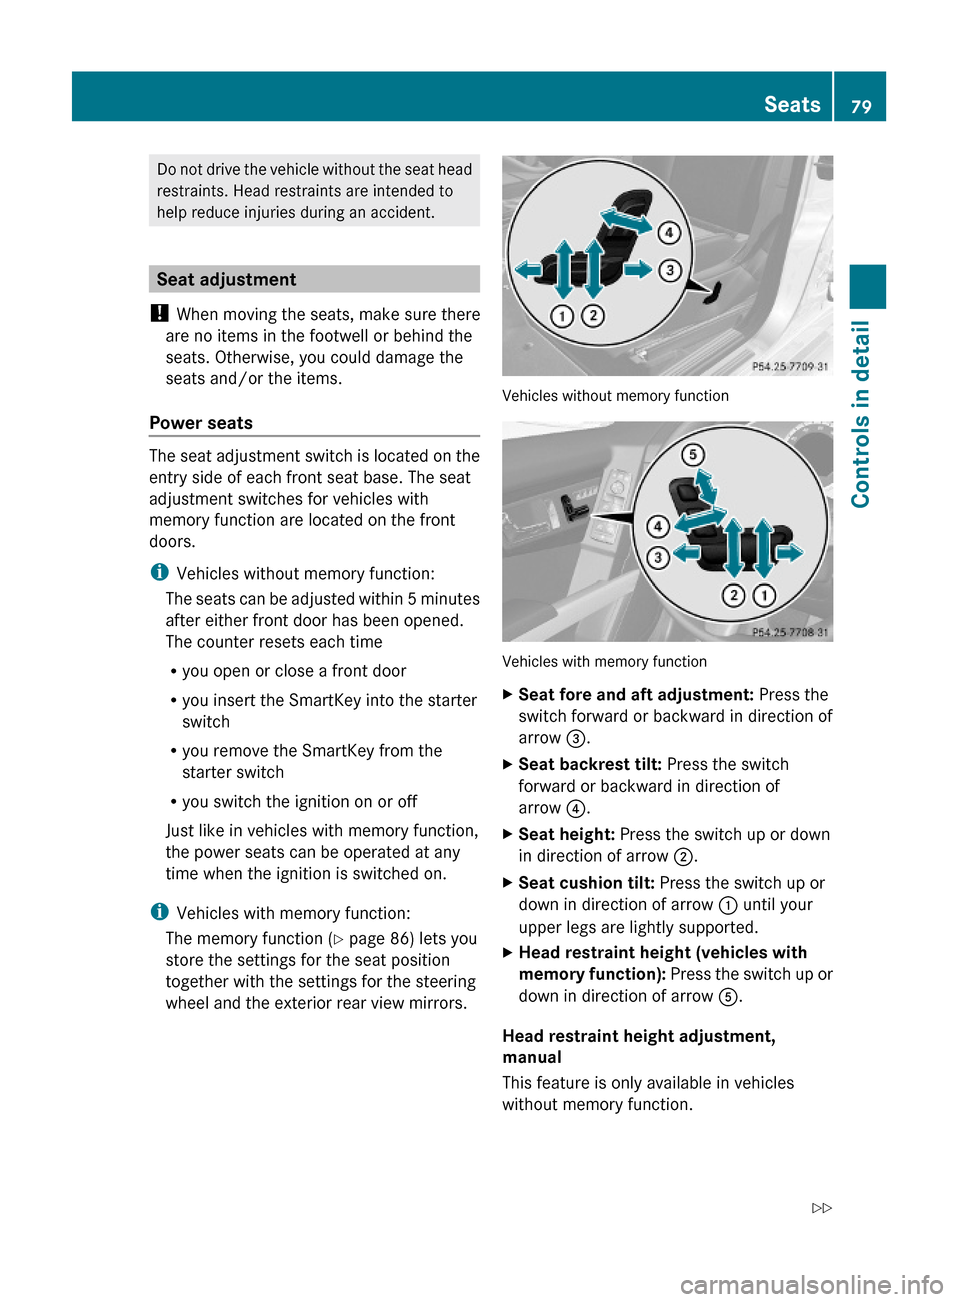
Vehicles without memory function
Vehicles with memory function
XSeat fore and aft adjustment: Press the
switch forward or backward in direction of
arrow =.
XSeat backrest tilt: Press the switch
forward or backward in direction of
arrow ?.
XSeat height: Press the switch up or down
in direction of arrow ;.
XSeat cushion tilt: Press the switch up or
down in direction of arrow : until your
upper legs are lightly supported.
XHead restraint height (vehicles with
memory function): Press the switch up or
down in direction of arrow A.
Head restraint height adjustment,
manual
This feature is only available in vehicles
without memory function.
Seats79Controls in detailX204_AKB; 3; 23, en-USd2ureepe,Version: 2.11.8.12009-07-16T19:16:58+02:00 - Seite 79Z
Page 89 of 344
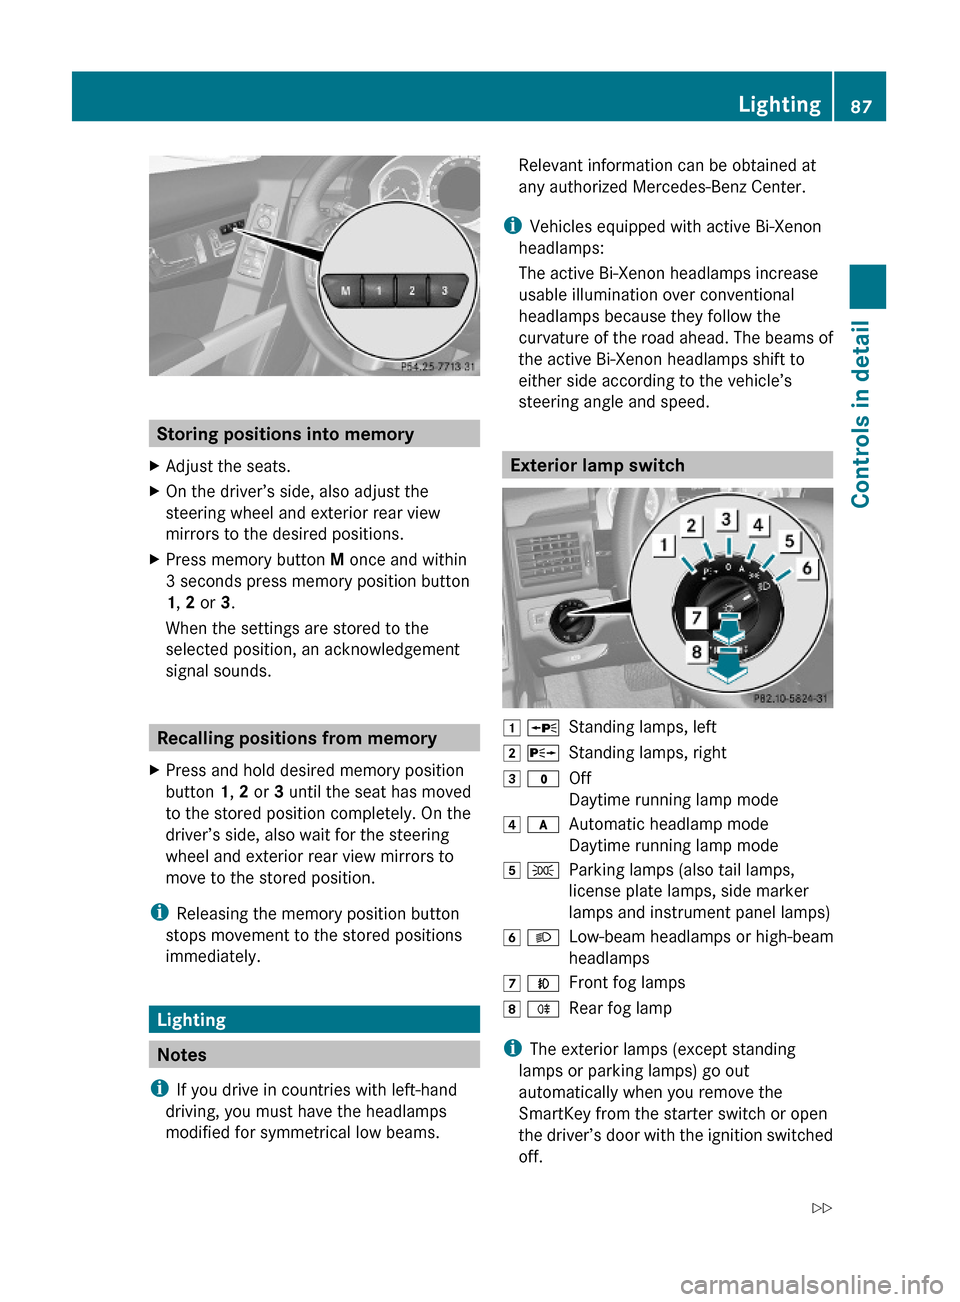
Storing positions into memory
XAdjust the seats.XOn the driver’s side, also adjust the
steering wheel and exterior rear view
mirrors to the desired positions.
XPress memory button M once and within
3 seconds press memory position button
1, 2 or 3.
When the settings are stored to the
selected position, an acknowledgement
signal sounds.
Recalling positions from memory
XPress and hold desired memory position
button 1, 2 or 3 until the seat has moved
to the stored position completely. On the
driver’s side, also wait for the steering
wheel and exterior rear view mirrors to
move to the stored position.
iReleasing the memory position button
stops movement to the stored positions
immediately.
Lighting
Notes
iIf you drive in countries with left-hand
driving, you must have the headlamps
modified for symmetrical low beams.
Relevant information can be obtained at
any authorized Mercedes-Benz Center.
iVehicles equipped with active Bi-Xenon
headlamps:
The active Bi-Xenon headlamps increase
usable illumination over conventional
headlamps because they follow the
curvature of the road ahead. The beams of
the active Bi-Xenon headlamps shift to
either side according to the vehicle’s
steering angle and speed.
Exterior lamp switch
1 WStanding lamps, left2 XStanding lamps, right3 $Off
Daytime running lamp mode
4 cAutomatic headlamp mode
Daytime running lamp mode
5 TParking lamps (also tail lamps,
license plate lamps, side marker
lamps and instrument panel lamps)
6 LLow-beam headlamps or high-beam
headlamps
7 NFront fog lamps8 RRear fog lamp
iThe exterior lamps (except standing
lamps or parking lamps) go out
automatically when you remove the
SmartKey from the starter switch or open
the driver’s door with the ignition switched
off.
Lighting87Controls in detailX204_AKB; 3; 23, en-USd2ureepe,Version: 2.11.8.12009-07-16T19:16:58+02:00 - Seite 87Z
Page 97 of 344
Problems with wipers
! If anything blocks the wipers (leaves,
snow, etc.), switch them off immediately.
For safety reasons, do the following before
attempting to remove any blockage:
R Stop the vehicle in a safe location.
R Remove the SmartKey from the starter
switch.
or
R Turn off the engine by pressing the
KEYLESS-GO start/stop button and
open the driver’s door (with the driver’s
door open, starter switch is in position
0 , same as with SmartKey removed from
starter switch).
R Engage the parking brake.
R Remove blockage.
R Turn the wipers on again.
If the windshield wipers fail to function at
all with the combination switch in position
Ä or Å ,
R set the combination switch to the next
higher wiper speed
R have the windshield wipers checked at
the nearest authorized Mercedes-Benz
Center
Power windows
Opening and closing
The door windows are opened and closed
electrically. The switches for all door windows
are located on the driver’s door control panel.
The switches for the respective door windows
are located on the front passenger door and
on the rear doors.
i Operating the rear door windows from
the rear is not possible when you activate
the override switch ( Y page 58).
GObserve Safety notes, see page 53.GWarning!
When opening or closing the door windows,
make sure there is no danger of anyone being
harmed by the opening/closing procedure.
The door windows are equipped with the
express operation and automatic reversal
function. If in express operation mode a door
window encounters an obstruction that
blocks its path, the automatic reversal
function will stop the door window and open
it slightly.
The door windows operate differently when
the switch is pulled and held. See the “Closing
when a door window is blocked” section in
this chapter for details.
The closing of the door windows can be
immediately halted by releasing the switch or,
if the switch was pulled past the resistance
point and released, by either pressing or
pulling the respective switch.
If a door window encounters an obstruction
that blocks its path in a circumstance where
you are closing the door windows by pressing
and holding button & on the SmartKey the
automatic reversal function will not operate.
Activate the override switch when children
are riding in the back seats of the vehicle. The
children may otherwise injure themselves,
e.g. by becoming trapped in the door window
opening.
GWarning!
Do not keep any part of your body up against
the window pane when opening a window. The
downward motion of the pane may pull that
part of your body down between the window
pane and the door frame and trap it there. If
there is a risk of entrapment, release the
switch and pull it to close the window.
i You can also open or close the door
windows using the SmartKey, see
“Summer opening feature” ( Y page 97)
Power windows95Controls in detailX204_AKB; 3; 23, en-USd2ureepe,Version: 2.11.8.12009-07-16T19:16:58+02:00 - Seite 95Z
Page 194 of 344
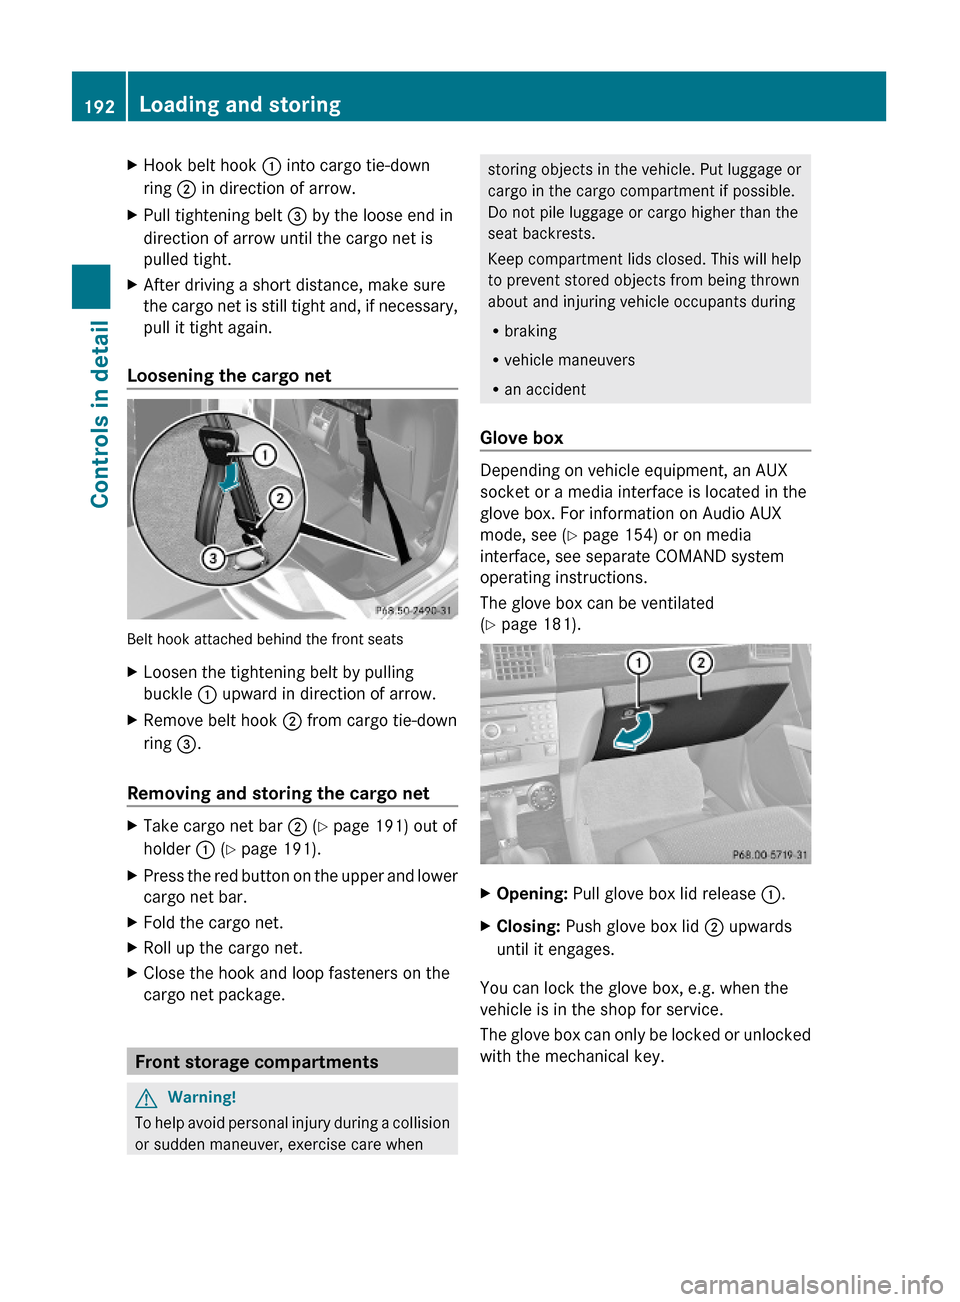
XHook belt hook : into cargo tie-down
ring ; in direction of arrow.
XPull tightening belt = by the loose end in
direction of arrow until the cargo net is
pulled tight.
XAfter driving a short distance, make sure
the cargo net is still tight and, if necessary,
pull it tight again.
Loosening the cargo net
Belt hook attached behind the front seats
XLoosen the tightening belt by pulling
buckle : upward in direction of arrow.
XRemove belt hook ; from cargo tie-down
ring =.
Removing and storing the cargo net
XTake cargo net bar ; (Y page 191) out of
holder : (Y page 191).
XPress the red button on the upper and lower
cargo net bar.
XFold the cargo net.XRoll up the cargo net.XClose the hook and loop fasteners on the
cargo net package.
Front storage compartments
GWarning!
To help avoid personal injury during a collision
or sudden maneuver, exercise care when
storing objects in the vehicle. Put luggage or
cargo in the cargo compartment if possible.
Do not pile luggage or cargo higher than the
seat backrests.
Keep compartment lids closed. This will help
to prevent stored objects from being thrown
about and injuring vehicle occupants during
Rbraking
Rvehicle maneuvers
Ran accident
Glove box
Depending on vehicle equipment, an AUX
socket or a media interface is located in the
glove box. For information on Audio AUX
mode, see (Y page 154) or on media
interface, see separate COMAND system
operating instructions.
The glove box can be ventilated
(Y page 181).
XOpening: Pull glove box lid release :.XClosing: Push glove box lid ; upwards
until it engages.
You can lock the glove box, e.g. when the
vehicle is in the shop for service.
The glove box can only be locked or unlocked
with the mechanical key.
192Loading and storingControls in detail
X204_AKB; 3; 23, en-USd2ureepe,Version: 2.11.8.12009-07-16T19:16:58+02:00 - Seite 192
Page 195 of 344
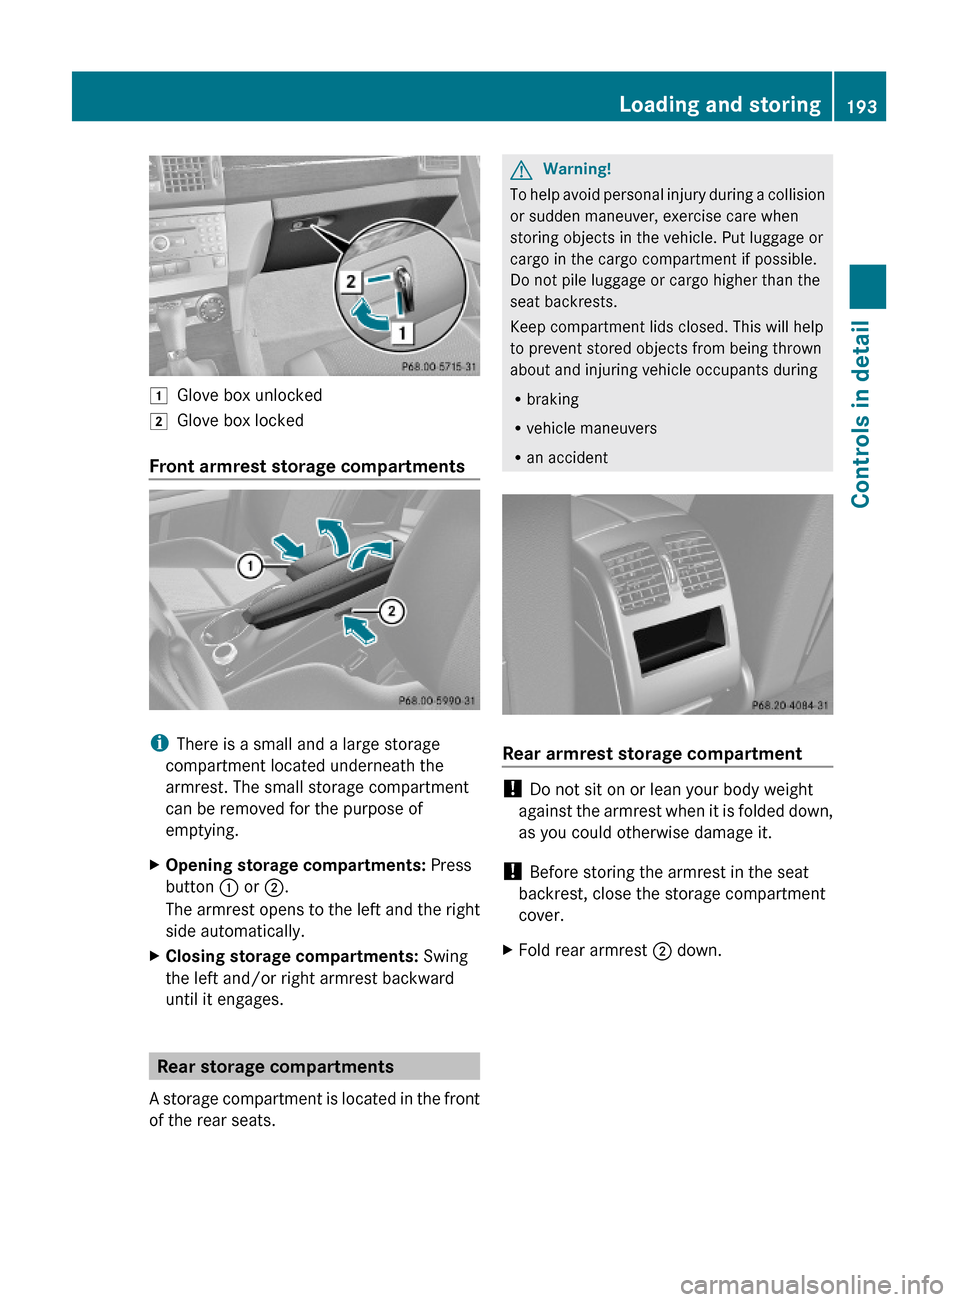
1Glove box unlocked2Glove box locked
Front armrest storage compartments
iThere is a small and a large storage
compartment located underneath the
armrest. The small storage compartment
can be removed for the purpose of
emptying.
XOpening storage compartments: Press
button : or ;.
The armrest opens to the left and the right
side automatically.
XClosing storage compartments: Swing
the left and/or right armrest backward
until it engages.
Rear storage compartments
A storage compartment is located in the front
of the rear seats.
GWarning!
To help avoid personal injury during a collision
or sudden maneuver, exercise care when
storing objects in the vehicle. Put luggage or
cargo in the cargo compartment if possible.
Do not pile luggage or cargo higher than the
seat backrests.
Keep compartment lids closed. This will help
to prevent stored objects from being thrown
about and injuring vehicle occupants during
Rbraking
Rvehicle maneuvers
Ran accident
Rear armrest storage compartment
! Do not sit on or lean your body weight
against the armrest when it is folded down,
as you could otherwise damage it.
! Before storing the armrest in the seat
backrest, close the storage compartment
cover.
XFold rear armrest ; down.Loading and storing193Controls in detailX204_AKB; 3; 23, en-USd2ureepe,Version: 2.11.8.12009-07-16T19:16:58+02:00 - Seite 193Z