sensor MERCEDES-BENZ GLS 2017 User Guide
[x] Cancel search | Manufacturer: MERCEDES-BENZ, Model Year: 2017, Model line: GLS, Model: MERCEDES-BENZ GLS 2017Pages: 390, PDF Size: 11.93 MB
Page 72 of 390
Active Brake Assist with cross-traffic function
detects pedestrians using typical characteris-
tics such as body contours and the posture of a
person standing upright.
i Observe the restrictions described in the
"Important safety notes" section
( Y
page 70).
Important safety notes
G WARNING
Active Brake Assist with cross-traffic function
will initially brake your vehicle by a partial
application of the brakes if a danger of colli-
sion is detected. There may be a collision
unless you brake yourself. Even after subse-
quent full application of the brakes a collision
cannot always be avoided, particularly when
approaching at too high a speed. There is a
risk of an accident.
Always apply the brakes yourself and try to
take evasive action, provided it is safe to do
so.
In the event of a partial application of the brakes,
the vehicle is braked with up to 50% of the full
braking pressure.
G WARNING
Active Brake Assist with cross-traffic function
cannot always clearly identify objects and
complex traffic situations.
In such cases, Active Brake Assist with cross-
traffic function might: R
issue an unnecessary warning or engage R
neither give a warning nor intervene
There is a risk of an accident.
Always pay particular attention to the traffic
situation and be prepared to brake, especially
if Active Brake Assist with cross-traffic func-
tion alerts you. Terminate the intervention in a
non-critical driving situation.
G WARNING
Active Brake Assist with cross-traffic function
cannot always clearly identify people, partic-
ularly if they are moving. Active Brake Assist with cross-traffic function cannot intervene in
these cases. There is a risk of an accident.
Always pay particular attention to the traffic
situation and be prepared to brake, especially
if Active Brake Assist with cross-traffic func-
tion alerts you.
In order to maintain the appropriate distance to
the vehicle in front and thus prevent a collision,
you must apply the brakes yourself.
G WARNING
Active Brake Assist with cross-traffic function
does not react: R
to small people, e.g. children R
to animals R
to oncoming vehicles R
when cornering
As a result, Active Brake Assist with cross-
traffic function may not warn you or engage in
all critical situations. There is a risk of an acci-
dent.
Always pay careful attention to the traffic sit-
uation and be ready to brake.
In the event of snowfall or heavy rain, the rec-
ognition can be impaired.
Recognition by the radar sensor system is also
impaired if: R
there is dirt on the sensors or anything else
covering the sensors R
there is interference by other radar sources R
there are strong radar reflections, for exam-
ple in parking garages R
a narrow vehicle is traveling in front, e.g. a
motorbike R
a vehicle is traveling in front on a different line
relative to the center of your vehicle R
vehicles quickly move into the radar sensor
system detection range
Recognition by the camera system is also
impaired in the event of: R
dirt on the camera or if the camera is covered R
glare on the camera system, e.g. from the sun
being low in the sky70
Driving safety systems
Safety
Page 73 of 390
R
darkness R
or if: -
pedestrians move quickly, e.g. into the path
of the vehicle -
the camera system no longer recognizes a
pedestrian as a person due to special cloth-
ing or other objects -
a pedestrian is concealed by other objects -
the typical outline of a person is not distin-
guishable from the background
Following damage to the front end of the vehicle,
have the configuration and operation of the
radar sensors checked at a qualified specialist
workshop. This also applies to collisions at slow
speeds where there is no visible damage to the
front of the vehicle.
Following damage to the windshield, have the
configuration and operation of the camera sys-
tem checked at a qualified specialist workshop.
Function X
To activate or deactivate: activate or deac-
tivate Active Brake Assist with cross-traffic
function using the on-board computer
( Y
page 237).
If the Active Brake Assist with cross-traffic
function is deactivated, the �
Page 74 of 390
Up to a speed of approximately 44 mph
(70 km/h) the Active Brake Assist with cross-
traffic function assists you with braking in haz-
ardous situations with: R
stationary obstacles in the path of the vehicle,
e.g. stopped or parked vehicles R
stationary pedestrians in the path of the vehi-
cle R
obstacles crossing your path that move in the
detection range of the sensors and are detec-
ted X
Keep the brake pedal depressed until the
emergency braking situation is over.
ABS prevents the wheels from locking.
You can prevent the intervention of Active Brake
Assist with cross-traffic function at any time by: R
depressing the accelerator pedal further R
activating kickdown R
releasing the brake pedal
The braking application of Active Brake Assist
with cross-traffic function is ended automati-
cally if: R
you maneuver to avoid the obstacle R
there is no longer a risk of collision R
there is no longer an obstacle detected in
front of your vehicle
STEER CONTROL
General information STEER CONTROL helps you by transmitting a
noticeable steering force to the steering wheel
in the direction required for vehicle stabilization.
This steering assistance is provided in particular
if: R
both right wheels or both left wheels are on a
wet or slippery road surface when you brake R
the vehicle starts to skid
Important safety notes
i Observe the "Important safety notes" sec-
tion ( Y
page 63). No steering assistance is provided from STEER
CONTROL, if: R
ESP ®
is deactivated R
ESP ®
is malfunctioning R
the steering is malfunctioning
If ESP ®
is malfunctioning, you will be assisted
further by the electrical power steering.
Protection against theft
Immobilizer X
To activate with the SmartKey: remove the
SmartKey from the ignition lock. X
To activate with KEYLESS-GO: switch the
ignition off and open the driver's door. X
To deactivate: switch on the ignition.
The immobilizer prevents your vehicle from
being started without the correct SmartKey.
When leaving the vehicle, always take the
SmartKey with you and lock the vehicle. Anyone
can start the engine if a valid SmartKey has been
left inside the vehicle.
i The immobilizer is always deactivated when
you start the engine.
In the event that the engine cannot be started
(yet the vehicle's battery is charged), the sys-
tem is not operational. Contact an authorized
Mercedes-Benz Center or call
1-800-FOR-MERCedes (in the USA) or
1-800-387-0100 (in Canada).
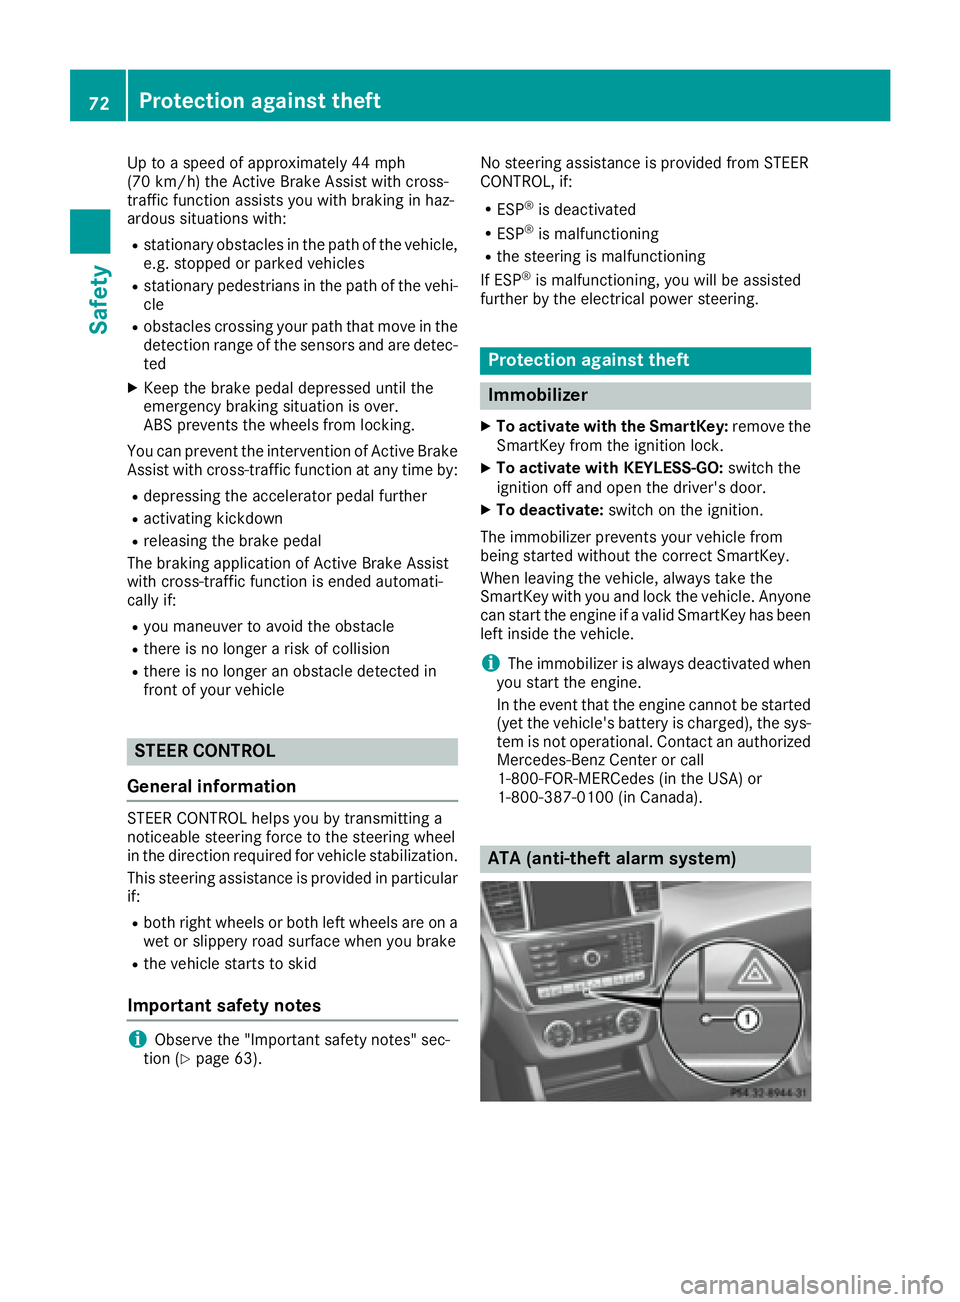
ATA (anti-theft alarm system)72
Protection against theft
Safety
Page 77 of 390
If activated in the multimedia system, the loca-
tor lighting also lights up in the dark (see sepa-
rate operating instructions). X
To open the tailgate automatically from
outside the vehicle: press and hold the �T
button until the tailgate opens.
Vehicles with KEYLESS-GO: X
To close the tailgate automatically from
outside the vehicle: if the SmartKey is loca-
ted in the immediate vicinity of the vehicle,
press the �T button on the SmartKey.
When the tailgate closes you can then release
the button.
KEYLESS-GO
General notes Bear in mind that the engine can be started by
any of the vehicle occupants if there is a KEY-
LESS-GO key in the vehicle ( Y
page 140).
Locking/unlocking centrally You can start, lock or unlock the vehicle using
KEYLESS-GO. To do this, you only need carry the
SmartKey with you. You can combine the func-
tions of KEYLESS-GO with those of a conven-
tional SmartKey. Unlock the vehicle by using
KEYLESS-GO, for instance, and lock it using the
�7 button on the SmartKey.
The driver's door and the door at which the han-
dle is used, must both be closed. The SmartKey
must be outside the vehicle. When locking or
unlocking with KEYLESS-GO, the distance
between the SmartKey and the corresponding
door handle must not be greater than 3 ft (1 m).
KEYLESS-GO checks whether a valid SmartKey
is in the vehicle by periodically establishing a
radio connection between the vehicle and the
SmartKey. This happens: R
when starting the engine R
while driving R
when the external door handles are touched R
during convenience closing X
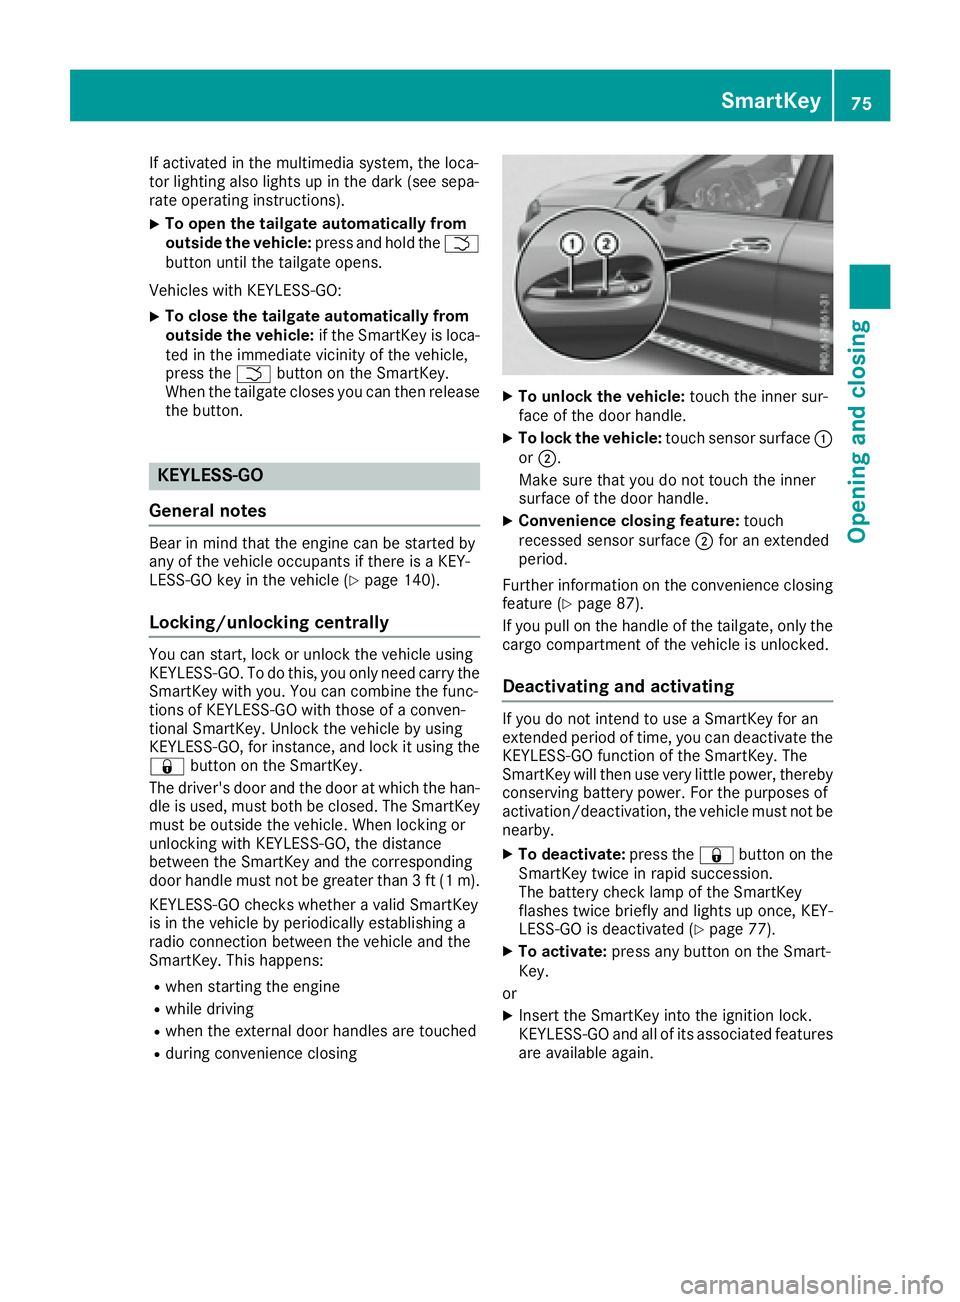
To unlock the vehicle: touch the inner sur-
face of the door handle. X
To lock the vehicle: touch sensor surface �C
or �D .
Make sure that you do not touch the inner
surface of the door handle. X
Convenience closing feature: touch
recessed sensor surface �D for an extended
period.
Further information on the convenience closing
feature ( Y
page 87).
If you pull on the handle of the tailgate, only the
cargo compartment of the vehicle is unlocked.
Deactivating and activating If you do not intend to use a SmartKey for an
extended period of time, you can deactivate the
KEYLESS-GO function of the SmartKey. The
SmartKey will then use very little power, thereby
conserving battery power. For the purposes of
activation/deactivation, the vehicle must not be
nearby. X
To deactivate: press the �7 button on the
SmartKey twice in rapid succession.
The battery check lamp of the SmartKey
flashes twice briefly and lights up once, KEY-
LESS-GO is deactivated ( Y
page 77).X
To activate: press any button on the Smart-
Key.
or X
Insert the SmartKey into the ignition lock.
KEYLESS-GO and all of its associated features
are available again. SmartKey 75
Opening and closing Z
Page 78 of 390
KEYLESS- GO start function
Gene ra l notesBear in min d that th e engin e can be started by
any of th e vehicl e occupant s if there is a Smart -
Key in th e vehicl e ( Y
page 140).
Changing the settings of the locking
system You can chang e th e setting s of th e locking sys-
tem. This mean s that only th e driver's door and
th e fuel filler flap are unlocke d when th e vehicl e
is unlocked. This is useful if you frequentl y travel
alone. X
To change th e setting: press and hold down
th e �6 and �7 buttons simultaneousl y
for about six seconds until th e battery indica-
to r lamp flashes twice ( Y
page 77) .
If th e setting of th e locking system is changed
within th e signal range of th e vehicle, pressing
th e �7 or �6 button:R
locks or R
unlocks th e vehicl e
The SmartKey no w function s as follows :X
To unlock: press th e �6 butto n once .X
To unlock centrally: press th e �6 butto n
twice .X
To lock centrally: press th e �7 button.
The KEYLESS-GO function is changed as fol -
lows : X
To unlock th e driver's door : touch th e inner
surfac e of th e door handle on th e driver's
door .X
To unlock centrally: touch th e inner surfac e
of th e door handle on th e front-passenger
door or th e rear door .X
To lock centrally: touch th e outer sensor
surfac e on on e of th e door handles
( Y
page 75) .X
To restor e th e factory settings: press and
hold down th e �6 and �7 buttons s imul-
ta
neously for approximately six seconds until
th e battery chec k lamp flashes twice
( Y
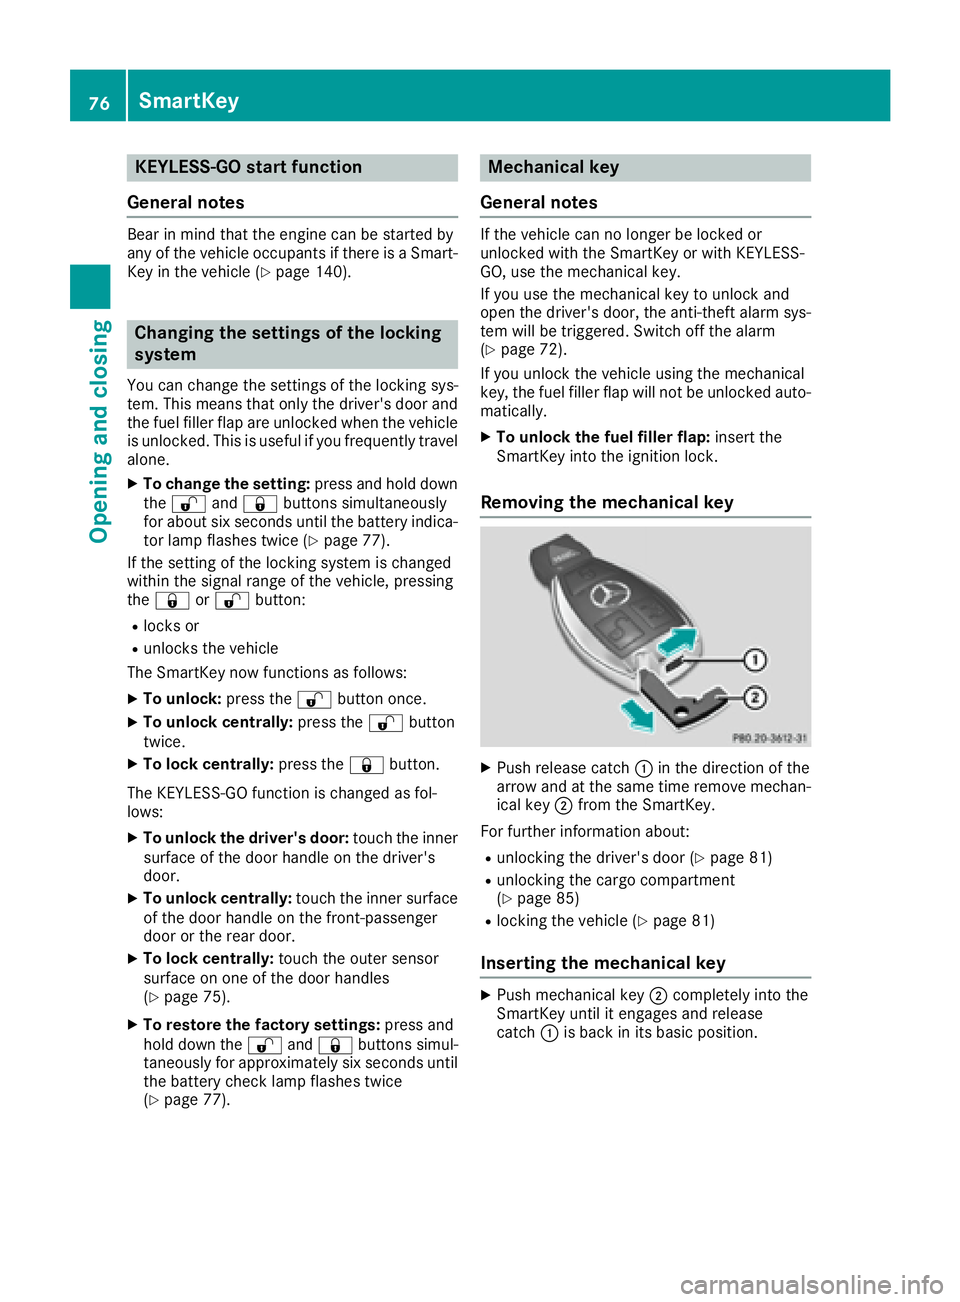
page 77) . Mechanical key
Gene ra l notesIf th e vehicl e can no longer be locke d or
unlocke d wit h th e SmartKey or wit h KEYLESS -
GO, use th e mechanical key.
If you use th e mechanical ke y to unloc k and
open th e driver's door , th e anti-thef t alarm sys-
te m will be triggered . Switc h off th e alarm
( Y
page 72) .
If you unloc k th e vehicl e usin g th e mechanical
key, th e fuel filler flap will no t be unlocke d auto -
matically. X
To unlock th e fuel filler flap: insert th e
SmartKey int o th e ignition lock.
Removing the me chanical key
X
Push release catch �C in th e direction of th e
arrow and at th e sam e time remove mechan -
ical ke y �D from th e SmartKey.
Fo r further information about :R
unlocking th e driver's door ( Y
page 81)R
unlocking th e cargo compartmen t
( Y
page 85) R
locking th e vehicl e ( Y
page 81)
Inserting the me chanical key X
Push mechanical ke y �D completely int o th e
SmartKey until it engage s and release
catch �C is bac k in it s basic position .76
SmartKey
Opening and closing
Page 90 of 390
Vehicles with KEYLESS-GO: R
Release the sensor surfaces on the exterior
door handle to interrupt the closing proce-
dure. R
To open, pull the same door handle immedi-
ately and hold it firmly. The door windows and
the sliding sunroof will open for as long as the
door handle is held but the door is not
opened.
Notes on the automatic reversing feature for: R
the side window ( Y
page 86)R
the sliding sunroof ( Y
page 90)R
the panorama roof with power tilt/sliding
panel ( Y
page 90)
Using the SmartKey The SmartKey must be close to the vehicle. For
vehicles without KEYLESS-GO, the SmartKey
must be near the driver's door handle. X
Vehicles without KEYLESS-GO: point the tip
of the SmartKey at the door handle on the
driver's door. X
Press and hold the �7 button until the side
windows and the sliding sunroof or the pano-
rama roof with power tilt/sliding panel are
fully closed. X
Make sure that all the side windows and the
sliding sunroof or panorama roof with power
tilt/sliding panel are closed.
On vehicles with a panorama roof with power
tilt/sliding panel: X
Press and hold the �7 button again until the
roller sunblinds of the panorama roof with
power tilt/sliding panel close. X
To interrupt convenience closing: release
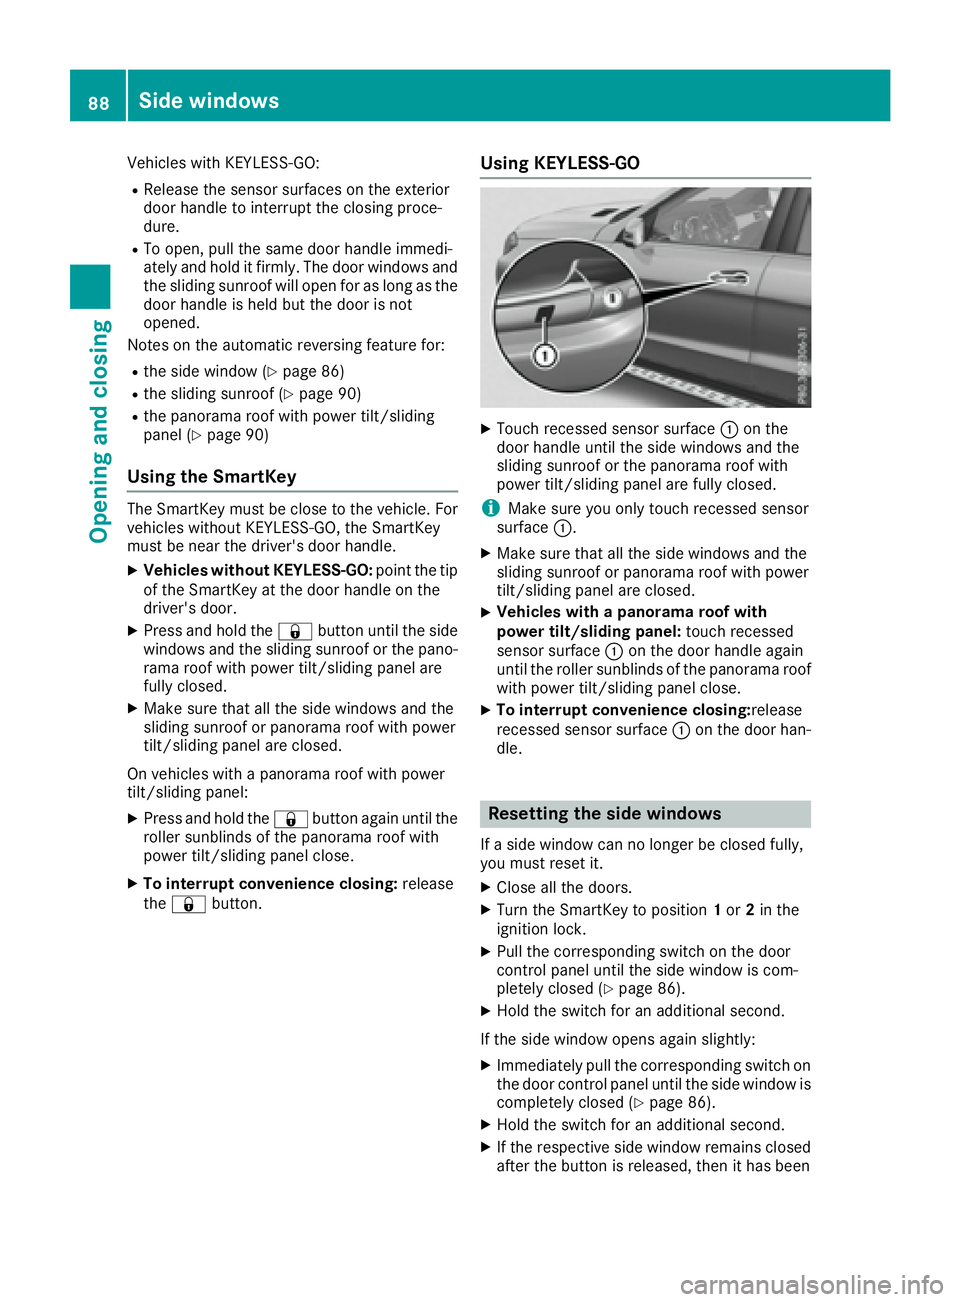
the �7 button. Using KEYLESS-GO X
Touch recessed sensor surface �C on the
door handle until the side windows and the
sliding sunroof or the panorama roof with
power tilt/sliding panel are fully closed.
i Make sure you only touch recessed sensor
surface �C . X
Make sure that all the side windows and the
sliding sunroof or panorama roof with power
tilt/sliding panel are closed. X
Vehicles with a panorama roof with
power tilt/sliding panel: touch recessed
sensor surface �C on the door handle again
until the roller sunblinds of the panorama roof
with power tilt/sliding panel close. X
To interrupt convenience closing: release
recessed sensor surface �C on the door han-
dle.
Resetting the side windows If a side window can no longer be closed fully,
you must reset it. X
Close all the doors. X
Turn the SmartKey to position 1 or 2 in the
ignition lock. X
Pull the corresponding switch on the door
control panel until the side window is com-
pletely closed ( Y
page 86).X
Hold the switch for an additional second.
If the side window opens again slightly: X
Immediately pull the corresponding switch on
the door control panel until the side window is
completely closed ( Y
page 86).X
Hold the switch for an additional second. X
If the respective side window remains closed
after the button is released, then it has been88
Side windows
Opening and closing
Page 114 of 390
Exterior lighting
General notes For reasons of safety, Mercedes-Benz recom-
mends that you drive with the lights switched on
even during the daytime. In some countries,
operation of the headlamps varies due to legal
requirements and self-imposed obligations.
Setting the exterior lighting
Setting options Exterior lighting can be set using: R
the light switch R
the combination switch ( Y
page 113)R
the on-board computer ( Y
page 239)
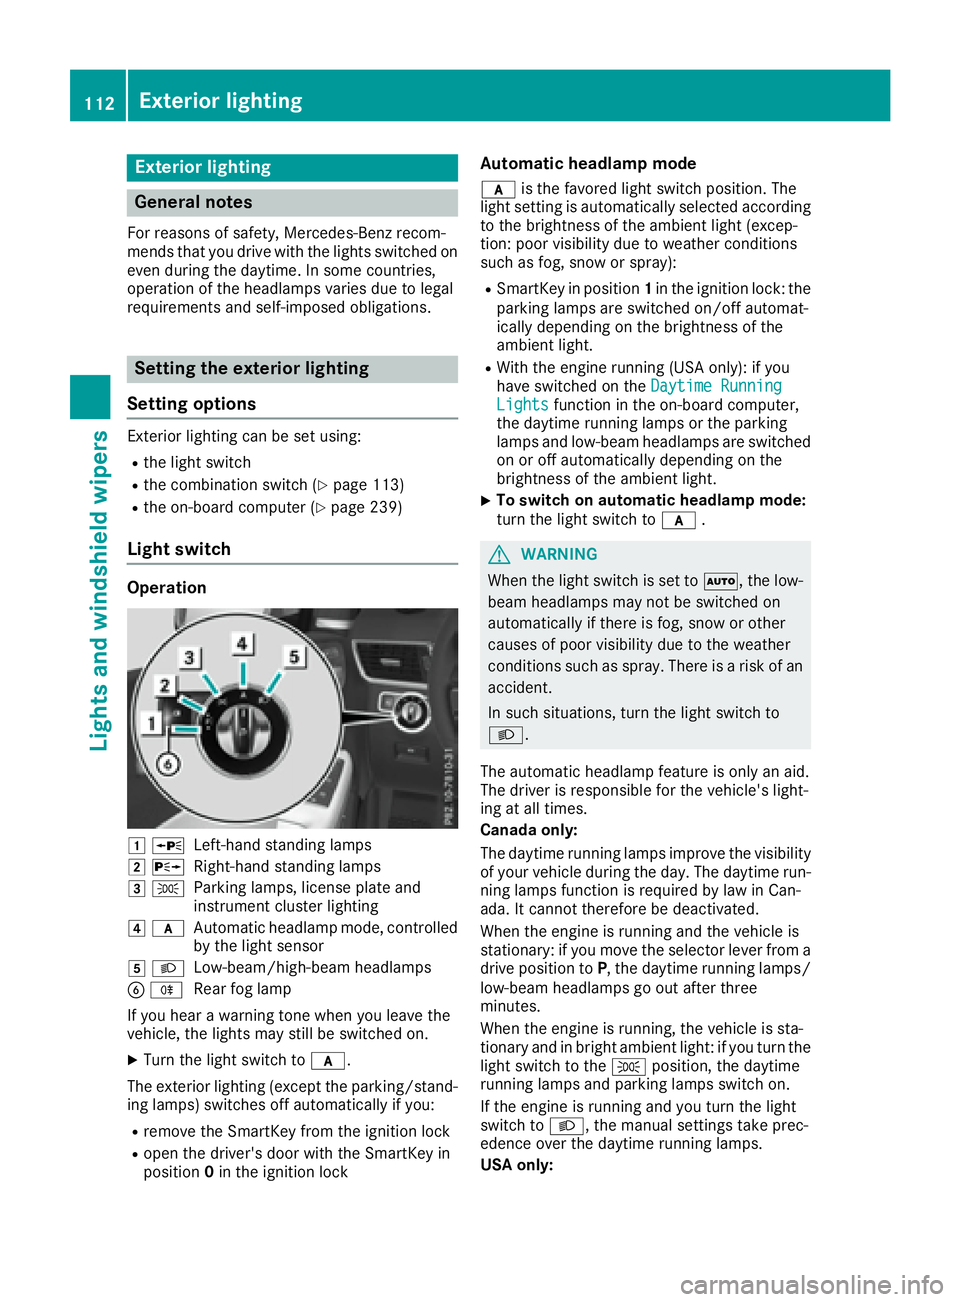
Light switch
Operation
�G �c
Left-hand standing lamps�H �d
Right-hand standing lamps�I �`
Parking lamps, license plate and
instrument cluster lighting�J �q
Automatic headlamp mode, controlled
by the light sensor
�K �X
Low-beam/high-beam headlamps
�
Page 115 of 390
The daytime running lamps improve the visibility
of your vehicle during the day. To do this, the
daytime running lamps function must be
switched on using the on-board computer
( Y
page 239).
If the engine is running and you turn the light
switch to �` or �X , the manual settings
take precedence over the daytime running
lamps.
Low-beam headlamps Even if the light sensor does not detect that it is
dark, the parking lamps and low-beam head-
lamps switch on when the ignition is switched on
and the light switch is set to the �X position.
This is a particularly useful function in the event
of rain and fog. X
To switch on the low-beam headlamps:
turn the SmartKey in the ignition lock to posi-
tion 2 or start the engine.X
Turn the light switch to �X .
The green �X indicator lamp in the instru-
ment cluster lights up.
Rear fog lamp The rear fog lamp improves visibility of your
vehicle for the traffic behind in the event of thick
fog. Please take note of the country-specific
regulations for the use of rear fog lamps. X
To switch on the rear fog lamp: turn the
SmartKey in the ignition lock to position 2 or
start the engine. X
Turn the light switch to �X or �q .X
Press the �^ button.
The yellow �^ indicator lamp in the instru-
ment cluster lights up. X
To switch off the rear fog lamp: press the
�^ button.
The yellow �^ indicator lamp in the instru-
ment cluster goes out.
Parking lamps
! If the battery charge is very low, the parking
lamps or standing lamps are automatically
switched off to enable the next engine start.
Always park your vehicle safely and in a well lit
area, in accordance with the relevant legal
stipulations. Avoid using the �` parking
lamps over a period of several hours. If pos-
sible, switch on the right-hand �d or left-
hand �c standing lamps. X
To switch on: turn the light switch to �` .
The green �` indicator lamp in the instru-
ment cluster lights up.
Standing lamps Switching on the standing lamps ensures the
corresponding side of t he vehicle is illuminated.X
To switch on the standing lamps: the
SmartKey should not be in the ignition lock or
it should be in position 0 .X
Turn the light switch to �c (left-hand side of
the vehicle) or �d (right-hand side of the
vehicle).
Vehicles towing a trailer: both the right-hand
and left-hand standing lamps (tail lamps) are
always illuminated on the trailer.
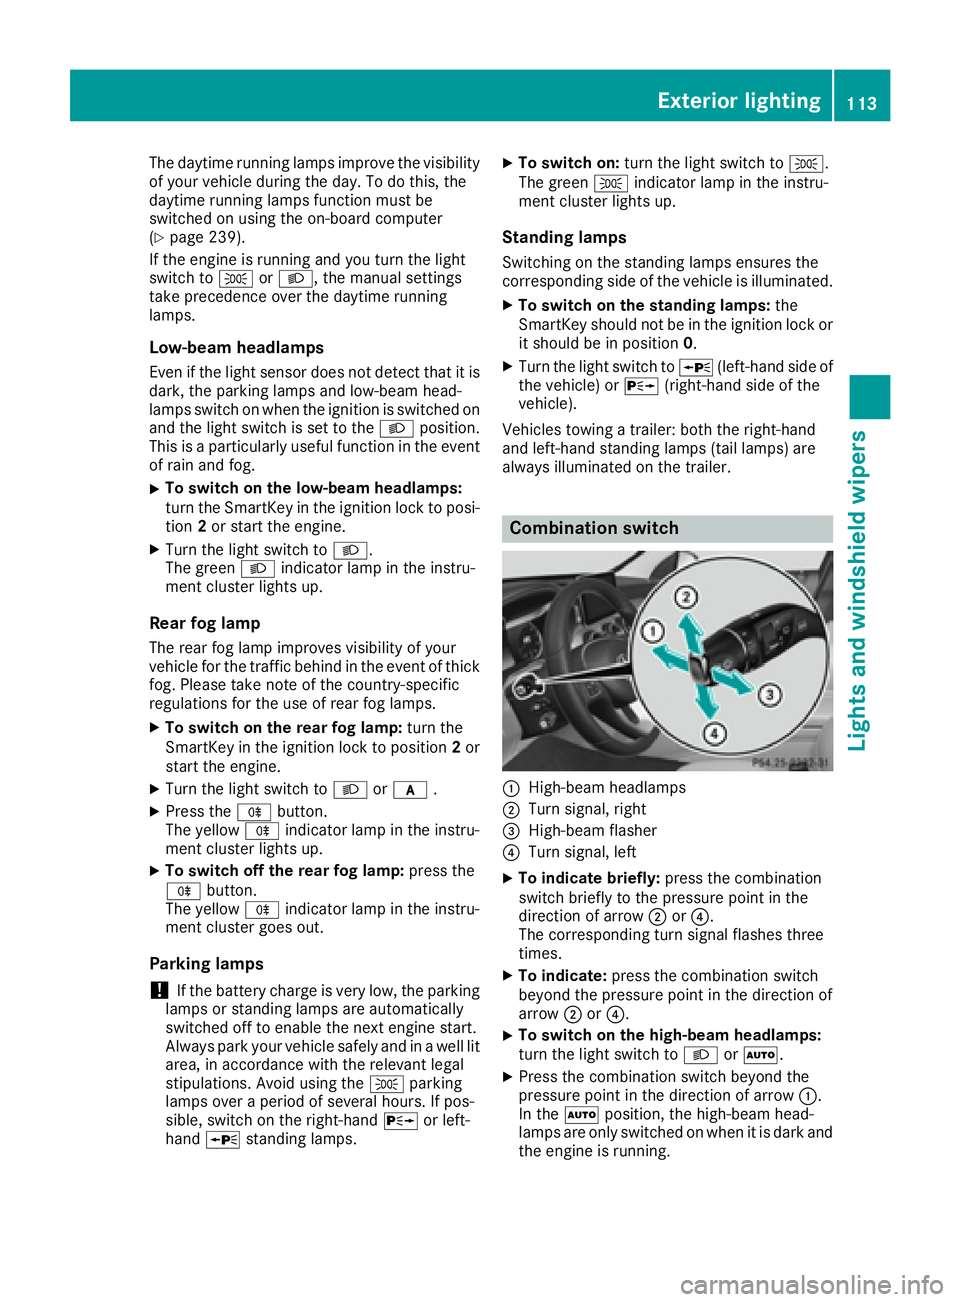
Combination switch
�C
High-beam headlamps �D
Turn signal, right �
Page 117 of 390
Not active: if you are driving at speeds below
80 km/h following activation.
Extended range fog lamps The extended range fog lamps reduce the glare
experienced by the driver and improve the illu-
mination of the edge of the road.
Active: if you are driving at speeds below
40 mph (70 km/h) and you switch on the rear
fog lamp.
Not active: if, following activation, you are driv-
ing at speeds above 60 mph (100 km/h) or if you
switch off the rear fog lamp
Off-road lights The off-road lights facilitate the early recogni-
tion of objects/obstacles when driving off-road
thanks to a symmetrical, wider and brighter dis-
tribution of light from the low-beam headlamps.
Active: when driving at speeds no faster than
30 mph (50 km/h) and the off-road program
selector wheel is in position 1 or 2.
Not active: when driving at speeds above
30 mph (50 km/h).
When the off-road lights are switched on, the
cornering light function is permanently activa-
ted, the active light function is deactivated and
the headlamp range control is set to static
mode.
Cornering light function The cornering light function improves the illu-
mination of the road over a wide angle in the
direction you are turning, enabling better visi-
bility in tight bends, for example. It can only be
activated when the low-beam headlamps are
switched on.
Active: R
if you are driving at speeds below 25 mph
(40 km/h) and switch on the turn signal or
turn the steering wheel R
if you are driving at speeds between 25 mph
(40 km/h) and 45 mph (70 km/h) and turn
the steering wheel
The cornering lamp may remain lit for a short
time, but is automatically switched off after no
more than three minutes. Adaptive Highbeam Assist
General notes You can use this function to set the headlamps
to change between low beam and high beam
automatically. The system recognizes vehicles
with their lights on, either approaching from the
opposite direction or traveling in front of your
vehicle, and consequently switches the head-
lamps from high beam to low beam.
The system automatically adapts the low-beam
headlamp range depending on the distance to
the other vehicle. Once the system no longer
detects any other vehicles, it reactivates the
high-beam headlamps.
The system's optical sensor is located behind
the windshield near the overhead control panel.
Important safety notes
G WARNING
Adaptive Highbeam Assist does not recognize
road users: R
who have no lights, e.g. pedestrians R
who have poor lighting, e.g. cyclists R
whose lighting is blocked, e.g. by a barrier
On very rare occasions, Adaptive Highbeam
Assist may fail to recognize other road users
that have lights, or may recognize them too
late. In this, or in similar situations, the auto-
matic high-beam headlamps will not be deac-
tivated or will be activated regardless. There is
a risk of an accident.
Always carefully observe the traffic conditions
and switch off the high-beam headlamps in
good time.
Adaptive Highbeam Assist cannot take into
account road, weather or traffic conditions.
Adaptive Highbeam Assist is only an aid. You are
responsible for adjusting the vehicle's lighting
to the prevailing light, visibility and traffic con-
ditions.
In particular, the detection of obstacles can be
impaired if: R
poor visibility, e.g. due to fog, heavy rain or
snow R
dirt on the sensors or the sensors are
obscuredExterior lighting 115
Lights and windshield wiper s Z
Page 122 of 390
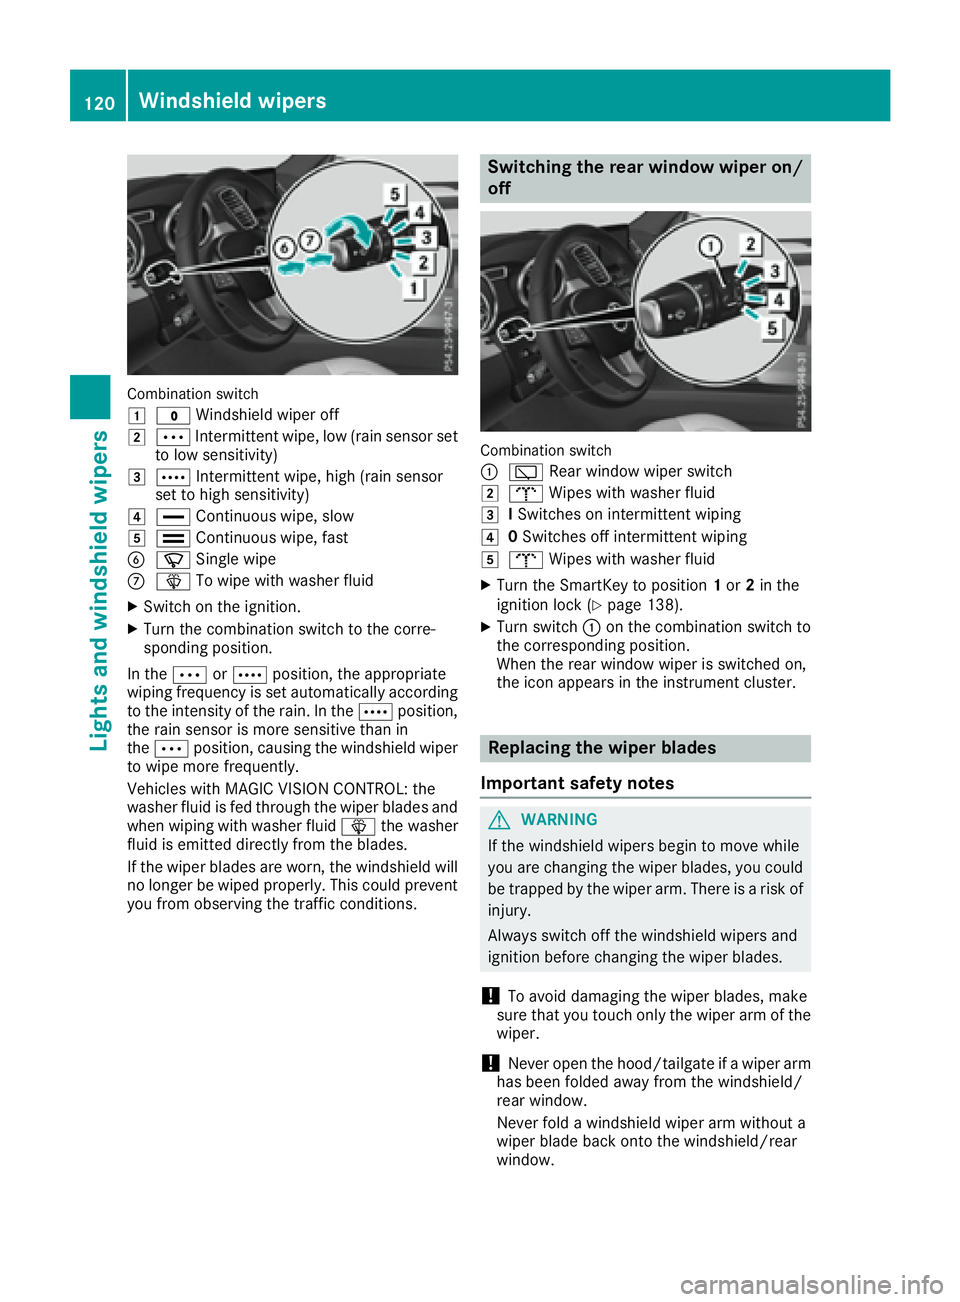
Combination swit ch
�G
�? Windshield wiper off�H
�b Intermittent wipe, low (rain sensor set
to low sensitivity)�I
�c Intermittent wipe, high (rain sensor
set to high sensitivity)�J
�