MERCEDES-BENZ GLS SUV 2018 Owner's Manual
Manufacturer: MERCEDES-BENZ, Model Year: 2018, Model line: GLS SUV, Model: MERCEDES-BENZ GLS SUV 2018Pages: 398, PDF Size: 6.75 MB
Page 241 of 398
Audio menu
Selecting a radio station
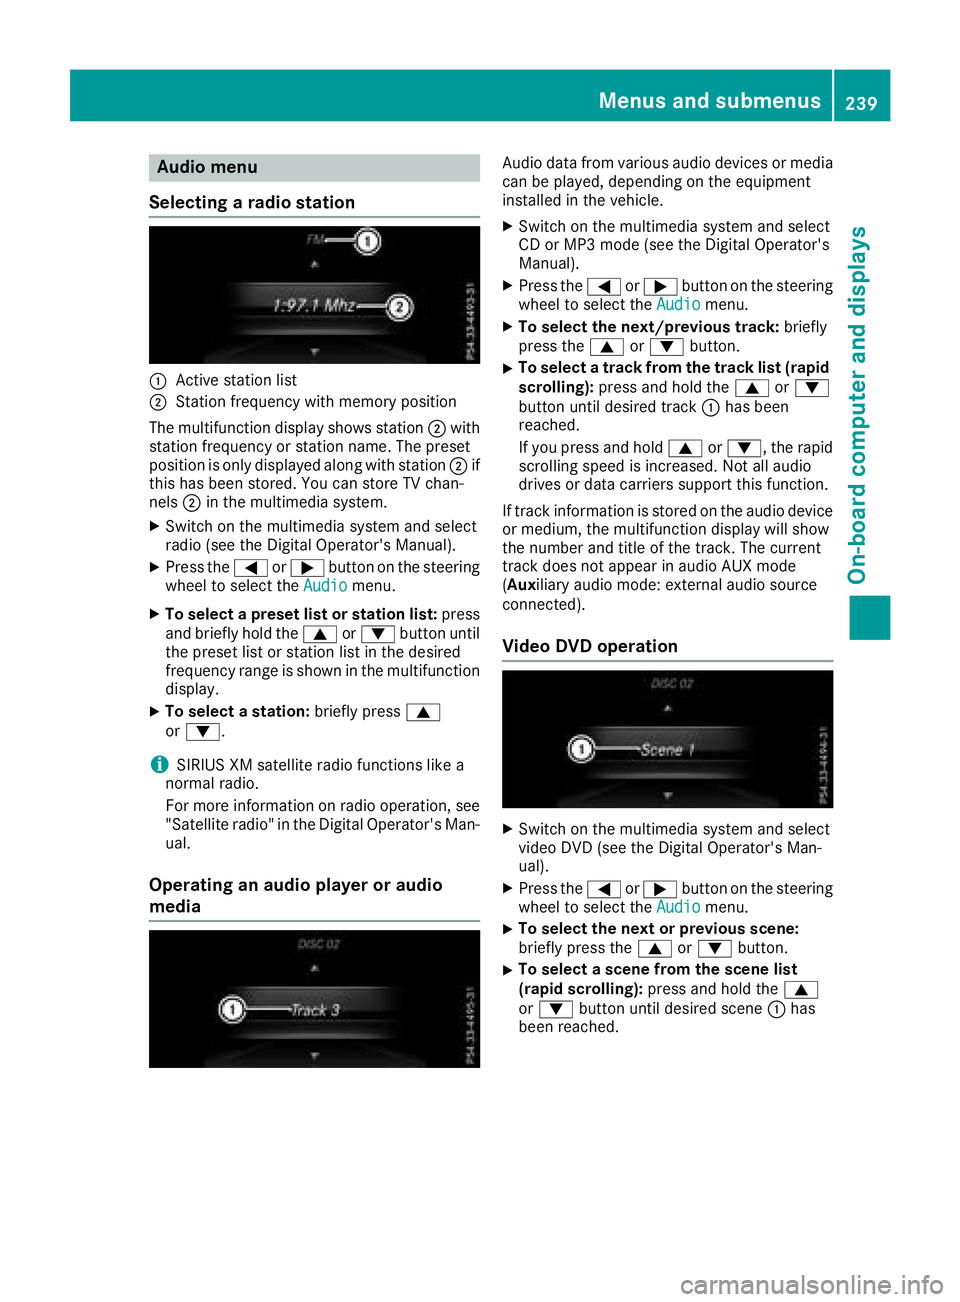
:Active station list
;Station frequency wit hmemory position
The multifunction display shows station ;with
station frequency or station name. The preset
position is only displayed alon gwit hstation ;if
this has been stored. You can store TV chan-
nels ;in th emultimedia system.
XSwitc hon th emultimedia system and select
radi o(see th eDigital Operator' sManual).
XPress th e= or; buttonon th esteering
whee lto select th eAudiomenu.
XTo select apreset list or station list :press
and briefl yhold th e9 or: buttonuntil
th epreset list or station list in th edesired
frequency range is shown in th emultifunction
display.
XTo select astation: brieflypress 9
or :.
iSIRIUS XM satellit eradi ofunction slik e a
normal radio.
Fo rmor einformation on radi ooperation ,see
"Satellit eradio" in th eDigital Operator' sMan -
ual.
Operating an audio player oraudio
media
Audio dat afrom various audio device sor media
can be played ,depending on th eequipmen t
installed in th evehicle.
XSwitc hon th emultimedia system and select
CD or MP3 mod e(see th eDigital Operator' s
Manual).
XPress th e= or; buttonon th esteering
whee lto select th eAudiomenu.
XTo select th enext/previou strack :briefl y
press th e9 or: button.
XTo select atrack from th etrack list (rapid
scrolling): press and hold th e9 or:
butto nuntil desired track :has been
reached.
If you press and hold 9or:, therapi d
scrollin gspee dis increased. Not all audio
drives or dat acarriers support this function .
If track information is store don th eaudio device
or medium, th emultifunction display will sho w
th enumber and titl eof th etrack .The curren t
track does no tappear in audio AU Xmod e
( Aux iliaryaudio mode: external audio source
connected).
Video DVD operation
XSwitc hon th emultimedia system and select
video DV D(see th eDigital Operator' sMan -
ual).
XPress th e= or; buttonon th esteering
whee lto select th eAudiomenu.
XTo select th enext or previou sscene:
briefl ypress th e9 or: button.
XTo select ascene from th escene list
(rapid scrolling): press and hold the9
or : buttonuntil desired scen e: has
been reached.
Menus and submenus23 9
On-board computer and displays
Z
Page 242 of 398
Telephone menu
Introduction
GWARNING
If you operate information systems and com-
munication equipment integrated in the vehi-
cle when driving, you may be distracted from
the traffic situation. You could also lose con-
trol of the vehicle. There is a risk of an acci-
dent.
Only operate this equipment when the traffic
situation permits. If you are not sure that this
is possible, park the vehicle paying attention
to traffic conditions and operate the equip-
ment when the vehicle is stationary.
When telephoning, you must observe the legal
requirements for the country in which you are
currently driving.
XSwitch on the mobile phone (see the manu-
facturer’s operating instructions).
XSwitch on the multimedia system (see the
Digital Operator's Manual)
XEstablish a Bluetooth®connection to the mul-
timedia system (see the Digital Operator's
Manual).
XPress the =or; button on the steering
wheel to select the Telmenu.
You will see one of the following display mes-
sages in the multifunction display:
RPhone READYor the name of the network
provider: the mobile phone has found a net-
work and is ready to receive.
RPhone No Service: there is no network
available or the mobile phone is searching for
a network.
Accepts a call
If someone calls you when you are in the Telmenu, a display message appears in the multi-
function display.
You can accept a call at any time regardless of
the menu selected.
XPress the6button on the steering wheel
to accept an incoming call.
Rejecting or ending a call
You can end or reject a call even if you are not in
the Telmenu.
XPress the ~button on the steering wheel
to reject or end a call.
Selecting an entry from the phone book
XPress the =or; button on the steering
wheel to select the Telmenu.
XPress the9,:ora button to
switch to the phone book.
XAuthorize access to the phone book on the
phone.
XPress the 9or: button to select the
desired name.
or
XTo start rapid scrolling: press and hold the
9 or: button for longer than one sec-
ond.
Rapid scrolling stops when you release the
button or reach the end of the list.
XIf only one telephone number is stored for
a name: press the 6ora button to
start dialing.
or
XIf there is more than one number for a
particular name: press the6ora
button to display the numbers.
XPress the 9or: button to select the
number you want to dial.
XPress the 6ora button to start dialing.
or
XTo exit the telephone book: press the~
or % button.
Redialing
The on-board computer saves the last names or
numbers dialed in the redial memory.
XPress the =or; button on the steering
wheel to select the Telmenu.
XPress the6button to switch to the redial
memory.
XPress the 9or: button to select the
desired name or number.
240Menus and submenus
On-board computer and displays
Page 243 of 398
XPress the6ora button to start dialing.
or
XTo exit the redial memory: press the~
or % button.
Assistance menu
Introduction
Depending on the equipment installed in the
vehicle, you have the following options in the
DriveAssist
menu:
RDisplaying the assistance graphic
(Ypage 241)
RActivating/deactivating the Traffic Sign
Assist display (Ypage 241)
RActivating or deactivating Steering Pilot
(Ypage 241)
RActivating or deactivating Active Brake Assist (Ypage 242)
RActivating or deactivating Active Brake Assist
with cross-traffic function (Ypage 242)
RActivating/deactivating ATTENTION ASSIST
(Ypage 242)
RActivating/deactivating Blind Spot Assist or
Active Blind Spot Assist (Ypage 242)
RActivating/deactivating Lane Keeping Assist
or Active Lane Keeping Assist (Ypage 242)
Displaying the assistance graphic
XPress the =or; button on the steering
wheel to select the DriveAssistmenu.
XPress9or: to select AssistanceGraphic.
XConfirm by pressing aon the steering
wheel.
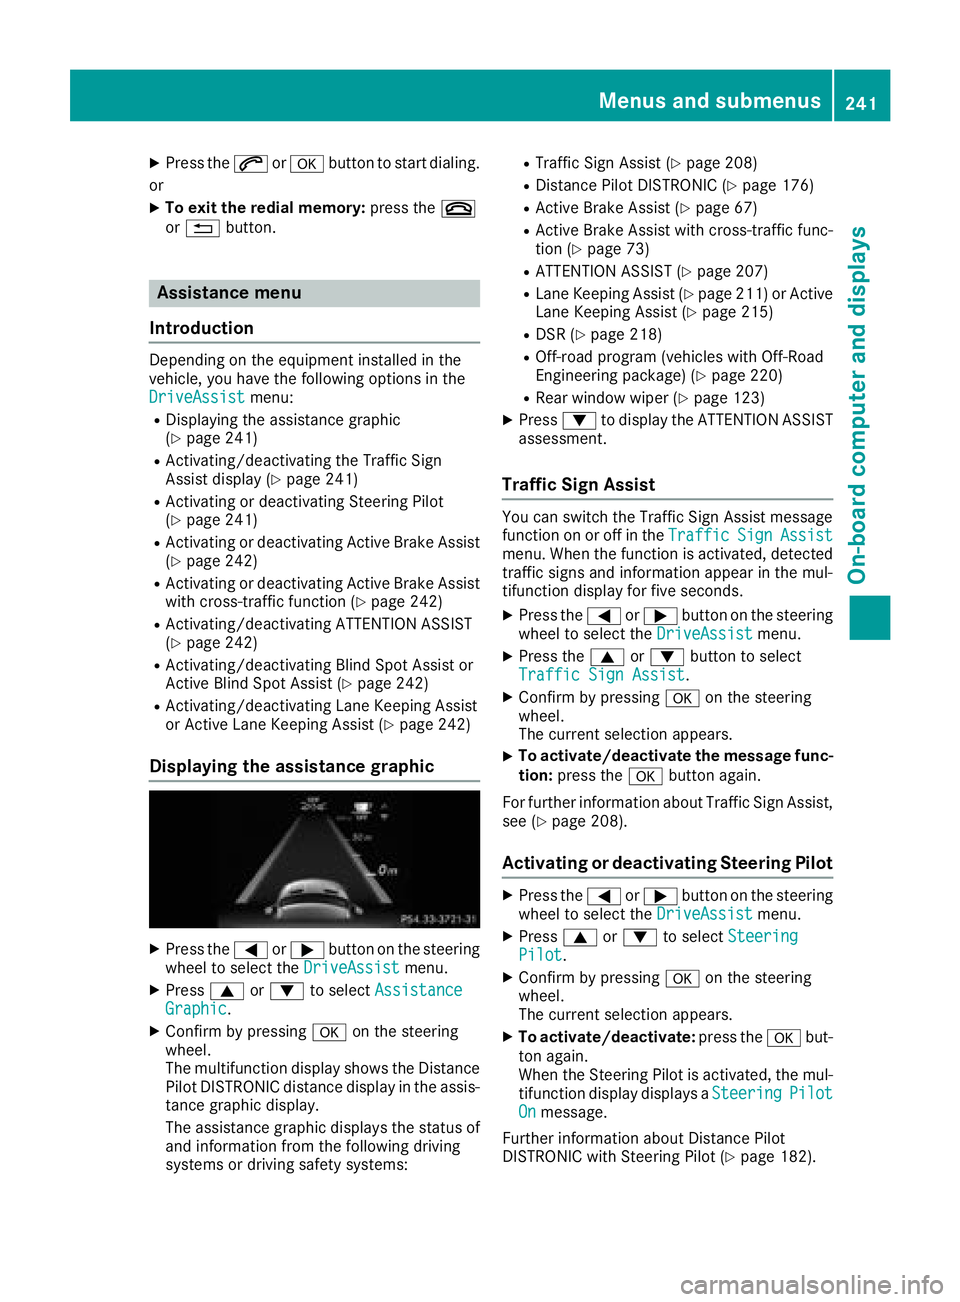
The multifunction display shows the Distance
Pilot DISTRONIC distance display in the assis-
tance graphic display.
The assistance graphic displays the status of
and information from the following driving
systems or driving safety systems:
RTraffic Sign Assist (Ypage 208)
RDistance Pilot DISTRONIC (Ypage 176)
RActive Brake Assist (Ypage 67)
RActive Brake Assist with cross-traffic func-
tion (Ypage 73)
RATTENTION ASSIST (Ypage 207)
RLane Keeping Assist (Ypage 211) or Active
Lane Keeping Assist (Ypage 215)
RDSR (Ypage 218)
ROff-road program (vehicles with Off-Road
Engineering package) (Ypage 220)
RRear window wiper (Ypage 123)
XPress :to display the ATTENTION ASSIST
assessment.
Traffic Sign Assist
You can switch the Traffic Sign Assist message
function on or off in the TrafficSignAssistmenu. When the function is activated, detected
traffic signs and information appear in the mul-
tifunction display for five seconds.
XPress the=or; button on the steering
wheel to select the DriveAssistmenu.
XPress the9or: button to select
Traffic Sign Assist.
XConfirm by pressing aon the steering
wheel.
The current selection appears.
XTo activate/deactivate the message func-
tion: press the abutton again.
For further information about Traffic Sign Assist,
see (
Ypage 208).
Activating or deactivating Steering Pilot
XPress the =or; button on the steering
wheel to select the DriveAssistmenu.
XPress9or: to select SteeringPilot.
XConfirm by pressing aon the steering
wheel.
The current selection appears.
XTo activate/deactivate: press theabut-
ton again.
When the Steering Pilot is activated, the mul- tifunction display displays a Steering
PilotOnmessage.
Further information about Distance Pilot
DISTRONIC with Steering Pilot (
Ypage 182).
Menus and submenus241
On-board computer and displays
Z
Page 244 of 398
Activating/deactivating Active Brake
Assist
You can use these functionsto activate/deac -
tivat eActive Brake Assis tor, on vehicles wit h
th eDrivin gAssistance package, to activat eor
deactivat eActive Brake Assis twit hcross-traffic
function .
XPress the= or; buttonon th esteering
whee lto select th eDriveAssistmenu.
XPress th e9 or: buttonto select
Brake Assist.
XPress ato confirm .
The curren tselection appears.
XTo activate/deactivate: press thea but-
to nagain .
When Active Brake Assis tor Active Brake
Assis twit hcross-traffic function is deactiva-
ted, th eæ symbol appear sin th emulti-
function display in th eassistanc egraphic dis-
play.
Further information on Active Brake Assis t
(
Ypage 67) and Active Brake Assis twit hcross -
traffic function (Ypage 72).
Activating/deactivating ATTENTION
ASSIST
XPress the= or; buttonon th esteering
whee lto select th eDriveAssistmenu.
XPress th e9 or: buttonto select
Attention Assist.
XPress th ea button.
The curren tselection appears.
XPress ato confirm .
XPress the: or9 buttonto set Off,
Standardor Sensitive.
XPress th ea buttonto sav eth esetting .
When ATTENTION ASSIST is deactivated, th e
é symbol appear sin th emultifunction dis-
play in th eassistanc egraphic sdisplay.
Fo rfurther information about ATTENTION
ASSIST ,see (
Ypage 207).
Activating/deactivating Blind Spot
Assist
XPress th e= or; buttonon th esteering
whee lto select th eDriveAssistmenu.
XPress th e9 or: buttonto select
Blind Spo tAssist.
XConfir mby pressing aon thesteering
wheel.
The curren tselection appears.
XTo activate/deactivate: press thea but-
to nagain .
Fo rfurther information about Blind Spot Assist,
see (
Ypage 209).
Fo rfurther information about Active Blind Spot
Assist, see (
Ypage 213).
Activating/deactivating Lane Keeping
Assist
XPress th e= or; buttonon th esteering
whee lto select th eDriveAssistmenu.
XPress th e9 or: buttonto select
Lan eKeepin gAssist.
XPress ato confirm .
The curren tselection appears.
XPress ato confirm .
XPress the: or9 buttonto set Off,
Standardor Adaptive.
When Lan eKeepin gAssis tor Active Lan e
Keepin gAssis tis activated, th emultifunction
display shows th elan emarking sas bright
lines in th eassistanc egraphic .
XPress th ea buttonto sav eth esetting .
Fo rfurther information about Lan eKeepin g
Assist, see (
Ypage 211).
Fo rfurther information about Active Lan eKeep-
ing Assist, see (
Ypage 215).
Service menu
Dependingon th eequipmen tinstalled in th e
vehicle, you hav eth efollowin goption sin th e
Serv.
menu:
Rcalling up display message sin message mem -
ory (Ypage 248)
Rrestarting th etire pressur eloss warning sys-
te m (Ypage 361) or checking th etire pres-
sur eelectronically (Ypage 363)
Rcalling up theservic edue dat e (Ypage 329).
242Menus and submenus
On-board computer and displays
Page 245 of 398
Settings menu
Introduction
Depending on the equipment installed in the
vehicle, In the Sett.menu you have the follow-
ing options:
RChanging the instrument cluster settings
(Ypage 243)
RChanging the light settings (Ypage 243)
RChanging the vehicle settings (Ypage 244)
RChanging the convenience settings
(Ypage 244)
RRestoring the factory settings (Ypage 245)
Instrument cluster submenu
Selecting the distance unit
The Display Unit Speedometer / Odome‐ter:function allows you to choose whether
certain displays appear in kilometers or miles in
the multifunction display.
XPress the =or; button on the steering
wheel to select the Sett.menu.
XPress the:or9 button to select the
Instrument Clustersubmenu.
XPress ato confirm.
XPress the :or9 button to select the
Display Unit Speedometer / Odometer
function.
You will see the selected setting: kmormiles.
XPress the abutton to save the setting.
The selected unit of measurement for distance
applies to:
RDigital speedometer in the Tripmenu
ROdometer and the trip odometer
RTrip computer
RCurrent consumption and the range
RNavigation instructions in the Navimenu
RCruise control
RDistance Pilot DISTRONIC
RASSYST PLUS service interval display
Selecting permanent display
ThePermanent Display:function allows you
to choose whether the multifunction display
always shows the outside temperature or the
speed. The speed display is inverse to the speedome-
ter.
XPress the
=or; button on the steering
wheel to select the Sett.menu.
XPress the:or9 button to select the
Instrument Clustersubmenu.
XConfirm by pressing aon the steering
wheel.
XPress the :or9 button to select the
Permanent Display:function.
The current setting, Outside Temperature,
Speedometer [km/h]or Speedometer[mph]appears.
XTo change the setting: pressaagain.
Light submenu
Setting the daytime running lamps
This function is not available in Canada.
XPress the =or; button on the steering
wheel to select the Sett.menu.
XPress the:or9 button to select the
Lightsubmenu.
XPress ato confirm.
XPress :or9 to select the DaytimeRunning Lightsfunction.
If the DaytimeRunningLightsfunction has
been switched on, the cone of light and the
W symbol in the multifunction display are
shown in orange.
XPress the abutton to save the setting.
Further information on daytime running lamps
(
Ypage 115).
Switching the Intelligent Light System
on/off
XPress the =or; button on the steering
wheel to select the Sett.menu.
XPress the:or9 button to select the
Lightsubmenu.
XPress ato confirm.
XPress the :or9 button to select the
Intell. Light Systemfunction.
If the Intell. Light Systemfunction has
been switched on, the cone of light and the
L symbol in the multifunction display are
shown in orange.
XPress the abutton to save the setting.
When you activate Intell. Light System
,
you activate the following functions:
Menus and submenus243
On-board computer and displays
Z
Page 246 of 398
RHighway mode
RActive light function
RCornering light function
RExtended range fog lamps
ROff-road lights
Further information on the Intelligent Light Sys-
tem (
Ypage 117).
Vehicle submenu
Activating/deactivating the automatic
door locking mechanism
If you activate the AutomaticDoorLockfunc-
tion, the vehicle is centrally locked above a
speed of approximately 9 mph (15 km/h).
XPress the =or; button on the steering
wheel to select the Sett.menu.
XPress the:or9 button to select the
Vehiclesubmenu.
XPress ato confirm.
XPress the :or9 button to select the
Automatic Door Lockfunction.
When the Automatic Door Lockfunction is
activated, the vehicle doors are displayed in
orange in the multifunction display.
XPress the abutton to save the setting.
For further information on the automatic locking
feature, see (
Ypage 84).
Activating/deactivating the acoustic
locking verification signal
If you switch on the AcousticLockfunction, an
acoustic signal sounds when you lock the vehi-
cle.
XPress the =or; button on the steering
wheel to select the Settingsmenu.
XPress the:or9 button to select the
Vehiclesubmenu.
XPress ato confirm.
XPress the :or9 button to select the
Acoustic Lockfunction.
If the Acoustic Lockfunction is activated,
the & symbol in the multifunction display
lights up orange.
XPress the abutton to save the setting.
Convenience submenu
Activating/deactivating the EASY-
ENTRY/EXIT feature
GWARNING
When the EASY-ENTRY/EXIT feature adjusts
the steering wheel, you and other vehicle
occupants – particularly children – could
become trapped. There is a risk of injury.
While the EASY-ENTRY/EXIT feature is mak-
ing adjustments, make sure that no one has
any body parts in the sweep of the steering
wheel.
If somebody becomes trapped:
Rpress one of the memory function position
buttons, or
Rmove the switch for steering wheel adjust-
ment in the opposite direction to that in
which the steering wheel is moving.
The adjustment process is stopped.
XPress the =or; button on the steering
wheel to select the Sett.menu.
XPress the:or9 button to select the
Conveniencesubmenu.
XPress ato confirm.
XUsing :or9, select the EasyEntry/Exitfunction.
If the EasyEntry/Exitfunction is activated,
the vehicle steering wheel is displayed in
orange in the multifunction display.
XPress the abutton to save the setting.
Further information on the EASY-ENTRY/EXIT
feature (
Ypage 109).
Switching the seat belt adjustment on/off
XPress the =or; button on the steering
wheel to select the Settingsmenu.
XPress the:or9 button to select the
Conveniencesubmenu.
XPress ato confirm.
XPress the :or9 button to select the
Belt Adjustmentfunction.
If the BeltAdjustmentfunction is activated,
the vehicle seat belt is shown in orange in the
multifunction display.
XPress the abutton to save the setting.
244Menus and submenus
On-board computer and displays
Page 247 of 398
For further information on belt adjustment, see
(Ypage 48).
Switching the fold-in mirrors when lock-
ing feature on/off
This function is only available when the vehicle is
equipped with the electrical fold-in function.
When you activate theAuto.
MirrorFoldingfunction, the exterior mirrors are folded in when
the vehicle is locked. The exterior mirrors fold
out automatically again as soon as you unlock
the vehicle.
XPress the =or; button on the steering
wheel to select the Sett.menu.
XPress the:or9 button to select the
Conveniencesubmenu.
XPress ato confirm.
XPress the :or9 button to select the
Auto. Mirror Foldingfunction.
If the Auto. Mirror Foldingfunction is
switched on, the multifunction display shows
the exterior mirror in orange.
XPress the abutton to save the setting.
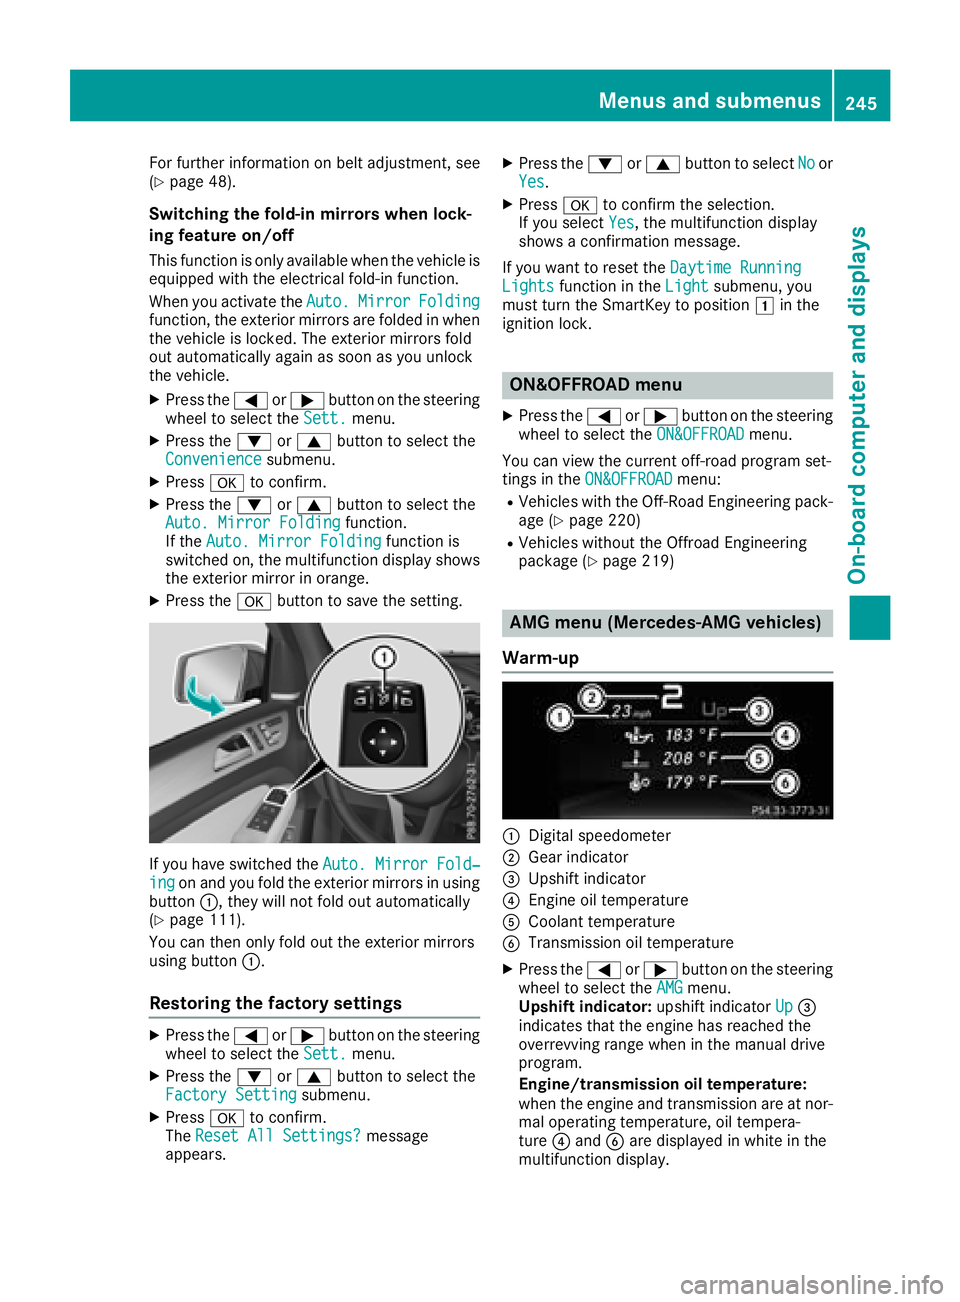
If you have switched the Auto. Mirror Fold‐ingon and you fold the exterior mirrors in using
button :, they will not fold out automatically
(
Ypage 111).
You can then only fold out the exterior mirrors
using button :.
Restoring the factory settings
XPress the=or; button on the steering
wheel to select the Sett.menu.
XPress the:or9 button to select the
Factory Settingsubmenu.
XPress ato confirm.
The Reset All Settings?message
appears.
XPress the :or9 button to select Noor
Yes.
XPress ato confirm the selection.
If you select Yes, the multifunction display
shows a confirmation message.
If you want to reset the Daytime Running
Lightsfunction in theLightsubmenu, you
must turn the SmartKey to position 1in the
ignition lock.
ON&OFFROAD menu
XPress the =or; button on the steering
wheel to select the ON&OFFROADmenu.
You can view the current off-road program set-
tings in the ON&OFFROAD
menu:
RVehicles with the Off-Road Engineering pack-
age (Ypage 220)
RVehicles without the Offroad Engineering
package (Ypage 219)
AMG menu (Mercedes-AMG vehicles)
Warm-up
:Digital speedometer
;Gear indicator
=Upshift indicator
?Engine oil temperature
ACoolant temperature
BTransmission oil temperature
XPress the =or; button on the steering
wheel to select the AMGmenu.
Upshift indicator: upshift indicatorUp=
indicates that the engine has reached the
overrevving range when in the manual drive
program.
Engine/transmission oil temperature:
when the engine and transmission are at nor-
mal operating temperature, oil tempera-
ture ?and Bare displayed in white in the
multifunction display.
Menus and submenus245
On-board computer and displays
Z
Page 248 of 398
If the multifunction display shows oil temper-
ature?orB in blue, the engine or the
transmission are not yet at normal operating
temperature. Avoid driving at full engine out-
put during this time.
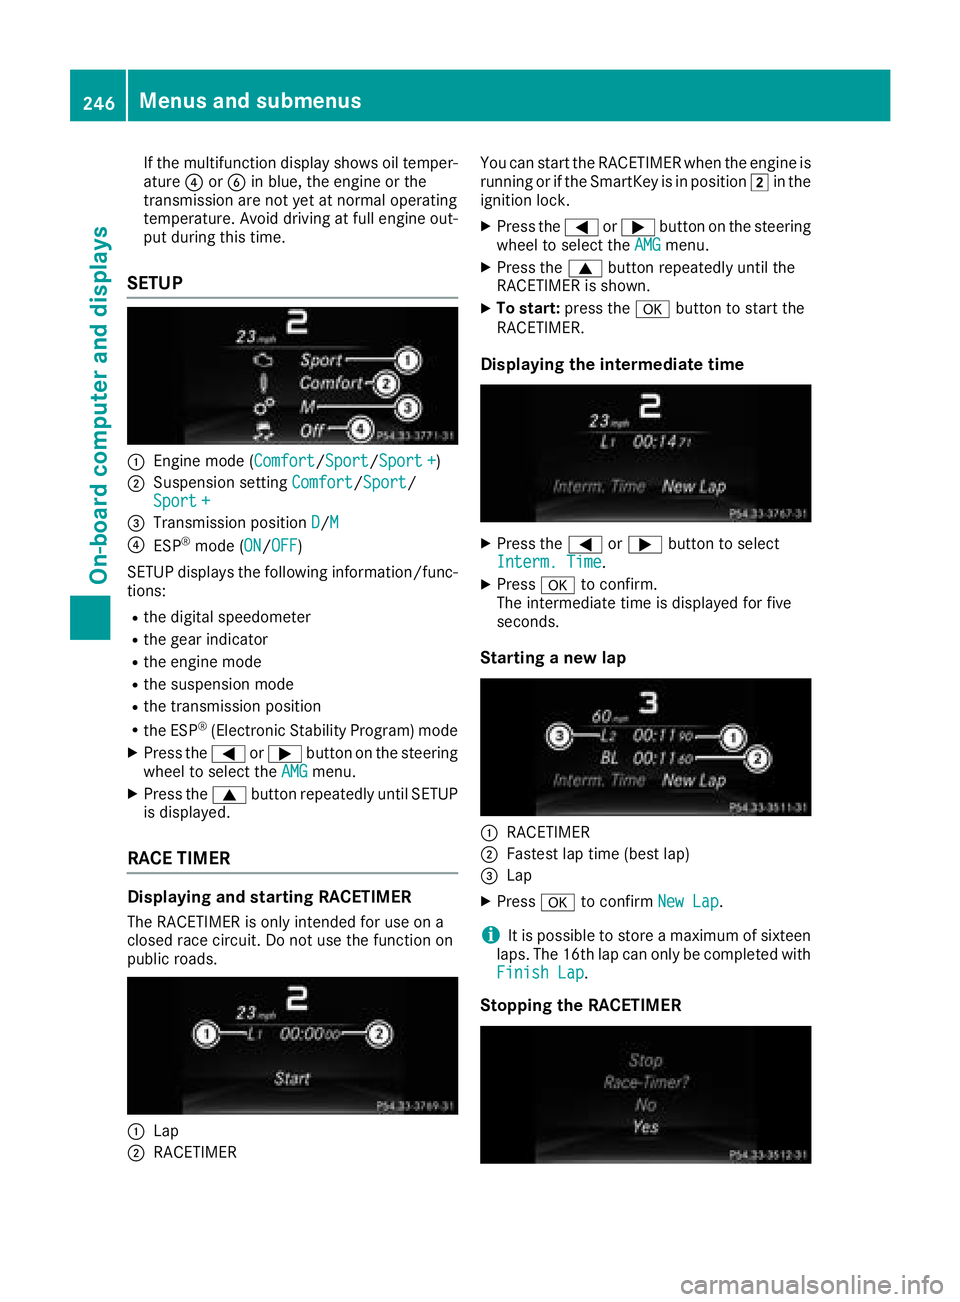
SETUP
:Engine mode (Comfort/ Sport/Sport +)
;Suspension setting Comfort/Sport/
Sport +
=Transmission position D/M
?ESP®mode (ON/OFF)
SETUP displays the following information/func- tions:
Rthe digital speedometer
Rthe gear indicator
Rthe engine mode
Rthe suspension mode
Rthe transmission position
Rthe ESP®(Electronic Stability Program) mode
XPress the =or; button on the steering
wheel to select the AMGmenu.
XPress the9button repeatedly until SETUP
is displayed.
RACE TIMER
Displaying and starting RACETIMER
The RACETIMER is only intended for use on a
closed race circuit. Do not use the function on
public roads.
:Lap
;RACETIMER You can start the RACETIMER when the engine is
running or if the SmartKey is in position
2in the
ignition lock.
XPress the =or; button on the steering
wheel to select the AMGmenu.
XPress the9button repeatedly until the
RACETIMER is shown.
XTo start: press the abutton to start the
RACETIMER.
Displaying the intermediate time
XPress the =or; button to select
Interm. Time.
XPress ato confirm.
The intermediate time is displayed for five
seconds.
Starting a new lap
:RACETIMER
;Fastest lap time (best lap)
=Lap
XPress ato confirm New Lap.
iIt is possible to store a maximum of sixteen
laps. The 16th lap can only be completed with
Finish Lap
.
Stopping the RACETIMER
246Menus and submenus
On-board computer and displays
Page 249 of 398
XPress the%button on the steering wheel.
XConfirm Yeswitha.
The RACETIMER interrupts timing if you stop the
vehicle and turn the SmartKey to position 1in
the ignition lock. If you turn the SmartKey to
position 3and then press ato confirm
Start
timing is continued.
Resetting the current lap
XStop the RACETIMER.
XPress the =or; button to select
Reset Lap.
XPress ato reset the lap time to "0".
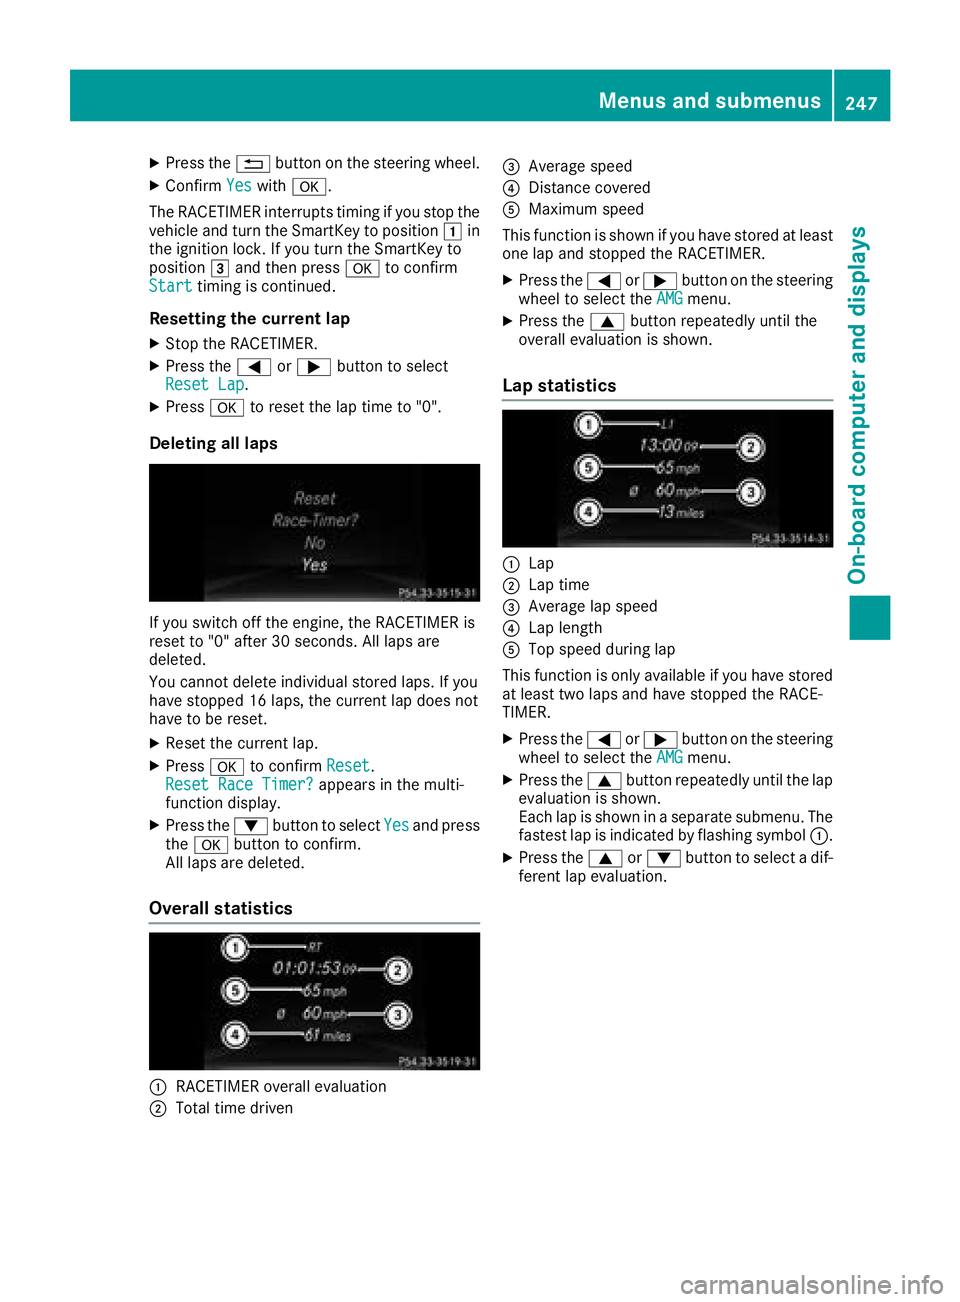
Deleting all laps
If you switch off the engine, the RACETIMER is
reset to "0" after 30 seconds. All laps are
deleted.
You cannot delete individual stored laps. If you
have stopped 16 laps, the current lap does not
have to be reset.
XReset the current lap.
XPress ato confirm Reset.
Reset Race Timer?appears in the multi-
function display.
XPress the :button to select Yesand press
the a button to confirm.
All laps are deleted.
Overall statistics
:RACETIMER overall evaluation
;Total time driven
=Average speed
?Distance covered
AMaximum speed
This function is shown if you have stored at least
one lap and stopped the RACETIMER.
XPress the =or; button on the steering
wheel to select the AMGmenu.
XPress the9button repeatedly until the
overall evaluation is shown.
Lap statistics
:Lap
;Lap time
=Average lap speed
?Lap length
ATop speed during lap
This function is only available if you have stored
at least two laps and have stopped the RACE-
TIMER.
XPress the =or; button on the steering
wheel to select the AMGmenu.
XPress the9button repeatedly until the lap
evaluation is shown.
Each lap is shown in a separate submenu. The
fastest lap is indicated by flashing symbol :.
XPress the9or: button to select a dif-
ferent lap evaluation.
Menus and submenus247
On-board computer and displays
Z
Page 250 of 398
Display messages
Introduction
General notes
Display messages appear in th emultifunction display.
Display messages wit hgraphi cdisplays may be shown in simplified form in th eOperator's Manual
and may therefore diffe rfrom th emultifunction display.
Please respon din accordance wit hth edisplay messages and follow th eadditional note sin this
Operator's Manual.
Certain display messages are accompanied by an audible warnin gtone or acontinuous tone .
Whe nyou stop and par kth evehicle, please observ eth enote son :
RHOLD function (Ypage 187)
RParking(Ypage 161)
Hiding display messages
XPress th ea or% buttonon th esteerin gwheel.
The multifunction display hide sth edisplay message.
High-priorit ydisplay messages are shown in red in th emultifunction display. Some high-priorit y
display messages canno tbe hidden .
The multifunction display shows these messages continuously until th ecauses fo rth emessages
hav ebee nremedied.
Message memory
The on-boar dcompute rsaves certain display messages in th emessage memory .You can cal lup
th edisplay messages:
XPress =or; on thesteerin gwhee lto selec tth eServ.menu.
If there are display messages, th emultifunction display shows 2Messages,fo rexample.
XPress th e9 or: buttonto selec tth eentry, e.g. 2messages.
XPress ato confirm .
XPress the9 or: buttonto scroll through th edisplay messages.
Whe nth eignition is switched off, all display messages are deleted, apar tfrom som ehigh-priorit y
display messages. Once th ecauses of th ehigh-priorit ydisplay messages hav ebee nrectified, th e
correspondin gdisplay messages are also deleted.
248Display messages
On-board computer and displays