sensor MERCEDES-BENZ M-Class 2011 W164 User Guide
[x] Cancel search | Manufacturer: MERCEDES-BENZ, Model Year: 2011, Model line: M-Class, Model: MERCEDES-BENZ M-Class 2011 W164Pages: 372, PDF Size: 16.23 MB
Page 51 of 372

carry a child on the front-passenger seat
once the system has been repaired.
A child in a rear-facing child restraint on the
passenger seat will be seriously injured or
even killed if the passenger front air bag
inflates.
R when securing a child in a front-facing child
restraint system on the front-passenger
seat, you must:
- move the front-passenger seat as far
back as possible
- use a child restraint system that is
suitable for the age, size and weight of
the child
- observe the manufacturer's installation
instructions in order to install and secure
the child restraint system correctly.GWarning
When using a BabySmart™-compatible child
restraint system on the front-passenger seat,
the front-passenger front air bag is only
disabled if the 42 indicator lamp
is illuminated.
Always check the 42 indicator
lamp if you are using a BabySmart™-
compatible child restraint system on the
front-passenger seat. If the 42
indicator lamp does not light up or goes out
when the child restraint system is installed,
check the anchorages of the restraint system.
If the 42 indicator lamp remains
out, do not use the BabySmart™ child
restraint system to carry a child on the front-
passenger seat until the system has been
repaired.
GWarning
The BabySmart™ air bag disabling system
ONLY works with specially adapted child
restraint systems. It does not work with child
restraint systems that are not compatible with
BabySmart™.
Never place anything between the seat
cushion and the child restraint system (e.g. a
cushion), as this reduces the effectiveness of
the BabySmart™ air bag deactivation system.
The underside of the child restraint system
must lie against the seat cushion of the front-
passenger seat. In the event of an accident,
an incorrectly installed child restraint system
could injure the child instead of offering
protection.
Observe the manufacturer's instructions
when installing special child restraint
systems.
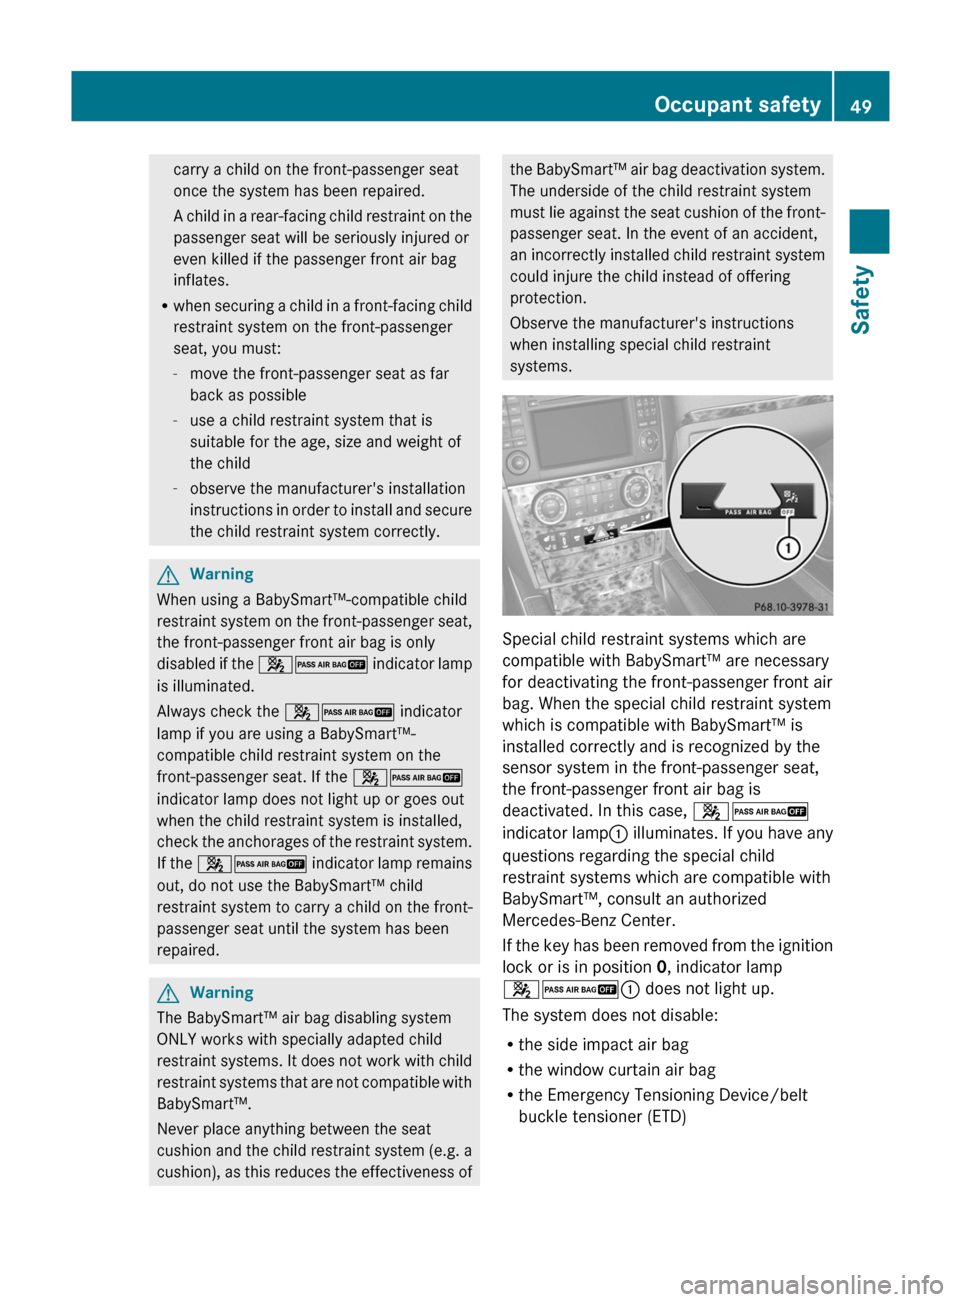
Special child restraint systems which are
compatible with BabySmart™ are necessary
for deactivating the front-passenger front air
bag. When the special child restraint system
which is compatible with BabySmart™ is
installed correctly and is recognized by the
sensor system in the front-passenger seat,
the front-passenger front air bag is
deactivated. In this case, 42
indicator lamp : illuminates. If you have any
questions regarding the special child
restraint systems which are compatible with
BabySmart™, consult an authorized
Mercedes-Benz Center.
If the key has been removed from the ignition
lock or is in position 0, indicator lamp
42 : does not light up.
The system does not disable:
R the side impact air bag
R the window curtain air bag
R the Emergency Tensioning Device/belt
buckle tensioner (ETD)
Occupant safety49SafetyBA 164.1 USA, CA Edition B 2011; 1; 2, en-USd2mskotVersion: 3.0.3.52010-04-21T17:25:06+02:00 - Seite 49Z
Page 104 of 372

XMake sure that the SmartKey is in position
1 or 2 in the ignition lock.XPress button ; for the right-hand exterior
mirror or button = for the left-hand
exterior mirror.
The indicator lamp in the corresponding
button lights up in red.
The indicator lamp goes out again after
some time. You can adjust the selected
mirror using adjustment button : as long
as the indicator lamp is lit.XPress adjustment button : up, down, to
the right or to the left until the exterior
mirror is set to a position that provides you
with a good overview of traffic conditions.
Folding the exterior mirrors in or out
electrically
XMake sure that the SmartKey is in position
1 or 2 in the ignition lock.XBriefly press button :.
Both exterior mirrors fold in or out.
i Make sure that the exterior mirrors are
always folded out fully while the vehicle is
in motion, as they may otherwise vibrate.
i If you are driving faster than
30 mph (47 km/h), you can no longer fold
in the exterior mirrors.
Resetting the exterior mirrors
If the battery has been disconnected or
completely discharged, the exterior mirrors
must be reset. The exterior mirrors will
otherwise not fold in when you select the
"Fold in mirrors when locking" function in the
on-board computer ( Y page 218).XMake sure that the SmartKey is in
position 1 in the ignition lock.XBriefly press button :.
Folding the exterior mirrors in or out
automatically
If the "Fold in mirrors when locking" function
is activated in the on-board computer
( Y page 218):
R the exterior mirrors fold in automatically as
soon as you lock the vehicle from the
outside.
R the exterior mirrors fold out again
automatically as soon as you unlock the
vehicle and then open the driver's or front-
passenger door.
i The mirrors do not fold out if they have
been folded in manually.
Exterior mirror out of position
If an exterior mirror has been pushed out of
position, proceed as follows:
X Vehicles without electrically folding
exterior mirrors: move the exterior mirror
into the correct position manually.XVehicles with electrically folding
exterior mirrors: press the mirror-folding
button ( Y page 102) repeatedly until you
hear the mirror engage in position.
The mirror housing is engaged again and
you can adjust the exterior mirrors as usual
( Y page 101).
Automatic anti-glare mirrors
GWarning!
The auto-dimming function does not react if
incoming light is not aimed directly at sensors
in the interior rear view mirror.
102MirrorsSeats, steering wheel and mirrors
BA 164.1 USA, CA Edition B 2011; 1; 2, en-USd2mskotVersion: 3.0.3.52010-04-21T17:25:06+02:00 - Seite 102
Page 105 of 372

The interior rear view mirror and the exterior
rear view mirror on the driver’s side do not
react, for example, when transporting cargo
which covers the rear window.
Light hitting the mirror(s) at certain angles
(incident light) could blind you. As a result,
you may not be able to observe traffic
conditions and could cause an accident.
The rear-view mirror and the exterior mirror
on the driver's side automatically go into anti-
glare mode if the ignition is switched on and
incident light from headlamps strikes the
sensor in the rear-view mirror.
The mirrors do not go into anti-glare mode if
reverse gear is engaged or the interior lighting
is switched on.
Parking position for the exterior
mirror on the front-passenger side
Setting and storing the parking position
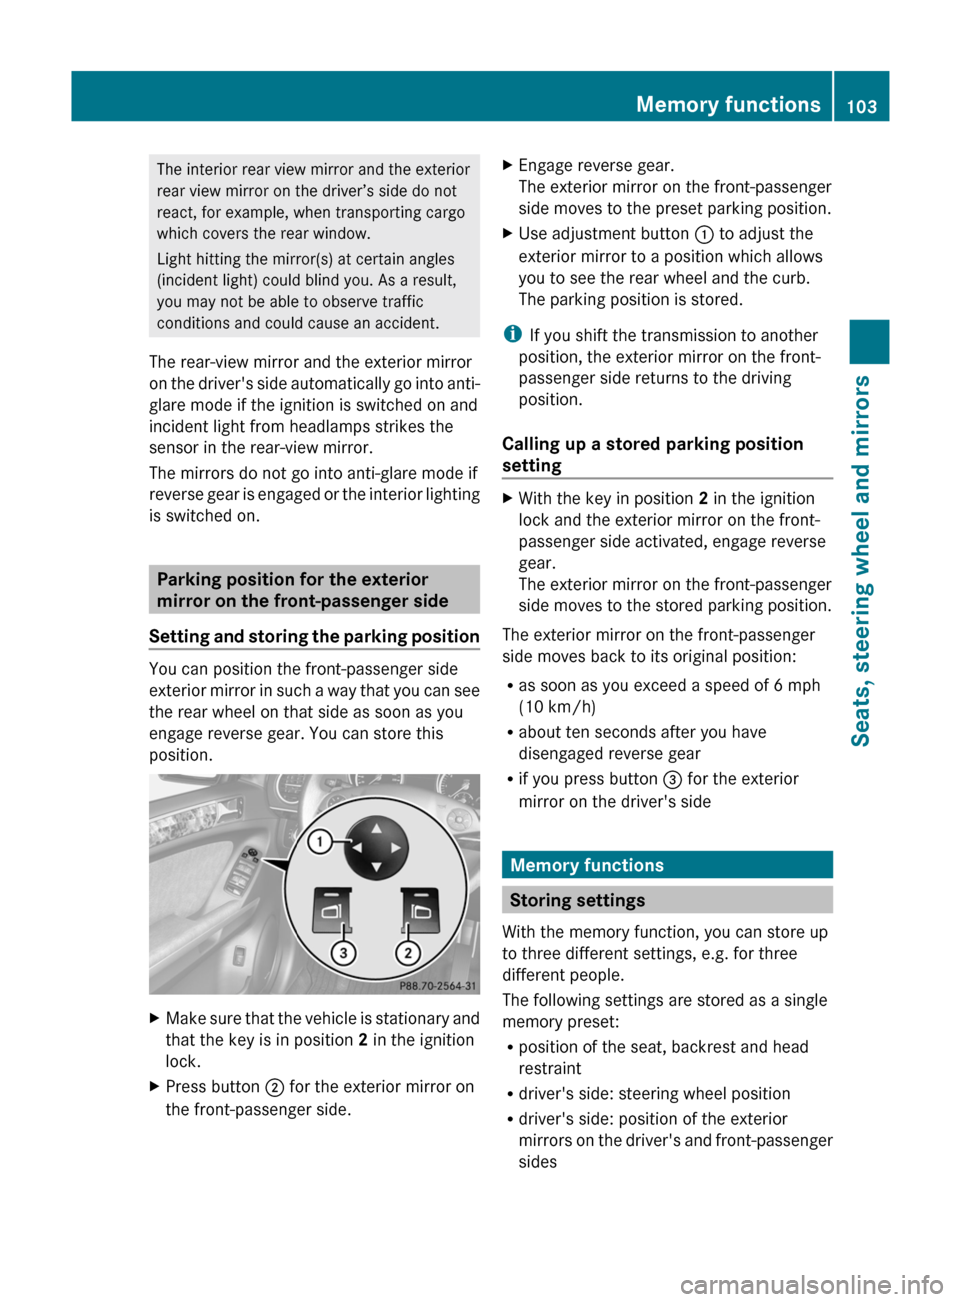
You can position the front-passenger side
exterior mirror in such a way that you can see
the rear wheel on that side as soon as you
engage reverse gear. You can store this
position.
XMake sure that the vehicle is stationary and
that the key is in position 2 in the ignition
lock.XPress button ; for the exterior mirror on
the front-passenger side.XEngage reverse gear.
The exterior mirror on the front-passenger
side moves to the preset parking position.XUse adjustment button : to adjust the
exterior mirror to a position which allows
you to see the rear wheel and the curb.
The parking position is stored.
i If you shift the transmission to another
position, the exterior mirror on the front-
passenger side returns to the driving
position.
Calling up a stored parking position
setting
XWith the key in position 2 in the ignition
lock and the exterior mirror on the front-
passenger side activated, engage reverse
gear.
The exterior mirror on the front-passenger
side moves to the stored parking position.
The exterior mirror on the front-passenger
side moves back to its original position:
R as soon as you exceed a speed of 6 mph
(10 km/h)
R about ten seconds after you have
disengaged reverse gear
R if you press button = for the exterior
mirror on the driver's side
Memory functions
Storing settings
With the memory function, you can store up
to three different settings, e.g. for three
different people.
The following settings are stored as a single
memory preset:
R position of the seat, backrest and head
restraint
R driver's side: steering wheel position
R driver's side: position of the exterior
mirrors on the driver's and front-passenger
sides
Memory functions103Seats, steering wheel and mirrorsBA 164.1 USA, CA Edition B 2011; 1; 2, en-USd2mskotVersion: 3.0.3.52010-04-21T17:25:06+02:00 - Seite 103Z
Page 119 of 372

XInsert a suitable tool into the openings in
the cover. The directions of arrow =
and ? indicate the angle at which the tool
needs to be inserted in order to reach the
adjustment screws.XTurn both screws uniformly until the
vertical setting corresponds to :. Turn the
screws clockwise to adjust the headlamp
upwards and counterclockwise to adjust it
downwards.
Gradation:
R Screw at arrow =: 0.67˚ angle of
inclination
R Screw at arrow ?: 0.50˚ angle of
inclination
The left and right headlamp need to be
adjusted individually.
i If it is not possible to adjust the
headlamps accurately, have the
adjustment performed at an authorized
Mercedes-Benz Center.
Windshield wipers
Important safety guidelines
GWarning!
Wiper blades are components that are subject
to wear and tear. Replace the wiper blades
twice a year, preferably in the spring and fall.
Otherwise the windows will not be wiped
properly. As a result, you may not be able to
observe surrounding traffic conditions and
could cause an accident.
! Do not operate the windshield wipers
when the windshield is dry, as this could
damage the wiper blades. Moreover, dust
that has collected on the windshield/rear
window can scratch the glass if wiping
takes place when the windshield/rear
window is dry.
If it is necessary to switch on the windshield
wipers in dry weather conditions, always
use washer fluid when operating the
windshield wipers.
Switching the windshield wipers on/
off
Combination switch
1$ Windshield wipers off2Ä Intermittent wipe, low 133Å
Intermittent wipe, high 144°
Continuous wipe, slow5¯ Continuous wipe, fastBí Single wipe/ î To wipe the
windshield using washer fluidXSwitch on the ignition.XTurn the combination switch to the
corresponding position.
! Intermittent wiping with rain sensor: due
to optical influences and the windshield
becoming dirty in dry weather conditions,
the windshield wipers may be activated
inadvertently. This could then damage the
windshield wiper blades or scratch the
windshield.
For this reason, you should always switch
off the windshield wipers in dry weather.
In the Ä or Å position, the appropriate
wiping frequency is set automatically
according to the intensity of the rain. In
13 Rain sensor set to low sensitivity.
14 Rain sensor set to high sensitivity.Windshield wipers117Lights and windshield wipersBA 164.1 USA, CA Edition B 2011; 1; 2, en-USd2mskotVersion: 3.0.3.52010-04-21T17:25:06+02:00 - Seite 117Z
Page 120 of 372

the Å position, the rain sensor is more
sensitive than in the Ä position, causing
the windshield wiper to wipe more frequently.
Intermittent wiping is interrupted when you
stop the vehicle and open a front door. This
prevents a person from being splashed
inadvertently when getting into or out of the
vehicle.
Intermittent wiping continues when all doors
are closed and
R you shift the automatic transmission to
drive position D or reverse gear R
or
R you change the wipe setting on the
combination switch.
i To prevent smearing on the windshield or
noise when wiping, wipe the windshield
occasionally with washer fluid.
Switching the rear window wiper on/
off
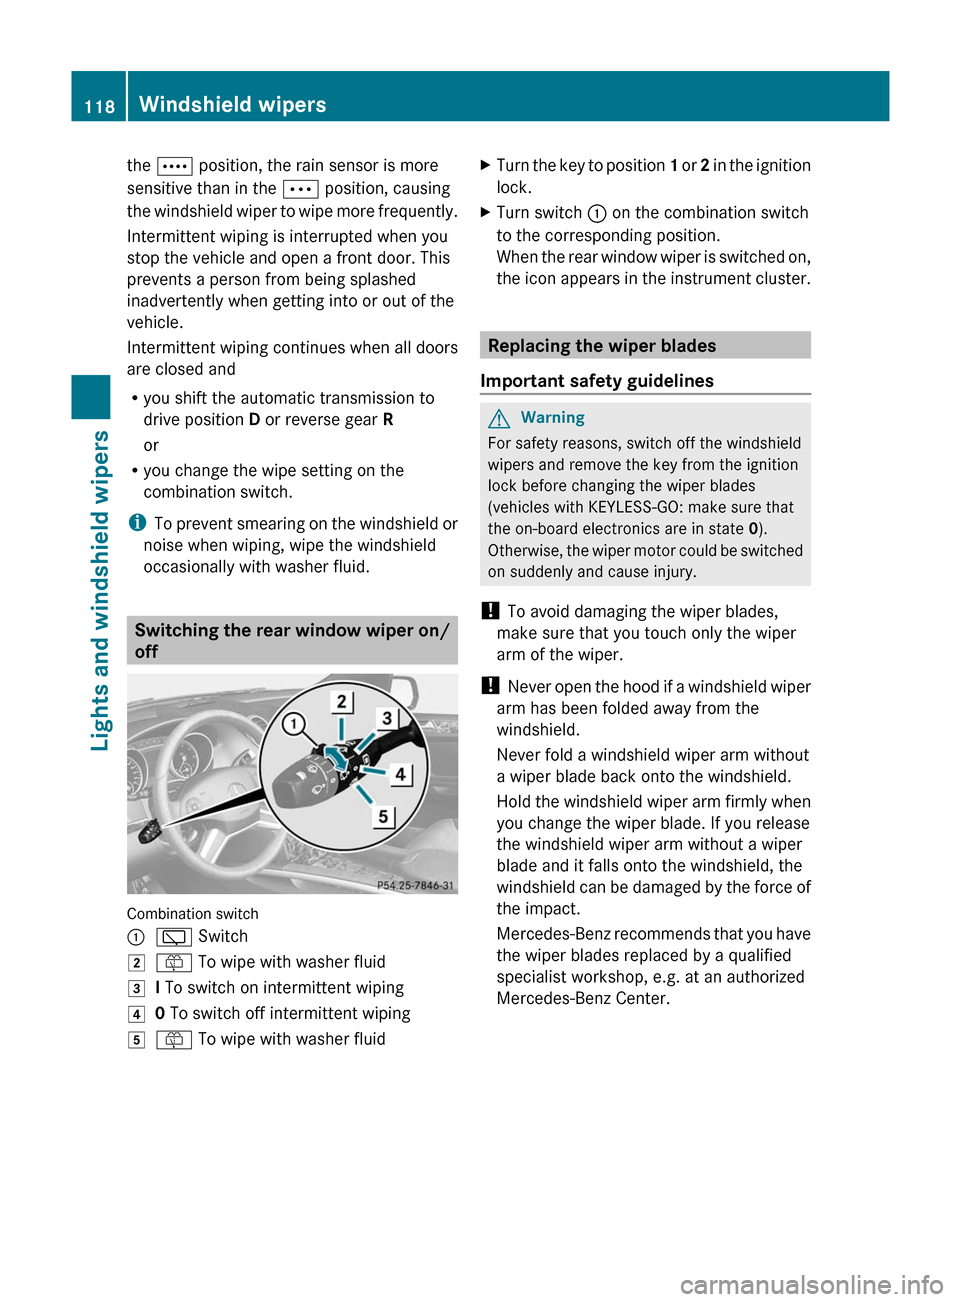
Combination switch
:è Switch2ô To wipe with washer fluid3I To switch on intermittent wiping40 To switch off intermittent wiping5ô To wipe with washer fluidXTurn the key to position 1 or 2 in the ignition
lock.XTurn switch : on the combination switch
to the corresponding position.
When the rear window wiper is switched on,
the icon appears in the instrument cluster.
Replacing the wiper blades
Important safety guidelines
GWarning
For safety reasons, switch off the windshield
wipers and remove the key from the ignition
lock before changing the wiper blades
(vehicles with KEYLESS-GO: make sure that
the on-board electronics are in state 0).
Otherwise, the wiper motor could be switched
on suddenly and cause injury.
! To avoid damaging the wiper blades,
make sure that you touch only the wiper
arm of the wiper.
! Never open the hood if a windshield wiper
arm has been folded away from the
windshield.
Never fold a windshield wiper arm without
a wiper blade back onto the windshield.
Hold the windshield wiper arm firmly when
you change the wiper blade. If you release
the windshield wiper arm without a wiper
blade and it falls onto the windshield, the
windshield can be damaged by the force of
the impact.
Mercedes-Benz recommends that you have
the wiper blades replaced by a qualified
specialist workshop, e.g. at an authorized
Mercedes-Benz Center.
118Windshield wipersLights and windshield wipers
BA 164.1 USA, CA Edition B 2011; 1; 2, en-USd2mskotVersion: 3.0.3.52010-04-21T17:25:06+02:00 - Seite 118
Page 126 of 372

FunctioniNotes/tipsISwitches the rear window
heating on/offJActivates/deactivates air-
recirculation modeOnly use "air-recirculation" mode briefly, e.g. if there
are unpleasant outside odors or when in a tunnel. The
windows could otherwise fog up as, in air-
recirculation mode, no fresh air is drawn into the
vehicle.KInterior temperature sensorLSwitches climate control on/
offActivate climate control using the à and Á
buttons. The indicator lamps in the à and Á
buttons light up.
Control panel for the multi-zone automatic climate control
For USA only
Functioni Notes/tipsFront control panel:Sets the temperature, leftSet the temperature to 72 ‡ (22 †).;Sets climate control to
automaticActivate climate control using the à and Á
buttons. The indicator lamps in the à and Á
buttons light up.124Overview of climate control systemsClimate control
BA 164.1 USA, CA Edition B 2011; 1; 2, en-USd2mskotVersion: 3.0.3.52010-04-21T17:25:06+02:00 - Seite 124
Page 127 of 372

FunctioniNotes/tips=Defrosts the windshieldOnly use the "defrosting" function briefly until the
windshield is clear again.?Increases the airflowADirects the airflow through the
defroster ventsBSwitches cooling with air
dehumidification on/offActivate climate control using the à and Á
buttons. The indicator lamps in the à and Á
buttons light up.Switches the residual heat
function on/offUse the residual heat function if you want to heat or
ventilate the vehicle interior when the ignition is
switched off. The "residual heat" function can only be
activated or deactivated with the ignition switched
off.CSets the temperature, rightSet the temperature to 72 ‡ (22 †).DSwitches rear-compartment
climate control on/offEDirects the airflow through the
center and side air ventsFDirects the airflow to the
footwells and side air ventsGDisplays the airflow levelHReduces the airflowISwitches the rear window
heating on/offJActivates/deactivates air-
recirculation modeOnly use "air-recirculation" mode briefly, e.g. if there
are unpleasant outside odors or when in a tunnel. The
windows could otherwise fog up as, in air-
recirculation mode, no fresh air is drawn into the
vehicle.KInterior temperature sensorLSwitches climate control on/
offActivate climate control using the à and Á
buttons. The indicator lamps in the à and Á
buttons light up.Rear control panelMIncreases the airflowOverview of climate control systems125Climate controlBA 164.1 USA, CA Edition B 2011; 1; 2, en-USd2mskotVersion: 3.0.3.52010-04-21T17:25:06+02:00 - Seite 125Z
Page 130 of 372

FunctioniNotes/tipsOInterior temperature sensorPSwitches the MONO function
on/offUse the MONO function if you want to adopt the
temperature, air distribution and airflow settings
from the driver's side for all climate control zones.
The indicator lamp in the º button lights up.Rear control panelQIncreases the airflowRSets the temperatureSet the temperature to 72 ‡ (22 †).SSets the rear-compartment
climate control to automaticTDirects the airflow through the
rear air ventsUDirects the airflow through the
footwell ventsVSwitches rear-compartment
climate control on/offWReduces the airflowOperating the control systems
Switching the control on/off
Important information
GWarning!
When the climate control system is
deactivated, the outside air supply and
circulation are also deactivated. Only choose
this setting for a short time. Otherwise the
windows could fog up, impairing visibility and
endangering you and others.
i Activate climate control primarily using
the à button ( Y page 130).
Activating/deactivating the front
climate control using the front control
panelXTurn the key to position 2 in the ignition
lock.XTo activate: press the à button.
The indicator lamp in the à button lights
up. Airflow and air distribution are set to
automatic mode.
or
XPress the ^ button.
The indicator lamp in the ^ button goes
out. The previously selected settings come
into effect again.XTo deactivate: press the ^ button.
The indicator lamp in the ^ button lights
up.128Operating the control systemsClimate control
BA 164.1 USA, CA Edition B 2011; 1; 2, en-USd2mskotVersion: 3.0.3.52010-04-21T17:25:06+02:00 - Seite 128
Page 177 of 372

GWarning!
The Distronic cannot take weather conditions
into account. Switch off the Distronic or do
not switch it on if:
R roads are slippery or covered with snow or
ice. The wheels could lose traction while
braking or accelerating, and the vehicle
could skid.
R the Distronic system sensor cover is dirty
or visibility is diminished due to snow, rain
or fog, for example. The distance control
system functionality could be impaired.
Always pay attention to surrounding traffic
conditions even while the Distronic is
switched on. Otherwise, you may not be able
to recognize dangerous situations until it is
too late. This could cause an accident in which
you and/or others could be injured.
GWarning!
The "Resume" function should only be
operated if the driver is fully aware of the
previously set speed and wishes to resume
this particular preset speed.
GWarning!
Close attention to road and traffic conditions
is imperative at all times, regardless of
whether or not the Distronic is activated.
Use of the Distronic can be dangerous on
winding roads or in heavy traffic because
conditions do not allow safe driving at a
constant speed.
The Distronic will not react to stationary
objects in the roadway (e.g. a stopped vehicle
in a traffic jam or a disabled vehicle). The
Distronic will also not respond to oncoming
vehicles.
Switch off the Distronic
R when changing from the left to the right
lane if vehicles are moving more slowly in
the left lane
R when entering a turn lane or highway off
ramp
R in complex driving situations, such as in
highway construction zones
In these situations, the Distronic will continue
to maintain the set speed unless deactivated.
The Distronic is designed and intended only
to maintain a set speed and keep a set
distance from moving objects in front of it.
i This device has been approved by the FCC
as a "Vehicular Radar System". The radar
sensor is intended for use in an automotive
radar system only. Removing, tampering
with, or altering the device will void any
warranties, and is forbidden by the FCC. Do
not tamper with, alter or use in any non-
approved way.
Any unauthorized modification to this
device may invalidate the vehicle's general
operating permit.
Cruise control lever:To store the current speed or a higher
speed;To store the current speed or a lower
speed=To deactivate DISTRONIC?To store the current speed or to call up
the last stored speedDriving systems175Driving and parkingBA 164.1 USA, CA Edition B 2011; 1; 2, en-USd2mskotVersion: 3.0.3.52010-04-21T17:25:06+02:00 - Seite 175Z
Page 186 of 372

ADS (Adaptive Damping System)
General notes
ADS is continuously electronically controlled.
It adapts the damping characteristics to the
current operating and driving situation.
Damping is controlled separately for each
wheel. This increases driving safety and tire
comfort.
This depends on:
R your driving style
R the road surface conditions
R the ADS setting
R the vehicle level setting
Your selection remains stored even if you
remove the key from the ignition lock.
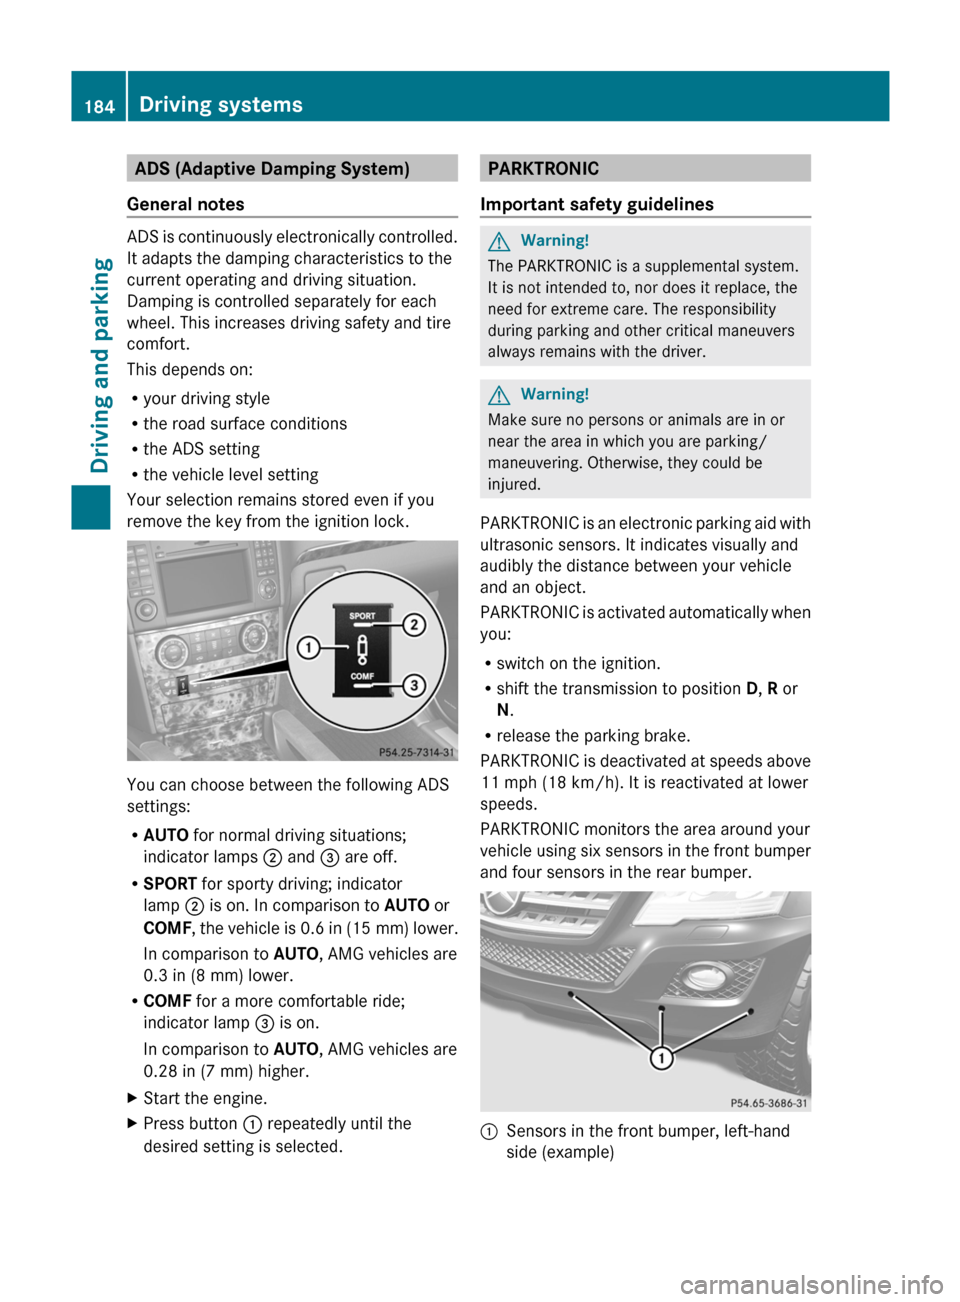
You can choose between the following ADS
settings:
R AUTO for normal driving situations;
indicator lamps ; and = are off.
R SPORT for sporty driving; indicator
lamp ; is on. In comparison to AUTO or
COMF , the vehicle is 0.6 in (15 mm) lower.
In comparison to AUTO, AMG vehicles are
0.3 in (8 mm) lower.
R COMF for a more comfortable ride;
indicator lamp = is on.
In comparison to AUTO, AMG vehicles are
0.28 in (7 mm) higher.
XStart the engine.XPress button : repeatedly until the
desired setting is selected.PARKTRONIC
Important safety guidelinesGWarning!
The PARKTRONIC is a supplemental system.
It is not intended to, nor does it replace, the
need for extreme care. The responsibility
during parking and other critical maneuvers
always remains with the driver.
GWarning!
Make sure no persons or animals are in or
near the area in which you are parking/
maneuvering. Otherwise, they could be
injured.
PARKTRONIC is an electronic parking aid with
ultrasonic sensors. It indicates visually and
audibly the distance between your vehicle
and an object.
PARKTRONIC is activated automatically when
you:
R switch on the ignition.
R shift the transmission to position D, R or
N .
R release the parking brake.
PARKTRONIC is deactivated at speeds above
11 mph (18 km/h). It is reactivated at lower
speeds.
PARKTRONIC monitors the area around your
vehicle using six sensors in the front bumper
and four sensors in the rear bumper.
:Sensors in the front bumper, left-hand
side (example)184Driving systemsDriving and parking
BA 164.1 USA, CA Edition B 2011; 1; 2, en-USd2mskotVersion: 3.0.3.52010-04-21T17:25:06+02:00 - Seite 184