warning lights MERCEDES-BENZ M-Class 2011 W164 Service Manual
[x] Cancel search | Manufacturer: MERCEDES-BENZ, Model Year: 2011, Model line: M-Class, Model: MERCEDES-BENZ M-Class 2011 W164Pages: 372, PDF Size: 16.23 MB
Page 199 of 372

Automatic mode
Use automatic mode ; for all driving
situations, including driving off-road or when
fording.
In automatic mode, the differential locks are
engaged and disengaged according to driving
requirements. This guarantees sufficient
traction for most driving situations with
unrestricted vehicle steerability.
XStart the engine.
The differential locks are in automatic
mode. The indicator lamp in selector
wheel : lights up above symbol for
automatic mode ;.
Engaging manually
GWarning!
Never drive on a paved surface with the center
and rear axle differential locks manually
engaged. Ability to steer the vehicle is greatly
reduced when the differential locks are
manually engaged, increasing the risk of an
accident.
For safety reasons, the locks are
automatically released at a vehicle speed
above 31 mph (50 km/h). Nevertheless, you
should only manually lock the differential if
absolutely necessary because engaged locks
will restrict the vehicle drivetrain while
cornering and cause the vehicle to chatter.
This could cause you to lose control of the
vehicle and cause an accident.
! The differential locks must not be
activated when the vehicle is being towed
or while the wheels are spinning.
Only engage the differential locks manually if
traction in automatic mode is insufficient.
At speeds of up to 19 mph (30 km/h), you
can engage the differential locks manually.XStart the engine.XTurn selector wheel : to desired position
= or ?.
The indicator lamp in selector wheel :
lights up at the corresponding symbol.
The engaged differential appears in the
multifunction display:
AThe differential lock for the transfer case
is locked.
If you have not previously selected the off-
road menu ( Y page 213) in the on-board
computer, the message disappears after
about five seconds.
The differential locks are not controlled
automatically. The steerability of the vehicle
is restricted considerably. Drive carefully and
accelerate gently for optimum traction.
! If the differential locks are activated
manually, the wheels scuff on the road
when cornering since the rotation
difference between the wheels is no longer
balanced out.
You can switch back to automatic mode at
any time. For safety reasons, the differential
locks disengage automatically at speeds
above 31 mph (50 km/h). If you stop the
vehicle and switch off the ignition for longer
than ten seconds, the differential locks
switch back to automatic mode.
Off-road driving systems197Driving and parkingBA 164.1 USA, CA Edition B 2011; 1; 2, en-USd2mskotVersion: 3.0.3.52010-04-21T17:25:06+02:00 - Seite 197Z
Page 225 of 372

Safety systemsDisplay messagesPossible causes/consequences and M SolutionsESP
Unavailable See
Operator's ManualGRisk of accident
ESP ®
(Electronic Stability Program) and therefore also PRE-
SAFE ®
are temporarily unavailable. The self-diagnosis function
might not be complete, for example. BAS (Brake Assist System)
has also been deactivated.
The brake system continues to function normally, but without the
functions listed above.
XCarefully drive a short distance making slight steering
movements at a speed above 12 mph (20 km/h)
If the display message disappears, the functions mentioned
above are available again.
If the display message continues to be displayed:
XDrive on carefully.XVisit a qualified specialist workshop.ESP ®
and therefore also BAS and PRE-SAFE ®
are not available due
to undervoltage.
The brake system continues to function normally, but without the
functions listed above.XDrive on carefully.XVisit a qualified specialist workshop immediately.If the display message is shown during the journey and the ä
warning lamp is flashing, then 4ETS (Electronic Traction System)
is deactivated. The brakes on the drive wheels could otherwise
overheat.XLet the brakes cool down until the display message disappears
and the ä warning lamp goes out.
4ETS is activated again.ESP
Inoperative See
Operator's ManualGRisk of accident
ESP ®
and therefore also Brake Assist and PRE-SAFE ®
are not
available due to a malfunction. The d warning lamp also lights
up in the instrument cluster.
The brake system continues to function normally, but without the
functions listed above.
XDrive on carefully.XVisit a qualified specialist workshop immediately.Display messages223On-board computer and displaysBA 164.1 USA, CA Edition B 2011; 1; 2, en-USd2mskotVersion: 3.0.3.52010-04-21T17:25:06+02:00 - Seite 223Z
Page 231 of 372
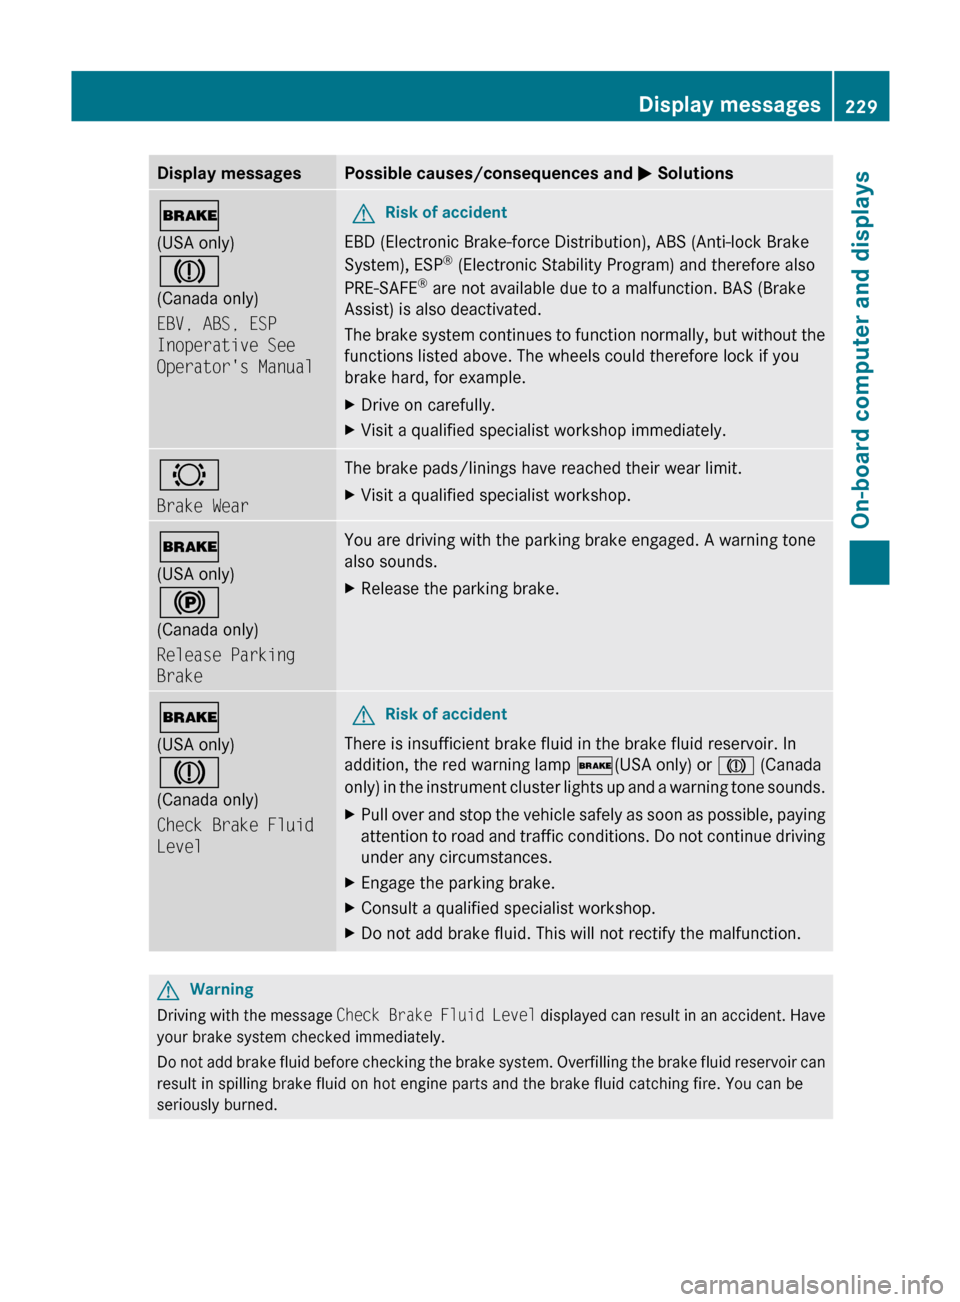
Display messagesPossible causes/consequences and M Solutions$
(USA only)
J
(Canada only)
EBV, ABS, ESP
Inoperative See
Operator's ManualGRisk of accident
EBD (Electronic Brake-force Distribution), ABS (Anti-lock Brake
System), ESP ®
(Electronic Stability Program) and therefore also
PRE-SAFE ®
are not available due to a malfunction. BAS (Brake
Assist) is also deactivated.
The brake system continues to function normally, but without the
functions listed above. The wheels could therefore lock if you
brake hard, for example.
XDrive on carefully.XVisit a qualified specialist workshop immediately.#
Brake WearThe brake pads/linings have reached their wear limit.XVisit a qualified specialist workshop.$
(USA only)
!
(Canada only)
Release Parking
BrakeYou are driving with the parking brake engaged. A warning tone
also sounds.XRelease the parking brake.$
(USA only)
J
(Canada only)
Check Brake Fluid
LevelGRisk of accident
There is insufficient brake fluid in the brake fluid reservoir. In
addition, the red warning lamp $(USA only) or J (Canada
only) in the instrument cluster lights up and a warning tone sounds.
XPull over and stop the vehicle safely as soon as possible, paying
attention to road and traffic conditions. Do not continue driving
under any circumstances.XEngage the parking brake.XConsult a qualified specialist workshop.XDo not add brake fluid. This will not rectify the malfunction.GWarning
Driving with the message Check Brake Fluid Level displayed can result in an accident. Have
your brake system checked immediately.
Do not add brake fluid before checking the brake system. Overfilling the brake fluid reservoir can
result in spilling brake fluid on hot engine parts and the brake fluid catching fire. You can be
seriously burned.
Display messages229On-board computer and displaysBA 164.1 USA, CA Edition B 2011; 1; 2, en-USd2mskotVersion: 3.0.3.52010-04-21T17:25:06+02:00 - Seite 229Z
Page 235 of 372
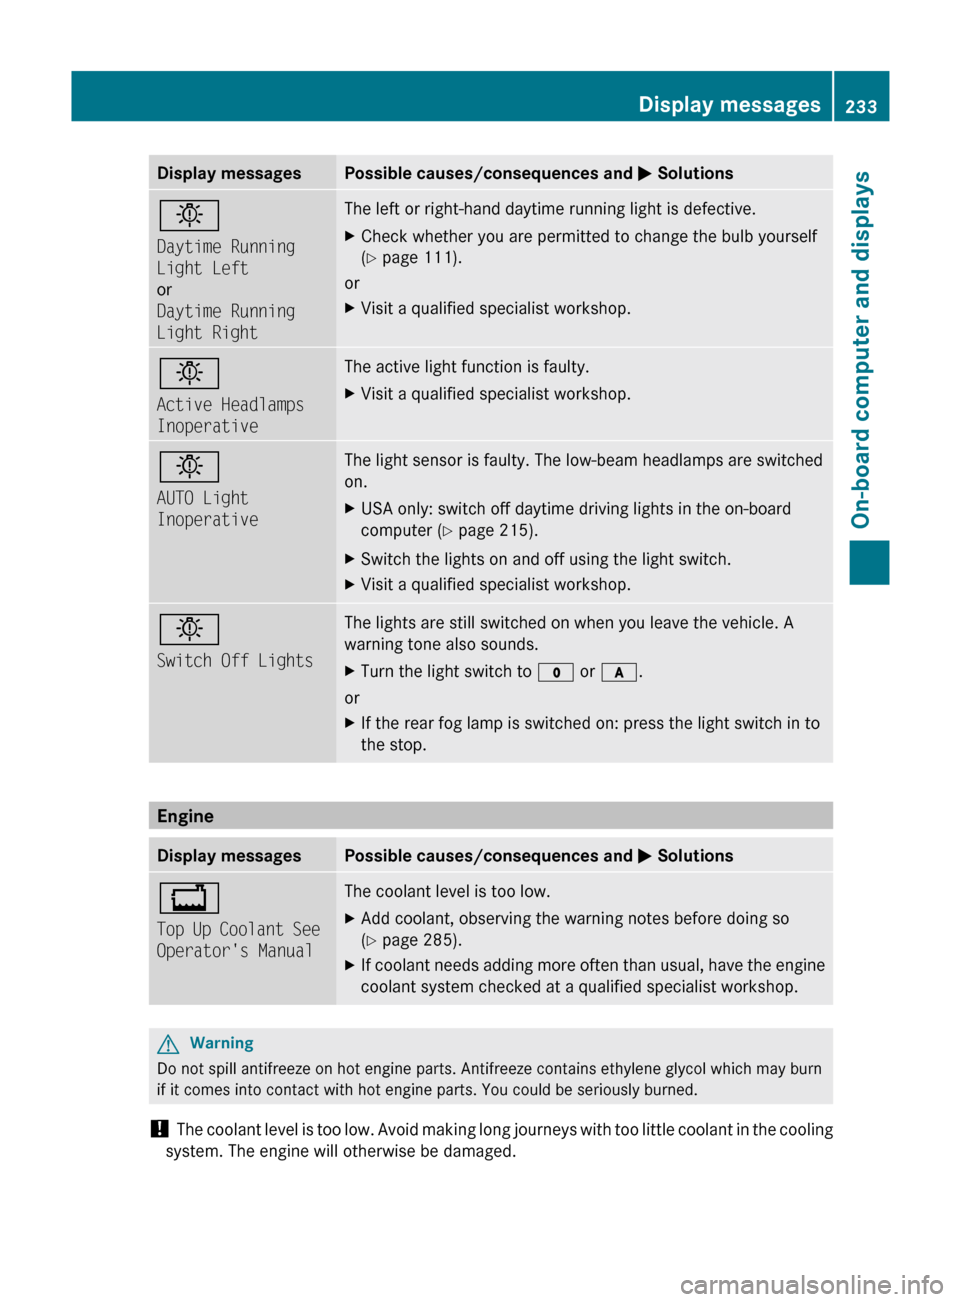
Display messagesPossible causes/consequences and M Solutionsb
Daytime Running
Light Left
or
Daytime Running
Light RightThe left or right-hand daytime running light is defective.XCheck whether you are permitted to change the bulb yourself
( Y page 111).
or
XVisit a qualified specialist workshop.b
Active Headlamps
InoperativeThe active light function is faulty.XVisit a qualified specialist workshop.b
AUTO Light
InoperativeThe light sensor is faulty. The low-beam headlamps are switched
on.XUSA only: switch off daytime driving lights in the on-board
computer ( Y page 215).XSwitch the lights on and off using the light switch.XVisit a qualified specialist workshop.b
Switch Off LightsThe lights are still switched on when you leave the vehicle. A
warning tone also sounds.XTurn the light switch to $ or c .
or
XIf the rear fog lamp is switched on: press the light switch in to
the stop.
Engine
Display messagesPossible causes/consequences and M Solutions+
Top Up Coolant See
Operator's ManualThe coolant level is too low.XAdd coolant, observing the warning notes before doing so
( Y page 285).XIf coolant needs adding more often than usual, have the engine
coolant system checked at a qualified specialist workshop.GWarning
Do not spill antifreeze on hot engine parts. Antifreeze contains ethylene glycol which may burn
if it comes into contact with hot engine parts. You could be seriously burned.
! The coolant level is too low. Avoid making long journeys with too little coolant in the cooling
system. The engine will otherwise be damaged.
Display messages233On-board computer and displaysBA 164.1 USA, CA Edition B 2011; 1; 2, en-USd2mskotVersion: 3.0.3.52010-04-21T17:25:06+02:00 - Seite 233Z
Page 250 of 372

Seat beltsProblemPossible causes/consequences and M Solutions7
After starting the
engine, the red seat
belt warning lamp lights
up for 6 seconds.The seat belt warning lamp reminds the driver and front passenger
to fasten their seat belts.XFasten your seat belt ( Y page 53).7
After starting the
engine, the red seat
belt warning lamp lights
up. In addition, a
warning tone sounds
for up to 6 seconds.GRisk of injury
The driver's seat belt is not fastened.
XFasten your seat belt ( Y page 53).
The warning tone ceases.7
The red seat belt
warning lamp lights up
after the engine starts,
as soon as the driver's
or the front-passenger
door is closed.GRisk of injury
The driver or front passenger has not fastened their seat belt.
XFasten your seat belt ( Y page 53).
The warning lamp goes out.GRisk of injury
There are objects on the front-passenger seat.
XRemove the objects from the front-passenger seat and stow
them in a secure place.
The warning lamp goes out.7
The red seat belt
warning lamp flashes
and an intermittent
audible warning
sounds.GRisk of injury
The driver or front passenger has not fastened their seat belt. In
addition, you are driving faster than 15 mph (25 km/h) or you have
briefly driven faster than 15 mph (25 km/h).
XFasten your seat belt ( Y page 53).
The warning lamp goes out and the intermittent audible warning
ceases.GRisk of injury
There are objects on the front-passenger seat. In addition, you are
driving faster than 15 mph (25 km/h) or you have briefly driven
faster than 15 mph (25 km/h).
XRemove the objects from the front-passenger seat and stow
them in a secure place.
The warning lamp goes out and the intermittent audible warning
ceases.248Warning and indicator lamps in the instrument clusterOn-board computer and displays
BA 164.1 USA, CA Edition B 2011; 1; 2, en-USd2mskotVersion: 3.0.3.52010-04-21T17:25:06+02:00 - Seite 248
Page 254 of 372
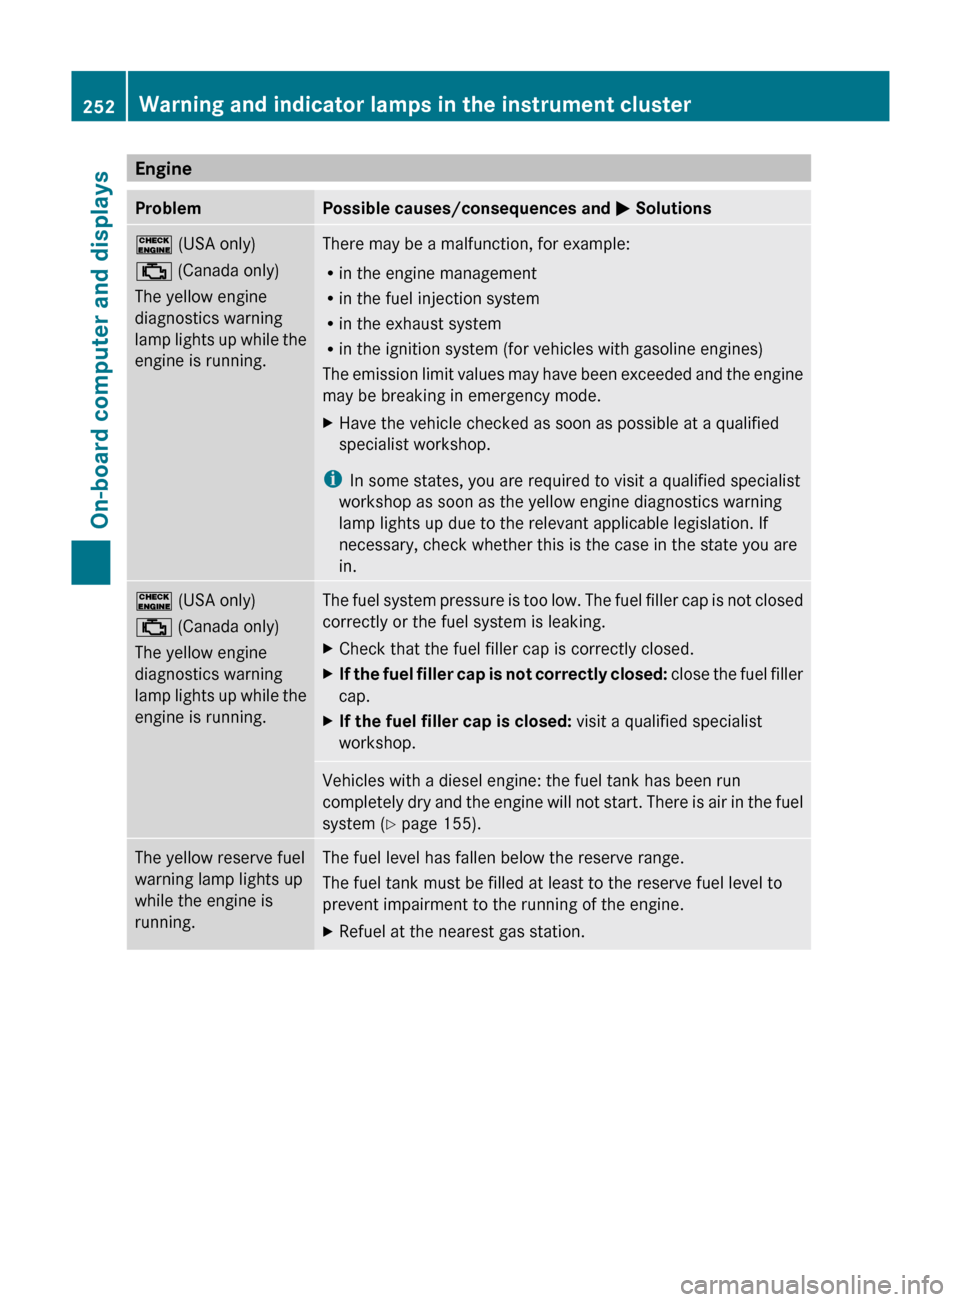
EngineProblemPossible causes/consequences and M Solutions! (USA only)
; (Canada only)
The yellow engine
diagnostics warning
lamp lights up while the
engine is running.There may be a malfunction, for example:
R in the engine management
R in the fuel injection system
R in the exhaust system
R in the ignition system (for vehicles with gasoline engines)
The emission limit values may have been exceeded and the engine
may be breaking in emergency mode.XHave the vehicle checked as soon as possible at a qualified
specialist workshop.
i In some states, you are required to visit a qualified specialist
workshop as soon as the yellow engine diagnostics warning
lamp lights up due to the relevant applicable legislation. If
necessary, check whether this is the case in the state you are
in.
! (USA only)
; (Canada only)
The yellow engine
diagnostics warning
lamp lights up while the
engine is running.The fuel system pressure is too low. The fuel filler cap is not closed
correctly or the fuel system is leaking.XCheck that the fuel filler cap is correctly closed.XIf the fuel filler cap is not correctly closed: close the fuel filler
cap.XIf the fuel filler cap is closed: visit a qualified specialist
workshop.Vehicles with a diesel engine: the fuel tank has been run
completely dry and the engine will not start. There is air in the fuel
system ( Y page 155).The yellow reserve fuel
warning lamp lights up
while the engine is
running.The fuel level has fallen below the reserve range.
The fuel tank must be filled at least to the reserve fuel level to
prevent impairment to the running of the engine.XRefuel at the nearest gas station.252Warning and indicator lamps in the instrument clusterOn-board computer and displays
BA 164.1 USA, CA Edition B 2011; 1; 2, en-USd2mskotVersion: 3.0.3.52010-04-21T17:25:06+02:00 - Seite 252
Page 255 of 372

Driving systemsProblemPossible causes/consequences and M Solutions·
The red DTR distance
warning lamp lights up
while the vehicle is in
motion. A warning tone
also sounds.GRisk of accident
A warning is issued if:
R you are approaching a vehicle in front at too great a speed
R DISTRONIC has detected a stationary obstacle in your line of
travel
XBe prepared to brake immediately.XPay careful attention to the traffic situation. You may have to
brake or take evasive action.
Tires
ProblemPossible causes/consequences and M Solutionsh
USA only:
The yellow combination
low tire pressure
telltale/TPMS
malfunction telltale for
the TPMS is on.GRisk of accident
The TPMS has detected a loss of pressure in at least one of the
tires.
XStop the vehicle without making any sudden steering or braking
maneuvers. Pay attention to the traffic conditions as you do so.XObserve the additional display messages in the multifunction
display.XCheck the tire pressure. If necessary, correct the tire pressure
( Y page 331).XIf necessary, change a wheel ( Y page 340).h
USA only:
The yellow combination
low tire pressure
telltale/TPMS
malfunction telltale for
the TPMS flashes for 60
seconds and then
remains illuminated.The TPMS is faulty.XObserve the additional display messages in the multifunction
display.XVisit a qualified specialist workshop.GWarning
Each tire, including the spare (if provided), should be checked every other week when cold and
inflated to the inflation pressure recommended by the vehicle manufacturer on the Tire and
Loading Information placard on the driver's door B-pillar or, if available, the tire inflation pressure
label on the inside of the fuel filler flap. If your vehicle has tires of a different size than the size
Warning and indicator lamps in the instrument cluster253On-board computer and displaysBA 164.1 USA, CA Edition B 2011; 1; 2, en-USd2mskotVersion: 3.0.3.52010-04-21T17:25:06+02:00 - Seite 253Z
Page 291 of 372
XMake sure the vehicle is stationary and the
ignition is switched off.XTurn the SmartKey to position
2 (Y page 139) in the ignition lock.
Use the SmartKey instead of the Start/
Stop button on vehicles with KEYLESS-GO.XDepress and hold the brake pedal.XShift the automatic transmission to
position N.XRelease the brake pedal.XRelease the parking brake.XSwitch off the ignition and leave the
SmartKey in the ignition lock.
! Make sure that the side windows are
completely closed, that the ventilation/
heating is switched off and that the
windshield wiper switch is set to 0.
Otherwise, the rain/light sensor could be
activated, triggering unintended wiper
movements. This can cause damage to the
vehicle.
After using an automatic car wash, wipe off
wax from the windshield and the wiper
blades. This will prevent smears and reduce
wiping noises caused by residue on the
windshield.
Washing by hand
Carefully remove all deposits of road salt as
soon as possible when driving in winter.
Also, clean the insides of the wheels when
washing the underbody of the vehicle.
XDo not use hot water and do not wash the
vehicle in direct sunlight.XUse a soft car sponge for cleaning.XUse a gentle cleaning agent, e.g. a
Mercedes-Benz approved car shampoo.XWash down the vehicle with a gentle water
jet.XDo not point the water jet directly at the air
inlets.XUse plenty of water and rinse the sponge
frequently.XRinse the vehicle with clean water and dry
it thoroughly with a chamois.XDo not allow the cleaning agent to dry on
the paintwork.
Power washers
GWarning!
Do not use power washers with circular-jet
nozzles (dirt grinders) to clean your vehicle, in
particular the tires. You could otherwise
damage the tires and cause an accident.
! Keep the distance between the vehicle
and the nozzle of the power washer at
11.8 in (30 cm). Information about the
correct distance is available from the
equipment manufacturer.
Move the power washer nozzle around
when cleaning your vehicle.
Do not aim directly at any of the following:
R tires
R door joint
R electrical components
R battery
R connectors
R lights
R seals
R trim elements
R ventilation slots
Damaged seals or electrical components
can lead to leaks or failures.
Cleaning the wheels
! Do not use acidic wheel cleaning products
to remove brake dust. This could damage
wheel bolts and brake components.
! Do not park the vehicle for an extended
period right after cleaning it, particularly
after having cleaned the wheels with wheel
cleaner. Wheel cleaners could cause
increased corrosion of the brake discs and
brake pads/linings. For this reason, you
should drive for a few minutes after
Care289Maintenance and careBA 164.1 USA, CA Edition B 2011; 1; 2, en-USd2mskotVersion: 3.0.3.52010-04-21T17:25:06+02:00 - Seite 289Z
Page 333 of 372

XMake sure that the key is in position 2
( Y page 139) in the ignition lock.XPress and hold the V or U button on
the multifunction steering wheel until the
standard display appears in the
multifunction display ( Y page 208).XPress the * or & button until the
Run Flat Indicator Active Menu: R-
Button message appears in the
multifunction display.XPress the reset button ( Y page 28) on the
instrument cluster.
The Restart Run Flat Indicator?
Yes Cancel message appears in the
multifunction display.
If you wish to confirm the restart:
XPress the W button.
The Run Flat Indicator Restarted
message appears in the multifunction
display.
After a teach-in period, the tire pressure
loss warning system will monitor the set
tire pressures of all four tires.
If you wish to cancel the restart:
XPress the X button.
or
XWait until the Restart Run Flat
Indicator? Yes Cancel message
disappears.
The tire pressure values stored at the last
restart will continue to be monitored.
Tire pressure monitoring system
(USA only)
Important safety information
The tire pressure monitoring system consists
of sensors installed in the vehicle wheels that
monitor the air pressure in all four tires. The
tire pressure monitoring system warns you
when the pressure in one or more tires
decreases. It only works when the
corresponding sensors are installed on all the
wheels.
The tire pressure monitor informs you via a
yellow warning lamp in the instrument cluster
about pressure loss or if the system is
malfunctioning. Whether the warning lamp
flashes or lights up indicates whether a tire
pressure is too low or the tire pressure
monitor is malfunctioning:
R If the warning lamp is lit up constantly, one
or more of your tires are significantly
underinflated. The tire pressure monitor is
not malfunctioning.
R If the warning lamp flashes for 60 seconds
and is then lit constantly, the tire pressure
monitor is malfunctioning.GWarning!
Each tire, including the spare (if provided),
should be checked at least once a month
when cold and inflated to the inflation
pressure recommended by the vehicle
manufacturer on the tire and loading
information table on the driver's door B-pillar
or the tire inflation pressure table on the
inside of the fuel filler flap. If your vehicle has
tires of a different size than the size indicated
on the tire and loading information table or
the tire inflation pressure table, you should
determine the proper tire inflation pressure
for those tires.
As an added safety feature, your vehicle has
been equipped with a tire pressure monitor
(TPMS). An indicator lamp lights up if one or
more of your tires are significantly
underinflated. Accordingly, when the low tire
pressure indicator lamp lights up, you should
stop and check your tires as soon as possible,
and inflate them to the proper pressure.
Driving on a significantly underinflated tire
causes the tire to overheat and can lead to
tire failure.
Underinflation also reduces fuel efficiency
and tire tread life and may affect the vehicle's
handling and stopping ability. Please note that
the TPMS is not a substitute for proper tire
maintenance and it is the driver's
Tire pressures331Tires and wheelsBA 164.1 USA, CA Edition B 2011; 1; 2, en-USd2mskotVersion: 3.0.3.52010-04-21T17:25:06+02:00 - Seite 331Z
Page 334 of 372

responsibility to maintain correct tire
pressure, even if underinflation has not
reached the level at which the low tire
pressure indicator lamp of the TPMS lights up.
Your vehicle has also been equipped with a
TPMS malfunction indicator to indicate when
the system is not operating properly. The
TPMS malfunction indicator is combined with
the low tire pressure indicator lamp. When the
system detects a malfunction, the indicator
lamp will flash for approximately 1 minute and
then remain illuminated. This sequence will
continue upon subsequent vehicle start-ups
as long as the malfunction exists. When the
malfunction indicator is lit, the system may
not be able to detect or signal low tire
pressure as intended.
TPMS malfunctions may occur for a variety of
reasons, including the installation of
incompatible replacement or alternate tires
or wheels on the vehicle that prevent the
TPMS from functioning properly. Always
check the TPMS malfunction indicator after
replacing one or more tires or wheels on your
vehicle to ensure that the replacement or
alternate tires and wheels allow the TPMS to
continue to function properly.
i If the tire pressure monitoring system
malfunctions, it may take up to 10 minutes
before the malfunction is displayed to you
by the tire pressure warning lamp flashing
for 60 seconds and then remaining lit.
When the error has been rectified, the tire
pressure warning lamp goes out after a few
minutes of driving.
Information on tire pressures is displayed in
the multifunction display. After a few minutes
of driving, the current tire pressure of each
tire is shown in the multifunction display.
i The tire pressure values in the on-board
computer may deviate from the inflation
pressure as measured using a tire pressure
checker at the filling station. The tire
pressures shown in the on-board computer
refer to pressures at sea level. At highaltitudes, a tire pressure checker will
display a higher tire pressure than the on-
board computer. In this case do not reduce
the tire pressure.
i If radio transmitting equipment (e.g. radio
headphones, a two-way radio) is operated
in or near the vehicle, this can lead to the
function of the tire pressure monitor being
impaired.
i This device complies with Part 15 of the
FCC Rules. Operation is subject to the
following two conditions:
1. This device may not cause harmful
interference, and
2. This device must withstand any
interference received, including
interference that may cause undesired
operation.
Any unauthorized modification to this
device could void the user's authority to
operate the equipment.
Checking the tire pressure
electronicallyXMake sure that the key is in position
2 (Y page 139) in the ignition lock.XPress and hold the V or U button on
the multifunction steering wheel until the
standard display appears in the
multifunction display ( Y page 208).XPress and hold the & or * button
until the current tire pressure of each tire
is shown in the multifunction display.
If the vehicle has been parked for longer than
20 minutes and subsequently you have not
driven faster than 15 mph (25 km/h), the
Tire pressure displayed after
driving for a few minutes message is
shown.
After a teach-in process, the tire pressure
monitor automatically detects new wheels or
new sensors. As long as it is not possible to
allocate tire pressure values to individual
wheel positions, the Tire Pressure
332Tire pressuresTires and wheels
BA 164.1 USA, CA Edition B 2011; 1; 2, en-USd2mskotVersion: 3.0.3.52010-04-21T17:25:06+02:00 - Seite 332