seat memory MERCEDES-BENZ M-Class 2011 W164 Owner's Manual
[x] Cancel search | Manufacturer: MERCEDES-BENZ, Model Year: 2011, Model line: M-Class, Model: MERCEDES-BENZ M-Class 2011 W164Pages: 372, PDF Size: 16.23 MB
Page 13 of 372
High-beam headlamps ...................109
Light switch ................................... 106
Low-beam headlamps ....................107
Rear fog lamp ................................ 108
Switching the daytime driving
lights on/off (on-board computer) . 215
Switching the exterior lighting
delayed switch-off on/off (on-
board computer) ............................ 216
Switching the surround lighting
on/off (on-board computer) ..........215
Light sensor (display message) ....... 233
Loading guidelines ............................ 256
Locking Automatic ........................................ 79
Emergency locking ........................... 80
From inside the vehicle (central
locking button) ................................. 79
Low-beam headlamp (display
message) ............................................ 230
LOW RANGE Display message ............................ 238
Off-road gear ................................. 194
LOW RANGE off-road gear ................ 194
Luggage net ....................................... 258
Lumbar support 4-way lumbar support ......................97
Luxury head restraints ....................... 95
M
Main-beam headlamps (display
message) ............................................ 231
Malfunction message see Display messages
Malfunctions relevant to safety
Reporting ......................................... 23
Manual drive program ...................... 149
mbrace Call priority .................................... 274
Display message ............................ 224
Downloading destinations
(COMAND) ..................................... 274
Emergency call .............................. 271
Important safety notes ..................270
Locating a stolen vehicle ...............275
MB info call button ........................273
Roadside Assistance button ..........272
Self-test ......................................... 271
System .......................................... 271
Vehicle remote unlocking ..............275
Mechanical key
Function/notes ................................ 75
Memory card (on-board computer) . 212
Memory function ............................... 103
Menu (on-board computer) Additional functions .......................219
AMG ............................................... 209
Audio ............................................. 211
DISTRONIC .................................... 179
DVD ............................................... 212
Message memory .......................... 222
Navigation ..................................... 212
Off-road ......................................... 213
Off-road mode ............................... 211
Overview of menus ........................207
Resetting to factory settings ..........213
Settings ......................................... 213
Standard display ............................ 208
Telephone ...................................... 220
Trip computer ................................ 219
Messages
see Display messages
Mirrors
Sun visor ........................................ 266
see Exterior mirrors or Rear-view mirror
MOExtended run-flat system ........... 311
MP3 Operating (on-board computer) .....212
see separate operating instructions
Multicontour seat ................................ 97
Multifunction display ........................ 206
Multifunction steering wheel Operating the on-board computer . 205
Overview .......................................... 30
N
Navigation On-board computer .......................212
see separate operating instructions
NECK-PRO head restraints
Operation ......................................... 52
Resetting triggered ..........................53
Notes on breaking-in a new
vehicle ................................................ 138
Index11BA 164.1 USA, CA Edition B 2011; 1; 2, en-USd2mskotVersion: 3.0.3.52010-04-21T17:25:06+02:00 - Seite 11
Page 16 of 372
Belt force limiters ............................ 57
Cleaning ......................................... 293
Correct usage .................................. 54
Emergency Tensioning Devices ........ 57
Fastening ......................................... 55
Important safety guidelines .............53
Releasing ......................................... 56
Safety guidelines ............................. 37
Switching belt adjustment on/off
(on-board computer) ......................218
Warning lamp ................................. 248
Warning lamp (function) ................... 57
Seat heating
Indicator lamp (Malfunction) ............98
Seats
Adjusting (electrically) .....................94
Adjusting the 4-way lumbar
support ............................................ 97
Adjusting the head restraint ............95
Cleaning the cover .........................292
Correct driver's seat position ........... 92
Important safety instructions ...........93
Multicontour seat ............................ 97
Storing settings (memory
function) ........................................ 103
Switching seat heating on/off .........97
Switching the seat ventilation on/
off .................................................... 98
Seat ventilation
Indicator lamp (Malfunction) ............99
Securing hooks .................................. 260
Sensors (cleaning instructions) ....... 291
Service indicator see Service interval display
Service interval display .................... 287
Displaying a service message (on-
board computer) ............................ 287
Service products
AdBlue ®
special additives ..............360
Brake fluid ..................................... 362
Coolant (engine) ............................ 362
Engine oil ....................................... 361
Filling capacity ............................... 357
Fuel ................................................ 358
Important safety notes ..................356
Notes ............................................. 356Refrigerant (air-conditioning
system) .......................................... 362
Washer fluid ................................... 363
Settings
Factory (on-board computer) .........213
On-board computer .......................213
Shift ranges ....................................... 148
Side impact air bag ............................. 40
Side marker lamp (display
message) ............................................ 232
Side windows Convenience closing feature ............86
Convenience opening feature ..........86
Important safety information ...........84
Opening/closing .............................. 85
Resetting ......................................... 87
Troubleshooting ............................... 87
Sliding sunroof
Important safety information ...........88
Troubleshooting ............................... 89
see Tilt/sliding sunroof
SmartKey
Changing the battery .......................76
Changing the programming .............75
Checking the battery .......................76
Important safety notes ....................72
Malfunction ...................................... 77
Snow chains ...................................... 165
Socket ................................................ 268
Dashboard ..................................... 268
Front-passenger footwell ...............268
Luggage compartment ...................269
Rear compartment .........................269
SOS
see mbrace
Spare wheel
Notes/data .................................... 352
Storage location ............................ 299
Stowing .......................................... 299
see Emergency spare wheel
Speedometer
Additional speedometer (on-
board computer) ............................ 208
Segments ...................................... 205
Setting the unit (on-board
computer) ...................................... 21414IndexBA 164.1 USA, CA Edition B 2011; 1; 2, en-USd2mskotVersion: 3.0.3.52010-04-21T17:25:06+02:00 - Seite 14
Page 54 of 372
of having to swerve to avoid an obstacle at
a speed above 85 mph (140 km/h).
PRE-SAFE ®
takes the following measures
depending on the hazardous situation
detected:
R the front seat belts are pre-tensioned.
R on vehicles with memory functions: the
front-passenger seat is adjusted if it is in an
unfavorable position under accident
conditions.
R if the vehicle skids, the side windows are
closed so that only a small gap remains.
R on vehicles with sliding sunroof: if the
vehicle skids, the sliding sunroof closes so
that only a small gap remains.
If the hazardous situation passes without
resulting in an accident, PRE-SAFE ®
slackens
the belt pretensioning. All settings made by
PRE-SAFE ®
can then be reversed.
If the seat belts are not released:XMove the backrest or the seat back slightly
until the belt pretensioning is reduced.
The locking mechanism releases.GWarning
Make sure that nobody can become trapped
as you adjust the seat.
! Make sure that there are no objects in the
footwell or behind the seats when resetting
the seats. There is a risk that the seats
and/or the objects could be damaged.
More information about belt adjustment, a
convenience function integrated into PRE-
SAFE ®
, can be found in the "Belt adjustment"
section ( Y page 56).
NECK-PRO head restraints
The NECK-PRO head restraints increase
protection to the driver's and front-
passenger's head and neck. To this end, the
head restraints on the driver's and front-
passenger seats are moved forwards and
upwards in the event of a rear-end collision of
a certain severity. This provides better head
support.GWarning
Do not secure any objects (e.g. coat hangers)
on the NECK-PRO head restraints. Otherwise,
the NECK-PRO head restraints may not
function properly, or in the event of a rear-end
collision may not be able offer the level of
protection they are designed to provide.
GWarning
Only use seat covers/head restraint covers
that have been tested and approved by
Mercedes-Benz for your model.
Using seat covers and head restraint covers
other than those recommended can prevent/
impair the triggering of NECK-PRO head
restraints and/or the deployment of side
impact air bags in the front.
Contact an authorized Mercedes-Benz Center
for availability.
If the NECK-PRO head restraints have been
triggered in an accident, you must reset the
NECK-PRO head restraints on the driver’s and
front-passenger seat ( Y page 53).
Otherwise, the additional protection will not
be available in the event of another rear-end
collision. You can recognize when NECK-PRO
head restraints have been triggered by the
fact that they have moved forwards and can
no longer be adjusted.
GWarning!
For your protection, drive only with properly
positioned head restraints.
Adjust the head restraint so that it is as close
to the head as possible and the center of the
head restraint supports the back of the head
at eye level. This will reduce the potential for
injury to the head and neck in the event of an
accident or similar situation.
52Occupant safetySafety
BA 164.1 USA, CA Edition B 2011; 1; 2, en-USd2mskotVersion: 3.0.3.52010-04-21T17:25:06+02:00 - Seite 52
Page 60 of 372
Rthe belt tongue is engaged in the buckle on
each of the three-point seat belts in the
front
R the front-passenger seat is occupied and
the belt tongue is engaged in the buckle on
the front-passenger side.
The ETDs on the outside seats in the rear
compartment are triggered independently of
the lock status of the seat belts.
The ETDs are triggered depending on the type
and severity of an accident:
R in the event of a head-on or rear-end
collision if the vehicle decelerates or
accelerates rapidly in a longitudinal
direction during the initial stages of the
impact
R in the event of a side impact, on the side
opposite the impact if the vehicle
decelerates or accelerates rapidly in a
lateral direction
R in certain situations if the vehicle overturns
and the system determines that it can
provide additional protection.
If the ETDs/belt buckle tensioners are
triggered, you will hear a bang and a small
amount of powder may also be released. Only
in rare cases will the bang affect your hearing.
The powder that is released generally does
not constitute a health hazard. The + SRS
warning lamp lights up.
i If the belt buckle tensioners have been
triggered on the front seats, the buckle will
be pulled down and will be almost flush with
the upper edge of the seat. The + SRS
warning lamp is lit.GWarning
The belt buckle tensioners on the front seats
only function if the belt buckles can be pulled
down unobstructed. They must not be
restricted in any way. Therefore, do not grab
the belt buckles and do not place any objects
under the belt buckles. Otherwise, the
tensioning of the belt by the buckle is
restricted or will not function, and will not
provide any additional protection.
GWarning
Pyrotechnical ETDs/belt buckle tensioners
that were activated must be replaced.
For your safety, when disposing of the
pyrotechnic ETDs/belt buckle tensioners
always follow our safety instructions. These
instructions are available from any authorized
Mercedes-Benz Center.
The PRE-SAFE ®
system is equipped with
electrically reversible pre-tensioners that do
not need replacing after deployment.
Children in the vehicle
Important safety guidelines
GWarning
When leaving the vehicle, always remove the
SmartKey from the ignition lock. Always take
the SmartKey with you and lock the vehicle.
Do not leave children unattended in the
vehicle, even if they are secured in a child
restraint system, or with access to an
unlocked vehicle. A child's unsupervised
access to a vehicle could result in an accident
and/or serious personal injury. The children
could:
R injure themselves on parts of the vehicle
R be seriously or fatally injured through
excessive exposure to extreme heat or cold
R injure themselves or cause an accident with
vehicle equipment that can be operated
even if the SmartKey is removed from the
ignition lock or removed from the vehicle,
such as seat adjustment, steering wheel
adjustment, or the memory function
If children open a door, they could injure other
persons or get out of the vehicle and injure
themselves or be injured by following traffic.
Do not expose the child restraint system to
direct sunlight. The child restraint system's
metal parts, for example, could become very
hot, and the child could be burned on these
parts.
58Children in the vehicleSafety
BA 164.1 USA, CA Edition B 2011; 1; 2, en-USd2mskotVersion: 3.0.3.52010-04-21T17:25:06+02:00 - Seite 58
Page 74 of 372
Vehicle equipment
i This manual describes all the standard
and optional equipment of your vehicle
which was available at the time of
purchase. Country-specific differences are
possible. Bear in mind that your vehicle
may not feature all functions described
here. This also refers to safety-related
systems and functions.
SmartKey
Important safety guidelines
GWarning!
When leaving the vehicle, always remove the
SmartKey from the starter switch. Always
take the SmartKey with you and lock the
vehicle. Do not leave children unattended in
the vehicle, even if they are secured in a child
restraint system, or with access to an
unlocked vehicle. A child's unsupervised
access to a vehicle could result in an accident
and/or serious personal injury. The children
could
R injure themselves on parts of the vehicle
R be seriously or fatally injured through
excessive exposure to extreme heat or cold
R injure themselves or cause an accident with
vehicle equipment that can be operated
even if the SmartKey is removed from the
starter switch or removed from the vehicle,
such as seat adjustment, steering wheel
adjustment, or the memory function
If children open a door, they could injure other
persons or get out of the vehicle and injure
themselves or be injured by following traffic.
Do not expose the child restraint system to
direct sunlight. The child restraint system's
metal parts, for example, could become very
hot, and the child could be burned by these
parts.
GWarning!
Do not carry heavy or hard objects in the
passenger compartment or cargo
compartment unless they are firmly secured
in place.
Unsecured or improperly positioned cargo
increases a child’s risk of injury in the event
of
R strong braking maneuvers
R sudden changes of direction
R an accident
General information
If you cannot open or lock the vehicle with the
SmartKey, either the battery in the SmartKey
is empty, the SmartKey is faulty, or the vehicle
battery is discharged.
XCheck the battery in the SmartKey and
replace it if necessary ( Y page 76).XUnlock the driver's door using the
mechanical key ( Y page 75).XLock the vehicle using the mechanical key
( Y page 75).XHave the vehicle battery and battery
contacts checked by an authorized
Mercedes-Benz Center.
If the SmartKey is faulty, contact Roadside
Assistance or an authorized Mercedes-Benz
Center.
SmartKey functions
General notes
i USA only:
This device complies with Part 15 of the
FCC regulations. Operation is subject to
the following conditions:
1. This device must not cause any harmful
interference, and
2. This device must be able to
accommodate interference that is
72SmartKeyOpening and closing
BA 164.1 USA, CA Edition B 2011; 1; 2, en-USd2mskotVersion: 3.0.3.52010-04-21T17:25:06+02:00 - Seite 72
Page 80 of 372
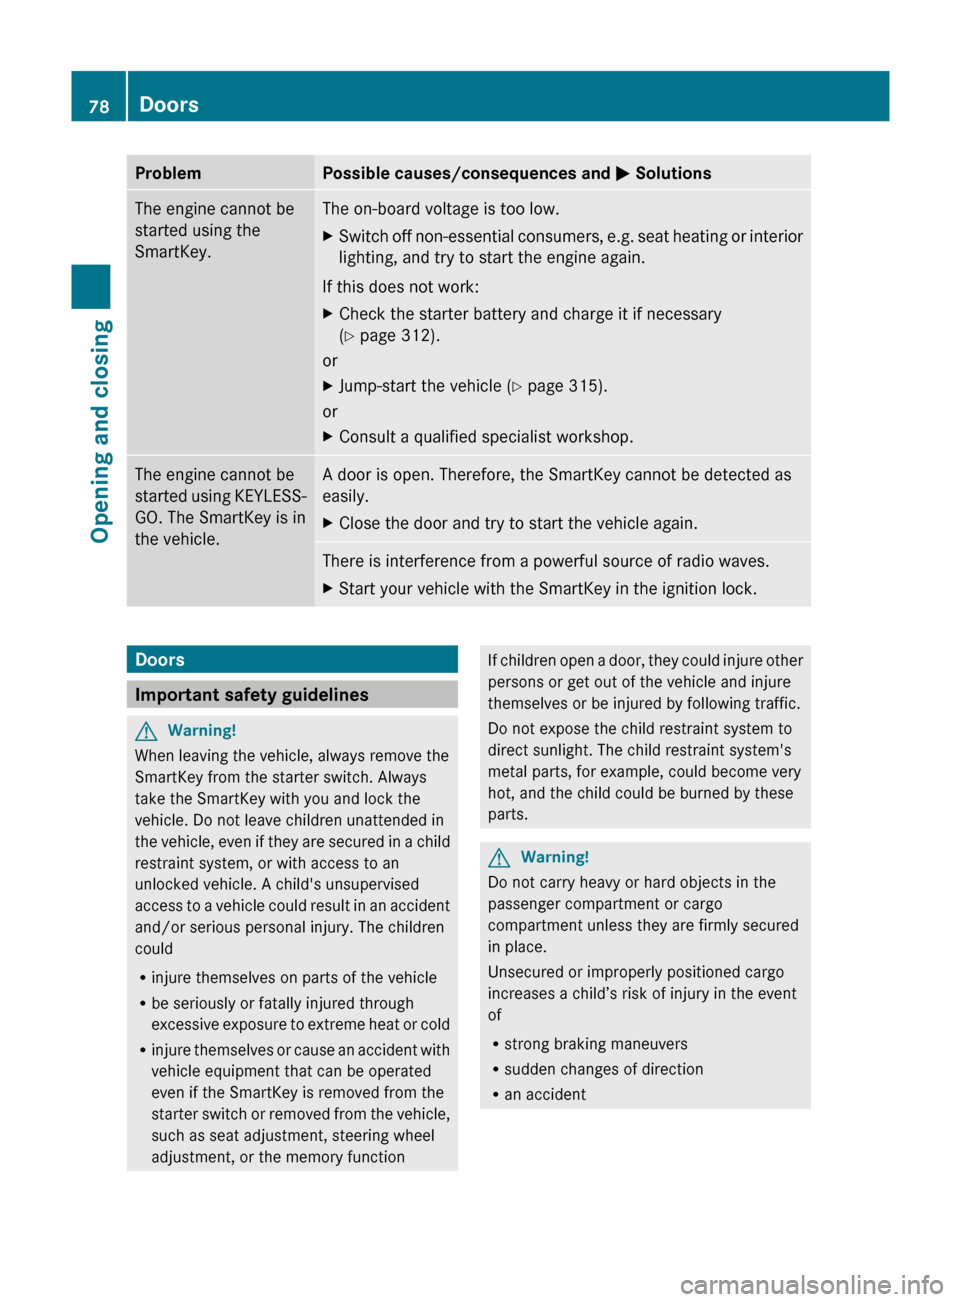
ProblemPossible causes/consequences and M SolutionsThe engine cannot be
started using the
SmartKey.The on-board voltage is too low.XSwitch off non-essential consumers, e.g. seat heating or interior
lighting, and try to start the engine again.
If this does not work:
XCheck the starter battery and charge it if necessary
( Y page 312).
or
XJump-start the vehicle ( Y page 315).
or
XConsult a qualified specialist workshop.The engine cannot be
started using KEYLESS-
GO. The SmartKey is in
the vehicle.A door is open. Therefore, the SmartKey cannot be detected as
easily.XClose the door and try to start the vehicle again.There is interference from a powerful source of radio waves.XStart your vehicle with the SmartKey in the ignition lock.Doors
Important safety guidelines
GWarning!
When leaving the vehicle, always remove the
SmartKey from the starter switch. Always
take the SmartKey with you and lock the
vehicle. Do not leave children unattended in
the vehicle, even if they are secured in a child
restraint system, or with access to an
unlocked vehicle. A child's unsupervised
access to a vehicle could result in an accident
and/or serious personal injury. The children
could
R injure themselves on parts of the vehicle
R be seriously or fatally injured through
excessive exposure to extreme heat or cold
R injure themselves or cause an accident with
vehicle equipment that can be operated
even if the SmartKey is removed from the
starter switch or removed from the vehicle,
such as seat adjustment, steering wheel
adjustment, or the memory function
If children open a door, they could injure other
persons or get out of the vehicle and injure
themselves or be injured by following traffic.
Do not expose the child restraint system to
direct sunlight. The child restraint system's
metal parts, for example, could become very
hot, and the child could be burned by these
parts.GWarning!
Do not carry heavy or hard objects in the
passenger compartment or cargo
compartment unless they are firmly secured
in place.
Unsecured or improperly positioned cargo
increases a child’s risk of injury in the event
of
R strong braking maneuvers
R sudden changes of direction
R an accident
78DoorsOpening and closing
BA 164.1 USA, CA Edition B 2011; 1; 2, en-USd2mskotVersion: 3.0.3.52010-04-21T17:25:06+02:00 - Seite 78
Page 82 of 372
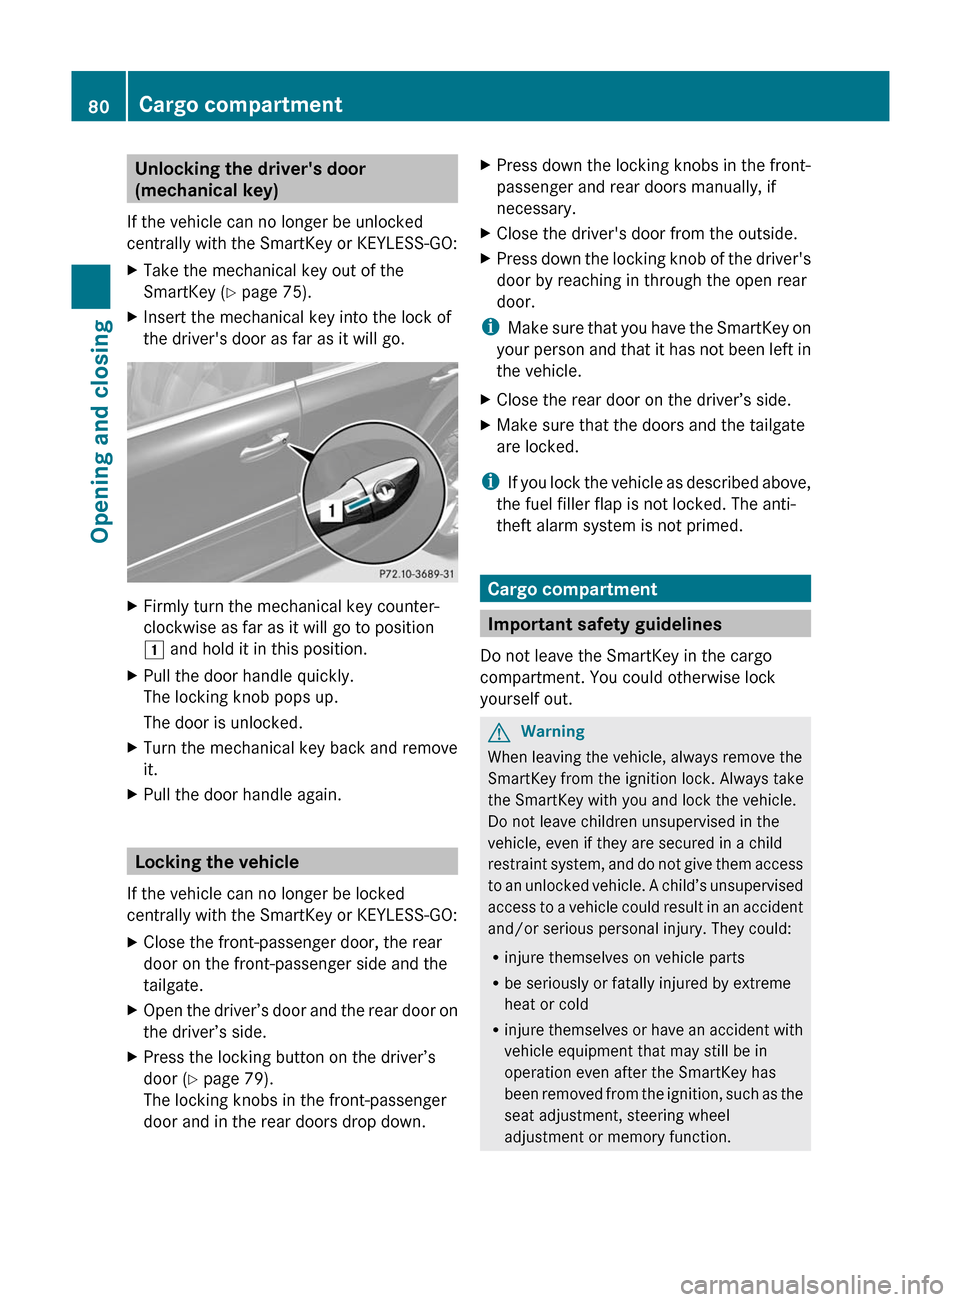
Unlocking the driver's door
(mechanical key)
If the vehicle can no longer be unlocked
centrally with the SmartKey or KEYLESS-GO:XTake the mechanical key out of the
SmartKey ( Y page 75).XInsert the mechanical key into the lock of
the driver's door as far as it will go.XFirmly turn the mechanical key counter-
clockwise as far as it will go to position
1 and hold it in this position.XPull the door handle quickly.
The locking knob pops up.
The door is unlocked.XTurn the mechanical key back and remove
it.XPull the door handle again.
Locking the vehicle
If the vehicle can no longer be locked
centrally with the SmartKey or KEYLESS-GO:
XClose the front-passenger door, the rear
door on the front-passenger side and the
tailgate.XOpen the driver’s door and the rear door on
the driver’s side.XPress the locking button on the driver’s
door ( Y page 79).
The locking knobs in the front-passenger
door and in the rear doors drop down.XPress down the locking knobs in the front-
passenger and rear doors manually, if
necessary.XClose the driver's door from the outside.XPress down the locking knob of the driver's
door by reaching in through the open rear
door.
i Make sure that you have the SmartKey on
your person and that it has not been left in
the vehicle.
XClose the rear door on the driver’s side.XMake sure that the doors and the tailgate
are locked.
i If you lock the vehicle as described above,
the fuel filler flap is not locked. The anti-
theft alarm system is not primed.
Cargo compartment
Important safety guidelines
Do not leave the SmartKey in the cargo
compartment. You could otherwise lock
yourself out.
GWarning
When leaving the vehicle, always remove the
SmartKey from the ignition lock. Always take
the SmartKey with you and lock the vehicle.
Do not leave children unsupervised in the
vehicle, even if they are secured in a child
restraint system, and do not give them access
to an unlocked vehicle. A child’s unsupervised
access to a vehicle could result in an accident
and/or serious personal injury. They could:
R injure themselves on vehicle parts
R be seriously or fatally injured by extreme
heat or cold
R injure themselves or have an accident with
vehicle equipment that may still be in
operation even after the SmartKey has
been removed from the ignition, such as the
seat adjustment, steering wheel
adjustment or memory function.
80Cargo compartmentOpening and closing
BA 164.1 USA, CA Edition B 2011; 1; 2, en-USd2mskotVersion: 3.0.3.52010-04-21T17:25:06+02:00 - Seite 80
Page 86 of 372
Activating the tailgateXTo open the tailgate: pull the handle on
the tailgate.XTo stop the opening procedure at the
desired position: press the close button
( Y page 82) on the tailgate or pull the
handle on the outside of the tailgate again.XTo store the position: press and hold the
closing button on the tailgate until you hear
a short tone.
The opening angle limiter is activated. The
tailgate will now stop in the stored position
when opening.
Deactivating the tailgate
XPress and hold the closing button
( Y page 82) in the tailgate until you hear
two short tones.
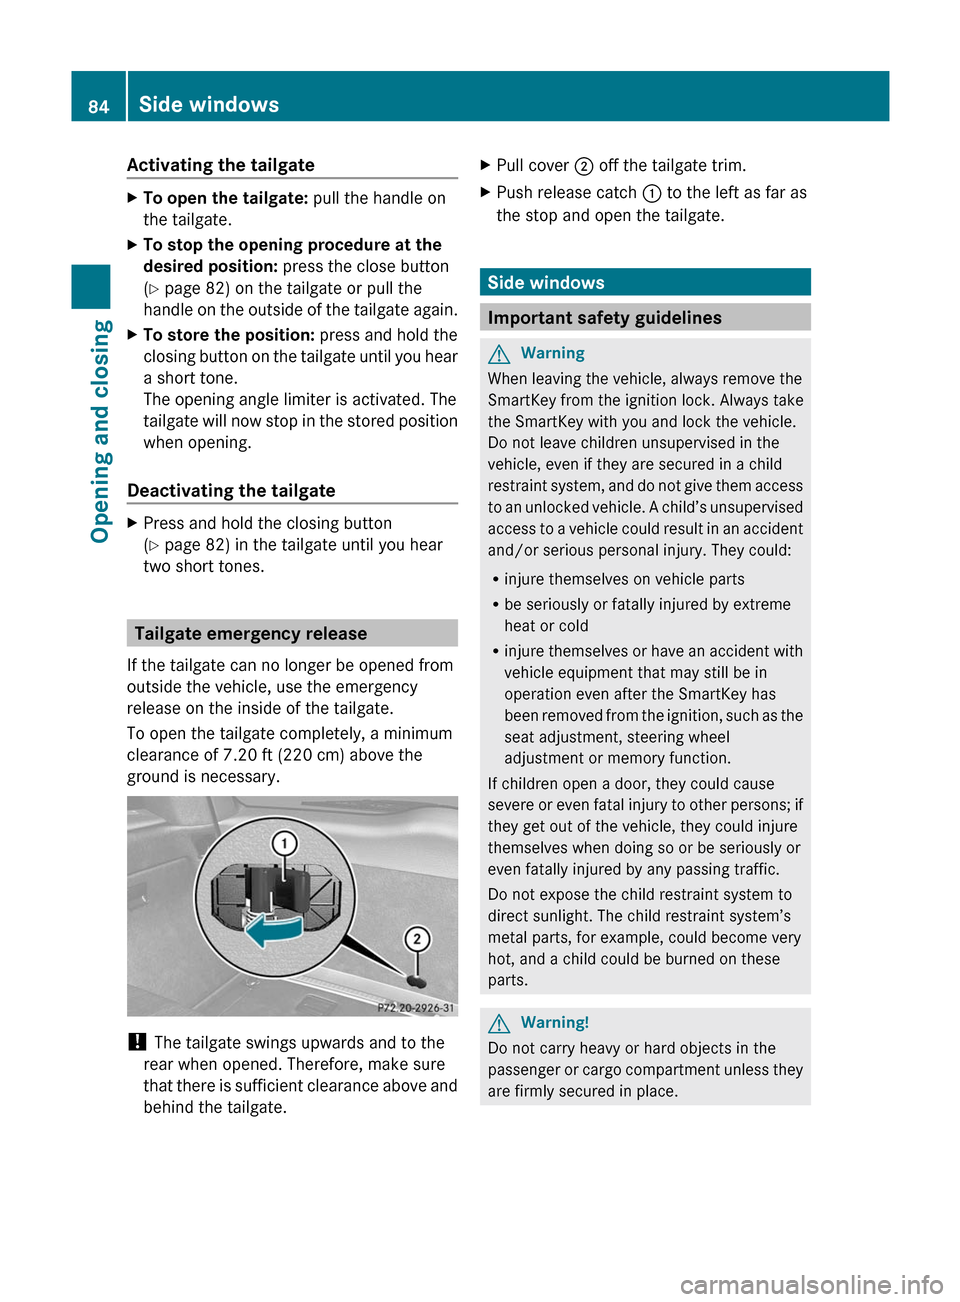
Tailgate emergency release
If the tailgate can no longer be opened from
outside the vehicle, use the emergency
release on the inside of the tailgate.
To open the tailgate completely, a minimum
clearance of 7.20 ft (220 cm) above the
ground is necessary.
! The tailgate swings upwards and to the
rear when opened. Therefore, make sure
that there is sufficient clearance above and
behind the tailgate.
XPull cover ; off the tailgate trim.XPush release catch : to the left as far as
the stop and open the tailgate.
Side windows
Important safety guidelines
GWarning
When leaving the vehicle, always remove the
SmartKey from the ignition lock. Always take
the SmartKey with you and lock the vehicle.
Do not leave children unsupervised in the
vehicle, even if they are secured in a child
restraint system, and do not give them access
to an unlocked vehicle. A child’s unsupervised
access to a vehicle could result in an accident
and/or serious personal injury. They could:
R injure themselves on vehicle parts
R be seriously or fatally injured by extreme
heat or cold
R injure themselves or have an accident with
vehicle equipment that may still be in
operation even after the SmartKey has
been removed from the ignition, such as the
seat adjustment, steering wheel
adjustment or memory function.
If children open a door, they could cause
severe or even fatal injury to other persons; if
they get out of the vehicle, they could injure
themselves when doing so or be seriously or
even fatally injured by any passing traffic.
Do not expose the child restraint system to
direct sunlight. The child restraint system’s
metal parts, for example, could become very
hot, and a child could be burned on these
parts.
GWarning!
Do not carry heavy or hard objects in the
passenger or cargo compartment unless they
are firmly secured in place.
84Side windowsOpening and closing
BA 164.1 USA, CA Edition B 2011; 1; 2, en-USd2mskotVersion: 3.0.3.52010-04-21T17:25:06+02:00 - Seite 84
Page 90 of 372
Sliding sunroof
Important safety guidelines
GWarning!
When leaving the vehicle, always remove the
SmartKey from the starter switch. Always
take the SmartKey with you and lock the
vehicle. Do not leave children unattended in
the vehicle, even if they are secured in a child
restraint system, or with access to an
unlocked vehicle. A child's unsupervised
access to a vehicle could result in an accident
and/or serious personal injury. The children
could
R injure themselves on parts of the vehicle
R be seriously or fatally injured through
excessive exposure to extreme heat or cold
R injure themselves or cause an accident with
vehicle equipment that can be operated
even if the SmartKey is removed from the
starter switch or removed from the vehicle,
such as seat adjustment, steering wheel
adjustment, or the memory function
If children open a door, they could injure other
persons or get out of the vehicle and injure
themselves or be injured by following traffic.
Do not expose the child restraint system to
direct sunlight. The child restraint system's
metal parts, for example, could become very
hot, and the child could be burned by these
parts.
GWarning!
Do not carry heavy or hard objects in the
passenger or cargo compartment unless they
are firmly secured in place.
Unsecured or improperly positioned cargo
increases a child’s risk of injury in the event
of
R strong braking maneuvers
R sudden changes of direction
R an accident
GWarning!
When opening or closing the tilt/sliding
sunroof, make sure there is no danger of
anyone being harmed by the opening/closing
procedure.
The tilt/sliding sunroof is equipped with the
automatic operation and anti-entrapment
features. If the movement of the tilt/sliding
sunroof is blocked during the closing
procedure, the tilt/sliding sunroof will stop
and open slightly.
The tilt/sliding sunroof operates differently
when the sunroof switch is pressed and held.
See the "Closing when the tilt/sliding sunroof
is blocked" section for details.
The opening/closing procedure of the tilt/
sliding sunroof can be immediately halted by
releasing the sunroof switch or, if the sunroof
switch was moved past the resistance point
and released, by moving the sunroof switch in
any direction.
GWarning!
The tilt/sliding sunroof is made out of glass.
In the event of an accident, the glass may
shatter. This may result in an opening in the
roof.
In a vehicle rollover, occupants not wearing
their seat belts or not wearing them properly
may be thrown out of the opening. Such an
opening also presents a potential for injury for
occupants wearing their seat belts properly as
entire body parts or portions of them may
protrude from the passenger compartment.
! Only open the sliding sunroof if it is free
of snow and ice. Otherwise, malfunctions
may occur.
Do not allow anything to protrude from the
sliding sunroof. Otherwise, the seals could
be damaged.
! If the sliding sunroof cannot be opened or
closed due to a malfunction, contact a
qualified specialist workshop, e.g. an
authorized Mercedes-Benz Center.
88Sliding sunroofOpening and closing
BA 164.1 USA, CA Edition B 2011; 1; 2, en-USd2mskotVersion: 3.0.3.52010-04-21T17:25:06+02:00 - Seite 88
Page 93 of 372

Vehicle equipment ..............................92
Correct driver's seat position ............92
Seats .................................................... 93
Steering wheel .................................... 99
Mirrors ............................................... 101
Memory functions .............................10391Seats, steering wheel and mirrorsBA 164.1 USA, CA Edition B 2011; 1; 2, en-USd2mskotVersion: 3.0.3.52010-04-21T17:25:06+02:00 - Seite 91