ad blue MERCEDES-BENZ M-Class 2011 W164 Owner's Manual
[x] Cancel search | Manufacturer: MERCEDES-BENZ, Model Year: 2011, Model line: M-Class, Model: MERCEDES-BENZ M-Class 2011 W164Pages: 372, PDF Size: 16.23 MB
Page 2 of 372
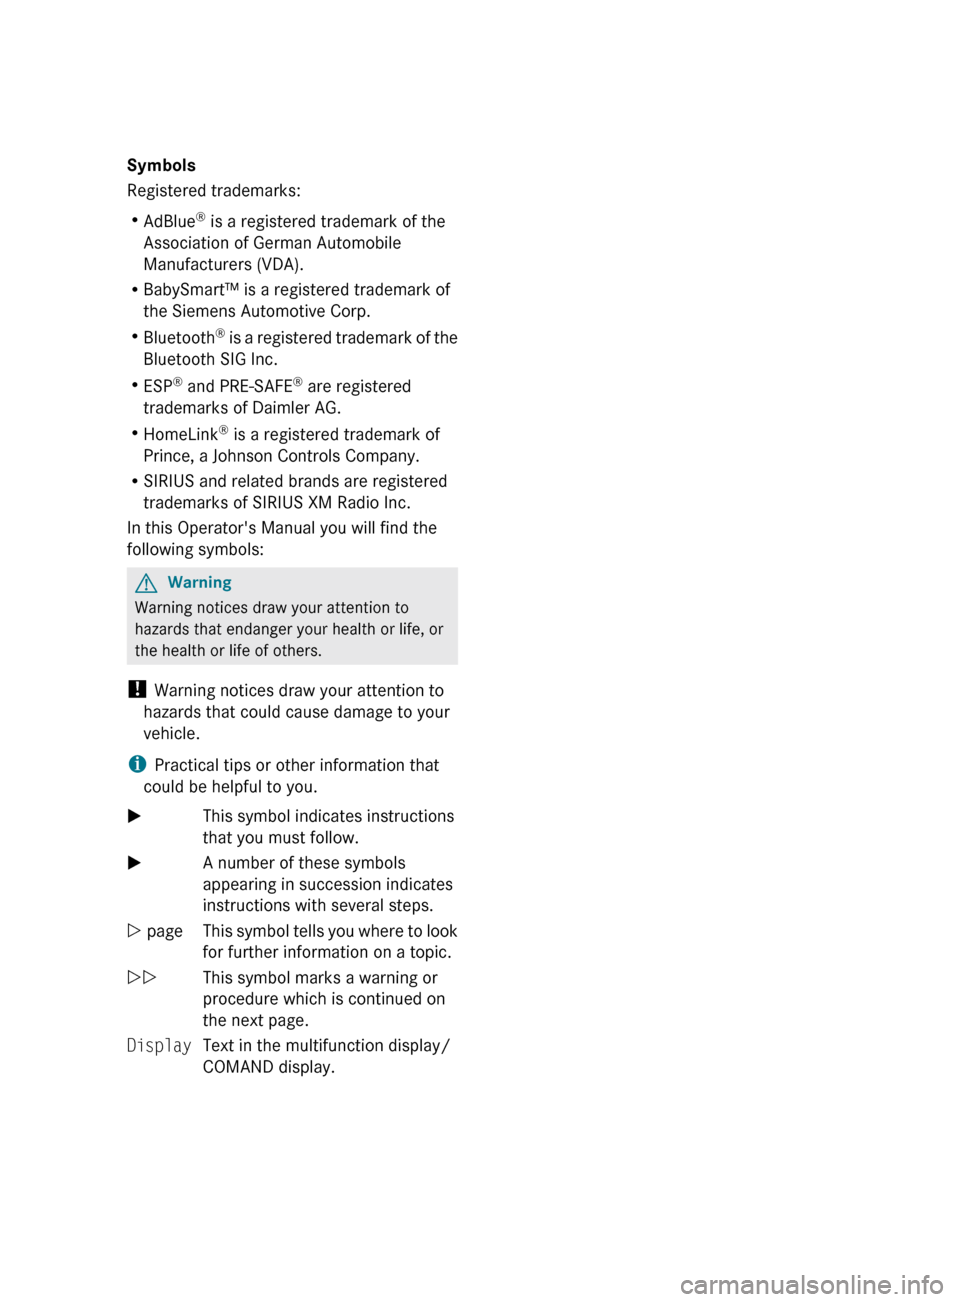
Symbols
Registered trademarks:
R AdBlue ®
is a registered trademark of the
Association of German Automobile
Manufacturers (VDA).
R BabySmart™ is a registered trademark of
the Siemens Automotive Corp.
R Bluetooth ®
is a registered trademark of the
Bluetooth SIG Inc.
R ESP ®
and PRE-SAFE ®
are registered
trademarks of Daimler AG.
R HomeLink ®
is a registered trademark of
Prince, a Johnson Controls Company.
R SIRIUS and related brands are registered
trademarks of SIRIUS XM Radio Inc.
In this Operator's Manual you will find the
following symbols:GWarning
Warning notices draw your attention to
hazards that endanger your health or life, or
the health or life of others.
! Warning notices draw your attention to
hazards that could cause damage to your
vehicle.
i Practical tips or other information that
could be helpful to you.
XThis symbol indicates instructions
that you must follow.XA number of these symbols
appearing in succession indicates
instructions with several steps.Y pageThis symbol tells you where to look
for further information on a topic.YYThis symbol marks a warning or
procedure which is continued on
the next page.DisplayText in the multifunction display/
COMAND display.BA 164.1 USA, CA Edition B 2011; 1; 2, en-USd2mskotVersion: 3.0.3.52010-04-21T17:25:06+02:00 - Seite 2
Page 6 of 372
1, 2, 3 ...
115 V socket ...................................... 269
12 V socket ........................................ 268
4ETS see ETS/4ETS
4MATIC (permanent four-wheel
drive) .................................................. 191
A
ABS (Anti-lock Braking System) Display message ............................ 228
Function/notes ................................ 65
Warning lamp ................................. 249
Accident (notes) ................................ 297
Active light function (display
message) ............................................ 233
Active service system see Service interval display
Adaptive Damping System (ADS) ..... 184
AdBlue ®
Adding ........................................... 156
Display message ............................ 236
Additional functions (on-board
computer) .......................................... 219
ADS (Adaptive Damping System) ..... 184
Air bags Display message ............................ 225
Front air bag (driver, front
passenger) ....................................... 39
Important safety information ...........38
PASSENGER AIRBAG OFF
indicator lamp (only Canada) ...........48
PASSENGER AIRBAG OFF
indicator lamp (only USA) ................42
Safety guidelines ............................. 37
Side impact air bag ..........................40
Window curtain air bag ....................41
Air-conditioning system
see Climate control
Air dehumidification
Activating/deactivating with
cooling ........................................... 129
Air distribution
Setting ........................................... 132
Air filter (display message) .............. 236
Airflow
Setting ........................................... 132
AIRMATIC package ............................ 183
Air nozzles see Air vents .................................. 135
Air pressure
see Tire pressure
Air-recirculation mode
Activating/deactivating .................133
Air vents ............................................. 135
Important safety information .........134
Rear ............................................... 135
Setting the center air vents ...........135
Setting the side air vents ...............135
Alarm system
see ATA
Ambient lighting (on-board
computer) .......................................... 216
AMG menu (on-board computer) ..... 209
Anti-lock Braking System see ABS
Anti-Theft Alarm system
see ATA
Anti-theft system
ATA (Anti-Theft Alarm system) .........69
Approach/departure angle .............. 170
Ashtray ............................................... 267
ATA (Anti-Theft Alarm system) Activating/deactivating ...................69
Function ........................................... 69
Switching off the alarm ....................69
Audio menu (on-board computer) .... 211
AUTO lights see Light sensor
Automatic car wash .......................... 288
Automatic transmission DIRECT SELECT lever .....................144
Display message ............................ 243
Driving tips .................................... 147
Emergency running mode ..............151
Kickdown ....................................... 147
Malfunction .................................... 151
Program selector button ................147
Pulling away ................................... 141
Starting .......................................... 141
Trailer towing ................................. 1474IndexBA 164.1 USA, CA Edition B 2011; 1; 2, en-USd2mskotVersion: 3.0.3.52010-04-21T17:25:06+02:00 - Seite 4
Page 7 of 372
B
BAS (Brake Assist System) ................. 66
Battery Charging ........................................ 314
Checking (SmartKey) .......................76
Display message ............................ 235
Important safety guidelines
(SmartKey) ....................................... 75
Jump-starting ................................. 315
Replacing (SmartKey) ......................76
Safety notes .................................. 312
Voltage (on-board computer) .........209
Belt
see Seat belts
Blind Spot Assist
Activating/deactivating (on-
board computer) ............................ 219
Display message ............................ 239
Function/notes ............................. 189
Trailer towing ................................. 191
BlueTEC
AdBlue ®
......................................... 360
Adding AdBlue ®
............................. 156
Brake fluid
Notes ............................................. 362
Brake fluid level ................................ 286
Brake lamp (display message) ......... 231
Brakes ABS .................................................. 65
BAS .................................................. 66
Brake fluid (notes) .........................362
Display message ............................ 229
High-performance brake system ....163
Maintenance .................................. 162
Parking brake ........................ 159, 163
Warning lamp ................................. 247
Braking
Important safety instructions ......... 161
Breakdown
see Accident (notes)
see Flat tire
Bulbs
Backup lamp .................................. 115
Brake lamp .................................... 115
High-beam headlamps ...................113
License plate lamp .........................116
Low-beam headlamps ....................113Overview ........................................ 112
Parking lamps ................................ 114
Rear fog lamp ................................ 115
Replacing ....................................... 114
Standing lamps (front) ...................114
Standing lamps (rear) ....................115
Tail lamps ...................................... 115
Turn signal lamp ............................ 115
Turn signals (front) ......................... 114
C
CAC (Customer Assistance Center) .........22
California
Important notice for retail
customers and lessees ....................20
Calling up a malfunction
see Display messages
Care
Carpets .......................................... 293
Car wash ........................................ 288
Display ........................................... 292
Gear or selector lever ....................292
Headlamps ..................................... 291
Notes ............................................. 288
Paint .............................................. 290
Plastic trim .................................... 292
Power washer ................................ 289
Rear view camera .......................... 291
Roof lining ...................................... 293
Seat belt ........................................ 293
Seat covers .................................... 292
Sensors ......................................... 291
Steering wheel ............................... 292
Tail pipes ....................................... 291
Trim strips ..................................... 292
Washing by hand ........................... 289
Wheels ........................................... 289
Windows ........................................ 290
Wiper blades .................................. 290
Wooden trim .................................. 292
Cargo compartment cover ............... 261
Cargo compartment enlargement ... 258
Cargo compartment floor ................. 298
Cargo net Attaching ....................................... 262
Important safety information .........261
Index5BA 164.1 USA, CA Edition B 2011; 1; 2, en-USd2mskotVersion: 3.0.3.52010-04-21T17:25:06+02:00 - Seite 5
Page 16 of 372
Belt force limiters ............................ 57
Cleaning ......................................... 293
Correct usage .................................. 54
Emergency Tensioning Devices ........ 57
Fastening ......................................... 55
Important safety guidelines .............53
Releasing ......................................... 56
Safety guidelines ............................. 37
Switching belt adjustment on/off
(on-board computer) ......................218
Warning lamp ................................. 248
Warning lamp (function) ................... 57
Seat heating
Indicator lamp (Malfunction) ............98
Seats
Adjusting (electrically) .....................94
Adjusting the 4-way lumbar
support ............................................ 97
Adjusting the head restraint ............95
Cleaning the cover .........................292
Correct driver's seat position ........... 92
Important safety instructions ...........93
Multicontour seat ............................ 97
Storing settings (memory
function) ........................................ 103
Switching seat heating on/off .........97
Switching the seat ventilation on/
off .................................................... 98
Seat ventilation
Indicator lamp (Malfunction) ............99
Securing hooks .................................. 260
Sensors (cleaning instructions) ....... 291
Service indicator see Service interval display
Service interval display .................... 287
Displaying a service message (on-
board computer) ............................ 287
Service products
AdBlue ®
special additives ..............360
Brake fluid ..................................... 362
Coolant (engine) ............................ 362
Engine oil ....................................... 361
Filling capacity ............................... 357
Fuel ................................................ 358
Important safety notes ..................356
Notes ............................................. 356Refrigerant (air-conditioning
system) .......................................... 362
Washer fluid ................................... 363
Settings
Factory (on-board computer) .........213
On-board computer .......................213
Shift ranges ....................................... 148
Side impact air bag ............................. 40
Side marker lamp (display
message) ............................................ 232
Side windows Convenience closing feature ............86
Convenience opening feature ..........86
Important safety information ...........84
Opening/closing .............................. 85
Resetting ......................................... 87
Troubleshooting ............................... 87
Sliding sunroof
Important safety information ...........88
Troubleshooting ............................... 89
see Tilt/sliding sunroof
SmartKey
Changing the battery .......................76
Changing the programming .............75
Checking the battery .......................76
Important safety notes ....................72
Malfunction ...................................... 77
Snow chains ...................................... 165
Socket ................................................ 268
Dashboard ..................................... 268
Front-passenger footwell ...............268
Luggage compartment ...................269
Rear compartment .........................269
SOS
see mbrace
Spare wheel
Notes/data .................................... 352
Storage location ............................ 299
Stowing .......................................... 299
see Emergency spare wheel
Speedometer
Additional speedometer (on-
board computer) ............................ 208
Segments ...................................... 205
Setting the unit (on-board
computer) ...................................... 21414IndexBA 164.1 USA, CA Edition B 2011; 1; 2, en-USd2mskotVersion: 3.0.3.52010-04-21T17:25:06+02:00 - Seite 14
Page 17 of 372
SRS (Supplemental Restraint
System) Display message ............................ 224
Introduction ..................................... 36
Warning lamp ................................. 251
Warning lamp (function) ................... 36
Standard display (on-board
computer) .......................................... 208
Starting the engine Important safety instructions ......... 140
Station
see Radio
Status line (on-board computer)
Multifunction display .....................206
Selecting the display ...................... 214
Steering (display message) .............. 244
Steering wheel Adjusting (electrically) ...................100
Adjusting (manually) ........................99
Buttons (on-board computer) ......... 205
Cleaning ......................................... 292
Important safety instructions ...........99
Memory function (storing
settings) ......................................... 100
Steering wheel heating ..................100
Storing settings (memory
function) ........................................ 103
Steering wheel heating
Indicator lamp (Malfunction) ..........100
Steering wheel paddle shifters ........ 148
Stowage compartments Armrest (under) ............................. 257
Glove box ....................................... 257
Stowage space
Center console .............................. 257
Center console (rear) .....................258
Cup holders ................................... 265
Important safety information .........256
Submenu (on-board computer)
Convenience .................................. 218
Instrument cluster .........................214
Lighting .......................................... 215
Time/Date ..................................... 215
Vehicle ........................................... 217
Summer opening
see Convenience opening feature
Sun visor ............................................ 266Supplemental Restraint System
see SRS
Surround lighting (on-board
computer) .......................................... 215
SUV (Sport Utility Vehicle) .......................21
Switching off the alarm (ATA) ............ 69
T
Tachometer ........................................ 204
Tailgate Display message ............................ 244
Emergency unlocking .......................84
Important safety guidelines .............80
Limiting the opening angle ...............83
Taillight
see Tail lamps
Tank contents
Gauge .............................................. 28
Technical data ................................... 354
ML 350 .......................................... 364
ML 350 4MATIC ............................. 364
ML 350 BlueTEC 4MATIC ...............363
ML 550 4MATIC ............................. 364
ML 63 AMG ................................... 365
Tires/wheels ................................. 347
TELEAID
Call priority .................................... 274
Display message ............................ 224
Downloading destinations
(COMAND) ..................................... 274
Emergency call .............................. 271
Important safety notes ..................270
Locating a stolen vehicle ...............275
MB info call button ........................273
Roadside Assistance button ..........272
Self-test ......................................... 271
System .......................................... 271
Vehicle remote unlocking ..............275
Telephone
Accepting a call ............................. 220
Display message ............................ 245
Menu (on-board computer) ............220
Number from the phone book ........ 221
Redialing ........................................ 221
Rejecting/ending a call .................221
Telephone compartment .................. 257
Index15BA 164.1 USA, CA Edition B 2011; 1; 2, en-USd2mskotVersion: 3.0.3.52010-04-21T17:25:06+02:00 - Seite 15
Page 100 of 372

Driver's and front-passenger seat
Rear compartment seats
The system automatically switches down
from level 3 to level 2 after approximately five
minutes.
The system automatically switches down
from level 2 to level 1 after approximately ten
minutes.
The system automatically switches off
approximately 20 minutes after it is set to
level 1.
XMake sure that the key is in position 2 in
the ignition lock.XTo switch on: press button : repeatedly
until the desired heating level is set.XTo switch off: press button : repeatedly
until all the indicator lamps go out.Problems with the seat heating
If one or all of the indicator lamps in the seat
heating button are flashing, the seat heating
has switched off automatically. The vehicle's
electrical system voltage is too low because
too many electrical consumers are switched
on.
XSwitch off electrical consumers which you
do not need, such as the rear window
defroster or interior lighting.
Once the battery is sufficiently charged, the
seat heating will switch back on
automatically.
Switching the seat ventilation on/off
Switching on/off
The three blue indicator lamps in the buttons
indicate the ventilation level you have
selected.
i If the battery voltage is too low, the seat
ventilation may switch off.
XMake sure that the key is in position 2 in
the ignition lock.XTo switch on: press button : repeatedly
until the desired ventilation level is set.
i You can open the side windows and the
tilt/sliding sunroof with the key
( Y page 86). The seat ventilation of the
driver's seat automatically switches to the
highest level.
98SeatsSeats, steering wheel and mirrors
BA 164.1 USA, CA Edition B 2011; 1; 2, en-USd2mskotVersion: 3.0.3.52010-04-21T17:25:06+02:00 - Seite 98
Page 158 of 372
AdBlue®
Important notes on use
BlueTEC exhaust gas aftertreatment 25
must
be operated with AdBlue ®
reducing agent in
order to function properly. Adding AdBlue ®
is
one of the tasks performed during
maintenance. Under normal operating
conditions, a tank of AdBlue ®
lasts until the
next service due date.
When the AdBlue ®
supply has almost run out,
the Check Additive – See Operator's
Manual message is shown in the
multifunction display.
When the AdBlue ®
supply sinks to a minimum
level, the Remaining Starts: 20 message
is shown in the multifunction display.
i When the Remaining Starts: 20
message is shown in the multifunction
display, you can start the engine 20 more
times. If AdBlue ®
is not topped up, it is then
not possible to start the engine again. Top
up the AdBlue ®
tank with approximately
1 gallon (3.8 l) of AdBlue ®
or have the
AdBlue ®
tank refilled at a qualified
specialist workshop, e.g. an authorized
Mercedes-Benz Center.
Use the special AdBlue ®
refill bottle when
adding between maintenance intervals. For
more information, please contact an
authorized Mercedes-Benz Center or
Roadside Assistance if applicable
( Y page 20).
Further information about BlueTEC exhaust
gas aftertreatment and AdBlue ®
is available
at any authorized Mercedes-Benz Center.
Adding AdBlue ®GWarning!
Make sure
R AdBlue ®
does not come into contact with
skin, eyes, or clothing
R to keep AdBlue ®
out of the reach of children
If you and/or others have come into contact
with AdBlue ®
:
R If AdBlue ®
has gotten into contact with
eyes, flush with plenty of water immediately
and seek medical help.
R Clean affected skin immediately with plenty
of water.
R If AdBlue ®
was swallowed, rinse mouth
immediately with plenty of water and drink
plenty of water. Consult a physician.
GWarning!
When opening the filler cap of the AdBlue ®
tank ammonia gas vapors may escape. Refill
AdBlue ®
in a well ventilated area only.
Ammonia gas vapors have a pungent odor and
are particularly irritating for your skin,
mucous membranes, and eyes. Inhaling
ammonia gas vapors will cause burning eyes,
nose, and throat, as well as coughing and
watering eyes.
! Only use AdBlue ®
that complies with
ISO 22241. Do not add any special
additives to AdBlue ®
and do not thin
AdBlue ®
with water. This could destroy the
BlueTEC exhaust gas aftertreatment.
! Rinse surfaces that have come into
contact with AdBlue ®
immediately with
water or remove AdBlue ®
using a damp
cloth and cold water. If the AdBlue ®
has
already crystallized, use a sponge and cold
water to clean it. AdBlue ®
residues
crystallize after time and contaminate the
affected surfaces.
25 Only on BlueTEC vehicles.156RefuelingDriving and parking
BA 164.1 USA, CA Edition B 2011; 1; 2, en-USd2mskotVersion: 3.0.3.52010-04-21T17:25:06+02:00 - Seite 156
Page 159 of 372
! AdBlue ®
is not a additive and must not be
added to the diesel tank. If AdBlue ®
is
added to the diesel tank this could damage
the engine.
i If you are adding between maintenance
intervals, add approximately 1 gallon (3.8 l)
of AdBlue ®
to the AdBlue ®
tank. 1 gallon
(3.8 l) of AdBlue ®
is approximately
2 AdBlue ®
refill bottles.
Further information about
AdBlue ®
(Y page 360).
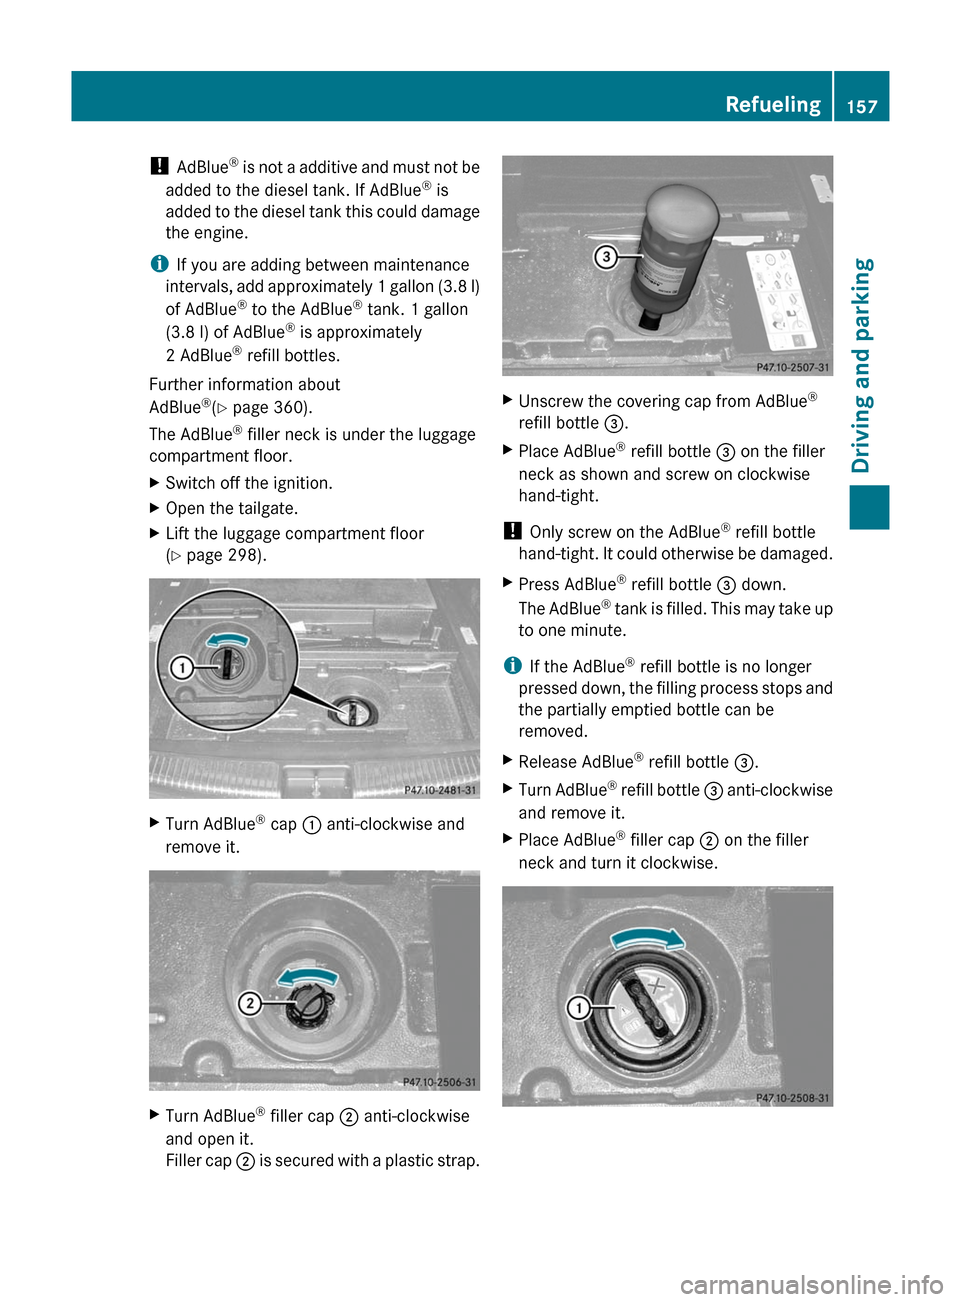
The AdBlue ®
filler neck is under the luggage
compartment floor.XSwitch off the ignition.XOpen the tailgate.XLift the luggage compartment floor
( Y page 298).XTurn AdBlue ®
cap : anti-clockwise and
remove it.XTurn AdBlue ®
filler cap ; anti-clockwise
and open it.
Filler cap ; is secured with a plastic strap.XUnscrew the covering cap from AdBlue ®
refill bottle =.XPlace AdBlue ®
refill bottle = on the filler
neck as shown and screw on clockwise
hand-tight.
! Only screw on the AdBlue ®
refill bottle
hand-tight. It could otherwise be damaged.
XPress AdBlue ®
refill bottle = down.
The AdBlue ®
tank is filled. This may take up
to one minute.
i If the AdBlue ®
refill bottle is no longer
pressed down, the filling process stops and
the partially emptied bottle can be
removed.
XRelease AdBlue ®
refill bottle =.XTurn AdBlue ®
refill bottle = anti-clockwise
and remove it.XPlace AdBlue ®
filler cap ; on the filler
neck and turn it clockwise.Refueling157Driving and parkingBA 164.1 USA, CA Edition B 2011; 1; 2, en-USd2mskotVersion: 3.0.3.52010-04-21T17:25:06+02:00 - Seite 157Z
Page 160 of 372
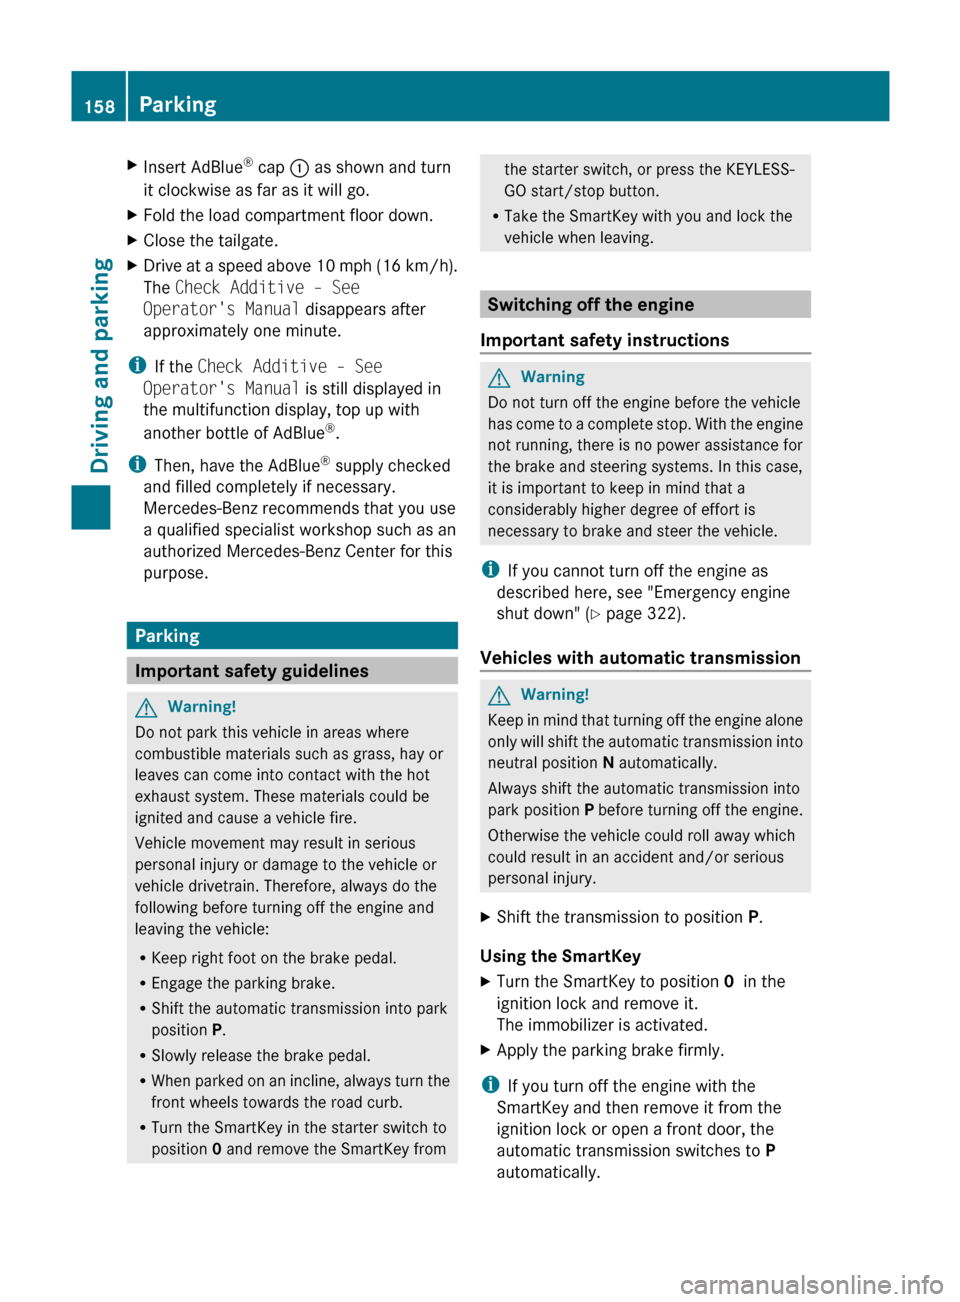
XInsert AdBlue®
cap : as shown and turn
it clockwise as far as it will go.XFold the load compartment floor down.XClose the tailgate.XDrive at a speed above 10 mph (16 km/h).
The Check Additive – See
Operator's Manual disappears after
approximately one minute.
i If the Check Additive – See
Operator's Manual is still displayed in
the multifunction display, top up with
another bottle of AdBlue ®
.
i Then, have the AdBlue ®
supply checked
and filled completely if necessary.
Mercedes-Benz recommends that you use
a qualified specialist workshop such as an
authorized Mercedes-Benz Center for this
purpose.
Parking
Important safety guidelines
GWarning!
Do not park this vehicle in areas where
combustible materials such as grass, hay or
leaves can come into contact with the hot
exhaust system. These materials could be
ignited and cause a vehicle fire.
Vehicle movement may result in serious
personal injury or damage to the vehicle or
vehicle drivetrain. Therefore, always do the
following before turning off the engine and
leaving the vehicle:
R Keep right foot on the brake pedal.
R Engage the parking brake.
R Shift the automatic transmission into park
position P.
R Slowly release the brake pedal.
R When parked on an incline, always turn the
front wheels towards the road curb.
R Turn the SmartKey in the starter switch to
position 0 and remove the SmartKey from
the starter switch, or press the KEYLESS-
GO start/stop button.
R Take the SmartKey with you and lock the
vehicle when leaving.
Switching off the engine
Important safety instructions
GWarning
Do not turn off the engine before the vehicle
has come to a complete stop. With the engine
not running, there is no power assistance for
the brake and steering systems. In this case,
it is important to keep in mind that a
considerably higher degree of effort is
necessary to brake and steer the vehicle.
i If you cannot turn off the engine as
described here, see "Emergency engine
shut down" ( Y page 322).
Vehicles with automatic transmission
GWarning!
Keep in mind that turning off the engine alone
only will shift the automatic transmission into
neutral position N automatically.
Always shift the automatic transmission into
park position P before turning off the engine.
Otherwise the vehicle could roll away which
could result in an accident and/or serious
personal injury.
XShift the transmission to position P.
Using the SmartKey
XTurn the SmartKey to position 0 in the
ignition lock and remove it.
The immobilizer is activated.XApply the parking brake firmly.
i If you turn off the engine with the
SmartKey and then remove it from the
ignition lock or open a front door, the
automatic transmission switches to P
automatically.
158ParkingDriving and parking
BA 164.1 USA, CA Edition B 2011; 1; 2, en-USd2mskotVersion: 3.0.3.52010-04-21T17:25:06+02:00 - Seite 158
Page 191 of 372
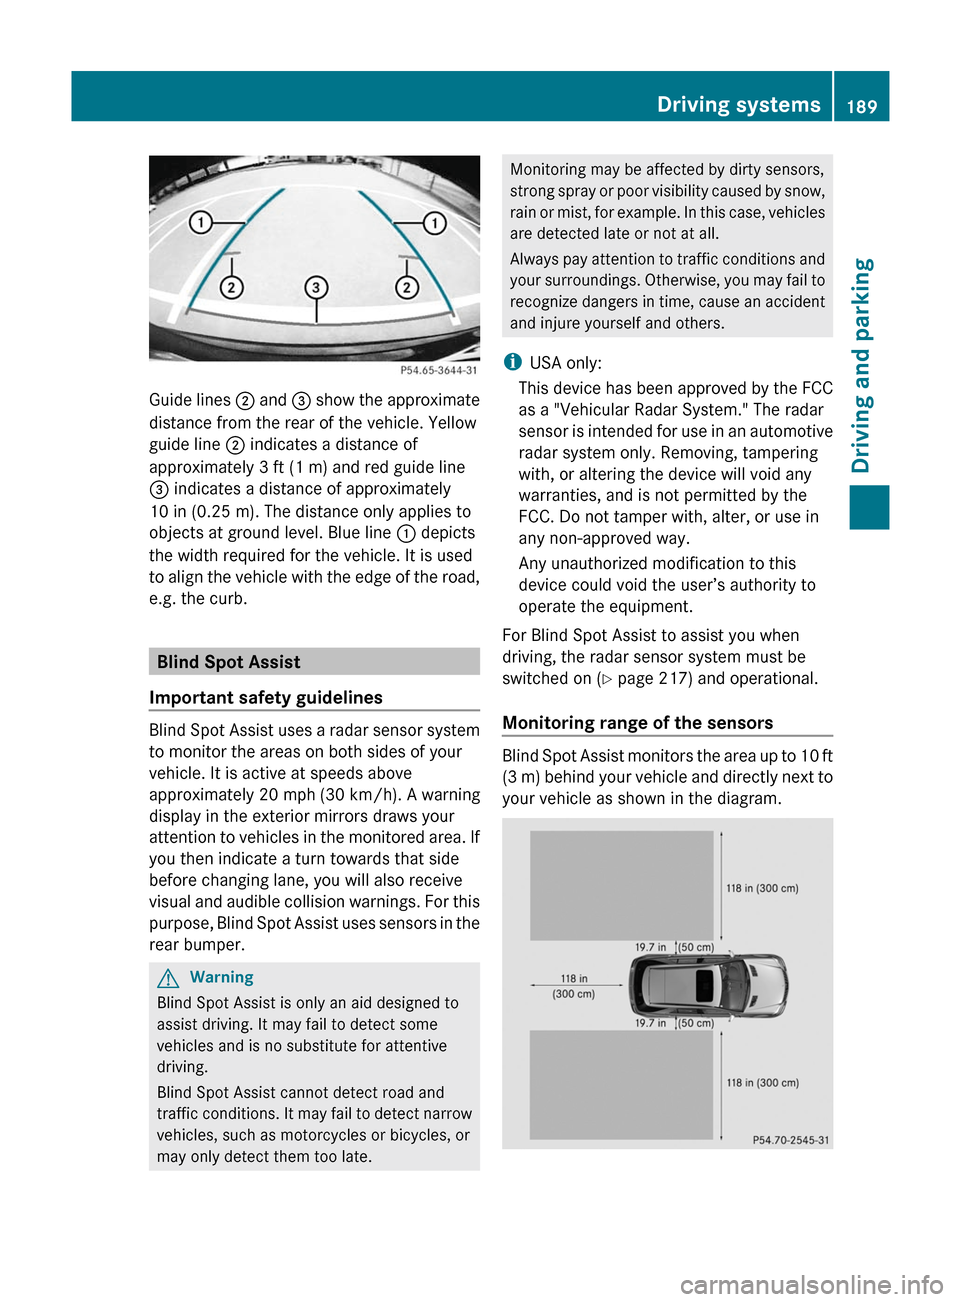
Guide lines ; and = show the approximate
distance from the rear of the vehicle. Yellow
guide line ; indicates a distance of
approximately 3 ft (1 m) and red guide line
= indicates a distance of approximately
10 in (0.25 m). The distance only applies to
objects at ground level. Blue line : depicts
the width required for the vehicle. It is used
to align the vehicle with the edge of the road,
e.g. the curb.
Blind Spot Assist
Important safety guidelines
Blind Spot Assist uses a radar sensor system
to monitor the areas on both sides of your
vehicle. It is active at speeds above
approximately 20 mph (30 km/h). A warning
display in the exterior mirrors draws your
attention to vehicles in the monitored area. If
you then indicate a turn towards that side
before changing lane, you will also receive
visual and audible collision warnings. For this
purpose, Blind Spot Assist uses sensors in the
rear bumper.
GWarning
Blind Spot Assist is only an aid designed to
assist driving. It may fail to detect some
vehicles and is no substitute for attentive
driving.
Blind Spot Assist cannot detect road and
traffic conditions. It may fail to detect narrow
vehicles, such as motorcycles or bicycles, or
may only detect them too late.
Monitoring may be affected by dirty sensors,
strong spray or poor visibility caused by snow,
rain or mist, for example. In this case, vehicles
are detected late or not at all.
Always pay attention to traffic conditions and
your surroundings. Otherwise, you may fail to
recognize dangers in time, cause an accident
and injure yourself and others.
iUSA only:
This device has been approved by the FCC
as a "Vehicular Radar System." The radar
sensor is intended for use in an automotive
radar system only. Removing, tampering
with, or altering the device will void any
warranties, and is not permitted by the
FCC. Do not tamper with, alter, or use in
any non-approved way.
Any unauthorized modification to this
device could void the user’s authority to
operate the equipment.
For Blind Spot Assist to assist you when
driving, the radar sensor system must be
switched on (Y page 217) and operational.
Monitoring range of the sensors
Blind Spot Assist monitors the area up to 10 ft
(3 m) behind your vehicle and directly next to
your vehicle as shown in the diagram.
Driving systems189Driving and parkingBA 164.1 USA, CA Edition B 2011; 1; 2, en-USd2mskotVersion: 3.0.3.52010-04-21T17:25:06+02:00 - Seite 189Z