check engine light MERCEDES-BENZ M-Class 2011 W164 Owner's Manual
[x] Cancel search | Manufacturer: MERCEDES-BENZ, Model Year: 2011, Model line: M-Class, Model: MERCEDES-BENZ M-Class 2011 W164Pages: 372, PDF Size: 16.23 MB
Page 8 of 372
Cargo tie down rings ......................... 260
CD player/CD changer (on-board
computer) .......................................... 212
Center console ..................................... 31
Central locking Automatic locking (on-board
computer) ...................................... 217
SmartKey ......................................... 72
Changing bulbs
Headlamps ..................................... 111
Changing gears .................................. 146
Changing the programming SmartKey ......................................... 75
Checklist
After driving off-road ...................... 168
Before driving off-road ...................167
Child-proof locks
Rear doors ....................................... 63
Special seat belt retractor ...............61
Children
In the vehicle ................................... 58
Restraint systems ............................ 59
Child seat
Automatic recognition .....................48
Automatic recognition/air bag
deactivation, self-test ......................50
ISOFIX (LATCH-type child seat
anchors) ........................................... 61
Special seat belt retractor ...............61
Top Tether ....................................... 62
Troubleshooting ............................... 51
Cigarette lighter ................................ 267
Climate control Activating/deactivating .................128
Activating/deactivating air-
recirculation mode .........................133
Controlling automatically ...............130
Cooling with air dehumidification ..129
Defrosting the windshield ..............132
Demisting the windows .................. 133
Dual-zone automatic climate
control ........................................... 123
Important safety information .........122
Indicator lamp ................................ 130
Multi-zone automatic climate
control ........................................... 124
Problems with "cooling with air
dehumidification" ........................... 130Problems with the rear window
heating .......................................... 133
Rear control panel .................125, 128
Refrigerant ..................................... 362
Setting the air distribution .............132
Setting the airflow .........................132
Setting the air vents ......................135
Setting the temperature ................131
Setting the temperature (rear
compartment) ................................ 131
Switching the MONO function on/
off .................................................. 132
Switching the rear window
heating on/off ............................... 133
Switching the residual heat
function on/off .............................. 134
Clock (on-board computer) ............... 215
Cockpit ................................................. 27
Collapsible spare wheel Inflating ......................................... 309
see Emergency spare wheel
Combination switch .......................... 109
Compass ............................................ 279
Calling up ....................................... 279
Consumption statistics (on-board
computer) .......................................... 219
Convenience closing feature .............. 86
Convenience opening feature ............ 86
Coolant (engine) Checking the level .........................285
Display message ............................ 233
Notes ............................................. 362
Temperature gauge ........................ 208
Cooling
see Climate control
Cornering light (display message) ... 230
Crash-responsive emergency
lighting ............................................... 111
Cruise control .................................... 171
Cruise control lever .......................172
Display message ............................ 239
Cup holder ......................................... 265
Center console .............................. 265
Rear compartment .........................266
Current fuel consumption (on-
board computer) ............................... 2206IndexBA 164.1 USA, CA Edition B 2011; 1; 2, en-USd2mskotVersion: 3.0.3.52010-04-21T17:25:06+02:00 - Seite 6
Page 38 of 372
Vehicle equipment
i This manual describes all the standard
and optional equipment of your vehicle
which was available at the time of
purchase. Country-specific differences are
possible. Bear in mind that your vehicle
may not feature all functions described
here. This also refers to safety-related
systems and functions.
Occupant safety
Overview of occupant safety
In this section you will learn the most
important facts about the restraint system
components of the vehicle.
The restraint systems are:
R Seat belts
R Child restraint systems
R "LATCH" type child seat mountings
Additional protection is provided by:
R SRS (Supplemental Restraint System)
R NECK-PRO head restraints
R PRE-SAFE ®
R Air bag system components with:
- PASSENGER air bag OFF indicator lamp
- USA only: front-passenger seat with
Occupant Classification System (OCS)
- Canada only: front-passenger seat with
BabySmart™ air bag deactivation system
The protective functions of the systems work
in conjunction with each other. The systems
are, however, autonomous.
GWarning!
Modifications to or work improperly
conducted on restraint system components
or their wiring, as well as tampering with
interconnected electronic systems, can lead
to the restraint systems no longer functioning
as intended.
Air bags or Emergency Tensioning Devices/
belt buckle tensioners, for example, could
deploy inadvertently or fail to deploy.
Therefore, never modify the restraint
systems. Do not tamper with electronic
components or their software.
i More information on the subject of
children in the vehicle and child restraint
systems can be found under the "Children
in the vehicle" chapter ( Y page 58).
SRS (Supplemental Restraint System)
Introduction
SRS reduces the risk of occupants coming
into contact with the vehicle's interior in the
event of an accident. It can also reduce the
effect of the forces to which occupants are
subjected during an accident.
SRS consists of:
R + SRS warning lamp
R air bags
R air bag control unit (with crash sensors)
R ETDs/belt buckle tensioners
R belt force limiters
SRS warning lamps
SRS functions are checked regularly when
you switch on the ignition and when the
engine is running. Therefore, malfunctions
can be detected in good time.
The + SRS warning lamp in the instrument
cluster lights up when the ignition is switched
on. It goes out no later than a few seconds
after the engine is started.
The SRS components are in operational
readiness when the + indicator lamp goes
out while the engine is running.
36Occupant safetySafety
BA 164.1 USA, CA Edition B 2011; 1; 2, en-USd2mskotVersion: 3.0.3.52010-04-21T17:25:06+02:00 - Seite 36
Page 80 of 372
ProblemPossible causes/consequences and M SolutionsThe engine cannot be
started using the
SmartKey.The on-board voltage is too low.XSwitch off non-essential consumers, e.g. seat heating or interior
lighting, and try to start the engine again.
If this does not work:
XCheck the starter battery and charge it if necessary
( Y page 312).
or
XJump-start the vehicle ( Y page 315).
or
XConsult a qualified specialist workshop.The engine cannot be
started using KEYLESS-
GO. The SmartKey is in
the vehicle.A door is open. Therefore, the SmartKey cannot be detected as
easily.XClose the door and try to start the vehicle again.There is interference from a powerful source of radio waves.XStart your vehicle with the SmartKey in the ignition lock.Doors
Important safety guidelines
GWarning!
When leaving the vehicle, always remove the
SmartKey from the starter switch. Always
take the SmartKey with you and lock the
vehicle. Do not leave children unattended in
the vehicle, even if they are secured in a child
restraint system, or with access to an
unlocked vehicle. A child's unsupervised
access to a vehicle could result in an accident
and/or serious personal injury. The children
could
R injure themselves on parts of the vehicle
R be seriously or fatally injured through
excessive exposure to extreme heat or cold
R injure themselves or cause an accident with
vehicle equipment that can be operated
even if the SmartKey is removed from the
starter switch or removed from the vehicle,
such as seat adjustment, steering wheel
adjustment, or the memory function
If children open a door, they could injure other
persons or get out of the vehicle and injure
themselves or be injured by following traffic.
Do not expose the child restraint system to
direct sunlight. The child restraint system's
metal parts, for example, could become very
hot, and the child could be burned by these
parts.GWarning!
Do not carry heavy or hard objects in the
passenger compartment or cargo
compartment unless they are firmly secured
in place.
Unsecured or improperly positioned cargo
increases a child’s risk of injury in the event
of
R strong braking maneuvers
R sudden changes of direction
R an accident
78DoorsOpening and closing
BA 164.1 USA, CA Edition B 2011; 1; 2, en-USd2mskotVersion: 3.0.3.52010-04-21T17:25:06+02:00 - Seite 78
Page 112 of 372
operated five times while the lights are on and
the engine is running (Y page 117). When you
switch off the ignition, the automatic
headlamp cleaning system is reset and
counting is resumed from 0.
Cornering light function (Bi-Xenon
headlamps)
The cornering light function improves the
illumination of the road over a wide angle in
the direction you are turning, enabling better
visibility in tight bends, for example. It can
only be activated when the low-beam
headlamps are switched on.
Active: if you are driving at speeds below
25 mph (40 km/h) and switch on the turn
signals or turn the steering wheel.
Not active: if you are driving at speeds above
25 mph (40 km/h) or switch off the turn
signal or turn the steering wheel to the
straight-ahead position.
The cornering light function may remain lit for
a short time, but is automatically switched off
after no more than three minutes.
Headlamps fogged up on the inside
The headlamps may fog up on the inside if
there is high atmospheric humidity.
XDrive with the headlamps switched on.
The headlamps clear up after a short
distance.If the moisture does not disappear, the
headlamp casing is not sealed correctly and
moisture has been able to enter.XHave the headlamps checked at a qualified
specialist workshop.
Interior lighting
Overview of interior lighting
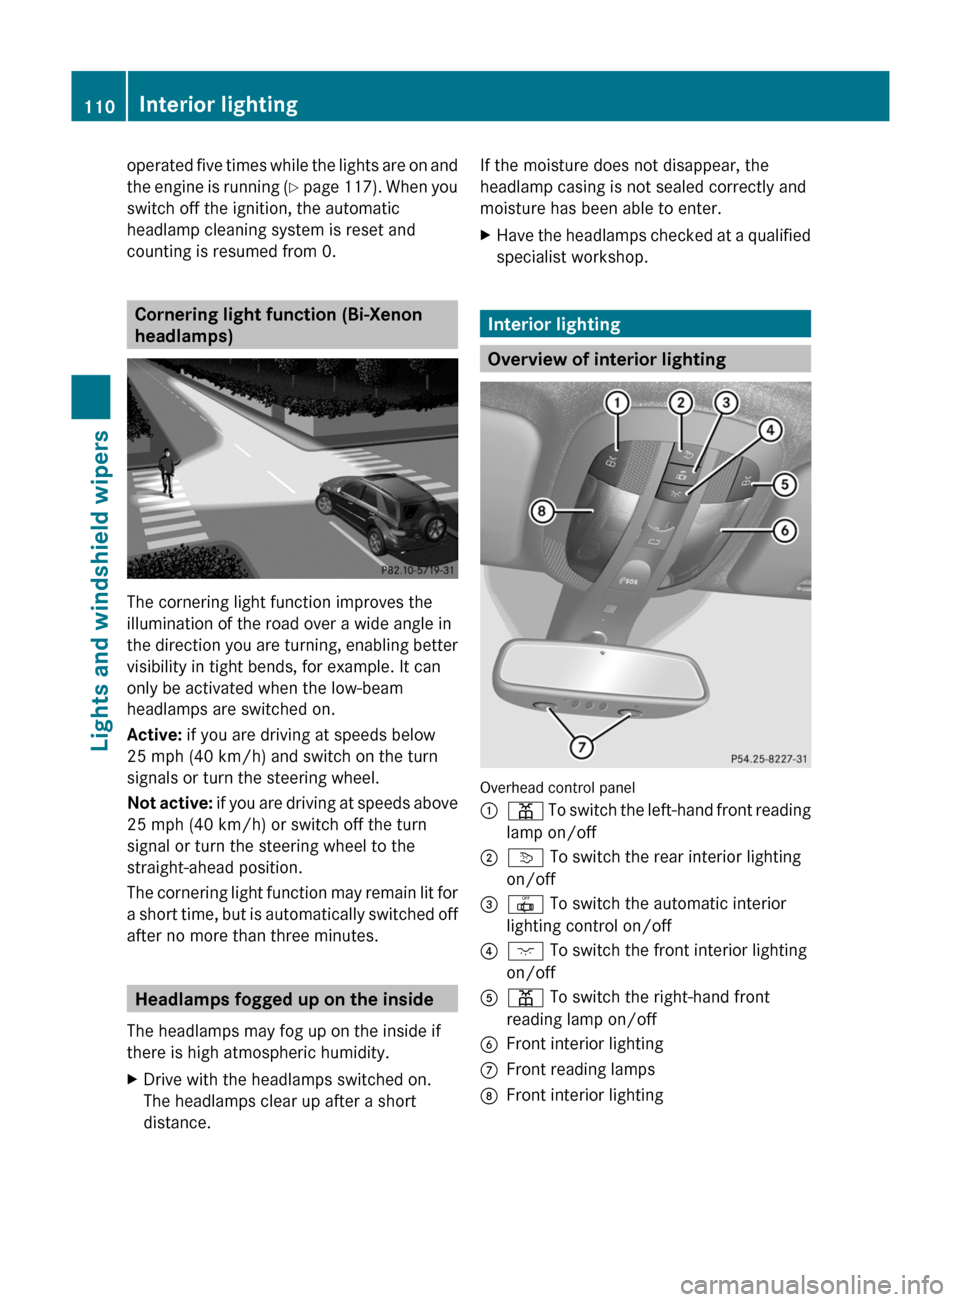
Overhead control panel
:p To switch the left-hand front reading
lamp on/off;v To switch the rear interior lighting
on/off=| To switch the automatic interior
lighting control on/off?c To switch the front interior lighting
on/offAp To switch the right-hand front
reading lamp on/offBFront interior lightingCFront reading lampsDFront interior lighting110Interior lightingLights and windshield wipers
BA 164.1 USA, CA Edition B 2011; 1; 2, en-USd2mskotVersion: 3.0.3.52010-04-21T17:25:06+02:00 - Seite 110
Page 113 of 372
Automatic interior lighting controlXTo switch on/off: press the | button.
When the automatic interior lighting
control is activated, the button is flush with
the overhead control panel.
The interior lighting automatically switches
on if you:
R unlock the vehicle
R open a door
R remove the key from the ignition lock .
The interior lighting delayed switch-off must
be activated ( Y page 217)
The interior lighting switches off after a delay.
You can set the delayed switch-off using the
on-board computer.
i The interior lighting switches off
automatically after five minutes in certain
conditions. This is the case when a door
stays open and the key in the ignition lock
is in position 0 or is removed.
Manual interior lighting control
! If the interior lighting has been switched
on manually, it will not be switched off
automatically.
This can cause the battery to discharge.
Make sure that the interior lighting does
not remain switched on too long after the
engine has been switched off.
XTo switch the front interior lighting on/
off: press the c button.XTo switch the rear interior lighting on/
off: press the v button.XTo switch the reading lamps on/off:
press the p button.
Crash-responsive emergency lighting
The interior lighting is activated automatically
if the vehicle is involved in an accident.
XTo switch off the crash-responsive
emergency lighting: press the hazard
warning lamp button.
or
XLock and then unlock the vehicle using the
key.
Changing bulbs
Important safety guidelines
Xenon bulbs
If your vehicle is equipped with Xenon bulbs,
you can recognize this by the following: the
cone of light from the Xenon bulbs moves
from the top to the bottom and back again
when you start the engine. For this to be
observed, the lights must be switched on
before starting the engine.
GWarning!
Xenon bulbs carry a high voltage. You could
get an electric shock and be seriously or even
fatally injured if you touch the electric
contacts on Xenon bulbs. Therefore, never
remove the cover from Xenon bulbs.
Do not change Xenon bulbs yourself, but have
them replaced at a qualified specialist
workshop which has the necessary specialist
knowledge and tools to carry out the work
required.
Mercedes-Benz recommends that you use an
authorized Mercedes-Benz Center for this
purpose. In particular, work relevant to safety
or on safety-related systems must be carried
out at a qualified specialist workshop.
Bulbs and lamps are an important aspect of
vehicle safety. You must therefore make sure
that these function correctly at all times.
Have the headlamp setting checked regularly.
Changing bulbs111Lights and windshield wipersBA 164.1 USA, CA Edition B 2011; 1; 2, en-USd2mskotVersion: 3.0.3.52010-04-21T17:25:06+02:00 - Seite 111Z
Page 122 of 372

Problems with the windshield wipers
The windshield wipers are obstructed
Leaves or snow, for example, may be
obstructing the windshield wiper movement.
The wiper motor has been deactivated.
XFor safety reasons, you should remove the
key from the ignition lock.
or
XSwitch off the engine using the Start/Stop
button and open the driver's door.XRemove the cause of the obstruction.XSwitch the windshield wipers back on.
The windshield wipers are not working
The windshield wiper drive is malfunctioning.
XSelect another wiper speed on the
combination switch.XHave the windshield wipers checked at a
qualified specialist workshop.120Windshield wipersLights and windshield wipers
BA 164.1 USA, CA Edition B 2011; 1; 2, en-USd2mskotVersion: 3.0.3.52010-04-21T17:25:06+02:00 - Seite 120
Page 141 of 372
Instructions included in your vehicle literature
portfolio. You may otherwise not receive all
necessary safety information and warning for
the operation of your vehicle.
! Warm up the engine quickly. Do not use
the engine's full performance until it has
reached operating temperature.
Only shift the automatic transmission to
the desired drive position when the vehicle
is stationary.
Where possible, avoid spinning the drive
wheels when pulling away on slippery
roads. You could otherwise damage the
drive train.
! AMG vehicles: at low engine oil
temperatures (below 68 ‡ (+20 †), the
maximum engine speed is restricted in
order to protect the engine. To protect the
engine and maintain smooth engine
operation, avoid driving at full throttle when
the engine is cold.
SmartKey positions
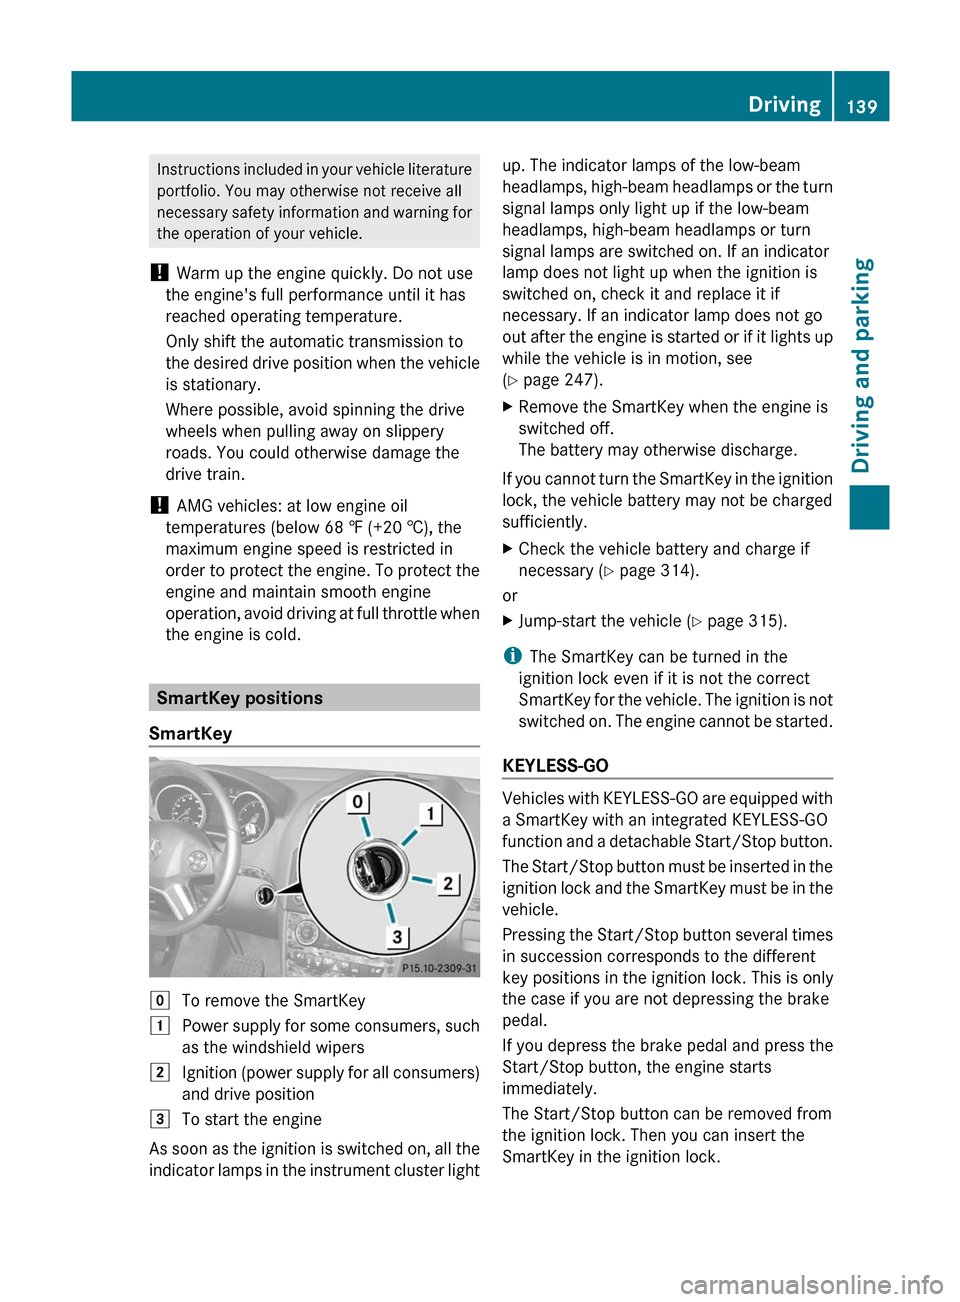
SmartKey
gTo remove the SmartKey1Power supply for some consumers, such
as the windshield wipers2Ignition (power supply for all consumers)
and drive position3To start the engine
As soon as the ignition is switched on, all the
indicator lamps in the instrument cluster light
up. The indicator lamps of the low-beam
headlamps, high-beam headlamps or the turn
signal lamps only light up if the low-beam
headlamps, high-beam headlamps or turn
signal lamps are switched on. If an indicator
lamp does not light up when the ignition is
switched on, check it and replace it if
necessary. If an indicator lamp does not go
out after the engine is started or if it lights up
while the vehicle is in motion, see
( Y page 247).XRemove the SmartKey when the engine is
switched off.
The battery may otherwise discharge.
If you cannot turn the SmartKey in the ignition
lock, the vehicle battery may not be charged
sufficiently.
XCheck the vehicle battery and charge if
necessary ( Y page 314).
or
XJump-start the vehicle ( Y page 315).
i
The SmartKey can be turned in the
ignition lock even if it is not the correct
SmartKey for the vehicle. The ignition is not
switched on. The engine cannot be started.
KEYLESS-GO
Vehicles with KEYLESS-GO are equipped with
a SmartKey with an integrated KEYLESS-GO
function and a detachable Start/Stop button.
The Start/Stop button must be inserted in the
ignition lock and the SmartKey must be in the
vehicle.
Pressing the Start/Stop button several times
in succession corresponds to the different
key positions in the ignition lock. This is only
the case if you are not depressing the brake
pedal.
If you depress the brake pedal and press the
Start/Stop button, the engine starts
immediately.
The Start/Stop button can be removed from
the ignition lock. Then you can insert the
SmartKey in the ignition lock.
Driving139Driving and parkingBA 164.1 USA, CA Edition B 2011; 1; 2, en-USd2mskotVersion: 3.0.3.52010-04-21T17:25:06+02:00 - Seite 139Z
Page 142 of 372

iYou do not have to remove the Start/Stop
button from the ignition lock when you
leave the vehicle. However, you should
always take the SmartKey with you when
leaving the vehicle. The vehicle can be
started with the Start/Stop button and the
electrical equipment can be operated while
the SmartKey is in the vehicle.:Start/Stop button;Ignition lockXInsert Start/Stop button : into ignition
lock ;.
i
When you insert Start/Stop button :
into ignition lock ;, the system requires a
detection time of two seconds before you
can use Start/Stop button :.
XShift the transmission to position P.XDo not press the brake pedal.
Start/Stop button
=USA only?Canada onlyXPosition 0: if Start/Stop button : has not
yet been pressed, this corresponds to the
SmartKey being removed from the ignition.XPosition 1: press Start/Stop button :.
You can now activate the windshield
wipers, for example.
i If you then open the driver's door when in
this position, the power supply is
deactivated.
XPosition 2 (ignition): press Start/Stop
button : twice.
i
If you press Start/Stop button : once
when in this position and the driver's door
is open, the power supply is deactivated
again.
As soon as the ignition is switched on, all the
indicator lights in the instrument cluster light
up. The indicator lamps of the low-beam
headlamps, high-beam headlamps or the turn
signal lamps only light up if the low-beam
headlamps, high-beam headlamps or turn
signal lamps are switched on. If an indicator
lamp does not light up when the ignition is
switched on, check it and replace it if
necessary. If an indicator lamp does not go
out after the engine is started or if it lights up
while the vehicle is in motion, see
( Y page 247).
Starting the engine
Important safety instructions
GWarning
Inhalation of exhaust gas is hazardous to your
health. All exhaust gas contains carbon
monoxide (CO), and inhaling it can cause
unconsciousness and possible death.
Do not run the engine in confined areas (such
as a garage) which are not properly ventilated.
If you think that exhaust gas fumes are
entering the vehicle while driving, have the
cause determined and corrected
immediately. If you must drive under these
140DrivingDriving and parking
BA 164.1 USA, CA Edition B 2011; 1; 2, en-USd2mskotVersion: 3.0.3.52010-04-21T17:25:06+02:00 - Seite 140
Page 146 of 372
ProblemPossible causes/consequences and M SolutionsVehicles with a
gasoline engine:
The engine is not
running smoothly and
is misfiring.There is a malfunction in the engine electronics or a mechanical
component of the engine management system.XOnly depress the accelerator pedal slightly.XHave the cause rectified immediately at a qualified specialist
workshop.
Otherwise, non-combusted fuel may get into the catalytic
converter and damage it.The coolant
temperature gauge
shows a value above
248 ‡(120 †).The coolant level is too low. The coolant is too hot and the engine
is no longer being cooled sufficiently.XStop as soon as possible and allow the engine and the coolant
to cool down.XCheck the coolant level ( Y page 285). Observe the warning
notes as you do so and add coolant if necessary.Automatic transmission
Important safety guidelines
GWarning
It is dangerous to shift the automatic
transmission out of parking position P or
neutral position N if the engine speed is
higher than idle speed. If your foot is not firmly
on the brake pedal, the vehicle could
accelerate quickly forward or in reverse. You
could lose control of the vehicle and hit
someone or something. Only shift into gear
when the engine is idling normally and when
your right foot is firmly on the brake pedal.
GWarning!
Keep in mind that turning off the engine alone
only will shift the automatic transmission into
neutral position N automatically.
Always shift the automatic transmission into
park position P before turning off the engine.
Otherwise the vehicle could roll away which
could result in an accident and/or serious
personal injury.
GWarning!
HYBRID vehicles: It is imperative that you read
the HYBRID Supplemental Operating
Instructions included in your vehicle literature
portfolio. You may otherwise not receive all
necessary safety information and warning for
the operation of your vehicle.
DIRECT SELECT lever
Overview of transmission positions
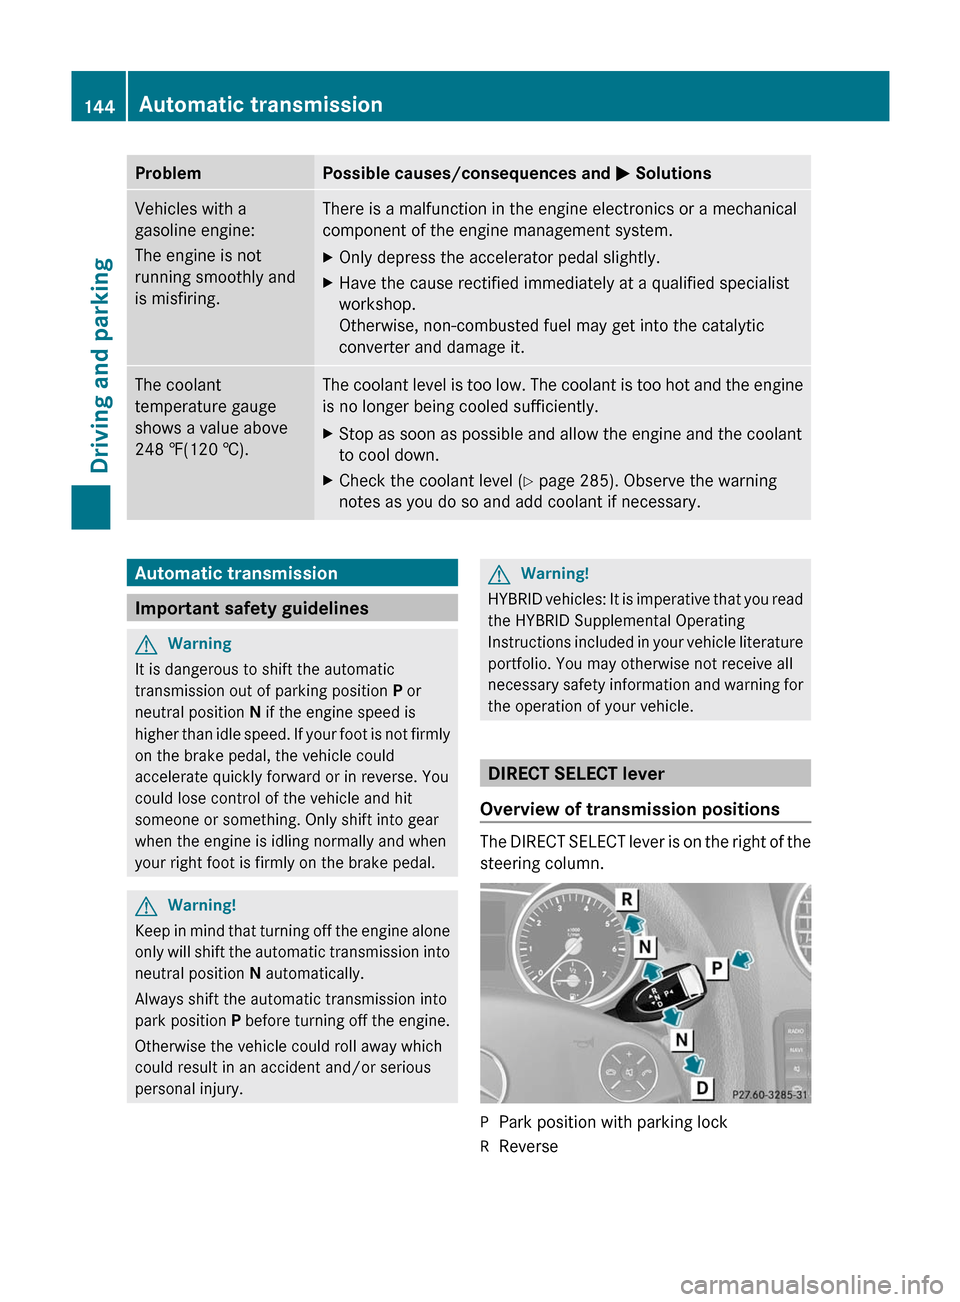
The DIRECT SELECT lever is on the right of the
steering column.
PPark position with parking lockRReverse144Automatic transmissionDriving and parking
BA 164.1 USA, CA Edition B 2011; 1; 2, en-USd2mskotVersion: 3.0.3.52010-04-21T17:25:06+02:00 - Seite 144
Page 163 of 372
Do not turn off the engine while the vehicle is
in motion.
Exhaust checkGWarning
Inhalation of exhaust gas is hazardous to your
health. All exhaust gas contains carbon
monoxide (CO), and inhaling it can cause
unconsciousness and possible death.
Do not run the engine in confined areas (such
as a garage) which are not properly ventilated.
If you think that exhaust gas fumes are
entering the vehicle while driving, have the
cause determined and corrected
immediately. If you must drive under these
conditions, drive only with at least one
window fully open at all times.
Certain engine systems are designed to keep
the level of poisonous components in exhaust
fumes within legal limits.
These systems only work optimally if they are
maintained exactly in accordance with the
manufacturer's specifications. For this
reason, all work on the engine must be carried
out by qualified and authorized Mercedes-
Benz technicians.
The engine settings must not be changed in
any circumstances. Furthermore, all specific
service work must be carried out at regular
intervals and in accordance with the
Mercedes-Benz service requirements. Details
can be found in the Service Booklet.
Engine oil
! Vehicles with a diesel particle filter:
If the vehicle is mostly driven for short
distances, it is possible that malfunctions
may occur during the automatic cleaning of
the diesel particle filter. This can lead to
engine damage. Therefore, if you frequently
drive short distances, make sure to drive
on highways or country roads for 20
minutes at least every 500 km.
Brakes
Important safety guidelinesGWarning
On slippery road surfaces, never downshift in
order to obtain braking action. This could
result in drive wheel slip and reduced vehicle
control. Your vehicle's ABS will not prevent
this type of loss of control.
GWarning
Make sure that you do not endanger other
road users when you apply the brakes.
Downhill gradients
! On long and steep gradients, you must
reduce the cargo on the brakes by shifting
to a lower gear in good time. This allows
you to take advantage of engine braking
and helps you to avoid overheating the
brakes and wearing them out excessively.
When you take advantage of engine
braking, a drive wheel may not turn for
some time, e.g. on a slippery road surface.
This could cause damage to the drive train.
Such damage is not covered by the
Mercedes-Benz warranty.
Heavy and light loads
GWarning
Depressing the brake pedal constantly results
in excessive and premature wear to the brake
pads.
It may also cause the brakes to overheat,
seriously impairing their effectiveness. It may
then not be possible to stop the vehicle in
sufficient time to avoid an accident.
If the brakes have been subjected to a heavy
cargo, do not stop the vehicle immediately,
but drive on for a short while. This allows the
airflow to cool the brakes more quickly.
Driving tips161Driving and parkingBA 164.1 USA, CA Edition B 2011; 1; 2, en-USd2mskotVersion: 3.0.3.52010-04-21T17:25:06+02:00 - Seite 161Z