length MERCEDES-BENZ M-Class 2011 W164 Owner's Manual
[x] Cancel search | Manufacturer: MERCEDES-BENZ, Model Year: 2011, Model line: M-Class, Model: MERCEDES-BENZ M-Class 2011 W164Pages: 372, PDF Size: 16.23 MB
Page 200 of 372
Message in the multifunction display
Diff. Lock System Overheated -
Wait briefly.
The differential lock system has overheated
and briefly disengaged.XContinue driving.
The differential locks cool off and are soon
available once again.
Towing a trailer
Notes on towing a trailer
Important safety instructions
GWarning!
Failure to use proper equipment and driving
technique can result in a loss of vehicle
control when towing a trailer.
Improper towing or failure to follow the
instructions in this manual can result in
vehicle damage and/or serious personal
injury. Follow the guidelines below carefully
to assure safe trailer operation.
Contact an authorized Mercedes-Benz Center
should you require an explanation of
information contained in this manual.
General information
R Only install an approved trailer coupling on
your vehicle.
Further information on availability and on
installation is available from any authorized
Mercedes-Benz Center.
R The bumpers of your vehicle are not
suitable for installing detachable trailer
couplings.
R Do not install hired trailer couplings or
other detachable trailer couplings on the
bumpers of your vehicle.
R To reduce the risk of damage to the ball
coupling, remove it from the ball coupling
recess when not in use.
Coupling up a trailerGWarning!
Vehicles with air suspension program: While
you are coupling or decoupling a trailer, make
sure nobody locks or unlocks the vehicle and/
or opens or closes doors or the tailgate.
The vehicle’s level could change and you
could endanger yourself and/or others as a
result.
Make sure that you do not operate the ADS
switch or the vehicle level control system
when coupling/decoupling the trailer.
Observe the maximum permissible trailer
dimensions (width and length).
Most federal states and all Canadian
provinces require by law:
R safety chains between the towing vehicle
and the trailer. The chains should be cross-
wound under the trailer drawbar. They must
be fastened to the vehicle's trailer
coupling, not to the bumper or the axle.
Allow for enough play in the chains to
facilitate turning tight corners.
R a separate brake system for certain types
of trailer.
R a safety switch for braked trailers. Check
the specific legal requirements applicable
to your federal state.
If the trailer detaches from the towing
vehicle, the safety switch applies the
trailer's brakes.
! Do not connect the trailer's brake system
(if featured) to the hydraulic brake system
of the towing vehicle, as the latter is
equipped with an anti-lock brake system.
Doing so will result in a loss of function of
the brake systems of both the vehicle and
the trailer.
i The vehicle's wiring harness features a
line to the brake indicator lamp.
198Towing a trailerDriving and parking
BA 164.1 USA, CA Edition B 2011; 1; 2, en-USd2mskotVersion: 3.0.3.52010-04-21T17:25:06+02:00 - Seite 198
Page 202 of 372
ROn long and steep gradients that are
difficult to drive down in shift range 1,
switch to the off-road drive program.
R When driving downhill, shift to a lower gear
to utilize the engine's braking effect.
Avoid continuous brake application as this
may overheat the vehicle brakes and, if
installed, the trailer brakes.
R If the coolant temperature increases
dramatically while the air-conditioning
system is switched on, switch off the air-
conditioning system.
Coolant heat can additionally be dissipated
by opening the windows and by setting the
blower fan and the interior temperature to
maximum.
R When overtaking, pay particular attention
to the extended length of your vehicle/
trailer combination.
Due to the length of your vehicle/trailer
combination, you will have to travel an
additional distance beyond the vehicle you
are overtaking before returning to the
previous lane.
Decoupling a trailer
GWarning!
Vehicles with air suspension program: While
you are coupling or decoupling a trailer, make
sure nobody locks or unlocks the vehicle and/
or opens or closes doors or the tailgate.
The vehicle’s level could change and you
could endanger yourself and/or others as a
result.
Make sure that you do not operate the ADS
switch or the vehicle level control system
when coupling/decoupling the trailer.
XMake sure that the automatic transmission
is set to position P.XApply the vehicle's parking brake.XStart the engine.XClose all doors and the tailgate.XApply the trailer's parking brake.GWarning!
Vehicles with air suspension program: As
soon as you disconnect the electrical
connection between the trailer and the
vehicle, the vehicle will lower. To help avoid
personal injury, make sure no one is near the
wheel housing or underneath the vehicle
before the electrical connection is
disconnected.
When you decouple the trailer, the vehicle is
temporarily raised because the springs are
relieved of load. Be especially careful during
this process, as you could otherwise injure
yourself and/or others. Make sure that any
persons remaining in the vehicle do not press
the switches for vehicle level control or the
ADS.
XDetach the trailer cable and decouple the
trailer.XDetach the trailer cable and decouple the
trailer.XSwitch off the engine.
Permissible trailer load and drawbar
noseweight
Weight specifications
The Gross Trailer Weight (GTW) is the
combined weight of the trailer together with
the cargo and equipment loaded on the
trailer. Permissible gross weight:
R Vehicles with 4MATIC: 7200 lb (3265 kg)
R Vehicles without 4MATIC: 4630 lb
(2100 kg)
The permissible Trailer drawbar Weight
Rating (TWR) is the maximum weight
permitted on the trailer drawbar:
R Vehicles with 4MATIC: 576 lb (261 kg) limit
for Mercedes-Benz-approved trailer
couplings
R Vehicles without 4MATIC: 370 lb (168 kg)
limit for Mercedes-Benz-approved trailer
couplings
200Towing a trailerDriving and parking
BA 164.1 USA, CA Edition B 2011; 1; 2, en-USd2mskotVersion: 3.0.3.52010-04-21T17:25:06+02:00 - Seite 200
Page 213 of 372
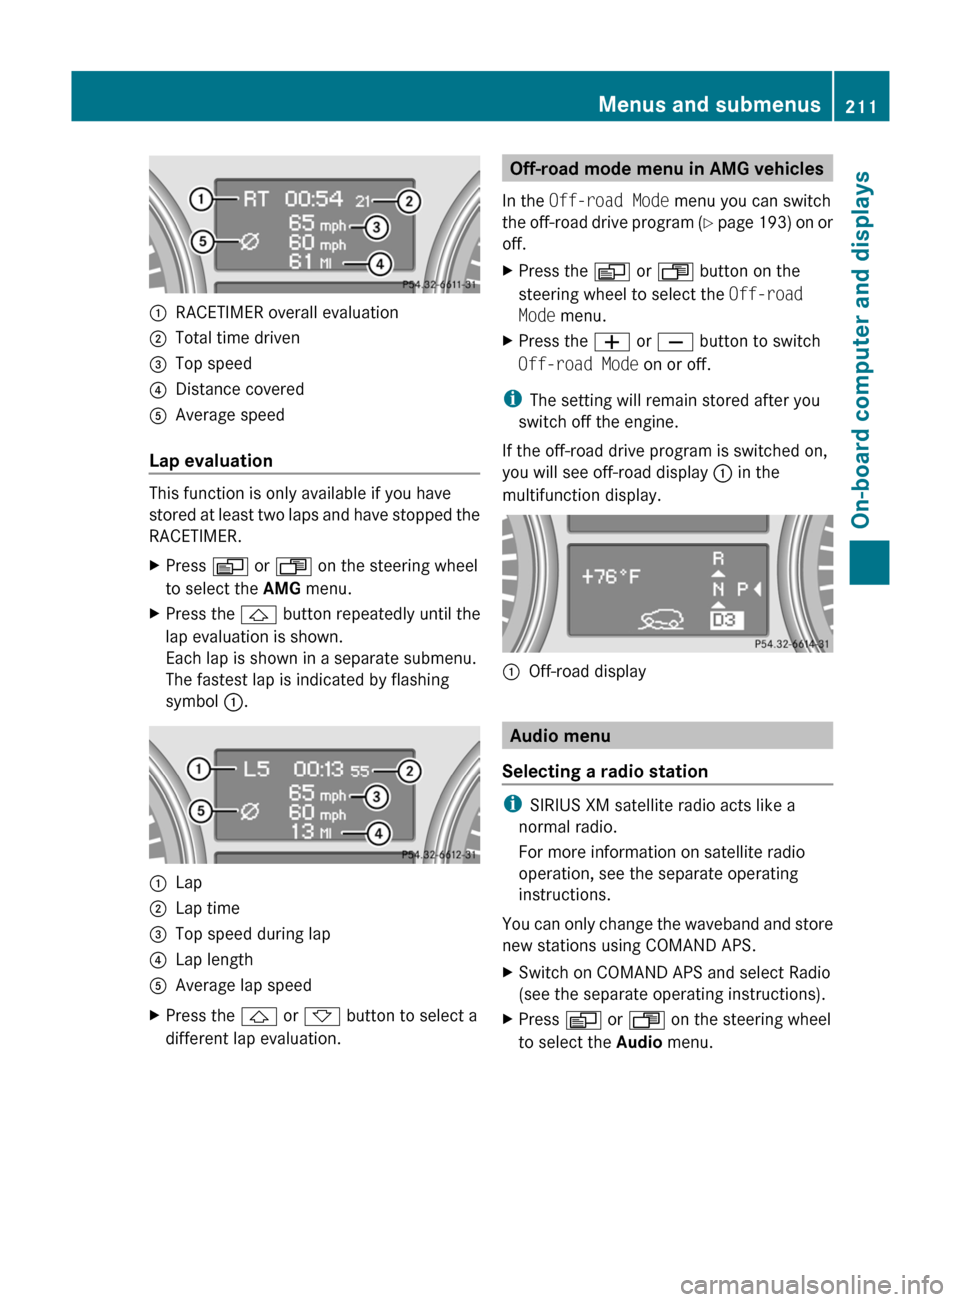
:RACETIMER overall evaluation;Total time driven=Top speed?Distance coveredAAverage speed
Lap evaluation
This function is only available if you have
stored at least two laps and have stopped the
RACETIMER.
XPress V or U on the steering wheel
to select the AMG menu.XPress the & button repeatedly until the
lap evaluation is shown.
Each lap is shown in a separate submenu.
The fastest lap is indicated by flashing
symbol :.:Lap;Lap time=Top speed during lap?Lap lengthAAverage lap speedXPress the & or * button to select a
different lap evaluation.Off-road mode menu in AMG vehicles
In the Off-road Mode menu you can switch
the off-road drive program (Y page 193) on or
off.XPress the V or U button on the
steering wheel to select the Off-road
Mode menu.XPress the W or X button to switch
Off-road Mode on or off.
i
The setting will remain stored after you
switch off the engine.
If the off-road drive program is switched on,
you will see off-road display : in the
multifunction display.
:Off-road display
Audio menu
Selecting a radio station
i SIRIUS XM satellite radio acts like a
normal radio.
For more information on satellite radio
operation, see the separate operating
instructions.
You can only change the waveband and store
new stations using COMAND APS.
XSwitch on COMAND APS and select Radio
(see the separate operating instructions).XPress V or U on the steering wheel
to select the Audio menu.Menus and submenus211On-board computer and displaysBA 164.1 USA, CA Edition B 2011; 1; 2, en-USd2mskotVersion: 3.0.3.52010-04-21T17:25:06+02:00 - Seite 211Z
Page 311 of 372
GWarning
Make sure to use the original length wheel
bolts when remounting the original wheel
after it has been repaired.
XClean the wheel and wheel hub contact
surfaces.
! To prevent damage to the paintwork, hold
the wheel securely against the wheel hub
while screwing in the first wheel bolt.
XSlide the emergency spare wheel onto the
alignment bolt and push it on.
XTighten the wheel bolts until they are
finger-tight.
XUnscrew the alignment bolt.XTighten the last wheel bolt until it is finger-
tight.
XVehicles with collapsible spare wheel:
inflate the collapsible spare wheel
(Y page 309) and then lower the vehicle
(Y page 310).
or
XVehicles with spare
wheel/"Minispare" emergency spare
wheel: lower the vehicle (Y page 310).
Inflating the collapsible spare wheel
GWarning!
Pump up the collapsible spare wheel before
lowering the vehicle. You could otherwise
damage the wheel rim.
GWarning!
Comply with the manufacturer's safety
instructions on the sticker on the electric air
pump.
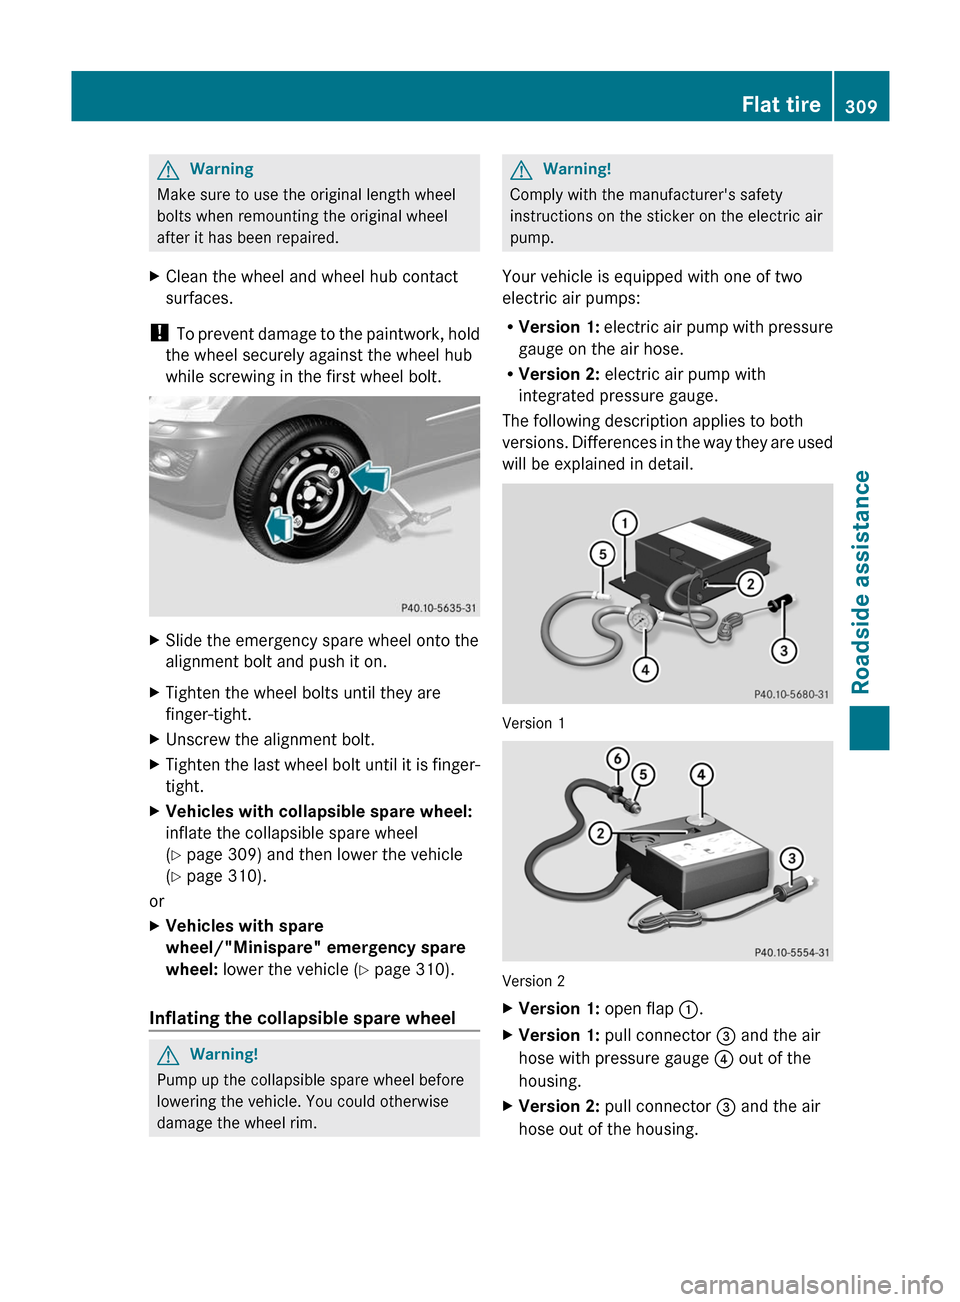
Your vehicle is equipped with one of two
electric air pumps:
RVersion 1: electric air pump with pressure
gauge on the air hose.
RVersion 2: electric air pump with
integrated pressure gauge.
The following description applies to both
versions. Differences in the way they are used
will be explained in detail.
Version 1
Version 2
XVersion 1: open flap :.XVersion 1: pull connector = and the air
hose with pressure gauge ? out of the
housing.
XVersion 2: pull connector = and the air
hose out of the housing.
Flat tire309Roadside assistanceBA 164.1 USA, CA Edition B 2011; 1; 2, en-USd2mskotVersion: 3.0.3.52010-04-21T17:25:06+02:00 - Seite 309Z
Page 314 of 372
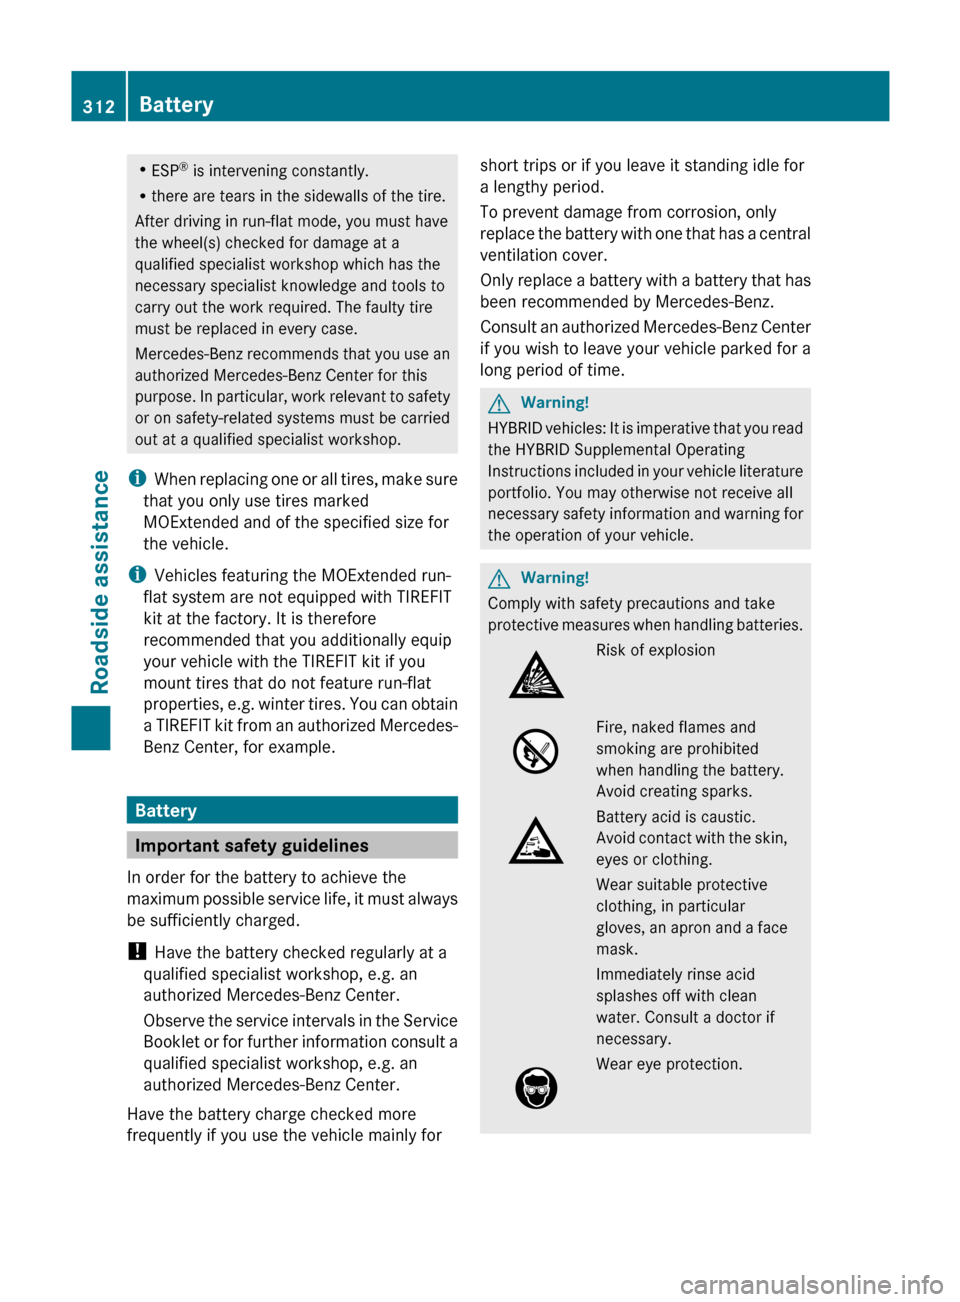
RESP® is intervening constantly.
Rthere are tears in the sidewalls of the tire.
After driving in run-flat mode, you must have
the wheel(s) checked for damage at a
qualified specialist workshop which has the
necessary specialist knowledge and tools to
carry out the work required. The faulty tire
must be replaced in every case.
Mercedes-Benz recommends that you use an
authorized Mercedes-Benz Center for this
purpose. In particular, work relevant to safety
or on safety-related systems must be carried
out at a qualified specialist workshop.
iWhen replacing one or all tires, make sure
that you only use tires marked
MOExtended and of the specified size for
the vehicle.
iVehicles featuring the MOExtended run-
flat system are not equipped with TIREFIT
kit at the factory. It is therefore
recommended that you additionally equip
your vehicle with the TIREFIT kit if you
mount tires that do not feature run-flat
properties, e.g. winter tires. You can obtain
a TIREFIT kit from an authorized Mercedes-
Benz Center, for example.
Battery
Important safety guidelines
In order for the battery to achieve the
maximum possible service life, it must always
be sufficiently charged.
! Have the battery checked regularly at a
qualified specialist workshop, e.g. an
authorized Mercedes-Benz Center.
Observe the service intervals in the Service
Booklet or for further information consult a
qualified specialist workshop, e.g. an
authorized Mercedes-Benz Center.
Have the battery charge checked more
frequently if you use the vehicle mainly for
short trips or if you leave it standing idle for
a lengthy period.
To prevent damage from corrosion, only
replace the battery with one that has a central
ventilation cover.
Only replace a battery with a battery that has
been recommended by Mercedes-Benz.
Consult an authorized Mercedes-Benz Center
if you wish to leave your vehicle parked for a
long period of time.
GWarning!
HYBRID vehicles: It is imperative that you read
the HYBRID Supplemental Operating
Instructions included in your vehicle literature
portfolio. You may otherwise not receive all
necessary safety information and warning for
the operation of your vehicle.
GWarning!
Comply with safety precautions and take
protective measures when handling batteries.
Risk of explosionFire, naked flames and
smoking are prohibited
when handling the battery.
Avoid creating sparks.
Battery acid is caustic.
Avoid contact with the skin,
eyes or clothing.
Wear suitable protective
clothing, in particular
gloves, an apron and a face
mask.
Immediately rinse acid
splashes off with clean
water. Consult a doctor if
necessary.
Wear eye protection.312BatteryRoadside assistance
BA 164.1 USA, CA Edition B 2011; 1; 2, en-USd2mskotVersion: 3.0.3.52010-04-21T17:25:06+02:00 - Seite 312
Page 317 of 372
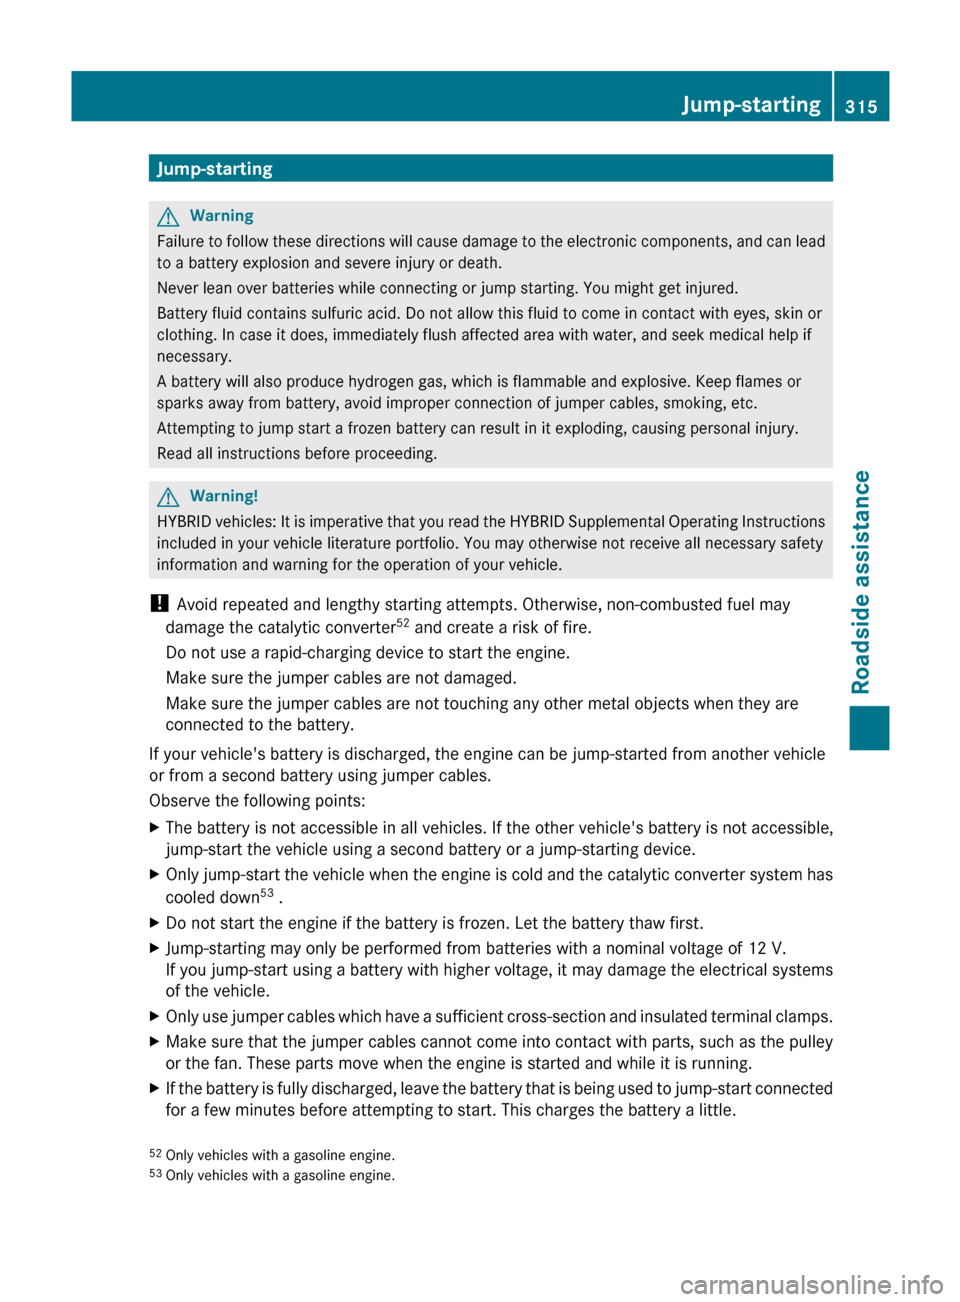
Jump-startingGWarning
Failure to follow these directions will cause damage to the electronic components, and can lead
to a battery explosion and severe injury or death.
Never lean over batteries while connecting or jump starting. You might get injured.
Battery fluid contains sulfuric acid. Do not allow this fluid to come in contact with eyes, skin or
clothing. In case it does, immediately flush affected area with water, and seek medical help if
necessary.
A battery will also produce hydrogen gas, which is flammable and explosive. Keep flames or
sparks away from battery, avoid improper connection of jumper cables, smoking, etc.
Attempting to jump start a frozen battery can result in it exploding, causing personal injury.
Read all instructions before proceeding.
GWarning!
HYBRID vehicles: It is imperative that you read the HYBRID Supplemental Operating Instructions
included in your vehicle literature portfolio. You may otherwise not receive all necessary safety
information and warning for the operation of your vehicle.
! Avoid repeated and lengthy starting attempts. Otherwise, non-combusted fuel may
damage the catalytic converter 52
and create a risk of fire.
Do not use a rapid-charging device to start the engine.
Make sure the jumper cables are not damaged.
Make sure the jumper cables are not touching any other metal objects when they are
connected to the battery.
If your vehicle's battery is discharged, the engine can be jump-started from another vehicle
or from a second battery using jumper cables.
Observe the following points:
XThe battery is not accessible in all vehicles. If the other vehicle's battery is not accessible,
jump-start the vehicle using a second battery or a jump-starting device.XOnly jump-start the vehicle when the engine is cold and the catalytic converter system has
cooled down 53
.XDo not start the engine if the battery is frozen. Let the battery thaw first.XJump-starting may only be performed from batteries with a nominal voltage of 12 V.
If you jump-start using a battery with higher voltage, it may damage the electrical systems
of the vehicle.XOnly use jumper cables which have a sufficient cross-section and insulated terminal clamps.XMake sure that the jumper cables cannot come into contact with parts, such as the pulley
or the fan. These parts move when the engine is started and while it is running.XIf the battery is fully discharged, leave the battery that is being used to jump-start connected
for a few minutes before attempting to start. This charges the battery a little.52 Only vehicles with a gasoline engine.
53 Only vehicles with a gasoline engine.Jump-starting315Roadside assistanceBA 164.1 USA, CA Edition B 2011; 1; 2, en-USd2mskotVersion: 3.0.3.52010-04-21T17:25:06+02:00 - Seite 315Z
Page 365 of 372
overheating. In the Service Booklet, you can
find information on the intervals for renewal.
The renewal interval is determined by the
coolant type and the cooling system design.
The renewal interval in the Service Booklet is
only valid if the coolant is added or renewed
with Mercedes-Benz approved products.
Therefore, only use MB 326.0 antifreeze/
corrosion inhibitor or another Mercedes-Benz
approved product of the same specification.
Information on other Mercedes-Benz
approved products of the same specification
can be obtained at any authorized Mercedes-
Benz Center or on the Internet at
http://bevo.mercedes-benz.com .
The coolant is checked at every service date
at an authorized Mercedes-Benz Center.
The antifreeze/corrosion inhibitor
concentration in the cooling system should:
R be at least 50%. This will protect the cooling
system against freezing down to around
-35 ‡ (-37 †).
R not exceed 55% (antifreeze protection
down to -49 ‡ (-45 †); otherwise, heat will
not be dissipated as effectively.
If the coolant level is too low, MB 326.0
antifreeze/corrosion inhibitor should be
added. Have the cooling system checked for
leaks.
Windshield and headlamp cleaning
system
GWarning
Washer solvent/antifreeze is highly
flammable. Do not spill washer solvent/
antifreeze on hot engine parts, because it may
ignite and burn. You could be seriously
burned.
XUse MB Windshield Washer Concentrate
MB SummerFit.XAt temperatures above freezing: add 1
part MB SummerFit to 100 parts water, e.g.
1.34 fl oz (40 ml) MB SummerFit to 1 gal
(4.0 l) of water.XAt temperatures below freezing: add 1
part MB SummerFit to 100 parts washer
fluid, e.g. 1.34 fl oz (40 ml) MB SummerFit
to 1 gal (4.0 l) of water.
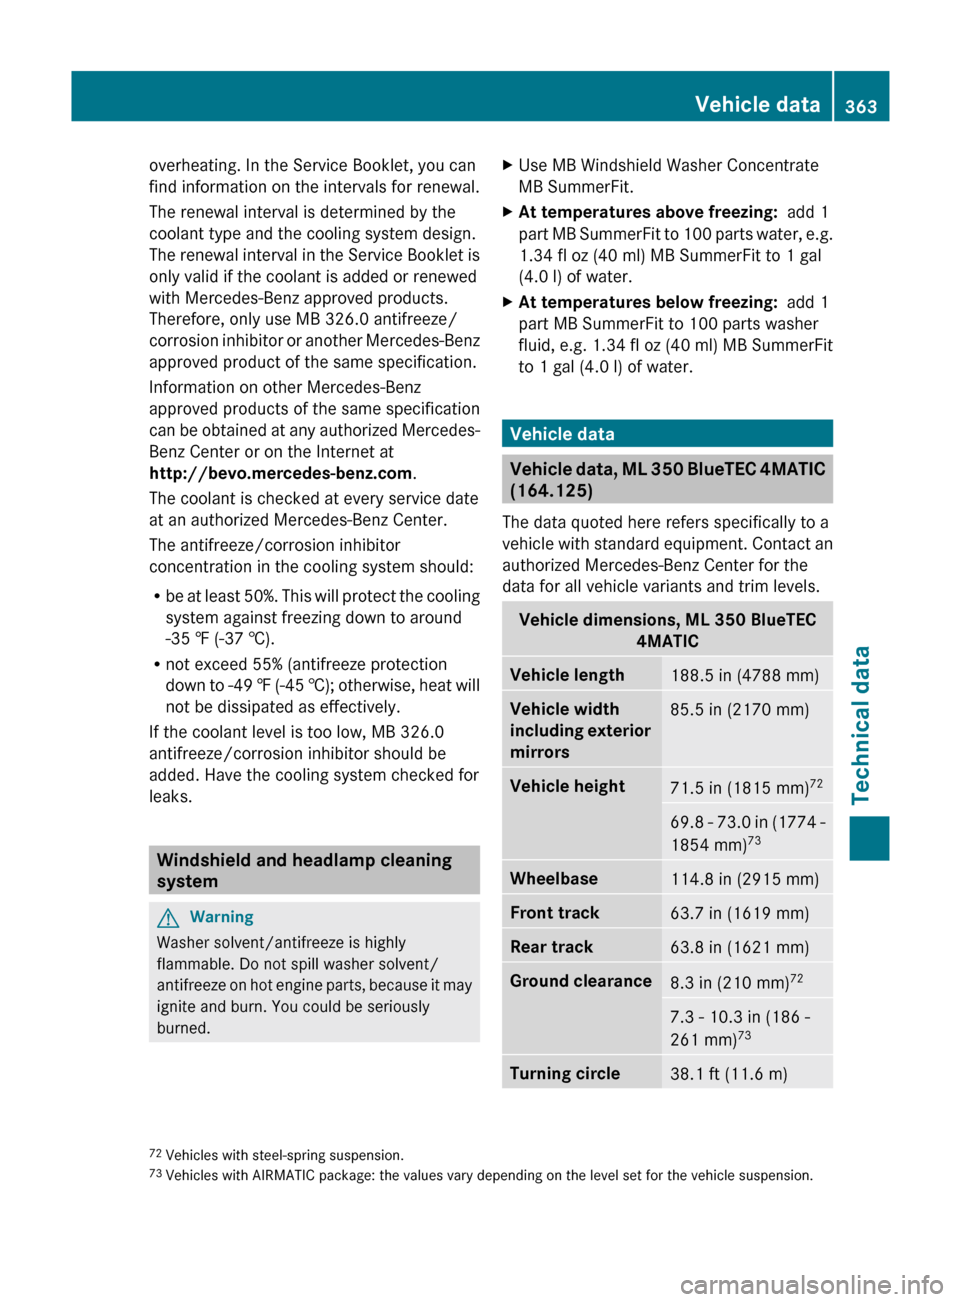
Vehicle data
Vehicle data, ML 350 BlueTEC 4MATIC
(164.125)
The data quoted here refers specifically to a
vehicle with standard equipment. Contact an
authorized Mercedes-Benz Center for the
data for all vehicle variants and trim levels.
Vehicle dimensions, ML 350 BlueTEC 4MATICVehicle length188.5 in (4788 mm)Vehicle width
including exterior
mirrors85.5 in (2170 mm)Vehicle height71.5 in (1815 mm) 7269.8 - 73.0 in (1774 -
1854 mm) 73Wheelbase114.8 in (2915 mm)Front track63.7 in (1619 mm)Rear track63.8 in (1621 mm)Ground clearance8.3 in (210 mm) 727.3 - 10.3 in (186 -
261 mm) 73Turning circle38.1 ft (11.6 m)72
Vehicles with steel-spring suspension.
73 Vehicles with AIRMATIC package: the values vary depending on the level set for the vehicle suspension.Vehicle data363Technical dataBA 164.1 USA, CA Edition B 2011; 1; 2, en-USd2mskotVersion: 3.0.3.52010-04-21T17:25:06+02:00 - Seite 363Z
Page 366 of 372
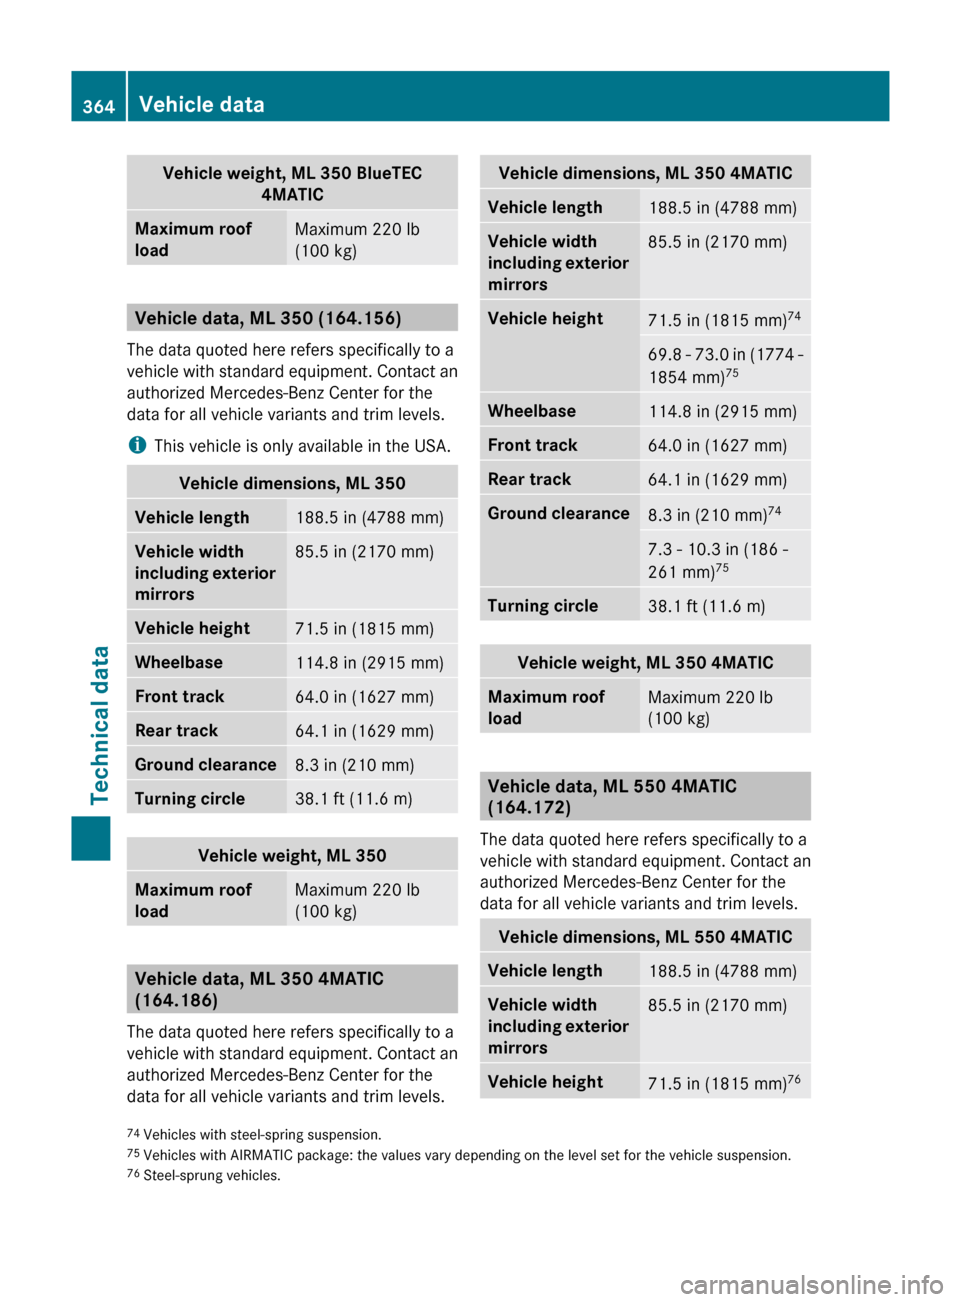
Vehicle weight, ML 350 BlueTEC4MATICMaximum roof
loadMaximum 220 lb
(100 kg)
Vehicle data, ML 350 (164.156)
The data quoted here refers specifically to a
vehicle with standard equipment. Contact an
authorized Mercedes-Benz Center for the
data for all vehicle variants and trim levels.
i This vehicle is only available in the USA.
Vehicle dimensions, ML 350Vehicle length188.5 in (4788 mm)Vehicle width
including exterior
mirrors85.5 in (2170 mm)Vehicle height71.5 in (1815 mm)Wheelbase114.8 in (2915 mm)Front track64.0 in (1627 mm)Rear track64.1 in (1629 mm)Ground clearance8.3 in (210 mm)Turning circle38.1 ft (11.6 m)Vehicle weight, ML 350Maximum roof
loadMaximum 220 lb
(100 kg)
Vehicle data, ML 350 4MATIC
(164.186)
The data quoted here refers specifically to a
vehicle with standard equipment. Contact an
authorized Mercedes-Benz Center for the
data for all vehicle variants and trim levels.
Vehicle dimensions, ML 350 4MATICVehicle length188.5 in (4788 mm)Vehicle width
including exterior
mirrors85.5 in (2170 mm)Vehicle height71.5 in (1815 mm) 7469.8 - 73.0 in (1774 -
1854 mm) 75Wheelbase114.8 in (2915 mm)Front track64.0 in (1627 mm)Rear track64.1 in (1629 mm)Ground clearance8.3 in (210 mm) 747.3 - 10.3 in (186 -
261 mm) 75Turning circle38.1 ft (11.6 m)Vehicle weight, ML 350 4MATICMaximum roof
loadMaximum 220 lb
(100 kg)
Vehicle data, ML 550 4MATIC
(164.172)
The data quoted here refers specifically to a
vehicle with standard equipment. Contact an
authorized Mercedes-Benz Center for the
data for all vehicle variants and trim levels.
Vehicle dimensions, ML 550 4MATICVehicle length188.5 in (4788 mm)Vehicle width
including exterior
mirrors85.5 in (2170 mm)Vehicle height71.5 in (1815 mm) 7674
Vehicles with steel-spring suspension.
75 Vehicles with AIRMATIC package: the values vary depending on the level set for the vehicle suspension.
76 Steel-sprung vehicles.364Vehicle dataTechnical data
BA 164.1 USA, CA Edition B 2011; 1; 2, en-USd2mskotVersion: 3.0.3.52010-04-21T17:25:06+02:00 - Seite 364
Page 367 of 372
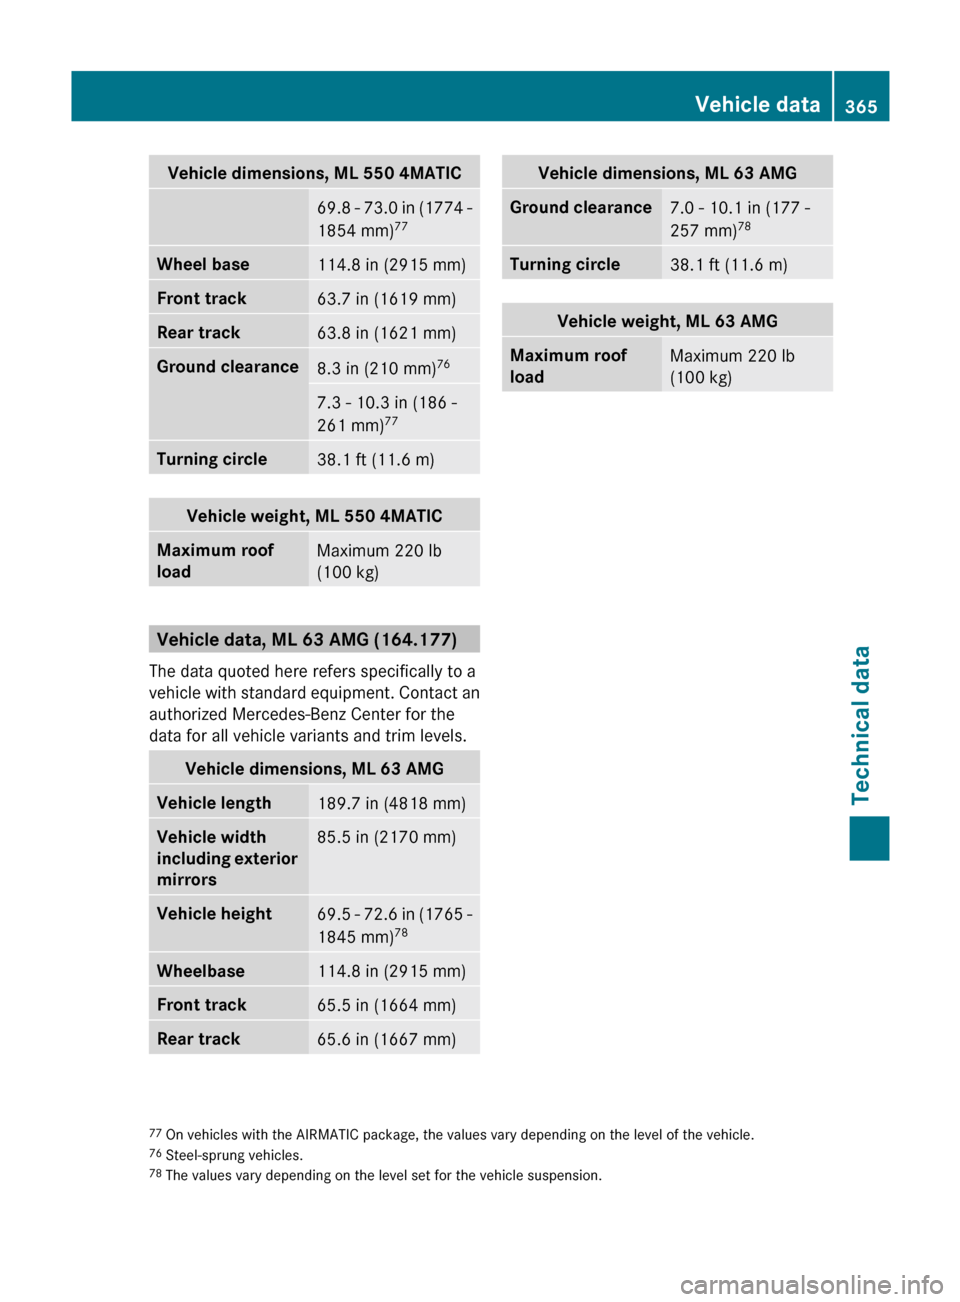
Vehicle dimensions, ML 550 4MATIC69.8 - 73.0 in (1774 -
1854 mm) 77Wheel base114.8 in (2915 mm)Front track63.7 in (1619 mm)Rear track63.8 in (1621 mm)Ground clearance8.3 in (210 mm) 767.3 - 10.3 in (186 -
261 mm) 77Turning circle38.1 ft (11.6 m)Vehicle weight, ML 550 4MATICMaximum roof
loadMaximum 220 lb
(100 kg)
Vehicle data, ML 63 AMG (164.177)
The data quoted here refers specifically to a
vehicle with standard equipment. Contact an
authorized Mercedes-Benz Center for the
data for all vehicle variants and trim levels.
Vehicle dimensions, ML 63 AMGVehicle length189.7 in (4818 mm)Vehicle width
including exterior
mirrors85.5 in (2170 mm)Vehicle height69.5 - 72.6 in (1765 -
1845 mm) 78Wheelbase114.8 in (2915 mm)Front track65.5 in (1664 mm)Rear track65.6 in (1667 mm)Vehicle dimensions, ML 63 AMGGround clearance7.0 - 10.1 in (177 -
257 mm) 78Turning circle38.1 ft (11.6 m)Vehicle weight, ML 63 AMGMaximum roof
loadMaximum 220 lb
(100 kg)77 On vehicles with the AIRMATIC package, the values vary depending on the level of the vehicle.
76 Steel-sprung vehicles.
78 The values vary depending on the level set for the vehicle suspension.Vehicle data365Technical dataBA 164.1 USA, CA Edition B 2011; 1; 2, en-USd2mskotVersion: 3.0.3.52010-04-21T17:25:06+02:00 - Seite 365Z