MERCEDES-BENZ M-CLASS SUV 2011 Owners Manual
Manufacturer: MERCEDES-BENZ, Model Year: 2011, Model line: M-CLASS SUV, Model: MERCEDES-BENZ M-CLASS SUV 2011Pages: 389, PDF Size: 9.22 MB
Page 201 of 389
:
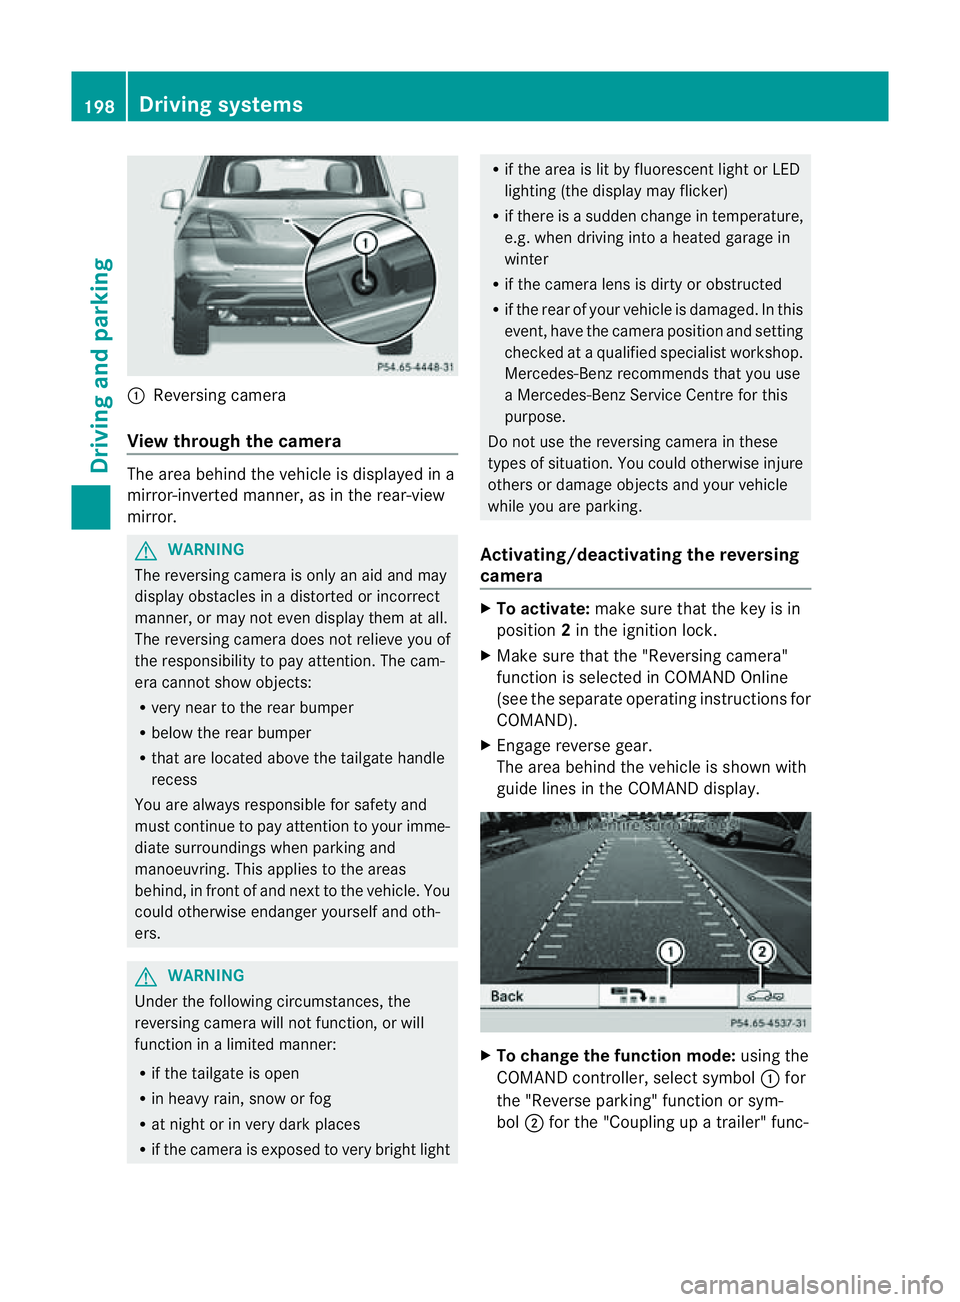
Reversin gcamera
View through th ecamera Th
ea rea behind the vehicle is displaye dina
mirror-inverted manner, as in the rea r-view
mirror. G
WARNING
The reversin gcamera is only an aid and may
display obstacles in adistorted or incorrect
manner, or may no teven display them at all.
Th er eversing camera does not relieve you of
the responsibility to pay attention. The cam-
era cannot show objects:
R ver ynear to the rear bumper
R belo wthe rea rbumper
R that are located above the tailgate handle
recess
You are alway sresponsible for safet yand
must continue to pay attentio ntoyourimme-
di at es urroundings when parking and
manoeuvring. This applie stothe areas
behind, in front of and nex ttothe vehicle. You
coul dotherwise endang er yourself and oth-
ers. G
WARNING
Under the following circumstances, the
reversing camera will not function, or will
function in alimited manner:
R if the tailgate is open
R in heavy rain, snow or fog
R at night or in very dark places
R if the camer aisexposed to very brigh tlight R
if the area is lit by fluorescen tlight or LED
lighting (the display may flicker)
R if there is asudden change in temperature,
e.g. when driving into aheated garage in
winter
R if the camera lens is dirt yorobstruc ted
R if the rear of your vehicle is damaged. In this
event ,have the camera positio nand setting
checked at aqualified specialist workshop.
Mercedes-Benz recommends that you use
aM ercedes-Benz Servic eCentr efor this
purpose.
Do not use the reversin gcamera in these
types of situation. You could otherwise injure
others or damage objects and your vehicle
while you are parking.
Activating/deactivating the reversing
camera X
To activate: make sure that the key is in
position 2in the ignition lock.
X Make sure that the "Reversing camera"
function is selected in COMAND Online
(see the separate operating instructions for
COMAND).
X Engage reverse gear.
The area behind the vehicle is shown with
guide lines in the COMAND display. X
To change the function mode: using the
COMAND controller, select symbol :for
the "Reverse parking" function or sym-
bol ;for the "Coupling up atrailer" func- 198
Dri
ving systemsDriving and parking
Page 202 of 389
tion. See the separate COMAND operating
instructi
ons.
The symbo lofthe selected function is high-
lighted.
To deactivate: the reversing camera is deac-
tivated if you:
R shift the transmission to position P
R drive forward ten metres
R shift the transmission from position Rto
anothe rposition (after 15 seconds)
R drive forwards at aspeed of over
10 km/h
Displays in the COMAN Ddisplay G
WARNING
Usin gthe reversing camera can be dangerous
if you ar ecolour-blin dorify our ability to dis-
tinguish colours is impaired.
Only use the reversin gcamera if you can see
and distinguis hbetween all the coloured
guide lines that are displayed by the reversing
camera in the COMAN Ddisplay. G
WARNING
Please note that objects not at ground level
may appea rtobefurther away than they
actually are. Thes einclude:
R the bumper of avehicle that is parked
behind your vehicle
R at railer drawbar
R theb all coupling of atrailer tow hitch
R thet ail-end of alorry
R slanted posts
The lines are only guides, not accurate meas-
urements of the distance to an obstacle.
Therefore, you should never pass the red line
when approachin ganobstacle. You could oth-
erwise cause an accident and injur eyourself
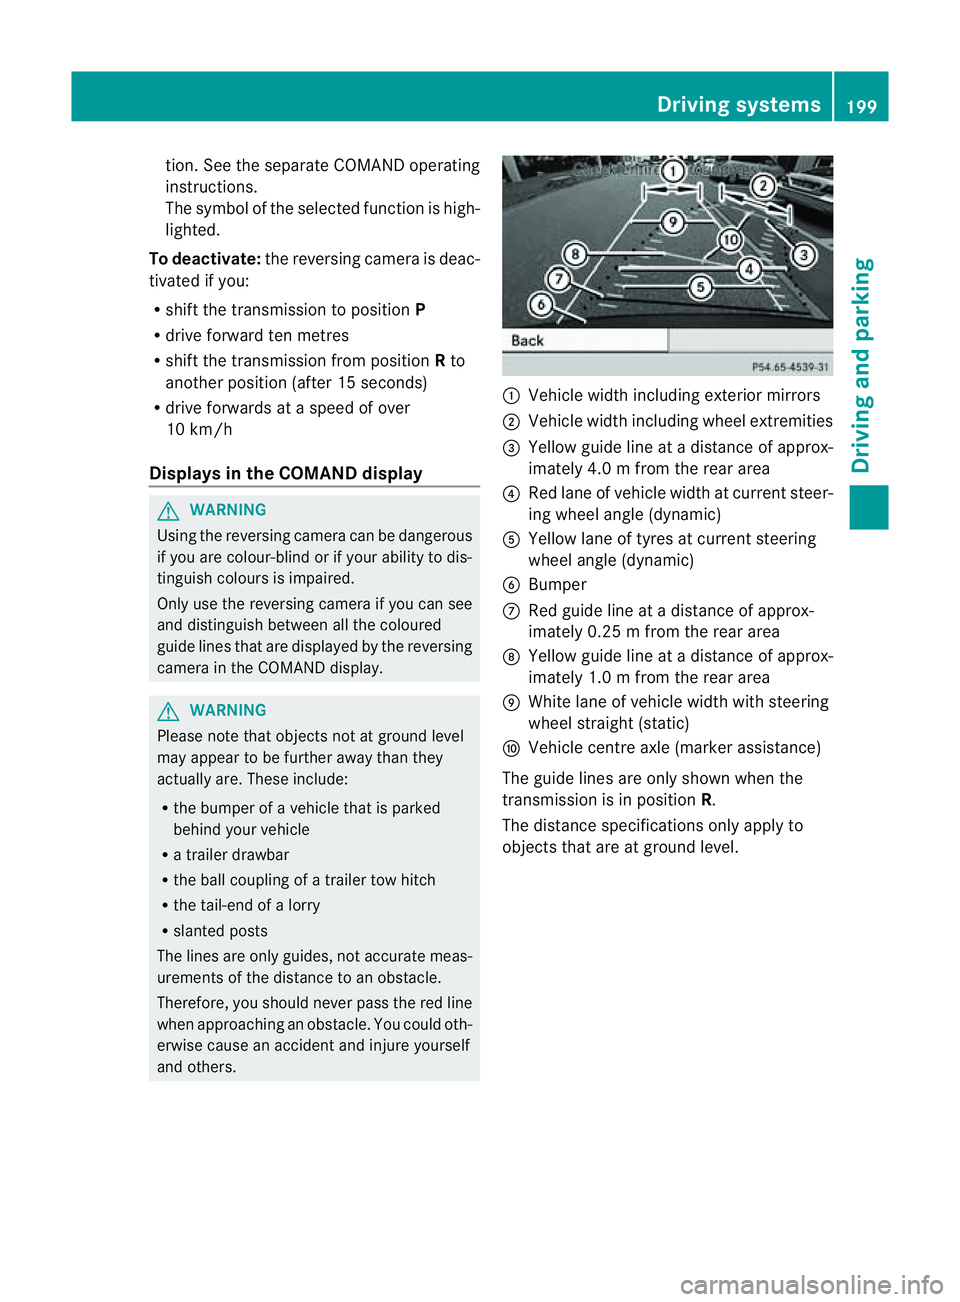
and others. :
Vehicle width includin gexterior mirrors
; Vehicl ewidth including wheel extremities
= Yellow guide line at adistance of approx-
imately 4.0 mfrom th erear area
? Red lane of vehicle width at curren tsteer-
ing whee langle (dynamic)
A Yellow lane of tyres at current steering
wheel angle (dynamic)
B Bumper
C Red guid eline at adistance of approx-
imately 0.2 5mfrom th erear area
D Yellow guide line at adistance of approx-
imately 1.0 mfrom th erear area
E White lane of vehicle width with steering
wheel straight (static)
F Vehicle centre axle (marker assistance)
The guide lines are only shown when the
transmission is in position R.
The distance specification sonly appl yto
objec tsthat are at ground level. Driving systems
199Drivingand park ing Z
Page 203 of 389
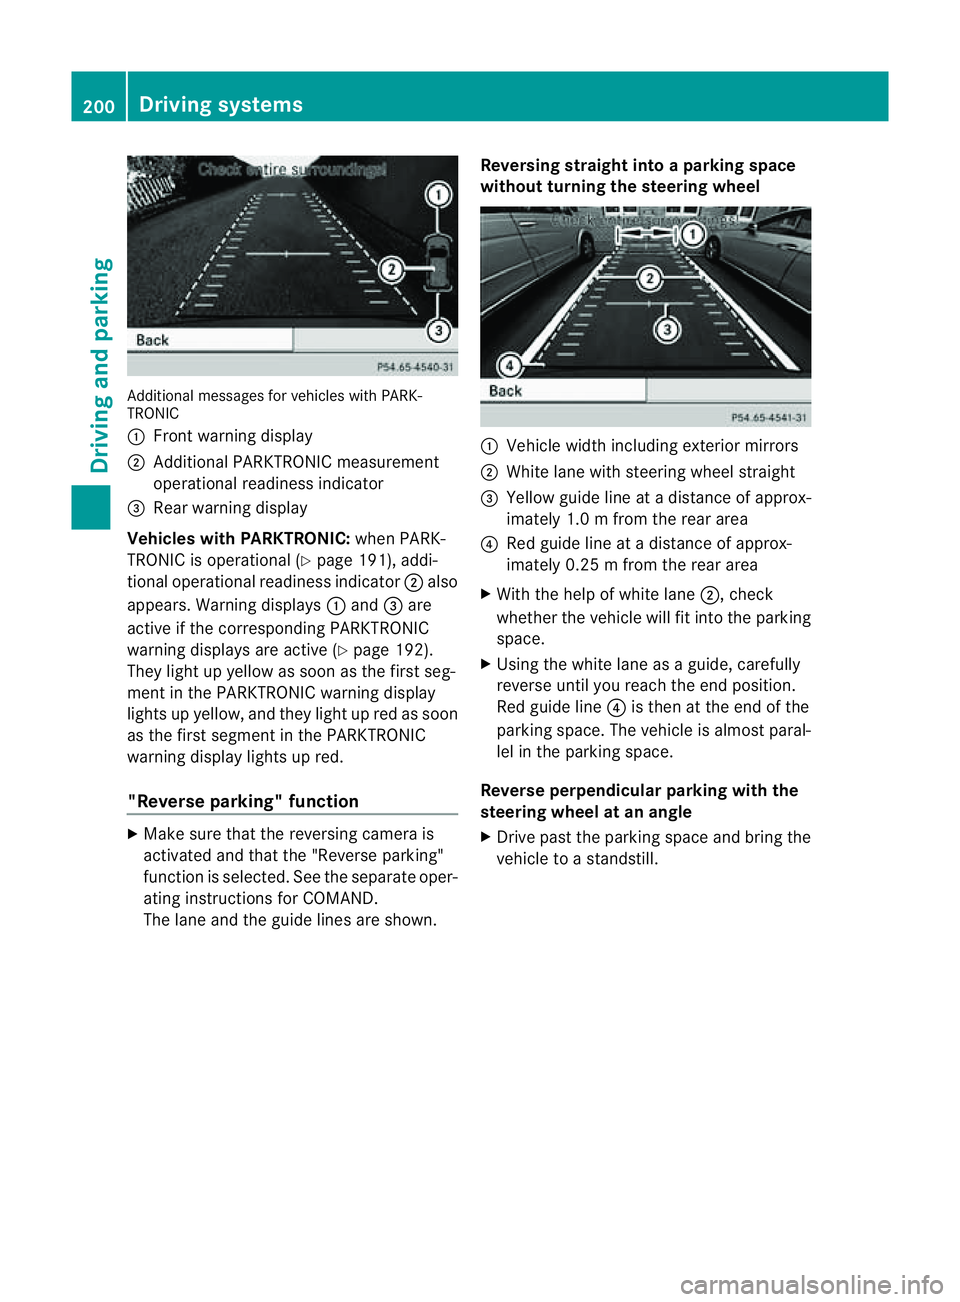
Additiona
lmessages for vehicles with PARK-
TRONIC
: Fron twarning display
; Additiona lPARKTRONIC measurement
operationa lreadiness indicator
= Rear warning display
Veh icleswithP ARKTRONIC: when PARK-
TRONIC is operationa l(Y page 191), addi-
tional operat iona lreadiness indicator ;also
appears. Warning displays :and =are
active if the corresponding PARKTRONIC
warning displays are active (Y page 192).
They ligh tupy ellow as soon as th efirst seg-
men tint he PARKTRONIC warnin gdisplay
lights up yellow, and they light up red as soon
as the first segment in the PARKTRONIC
warnin gdispla ylights up red.
"Reverse parking" function X
Make sure that the reversing camera is
activated and that the "Reverse parking"
func tion is selected. See the separate oper-
atin ginstructions for COMAND.
The lane and the guid elines are shown. Reversing straight into
aparking space
without turnin gthe steering wheel :
Vehicl ewidth including exterior mirrors
; White lane with steering wheel straight
= Yellow guide line at adistance of approx-
imately 1.0 mfrom th erear area
? Red guide line at adistance of approx-
imately 0.2 5mfrom th erear area
X With the help of white lane ;,check
whether the vehicle will fit int othe parking
space.
X Using the white lan easaguide, carefully
reverse until you reach the end position.
Red guide line ?is then at the end of the
parking space. The vehicle is almost paral-
lel in the parking space.
Reverse perpendicular parking with the
steering wheel at an angle
X Drive past the parking space and bring the
vehicle to astandstill. 200
Drivin
gsystemsDrivin gand parking
Page 204 of 389
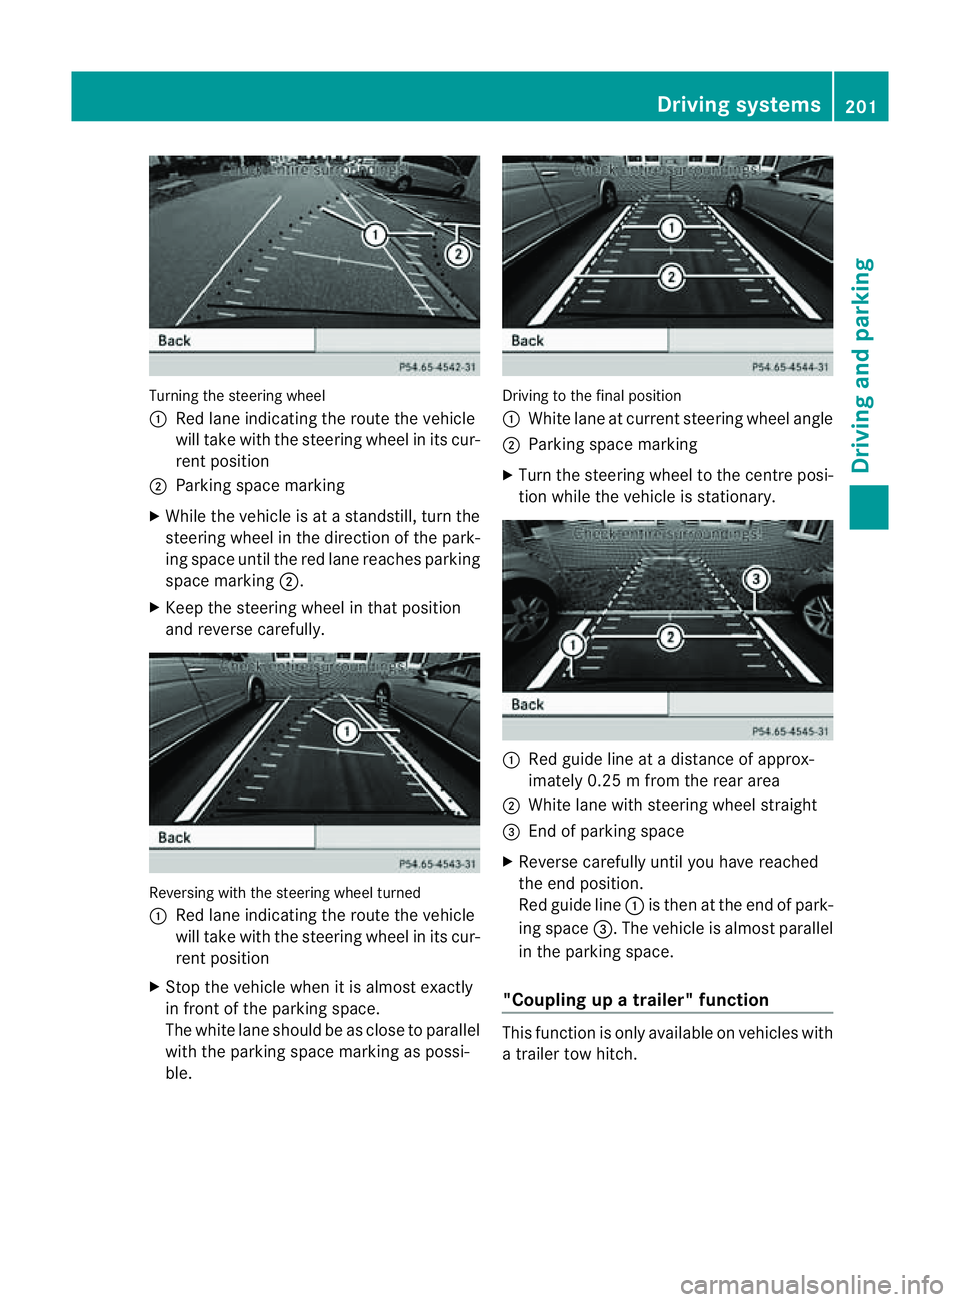
Turning the steering wheel
:
Red lane indicating the rout ethe vehicle
will tak ewith the steerin gwheel in its cur-
ren tposition
; Parkin gspace marking
X While the vehicle is at astandstill, turn the
steerin gwheel in the direction of the park-
ing spac euntil the red lane reache sparking
space marking ;.
X Keep the steering wheel in that position
and reverse carefully. Reversing with the steering wheel turned
:
Red lane indicating the route the vehicle
will take with the steering wheel in its cur-
rent position
X Stop the vehicle when it is almost exactly
in front of the parking space.
The white lane should be as close to parallel
with the parking space markin gaspossi-
ble. Drivi
ngto the final position
: White lane at current steerin gwheel angle
; Parkin gspace marking
X Turn the steerin gwheel to the cen trep osi-
tion while the vehicle is stationary. :
Red guide line at adistance of approx-
imately 0.2 5mfrom th erear area
; White lane with steerin gwheel straight
= Endofp arking space
X Reverse carefully until you have reached
the end position.
Red guide line :is then at the end of park-
ing space =.The vehicle is almost parallel
in the parkin gspace.
"Coupling up atrailer" function Thi
sfunction is only available on vehicles with
at railer to whitch. Drivin
gsystems
201Drivingand park ing Z
Page 205 of 389
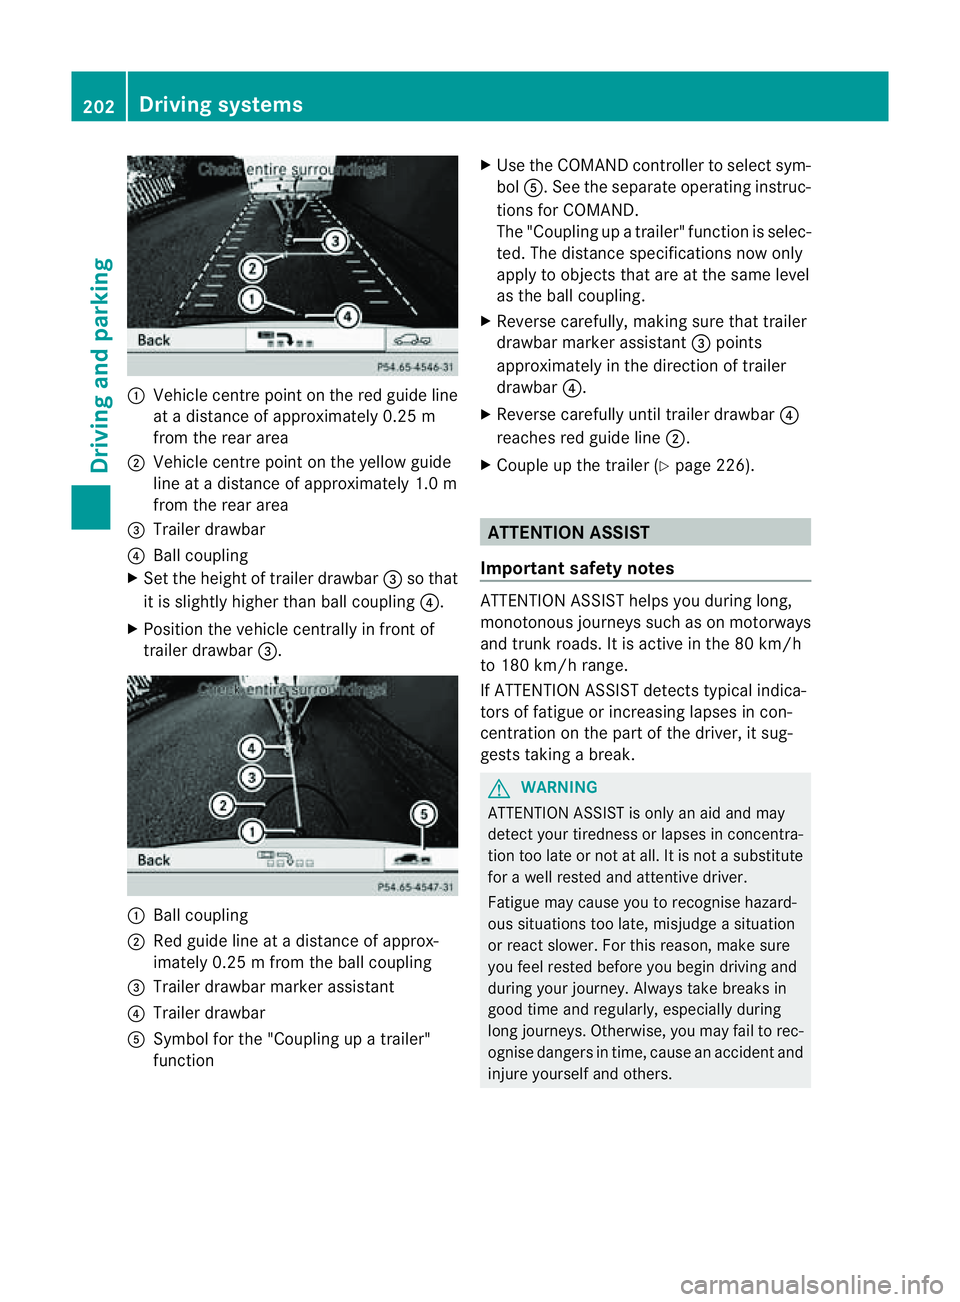
:
Vehicl ecentr epoint on the red guide line
at ad istance of approxim ately0.25 m
from the rear area
; Vehicl ecentr epoint on the yellow guide
line at adistance of approxim ately1.0 m
from the rear area
= Trailer drawbar
? Ball coupling
X Set the heigh toftrailer drawbar =so that
it is slightly higher than ball coupl ing?.
X Posi tion the vehicle centrally in front of
trailer drawbar =. :
Ball coupling
; Red guid eline at adistance of approx-
imately 0.2 5mfrom th eball coupling
= Trailer drawbar marker assistant
? Trailer drawbar
A Symbol for the "Coupling up atrailer"
function X
Use th eCOMAN Dcontroller to select sym-
bol A.S ee the separate operatin ginstruc-
tions for COMAND.
The "Coupling up atrailer" functio niss elec-
ted. The distan cespecifi cations now only
apply to obje ctst hat ar eatthe sam elevel
as the ball coupling.
X Reverse carefully, makin gsure that trailer
drawbar marker assistant =points
approximately in the direction of trailer
drawbar ?.
X Reverse carefully until trailer drawbar ?
reaches red guide line ;.
X Couple up the trailer (Y page 226). ATTENTION ASSIST
Important safet ynotes ATTENTION ASSIS
Thelps you during long,
monotonous jour neys such as on motorways
and trun kroads. It is active in the 80 km /h
to 180 km/ hrange.
If ATTENTION ASSIS Tdetects typical indica-
tors of fatigue or inc reasing lapses in con-
centration on the part of the driver, it sug-
gests takin gabreak. G
WARNING
ATTENTIO NASSIST is only an aid and may
detec tyour tiredness or lapses in concentra-
tion too late or not at all. It is not asubstitute
for aw ell reste dand attentiv edriver.
Fatigue may cause you to recognise hazard-
ou ss ituations to olate ,misjudge asituation
or reac tslower .For this rea son, make sure
you fee lreste dbefore you begin driving and
duri ngyour jour ney. Always tak ebreaks in
good time and regularly ,especiall yduring
long jour neys. Otherwise ,you may fai ltorec-
ognise danger sintime, caus eanaccidentand
injur eyours elfa nd others. 202
Driving systemsDriving and
parking
Page 206 of 389
ATTENTIO
NASSIST asse sses your level of
fatigue or lapses in conc entrati on by taki ng
the following criteri aintoa ccount:
R your personal drivin gstyle, e.g. steering
characteristics
R drivin gconditions, e.g. time, drivin gtime
The functionalit yofATTENTION ASSIST is
restricted, and warnings may be delaye dor
not occur at all:
R if the road condition is poor, e.g. if the sur-
fac eisu neven or if there are potholes
R if there is astron gside wind
R if you hav eadopt edasport ydrivin gstyle
wit hh igh corn eringspeeds or hig hrates of
acceleration
R if you are predominantly drivin gslower
than 80 km/h or faste rtha n1 80 km/h
R if you are currently using COM ANDO nline
or makin gatelephon ecall wit hit
R if th etime has been set incorrectly
R in active drivin gsituations, suc haswhen
you chang elanes or chang eyour speed
Warning an ddispla ymessages in the
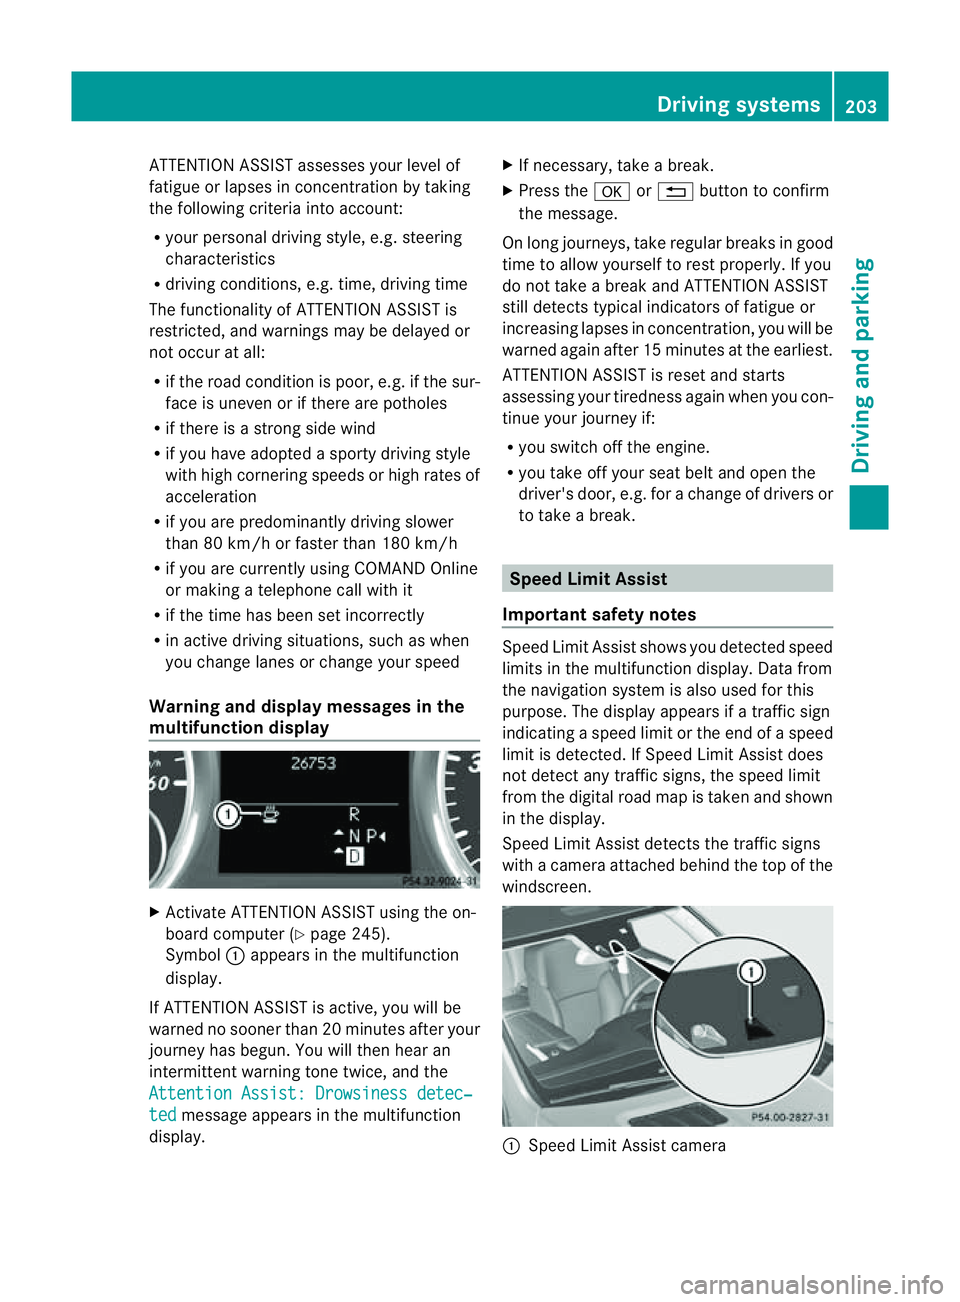
multifunction display X
Activa teATTENTION ASSIST using the on-
board computer (Y page 245).
Symbol :appear sinthe mu ltifunction
display.
If ATTENTION ASSIST is active ,you will be
war nednos oonerthan 20 minutes after your
journey has begun .You will then hear an
intermittent warnin gtone twice, and the
Attentio nAssist: Drowsiness detec‐ ted message appe
arsint he multifunction
display. X
If necessary, tak eabreak.
X Press the aor% buttontoc onfirm
the message.
On long journeys, tak eregular break singood
tim etoa llow yourself to rest properly. If you
do not take abrea kand ATTENT IONA SSIST
still detects typica lindicators of fatigue or
increasing lapses in concentration, you will be
warned agai nafter 15 minutes at th eearliest.
ATTENTION ASSIST is reset and starts
assessing your tiredness again when you con-
tinue your journey if:
R you switch off the engine.
R you take off your seat belt and open the
driver' sdoor, e.g. for achange of driver sor
to take abreak. Speed Limit Assist
Important safety notes Speed Limit Assist show
syou detec teds peed
limit sint he multifunction display. Dat afrom
th en avigation system is also used for this
purpose. The displ ayappears if atraffi csign
indicatin gaspeed limit or the end of aspeed
limit is detected. If Speed Limit Assist does
not detect any traffic signs, the speed limit
from the digital road map is taken and shown
in the display.
Speed Limit Assist detect sthe traffic signs
with acamera attached behind the top of the
windscreen. :
Speed Limit Assis tcamera Driving systems
203Drivingand parking Z
Page 207 of 389
G
WARNING
Speed Limit Assis tisonly an aid and may
detect spe edlimit signs incorrectly or not at
all.
Th es ystem may be impaired or may not func-
tion if:
R there is poo rvisibility, e.g. due to snow,
rain, fog or spray.
R ther eisg lare, e.g. fro mthe sun or fr om
oncomin gtraffic.
R the winds creen is dirty, misted up or cov-
ered, for instanc ebyasticker,inthe vicinity
of the camera.
R the traffic sign sare covered ,for instance
by dirt ,snow or trees.
R the traffic sig nsare poorly illuminated.
R there are ambiguous traffic signs, for
instanc enear roadworks or on multi-lane
roads.
Traf fics ign salways have priority over the
Speed Limit Assist display. Speed Limit Assist
cannot detec troad and traffic conditions. It is
not asubstitut efor attentive driving.
Always pay attention to traffic condition sand
your surroundings. Otherwise ,you may fai lto
recognise dange rsin time, cause an accident
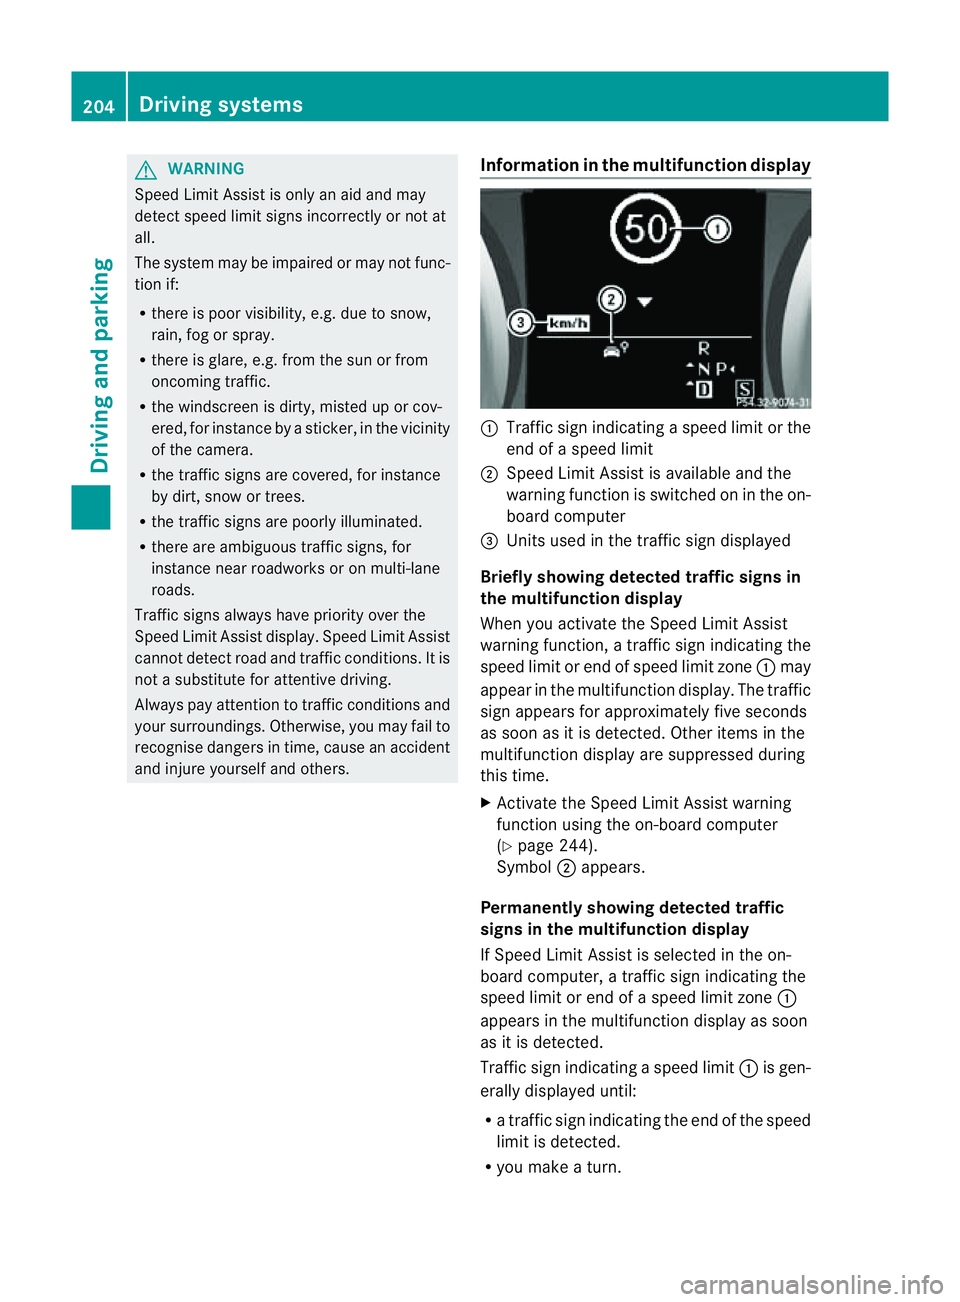
and injure yourself and others. Information in th
emultifunction display :
Traffic sig nindicatin gaspeed limit or the
end of aspeed limit
; Speed Limit Assist is available and the
warning fun ction is switched on in the on-
board computer
= Unit sused in the traffi csign displayed
Briefly showing detected traffic signs in
the multifunction display
When you activate the Speed Limit Assist
warnin gfunction, atraffic sign indicating the
spee dlimit or end of speed limit zone :may
appear in the multifunction display. The traffic
sign appears for approximately fiv eseconds
as soon as it is detected. Other item sinthe
multifunction displa yare suppresse dduring
this time.
X Activat ethe Speed Limi tAssist warning
function usin gthe on-boar dcompu ter
( Y page 24 4).
Symbol ;appears.
Permanentl yshowing detected traffic
sign sint he multifunctio ndisplay
If Speed Limit Assist is selected in the on-
board computer, atraffic sign indicating the
spee dlimit or end of aspeed limit zone :
appear sinthe multifunction displa yassoon
as it is detected.
Traffic sign indicating aspeed limit :is gen-
erall ydisplayed until:
R at raffic sign indicating th eend of the speed
limit is dete cted.
R you mak eaturn. 204
Driving systemsDrivin
gand parking
Page 208 of 389
R
you leave or enter atow n.
R the roa dtypec hanges (e.g. mot orway,
country road).
R yo uh avet ravelle dacertainminimum dis-
tance withou tthe traffic sign being repea-
ted or detected again.
X Display Speed Limi tAssist usin gthe on-
boar dcomputer (Y page 244).
i You can also activat eSpeed Limit Assist
using COMAND Online. The maximum per-
missible speed is shown in the COMAND
display; see the COMAND operating
instruc tions. Nigh
tView Assist Plus
Important safet ynotes In addition to the illumination provided by the
normal headlamps, Night View Assist Plus
uses infrared light to illuminat
ethe road. The
Night View Assist Plus camer apicksupt he
infrared light and displays amonochrome
image in COMAND. The image displayed in
COMAN Dcorresponds to aroad lit up by
main-beam headlamps. This enables you to
see the road's course and any obstacles in
good time. When pedestrian recognition is
active, pedestrians recognised by the system
ar eh ighlighted in the Night View Assist Plus
display. G
WARNING
Night View Assist Plus is only an aid designed
to assist driving and does not relieve you of
the responsibility to pay attention. Continue
to look through the windscreen instead of
relyin gont he Night View Assist Plus display.
You ar eresponsible for safet yand must drive
in accordance with traffic conditions .You
coul dotherwis eendange ryoursel fand oth-
ers. The system may be impaired or may not func-
tion if:
R there is poo rvisibility, e.g. due to snow,
rain, fog or spray.
R the windscreen is dirty, misted up or cov-
ered, for instance by asticker, in the vicinity
of the camera.
R on bends ,onuphill gradients or downhill
gradients.
Light from the headlamps of oncoming vehi-
cles does not affect the Night View Assist Plus
display in the multifunction display. This is
also the case if you cannot switch on the
main-beam headlamps due to oncomin gtraf-
fic. G
WARNING
Night View Assis tPlus does not detect
object sinthe immediat evicinity of the vehi-
cle. Look through the windscreen when
manoeuvring. Make sure that there are no
people or animals in the area in which you are
manoeuvring.
i Infrared light is not visible to the human
eye and therefore does not dazzle. Night
View Assist Plus can therefore remain
switched on even if there is oncomin gtraf-
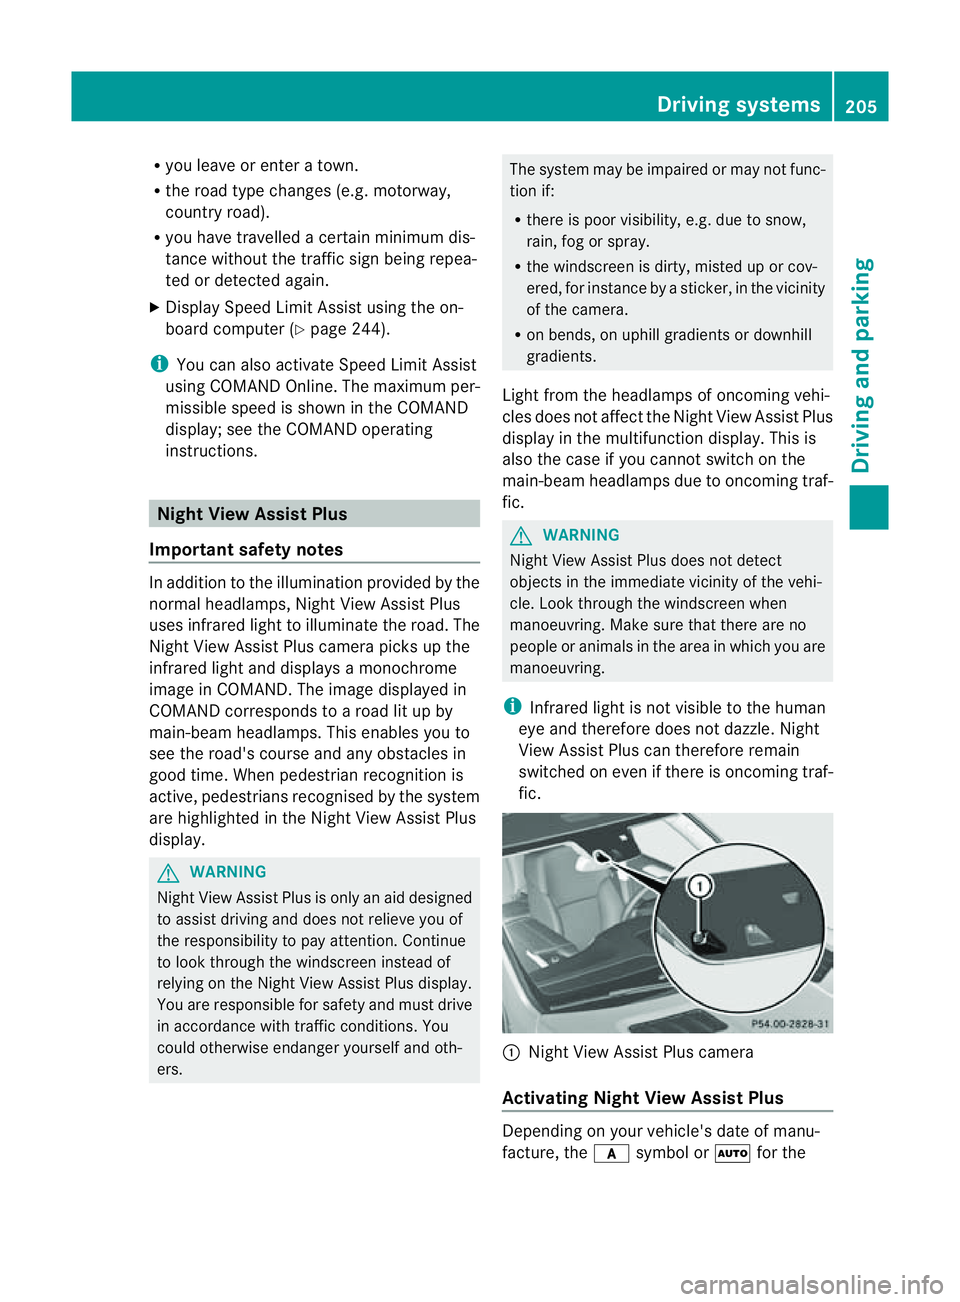
fic. :
Night Vie wAssist Plus camera
Activating Nigh tView Assist Plus Depending on your vehicle'
sdate of manu-
facture, the csymbol or Ãfor the Driving systems
205Drivingand parking Z
Page 209 of 389
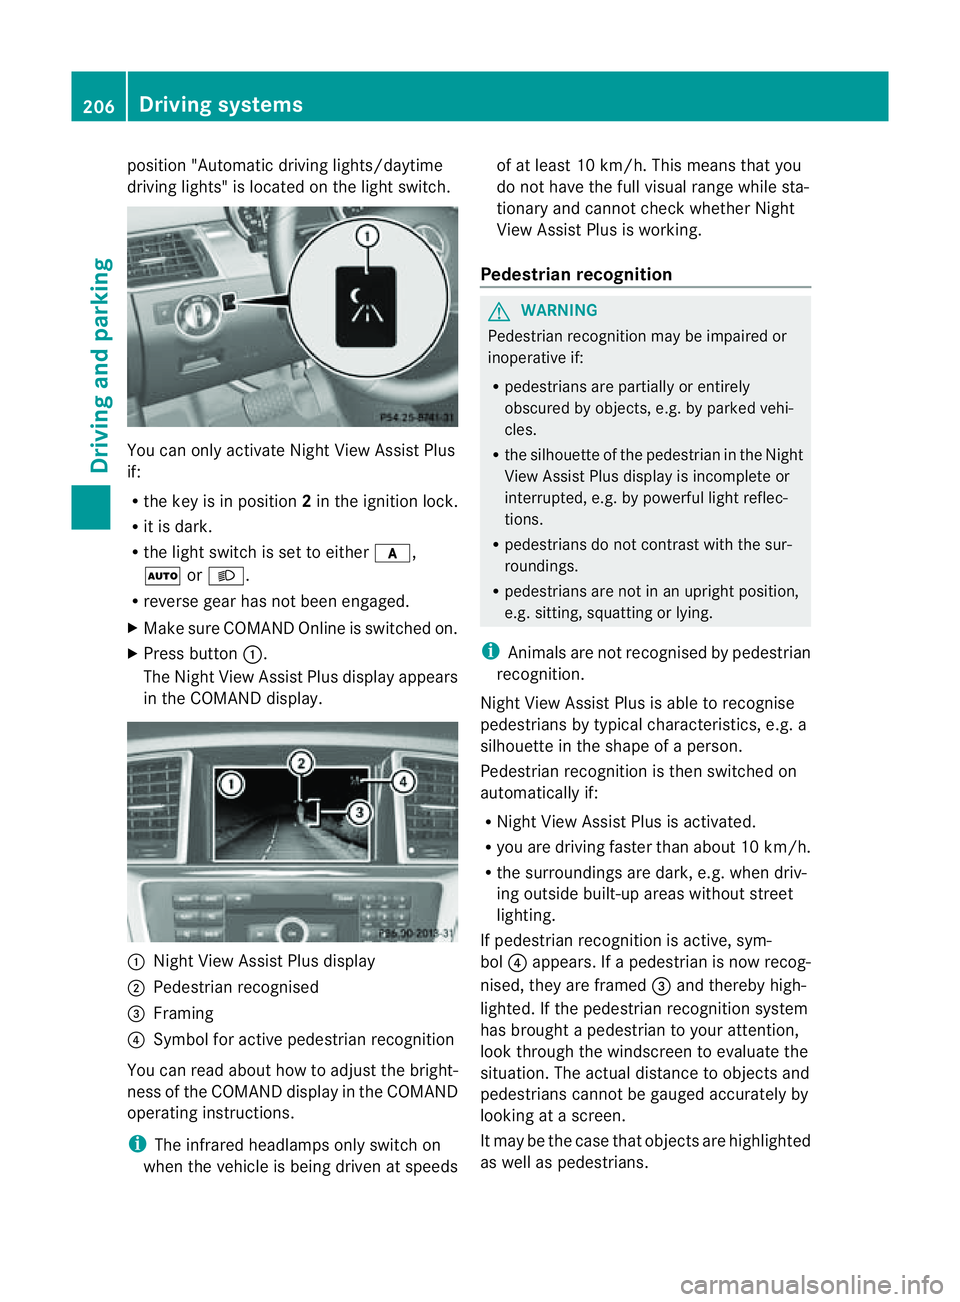
position "Automatic drivin
glights/daytime
drivin glights" is located on the light switch. You can only activat
eNight View Assist Plus
if:
R the key is in position 2in the ignition lock.
R it is dark.
R the light switc hisset to either c,
à orL.
R rev ers egear has not been engaged.
X Make sure COMAND Onlin eisswitched on.
X Press button :.
The Night View Assist Plus display appears
in the COMAN Ddisplay. :
Night View Assist Plus display
; Pedestrian recognised
= Framing
? Symbol for active pedestrian recognition
You can read abou thow to adjust the bright-
nes soft he COMAND displa yinthe COMAND
operating instructions.
i The infrared headlamps only switc hon
when the vehicle is being drive natspeeds of at least 10 km/h. This mean
sthat you
do not hav ethe full visual range while sta-
tionar yand cannot check whether Night
View Assist Plus is working.
Pedestrian recognition G
WARNING
Pedestrian recognition may be impaired or
inoperative if:
R pedestrians are partiall yorentirely
obscured by obje cts, e.g. by parked vehi-
cles.
R the silhouett eofthe pedestrian in the Night
View Assist Plus displa yisincomplete or
interrupted, e.g. by powerful ligh treflec-
tions.
R pedestrians do not contrast with the sur-
roundings.
R pedestrians are not in an upright position,
e.g. sitting, squattin gorlying.
i Animals are not recognised by pedestrian
recognition.
Night View Assist Plus is able to recognise
pedestrians by typical characteristics, e.g. a
silhouette in the shape of aperson.
Pedestrian recognition is then switched on
automatically if:
R Night View Assist Plus is activa ted.
R you are driving faster than about 10 km/ h.
R the surrounding sare dark ,e.g.w hen driv-
ing outside built-up areas without street
lighting.
If pedestrian recognition is active ,sym-
bol ?appears. If apedestrian is now recog-
nised, they are framed =and thereby high-
lighted. If the pedestrian recognition system
has brought apedestrian to your atten tion,
look through the windscreen to evaluate the
situation .The actual distanc etoobjectsand
pedestrians cannot be gauged accurately by
looking at ascreen.
It may be the case that objects are highlighted
as wel laspedestrians. 206
Driving systemsDriving and parking
Page 210 of 389
Misted up or dirty windscreen
If th
ewindscreen in front of the camera is
misted up or dirty on the insid eoroutside, the
Night View Assis tPlusd isplay is affected.
X To demist: check the automatic air condi-
tioning settings (Y page128) and fol ddown
the camera cover (Y page 328).
X To demist th einside of th ewind-
sc reen: fold dow nthe camera cover
(Y page 328) and clea nthe windscreen
(Y page 326). Driving systems
207Drivingand park ing Z