LED MERCEDES-BENZ M-CLASS SUV 2011 Owner's Manual
[x] Cancel search | Manufacturer: MERCEDES-BENZ, Model Year: 2011, Model line: M-CLASS SUV, Model: MERCEDES-BENZ M-CLASS SUV 2011Pages: 389, PDF Size: 9.22 MB
Page 116 of 389
Changing bulbs
Important safety notes
Xenon bulbs If your vehicle is equipped wit
hxenon bulb s,
you ca nrecognise this by th efollowing: the
cone of light from th exenon bulbs moves
from th etop to the bottomand back again
whe nyou star tthe engine. Fo rthis to be
observed ,the lights must be switched on
before startin gthe engine. G
DANGER
Xenon bulb scarry ahigh voltage. You could
get an electric shock and be seriously or even
fatally injured if you touch the electric con-
tacts on xenon bulbs. Therefore, never
remov ethe cover from xenon bulbs.
Do not change xenon bulbs yourself, but have
them replaced at aqualified specialist work-
sho pwhich has the necessar yspecialist
knowledge and tools to carry out the work
required.
Mercedes-Ben zrecom mends that you use a
Mercedes-Benz Service Centre for this pur-
pose. In particular, work relevant to safety or
on safety-related systems must be carried out
at aq ualified specialist workshop.
Bulbs and lamps are an important aspect of
vehicle safety. You must therefore make sure
that thes efunction correctly at all times.
Have the headlamp setting checked regularly.
Other bulbs There are bulbs other than the xenon bulbs
that you cannot replace. Replace only the
bulbs listed (Y page 113). Have the bulbs that
you cannot replace yourself changed at a
qualified specialist workshop.
Mercedes -Benz recommends that you use a
Mercedes-Benz Ser vice Centre for thi spur-
pose .Inp articular, work relevant to safety or
on safety-related systems must be carried out
at aq ualified specialist workshop. If you require assistanc
echangi ngbulbs, con-
sult aqualified specialist workshop.
Do not touch the glass tube of new bulbs with
your bare hands. Even minor contamination
can burn into the glass surface and reduce
the servic elife of the bulbs. Always use alint-
free cloth or only touch the base of the bulb
when fitting.
Only use bulbs of the correct type.
If the new bulb still does not light up, consult
aq ualified specialist workshop.
Bulbs and lamps are an important aspect of
vehicle safety. You must therefore make sure
that these function correctly at all times.
Have the headlamp setting checked regularly. G
WARNING
Bulbs and lights can become very hot. For this
reason, allow them to cool down before
changin gthem. Otherwise, you coul dburn
yourself when you touch them.
Keep bulbs out of the reach of children. Oth-
er wise ,they could damage them, for example,
and inj uret hemselves.
Never use abulbw hich ha sbeend ropped.
Suc hab ulbm ay explod eand injure you.
Halogen bulb sare pressu rised and could
explode when yo uchange them, especiall yif
the yarever yhot. Yo ushould therefor ewear
eye protec tion and gloves when you are
changing them. Overview of bulb replacement
–bulbs
Yo uc an replace the following bulbs. The
details for the bul btype can be found in the
legend. Changing bulbs
113Lightsand windsc reenwipers Z
Page 127 of 389
Q
Switche srear-com partment climate contro lon/of f(Y page 124)
R Reduces the airflow (Y page 127)Notes on using THERMOTRONIC auto-
matic climat econtrol
The following contains notes and recommen-
dations on optimum operation of
THERMO TRONIC automatic climate contro l.
R Activate climate control using the Ãand
¿ buttons .The indicator lamps in the
à and¿ buttons light up.
R In automatic mode, you can also use the
ñ button to set aclimate mode
(FOCUS/MEDIUM/DIFFUSE). The
MEDIU Mlevel is rec ommended.
R Set th etemperature to 22 †.
R Only use the demisting function briefly,
unt ilthe windscreen is clear again.
R Only us ethe air-recircu lation mod ebriefly,
e.g .ift here ar eunpleasant outsid eodours
or when in atunnel. The window scould
otherwise mist up as ,inair-recirculation
mode, no fresh air is drawn int othe vehicle.
R Use the ZON Efunction to adopt the tem-
perature settings on the driver' sside for
the front-passenger side and the rear com-
partment as well. The indicator lamp in the
á button goes out.
R Use the residual heat function if you want
to heat or ventilate the vehicle interior
when the ignition is switched off. The resid-
ual heat function can only be activated or
deactivated with the ignition switched off. Operating the climat
econtrol system Switching climat
econtrol on/off
Importan tinfor mation i
Whe nclimate contro lisswitched off, the
air supply and air circulation are also
switched off. Only select this setting briefly. Otherwise, the windows may mist
up.
i Switc honc limatecontr ol primaril yusing
the à button( Ypage 12 5).
In th erear compartmen t,you can also switch
climat econtr olon and off using the Ãand
^ buttons.
Switching on/off X
Tur nthe key to position 2in the igni tion
lock.
X To switch on: press theÃbutton.
The indicator lam pintheà button lights
up. Air flow and air distribution ar eset to
automatic mode.
or
X Press button ^.
The indicator lam pinthe^ button goes
out. The previously selec teds ettings come
int oe ffect again.
X To switch off: press the^button.
Th eindicator lamp in the ^button lights
up. Activating/deactiv
ating the cooling
with air deh umidification function
Importan tinfor mation The cooling with air dehumidification function
is only availabl
ewhen the engin eisrunning.
The air inside the vehicle is cooled and dehu-
midified according to the temperature selec-
ted. G
WARNING
If the "cooling with air dehumidification" func-
tion is deactivated, the air inside the vehicle
will not be cooled (during warm weather) or
dehumidified. The windows could mist up 124
Operating th
eclimat econtrol systemClimat econtrol
Page 133 of 389
X
To deactivate: press theÌ/Á but-
ton.
The indicator lamp in the Ì/Ábut-
ton goe sout.
i Residual hea tisdeactivated automati-
cally:
R after about 30 minutes
R when the ignition is switched on
R if the batter yvoltage drops
R if the coolant temperatur eistoo low Auxiliar
yheating
Important safety notes G
WARNING
Exhaust fumes are produced when the auxili-
ary heating is in operation. Inhalin gthese
exhaust fumes can be poisonous. You should
therefor eswitch off the auxiliary heating in
confined spaces without an extraction sys-
tem, e.g. agarage. G
WARNING
When operating the auxiliary heating, parts of
the vehicle may become very hot, and highly
inflammable material such as fuels could be
ignited. Operating the auxiliary heating is thus
prohibited at filling stations or when your vehi-
cle is being refuelled .You must therefore
switc hoff the auxiliary heating at filling sta-
tions.
! Operatin gthe auxiliary heating/ ventila-
tion draws on the vehicl ebattery. After you
have heated or ventilated the vehicle a
maximum of two times, drive for alonger
distance.
i Switch on the auxiliary heatin gregularly,
e.g. for about ten minutes ever ymonth.
The auxiliary heatin gheats the air in the vehi-
cle interior to the set temperature without
using the heat of the runnin gengine .The aux-
iliary heating is operated directly usin gthe
vehicle' sfuel. For this reason, the tank con- tent must be at least at reserve fuel level to
ensure that the auxiliary heating functions.
The auxiliary heating/ventilation automati-
cally adjusts to changes in temperature and
weather conditions. For this reason, the aux-
iliary heating could switch from ventilation
mode to heating mode or from heating mode
to ventilation mode.
The auxiliary heating switches off when the
engine is switched off. The auxiliary ventila-
tion switches off when you turn the key to key
position 2.
The auxiliary heating switches off automati-
cally after 30 minutes. This time limit can be
altered. To do this, visit aqualified specialist
workshop, e.g. aMercedes-Benz Service
Centre.
You can notu se the auxiliary ven tilation to
cool the vehicle interior to atemperature
lower than the outside temperature.
Before switching on X
Turn the key to position 2in the ignition
lock.
X Set the temperature.
The auxiliary heating/ventilation can be acti-
vated even when the climate control is being
controlled manually. Optimum comfor tcan
be attained when the system is set to auto-
matic mode. Set the temperature to 22 †.
The auxiliary heating/ventilation can be acti-
vated or deactivated using the remote control
or the button on the centre console.
The on-board computer can be used to spec-
ify up to three departure times, one of which
may be preselected (Y page 250).130
Operating the climate control systemClimate control
Page 136 of 389
H
Environmenta
lnote Batteries contain pollutants.
It is agains
tthe law to dis-
pose of them with the house-
hold rubbish. They must be
collected separatel yand
recycled in an environmen-
tally responsible manner. Dispose of batteries in an
environmentally responsible
manner. Take discharged
batteries to aqualified spe-
cialist workshop ,e.g. a
Mercedes-Benz Service
Centre, or to aspecial col-
lection point for old batter-
ies.
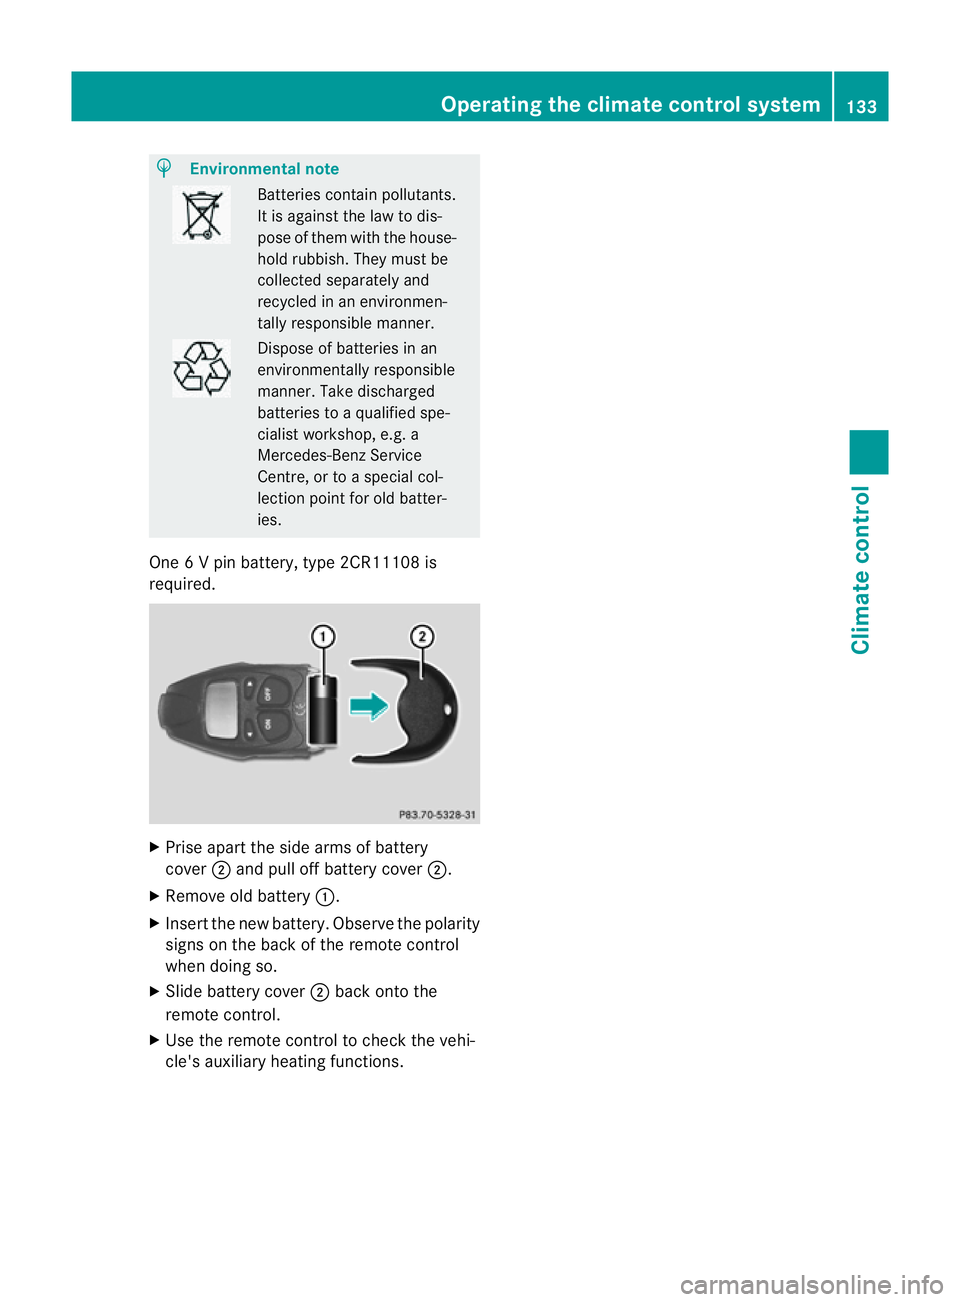
One 6Vp in battery ,type 2CR11108 is
required. X
Prise apart the side arms of battery
cover ;and pull off battery cover ;.
X Remove old battery :.
X Insert the new battery. Observe the polarity
signs on the back of the remote control
when doing so.
X Slide battery cover ;back onto the
remote control.
X Use the remote control to check the vehi-
cle's auxiliary heating functions. Operating the climate control system
133Climate control Z
Page 138 of 389
Displa
ymessages Possible causes/consequences and
M Solutions
If th
eauxiliar yheating is faulty:
X Hav ethe auxil iaryh eatin gchecked at aqualified specialist
workshop. Adjusting th
eair vents Important safet
ynotes G
WARNING
Ver yhot or ver ycold ai rcan flo wfromt he air
vents. This coul dcause burns or frostbite to
bare skin in the immediate vicinity of the
vents. Keep bare skin away from these air
outlets. If necessary, direct the airflow away
to ad ifferent area of the vehicle interior.
In order to ensure the direct flow of fresh air
through the air vent sinto the vehicl einterior,
please observe the following notes:
R keep the air inlet grill eonthe bonnet and
in the engin ecompartmen tonthe front-
passenger side free of blockages, such as
ice, snow or leaves.
R never cover the ven tsor ven tilation grilles
in the vehicle interior.
i For virtually draught-free ventilation,
adjust the sliders of the air vent stothe
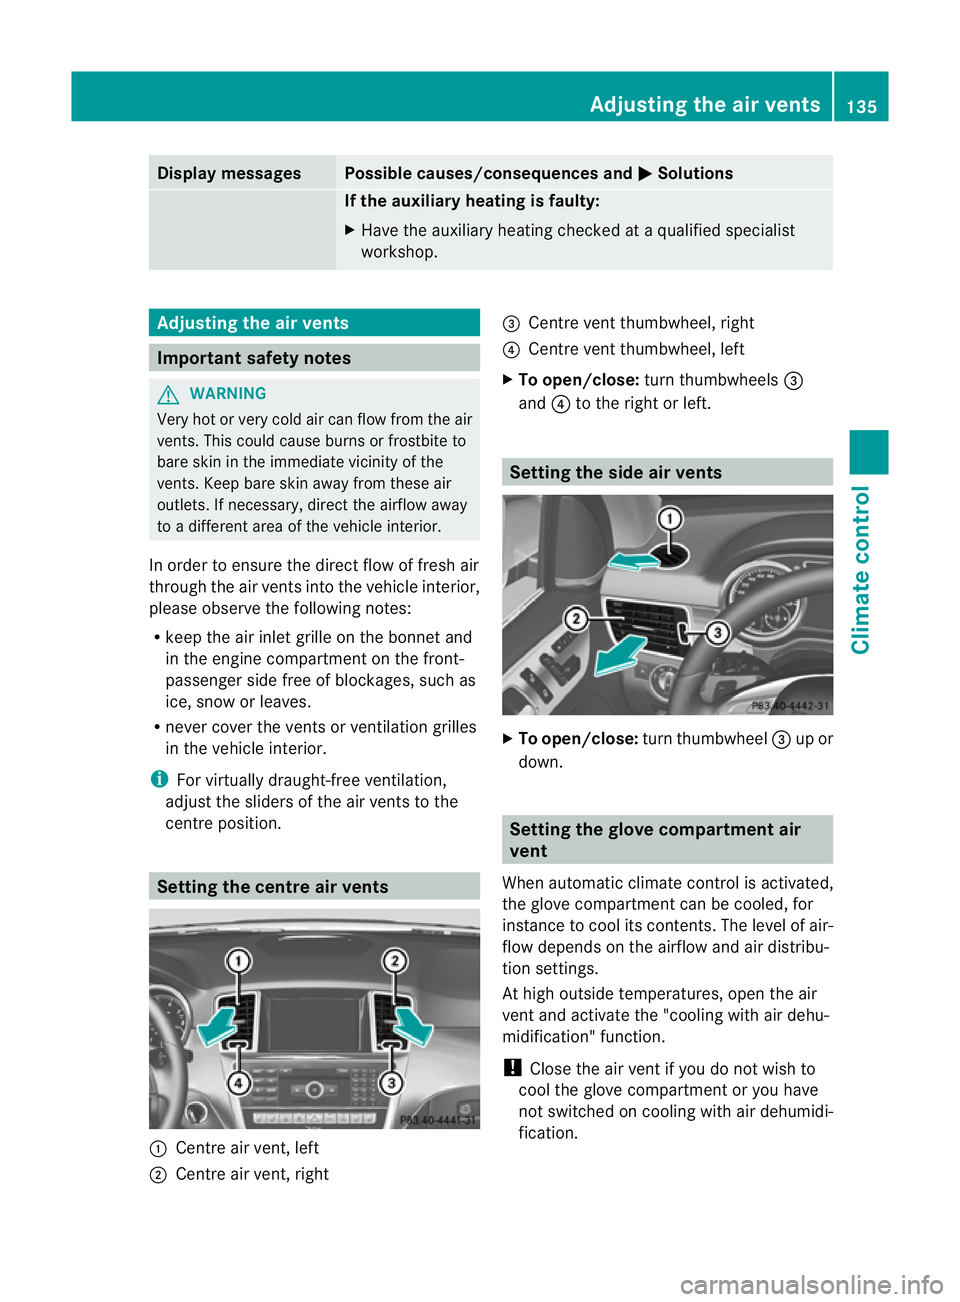
cen treposition. Setting the centre air vents
:
Centr eair vent ,left
; Centre air ven t, right =
Centre ven tthumbwheel, right
? Centre ven tthumbwheel, left
X To open/close: turnthumbwheels =
and ?to the right or left. Setting th
eside air vents X
To open/close: turnthumbwheel =up or
down. Setting th
eglove compartment air
vent
When automatic climate control is activated,
the glove compartmen tcan be cooled, for
instance to cool its con tents.The level of air-
flo wd epends on the airflow and air distribu-
tion settings.
At high outside temperatures, open the air
ven tand activate the "cooling with air dehu-
midification" function.
! Clos ethe air ven tifyou do not wish to
cool the glove compartmen toryou have
not switched on coolin gwith air dehumidi-
fication. Adjusting the air vents
135Climate control Z
Page 144 of 389
X
Depres sthe brake peda land kee pit
depressed.
X To star tapetrol engine: press the Start/
Stop button (Y page 139) once.
The engin estarts.
X To start adiesel engine: press the Start/
Stop button (Y page 139)once.
Preglow is activated and the engin estarts. Pulling away
Automatic transmission i
It is only possible to shift the transmission
from position Pto the desired position if
you depress the brake pedal. Only then is
the parkin glock released. If the brake
pedal is not depressed, the DIREC TSELE CT
lever can still be move dbut the parking lock
remains engaged.
X Depress the brak epedal and keep it
depressed.
X Shift th etransmissio ntoposition Dor R
(Y page 145).
X Releas ethe brak epedal.
X Carefully depress th eaccele rator pedal.
The electric parki ngbrak e(Ypage 16 1)is
automatically released.
The red !indicator lamp in the instru-
ment cluster goes out.
i The vehicle locks centrally onc eyou have
pulled away .The lockin gknobs in the doors
drop down.
You can open the doors from the inside at
any time.
You can also deactivat ethe automatic lock-
ing featur e(Ypage 24 9).
i Upshif tstake place at higher engine
speeds after acold star t.This helps the
catalytic converter to reach its operating
temperature mor equickly. Pullin
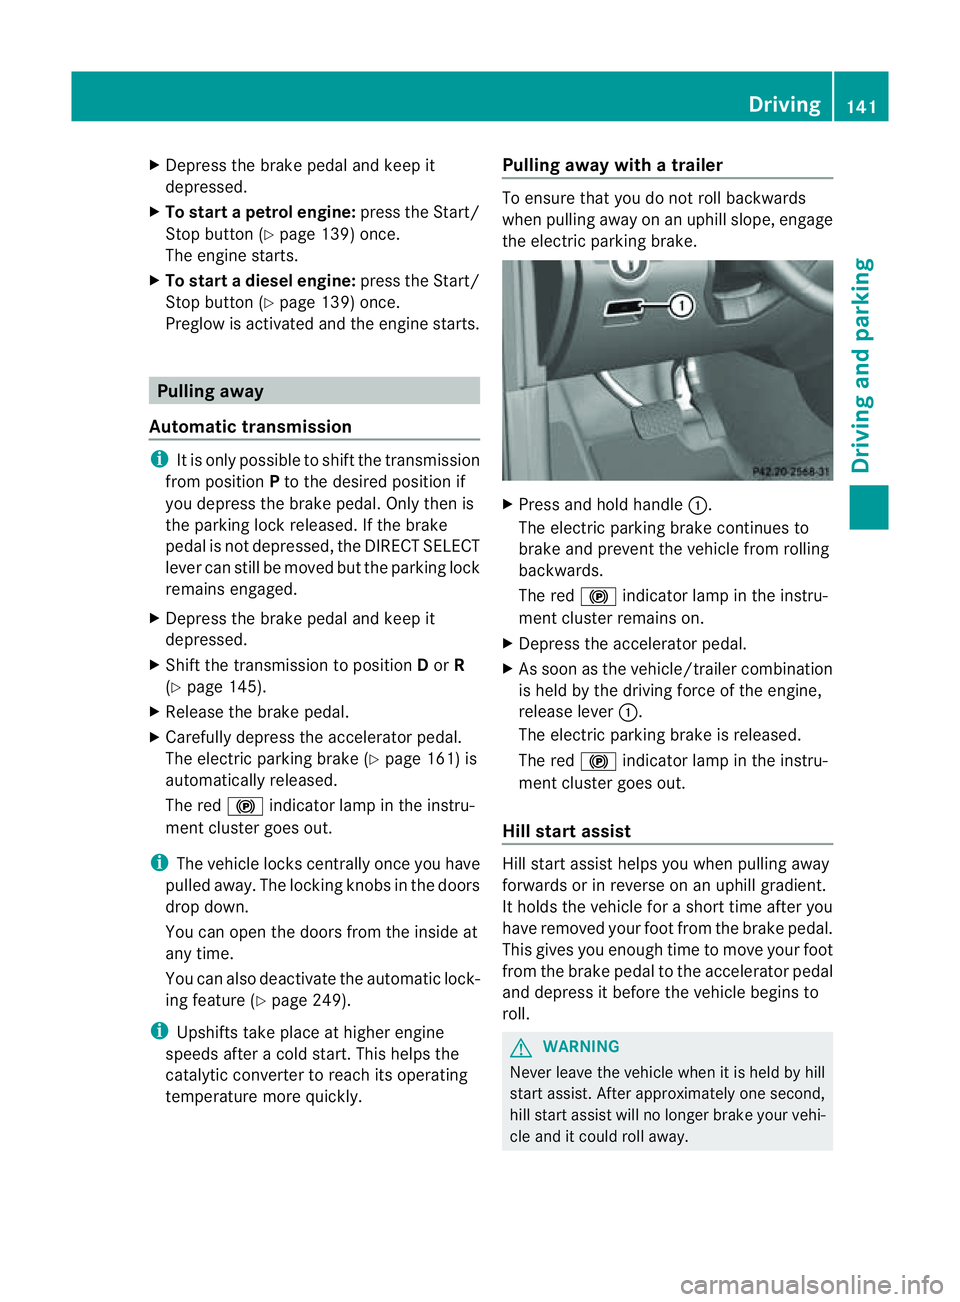
gaway with atrailer To ensure that you do not roll backwards
when pulling away on an uphill slope, engage
the electric parking brake. X
Press and hol dhandle :.
The electric parking brake continues to
brake and prevent the vehicle from rolling
backwards.
The red !indicator lamp in the instru-
ment cluster remains on.
X Depress the accelerator pedal.
X As soon as the vehicle/trailer combination
is held by the driving force of the engine,
release lever :.
The electric parking brake is released.
The red !indicator lamp in the instru-
ment cluster goes out.
Hill star tassist Hill star
tassist helps you when pulling away
forwards or in reverse on an uphil lgradient.
It hold sthe vehicle for ashort tim eafter you
have removed you rfoot from the brake pedal.
This gives you enough tim etomove your foot
from the brake pedal to the accelerator pedal
and depress it befor ethe vehicle begin sto
roll. G
WARNING
Neve rleave the vehicle when it is held by hill
star tassist. Af tera pproximately one second,
hill start assist will no longer brak eyour vehi-
cle and it coul droll away. Driving
141Drivingand parking Z
Page 146 of 389
erator pedal, the engin
estart sautomati-
cally and the brakin geffect of th eHOLD
function is deactivated. Depress the accel-
erator pedal carefully ,asthe engin emust
be started first.
Automatic engin estart The engi
neis started automatically if:
R you depress the accelerator pedal.
R you release the brakes when in transmis-
sion position Dor N,w hen the HOL Dfunc-
tion is not active.
R the ECO start/stop function is deactivated
by pressing the ECO button.
R the vehicle start storoll.
R the driver's seat belt is removed or the driv-
er' sd oor is opened.
R you shift the transmission to position R.
R you switc htodrive program M.
R yo us witch to an off-road program.
R the brake system requires this.
R the system detect smoistur eont he wind-
screen when the air-conditionin gsystem is
switched on.
R the battery' scharge status is too low.
R the bonnet is opened.
R the temperature in the vehicle interior devi-
ates from the set range.
i Shif ting the transmissio ntoposition P
does not star tthe engine.
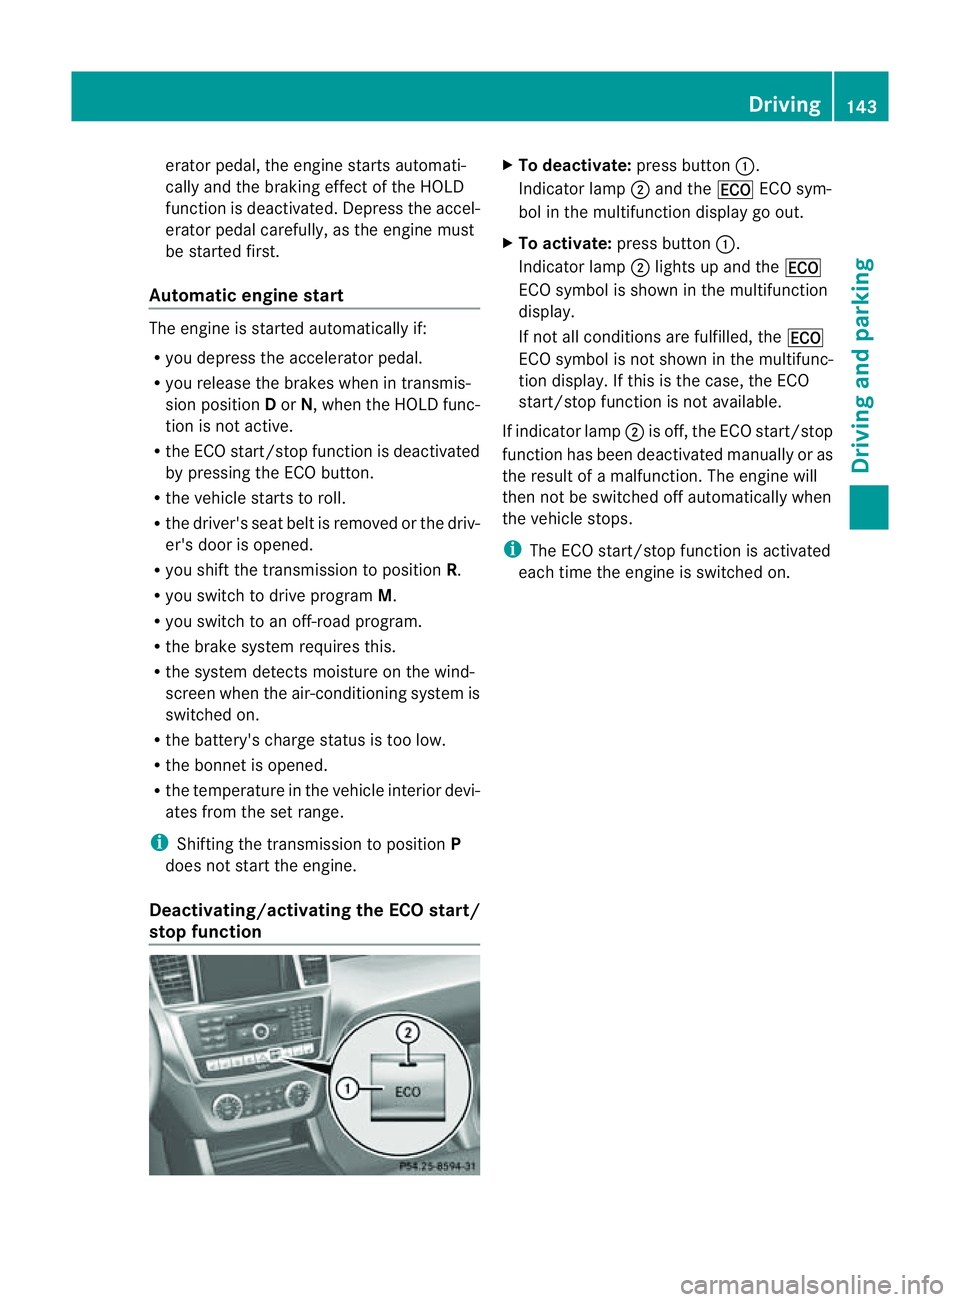
Deactiva ting/activa ting th eECO start/
stop function X
To deactivate: press button:.
Indicator lamp ;and the ¤ECO sym-
bol in the multifunction display go out.
X To activate: press button :.
Indicator lamp ;lights up and the ¤
ECO symbol is shown in the multifunction
display.
If not all conditions are fulfilled, the ¤
ECO symbol is not shown in the multifunc-
tion display. If this is the case, the ECO
start/stop function is not available.
If indicator lamp ;is off, the ECO start/stop
function has been deactivated manually or as
the result of amalfunction. The engine will
then not be switched off automatically when
the vehicle stops.
i The ECO start/stop function is activated
each time the engine is switched on. Driving
143Drivingand parking Z
Page 148 of 389
Problem Possible causes/consequences and
M Solutions
Vehicles with
apetrol
engine:
The engine is not run-
ning smoothly and is
misfiring. There is
amalfunction in the engine electronics or in amechanical
componen tofthe engin emanagement system.
X Only depress the accelerator pedal slightly.
X Have the cause rectified immediately at aqualified specialist
workshop, e.g. aMercedes-Benz Servic eCentre.
Otherwise, non-combusted fuel may get into the catalytic con-
verter and damage it. The coolan
ttempera-
tur ed isplay is showing
more than 120 †. The
coolant warnin glamp
may also be on and a
warning tone may
sound. The coolant level is too low. The coolant is too hot and the engine
is no longer being cooled sufficiently.
X Stop as soon as possible and allow the engine and the coolant
to cool down.
X Check the coolant level (Y page 321). Observe the warning
notes as you do so and top up the coolant if necessary. If the coolant level is correct
,the radiator fa nmay be faulty. The
coolant is too hot and the engine is no longer being cooled suffi-
ciently.
X At coolant temperatures under 120 †, drive on to the nearest
qualified specialis tworkshop, e.g. to aMercedes-Benz Service
Centre.
X Avoid heavy loads on the engine as you do so, e.g. driving on
mountain roads and stop-start traffic. Automa
tict ransmission Important safety notes
G
WARNING
The movement of the pedal smust not be
impaired in any way. Do not keep any objects
in the driver's footwell. Make sure that floor-
mats or carpets are correctly secured and
that there is sufficient clearance for the ped-
als.
Do not place several floormats on top of one
another. G
WARNING
Do not change down for additional engine
braking on aslippery road surface. This could
cause the drive wheels to lose their grip and
the vehicle could skid. This could cause you to lose control of your vehicle and cause an
accident. DIRECT SELECT lever
Overview of transmissio npositions The DIRECT SELECT leve
risonthe right of the
steering column. Automa
tict ran smission
145Drivingand park ing Z
Page 149 of 389

P
Park position with parkin glock
R Reverse gear
N Neutral
D Drive
i The DIREC TSELE CT lever alway sretur ns
to its original position. The curren ttrans-
mission position P,R, Nor Dap pe ars in the
transmission position display
(Y pag e146) in the mult ifunction display.
Transmissi onposition and driv epro-
gram display The current transmission pos
ition and drive
program appear in the multifunction display. :
Trans mission position display
; Driv eprogram display
i Thea rrow sint he transmission position
displa yshow how and int owhich transmis-
sion position syou can chan ge usingthe
DIRECT SELECT lever.
! If the transmission position displa yint he
multifunction displa yisnot working, you
should pull away carefully to chec kwhether
the desired transmission position is
engaged. Ideally, you should selec ttrans-
mission position Dand drive program Eor
S.Don ot restric tthe shift range. Engaging pa
rk position P X
Push th eDIRECT SELECT lever in the direc-
tion of arrow P.
i The automatic transmission shi ftsa uto-
matically int opark posi tion Pif you open
th ed river' sdoor when th evehicle is sta-
tionar yordriving at very lo wspeed ,and the
transmission is in position Dor R.
i If you dep ress th ebrake peda land push
the DIRECT SELECT lever up or dow n,the
parking lock is disengaged and the trans-
mission shifts to neutral N.
If you want to shift from park position P
directly to Ror D,d epress the brak eand
pus hthe DIREC TSELECT lever up or down
past the first point of resistance.
! If the engine speed is too high, do not shift
the automatic transmission directly from
D to R,f rom Rto Dor directly to P.Other-
wise ,the automatic transmission could be
damaged.
Engaging pa rk position Pautomatically Park position
Pis automatically engaged if:
R you switch off th eengine using the key and
remove the key, or if you swi tcho ff the
engin eusingthe Start/Stop button and
open on eofthe front do ors.
R HOL D(Ypage 187) or DISTRONI CPLUS
(Y page 174) bra keyour vehicle until it is
stationar yand at leas tone of th efollowing
condition sisfulfilled:
- there is asystem malfunction.
- there is asevere uphill or downhill slope.
The electric parking brak eisthena lso
applied.
Engaging revers egear R !
Only shif tthe automatic transmission to
R when the vehicle is stationary.
X Push the DIREC TSELECT lever up past the
first point of resistance. 146
Automatic transmissionDrivin
gand parking
Page 160 of 389
AdBlue
®
Important notes on use To function properly, BlueTE
Cexhaust gas
aftertreatmen tmust be ope rated with the
reducin gagen tAdBlue ®
.
When the supply of AdBlue ®
is almost used
up, the Refill AdBlue See Owner's Man‐
ual message is shown in the multifunction
display.
When the AdBlue ®
supply drops to amini-
mum ,the Refill AdBlue No star tinXXXX km message is show
ninthe multifunc-
tion display.
If the Refill AdBlue No star tinXXXX km message is show
ninthe multifunction dis-
play ,you can still drive the vehicle over the
distance shown. If the AdBlue ®
is not topped
up, you will subsequen tlybeu nable to start
the engi ne.R efill the AdBlue ®
tank or have
the AdBlue ®
tank refilled at aqualified spe-
cialist workshop. If the Refill AdBlueEng. star
tnot possible message
appears in th emultifunction display and the
engine does not start ,you must top up with
at least 3. 8lAdBlue ®
(approximately 2
AdBlue ®
refill bottles).
i If you drive the vehicl efaster than
15 km/h, the Refill AdBlue Se eOwn‐ er's Manual message goes ou
tafter
approximately one minute.
Further info rmation about BlueTEC exhaust
gas aftertreatment and about AdBlue ®
can
be obtained from any Mercedes-Benz Service
Centre. Topping up AdBlue
® G
WARNING
AdBlue ®
must not come int ocontac twith
skin ,eyes or clothing.
R If AdBlue ®
comes into contact with your
eyes or skin, rinse affected areas with clean
water immediately.
R If AdBlue ®
is swallowed ,immediatel yrinse
your mouth out with alot of clea nwater and
drink plenty of water.
R Change clothing that is soile dwith
AdBlue ®
immediately.
R If allergic reactions occur, consult adoctor
immediately.
Keep AdBlue ®
out of the reach of children. G
WAR
NING
If you ope nthe AdBlue ®
tan kcap, small
amount sofammonia vapou rmay be released.
This depends in particular upon the age of the
AdBlue ®
.
Ammonia vapours have apungent odour and
are particularly irritating to:
R skin
R mucous membranes
R eyes
You may experienc eaburnin gsensation in
your eyes, nose and throat, as well as cough-
ing and waterin gofthe eyes.
Do not inhale any ammonia vapour sthat may
be released. Fil lthe AdBlue ®
tan konly in well-
ventilate dareas.
! Only us eAdBlue ®
in accordanc ewith
ISO 22241. Do not mix any additives with
AdBlue ®
,a nd do not dilute AdBlue ®
with
water. Thi smay destroy the BlueTEC
exhaust gas aftertreatment system.
! In order to fill the AdBlue ®
tank ,the vehi-
cle must be parked on alevel surface. The
AdBlue ®
tank can only be filled as intended
with the vehicle parked on alevel surface.
Fluc tuations in capacit ywill thus be avoi- Refuelling
157Drivingand park ing Z