brakes MERCEDES-BENZ M-CLASS SUV 2011 Owner's Manual
[x] Cancel search | Manufacturer: MERCEDES-BENZ, Model Year: 2011, Model line: M-CLASS SUV, Model: MERCEDES-BENZ M-CLASS SUV 2011Pages: 389, PDF Size: 9.22 MB
Page 182 of 389
not accelerate. Thi
sisbasedonthe current
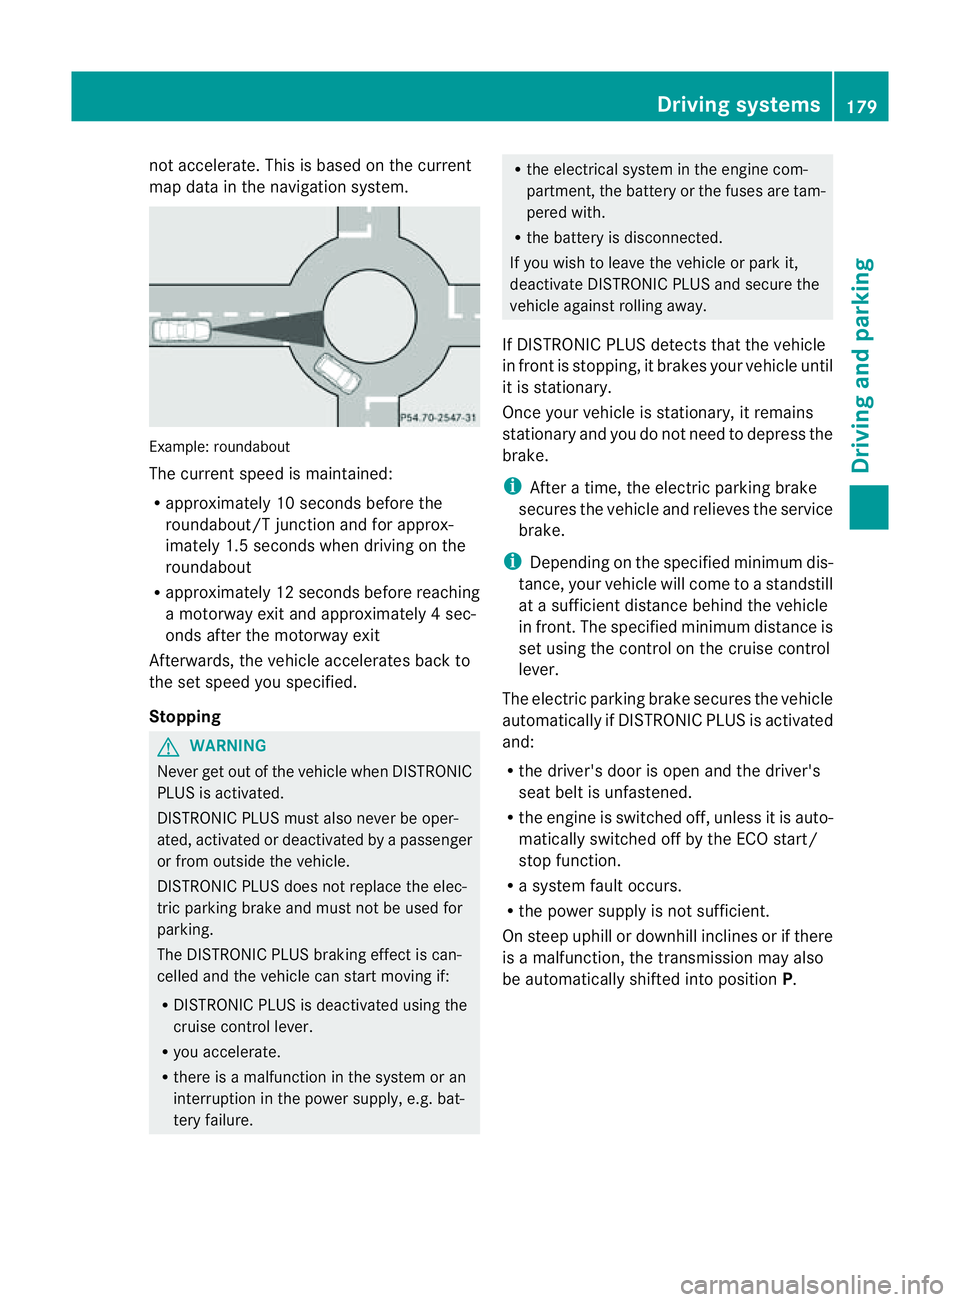
map data in the navigation system. Example: roundabout
The current speed is maint
ained:
R approximatel y10second sbefore the
roundabout/T junction and for approx-
imatel y1.5 second swhend riving on the
roundabout
R approximatel y12second sbefore reaching
am otorwa yexita nd approximatel y4sec-
onds after the motorwa yexit
Afterwards ,the vehicle accelerates bac kto
the set speed you specified.
Stopping G
WARNING
Never get out of the vehicle when DISTRONIC
PLUS is activated.
DISTRONIC PLUS must also never be oper-
ated, activated or deactivated by apassenger
or from outside the vehicle.
DISTRONIC PLUS does not replace the elec-
tric parkin gbrake and mus tnot be used for
parking.
The DI STRONIC PLUS brakin geffect is can-
celle dand the vehicl ecan start movin gif:
R DISTRONIC PLUS is deactivated using the
cruis econtrol lever.
R you accelera te.
R there is amalfunction in the system or an
interruption in the power supply, e.g. bat-
tery failure. R
the electrical system in the engine com-
partment, the batter yorthe fuses ar etam-
pered with.
R the batter yisdisconnected.
If you wish to leave the vehicle or park it,
deactiva teDISTRONIC PLUS and secure the
vehicle agains trolling away.
If DI STRONIC PLUS detects that the vehicle
in fron tisstopping, it brakes your vehicle until
it is stationary.
Once your vehicle is stationary, it remains
stationary and you do not need to depress the
brake.
i After atime, the electric parkin gbrake
secure sthe vehicle and relieves the service
brake.
i Depending on the specifie dminimum dis-
tance, your vehicle will come to astandstill
at as ufficient distance behind the vehicle
in front .The specifie dminimum distance is
set using the control on the cruise control
lever.
The electric parkin gbrake secure sthe vehicle
automatically if DI STRONIC PLUS is activated
and:
R the driver's doo risopen and the driver's
seat belt is unfastened.
R the engine is switched off ,unles sitisa uto-
matically switched off by the ECO start/
stop function.
R as ystem fault occurs.
R the powe rsupply is not sufficient.
On steep uphill or downhill inclines or if there
is am alfunction, the transmission may also
be automatically shifted into position P. Driving systems
179Drivingand parking Z
Page 190 of 389
HOL
Dfunction
Gen eral notes Th
eH OLD function ca nassist the driver in the
foll owing situations:
R when pulling away, especially on steep
slopes
R when manoeuvrin gonsteep slopes
R when waiting in traffic
The vehicle is kept stationary without the
driver having to depress the brake pedal.
The braking effect is cancelled and the HOLD
function is deactivated when you depress the
accelerator peda ltop ull away.
Activation conditions You can activate the HOLD function if:
R the vehicle is stationary.
R the engine is running or if it has been auto-
matically switched off by the ECO start/
stop function.
R the driver' sdoor is closed or if your seat
belt is fastened.
R the electric parkin gbrake is released.
R thet ransmission is in position D,Ror N.
R DISTRONIC PLUS is deactivated.
Activatin gthe HOL Dfunction X
Make sure that th eactivation conditions
are met.
X Depress the brake pedal. X
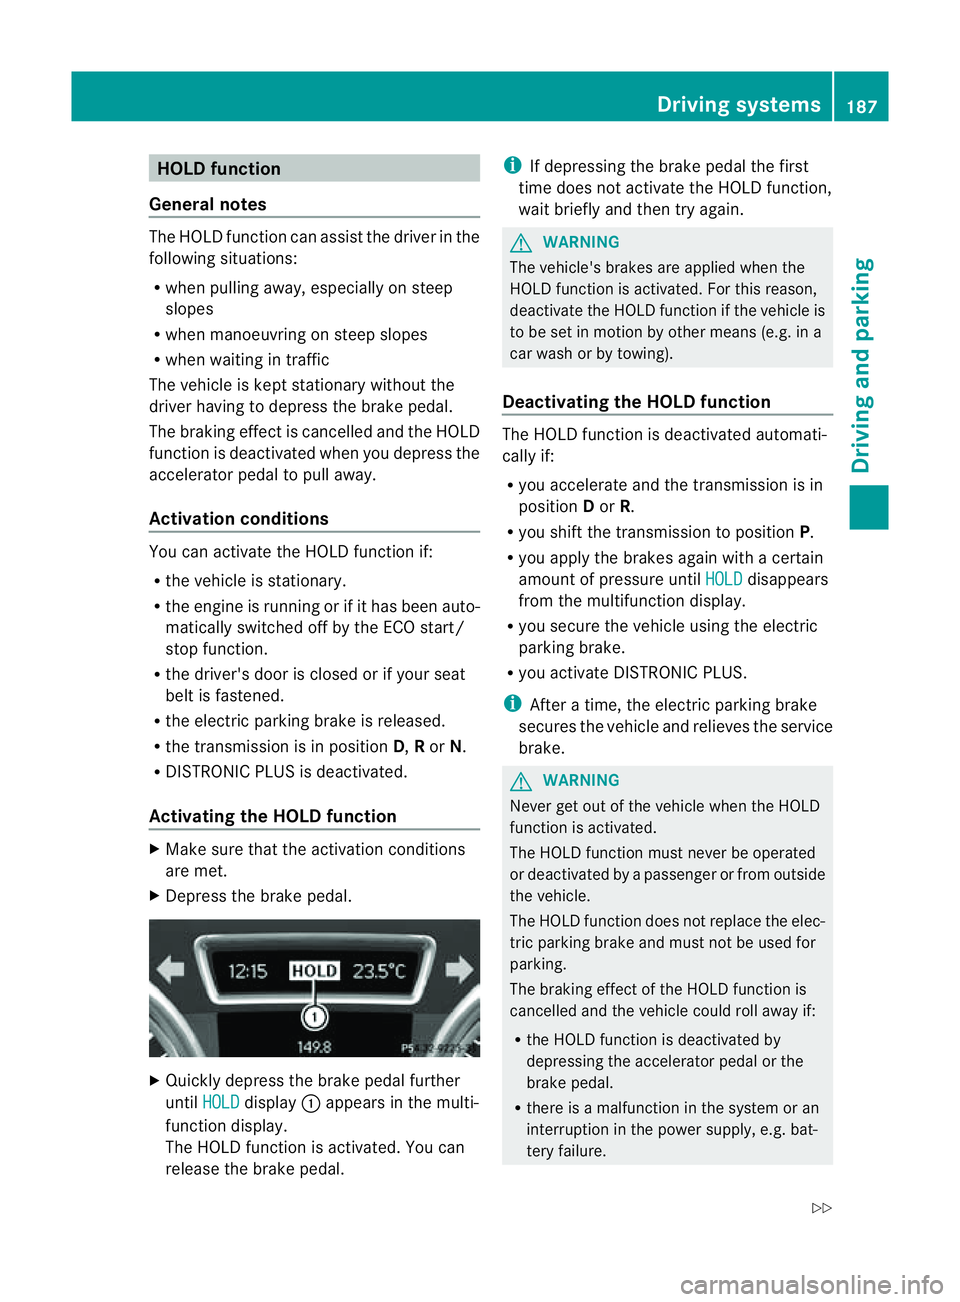
Quickly depress the brake pedal further
until HOLD display
:appears in the multi-
function display.
Th eH OLD func tion is activated. You can
release the brake pedal. i
If depressing the brake pedal the first
tim edoes not activate the HOL Dfunction,
wait briefly and then try again. G
WARNING
The vehicle's brakes are applied when the
HOLD function is activated. For this reason,
deactivate the HOLD function if the vehicle is
to be set in motion by other means (e.g. in a
car wash or by towing).
Deactivating the HOLD function The HOLD function is deactivated automati-
cally if:
R you accelerate and the transmission is in
position Dor R.
R you shift the transmission to position P.
R you apply the brakes again with acertain
amount of pressur euntil HOLD disappears
from the multifunctio ndisplay.
R you secure the vehicle using the electric
parkin gbrake.
R yo ua ctivate DISTRONIC PLUS.
i After atime, the electric parkin gbrake
secure sthe vehicle and relieves the service
brake. G
WARNING
Never get out of the vehicle when the HOLD
func tion is activated.
The HOL Dfunction must never be operated
or deactivated by apassenger or from outside
the vehicle.
The HOLD function does not replace the elec-
tric parking brake and must not be used for
parking.
The braking effect of the HOLD function is
cancelled and the vehicle could roll away if:
R the HOLD function is deactivated by
depressing the accelerator pedal or the
brake pedal.
R there is amalfunction in the system or an
interruption in the power supply ,e.g. bat-
tery failure. Driving systems
187Drivingand parkin g
Z
Page 195 of 389
vehicle. Yo
ucould dam aget he vehicle or
the objects.
The sensor smay not detect snow and
objects which absorb ultrasonic sources.
Ultrasonic sources, such as an automatic
car wash, alorry's compressed-air brakes
or ap neumatic drill, coul dcause PARK-
TRONI Ctom alfunction.
PARKTRONIC may not fun ctioncorrectly on
uneven terrain.
Minimum distance Centre approxima
tely 20 cm Corners approximately 15 cm
If there is an obstacle within this range, the
relevan twarning displays light up and awarn-
ing ton esounds. If th edistanc efalls below
the minimum, the distanc emay no longer be
shown.
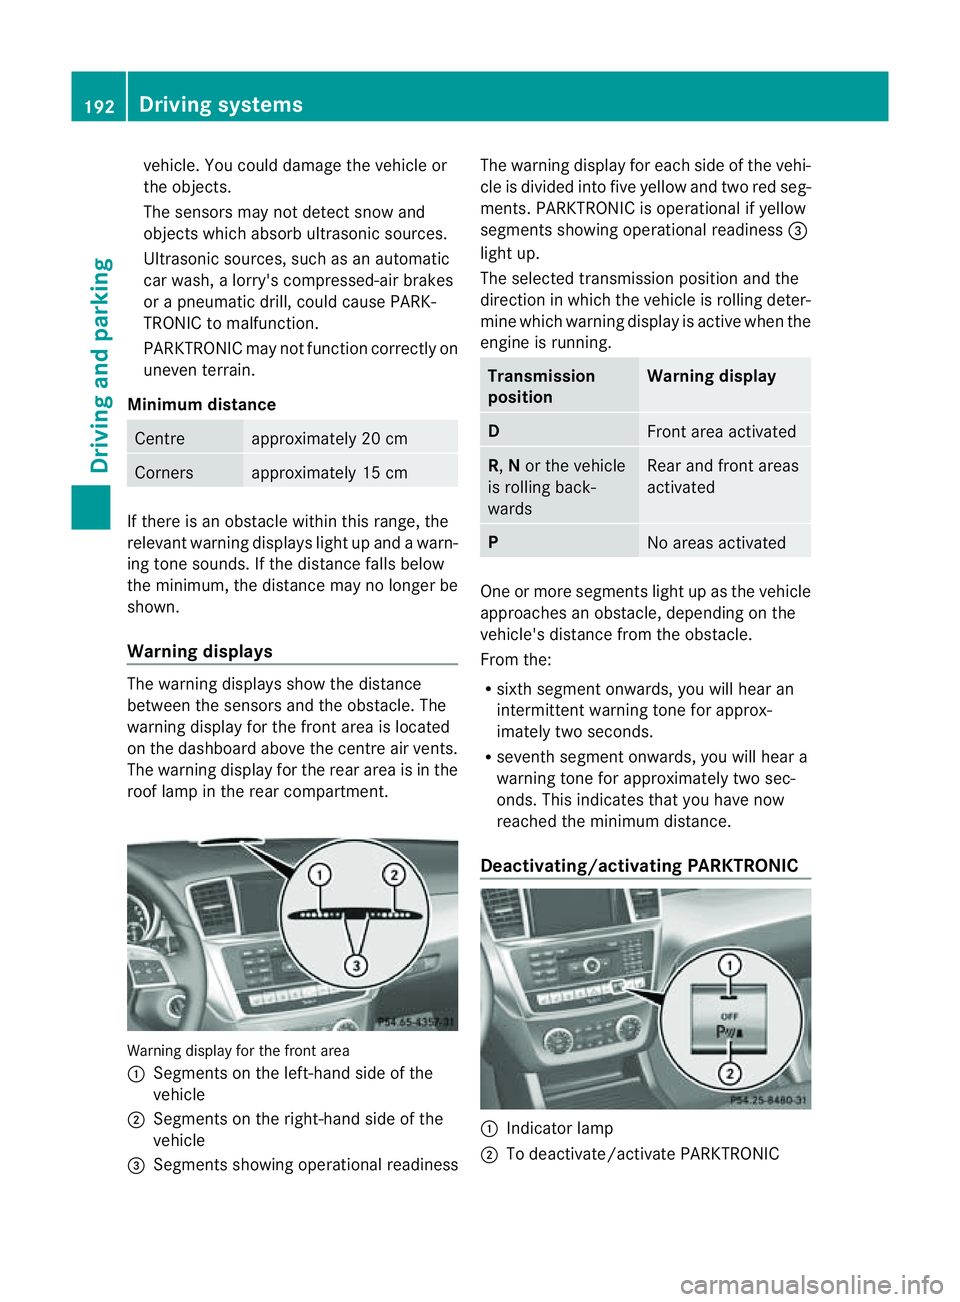
Warning displays The warning displays show the distan
ce
between th esensor sand the obstacle. The
warning display for the fron tarea is located
on th edashboard above the centre air vents.
The warning display for the rear area is in the
roof lamp in the rear compartment. Warning display for the front area
: Segments on the left-hand side of the
vehicle
; Segments on the right-hand side of the
vehicle
= Segments sho wingoperational readiness The warning display for each side of the vehi-
cle is divided into fiv
eyellow and two red seg-
ments. PARKTRONI Cisoperational if yellow
segment sshowing oper ational readiness =
light up.
The selected transmission position and the
direction in which the vehicle is rolling deter-
mine which warning display is activ ewhen the
engin eisrunning. Transmission
position Warning display
D
Front area activated
R,
Nor the vehicle
is rolling back-
wards Rea
rand front areas
activated P
No area
sactivated One or more segment
slight up as the vehicle
approaches an obstacle, depending on the
vehicle's distance from the obstacle.
From the:
R sixth segment onwards, you wil lhear an
intermitten twarnin gtonef or approx-
imately two seconds.
R seven thsegment onwards, you will hear a
warnin gtonef or approximately two sec-
onds. This indicates that you have now
reached the minimu mdistance.
Deactivating/activating PARKTRONIC :
Indicator lamp
; To deactivate/activate PARKTRONIC 192
Drivin
gsystemsDrivin gand parking
Page 199 of 389
the turn si
gnal on the driver' sside is activa-
ted. If you wish to park in aspace on the driv-
er' ss ide, the indicator on the driver' sside
must remain on. This must remain switched
on until you acknowledge the use of Active
Parking Assist by pressin gthe a button
on the multifunction steeri ngwheel.
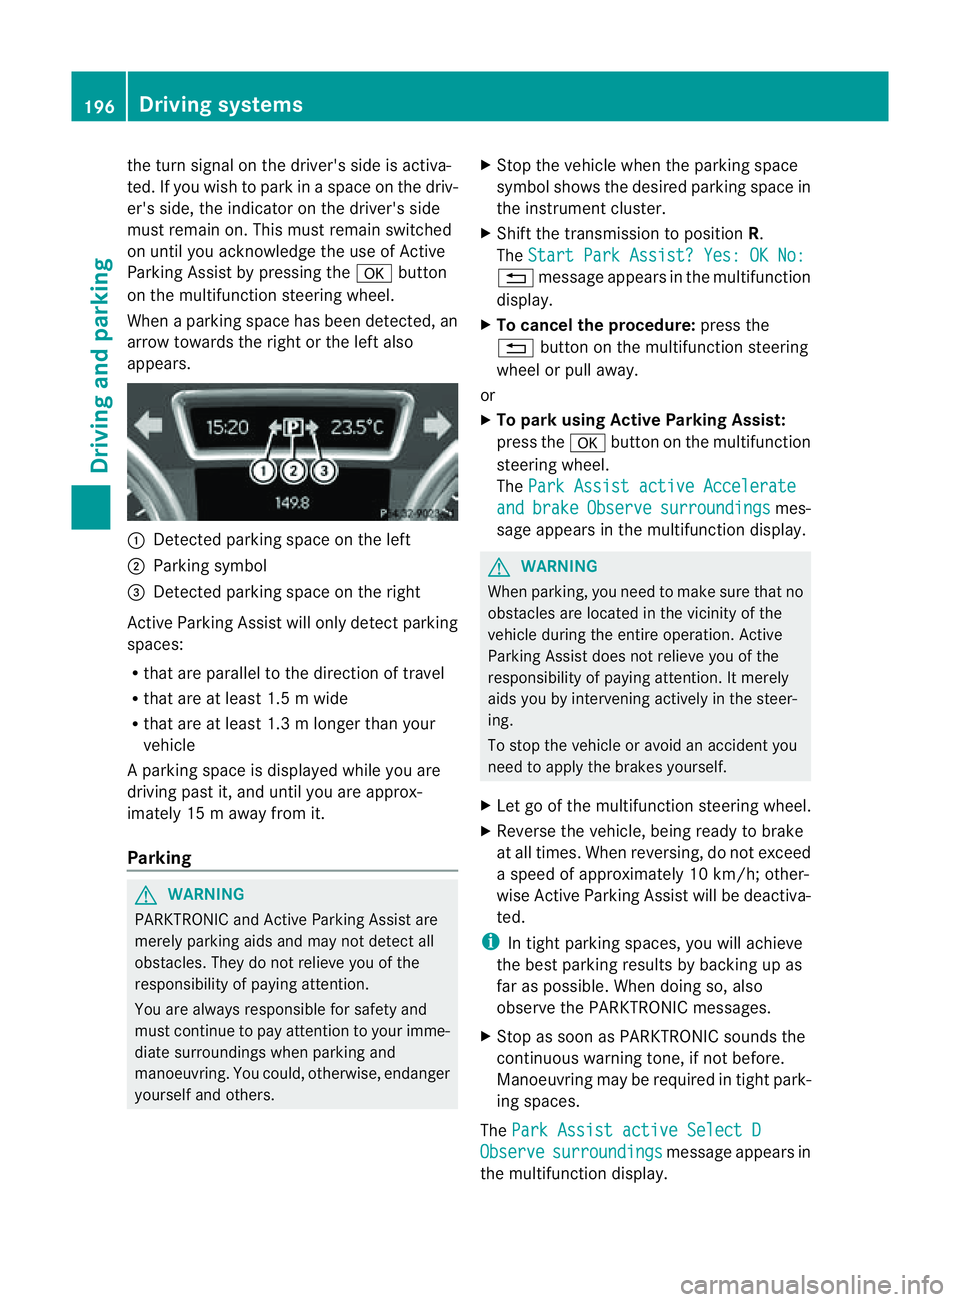
When aparking space has been detected, an
arrow towards the right or the left also
appears. :
Detected parking space on the left
; Parking symbol
= Detected parking space on the right
Activ eParking Assist will only detect parking
spaces:
R that are parallel to the direction of travel
R that are at least 1. 5mwide
R that are at least 1. 3mlonger than your
vehicle
Ap arking space is displayed while you are
driving past it, and until you are approx-
imately 15 maway from it.
Parking G
WARNING
PARKTRONI Cand Activ eParking Assist are
merely parking aids and may not detec tall
obstacles. They do not reliev eyou of the
responsibili tyof paying attention.
You are alway sresponsible for safet yand
must continue to pay attention to your imme-
diate surroundings whe nparking and
manoeuvring. You could, otherwise, endanger
yourself and others. X
Stop the vehicle when the parking space
symbol shows the desired parking space in
the instrumen tcluster.
X Shif tthe transmission to position R.
The Star tPark Assist? Yes: OK No: %
message appe arsint he multifunction
display.
X To cancel th eprocedure: press the
% button on the multifunction steering
whee lorp ull away.
or
X To par kusing Active Parking Assist:
press the abutton on the multifunction
steeri ngwheel.
The Park Assist active Accelerate and brake Observe surroundings mes-
sage appears in the multifunction display. G
WARNING
When parking, you need to make sure that no
obstacles are located in the vicinit yofthe
vehicle during the entire operation .Active
Parkin gAssist does not reliev eyou of the
responsibilit yofpaying attention. It merely
aids you by intervenin gactivel yinthe steer-
ing.
To stop the vehicle or avoid an accident you
need to apply the brakes yourself.
X Let go of the multifunction steerin gwheel.
X Reverse the vehicle, being ready to brake
at all times. When reversi ng,don ot exceed
as peed of approximately 10 km/h; other-
wise Active Parking Assist will be deactiva-
ted.
i In tight parking spaces, you will achieve
the best parking result sbybackingupas
far as possible .When doing so, also
observe the PARKTRONIC messages.
X Stop as soon as PARKTRONIC sound sthe
continuous warnin gtone, if not before.
Manoeuvring ma yberequired in tight park-
ing spaces.
The Park Assist active Select D Observe surroundings message appear
sin
the multifunction display. 196
Drivin
gsystemsDrivin gand parking
Page 218 of 389
R
the Off-roa dprogra misa ctivate d(vehicles
without th eON&OFFROAD package).
R Off-road progra m1or2isactivated(vehi-
cle sw ith the ON&OFFROAD package).
R the LOW RANGE off-road gear is activated
(vehicles with the ON&OFFROAD package).
R al oss of tyr epressure or adefectiv etyre is
detected.
Activating Active Blind Spot Assist
X On vehicles without anavigation system,
make sure that the Becker ®
MAP PILOT is
connected; see the separate operating
instructions for Audio 20.
X Make sure that the radar senso rsystem
(Y page 249) and Active Blind Spot Assist
(Y page 245) are activated in the on-board
computer.
X Turn the key to position 2in the ignition
lock.
Warning lamps :ligh tupr ed in the exte-
rior mirror sfor approximately 1. 5seconds
and then tur nyellow.
Trailer towing
If you attach atrailer, make sure that yo uhave
correctly established the electrical connec-
tion. This can be accomplished by checking
the trailer lighting .Active Blind Spo tAssist is
then deactivated. The indicator lam plights up
yellow in the exterior mirrors and the ActiveBlind Spot Assist currently unavail‐
able Se
eOwner's Manual message
appe arsint he multifunction display.
Active Lan eKeeping Assist Import
ants afety notes
Active Lane Keeping Assis tmonitors the area
in front of your vehicle by means of acamera
at the top of the windscreen. Active Lane
Keeping Assis tdetect slane markings on the
road and warns you before you leave your
lane unintentionally .Ifyou do not react to the
warning, alane-correcting application of the
brakes can bring the vehicle back into the
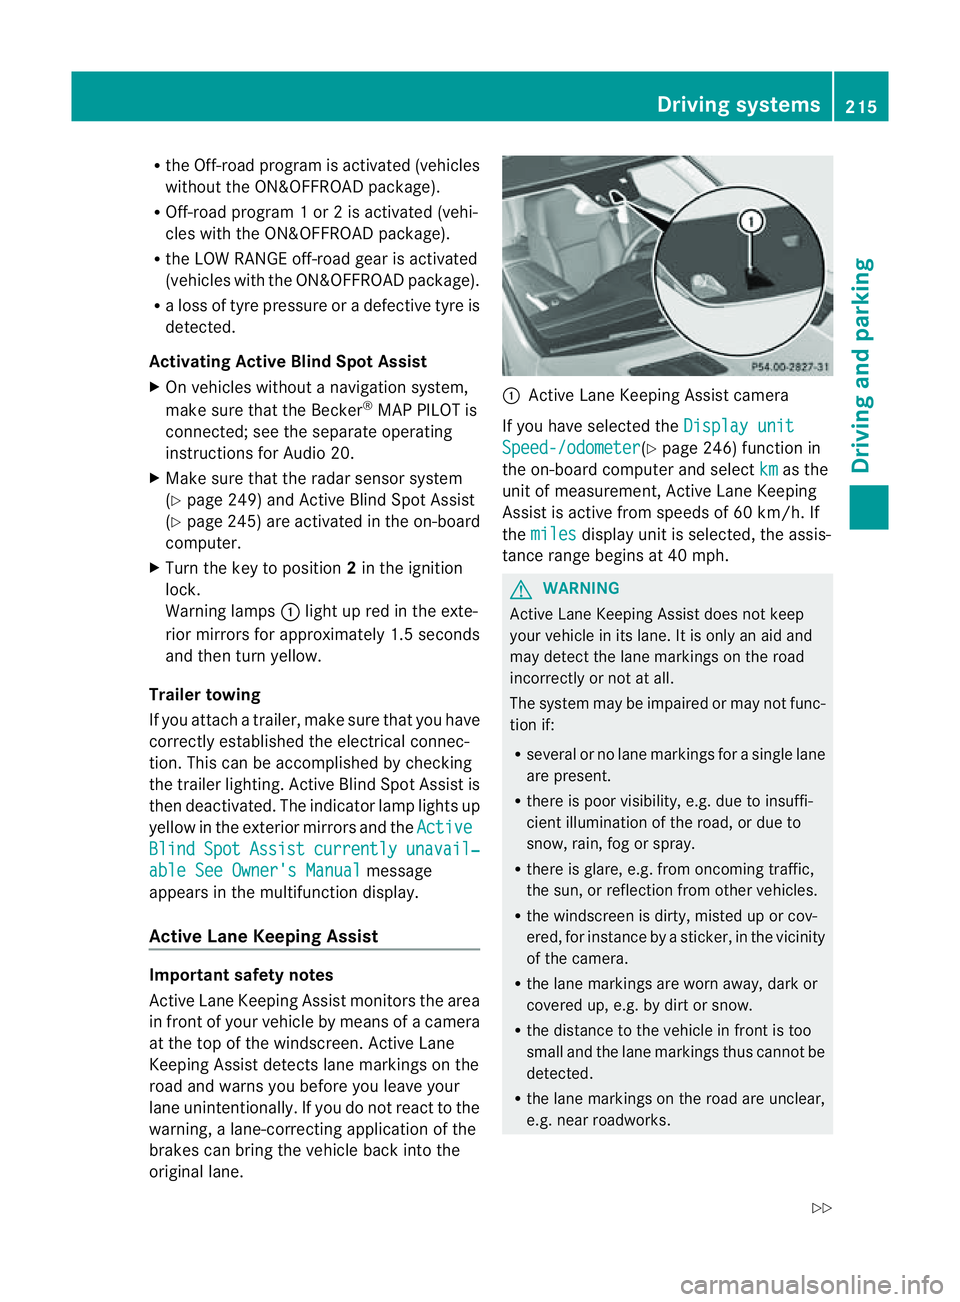
original lane. :
Active Lane Keeping Assis tcamera
If you have selected the Displayunit Speed-/odometer (Y
page 246) function in
th eo n-board compute rand select km as the
unit of measurement, Active Lane Keeping
Assist is active from speeds of 60 km/h. If
the miles display unit is selected
,the assis-
tan ce ra nge begins at 40 mph. G
WARNING
Active Lane Keeping Assist doe snot keep
your vehicle in its lane. It is only an aid and
may detec tthe lan emarkings on the road
incorrectly or not at all.
The system may be impaired or may not func-
tion if:
R several or no lane markings for asingle lane
are present.
R there is poor visibility, e.g. due to insuffi-
cient illumination of the road, or due to
snow, rain, fog or spray.
R there is glare, e.g. from oncoming traffic,
the sun, or reflec tion from other vehicles.
R the windscreen is dirty, misted up or cov-
ered, for insta ncebyasticker, in the vicinity
of the camera.
R the lane markings are worn away ,dark or
covered up, e.g. by dirt or snow.
R the distance to the vehicle in front is too
small and the lane markings thus cannot be
detected.
R the lane markings on the road are unclear,
e.g. near roadworks. Driving systems
215Drivingand park ing
Z
Page 223 of 389
R
Hig hway level is set.
R ADS (Adaptive Damping System) adjusts
the comfort damping characteristics to
the current operating and driving condi-
tions.
R The automatic transmission selects the
automatic drive progra mforac omforta-
ble and efficien tdriving style ,and the
shift points are optimally adjusted.
R The differential lock is engaged when
pulling away. Off-road driving systems
4MATIC (permanent all-wheel drive)
4MATIC ensures that all four wheels are per-
manently driven. Togethe rwith ESP ®
and
4ETS, it improves the trac tion of your vehicle
whenever adrive whee lspins due to insuffi-
cient grip. G
WARNING
4MATI Ccannot reduce the risk of an accident
if you drive too fast.
If ad rive whee lspins due to insufficien tgrip:
R onl ydepress the accelerator peda lasfar as
necessary when pulling away.
R accelerate less when driving.
R adapt you rdriving style to su itroa dand
traffic conditions.
! Never tow the vehicle with one axle
raised. Thi smay damage the transfer case.
Damage of this sort is not covered by the
Mercedes-Benz implied warranty. All
wheels must remain either on the ground
or be fully raised. Observe the instructions
for towing the vehicle with all wheels in full
contact with the ground.
i In wintry driving conditions, the maximum
effect of 4MATIC can only be achieved if
you use winter tyres (M+S tyres), with snow
chains if necessary. !
Functio norperformanc etests ma yonly
be performed on a2-axle dynamometer. If
you wis htooperatethe vehicle on such a
dynamometer, pleas econsult aMercedes-
Benz Service Centr ebeforehand. You could
otherwise damage th edrive train or the
bra kesystem.
Fo rinformation abou tdriving off-roa d, see
( Y page 166). DSR (Downhill Speed Regulation)
Important safety notes DSR assists you when driv
ingd ownhill .It
keeps the spee doftravel at th espeed set on
the on-board comp uter. Th esteeper the
downhil lgradient ,the greate rthe DS Rbrak-
ing effect on th evehicle. When driving on flat
stretches of road or on an uphill gradient, the
DSR braking effect is minima lornon-existent. G
WARNING
DSR is only an aid designe dtoassist you when
driving downhill. You ar eresponsible for keep-
ing control of the vehicle and for assessing
whether the downhill gradien tcan be man-
aged.
When activating DSR the vehicle may brake
suddenly due to DSR intervening. This is
dependent on the downhill gradient and the
difference between the current spee dand the
speed set. DSR may not always be able to
keep to the set speed, depending on road sur-
face and tyre conditions .You coul dlose con-
trol of the vehicle and cause an accident.
Selec taset speed suitable for the prevailing
conditions and when necessary, apply the
brakes manually.
DSR con trols the set speed when it is active
and the automatic transmission is in the D,
R or Nposition. By accelerating or braking,
you can always drive at ahigher or alower
speed than that set on the on-boar dcom-
puter. 220
Off-road driving systemsDriving and parking
Page 224 of 389
G
WARNING
If you depress the accelerato rpeda lwith DSR
activated, then the set spee dcan be excee-
ded. Drive downhill with special care and
alway skeep in min dthat DSR brakes the vehi-
cle as soon as you remove your foot from the
accelerator pedal. The vehicle may brake sud-
denly due to DSR intervening, depending on
the downhill gradient and the difference
between the current speed and the set speed.
You could lose control of the vehicle and
cause an accident.
For information about driving off-road, see
(Y page 166).
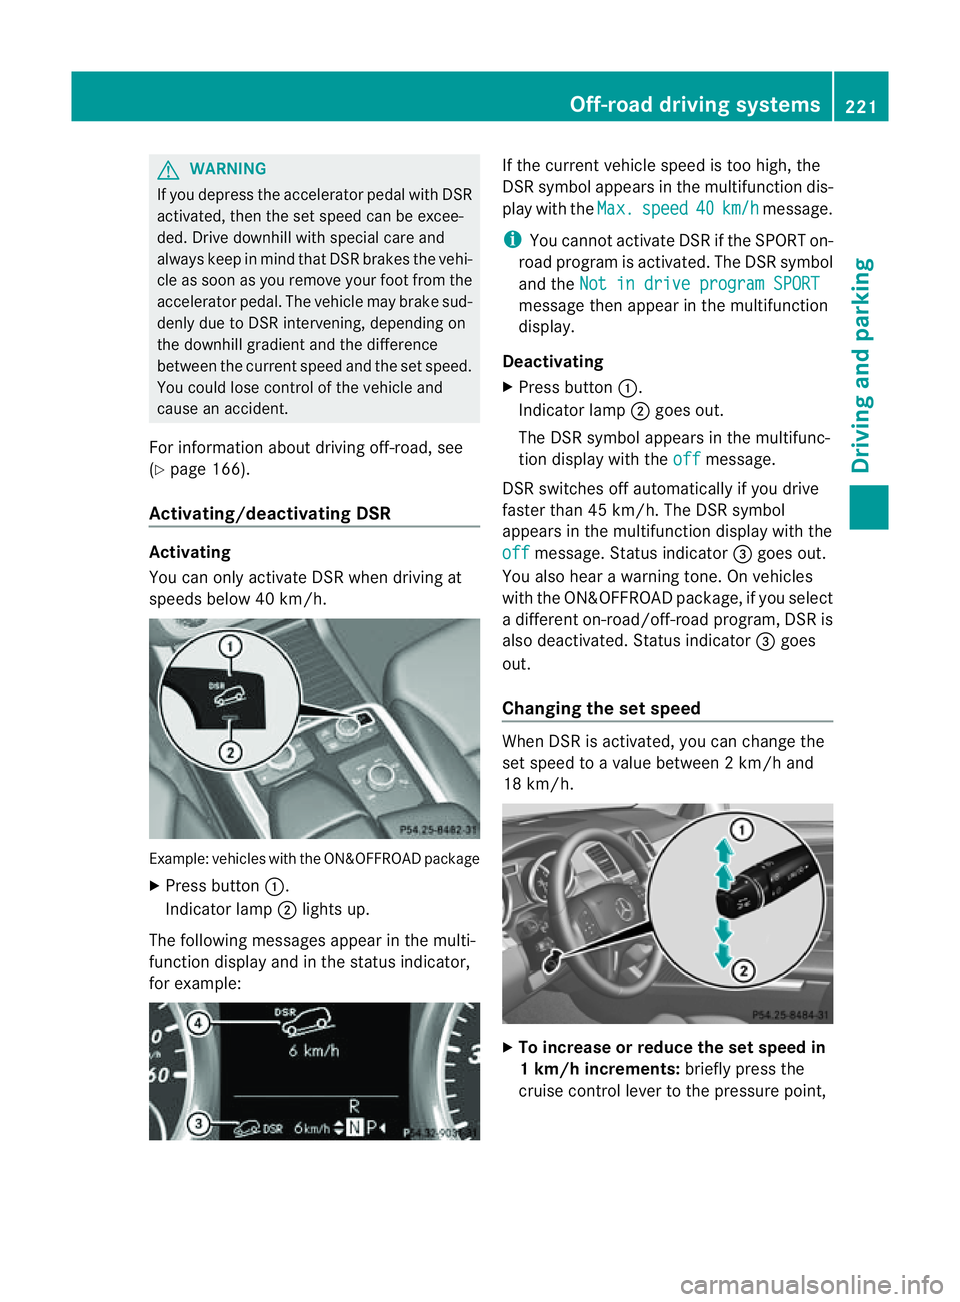
Activating/deactivating DSR Activating
You can only activate DSR when driving at
speeds below 40 km/h. Example: vehicles with the ON&OFFROAD package
X Press button :.
Indicator lamp ;lights up.
The following messages appear in the multi-
func tion display and in the status indicator,
for example: If the curren
tvehicle speed is too high, the
DSR symbol appear sint he multifunc tion dis-
play with the Max. speed 40 km/h message.
i You can notactivate DSR if the SPORT on-
road program is activated. Th eDSR symbol
and the Not in drive progra mSPORT message then appear in th
emultifunction
display.
Deactivating
X Press button :.
Indicator lamp ;goes out.
The DSR symbol appears in the multifunc-
tion display with the off message.
DSR switches off automatically if you drive
faster than 45 km/h. The DSR symbol
appears in the multifunction display with the
off message. Status indicator
=goes out.
You also hear awarning tone. On vehicles
with the ON&OFFROAD package, if you select
ad ifferent on-road/off- road program, DSR is
also deactivated. Status indicator =goes
out.
Changing the set speed When DSR is activated, you can change the
set spee dtoavalue between 2km/h and
18 km/h. X
To in crease or reduce the set speed in
1k m/h increments: briefly press the
cruise control lever to the pressure point, Off-road drivin
gsystems
221Drivingand park ing Z
Page 229 of 389
R
cond ition of the LOW RAN GEoff-r oad
gear
R the on-roa dtraile rprogram is selected Tow
inga trailer Note
sont owingatrailer
Important safety notes G
WARNING
When reversing the vehicl etowards the
trailer, make sure there is nobod ybetween
the trailer and the vehicle.
Couple and uncoupl ethe trailer carefully .If
you do not couple the trailer to the towing
vehicle correctly, the trailer coul dbecome
detached.
Make sure that the following values are not
exceeded:
R the permissible trailer drawbar noseweight
R the permissible trailer load
R the permissible rear axle load of the towing
vehicle
R the maximu mpermissible gross vehicle
weight of both the towing vehicle and the
trailer
You will fin dthe applicable permissible val-
ues, whic hmust not be exceeded ,inthe vehi-
cle documen ts.
You will find the values approved by the man-
ufacturer on the vehicle identification plates
and those for the towing vehicle in the "Tech-
nical data" section. G
WARNING
If the Checktrailer hitch locking mechanism message appears in th
emulti-
function display while the vehicle is in motion,
pull over immediately and check whethe rthe
ball coupling is correctly engaged. G
WARNING
When towin gatrailer, you rvehicle' shandling
characteristics will be different in comparison
to when driving without atrailer.
Th ev ehicle/ trailer combination:
R is heavier
R is restricted in its acceleration and gradi-
ent-climbin gcapability
R has an increased braking distance
R is affected more by stron gcrosswinds
R demand smore sensitive steering
R has alarger turnin gcircle
As aresult, the handlin gcharacteristic smay
be impaired and you may lose control of the
vehicle. This could lead to an accident with
serious or even fatal injuries.
When towing atrailer, alway sadjust your
speed to the current road and weather con-
ditions. Do not exceed the maximum permis-
sible speed for your vehicle/trailer combina-
tion. G
WARNING
Never depress the brak epedal continuously
while the vehicle is in motion ,e.g. never cause
the brakes to rub by applying cons tant slight
pedal pressure. Thi scauses the brake system
to overheat, increases the braking distance
and can lead to the brakes failing completely. G
WARNING
On no account shoul dyou attempt to dra wthe
vehicle/ trailer combination out by increasing
speed. G
WARNING
If you exceed the maximum noseweight when
using acarrier system on the ball coupling:
R the carrier system may be thrown around.
R the ball coupling and the carrier system
may become detached from the vehicle.
As aresult, you may injure others or cause an
accident. 226
Towing
atrailerDriving and parking
Page 230 of 389
Do not exceed the maximum noseweight.
When driving with aloaded carriersystem,
always adjust your drivin gstyle to th eprevail-
ing road, traffic and weather conditions and
drive par ticularly carefully.
You can use carrier sys tems, e.g. bi cycle
racks or load-bea ringimplements on th eball
coupling. The maximum noseweight of 75 kg
applies when usin gcarrier system sontheball
coupling.
General information i
Chec kthe tyr epressure when towin ga
trailer. You will find the values in the tyre
pressure table in the fuel filler flap of the
vehicle (Y page 359).
You will find installation dimensions and loads
in the "Technical data" section
(Y page 378).
The maximum noseweight of the trailer draw-
bar on the ball coupling is 18
.H owever, the
actual noseweight must not exceed the value
given on the trailer tow hitc hortrailer identi-
ficatio nplates. The lowest weight applies.
! Use anoseweight as close as possible to
the maximum permissible noseweight .Do
not use anoseweight of less than 50 kg,
otherwise the trailer ma ycome loose.
Bear in min dthat the payload and the rear
axl eload ar ereduced by the actual nose-
weight.
Please note that when towing atrailer, PARK-
TRONIC (Y page 191) and Blind Spo tAssist
(Y page 208) ar eonly available with limita-
tions ,orn ot at all.
i On vehicles withou tlevel control, the
height of the ball couplin gwill alter accord-
ing to the load placed on the vehicle. If nec-
essary, use atrailer wit haheight-adjusta-
ble drawbar. Driving tips i
Observ ethe information on ESP ®
trailer
stabilisation (Y page 65)and on pull ing
away with atrailer. (Y page 141).
Vehicles wit hthe ON&OFFROAD package:
selec tthe trailer program (Y page 219) with
the off-road program selector wheel in the
cen treconsole.
Th em aximum permissible spee dfor vehicle/
trailer combination sdepends on the type of
trailer .Befor ebeginning the journey, check
the trailer's documents to see what the max-
imu mpermitted speed is. Observ ethe legally
prescribed maximum speed in the relevant
country.
For certai nMercedes-Ben zvehicles, the max-
imu mp ermissible rear axle load is inc reased
when towing atrailer. Refer to th e"Techni cal
data" section to fin dout whether this applies
to your vehicle. If you utilise any of the added
maximum rear axle load when towing atrailer,
th ev ehicle/trailer combination may not
exceed amaximum spee dof100 km/ hfor
reasons concer ning the operating permit.
Thi salso applies in countries in which the
permissible maximum speed for vehicle/
trailer combinations is above 100 km/h.
When towing atrailer, your vehicle's handling
characteristics will be differe ntin comparison
to when drivin gwithout atrailer and it will
consume more fuel.
On long and stee pdownhil lgradients ,you
must select shift range 1,2or 3in good time.
i This also applies if you have activated
cruise con trol, SPEEDTRONIC or DI S-
TRONIC PLUS.
This will use the brakin geffect of th eengine,
so les sbraking wil lberequired to maintain
the speed. This relieves the load on the brake
system and prevent sthe brakes from over-
heating and wearing too quickly .Ifyou need
additional braking, depress the brake pedal
repeatedly rather than con tinuously.
18 Data unavailable at time of going to print. Towing
atrailer
227Driving andparki ng Z
Page 327 of 389
You can obtain fur
ther information about
BlueTE Cexhaus tgas aftertreatmen tand
AdBlue ®
from any Mercedes-Benz Service
Centre. Care
Note
sonc are
Regular care of your vehicle is aconditio nfor
retaining th equalit yint he long term.
Us ec arep roducts and cleani ngagent srec-
ommended and approved by Mercedes-Benz.
! For cleanin gyour vehicle ,donot useany
of the following:
R dry ,rough or hard cloths
R abrasive cleanin gagents
R solvents
R cleanin gagents con taining solvents
Do not scrub.
Do not touch the surfaces or protective
film swith hard objects, e.g. aring or ice
scraper .You coul dotherwis escratch or
damag ethe surfaces and protective film. H
Environmenta
lnote
Dispose of empty packaging and cleaning
cloths in an environmentally responsible man-
ner.
! Do not park up the vehicle for an extended
period straight after cleaning it, particular ly
after having cleaned the wheels with wheel
cleaner. Whee lcleaners could cause
increased corrosion of the brake discs and
brake pads/linings. For this reason, you
should drive for afew minutes after clean-
ing. Brakin gheats the brak ediscs and the
brake pads/linings, thus drying them. The
vehicle can then be parked up. Care of the exterior
Automatic car wash G
WARNING
Braking efficiency is reduced after washing
the vehicle. This could cause an accident. For
this reason, following acar wash, drive with
particular care until the brakes are dry.
You can wash the vehicle in an automatic car
wash from the very start.
If the vehicle is very dirty, pre-wash it before
cleaning it in an automatic car wash.
! In car washe swithatowing mechanism,
make sure that the automatic transmission
is in transmission position N,otherwis ethe
vehicle could be damaged.
R Vehicles with akey:
do not remove the key from the ignition
lock. Do not open the driver' sdoor or
front-passenger door when the engin eis
switched off .Otherwise, the automatic
transmission selects park position P
automaticall yand locks the wheels .You
can prevent this by shifting the auto-
matic transmission to Nbeforehand.
R Vehicles with KEYLE SS-GO:
do not ope nthe driver's door or front-
passenger door when the engin eis
switched off .Otherwise, the automatic
transmission selects park position P
automaticall yand locks the wheels.
Observe the following to make sure that the
automati ctransmission stays in position N:
X Make sure th evehicle is stationary and the
ignition is switched off.
X Turn the key to position 2(Y page 139) in
the ignition lock.
Use the key instead of the Start/Stop but-
ton on vehicles with KEYLE SS-GO.
X Depres sand hol dthe brake pedal.
X Shif tthe automatic transmission to posi-
tion N.
X Release the brake pedal. 324
CareMaintenance and care