brake MERCEDES-BENZ METRIS 2016 MY16 Operator’s Manual
[x] Cancel search | Manufacturer: MERCEDES-BENZ, Model Year: 2016, Model line: METRIS, Model: MERCEDES-BENZ METRIS 2016Pages: 310, PDF Size: 7.28 MB
Page 280 of 310
Tire pressure tables
Vehicle swithag ross vehicle weight of 6,724 lb s(3.05 t)
!The pressure differenc ebetween tire sonany one axl emustbenog reaterthan1 0kPa (0.1 ba r/
1.5 psi).
The following tire pressure values apply to vehicles with:
Rag ross vehicle weight of 6,724 lbs (3.05 t)
Ragross axle weight rating of 3,418 lbs(1,550 kg)on the rear axle and
Rthe tires referredtounder"Wheel and tire combinations" (Ypag e291).
Always observe the notes unde r"Information on tire pressures "(
Ypage270).
The tire pressure for the spare wheelis 340 kPa (3.4 bar/49 psi).
Partiallyladen vehicleFully laden vehicle
Tire sizeFron taxleRear axleFron taxleRear axle
225/55 R17RF270 kPa
(2.7 bar/ 39 psi)270 kPa
(2.7 bar/ 39 psi)300 kPa
(3.0 bar/ 44 psi)310 kPa
(3.1 bar/45 psi)
Loading the vehicle
Instruction labels for tires and loads
GWARNING
Overloaded tires can overheat, causing a
blowout. Overloaded tires can also impair the steering and driving characteristics and lead
to brake failure. There is arisk of accident.
Observe the loa drating of the tires. The load
rating must be at least hal fofthe GAWR of
you rvehicle. Never overload the tires by
exceeding the maximu mload.
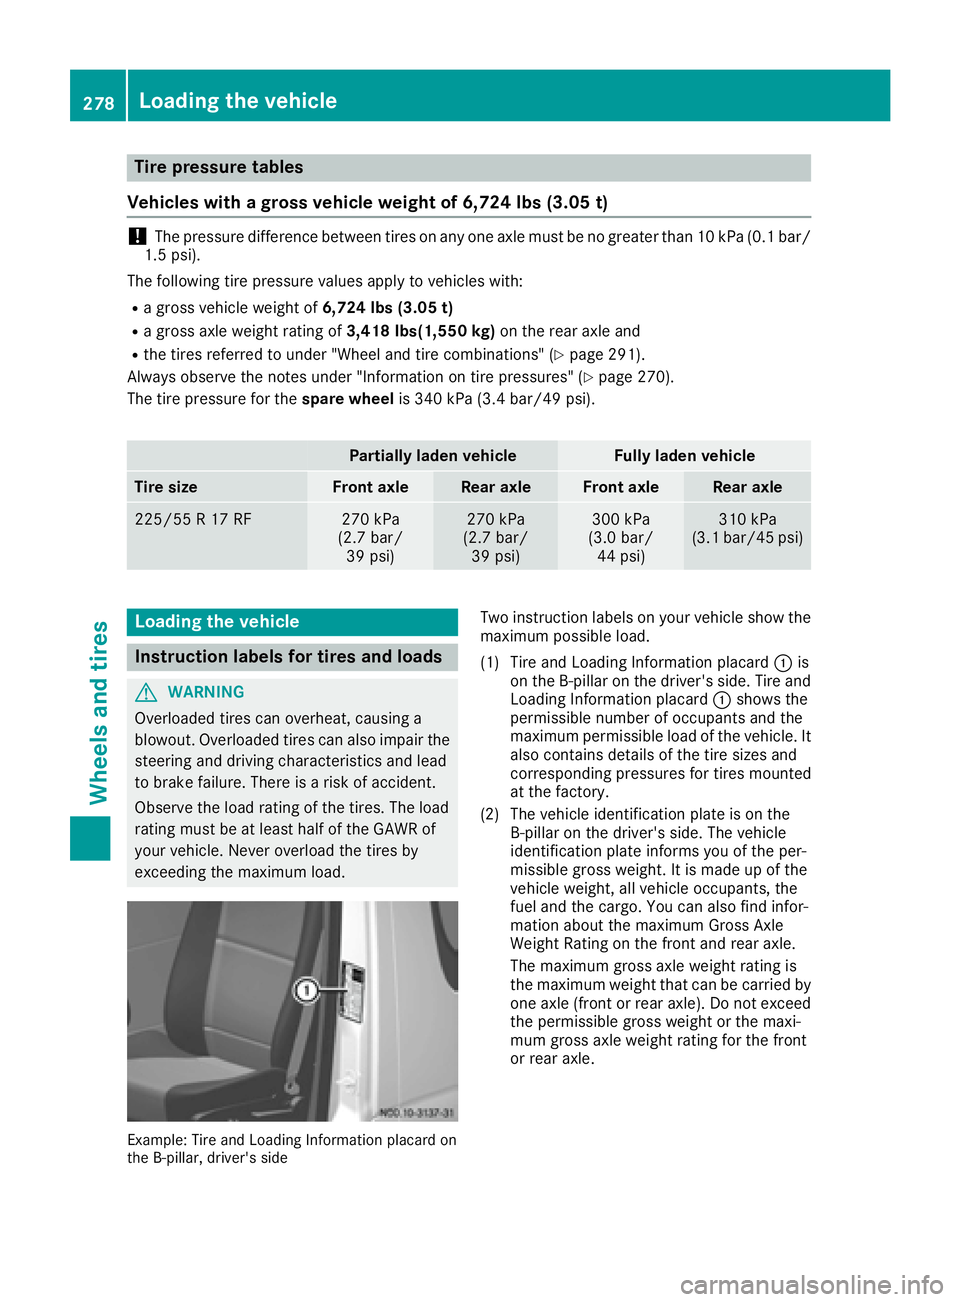
Example: Tire and Loading Information placard on
the B-pillar, driver's side
Two instructio nlab elsony ourvehicle show the
maximu mpossibl eload.
(1) Tire and Loading Information placard :is
on the B-pillar on the driver's side .Tire and
Loading Information placard :showst he
permissible numbe rofoccupants and the
maximu mpermissible loa dofthe vehicle. It
also contains details of the tire sizes and
corresponding pressures for tires mounted
at the factory.
(2) The vehicle identification plate is on the B-pillar on the driver's side .The vehicle
identification plate informs you of the per-
missible gross weight. It is made up of the
vehicle weight, al lvehicle occupants, the
fuel and the cargo .You can also find infor-
matio nabout the maximu mGrossAxle
Weight Rating on the front and rear axle.
The maximu mgross axle weight rating is
the maximu mweight that can be carrie dby
one axle (front or rear axle). Do not exceed the permissible gross weight or the maxi-
mum gross axle weight rating for the front
or rear axle.
278Loading the vehicle
Wheels and tires
Page 287 of 310
GVW (Gross VehicleWeight)
The gross vehicle weight includes the weight of
the vehicle including fuel ,tools, spare wheel,
accessories installed, occupants, luggage and
the drawbar noseweight if applicable. The gross
vehicle weight must never exceed the permissi-
ble gross weight (GVWR) specified on the
B-pilla ronthe driver's side (
Ypage 294).
GVWR (Gross Vehicl eWeight Rating)
The GVWR is the maximu mpermitted gross
weight of the full yladen vehicle (weight of the
vehicle including all accessories, occupants,
fuel ,luggage and the drawbar noseweight if
applicable).T he permissibleg ross weight is
specified on the vehicle identification plate on
the B-pilla ronthe driver's side (
Ypage 294).
Maximum weight of the laden vehicle
The maximu mweight is the sum of:
Rthe curb weight of the vehicle
Rthe weight of the accessories
Rthe loadl imit
Rthe weight of the factory installed optional
equipment
Kilopascal (kPa)
Metric unit for tire pressure. 6.9 kPa are the
equivalent of 1psi.A nother tire pressure unit is
bar. 100 kilopascals (kPa) are the equivalent of
1b ar.
Load index
In addition to the loadb earing index,aload
index can be stamped onto the sidewal lofthe
tire. It specifies the load-bearing capacity of the
tire more precisely.
Curb weight
The weight of avehicle with standard equipment
including the maximu mfilling capacity of fuel,
oil, and coolant. It also includes the air-condi-
tioning system and optional equipment if these
are installed on the vehicle ,but does not include
passengers or luggage.
Maximum tire load
The maximu mtire loadink ilograms or pounds is
the maximu mweight for which atire is
approved.
Maximum permissiblet ire pressure
Maximumpermissiblet ire pressure for one tire.
Maximum load on one tire
Maximumloadono ne tire. This is calculated by
dividing
the maximu maxle loadofo ne axle by
two.
PSI (Pounds per square inch)
Standard unit of measurement for tire pressure.
Aspec tratio
Relationshi pbetwee ntire heighta nd width in
percent.
Tire pressure
Pressure inside the tire applying an outward
force to every square inch of the tire's surface.
Tire pressure is specified in pounds per square
inch (psi), in kilopascal (kPa) or in bar. Tire pres-
sure shoul donly be corrected when the tires are
cold.
Col dtire pressure
The tires are cold:
Rif the vehicle has been parked for at least
three hours withou tdirect sunlight on the
tires, and
Rif the vehicle has not been driven further than
1m ile (1.6 km)
Tire tread
The part of the tire that comes into contact with
the road.
Tire bead
The tire beade nsures that the tire sits securely
on the wheel. There are severals teel wiresinthe
beadtop revent the tire from coming loose from
the whee lrim.
Sidewall
The part of the tire betwee nthe tread and the
tire bead.
Weight of optional extras
The combined weight of those optional extras
that weigh more than the replaced standard
parts and more than 2.3 kg (5 lbs). These
optional extras, such as high-performance
brakes, aroof rack or ahigh-performance bat-
tery, are not included in the curb weight and the weight of the accessories.
What you shouldk now about wheels and tires285
Wheelsand tires
Z
Page 288 of 310
TIN (Tire IdentificationNumber)
Auniqu eide ntificatio nnumbe rwhich can be
used by atire manufacturer to identify tires, for
exampl efor ap roduct recall ,and thusi dentify
the purchasers. The TIN is compose dofthe
manufacturer identificatio ncode, tire size, tire
model cod eand manufacturing date.
Load bearin gind ex
The load bearing index (als oloa dindex) is acode
thatc ontains the maximu mloadb eari ng capa-
city of atire.
Traction
Tractio nist he resul toffrictio nbetween the tires
and the roa dsurface.
TWR (permissibl etrailer drawbar load)
The TWRist he maximumpermissibl eweigh t
thatm ayact on the ball coupling of the trailer
tow hitch.
Wea rind icator
Narrowb ars( tread wear bars) thata redistrib-
ute doverthe tire tread. If the tire trea dislevel
with the bars, the wear limit of áin (1.6 mm)
hasb eenr eached.
Distribution of the vehicle occupants
The distributio nofvehicleoccupants ove rdes-
ignate dseatp osit ions in avehicle.
Maximum permissible payload weight
Nomina lloa da nd goods/luggage load plus
68 kg (150 lb s)multiplie dbythe number of
seats in the vehicle.
Changing wheels
Rotating the wheels
GWARNING
Interchanging the front and rear wheels may
severelyi mpair the driving characteristics if
the wheels or tires have different dimensions. The whee lbrakes or suspension components
may als obedamaged. There is arisk of acci-
dent.
Rotate front and rear wheels only if the wheels and tires are of the same dimensions.
!On vehicles equippedw ithatire pressure
monitor, electronic components are located
in the wheel.
Tire-mounting tools should not be used near
the valve .This could damage the electronic
components.
Only have tires changed at aqualified spe-
cialist workshop.
Always observe the instructions and safety
notes under "Mounting awheel" (
Ypage 287).
The wea rpatterns on the front and rear tires
differ, depending on the operating conditions.
Rotate the wheels before aclear wea rpattern
has formed on the tires. Front tires typically
wea rmore on the shoulders and the rear tires in
the center.
If you rvehicle's tire configuration allows, you
can rotate the wheels according to the intervals
in the tire manufacturer's warranty book in your
vehicled ocuments. If no warranty book is avail-
able, the tires should be rotated every 3,000 to
6,000 mile s(5,000 to 10,000 km) or earlier if
tire wea rrequires. Do not change the direction
of rotation.
Clean the contact surfaces of the whee land the
brake disc thoroughly every time awheelisr ota-
ted. Avoid oily or greas ycleaning agents.
Check the tire pressure and reactivate the tire
pressure monitor if necessary.
Directio nofrotation
Tires with aspecified directio nofrotation have
additional benefits, e.g. if there is arisk of hydro-
planing. You wil lonly gai nthese benefits if the
correct directio nofrotation is observed.
An arrow on the sidewal lofthe tire indicates its
correct directio nofrotation.
You may mount aspare whee lagainst the direc-
tion of rotation. Observe the time restriction on
use as wel lasthe speed limitation specified on
the spare wheel.
Storing wheels
Store wheels that are not being used in acool,
dry and preferably dark place. Protect the tires
from contact with oil, greas eand fuel.
286Changing wheels
Wheel sand tires
Page 289 of 310
Mountingawheel
Vehicle preparation
XStop the vehicleasf ar awayaspossible from
traffic and on alevel, firm and non-slip sur-
face.
XIf you rvehicl eposesar isk to approaching
traffic, switch on the hazar dwarning lamps.
XApply the parking brake.
XTurn the front wheels to the straight-ahead
position.
XShift the transmission to position P.
XSwitch off the engine.
XPassengers should leave the vehicle. Make
sure that the passengers are not endangered
as they do so.
XMake sure that no one is near the dange rarea
while the whee lisbeing changed .Anyone
who is not directly assisting in the wheel
change should, for example, stand behind the
barrier.
XPlace the warning triangl eorwarning lamp at
as uitable distance.
Observe the lega lrequirements on the cor-
rect use of the warning triangl eorwarning
lamp for the country in which you are cur-
rently driving
XSecure the vehicletop revent it from rolling
away.
Observe the safety notes on parking under
"Driving and parking" (
Ypag e132)
XOn level terrain: place chocks or other suit-
abl eo bjects under the front and rear of the
whee lthat is diagonally opposite the whee lto
be changed.
XOn slight inclines: place chocks or other
suitable objects under the wheels on the front and rear axle sopposite the whee ltobe
changed.
XIf included in the vehiclee quipment, take the
tire-changing tool kit out of the vehiclet ool kit
(
Ypag e260).
Apart from some country-specific variants,
vehicles are not equipped with tire-changing
tools. Some tools for changing awhee lare
specific to the vehicle. Consult aqualified
specialist worksho pfor more information on
which tools are required to perform awheel
change on you rv
ehi cle.
XIf included in the vehiclee quipment, remove
the spare whee lfrom the spare whee lbracket (
Ypag
e292) .Observe the safety notes listed
under "Spare wheel" (Ypag e291).
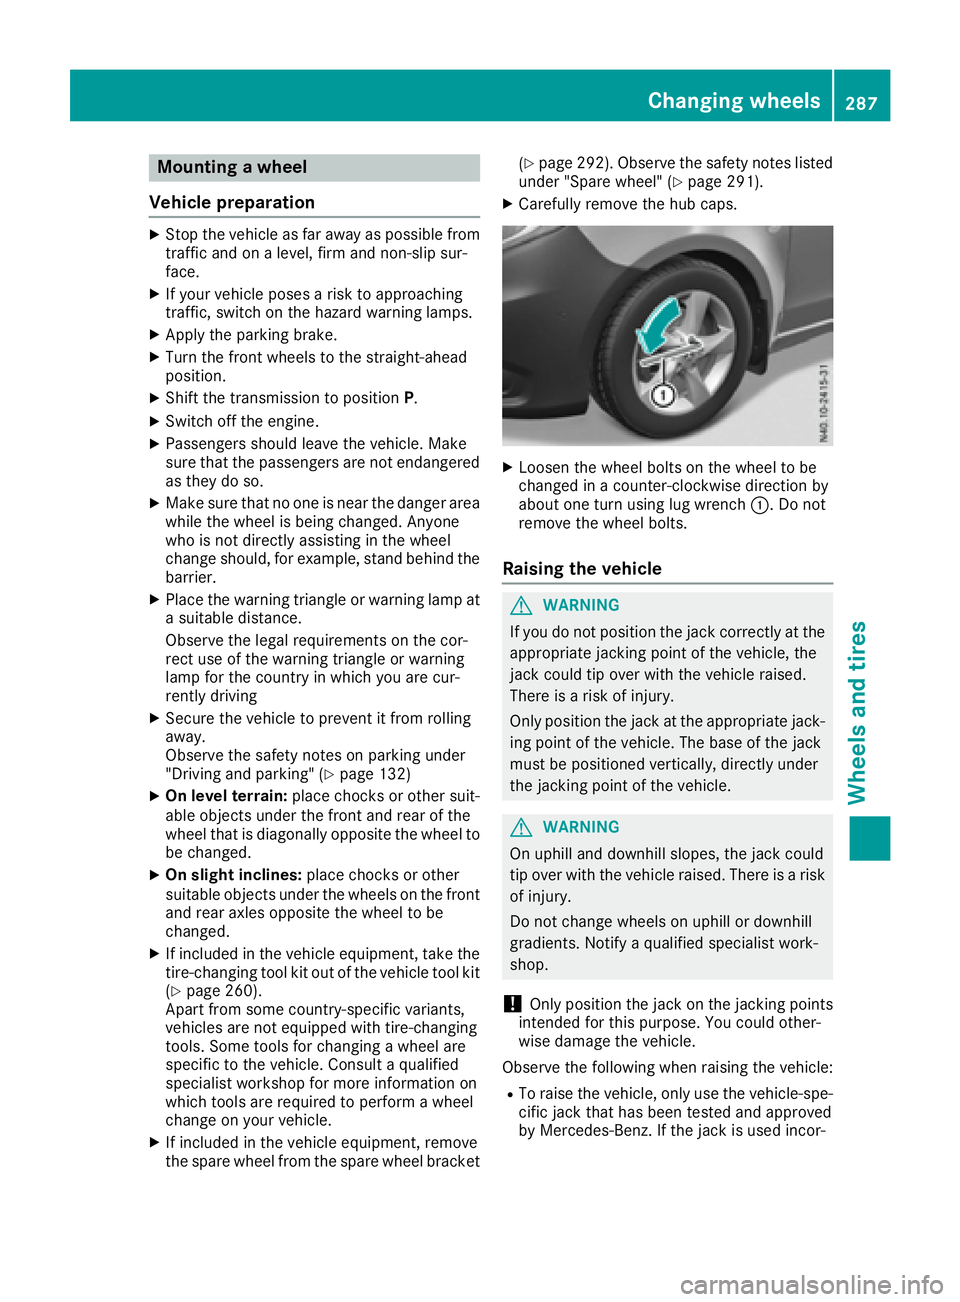
XCarefully remove the hub caps.
XLoosen the whee lbolts on the whee ltobe
changed in acounter-clockwise direction by
about one turn using lug wrench :.Donot
remove the whee lbolts.
Raisingt he vehicle
GWARNING
If you do not position the jack correctly at the
appropriate jacking point of the vehicle, the
jack coul dtip over with the vehicler aised.
There is arisk of injury.
Only position the jack at the appropriate jack-
ing point of the vehicle. The bas eofthe jack
must be positioned vertically,d irectly under
the jacking point of the vehicle.
GWARNING
On uphill and downhill slopes, the jack could
tip over with the vehicler aised. There isarisk
of injury.
Do not change wheels on uphill or downhill
gradients. Notify aqualified specialist work-
shop.
!Only position the jack on the jacking points
intended for this purpose. You coul dother-
wis edamage the vehicle.
Observe the following when raising the vehicle:
RTo rais ethe vehicle, only use the vehicle-spe-
cific jack that has been tested and approved
by Mercedes-Benz. If the jack is use dincor-
Changing wheels287
Wheels and tires
Z
Page 290 of 310
rectly, it could tip over while the vehicleis
raised.
RThe vehicle's jack is intended only to rais ethe
vehicl efor as hort time when changing a
wheel. It is not suited for performing mainte-
nance work under the vehicle.
RAvoid changing the whee lonuphill and down-
hill slopes.
RBefore raising the vehicle, secure it from roll-
ing awa ybyapplying the parking brake and
inserting whee lchocks. Never disengage the
parking brake while the vehicl eisraised.
RThe jack must be placed on afirm, flat and
non-slip surface. On aloose surface, alarge,
load-bearing underlay must be used .Ona
slippery surface, anon-slip underlay must be
used ,e.g. rubber mats.
RMake sure that the distance between the
underside of the tires and the ground does not
exceed 1.2 in(3 cm).
RNever place you rhands or feet under the
raised vehicle.
RNever lie under the raised vehicle.
RNever start the engine when the vehicl eis
raised.
RNever open or close adoor or the tailgate/
rear door when the vehicl eisraised.
RMake sure that no persons are present in the
vehicl ewhen the vehicl eisraised.
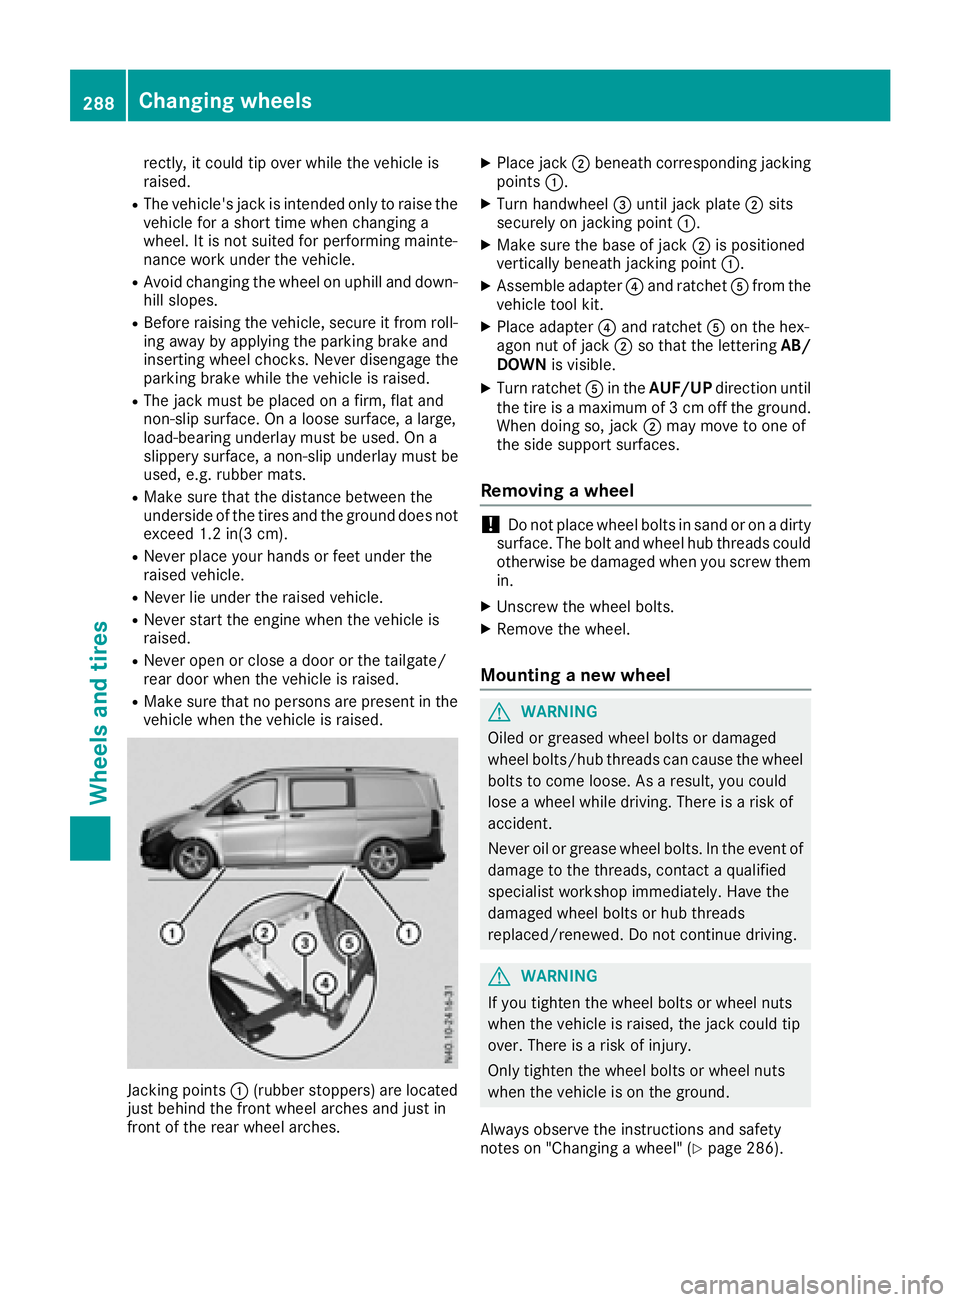
Jacking points :(rubber stoppers)a re located
just behind the front whee larches and just in
front of the rear whee larches.
XPlace jack ;beneath corresponding jacking
points :.
XTurn handwheel =until jack plate ;sits
securely on jacking point :.
XMake sure the base of jack ;is positioned
vertically beneath jacking point :.
XAssembleadapter?and ratchet Afrom the
vehicl etool kit.
XPlace adapter ?and ratchet Aon the hex-
agon nut of jack ;so that the lettering AB/
DOWN is visible.
XTurn ratchet Ain the AUF/UP directionuntil
the tire is amaximu mof3cm off the ground.
When doing so, jack ;may move to one of
the side support surfaces.
Removin gawheel
!Do not place whee lbolts in sand or on adirty
surface. The bolt and whee lhub threads could
otherwise be damaged when you screw them
in.
XUnscrew the whee lbolts.
XRemove the wheel.
Mountin ganew wheel
GWARNING
Oile dorg reased whee lbolts or damaged
whee lbolts/hu bthreads can caus ethe wheel
bolts to come loose .Asaresult, you could
lose awhee lwhile driving. There is arisk of
accident.
Never oil or greas ewhee lbolts. In the event of
damage to the threads ,contact aqualified
specialist workshop immediately. Have the
damaged whee lbolts or hub threads
replaced/renewed. Do not continue driving.
GWARNING
If you tighten the whee lbolts or whee lnuts
when the vehicl eisraised, the jack could tip
over. There is arisk of injury.
Only tighten the whee lbolts or whee lnuts
when the vehicl eisonthe ground.
Always observe the instructions and safety
notes on "Changing awheel" (
Ypag e286).
288Changing wheels
Wheels and tires
Page 297 of 310
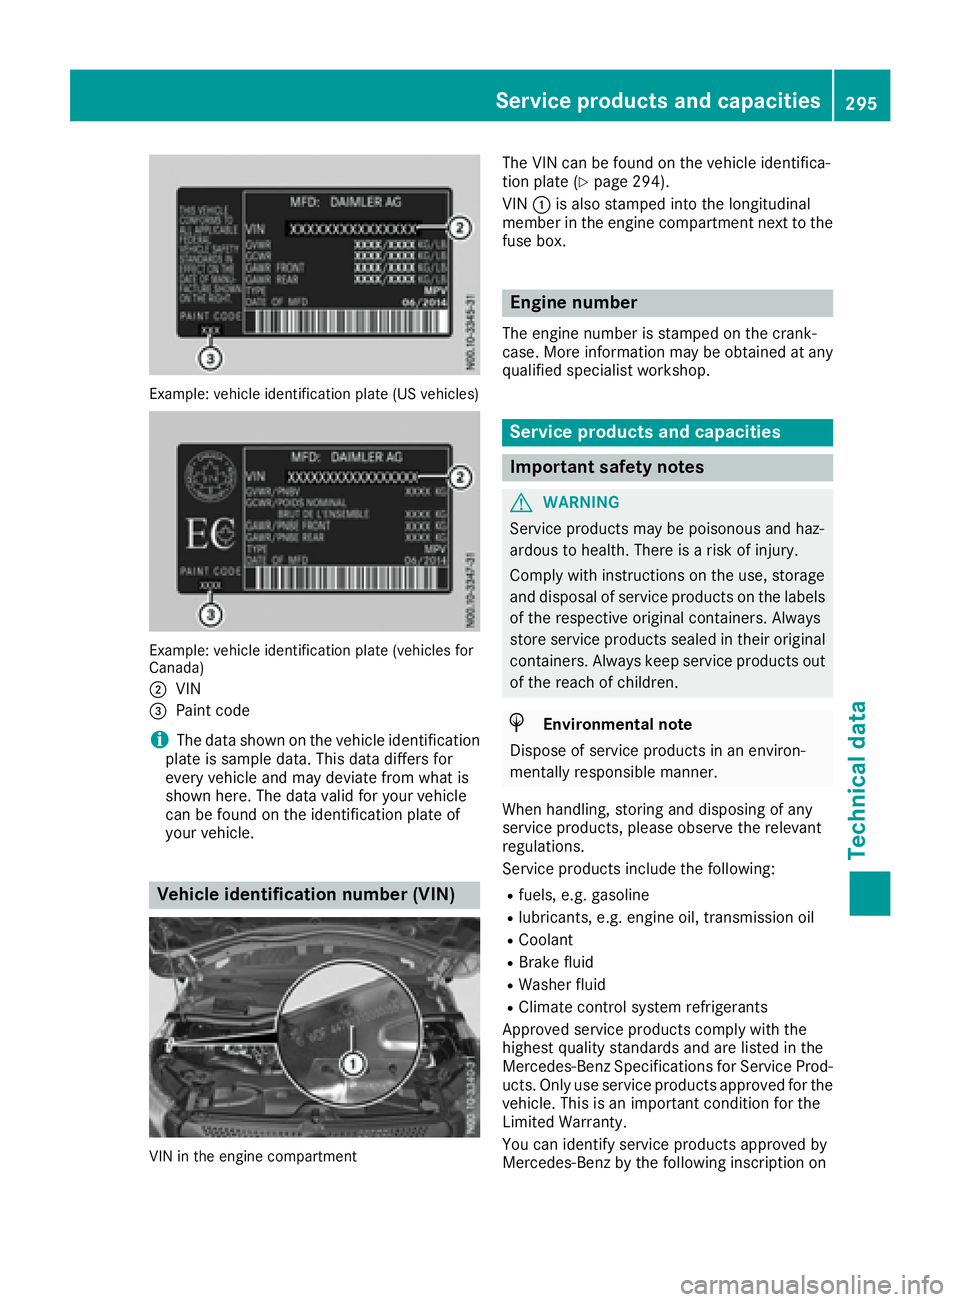
Example: vehicleide ntification plate (US vehicles)
Example: vehicl eide ntification plate (vehicle sfor
Canada)
;
VIN
=Paint code
iThe data shown on the vehicl eide ntification
plate is sampl edata. Thi sdatad iffers for
every vehicl eand mayd eviate from what is
shown here. The data vali dfor your vehicle
can be found on the identificatio nplate of
your vehicle.
Vehicl eidentificatio nnumber (VIN)
VIN in the engine compartment
The VIN can be found on the vehicl eide ntifica-
tio np late (Ypage 294).
VIN :is also stampe dinto the longitudinal
membe rinthe engine compartment next to the
fuse box.
Engine number
The engine numbe risstampe donthe crank-
case. Mor einformatio nmaybe obtained at any
qualified specialist workshop.
Service products and capacities
Important safety notes
GWARNING
Service products maybep oisonousand haz-
ardous to health .There is ariskofi njury.
Compl ywithi nstructions on the use, storage
and disposalofs erviceproducts on the labels
of the respective original containers. Always
stor eservic eproducts seale dintheiroriginal
containers. Alway skeeps ervic eproducts out
of the reach of children.
HEnvironmental note
Dispose of servic eproducts in an environ-
mentall yresponsibl emanner.
Whe nhandling ,storing and disposing of any
servic eproducts, please observe the relevant
regulations.
Service products includ ethe following:
Rfuels, e.g .gasoline
Rlubricants ,e.g.e ngine oil, transmission oil
RCoolant
RBrake fluid
RWashe rfluid
RClimate contro lsystem refrigerants
Approve dservic eproducts comply with the
highest quality standards and ar elisted in the
Mercedes-Benz Specifications for Service Prod-
ucts .Onlyu seservic eproducts approved for the
vehicle. Thi sisanimportant condition for the
Limite dWarranty.
Yo uc an identify servic eproducts approved by
Mercedes-Benz by the following inscription on
Servic eproducts and capacities295
Technica ldata
Z
Page 302 of 310
Rear axle
Serviceproduct: transmission oil
Product name/numberMaintenance
interval
Mobilub eFE 75-W-85
Mobilube FE Plus NG
MB Shee tNo. 235.7—
Further information can be obtained at any
qualified specialist workshop.
Brake fluid
GWARNING
The brake fluid constantly absorbsm oisture
from the air. Thi slowers the boiling point of
the brake fluid .Ifthe boiling point of the brake
fluid is too low, vapor pockets may form in the
brake system when the brakes are applied
hard. Thi swould impai rbraking efficiency.
There is ariskofana ccident.
Yo us houl dhavet he brake fluid renewe dat
the specified intervals.
!Brake fluid corrodes paint, plastic and rub-
ber .Ifp aint, plastic or rubber hasc ome into
contact with brake fluid ,rins ew ithw ater
immediately.
Whe nhandling, storing and disposing of brake
fluid ,pleas eobserve the relevant regulations
and the important safety notes for service prod-
ucts (
Ypage 295).
Overap eriodoft ime,the brake fluid absorbs
moistur efrom the air. Thi sreduce sits boiling
point.
Have the brake fluid renewe devery 2years at a
qualified specialist workshop.
iThere is usuall yanotice in the engine com-
partment to remind yo uwhent he next brake
fluid change is due.
Use only approved brake fluid sthat comply with
the Mercedes-Benz Specifications for Service
Products. Alway scheck for the identification
DOT 4plus.
Information abouta pproved brake fluid scan be
obtained:
Rat any qualified specialist workshop
Ron the Interne tat
http://bevo.merced es-benz.com.
Coolant
Important safety notes
GWARNING
If antifreezec omes intocontac twithh ot com-
ponents in th eenginec ompartment, it may
ignite .Thereisar iskoff irea nd injury.
Let th eenginec ooldown before you add anti-
freeze. Makes ure that antifreezeisn otspilled
next to th efille rneck. Thoroughlyc lean the
antifreezef romc omponents before starting
th ee ngine.
!Takec aren otto spill any coolant on painted
surfaces .You coul dotherwise damag ethe
paintwork.
When handling, storin gand disposingofc oolant
and antifreeze, please observ ethe relevan treg-
ulationsa nd theimportant safety note sfor ser-
vic ep roduct s(
Ypage 295).
Coolan tadditive with corrosion and
antifreeze protection
!Use only approved antifreeze/corrosion
inhibitor that complies withMBS pecification
300Service products and capacities
Technical data
for Service Products, Sheet Number 325.
Using other, non-approved antifreeze/corro-
sion inhibitors may causedamage to the cool-
ant system and reduce the engine' sservice
life