warning lights MERCEDES-BENZ METRIS 2016 MY16 Operator’s Manual
[x] Cancel search | Manufacturer: MERCEDES-BENZ, Model Year: 2016, Model line: METRIS, Model: MERCEDES-BENZ METRIS 2016Pages: 310, PDF Size: 7.28 MB
Page 96 of 310
Switching on the standing lamps:
XTurn the key to position0(Ypage 120) in the
ignition lock or remove the key.
XRight-hand standing lamp: turn the light
switch to position X.
XLeft-hand standing lamp: turn the light
switch to position W.
Combination switch
Turns ignal lamps
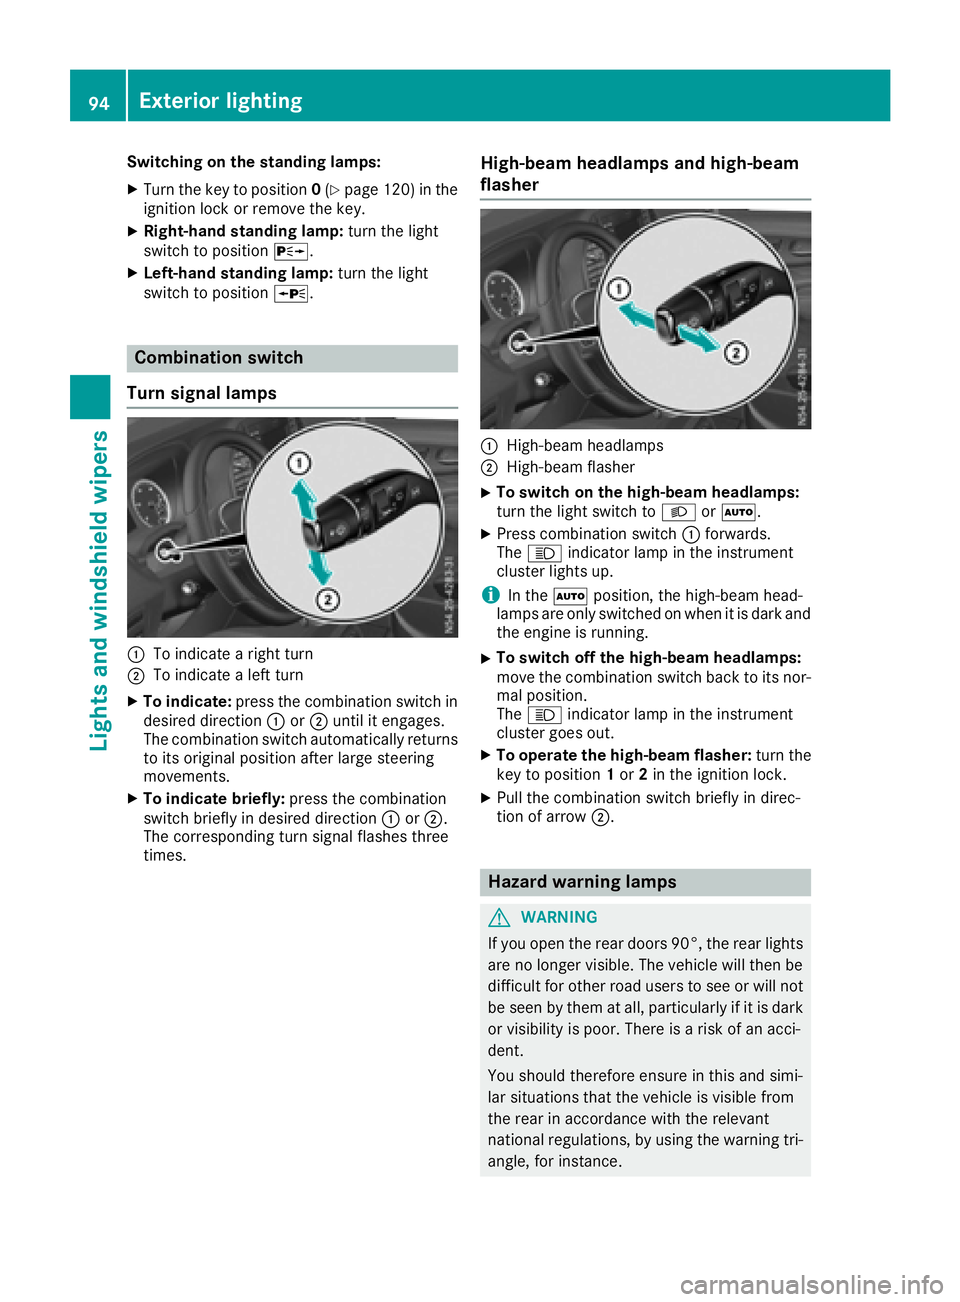
:To indicate aright turn
;To indicate aleft turn
XTo indicate: press the combination switch in
desired direction :or; until it engages.
The combination switch automatically returns
to its original position after large steering
movements.
XTo indicate briefly: press the combination
switch briefly in desired direction :or;.
The correspondingt urn signal flashes three
times.
High-beam headlamps and high-beam
flasher
:High-beam headlamps
;High-beam flasher
XTo switch on the high-beam headlamps:
turn the light switch to LorÃ.
XPress combination switch :forwards.
The K indicator lamp in the instrument
cluster lights up.
iIn the Ãposition, the high-beam head-
lamps are only switched on when it is dark and
the engine is running.
XTo switch off the high-beam headlamps:
move the combination switch back to its nor-
mal position.
The K indicator lamp in the instrument
cluster goes out.
XTo operate the high-beam flasher: turn the
key to position 1or 2in the ignition lock.
XPull the combination switch briefly in direc-
tion of arrow ;.
Hazard warning lamps
GWARNING
If you open the rear doors 90°, the rear lights are no longer visible. The vehicle will then be
difficult for other road users to see or will not
be seen by them at all, particularly if it is dark
or visibility is poor. There is arisk of an acci-
dent.
You should therefore ensure in this and simi-
lar situations that the vehicle is visible from
the rear in accordance with the relevant
national regulations, by using the warning tri-
angle, for instance.
94Exterior lighting
Lights and windshield wipers
Page 97 of 310
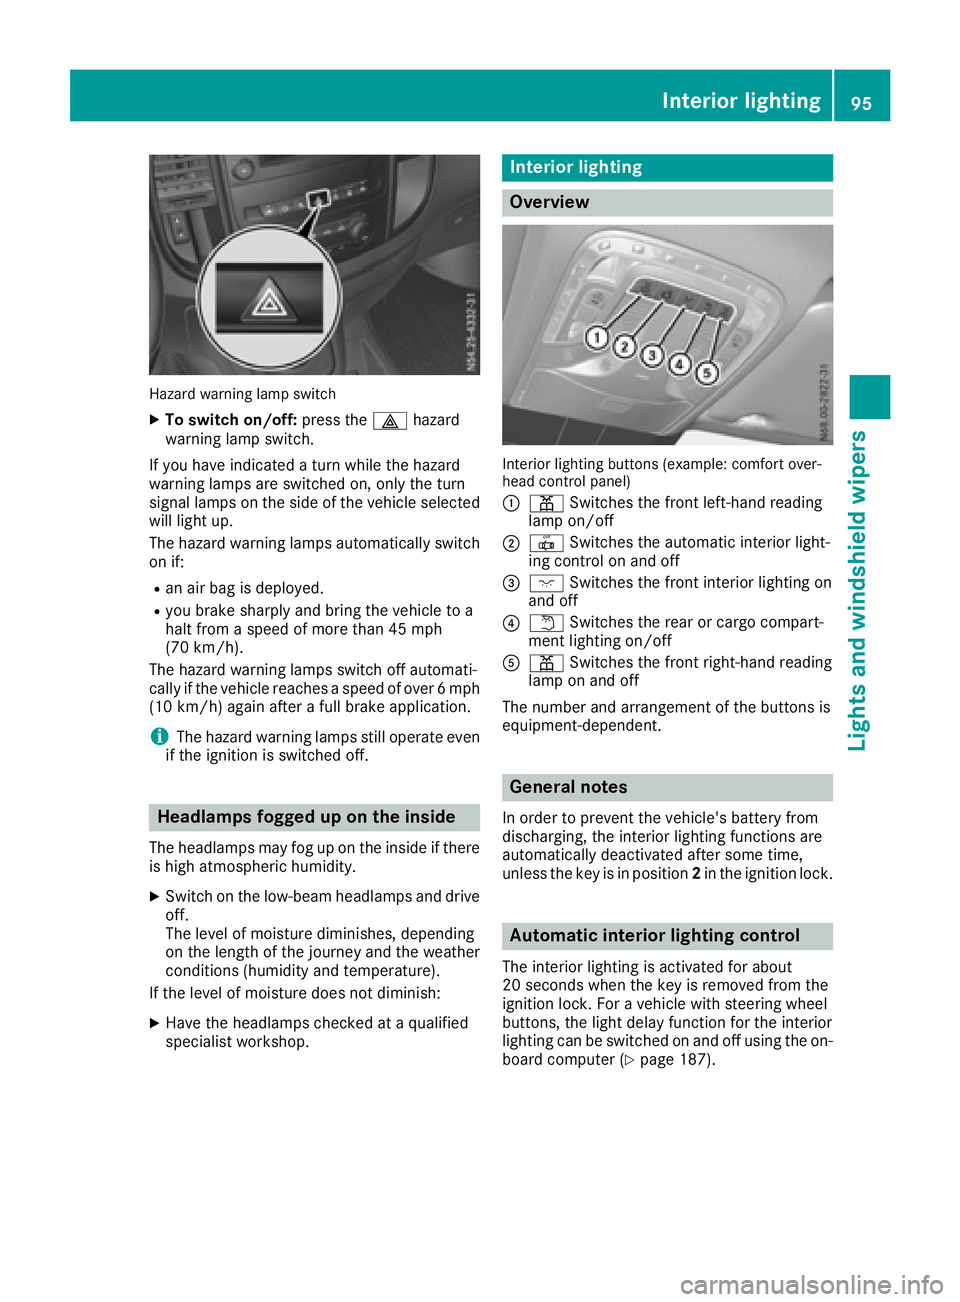
Hazard warning lamp switch
XTo switch on/off:pressthe £ hazard
warning lamp switch.
If yo uhave indicated aturn while the hazard
warning lamps are switched on, only the turn
signal lamps on the sid eofthe vehicle selected
will light up.
The hazard warning lamps automatically switch
on if:
Ran ai rbag is deployed.
Ryoub rake sharpl yand bring the vehicle to a
hal tfrom aspeed of more than 45 mph
(70 km/h).
The hazard warning lamps switch off automati-
cally if the vehicle reaches aspeed of over 6mph
(10 km/h )again after afullb rake application.
iThe hazard warning lamps stil loperate even
if the ignition is switched off.
Headlamps foggedupo nthe inside
The headlamps may fog up on the inside if there
is hig hatmospheric humidity.
XSwitch on the low-beamh eadlamps and drive
off.
The leve lofmoisture diminishes, depending
on the length of the journe yand the weather
conditions (humidity and temperature).
If the leve lofmoisture doesn ot diminish:
XHave the headlamps checked at aqualified
specialist workshop.
Interio rlighting
Overview
Interio rlighting buttons (example: comfort over-
hea dcontrol panel)
:
p Switche sthe front left-hand reading
lamp on/off
;| Switche sthe automati cinterior light-
ing control on and off
=c Switche sthe front interior lighting on
and off
?w Switche sthe rearorc argo compart-
ment lighting on/off
Ap Switche sthe front right-hand reading
lamp on and off
The number and arrangement of the buttons is
equipment-dependent.
General notes
In ordertop revent the vehicle' sbattery from
discharging, the interior lighting functions are
automatically deactivate dafter some time,
unless the key is in position 2in the ignition lock.
Automatic interior lighting control
The interior lighting is activated for about
20 secondsw hent he key is remove dfromt he
ignition lock. For avehicl ewiths teering wheel
buttons, the light dela yfun ctio nfor the interior
lighting can be switched on and off using the on-
boar dcompute r(
Ypage 187).
Interior lighting95
Lights and windshield wiper s
Z
Page 100 of 310
Signal and ambient light in the tail-
gate
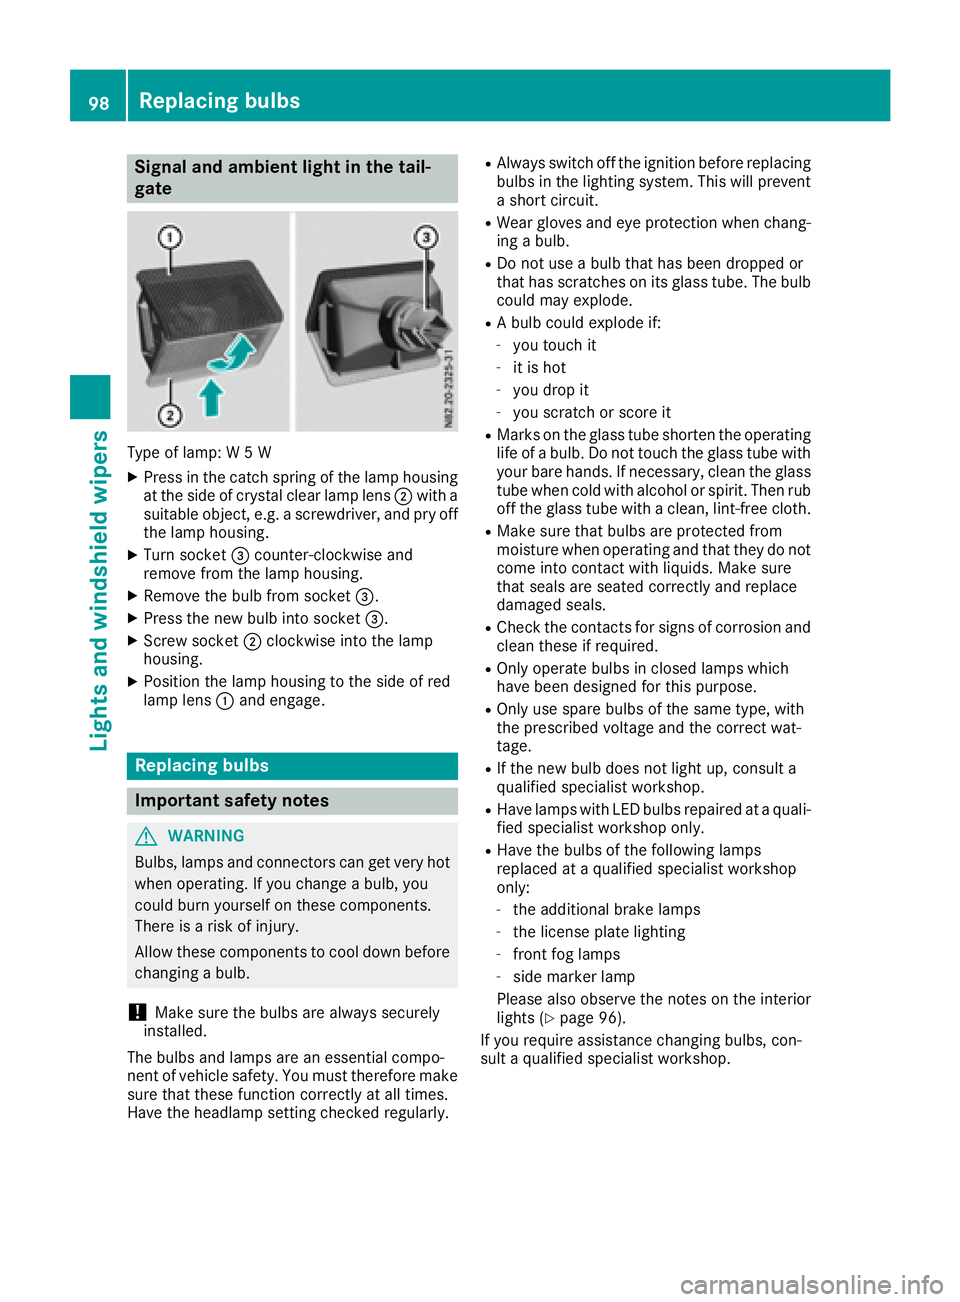
Type of lamp:W5W
XPress in the catch spring of the lamp housing
at the side of crystal clear lamp lens ;with a
suitable object ,e.g. ascrewdriver, and pry off
the lamp housing.
XTurn socket =counter-clockwise and
remove from the lamp housing.
XRemove the bulb from socket =.
XPress the new bulb into socket =.
XScrew socket;clockwise into the lamp
housing.
XPosition the lamp housing to the side of red
lamp lens :and engage.
Replacing bulbs
Important safety notes
GWARNING
Bulbs, lamps and connectors can get very hot
when operating. If you change abulb, you
could burn yourself on these components.
There is arisk of injury.
Allow these components to cool down before
changing abulb.
!Make sure the bulbs are always securely
installed.
The bulbs and lamps are an essential compo-
nent of vehicle safety. You must therefore make
sure that these function correctly at all times.
Have the headlamp settingc hecked regularly.
RAlways switch off the ignition before replacing
bulbs in the lighting system. This will prevent
as hort circuit.
RWear gloves and eye protection when chang-
ing abulb.
RDo not use abulb that has been dropped or
that has scratches on its glass tube. The bulb
could may explode.
RAb ulb could explode if:
-you touch it
-it is hot
-you drop it
-you scratchors core it
RMarks on the glass tube shorten the operating
life ofabulb. Do not touch the glass tube with
your bare hands. If necessary, clean the glass
tube when cold with alcohol or spirit. Then rub
off the glass tube with aclean, lint-free cloth.
RMake sure that bulbs are protected from
moisture when operating and that they do not
come into contact with liquids. Make sure
that seals are seated correctly and replace
damaged seals.
RCheck the contacts for signs of corrosion and
clean these if required.
ROnly operate bulbs in closed lamps which
have been designed for this purpose.
ROnly use spare bulbs of the same type, with
the prescribed voltage and the correct wat-
tage.
RIf the new bulb does not light up, consult a
qualified specialist workshop.
RHave lamps with LED bulbs repaired at aquali-
fied specialist workshop only.
RHave the bulbs of the following lamps
replaced at aqualified specialist workshop
only:
-the additional brake lamps
-the license plate lighting
-front fog lamps
-side marker lamp
Please also observe the notes on the interior
lights (
Ypage 96).
If you require assistance changing bulbs, con-
sult aqualified specialist workshop.
98Replacing bulbs
Lights and windshieldw ipers
Page 105 of 310
stop automatically.The rear window wiper will
only resume wiping againw hen the tailgate and
rear door are closed and you pull awaya gain.
The rear window will no longer be wiped properly
if the wiper blade is worn. This may prevent you
from observing the traffic conditions. Informa-
tion on replacing the wiper blade can be found
under "Replacing wiper blades" (
Ypage 103).
Replacing the wiper blades
Important safety notes
GWARNING
If the windshieldw ipers begin to move while
you are changing the wiper blades, you could be trapped by the wiper arm. There is arisk of
injury.
Always switch off the windshieldw ipers and
ignition before changing the wiper blades.
!Never open the hood/tailgate or rear doors
if aw indshieldw iper arm has been folded
awayf rom the windshield/rear window.
Never fold awindshieldw iper arm without a
wiper blade back onto the windshield/rear
window.
Hold the windshieldw iper arm firmly when
you change the wiper blade.Ify ou release the
windshieldw iper arm without awiper blade
and it falls onto the windshield/rear window,
the windshield/rear window may be damaged
by the force of the impact.
Mercedes-Benz recommends that you have
the wiper bladesc hanged ataqualified spe-
cialist workshop.
!Only hold the wiper blade by the wiper arm.
You could otherwise damage the wiper rub-
ber.
Wiper bladesa re wear parts. The windshieldw ill
no longer be wiped properly if the wiper blades
are worn. This may prevent you from observing
the traffic conditions.
Please observe the service indicator after
changing the wiper bladesoft he windshield
wiper.
Service indicator
Replacement wiper bladesf or the windshield
wiper have aservice indicator on the tip of the
wiper blade.
Depending on the amount of use, the service
indicator will change color from black to yellow.
Change the wiper blade if:
Rthe wiper blade is damaged
Rthe service indicator has turned yellow
In order to activate the service indicator, you
have to remove the protective film
(
Ypage 103).
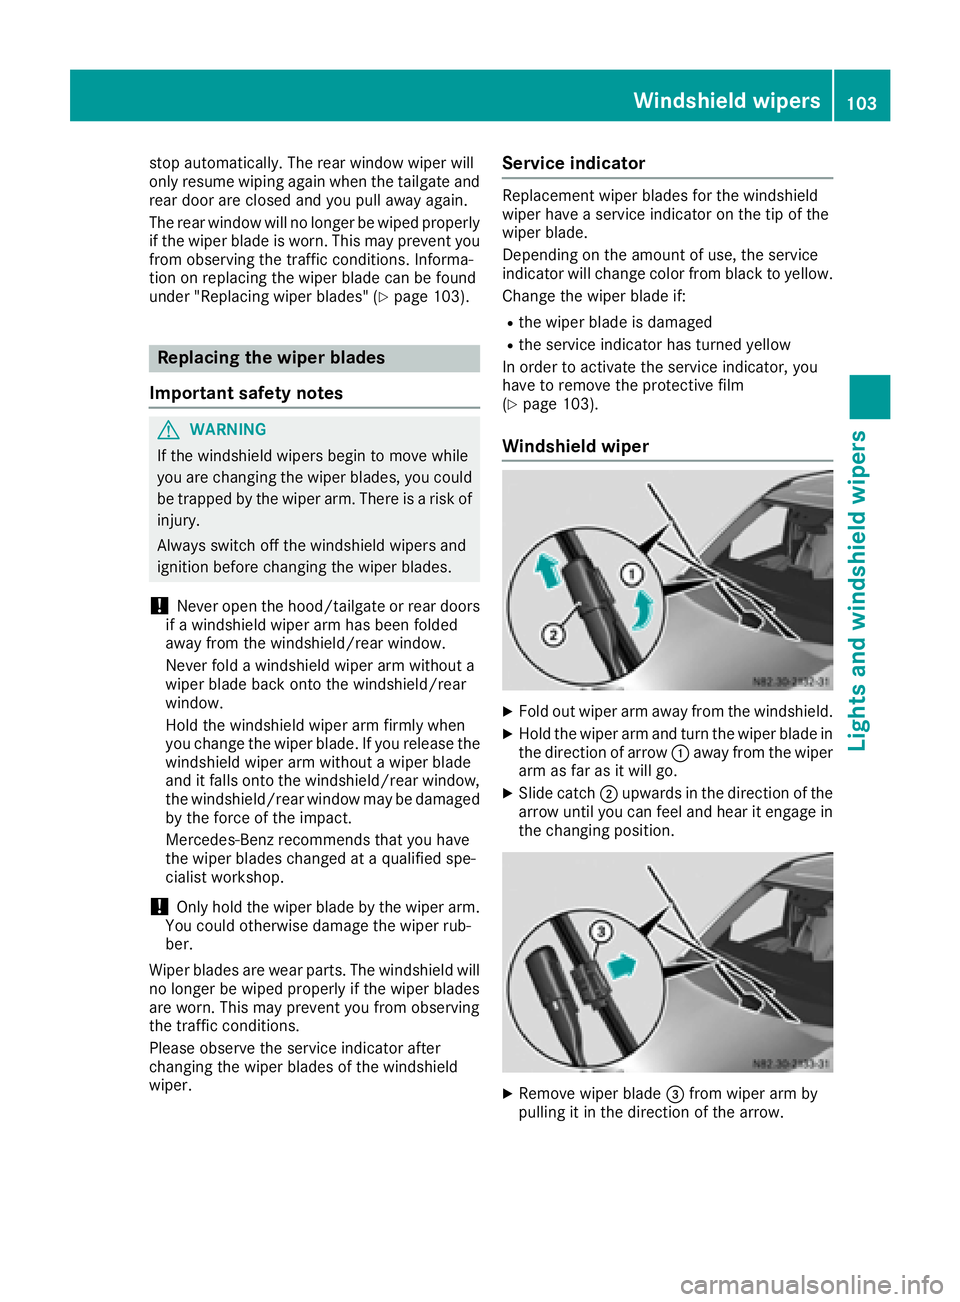
Windshield wiper
XFold out wiper arm awayf rom the windshield.
XHold the wiper arm and turn the wiper blade in
the direction of arrow:awayf rom the wiper
arm as far as it will go.
XSlide catch ;upwards in the direction of the
arrow until you can feel and hear it engage in
the changing position.
XRemove wiper blade =from wiper arm by
pulling it in the direction of the arrow.
Windshield wipers103
Lights and windshield wipers
Z
Page 118 of 310
TEMPMATIC air-conditioning system or
dual-zone automatic climate control
XSwitch on climate control(Ypage 110).
XPress thehbutton.
If the indicator lamp in the hbutton lights
up ,air-recirculation mod eisactivated.
Air-recirculation mod eswitches on automati-
cally:
Rat high outside temperatures
Rwhil edrivin ginat unnel(on ly vehicles with a
navigation system).
The indicator lamp in the hbutton is thenn ot
li tu p.Outside ai risadded automaticall yafter
abou t30m inutes.
Air-recirculation mod eisdeactivated automati-
cally:
Rafter approximately 5minute satoutside tem-
peratures belo wabout 45‡(7† )
Rafter approximately 5minute sw hen the cool-
ing with air dehumidification function is deac-
tivated
Rafter approximately 30 minutes at outside
temperatures above about 45 ‡(7†)and
when the cooling with air dehumidification
function is active.
Convenienceo pening/pre-entryc li-
matec ontrol
GWARNING
During convenience opening, body parts
could be drawn in or become trapped
between the side window and the door frame.
There is arisk of injury.
Monitor the entire opening procedure when
using convenience opening. When opening,
make sure that nobody touches the side win- dow. Release the %switch immediately if
somebody becomes trapped, to interrupt the
opening procedure.
XPre-entry climate control and conveni-
ence opening with the key: press and hold
the % button on the key.
The side windows open automatically and the
blower of the climate control system is acti-
vated.
XRelease the %button.
iAt high interior temperatures, the blower is
also switched on when adoor is opened. This
means that slightly cooled air enters the vehi-
cle interior after the engine is started, to cool
the vehicle more rapidly.
Switching the residual heat function
on/off
General notes
Only vehicles with automatic climate control
have the residual heat function.
Once the engine is switched off, it is possible to
make use of the residual heat of the engine to
continue heating or ventilating the front com-
partment of the vehicle for approximately
30 minutes. The heating or ventilation time
depends on the set interior temperature.
Switching the function on/off
XTurn the key to position 0in the ignition lock
or remove it.
XPress the Ìbutton.
If the residual heat function is activated, the
indicator lamp in the Ìbutton comes on.
The blower will run at alow speed regardless
of the airflow setting.
If you activate the residual heat function at
high temperatures, only the auxiliary ventila-
tion will be activated. The blower then runs at
medium speed.
The residual heat function switches off auto-
matically
Rafter approximately 30 minutes
Rif the starter battery's condition of charge is
too low
Rwhen you switch on the ignition
Adjusting the air vents
Important safety notes
GWARNING
Very hot or very cold air can flow from the air
vents .This could result in burns or frostbite in
the immediate vicinity of the air vents.T here
is ar isk of injury.
116Adjusting the air vents
Climatec ontrol
Page 135 of 310
GWARNING
If you leave children unsupervised in the vehi-
cle, they coul dset it in motion by, for example:
Rrelease the parking brake.
Rshift the automatic transmission out of the
parking position P.
Rstart the engine.
In addition, they may operate vehiclee quip-
ment and become trapped. There is arisk of
an accident and injury.
When leaving the vehicle, alway stake the
SmartKey with you and lock the vehicle. Never
leave children unsupervised in the vehicle.
!Always secure the vehiclec orrectly against
rolling away. Otherwise, the vehicleori ts driv-
etrain coul dbedamaged.
!When the vehicleisp arked,alway sremove
the key to prevent the battery from becoming
discharged.
Always park you rvehicl esafel yand secure it
against rolling away. When parking, observe the
lega lrequirements of the country in which you
are currently driving.
To ensure that the vehicleisp roperly secured
against rolling awa yunintentionally:
Rthe parking brake must be firmly applied
Rthe transmission must be in position Pand the
key must be removed from the ignitio nlock
Ron steep uphill or downhill gradients, the front
wheels must be turned toward sthe curb
Parking brake
GWARNING
If you leave children unsupervised in the vehi-
cle, they coul dset it in motion by, for example:
Rrelease the parking brake.
Rshift the automatic transmission out of the
parking position P.
Rstart the engine.
In addition, they may operate vehiclee quip-
ment and become trapped. There is arisk of
an accident and injury.
When leaving the vehicle, alway stake the
SmartKey with you and lock the vehicle. Never
leave children unsupervised in the vehicle.
GWARNING
If you must brake the vehiclew ith the parking
brake, the braking distance is considerably
longer and the wheels coul dlock. There is an
increased dange rofskidding and accidents.
Only use the parking brake to brake the vehi-
cle when the service brake is faulty. Do not
apply the parking brake too firmly .Ifthe
wheels lock, release the parking brake until
the wheels begint urning again.
The brake lampsare not illuminated when you
brake the vehicleu sing the parking brake.
As arule ,you may only apply the parking brake
when the vehicleiss tationary.
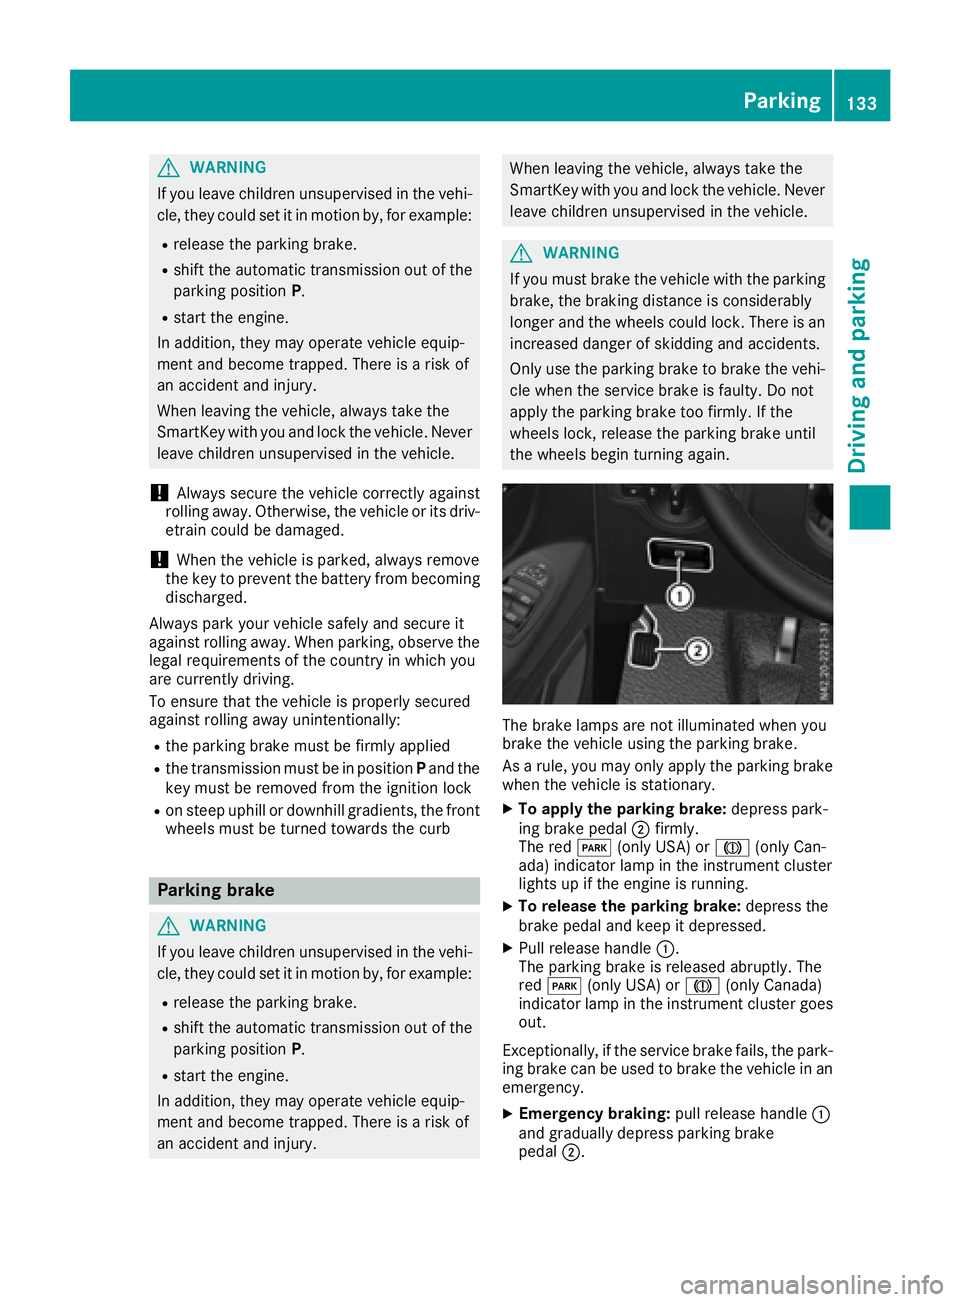
XTo apply the parking brake: depress park-
ing brake pedal ;firmly.
The red F(only USA) or J(only Can-
ada )indicator lamp in the instrument cluster
lights up if the engine is running.
XTo release the parking brake: depress the
brake pedala nd keep it depressed.
XPullrelease handle :.
The parking brake is released abruptly.T he
red F (only USA) or J(only Canada)
indicator lamp in the instrument cluster goes
out.
Exceptionally,ift he service brake fails, the park-
ing brake can be used to brake the vehicleina n
emergency.
XEmergency braking: pullrelease handle :
and gradually depress parking brake
pedal ;.
Parking133
Driving and parking
Z
Page 144 of 310
Storing and maintaining the current
speed
XAccelerate the vehicle to the desired speed
above 20 mph (30 km/h).
XBriefly push the cruise control lever up:or
down =.
XRelease the accelerator pedal.
Cruise control is activated. The current speed
is stored and shown briefly in the display's
text field.
The display also shows the Vsymbol and
the stored speed:
Rin the header on vehicles without steering
wheel buttons (Ypage 170)
Rin the status area on vehicles with steering
wheel buttons (Ypage 176)
Resuming the stored speed
GWARNING
If you call up the stored speed and it differs
from the current speed, the vehicle acceler-
ates or decelerates. If you do not know the
stored speed, the vehicle could accelerate or brake unexpectedly. There is arisk of an acci-
dent.
Pay attention to the road and traffic condi-
tions before calling up the stored speed. If you
do not know the stored speed, store the
desired speed again.
XBriefly pull the cruise control lever towards
you ;.
XRelease the accelerator pedal.
Cruise control is activated and resumes the
vehicle's speed to the last speed stored.
The stored speed is shown briefly in the dis-
play.
The display also shows the Vsymbol and
the stored speed:
Rin the header on vehicles without steering
wheel buttons (Ypage 170)
Rin the status area on vehicles with steering
wheel buttons (Ypage 176)
iWhen you pull the cruise control lever
towards you for the first time after startin gthe
engine, cruise control adopts the current
speed.
Setting the speed
It may be amoment before the vehicle starts to
accelerate or brake to the set speed. Take this
delay into account when settingt he speed.
XPress the cruise control lever up:to
increase the speed or down =to reduce the
speed.
The vehicle will accelerate or decelerate. The
speed is shown in the display.
XRelease the cruise control lever once the
desired speed is reached.
The displayed speed is stored.
or
XBriefly press the cruise control lever as far as
the 1st pressure point up :or down =.
The last speed stored is increased/reduced in increments of 1mph (1 km/h).
or
XBriefly press the cruise control lever beyond
the pressure point up :or down =.
The last speed stored is increased/reduced in increments of 5mph (10 km/h).
iCruise control is not deactivated if you
depress the accelerator pedal. If you acceler-
ate briefly to overtake, for example, cruise
control resumes the vehicle’s speed to the
last speed stored after you have finished over-
taking.
To deactivatec ruise control
There are various ways to deactivate cruise con-
trol:
XBriefly press the cruise control lever for-
wards?.
or
XApply the brakes.
The last speed set remains stored. The last
speed stored is deleted when you switch off the
engine.
Cruise control is deactivated automatically
when:
Ryou apply the brakes
Ryou apply the parking brake and the F
(only USA) or J(only Canada) indicator
lamp in the instrumentc luster lights up
Ryou are driving slower than 20 mph (30 km/h)
Ryou shift the automatic transmission to neu-
tral positionNwhile the vehicle is in motion
142Driving systems
Driving and parking
Page 148 of 310
sufficient distance to the side for other road
users and obstacles.
In particular, the detection of obstacles can be
impaired in the case of:
Rdirt on the sensors or anything else covering
the sensors
Rfog, heavy rain or snow
Rnarrow vehicles, e.g. motorcycles or bicycles
Rvery wide lanes
Rnarrow lanes
Rvehicles not driving in the middle of their lane
Rbarriers or other road boundaries
Vehicles in the monitoring range are then not
indicated.
iUSA only:
This device has been approved by the FCC as
a" Vehicular Rada rSystem". The radar sensor
is intended for use in an automotive radar
system only. Removal, tampering, or altering
of the device will void any warranties, and is
not permitted by the FCC. Do not tamper with,
alter, or use in any non-approved way.
Any unauthorized modification to this device
could void the user’s authority to operate the
equipment.
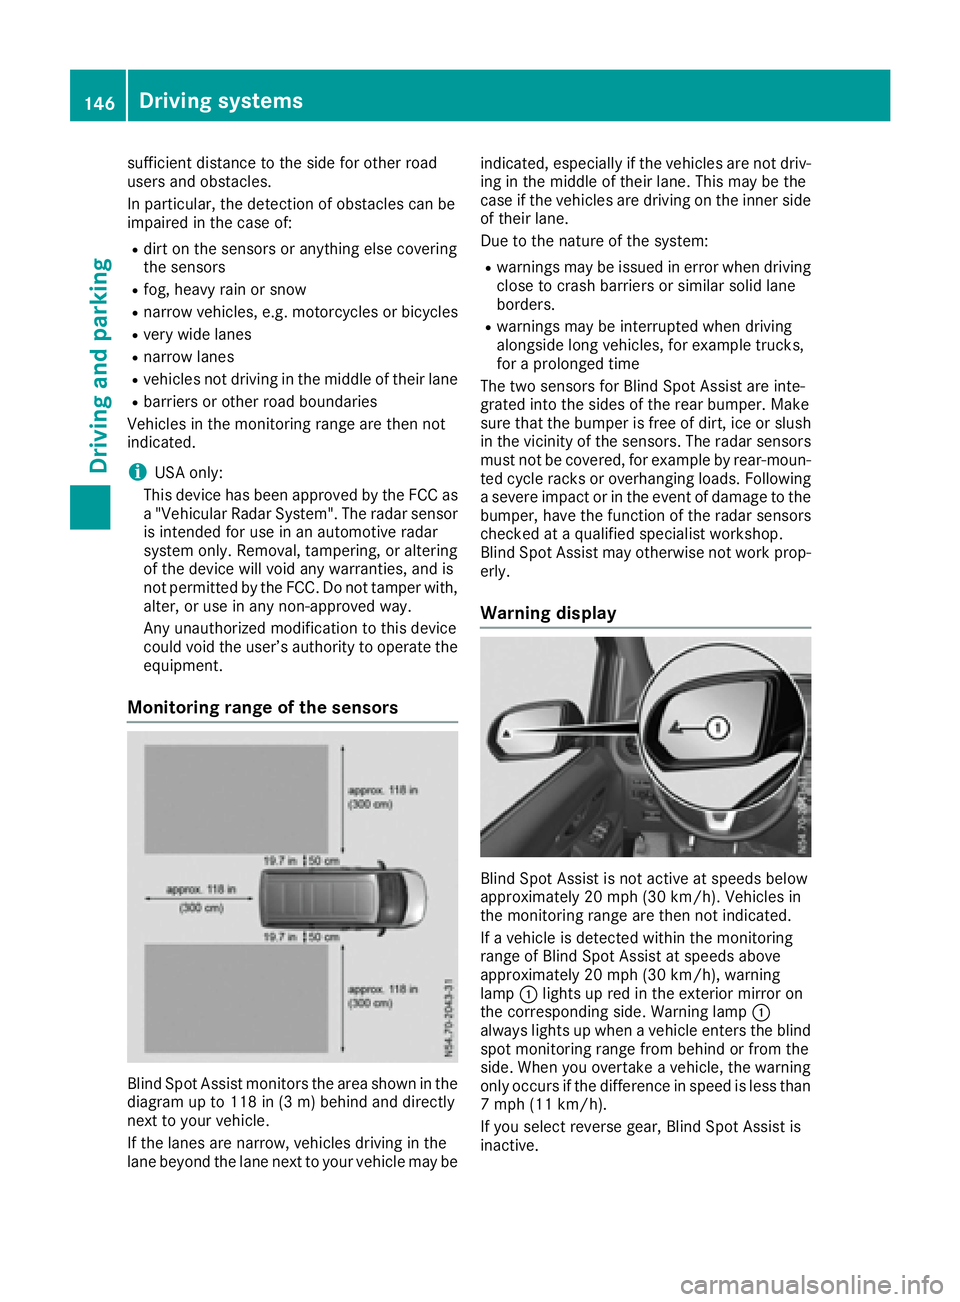
Monitoring range of the sensors
Blind Spot Assist monitors the area shown in the
diagramupt o118 in (3 m) behind and directly
next to your vehicle.
If the lanes are narrow, vehicles driving in the
lane beyond the lane next to your vehicle may be indicated, especially if the vehicles are not driv-
ing in the middle of their lane. This may be the
case if the vehicles are driving on the inner side
of their lane.
Due to the nature of the system:
Rwarnings may be issued in error when driving
close to crash barriers or similars olid lane
borders.
Rwarnings may be interrupted when driving
alongside long vehicles, for example trucks,
for aprolonged time
The two sensors for Blind Spot Assist are inte-
grated into the sides of the rear bumper. Make
sure that the bumper is free of dirt, ice or slush
in the vicinity of the sensors. The radar sensors
must not be covered, for example by rear-moun-
ted cycle racks or overhanging loads. Following
as evere impact or in the event of damage to the
bumper, have the function of the radar sensors
checked at aqualified specialist workshop.
Blind Spot Assist may otherwise not work prop-
erly.
Warning display
Blind Spot Assist is not active at speeds below
approximately 20 mph (30 km/h). Vehicles in
the monitoring range are then not indicated.
If av ehicle is detected within the monitoring
range of Blind Spot Assist at speeds above
approximately 20 mph (30 km/h), warning
lamp :lights up red in the exterior mirror on
the corresponding side. Warning lamp :
always lights up when avehicle enters the blind
spot monitoring range from behind or from the
side. When you overtake avehicle, the warning
only occurs if the difference in speed is less than
7m ph (11 km/h).
If you select reverse gear, Blind Spot Assist is
inactive.
146Driving systems
Driving and parking
Page 150 of 310
If you fail to adapt yourdriving style, Lane Keep-
ing Assist can neither reduce the risk of accident
nor override the law sofphysics. Lane Keeping
Assist cannot take into account road, weather or
traffic conditions. Lane Keeping Assist is only an aid .You are responsible for the distance to the
vehicle in front, for vehicle speed,b raking in
good time and for staying in you rlane.
Lane Keeping Assist does not keep you rvehicle
in its lane.
The system may be impaired or may not function
if:
Rthere is poor visibility, e.g. due to insufficient
illuminatio nofthe road, or due to snow, rain,
fog or spray
Rthere is glare ,e.g. from oncoming traffic, the
sun or reflection from other vehicles( e.g. if
the road surface is wet)
Rthe windshield is dirty, fogged up, damaged or
covered, for instance by asticker, in the vicin-
ity of the camera
Rno, or several ,unclea rlane markings are pres-
ent for one lane, e.g. in aconstruction area
Rthe lane markings are worn away, dark or cov-
ered up, e.g. by dirt or snow
Rthe distance to the vehicle in front is too small
and the lane markings thus cannot be detec-
ted
Rthe lane markings change quickly, e.g. lanes
branch off, cross one another or merge
Rthe road is narrow and winding
Rthere are highlyv ariable shade conditions on
the road
Deactivating and activating Lane Keep-
ing Assist
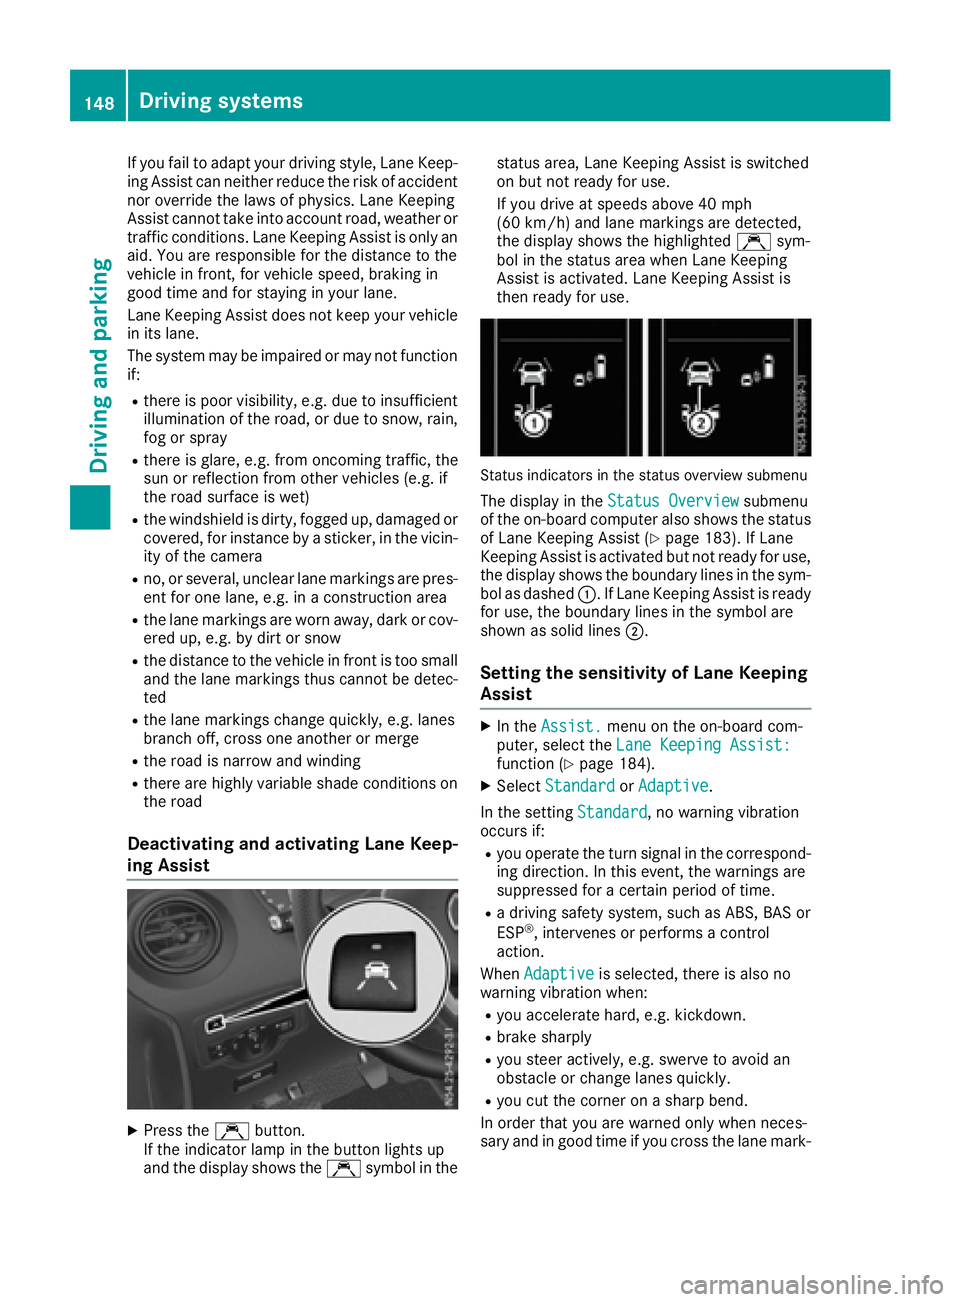
XPress the Çbutton.
If the indicator lamp in the button lights up
and the display shows the Çsymbo linthe status area
,Lane Keeping Assist is switched
on but not ready for use.
If you drive at speedsa bove 40 mph
(60 km/h) and lane markings are detected,
the display shows the highlighted Çsym-
bol in the status area when Lane Keeping
Assist is activated. Lane Keeping Assist is
then ready for use.
Status indicators in the status overview submenu
The display in the Status Overviewsubmenu
of the on-board computer also shows the status
of Lane Keeping Assist (
Ypage 183). If Lane
Keeping Assist is activated but not ready for use,
the display shows the boundary lines in the sym-
bol as dashed :.IfLane Keeping Assist is ready
for use, the boundary lines in the symbo lare
shown as solid lines ;.
Setting the sensitivity of Lane Keeping
Assist
XIn theAssist.menu on the on-board com-
puter, select the Lane Keeping Assist:
function (Ypage 184).
XSelectStandardorAdaptive.
In the setting Standard
,now arning vibration
occurs if:
Ryou operate the turn signal in the correspond-
ing direction. In this event, the warnings are
suppressed for acertain period of time.
Rad riving safety system, such as ABS, BAS or
ESP®,i ntervenes or performs acontrol
action.
When Adaptive
is selected, there is also no
warning vibratio nwhen:
Ryou accelerate hard, e.g. kickdown.
Rbrake sharply
Ryou steer actively ,e.g. swerve to avoid an
obstacle or change lanes quickly.
Ryou cut the corner on asharp bend.
In order that you are warned only when neces-
sary and in good time if you cross the lane mark-
148Driving systems
Driving and parking
Page 152 of 310
Standard:the sensitivity with which the sys-
tem determines the attention level is set to
normal.
Sensitive: the sensitivity is set higher. The
driver is warned earlier.
When ATTENTION ASSIST is switched on and
the vehicle engine is running:
Ron vehicles without steering wheel buttons,
the À indicator lamp in the instrument
cluster lights up
Ron vehicles with steering-wheel buttons, the
display shows the Àsymbol:
-in the status area
-in the Status Overviewof the Assist.menu (Ypage 183)
For vehicles with steering wheel buttons, if you
deactivate ATTENTION ASSIST, the system is
automatically re-activated when you start the
engine. The system sensitivity then corresponds to the last selection activated –standard or sen-
sitive.
If you switch off ATTENTION ASSIST in avehicle
without steering wheel buttons, the system
remains switched off even after you start the
engine. The status of the system after switching
on the engine always corresponds to the status
last selected.
Warning in the display
If the system detectst iredness or increasing
lapses in concentration, the warning Atten‐
tion Assist: TakeaBreak!orAttent.Asst: Take Break!is shown in the display.
An additional warning tone sounds.
XIf necessary, take abreak.
XConfirm the message by pressing the a
button on the steering wheel.
On long journeys, take regular breaks in good
time to allow yourself to rest. If you do not take
ab reak and ATTENTION ASSIST continues to
detect increasing lapses in concentration, you
will be warned again after 15 minutes at the
earliest. This will only happen if ATTEN-
TION ASSIST still detectst ypical indicators of
fatigue or increasing lapses in concentration.
PARKTRONIC
General notes
PARKTRONIC is an electronic parking aid. The
system is equipped with ultrasonic sensors in
the front and rear bumpers to monitor the area
around your vehicle. PARKTRONIC indicates vis-
uallya nd audibly the distance between your
vehicle and an object.
Your vehicle features two separate sound emit-
ters with different frequencies for the warning
tones. The warning ranges in front of and behind the vehicle are indicated by different warning
tones.
PARKTRONIC is activated automatically when
you:
Rturn the key to position 2in the ignition lock
Rrelease the parking brake and
Rmove the selector lever to D,Nor R
PARKTRONIC is deactivated at speeds above
11 mph (18 km/h). PARKTRONIC is reactivated
at speeds below 10 mph (16 km/h).
Important safety notes
PARKTRONIC is only an aid. It cannot replace
your own awareness of the immediate surround-
ings. You are responsible for safe maneuvering,
parking and pulling away.W hen maneuvering,
parking and pulling away,m ake sure that there
are no persons, animals or object sinthe maneu-
vering area.
!Pay particular attention to obstacles above
or below the sensors when parking, such as
flower pots or trailer towbars. PARKTRONIC
does not recognizes uch objectswhen they
are in the immediate vicinity of the vehicle.
You could damage the vehicle or objects.
PARKTRONIC can suffer interference from:
Rultrasonic sources such as atruck's
compressed-air brakes, an automatic car
wash or apneumatic drill
Rattachments to the vehicle, e.g. rear moun-
ted racks
Rnumber plates (vehicle license plates) that
are not affixed flat against the bumper
Rdirty or icy sensors
Remove adetachable trailer coupling if it is no
longer required. PARKTRONIC measures the
minimum detection range to an obstacle from
the bumper, not the ball coupling.
150Driving systems
Driving and parking