warning lights MERCEDES-BENZ METRIS 2016 MY16 Operator’s Manual
[x] Cancel search | Manufacturer: MERCEDES-BENZ, Model Year: 2016, Model line: METRIS, Model: MERCEDES-BENZ METRIS 2016Pages: 310, PDF Size: 7.28 MB
Page 154 of 310
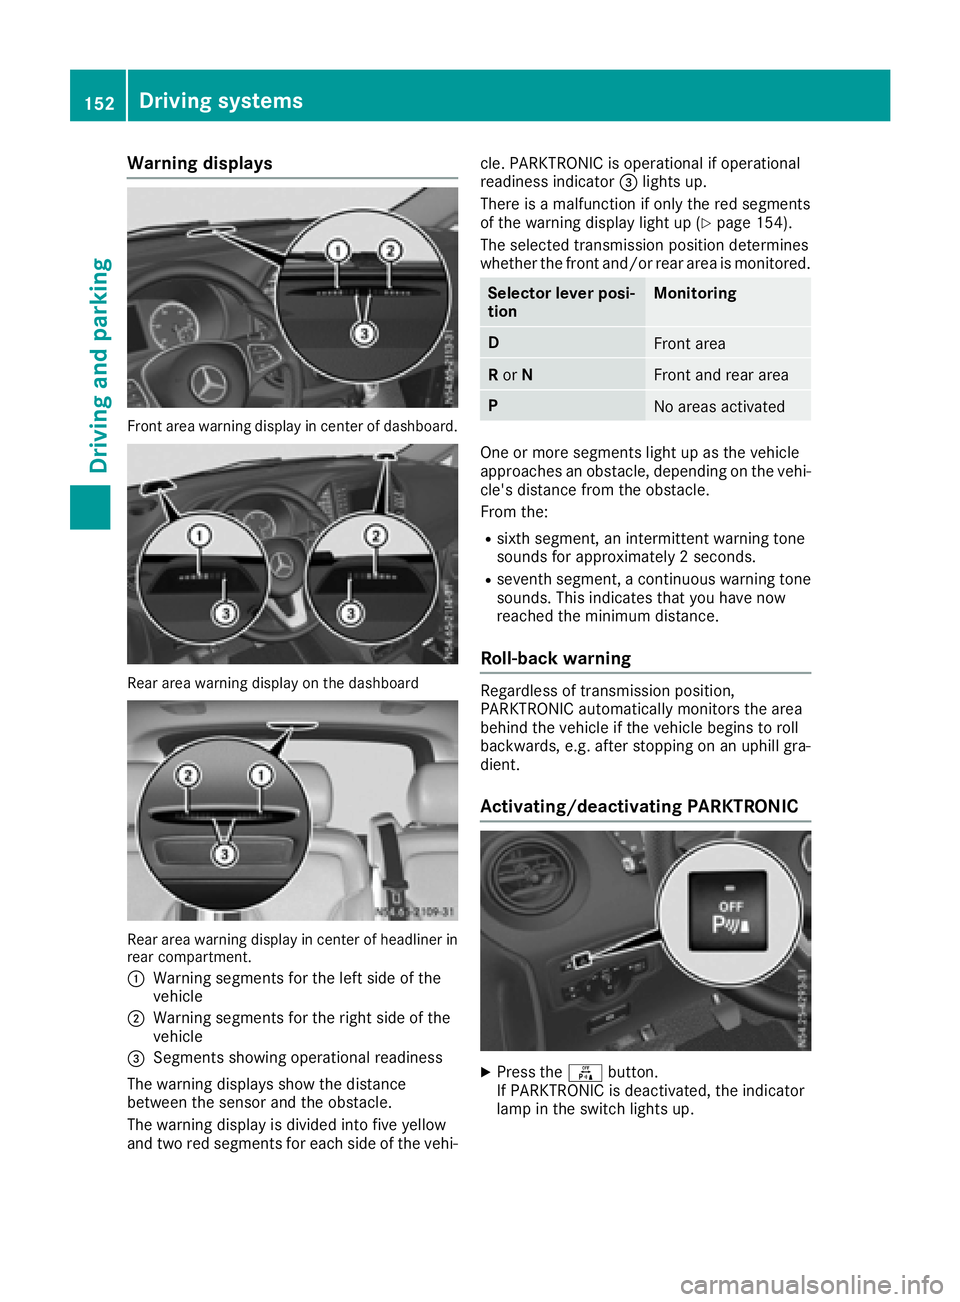
Warning displays
Front area warning display in center of dashboard.
Reararea warning display on the dashboard
Rea rarea warning display in center of headliner in
rear compartment.
:
Warning segments for the left side of the
vehicle
;Warning segments for the right side of the
vehicle
=Segments showing operational readiness
The warning display sshow the distance
between the sensor and the obstacle.
The warning display is divided into five yellow
and two red segments for each side of the vehi- cle. PARKTRONIC is operational if operational
readiness indicator
=lights up.
There is amalfunction if only the red segments
of the warning display light up (
Ypag e154).
The selected transmission position determines
whethe rthe front and/or rear area is monitored.
Selector lever posi-
tionMonitoring
DFront area
R or NFront and rear area
PNo area sactivated
One or more segments light up as the vehicle
approache sanobstacle, depending on the vehi-
cle's distance from the obstacle.
From the:
Rsixth segment, an intermittent warning tone
sound sfor approximately 2seconds.
Rseventh segment, acontinuou swarning tone
sounds. This indicates that you have now
reache dthe minimu mdistance.
Roll-back warning
Regardless of transmission position,
PARKTRONIC automatically monitors the area
behind the vehicl eifthe vehicl ebegins to roll
backwards, e.g. after stopping on an uphill gra-
dient.
Activating/deactivating PARKTRONIC
XPress the fbutton.
If PARKTRONIC is deactivated, the indicator
lam pint he switch lights up.
152Driving systems
Driving and parking
Page 156 of 310
Problems with PARKTRONIC
ProblemPossible causes/consequences andMSolutions
Only the red segments in
the PARKTRONIC warn-
ing displaysare lit.
Aw arning tone also
sounds for approx-
imately 2seconds.
PARKTRONIC is then
deactivated.
The indicator lamp of the
f button lights up
and the red segments in
the PARKTRONIC warn-
ing display go out.PARKTRONIC has malfunctioned and has switched itself off.
XIf problems persist, have PARKTRONIC checked at aqualified spe-
cialist workshop.
The PARKTRONIC warn-
ing displaysi mplausible
distances.
For example, all the seg-
mentsm ay be lit even
though there is no obsta-
cle present.The PARKTRONIC sensors are dirty or iced up.
XClean the PARKTRONIC sensors (Ypage 257).
XTurn the key to position 2again in the ignition lock.
The license plate or other parts attached near the sensors may not be
secured correctly.
XCheck the license plate and attachmentp arts near the sensors for
correct seating.
An external radio or ultrasonic source may be causing interference.
XCheck PARKTRONIC functions in adifferent location.
Active Parking Assist
General notes
Active Parking Assist is an electronic parking
aid. The system uses ultrasound sensors to
measure the road on both sides of the vehicle
and indicates suitable parking spaces. It can
then actively steer and brake the vehicle to help
you to park and exit the parking space.
Active Parking Assist includes the PARKTRONIC
parking aid which indicates visuallya nd audibly
the distance between your vehicle and an
object .Todot his, PARKTRONIC uses the ultra-
sonic sensors of the Active Parking Assist
(
Ypage 150).
Important safety notes
Active Parking Assist is only an aid. It is not a
substitute for your attention to the immediate
surroundings. You are responsible for safe maneuvering, parking and pulling away.M
ake
sure that no persons, animals or object sare in
the maneuvering range.
When you deactivate PARKTRONIC, Active Park-
ing Assist will also be deactivated.
For vehicles with atrailer coupling installed, the
minimum length for parking spaces will be
slightly increased.
If you have attached atrailer to your vehicle, you
should not use Active Parking Assist. Once the
electrical connection is established between
your vehicle and the trailer, Active Parking
Assist is no longer available. PARKTRONIC is
then deactivated for the rear area.
GWARNING
While parking or pulling out of aparking
space, the vehicle swings out and can drive
onto areas of the oncomingl ane. This could
result in acollision with another road user.
There is arisk of an accident.
154Driving systems
Driving and parking
Page 168 of 310
RWhen driving withatrailer, check at regular
intervals that the load is secured and that the
brakes and lights are working.
RBear in mind that the handling will be less
stable when towing atrailer than when driving
without one. Avoid sudden steerin gmove-
ments.
RThe vehicle/trailer combination is heavier,
accelerates more slowly and has adecreased
gradient climbing capability and alonger
braking distance.
It is more susceptible to crosswinds and
requires cautious steering.
RIf possible, do not brake suddenly, but rather
moderately at first so that the trailer can acti-
vate its brakes. Then increase the forceont he
brake pedal.
RIf the automatic transmission repeatedly
shifts between gears when driving on inclines,
restrict the shift range. Select shift range 4,3,
2 or 1.
Drivin ginal ow gear and at alow speed
reduces the risk of damaging the engine.
RWhen driving on adownhill gradient, shift to a
low gear and take advantage of the engine's
braking effect.
Avoid continuous brake application as this
may overheat the vehicle brakes and, if instal-
led, the trailer brakes.
RIf the coolant temperature increases dramat-
ically while the air-conditionin gsystem is
switched on, switch off the air-conditioning
system.
Coolant heat can also be dissipated by
switchin gthe airflow and the temperature of
the air conditioning to the maximum level.
Open the windows if necessary.
RWhen overtaking, pay particular attention to
the extended length of your vehicle/trailer
combination.
Due to the length of your vehicle/trailer com- bination you need an additional distance
before you can return to your original lane.
Uncoupling atrailer
GWARNING
If you uncouple atrailer with the overrun
brake engaged, you could trap your hand
between the vehicle and the trailer drawbar.
There is arisk of injury.
Do not uncouple atrailer if the overrun brake
is engaged.
!Do not disconnect atrailer with an engaged
overrun brake. Otherwise, your vehicle could
be damaged by the rebounding of the overrun
brake.
XMake sure that the selector lever of the auto-
matic transmission is in position P.
XEngage the vehicle's parking brake.
XClose all doors.
XApply the parking brake of the trailer.
XIn addition, secure the trailer against rolling
away withawheel chock or similar object.
XRemove the trailer cable and safety chains
and decouple the trailer.
Permissible trailer loads and trailer
drawbar noseweights
Weight information
!For vehicles with apermissible gross vehicle
weight of 6724 lbs (3050 kg), the permissible gross combination weight is less than the sum
of the permissible gross vehicle weight plus
the permissible trailer load. Exceeding the
permitted gross combination weight could
damage the powertrain ,transmission or
trailer tow hitch.
If either the vehicle or the trailer is fully laden,
the permitted gross vehicle weight or the per- mitted trailer load values are reduced accord-
ingly. In this case, you may only partially load
the trailer or the vehicle.
The gross trailer weight (GTW) is calculated by
adding the weight of the trailer to the weight of
the load and equipment. The permissible gross
trailer weight is 5000 lbs (2268 kg).
The maximum noseweight of the trailer drawbar
on the ball coupling is 500 lbs (227 kg). The
actual noseweight may not exceed the value
given on the identification plates of the trailer
tow hitch or the trailer. If the values vary, the
lowest value alwaysa pplies.
The gross combination weight rating (GCWR) is
calculated by adding the gross weight of the
trailer to the gross vehicle weight including a
166Towing atrailer
Driving and parking
Page 171 of 310
On vehicles with steering wheel buttons, the
light sensor in the instrument cluster automati-
cally controls the brightness of the displaylight-
ing.
While the lights are on, the brightness is depend-
ent upon the brightness of the ambient light.
You can also adjust the brightness of the instru-
ment lighting and the displayl ighting
Rby pressing thefand gbuttons on the
instrument cluster on vehicles without steer-
ing wheel buttons (not in the Settings
menu)
Rby turning control:on vehicles with steer-
ing wheel buttons.
Speedometer
If you change the wheel size on your vehicle,
make sure it is assigned to the correct wheel
size category (
Ypage 267). If you change wheel
size category without recoding the control unit,
the speedometer indication will be inaccurate.
The current vehicle speed may then be higher
than the speed displayed in the speedometer.
The speed can also be shown in the displayi n
the form of adigital speedometer:
Ron vehicles without steering wheel buttons
(Ypage 172)
Ron vehicles with steering wheel buttons
(Ypage 178)
iIn some countries, awarning sounds and/or
the displays howsamessage when the vehi-
cle reaches the maximum legally permissible
speed limit, e.g. at 75 mph (120 km/h).
Tachometer
!
Do not drive in the overrevving range, as this
could damage the engine.
HEnvironmental note
Avoid driving at high engine speeds. This
unnecessarily increases the fuel consumption
of your vehicle and harms the environment as
ar esult of increased emissions.
The red band in the tachometer indicates the
engine's overrevving range.
To protect the engine, the fuel supply is inter-
rupted when the red band is reached.
Outside temperatured isplay
You should pay special attention to road condi-
tions when temperatures are around freezing
point.
Please bear in mind that the outside tempera-
ture displayshows the air temperature meas-
ured and not the road temperature.
The displays hows the outside temperature in
the header:
Ron vehicles without steering-wheel buttons
(Ypage 170)
Ron vehicles with steering wheel buttons
(Ypage 176).
Changes in the outside temperature are dis-
played after ashort delay.
Coolant temperatureg auge
GWARNING
Opening the hood when the engine is over-
heated or when there is afire in the engine
compartment could expose you to hot gases
or other service products. There is arisk of
injury.
Let an overheated engine cool down before
opening the hood. If there is afire in the
engine compartment,k eep the hood closed
and contact the fire department.
On vehicles without steering wheel buttons, you
can have the coolant temperature shown in the
display(
Ypage 172).
On vehicles with steering wheel buttons, an ana-
log coolant temperature gage is located in the
tachometer in the instrument cluster
(
Ypage 37).
Under normal operating conditions and with the
specified coolant level, the gage may rise to
248 ‡(120† ).
Display and operation169
On-board computer and displays
Z
Page 176 of 310
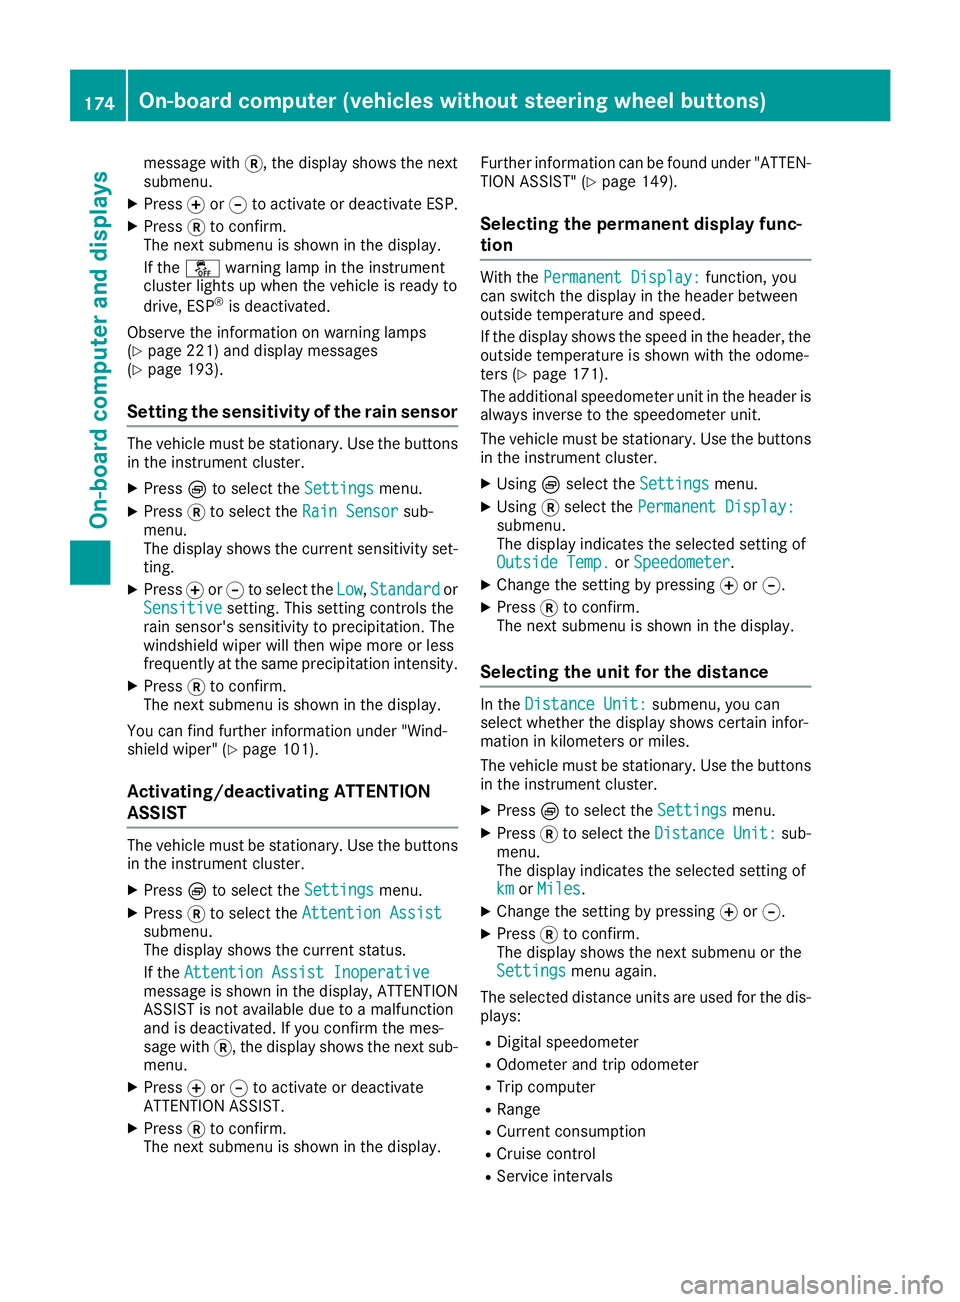
message with3,the display shows the next
submenu.
XPress forg to activate or deactivate ESP.
XPress 3to confirm.
The next submenu is shown in the display.
If the å warning lamp in the instrument
cluster lights up when the vehicleisr eadyto
drive, ESP
®is deactivated.
Observe the informatio nonwarning lamps
(
Ypage 221) and display messages
(Ypage 193).
Setting the sensitivity of the rain sensor
The vehiclem ust be stationary .Use the buttons
in the instrument cluster.
XPress Èto select the Settingsmenu.
XPress3to select the Rain Sensorsub-
menu.
The display shows the current sensitivity set-
ting.
XPress forg to select the Low,Standardor
Sensitivesetting. This setting controls the
rain sensor's sensitivity to precipitation. The
windshieldw iper willthen wip emore or less
frequently at the same precipitation intensity.
XPress 3to confirm.
The next submenu is shown in the display.
You can find further informatio nunder "Wind-
shiel dwiper" (
Ypage 101).
Activating/deactivatin gATTENTION
ASSIST
The vehiclem ust be stationary .Use the buttons
in the instrument cluster.
XPress Èto select the Settingsmenu.
XPress3to select the Attention Assistsubmenu.
The display shows the current status.
If theAttention Assist Inoperative
message is shown in the display ,ATTENTION
ASSIST is not available due to amalfunction
and is deactivated. If you confirm the mes-
sage with 3,the display shows the next sub-
menu.
XPress forg to activate or deactivate
ATTENTION ASSIST.
XPress 3to confirm.
The next submenu is shown in the display. Further informatio
ncan be found under "ATTEN-
TION ASSIST" (
Ypage 149).
Selecting the permanent display func-
tion
With the Permanent Display:function, you
can switch the display in the header between
outsid etemperature and speed.
If the display shows the speed in the header, the
outsid etemperature is shown with the odome-
ters (
Ypage 171).
The additional speedometer unit in the header is
alway sinverse to the speedometer unit.
The vehiclem ust be stationary .Use the buttons
in the instrument cluster.
XUsing Èselect the Settingsmenu.
XUsing3select the Permanent Display:submenu.
The display indicates the selected setting of
Outside Temp.
orSpeedometer.
XChange the setting by pressing forg.
XPress 3to confirm.
The next submenu is shown in the display.
Selecting the unit for the distance
In the Distance Unit:submenu, you can
select whether the display shows certain infor-
mation in kilometers or miles.
The vehiclem ust be stationary .Use the buttons
in the instrument cluster.
XPress Èto select the Settingsmenu.
XPress3to select the Distance Unit:sub-
menu.
The display indicates the selected setting of
km
or Miles.
XChange the setting by pressing forg.
XPress 3to confirm.
The display shows the next submenu or the
Settings
menu again.
The selected distance units are used for the dis- plays:
RDigital speedometer
ROdometer and trip odometer
RTrip computer
RRange
RCurrent consumption
RCruise control
RService intervals
174On-board computer (vehicles without steerin gwheel buttons)
On-board computer and displays
Page 186 of 310
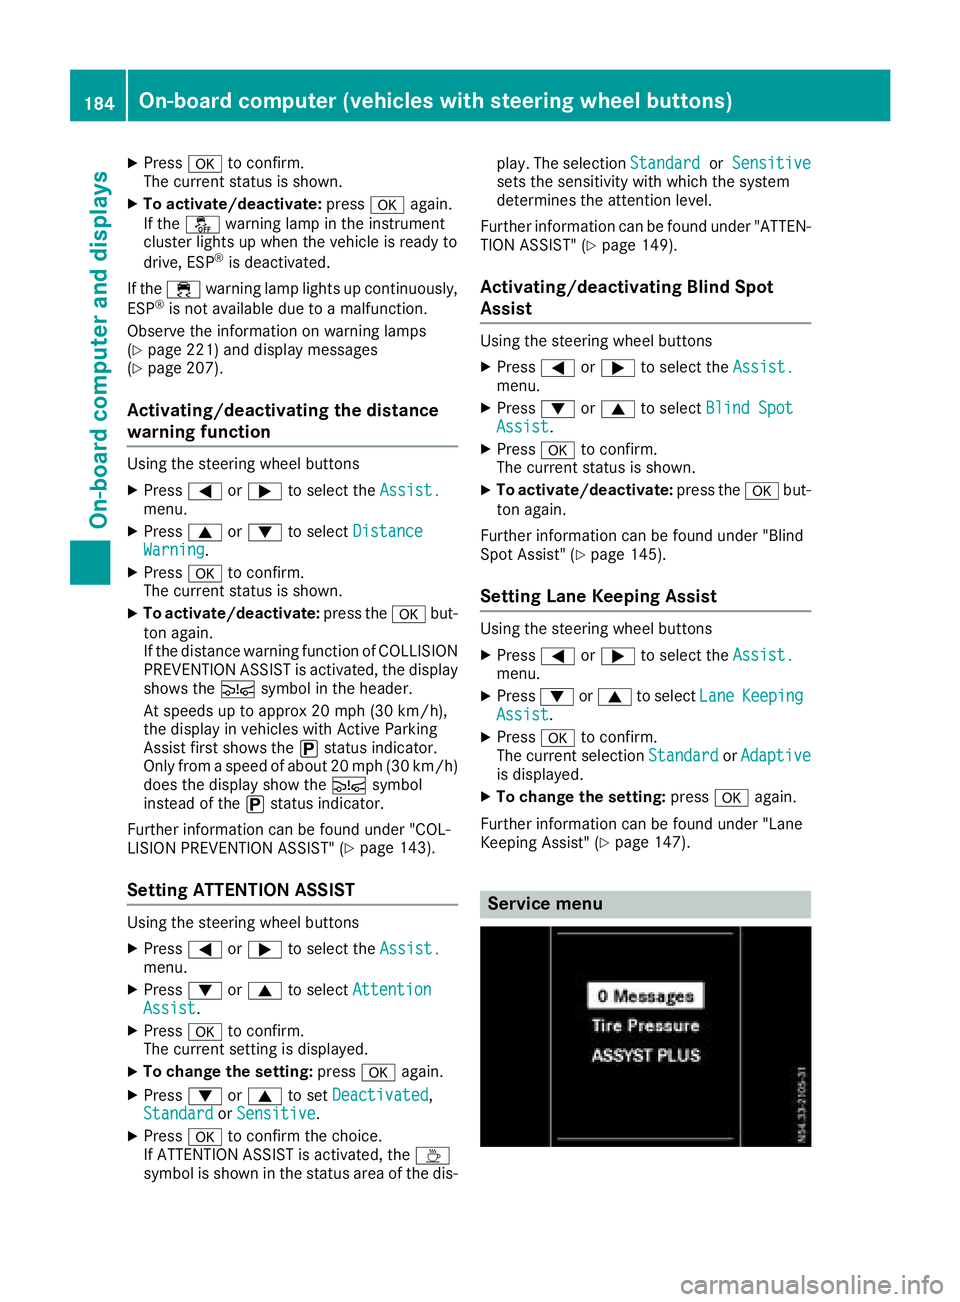
XPressato confirm.
The currents tatus is shown.
XTo activate/deactivate: pressaagain.
If the å warning lamp in the instrument
cluster lights up when the vehicle is ready to
drive, ESP
®is deactivated.
If the ÷ warning lamp lights up continuously,
ESP
®is not availabled ue toamalfunction.
Observe the information on warning lamps
(
Ypage 221) and display messages
(Ypage 207).
Activating/deactivating the distance
warning function
Using the steerin gwheel buttons
XPress =or; to select the Assist.menu.
XPress9or: to select DistanceWarning.
XPressato confirm.
The currents tatus is shown.
XTo activate/deactivate: press theabut-
ton again.
If the distanc ewarning function of COLLISION
PREVENTION ASSIST is activated, the display
shows the Äsymbol in the header.
At speeds up to approx 20 mph (30 km/h),
the display in vehicles with Active Parking
Assist first shows the ístatus indicator.
Only from aspeed of about 20 mph (30 km/ h)
does the display show the Äsymbol
instead of the ístatus indicator.
Further information can be found under "COL-
LISION PREVENTION ASSIST" (
Ypage 143).
Setting ATTENTION ASSIST
Using the steering wheel buttons
XPress =or; to select the Assist.menu.
XPress:or9 to select AttentionAssist.
XPressato confirm.
The currents etting is displayed.
XTo change the setting: pressaagain.
XPress :or9 to set Deactivated,
Standardor Sensitive.
XPress ato confirm the choice.
If ATTENTION ASSISTisa ctivated, theÀ
symbol is shown in the status area of the dis- play. The selection
Standard
orSensitivesets the sensitivity with which the system
determines the attention level.
Further information can be found under "ATTEN-
TION ASSIST" (
Ypage 149).
Activating/deactivating Blind Spot
Assist
Using the steering wheel buttons
XPress =or; to select the Assist.menu.
XPress:or9 to select Blind SpotAssist.
XPressato confirm.
The currents tatus is shown.
XTo activate/deactivate: press theabut-
ton again.
Further information can be found under "Blind
Spot Assist "(
Ypage 145).
Setting Lane Keeping Assist
Using the steering wheel buttons
XPress=or; to select the Assist.menu.
XPress:or9 to select LaneKeepingAssist.
XPressato confirm.
The currents electionStandardorAdaptiveis displayed.
XTo change the setting: pressaagain.
Further information can be found under "Lane
Keeping Assist "(
Ypage 147).
Service menu
184On-boardcomputer (vehicles with steering wheel buttons)
On-boardcomputer and displays
Page 187 of 310
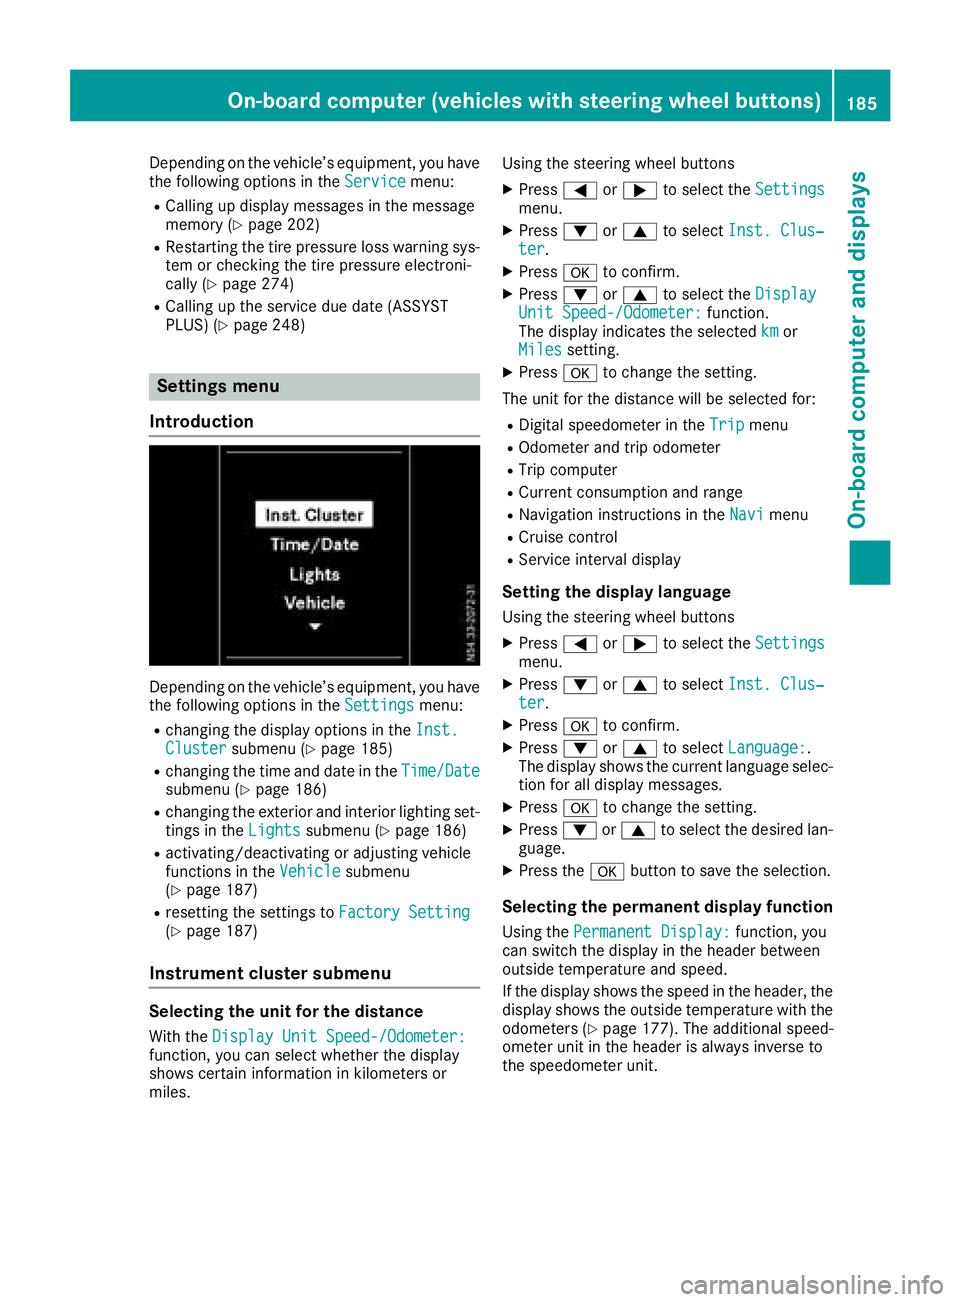
Depending on the vehicle’sequipment ,you have
the following options in the Servicemenu:
RCalling up displaymessage sinthe message
memory (Ypage 202)
RRestartin gthe tire pressure loss warning sys-
tem or checking the tire pressure electroni-
cally (
Ypage 274)
RCalling up the servic eduedate (ASSYST
PLUS) (Ypage 248)
Settings menu
Introduction
Depending on the vehicle’ sequipment ,you have
the following options in the Settingsmenu:
Rchanging the displayoptions in the Inst.Clustersubmenu (Ypage 185)
Rchanging the time and date in the Time/Datesubmenu (Ypage 186)
Rchanging the exteriorand interio rlighting set-
ting sint heLightssubmenu (Ypage 186)
Ractivating/deactivating or adjusting vehicle
functions in the Vehiclesubmenu
(Ypage 187)
Rresetting the settings to FactorySetting(Ypage 187)
Instrument cluste rsubmenu
Selecting the uni tfor the distance
With the DisplayUnitS peed-/Odometer:function, yo ucan select whether the display
shows certain informatio ninkilometers or
miles. Using the steerin
gwheel buttons
XPress =or; to select the Settingsmenu.
XPress:or9 to select Inst. Clus‐ter.
XPressato confirm.
XPress :or9 to select the DisplayUnitSpeed-/Odometer:function.
The displa yindicates the selected kmor
Milessetting.
XPress ato change the setting.
The uni tfor the distance will be selecte dfor:
RDigita lspeedom eterint heTripmenu
ROdometer and trip odometer
RTripc omputer
RCurrent consumption and range
RNavigation instructions in the Navimenu
RCruise control
RService intervaldisplay
Settingthe display language
Using the steerin gwheel buttons
XPress =or; to select the Settingsmenu.
XPress:or9 to select Inst. Clus‐ter.
XPressato confirm.
XPress :or9 to select Language:.
The displa yshows the current languag eselec-
tio nfor al ldisplay messages.
XPressato change the setting.
XPress :or9 to select the desired lan-
guage.
XPress the abutton to save the selection.
Selecting the permanent display function
Using the Permanent Display:function, you
can switch the displa yinthe header between
outside temperatur eand speed.
If the displa yshows the spee dinthe header, the
displa yshows the outside temperatur ewitht he
odometers (
Ypage 177). The additional speed-
ometer uni tinthe header is always invers eto
the speedomete runit.
On-board computer (vehicle swiths teering whee lbuttons)18 5
On-board computera nd displays
Z
Page 195 of 310
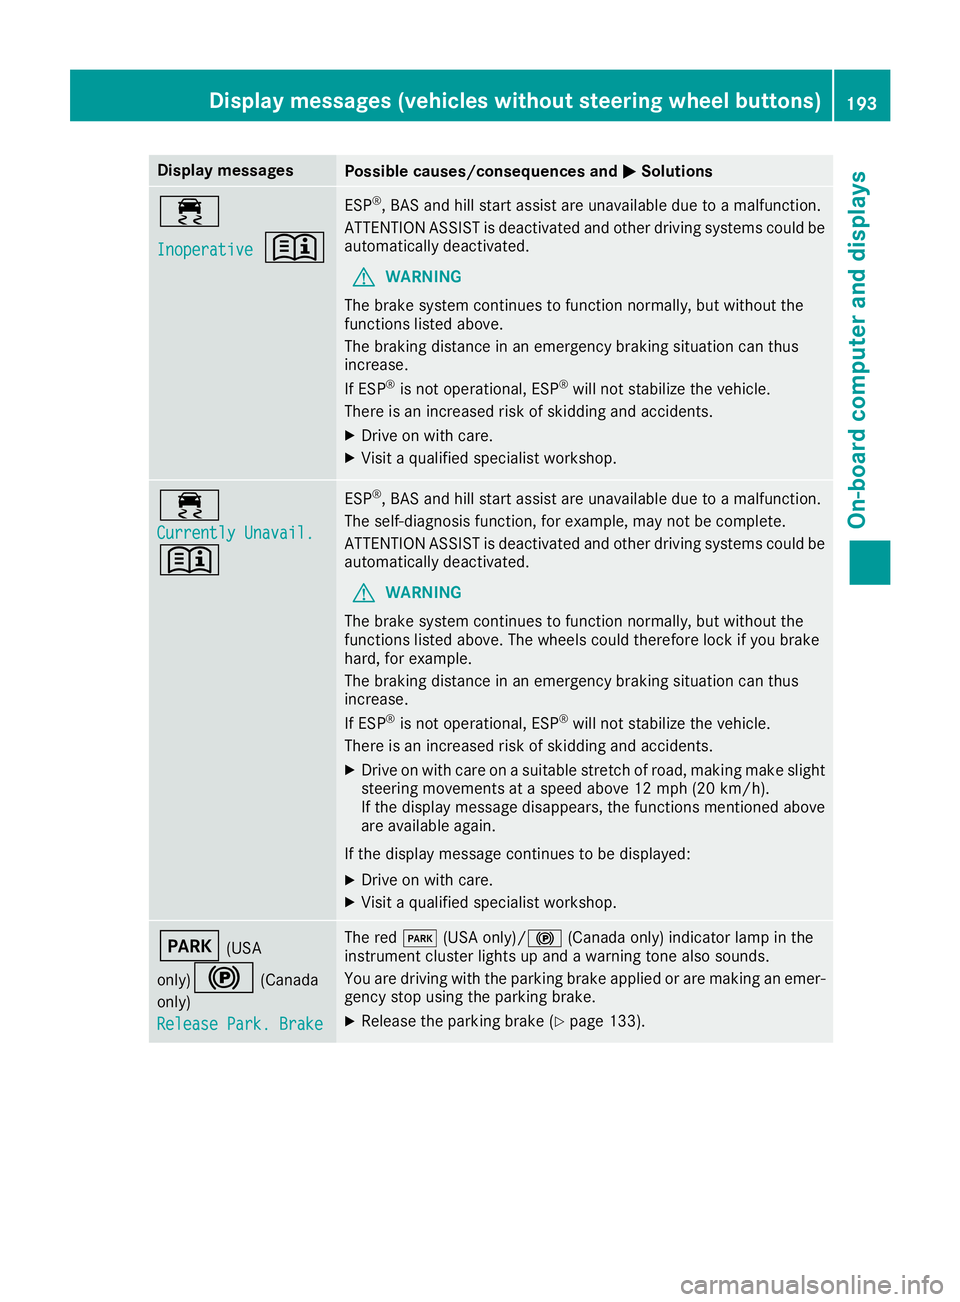
Display messagesPossible causes/consequences andMSolutions
÷
Inoperative+
ESP®,BAS and hill start assist are unavailable due to amalfunction .
ATTENTION ASSIST is deactivated and other drivin gsystems could be
automatically deactivated.
GWARNIN G
The brak esystem continues to function normally, but without th e
function slisted above.
The braking distanc einanemergenc ybraking situation can thus
increase.
If ES P
®is no toperational, ES P®will notstabiliz ethe vehicle.
There is an increased ris kofskiddin gand accidents .
XDrive on withcare.
XVisit aqualified specialist workshop .
÷
Currently Unavail.
+
ESP®,BAS and hill start assist are unavailable due to amalfunction .
The self-diagnosis function ,for example, may no tbecomplete.
ATTENTION ASSIST is deactivated and other drivin gsystems could be
automatically deactivated.
GWARNIN G
The brak esystem continues to function normally, but without th e
function slisted above. The wheels could therefor eloc kify ou brak e
hard, for example.
The braking distanc einanemergenc ybraking situation can thus
increase.
If ES P
®is no toperational, ES P®will notstabiliz ethe vehicle.
There is an increased ris kofskiddin gand accidents .
XDrive on withcareonas uitable stretch of road, making mak eslight
steering movement sataspeed abov e12mph(20 km/ h).
If the display messag edisappears, the functions mentioned above
are available again.
If the display message continues to be displayed:
XDrive on with care.
XVisit aqualifieds pecialist workshop.
F(USA
only)
!(Canada
only)
Release Park. Brake
The red F(USA only)/! (Canada only) indicator lamp in the
instrument cluster lights up and awarning tone also sounds.
You are driving with the parking brake applied or are making an emer-
gency stop using the parking brake.
XRelease the parking brake (Ypage 133).
Display messages( vehicles without steeringw heel buttons)193
On-board computer and displays
Z
Page 196 of 310
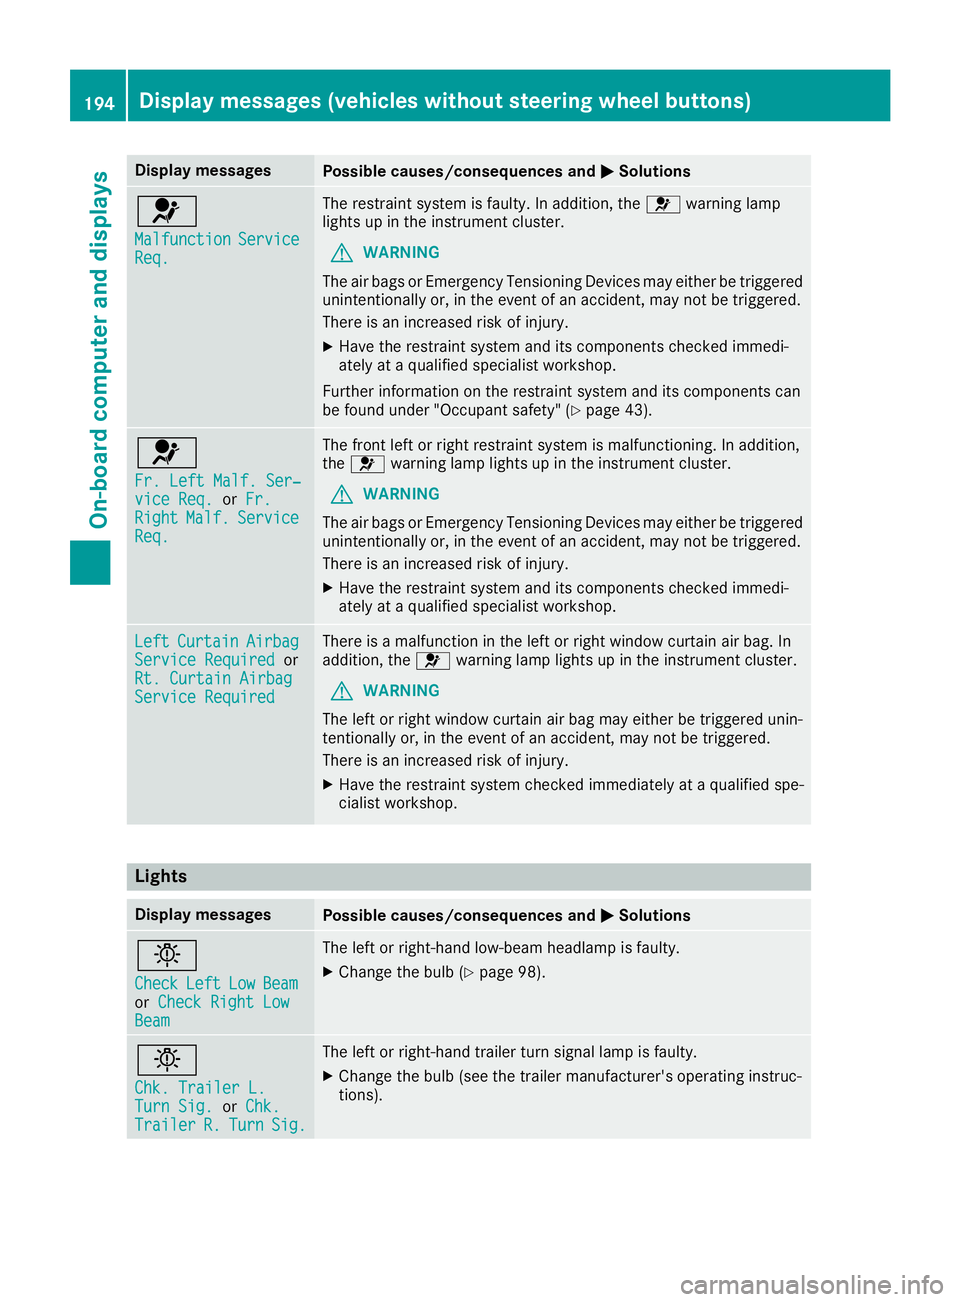
Display messagesPossible causes/consequences andMSolutions
6
MalfunctionServiceReq.
The restrain tsystem is faulty. In addition ,the 6 warning lamp
lights up in th einstrumen tcluster.
GWARNIN G
The air bags or Emergency Tensioning Devices may either be triggered
unintentionally or, in th eevent of an accident, may no tbetriggered .
There is an increased ris kofinjury.
XHavethe restrain tsystem and it scom ponent schecked immedi-
ately at aqualified specialist workshop .
Further information on th erestrain tsystem and it scom ponent scan
be found under "Occupant safety" (
Ypage 43).
6
Fr. LeftMalf. Ser ‐viceReq.or Fr.RightMalf.Servic eReq.
The fron tleftorr ight restrain tsystem is malfunctioning .Inaddition ,
th e6 warning lamp lights up in th einstrumen tcluster.
GWARNIN G
The air bags or Emergency Tensioning Devices may either be triggered
unintentionally or, in th eevent of an accident, may no tbetriggered .
There is an increased ris kofinjury.
XHavethe restrain tsystem and it scom ponent schecked immedi-
ately at aqualified specialist workshop .
LeftCurtai nAirbagServiceRequiredor
Rt. Curtai nAirbag
Servic eRequired
There is amalfunction in th eleftorr ight window curtai nair bag. In
addition ,the 6 warning lamp lights up in th einstrumen tcluster.
GWARNIN G
The lef torright window curtai nair bag may either be triggered unin-
tentionally or, in th eevent of an accident, may no tbetriggered .
There is an increased ris kofinjury.
XHavethe restrain tsystem checke dimmediately at aqualified spe -
cialist workshop .
Lights
Display messagesPossible causes/consequences and MSolutions
b
CheckLeftLowBeamorCheck Right LowBea m
The lef torright-hand low-beam headlamp is faulty.
XChange th ebulb (Ypage 98).
b
Chk .Traile rL.TurnSig.or Chk .Traile rR.TurnSig.
The lef torright-hand trailer tur nsignal lamp is faulty.
XChange th ebulb (see th etrailer manufacturer' soperating instruc-
tions).
194Display message s(vehicles withou tsteering wheelbuttons)
On-board computera nd displays
Page 197 of 310
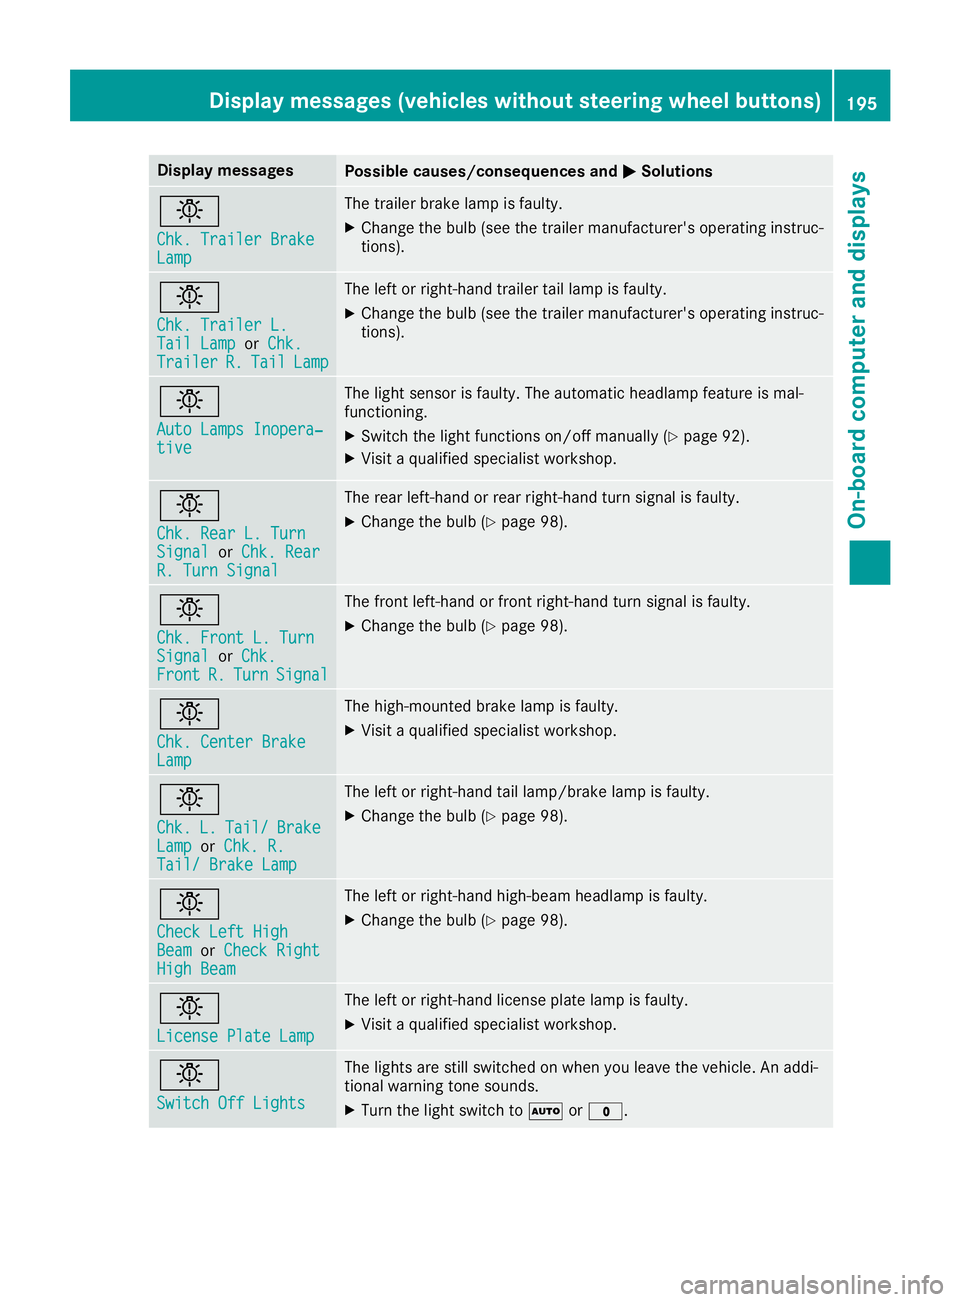
Display messagesPossible causes/consequences andMSolutions
b
Chk.Traile rBrakeLamp
The trailer brak elamp is faulty.
XChange th ebulb (see th etrailer manufacturer' soperating instruc-
tions).
b
Chk .Traile rL.TailLampor Chk .Traile rR.TailLamp
The lef torright-hand trailer tai llamp is faulty.
XChange th ebulb (see th etrailer manufacturer' soperating instruc-
tions).
b
Aut oLamps Inopera‐tive
The ligh tsensor is faulty. The automatic headlamp feature is mal-
functioning .
XSwitchthe ligh tfunction son/of fmanually (Ypage 92).
XVisitaqualified specialist workshop .
b
Chk.RearL.T urnSignalor Chk .RearR. Tur nSignal
The rear left-han dorrear right-hand tur nsignal is faulty.
XChange th ebulb (Ypage 98).
b
Chk .Front L. Tur nSignalorChk .FrontR.TurnSignal
The fron tleft-han dorfrontright-hand tur nsignal is faulty.
XChange th ebulb (Ypage 98).
b
Chk .Center BrakeLamp
The high-mounte dbrak elamp is faulty.
XVisit aqualified specialist workshop .
b
Chk.L.Tail/BrakeLamporChk .R.Tail/ Brake Lam p
The leftorright-hand tai llamp/brake lamp is faulty.
XChange th ebulb (Ypage 98).
b
Check Lef tHighBea morCheck RightHig hBeam
The lef torright-hand high-beam headlamp is faulty.
XChange th ebulb (Ypage 98).
b
Licens ePlate Lam p
The leftorright-hand license plat elamp is faulty.
XVisit aqualified specialist workshop .
b
Switch Off Lights
The lights are still switched on when you leav ethe vehicle. An addi-
tional warning tone sounds.
XTurn th eligh tswitch to Ãor$.
Display message s(vehicles withou tsteering wheelbuttons)19 5
On-board computera nd displays
Z