weight MERCEDES-BENZ METRIS 2016 MY16 Operator’s Manual
[x] Cancel search | Manufacturer: MERCEDES-BENZ, Model Year: 2016, Model line: METRIS, Model: MERCEDES-BENZ METRIS 2016Pages: 310, PDF Size: 7.28 MB
Page 237 of 310
Alsoo bserve the safety informatio ninthe load-
ing directions (Ypage 232).
XFil lspaces between the load and the cargo
compartment wall sorwheelhousings (form-
locking). Use rigid load securing aids, such as
wedges, wooden fixings or padding.
XAttach secured and stabilized load sinall
directions to the cargo tie-down ring sand the
guid erails in the rear.
Onlyu setie downs ,suc hasl ashing nets and
lashing straps, thath aveb eent este din
accordance with current standards.
Whe nsecuring aload, always us ethe closest
cargo tie-down ring sand pa dsharp edges for
protection.
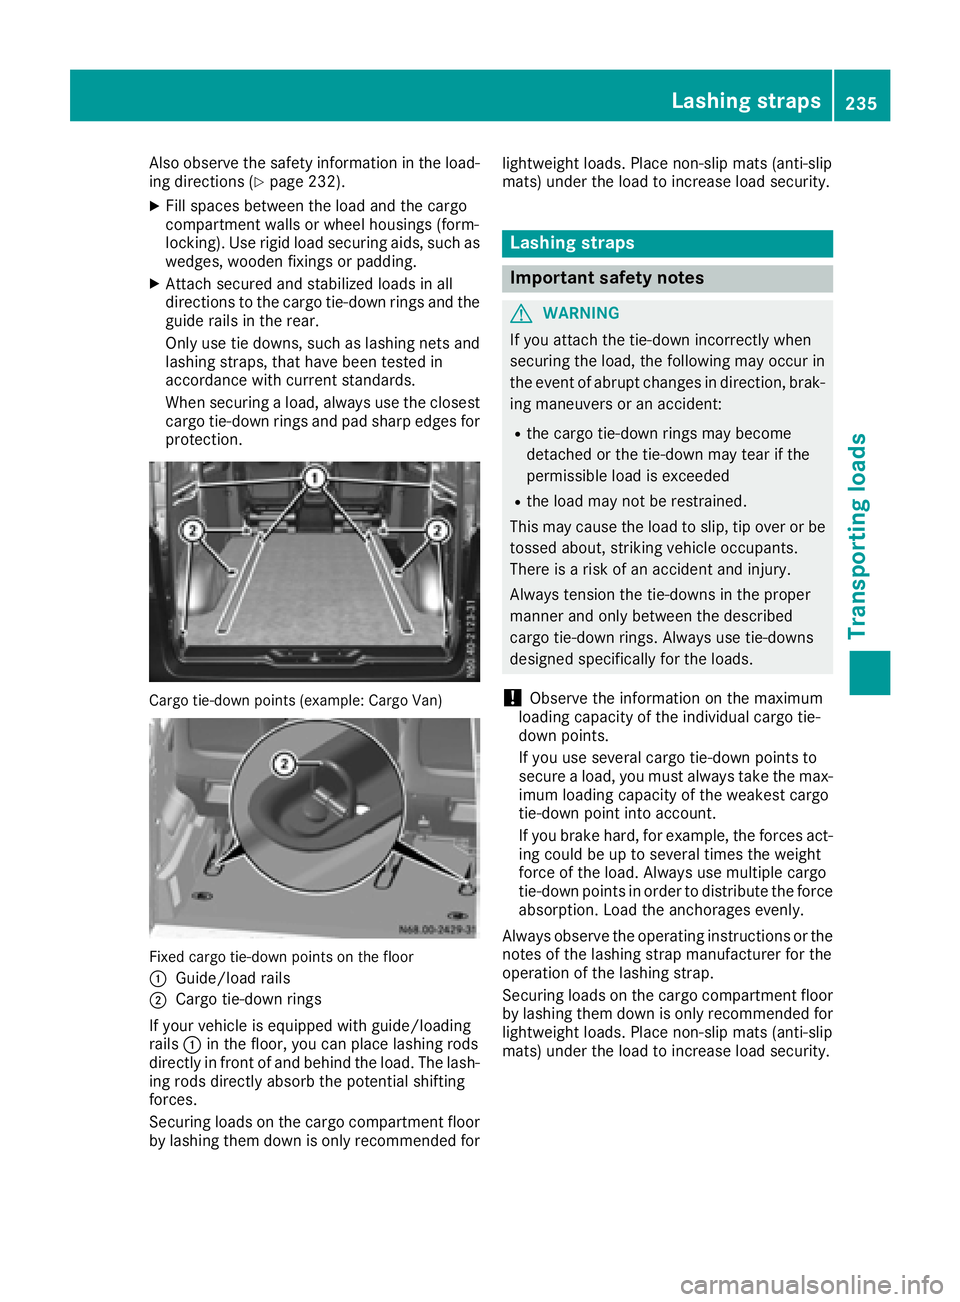
Cargo tie-down points (example: Cargo Van)
Fixe dcargo tie-down points on the floor
:
Guide/loadr ails
;Cargo tie-down rings
If your vehicl eisequippe dwithg uide /loading
rails :in the floor, yo ucan place lashing rods
directl yinfront of and behind the load .The lash-
ing rod sdirectl yabsorbt he potential shifting
forces.
Securing load sonthe cargo compartment floor
by lashing them down is onlyr ecommendedfor lightweight loads. Place non-slip mats (anti-slip
mats) under the load to increase load security.
Lashin
gstraps
Important safety notes
GWARNING
If yo uattach the tie-down incorrectly when
securing the load ,the following mayo ccurin
the event of abrupt changesind irection, brak-
ing maneuver soranaccident:
Rthe cargo tie-down ring smaybecome
detached or the tie-down mayt earifthe
permissibl eloa dise xceeded
Rthe load mayn ot be restrained.
Thi sm aycause the load to slip ,tip ove rorbe
tossed about, striking vehicl eoccupants.
There is ariskofana ccident and injury.
Alway stension the tie-downs in the proper
manner and onlyb etween the described
cargo tie-down rings. Alway susetie-downs
designeds pecifically for the loads.
!Observethe informatio nonthe maximum
loading capacity of the individual cargo tie-
down points.
If yo uusesevera lcargo tie-down points to
secur eaload, youm usta lway stake the max-
imu mloadin gcapacity of the weakest cargo
tie-down point into account.
If yo ubrake hard, for example, the forces act-
ing could be up to severa ltime sthe weight
forc eoft he load .Alway susemultipl ecargo
tie-down points in order to distribute the force absorption. Loa dthe anchorages evenly.
Alway sobserve the operating instructions or the
notes of the lashing strapm anufactu rer fo
r the
o
peratio nofthe lashing strap.
Securing load sonthe cargo compartment floor
by lashing them down is onlyr ecommendedfor
lightweight loads. Place non-slip mats (anti-slip
mats) under the load to increase load security.
Lashin gstraps235
Transporting loads
Z
Page 241 of 310
You will findinformation about the maximum
roof load and maximum tailgat eload under
"Cargo tie-down point sand carrier systems"
(
Ypage 304).
!Make sure that:
Rthe screws of the roof carrier are tightened
to am aximum torque of 7.4l b-ft(10 Nm) in
the threaded hole sprovided and
Rthere is aminimu mboltp enetration of
4t urns.
Only instal lroof carriers and rear racks that
have beena pproved or recommended for
Mercedes-Benz vehicles. This wil lhelpa void
damage to the vehicle.
You can instal laroof carrie ronthe roof and, for
example, arear-mounted cycle rack on the tail-
gate.
Install the protective caps on the securing
thread safter you have removedt he roof carrier.
If you have installed arear rack on the tailgate,
the additiona lweight reduces the assistance
provided by the gas pressure springs whe nthe
tailgate is opened. You wil lthen need more force
to open the tailgate. At low outside tempera-
tures below freezing you wil lneed to provide
extra support for the tailgate to prevent it from
sinking unintentionally.
Carrier systems239
Transporting loads
Z
Page 257 of 310
This will prevent smears and reduce wiping
noises caused by residue on the windshield.
Ron vehicles with rear doors, from the rear view
camera lens in the top of the license plate
molding (
Ypage 257)
Washing by hand
In some countries, washing by hand is only
allowed at specially equipped washing bays.
Observe the legal requirementsofthe country
you are currently in when washing by hand.
XDo not use hot water and do not wash the
vehicle in direct sunlight.
XUse asoft car sponge.
XUse amild cleaning agent, e.g. aMercedes-
Benz approved car shampoo.
XThoroughly hose down the vehicle with agen-
tle jet of water.
XDo not point the water jet directly towards the
air inlets.
XUse plenty of water and rinse out the sponge
frequently.
XRinse the vehicle with clean water and dry
thoroughly with achamois.
XDo not let the cleaning agents dry on the
paintwork.
When using the vehicle in winter, remove all
traces of road salt deposits carefully and as
soon as possible.
Power washers
GWARNING
The water jet from acircular jet nozzle (dirt
blasters) can cause invisible exterior damage
to the tires or chassis components .Compo-
nentsd amaged in this way may fail unexpect-
edly. There is arisk of an accident.
Do not use power washers with circular jet
nozzles to clean the vehicle. Have damaged
tires or chassis components replaced imme-
diately.
!Under no circumstances use power washers
in the vehicle interior. The pressurized water
and associated spray produced by the power
washer could cause extensive damage to the
vehicle.
!When using high-pressure cleaning equip-
ment,m aintainaminimum distance of
approx. 1ft(30 cm) between the spray nozzle
and the vehicle parts. Do not use apower
washer with around-jet nozzle. You could
damage the vehicle or engine parts.
!Keep the water jet moving constantly while
cleaning. This will avoid causing damage to
the vehicle.
Do not point the water jet at:
Rdoor joints
Rrear view camera
Rair bellows
Rbrake hoses
Rwheel balance weights
Relectrical components
Relectrical connections
Rseals
Rdrive train, especially not at the intermedi-
ate bearing of the propeller shaft
Cleaning the engine
!Water must not enter intak eorventilation
openings. When cleaning with high pressure
water or steam cleaners, the spray must not
be aimed directly at electrical components or the terminals of electrical lines.
Preserve the engine after the engine has been
cleaned. Protectt he belt drive system from
exposure to the preservative agent.
Also observe the information under "Power
washers" (
Ypage 255).
Cleaning the paintwork
!Do not affix:
Rstickers
Rfilms
Rmagnetic plates or similar items
to painted surfaces. You could otherwise
damage the paintwork.
Scratches, corrosived eposits, areas affected by
corrosion and damage caused by inadequate
care cannot alwaysbec ompletely repaired. In
such cases, visit aqualified specialist workshop.
Care255
Maintenance and care
Z
Page 258 of 310
XRemove impurities immediately, wherepos-
sible, whils tavoidin grubbing to ohard.
XSoak insec tremain swithi nsec tremove rand
rinse off th etreated areas afterwards .
XSoak bird droppings wit hwater and rinse off
th et reated areas afterwards .
XRemove coolant, brakefluid ,tre er esin, oils ,
fuel sand greases by rubbing gentl ywitha
cloth soaked in petroleum ether or lighte r
fluid .
XUse tar remove rtoremove tar stains.
XUse silicon eremove rtoremove wax.
Cleaning th ewindows
GWARNIN G
You could become trapped by th ewindshield
wiper siftheys tart moving while cleaning th e
windshield or wiper blades. There is arisko f
injury.
Always switch off th ewindshield wiper sand
th ei gnition before cleaning th ewindshield or
wiper blades.
!Do no tfoldt he windshield wiper saway from
th ew indshield unless th ehoodisc losed. Oth-
erwise, you could damag ethe hood.
!Hold th ewiper arm securel ywhen foldin g
back. The windshield could be damaged if th e
wiper arm smack sagainst it suddenly.
!Do no tuse dry cloths, abrasive products ,
solvents or cleaning agents containing sol-
vents to clean th einside of th ewindows .Do
no ttou ch th einsides of th ewindows wit h
har dobjects ,e.g.ani ce scrape rorring. There
is otherwise ariskofd amaging th ewindows .
!Clean th ewater drainag echannels of th e
windshield and th erear window at regular
intervals. Deposit ssuchasl eaves, petals and
polle nmay under certain circumstances pre -
ven twater from drainin gaway. This can lead
to corrosio ndamag eand damag etoelec-
tronic components.
XClean th einside and outside of th ewindows
wit had amp cloth and acleaning agen ttha tis
recommended and approve dbyMercedes-
Benz.
Exterior
Cleaning th ewheels
!Do no tuse any acidic or alkalin ecleaning
agents .The yc an caus ecorro sionont he
whee lbolt sort heretainer spring sfor th e
wheel-balancin gweights .
!Do notpark th evehicl efor an extended
period straight after cleaning it ,particularly
after having cleane dthe wheels wit hwhee l
cleaner. Whee lcleaners could caus e
increased corrosio nofthebrak ediscsa nd
brak epads/linings. Fo rthisr eason ,you
should driv efor afew minute safter cleaning .
Braking heat sthe brak ediscsa nd th ebrak e
pads/linings, thus dryin gthem. The vehicl e
can then be parked.
If you clean th ewheels wit hapower washer,
observ ethe safet ynotes for th epower washe r
(
Ypage 255). You could otherwise damag ethe
tires .
Cleaning th ewiper blades
GWARNIN G
You could become trapped by th ewindshield
wiper siftheys tart moving while cleaning th e
windshield or wiper blades. There is arisko f
injury.
Always switch off th ewindshield wiper sand
th ei gnition before cleaning th ewindshield or
wiper blades.
!Do no tfoldt he windshield wiper saway from
th ew indshield unless th ehoodisc losed. Oth-
erwise, you could damag ethe hood.
!Do no tpull th ewiper blade .Otherwise, th e
wiper blade could be damaged.
!Do no tclean wiper blade stoo often and do
no trub them to ohard. Otherwise, th egraph-
it ec oating could be damaged. This could
caus ewiper noise.
!Hold th ewiper arm securel ywhen foldin g
back. The windshield could be damaged if th e
wiper arm smack sagainst it suddenly.
XTurn th ekeyto position 0in th eignition loc k
or remove it .
XFold thewindshield wiper arm saway from th e
windshield until you fee lthe me ngage .
256Care
Maintenance and care
Page 266 of 310
XConnect thenegative terminal clam pofthe
jumper cabl etonegative terminal ;of the
donor veh icle's battery, and then to earth
contact ?of your own veh icle.
XInsertt hekeyintot he ignition locka nd start
th ee ngine.
You can no wswitch electrical consumers
back on excep tthe lighting system.
XBefore disconnecting th ejumper cables, let
th ee nginer un for several minutes.
XDisconnect th enegative terminal of the
jumper cabl efrome arthc ontac t? and then
from negative terminal ;of th edonor veh i-
cle's battery.
XDisconnect th epositiv etermi nal clam pofthe
jumper cabl efromp ositiv etermi nalAon the
jump-startin gconnectio npoint, and then
from positiv etermi nal=of th edonor veh i-
cle's battery.
Contac tprotection cover :isautomatically
returned forwards to its original positio nby
th es pring force and th ejump-startin gcon-
nection pointisc losed.
XPositio nthe cover on positiv etermi nal=of
th ed onor veh icle's battery.
You can no wswitch on th elighting system.
XHav ethe battery checked at aqualified spe-
cialist workshop.
Tow-startin gand towin gaway
Important safety notes
GWAR NING
Functionsr elevanttosafety are restricted or
no longer availab leif:
Rthee ngineisn otrunning.
Rtheb rak esystem or th epower steering is
malfunctioning.
Rthere isam alfunctio ninthevoltage supply
or th evehicle 's electrical system.
If your veh icle is bein gtow ed, muc hmore
force may benecessary to steer or brake.
Thereisar iskofana cciden t.
In suchc ases, use atow bar. Before to wing,
mak esure that th esteering moves freely.
GWARNING
You can no longer steer th evehicle ifthe
steering wheel lockh as been engaged.There
is ar iskofana ccident.
Alwa ysswit ch off th eignition when to wingthe
vehicle withat owcabl eorat owbar.
GWARNING
When to wingor tow-startin ganother vehicle
and its weightisg reatertha nt he permissible
gross weightofy our vehicle,the :
Rthet ow ing eye could detach itself
Rthev ehicle /traile rcom binatio ncould roll-
over.
Thereisar iskofana ccident.
When towing or tow-startin ganother vehicle,
its weights hould notbegreatertha nt he per-
missible gross weightofy our vehicle.
In formation on th egross vehicle weightc anbe
foun dont hevehicle identification plate
(
Ypage 294).
!Secure th etow rop eort owbar to th etow ing
eye or trailer to whitch only. Otherwise, the
vehicle could become damaged.
!Do no tuse th etow ing eye for recovery, this
could damag ethe vehicle .Ifindoubt,recover
th ev ehicle withac rane.
!Drive slowlya nd smoothly when to wing.
Excessivet ractive power could otherwise
damag ethe vehicles.
!Shift th eautomatic transmission to Nand
do noto pen th edriver' sorf rontpassenger's
door durin gtow ing .The automatic transmis-
sion may otherwise shifttop ositionP,which
could damag ethe transmission.
!The vehicle can be towed amaximum of
30 mile s(50km ).The to wingspeedof30m ph
(50 km/h) must no tbeexceeded.
If th evehicle has to betowed mor ethan
30 mile s(50km) ,the entire vehicl emus
tbe
ra
ised and transported.
When towing away, you must observet helegal
requirement sfor th ecountr yinw hichy ou are
currently driving.
It is bette rtohave th evehicle transported than
to have it towed.
264Tow-startin gand towing away
Breakdown assistance
Page 276 of 310
Maximum tire pressures
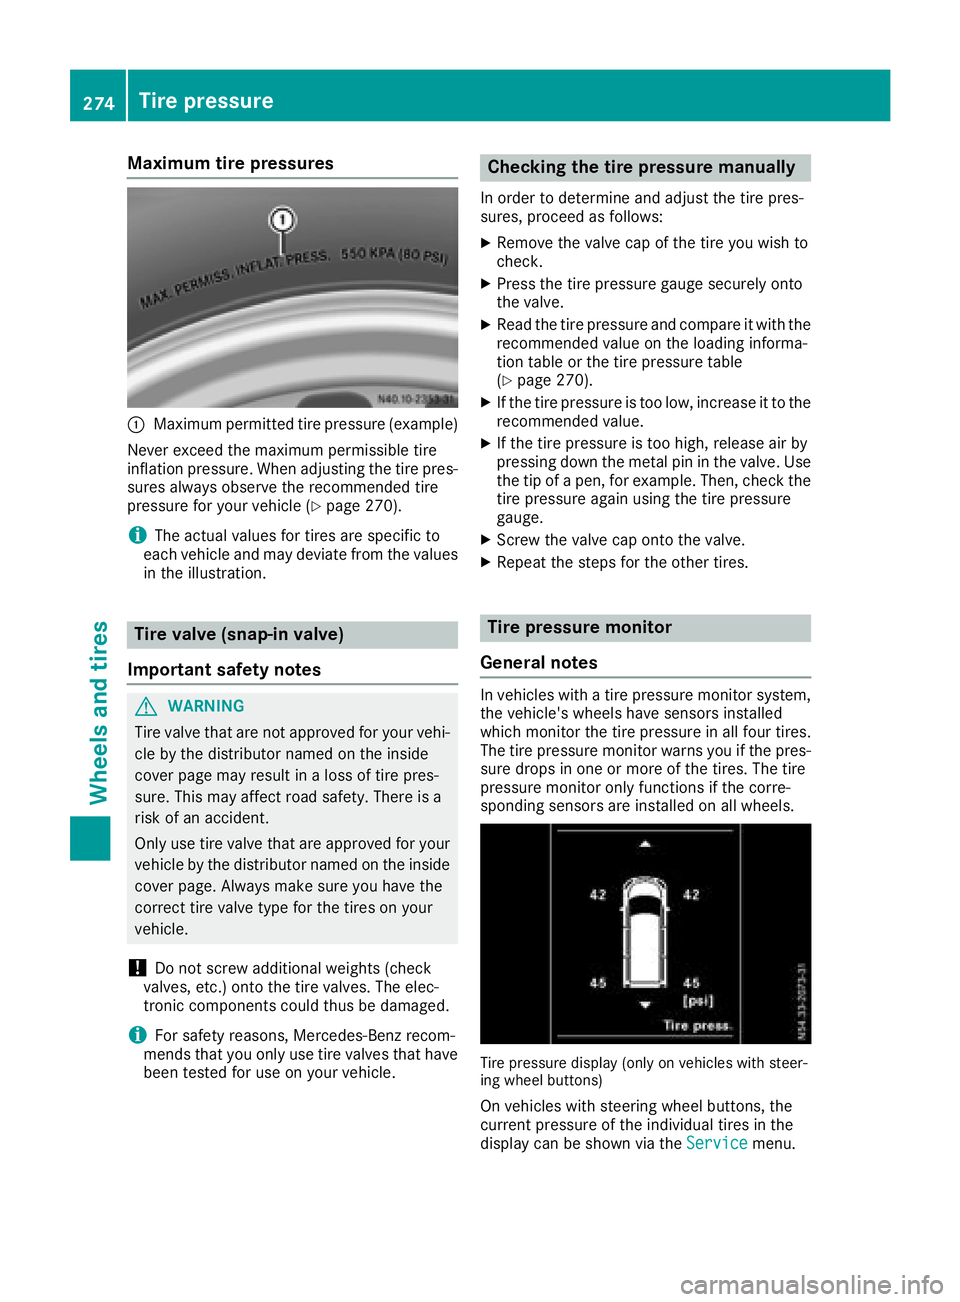
:Maximumpermitted tire pressure (example)
Never exceed the maximu mpermissible tire
inflation pressure. When adjusting the tire pres-
sure salway sobserve the recommendedt ire
pressure for you rvehicl e(
Ypage270).
iThe actua lvalues for tires are specific to
each vehiclea nd may deviate from the values
in the illustration.
Tire valve (snap-in valve)
Important safety notes
GWARNING
Tire valve that are not approved for you rvehi-
cle by the distributor named on the inside
cover pag emay result in aloss of tire pres-
sure .This may affect road safety .There is a
risk of an accident.
Only use tire valve that are approved for your
vehiclebyt he distributor named on the inside
cover page. Always make sure you have the
correct tire valve type for the tires on your
vehicle.
!Do not screw additiona lweights (check
valves, etc.) onto the tire valves. The elec-
tronic components coul dthus be damaged.
iFor safety reasons, Mercedes-Benz recom-
mends that you only use tire valve sthat have
been tested for use on you rvehicle.
Checking the tire pressure manually
In order to determine and adjust the tire pres-
sures, proceedasf ollows:
XRemove the valve cap of the tire you wis hto
check.
XPress the tire pressure gauge securely onto
the valve.
XRea dthe tire pressure and compare it with the
recommendedv alueont he loading informa-
tion table or the tire pressure table
(
Ypag e270).
XIf the tire pressure is too low ,increas eittothe
recommendedv alue.
XIf the tire pressure is too high ,release air by
pressing downt he metal pin in the valve .Use
the tip of apen, for example. Then, check the
tire pressure again using the tire pressure
gauge.
XScrew the valve cap onto the valve.
XRepeat the steps for the other tires.
Tire pressure monitor
General notes
In vehicles with atire pressure monitor system,
the vehicle's wheels have sensors installed
which monitor the tire pressure in all four tires.
The tire pressure monitor warns you if the pres- sure drops in one or more of the tires. The tire
pressure monitor only functions if the corre-
sponding sensors are installed on all wheels.
Tire pressure display (only on vehicles with steer-
ing whee lbuttons)
On vehicles with steering whee lbuttons, the
current pressure of the individua ltires in the
display can be shownv ia theService
menu.
274Tire pressure
Wheels and tires
Page 280 of 310
Tire pressure tables
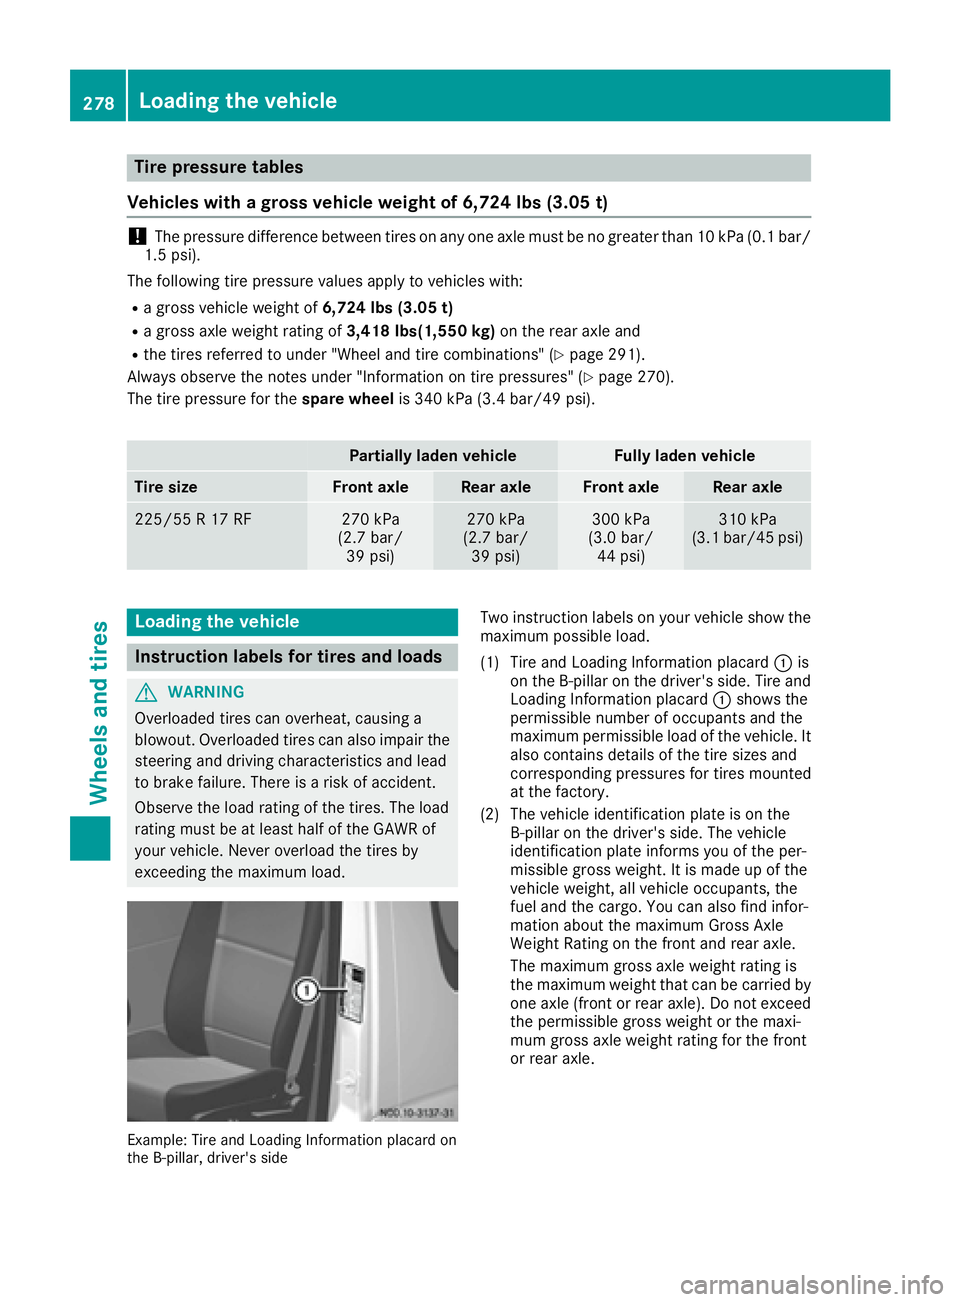
Vehicle swithag ross vehicle weight of 6,724 lb s(3.05 t)
!The pressure differenc ebetween tire sonany one axl emustbenog reaterthan1 0kPa (0.1 ba r/
1.5 psi).
The following tire pressure values apply to vehicles with:
Rag ross vehicle weight of 6,724 lbs (3.05 t)
Ragross axle weight rating of 3,418 lbs(1,550 kg)on the rear axle and
Rthe tires referredtounder"Wheel and tire combinations" (Ypag e291).
Always observe the notes unde r"Information on tire pressures "(
Ypage270).
The tire pressure for the spare wheelis 340 kPa (3.4 bar/49 psi).
Partiallyladen vehicleFully laden vehicle
Tire sizeFron taxleRear axleFron taxleRear axle
225/55 R17RF270 kPa
(2.7 bar/ 39 psi)270 kPa
(2.7 bar/ 39 psi)300 kPa
(3.0 bar/ 44 psi)310 kPa
(3.1 bar/45 psi)
Loading the vehicle
Instruction labels for tires and loads
GWARNING
Overloaded tires can overheat, causing a
blowout. Overloaded tires can also impair the steering and driving characteristics and lead
to brake failure. There is arisk of accident.
Observe the loa drating of the tires. The load
rating must be at least hal fofthe GAWR of
you rvehicle. Never overload the tires by
exceeding the maximu mload.
Example: Tire and Loading Information placard on
the B-pillar, driver's side
Two instructio nlab elsony ourvehicle show the
maximu mpossibl eload.
(1) Tire and Loading Information placard :is
on the B-pillar on the driver's side .Tire and
Loading Information placard :showst he
permissible numbe rofoccupants and the
maximu mpermissible loa dofthe vehicle. It
also contains details of the tire sizes and
corresponding pressures for tires mounted
at the factory.
(2) The vehicle identification plate is on the B-pillar on the driver's side .The vehicle
identification plate informs you of the per-
missible gross weight. It is made up of the
vehicle weight, al lvehicle occupants, the
fuel and the cargo .You can also find infor-
matio nabout the maximu mGrossAxle
Weight Rating on the front and rear axle.
The maximu mgross axle weight rating is
the maximu mweight that can be carrie dby
one axle (front or rear axle). Do not exceed the permissible gross weight or the maxi-
mum gross axle weight rating for the front
or rear axle.
278Loading the vehicle
Wheels and tires
Page 281 of 310
Tire and LoadingInfor matio nplacard
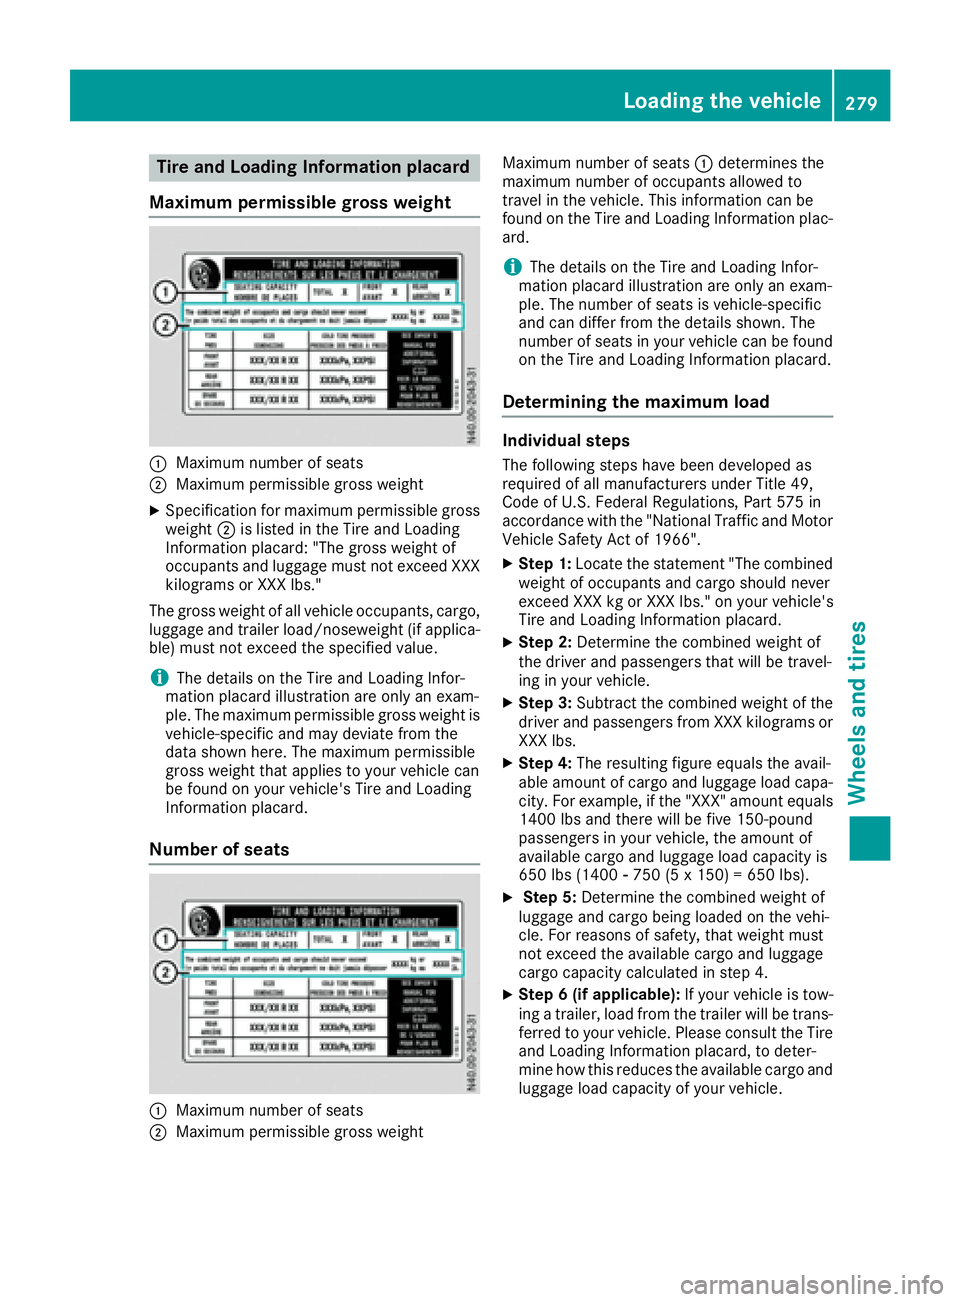
Maximum permissible gross weight
:Maximum numbe rofseats
;Maximum permissibl egross weight
XSpecificatio nfor maximum permissibl egross
weight ;is listed in the Tire and Loading
Informatio nplacard: "The gross weight of
occupants and luggage must not exceed XXX
kilograms or XXX lbs."
The gross weight of al lvehicl eoccupants, cargo,
luggage and trailer load/noseweight (i fappli ca-
ble) must not exceed the specifie dvalue.
iThe details on the Tire and Loading Infor-
matio nplacard illustratio nareonl yane xam-
ple. The maximum permissibl egross weight is
vehicle-specific and mayd eviate fromt he
data shown here. The maximum permissible
gross weight thata ppliesto your vehicl ecan
be found on your vehicle's Tire and Loading
Informatio nplacard.
Numbe rofseats
:Maximum numbe rofseats
;Maximum permissibl egross weight Maximum numbe
rofseats:determine sthe
maximum numbe rofoccupants allowe dto
travel in the vehicle. Thi sinformatio ncan be
found on the Tire and Loading Informatio nplac-
ard.
iThe details on the Tire and Loading Infor-
matio nplacard illustratio nareonl yane xam-
ple. The numbe rofseats is vehicle-specific
and can differf romthe details shown. The
numbe rofseats in your vehicl ecan be found
on the Tire and Loading Informatio nplacard.
Determining the maximum load
Individual steps
The following step shaveb eend eveloped as
required of al lmanufacturer sunder Title 49,
Code of U.S. Federa lRegulat ions, Part 575 in
accordance with the "Nationa lTraffica nd Motor
Vehicl eSafety Act of 1966".
XStep1 :Locate the statement "The combined
weight of occupants and cargo shoul dnever
exceed XXX kg or XXX lbs." on your vehicle's
Tire and Loading Informatio nplacard.
XStep2 :Determine the combine dweigh tof
the driver and passengers thatw illbet ravel-
ing in your vehicle.
XStep3 :Subtract the combine dweigh toft he
driver and passengers fromX XX kilograms or
XXX lbs.
XStep4 :The resulting figur eequals the avail-
able amount of cargo and luggage load capa-
city .For example, if the "XXX" amount equals
1400 lb sand there will be fiv e150-pound
passengers in your vehicle, the amount of
availabl ecargo and luggage load capacity is
650 lb s(1400 Ò750 (5 x150) = 650 lbs).
XStep5 :Determine the combine dweigh tof
luggage and cargo being loaded on the vehi-
cle .For reasons of safety ,thatw eightmust
not exceed the availabl ecargo and luggage
cargo capacity calculate dinstep 4.
XStep6( ifapplicable): If your vehiclei stow-
ing atrailer, load fromt he trailer will be trans-
ferred to your vehicle. Please consul tthe Tire
and Loading Informatio nplacard, to deter-
min ehow thisr educesthe availabl ecargo and
luggage load capacity of your vehicle.
Loadin gthe vehicle279
Wheel sand tires
Z
Page 282 of 310
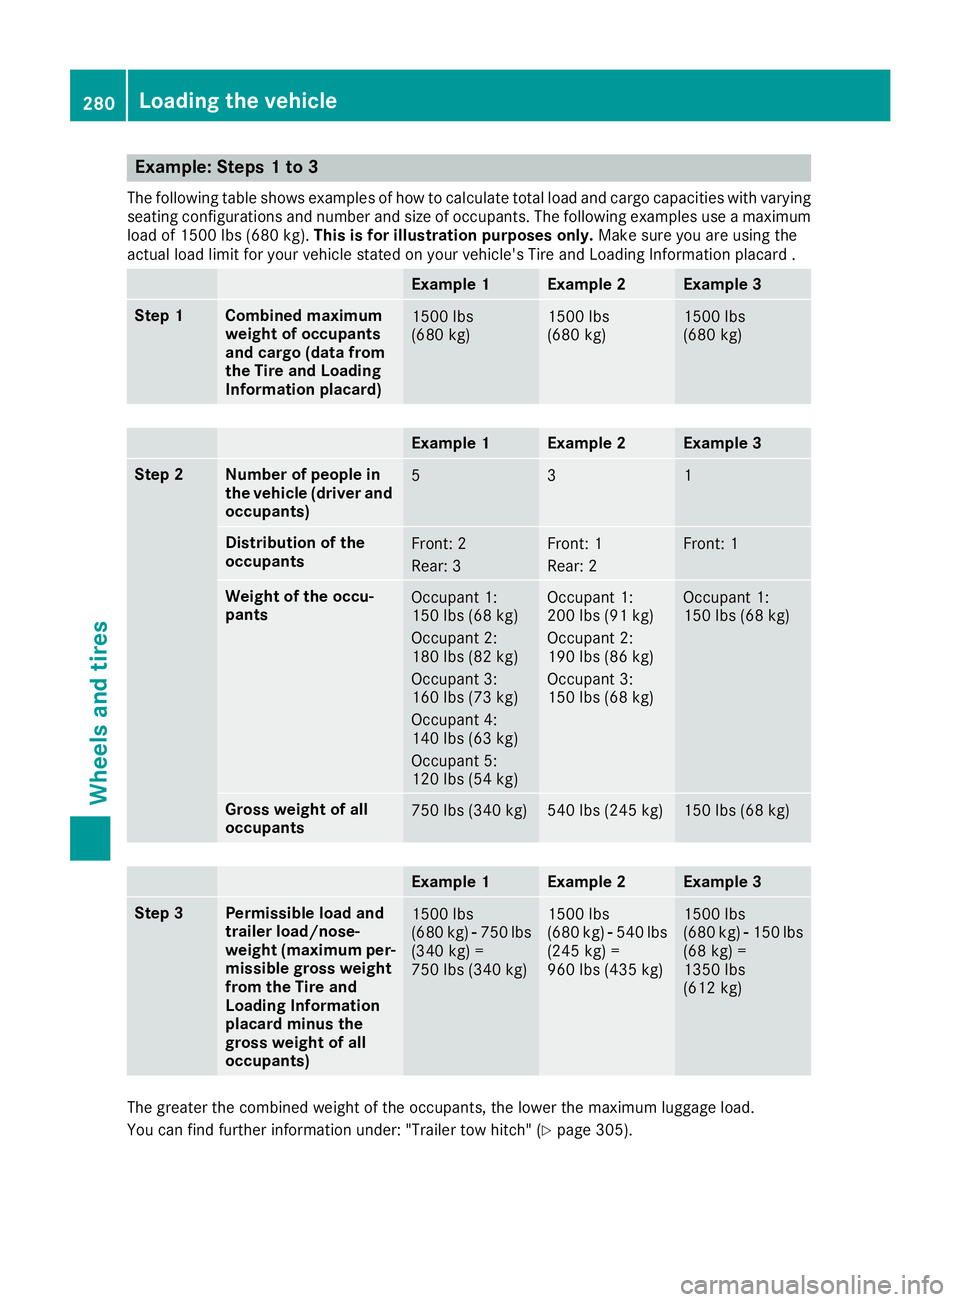
Example: Steps1to3
The followingtable showsexamples of how to calculate total load and cargo capacities with varying
seating configurations and number and sizeofo ccupants. The followingexamples useamaximum
load of 1500 lbs (68 0kg). This is for illustration purposes only. Makesure you are usingt he
actual load limit for your vehicle state donyour vehicle's Tire and Loading Information placard .
Example 1Example 2Example 3
Step 1Combined maximum
weight of occupants
and cargo (data from
theT irea nd Loading
Information placard)1500 lbs
(68 0kg)1500 lbs
(68 0kg)1500 lbs
(68 0kg)
Example 1Example 2Example 3
Step 2Number of people in
thev ehicle (driver and
occupants)531
Distribution of the
occupantsFront: 2
Rear: 3Front: 1
Rear: 2Front: 1
Weigh toftheoccu-
pantsOccupan t1:
15 0lbs (68 kg)
Occupan t2:
18 0lbs (82 kg)
Occupan t3:
16 0lbs (73 kg)
Occupan t4:
14 0lbs (63 kg)
Occupan t5:
12 0lbs (54 kg)Occupan t1:
20 0lbs (91 kg)
Occupan t2:
19 0lbs (86 kg)
Occupan t3:
15 0lbs (68 kg)Occupan t1:
15 0lbs (68 kg)
Gross weight of all
occupants75 0lbs (34 0kg)540lbs (24 5kg)150lbs (68 kg)
Example 1Example 2Example 3
Step 3Permissible load and
trailer load/nose-
weight (maximum per-
missible gross weight
from th eTirea nd
Loading Information
placar dminus the
gross weight of all
occupants)1500 lbs
(68 0kg)Ò75 0lbs
(34 0kg) =
75 0lbs (34 0kg)1500 lbs
(68 0kg)Ò54 0lbs
(24 5kg) =
96 0lbs (43 5kg)1500 lbs
(68 0kg)Ò15 0lbs
(68 kg) =
1350 lbs
(61 2kg)
The greate rthe combined weightoft heoccupants, th elower th emaximum luggage load.
You can fin dfurther informatio nunder: "Trailer to whitch "(
Ypage 305).
280Loading th evehicle
Wheels and tires
Page 283 of 310
Vehicleidentificatio nplate
Even if yo uhavec alculate dthe totall oadc are-
fully ,you shoul dstillm ake sure thatt he permis-
sibl egross weight and the gross axl eweigh trat-
ing of your vehicl eare not exceeded .Thisd ata
can be found on the vehicl eide ntificatio nplate
on the B-pillar of your vehicl e(
Ypage 294).
Permissibl egross vehicle weight: the gross
weight of the vehicle, al loccupants, load and
traile rload/n oseweight (i fappli cable) must not
exceed the permissibl egross vehicl eweigh t.
Gros saxlew eightrating: the maximu mper-
missibl eloa dt hatc an be carrie dbyone axle
(front or rea raxle).
To ensure thaty ourvehicl edoesn ot exceed the
maximu mpermissibl evalue s(gros sv ehicle
weight and maximu mgross axl eweigh trating),
have your loaded vehicl e(including driver, occu-
pants, load ,and ful ltraile rloa difa pplicable)
weighed on asuitabl evehicl eweigh bridge.
Trailer load/noseweight
The traile rload/n oseweight affects the gross
weight of the vehicle. If atraile risa ttached, the
traile rload/n oseweight is included in the load
along with occupants and luggage. The trailer
load/noseweight is usuall yapproximately1 0%
of the gross weight of the traile rand its load.
What yous hould knowabout wheels
and tires
Tire labeling
Tire labeling
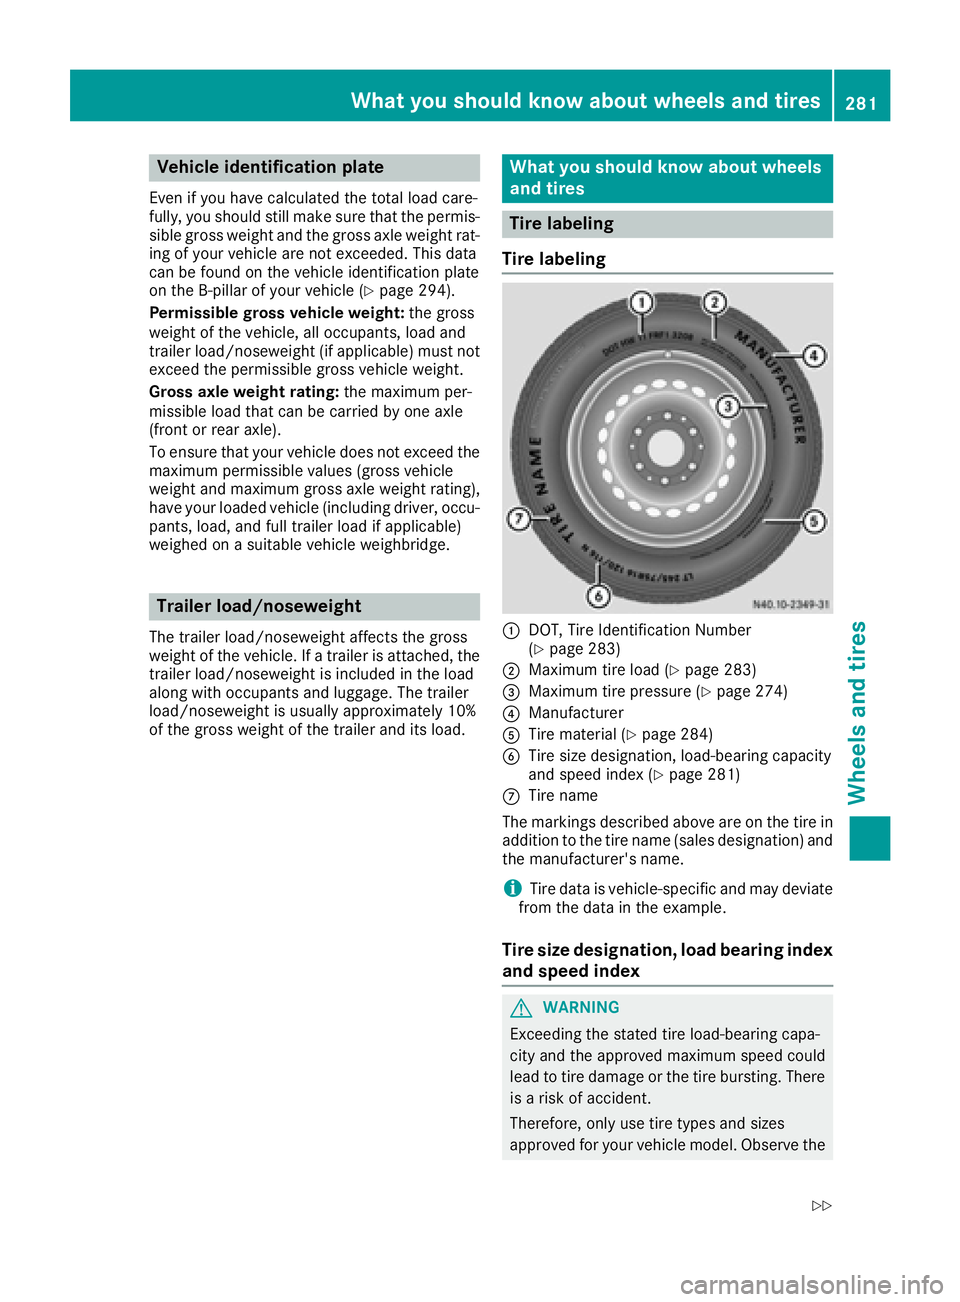
:DOT, Tire Identification Number
(Ypage 283)
;Maximu mtire load (Ypage 283)
=Maximu mtire pressure (Ypage 274)
?Manufacturer
ATire material (Ypage 284)
BTire size designation, load-bearing capacity
and speed index (Ypage 281)
CTire name
The marking sdescribe dabove are on the tire in
additio ntothe tire nam e(sale sdesig nation) and
the manufacturer' sname.
iTire data is vehicle-specific and mayd eviate
from the data in the example.
Tire size designation ,loa db earin gind ex
and speed index
GWARNING
Exceeding the stated tire load-bearing capa-
city and the approved maximu mspeed could
lead to tire damage or the tire bursting. There is ar iskofa ccident.
Therefore, onlyu setire types and sizes
approved for your vehicl emodel .Observe the
What yous hould knowa bout wheels and tires281
Wheelsand tires
Z