battery MERCEDES-BENZ METRIS 2017 MY17 Operator’s Manual
[x] Cancel search | Manufacturer: MERCEDES-BENZ, Model Year: 2017, Model line: METRIS, Model: MERCEDES-BENZ METRIS 2017Pages: 318, PDF Size: 5.01 MB
Page 81 of 318
You will find details of the tailgate opening
dimensions under "Technical data"
(
Ypage 311).
Opening and closing
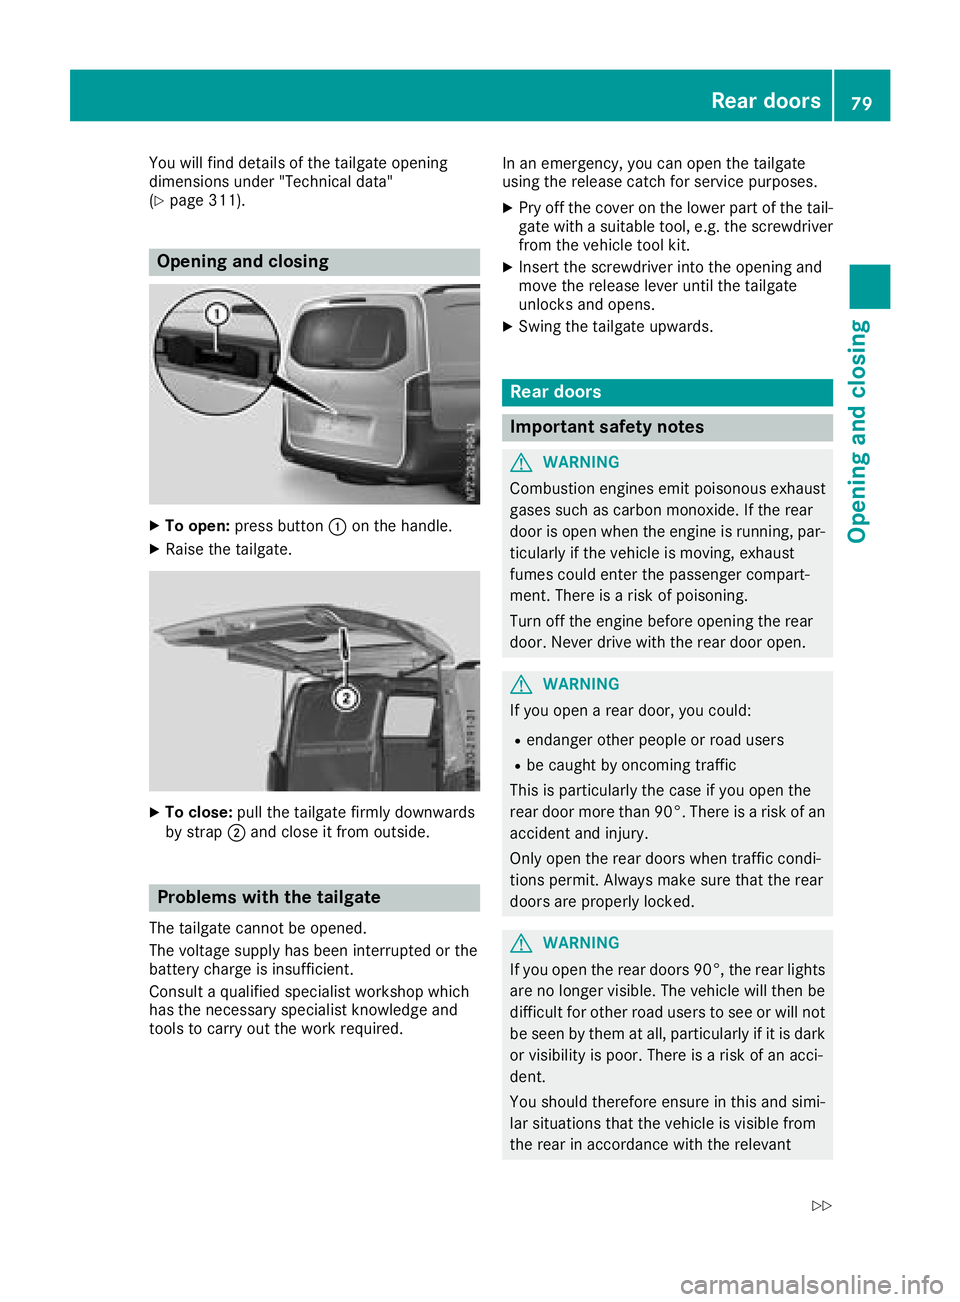
XTo open:press button :on the handle.
XRaise the tailgate.
XTo close: pull the tailgate firmly downwards
by strap ;and close it from outside.
Problems with the tailgate
The tailgate cannot be opened.
The voltage supply has been interrupted or the
battery charge is insufficient.
Consult a qualified specialist workshop which
has the necessary specialist knowledge and
tools to carry out the work required. In an emergency, you can open the tailgate
using the release catch for service purposes.
XPry off the cover on the lower part of the tail-
gate with a suitable tool, e.g. the screwdriver from the vehicle tool kit.
XInsert the screwdriver into the opening and
move the release lever until the tailgate
unlocks and opens.
XSwing the tailgate upwards.
Rear doors
Important safety notes
GWARNING
Combustion engines emit poisonous exhaust
gases such as carbon monoxide. If the rear
door is open when the engine is running, par-
ticularly if the vehicle is moving, exhaust
fumes could enter the passenger compart-
ment. There is a risk of poisoning.
Turn off the engine before opening the rear
door. Never drive with the rear door open.
GWARNING
If you open a rear door, you could:
Rendanger other people or road users
Rbe caught by oncoming traffic
This is particularly the case if you open the
rear door more than 90°. There is a risk of an
accident and injury.
Only open the rear doors when traffic condi-
tions permit. Always make sure that the rear
doors are properly locked.
GWARNING
If you open the rear doors 90°, the rear lights are no longer visible. The vehicle will then be
difficult for other road users to see or will not
be seen by them at all, particularly if it is dark
or visibility is poor. There is a risk of an acci-
dent.
You should therefore ensure in this and simi-
lar situations that the vehicle is visible from
the rear in accordance with the relevant
Rear doors79
Opening and closing
Z
Page 92 of 318
release knob;and slide the head restraint
back to the desired position.
XLet go of release button ;.
XEnsure that the head restraint has engaged
properly.
The head restraints can be removed and instal-
led as follows:
XTo remove: pull the head restraint up to the
stop.
XPress release button :and pull out the head
restraint.
XTo insert: insert the head restraint so that the
rod with the detents is on the left when viewed
in the direction of travel.
XPush the head restraint down until it engages.
Armrests
XTo adjust the armrest angle: fold the arm-
rest up by more than 45° to position 2.
The armrest is released.
XFold armrest 3forward to the stop.
XSlowly fold the armrest up to the desired posi-
tion.
XTo fold the armrest up: if necessary, fold the
armrest up by more than 90° to position 1.
Seat heating
GWARNING
Repeatedly switching on the seat heating can
cause the seat cushion and backrest pads to
become very hot. The health of persons with
limited temperature sensitivity or a limited
ability to react to high temperatures may be
affected or they may even suffer burn-like
injuries. There is a risk of injury.
Therefore, do not switch the seat heating on
repeatedly.
!When you leave your seat, do not place any-
thing on the seat and switch off the seat heat-
ing. Do not switch the seat heating on when
the seat is not occupied, e.g. when driving
without a front passenger. The seat heating
may otherwise overheat, causing damage to
the seat.
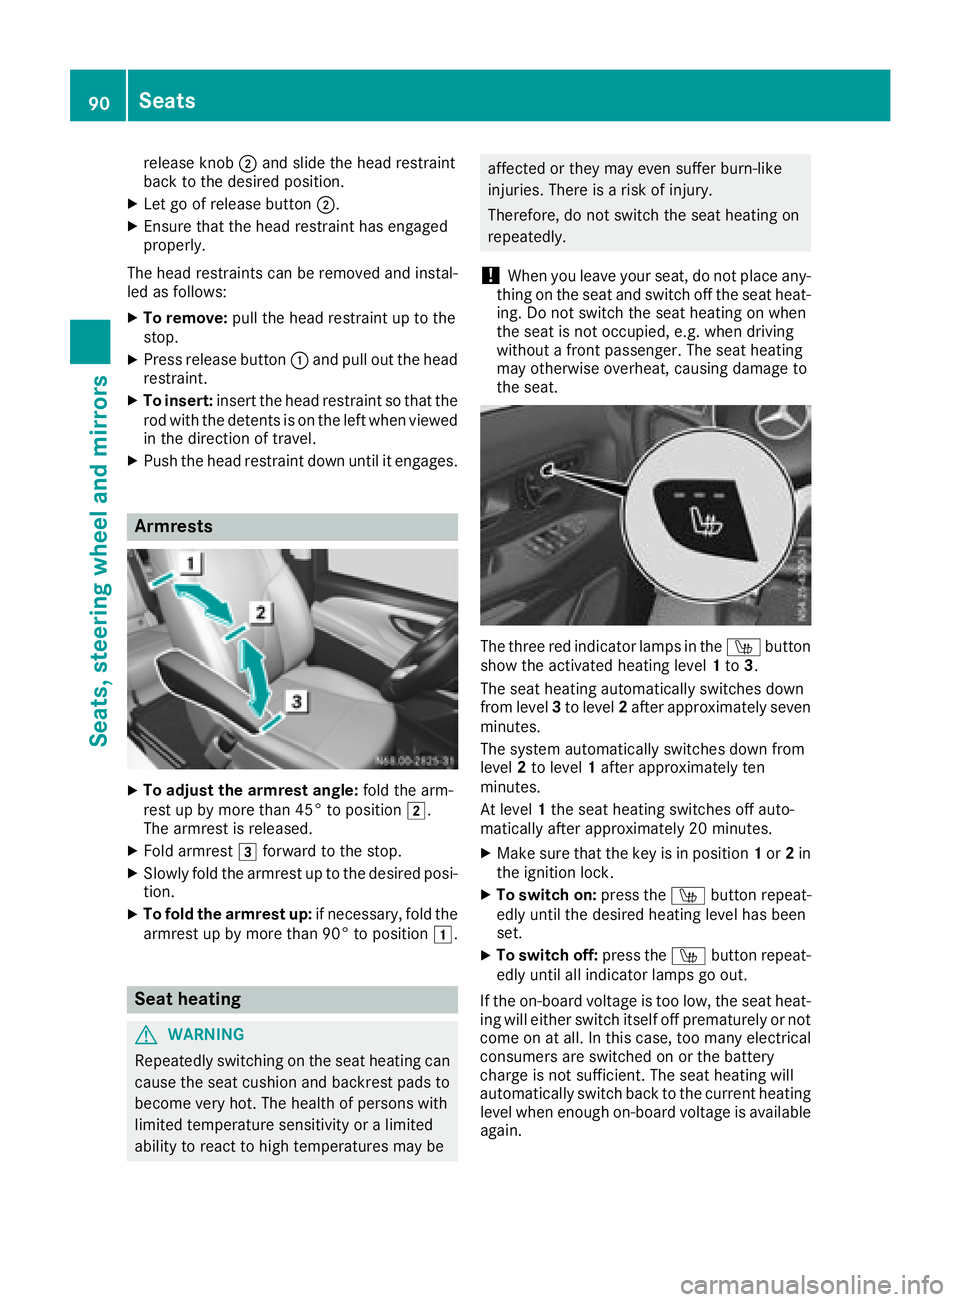
The three red indicator lamps in the Íbutton
show the activated heating level 1to 3.
The seat heating automatically switches down
from level 3to level 2after approximately seven
minutes.
The system automatically switches down from
level 2to level 1after approximately ten
minutes.
At level 1the seat heating switches off auto-
matically after approximately 20 minutes.
XMake sure that the key is in position 1or 2in
the ignition lock.
XTo switch on: press theÍbutton repeat-
edly until the desired heating level has been
set.
XTo switch off: press theÍbutton repeat-
edly until all indicator lamps go out.
If the on-board voltage is too low, the seat heat-
ing will either switch itself off prematurely or not
come on at all. In this case, too many electrical
consumers are switched on or the battery
charge is not sufficient. The seat heating will
automatically switch back to the current heating level when enough on-board voltage is available
again.
90Seats
Seats, steering wheel and mirrors
Page 97 of 318
Low-beam headlamps
When the ignition is switched on and the light
switch is in theLposition, the parking lamps
and low-beam headlamps are switched on even
if the light sensor does not sense dark ambient
light. This is particularly useful when there is fog
or rain.
XTo switch on: turn the key to position 2in the
ignition lock or start the engine.
XTurn the light switch to the Lposition.
The L indicator lamp in the instrument
cluster lights up.
Daytime running lamps
XTo switch on: turn the light switch to the
$ orà position.
Automatic headlamp mode
GWARNING
When the light switch is set to Ã, the low-
beam headlamps may not be switched on
automatically if there is fog, snow or other
causes of poor visibility due to the weather
conditions such as spray. There is a risk of an
accident.
In such situations, turn the light switch to
L.
Automatic headlamp mode is only a driving aid.
You are responsible for the vehicle lighting at all
times.
When the parking lamps and low-beam head-
lamps are switched on, the green T(parking
lamps) and L(low-beam headlamps) indica-
tor lamps in the instrument cluster light up.
à is the preferred light switch setting. The
light setting is automatically selected according
to the brightness of the ambient light (excep-
tion: poor visibility due to weather conditions,
such as fog, snow or spray):
RKey in position 1in the ignition lock: the
standing lamps are switched on or off auto-
matically depending on the brightness of the
ambient light.
RWhen the engine is on: depending on the
ambient light, the daytime running lamps or
the parking lamps and low-beam headlamps
are switched on/off automatically.
XTo switch on automatic headlamp mode:
turn the light switch to Ã.
Fog lamps/rear fog lamp
You can only switch the fog lamps on or off
manually in vehicles which have fog lamps
installed.
Front fog lamps help you to see and be seen in
conditions of poor visibility due to fog or pre-
cipitation. They can only be operated together
with the parking lamps or with the low-beam
headlamps.
The rear fog lamp improves visibility of your
vehicle for the traffic behind in the event of
heavy fog. Observe the legal requirements of the
country you are currently in when using the rear
fog lamp.
XTurn the light switch to LorÃ.
XTurn the key to position 2in the ignition lock
or start the engine.
XTo switch the front foglamps on/off: press
the N button.
When the green Nindicator lamp in the
instrument cluster goes on, the fog lamps are
switched on.
XTo switch the rear foglamp on/off: press
the R button.
When the yellow Rindicator lamp in the
instrument cluster goes on, the rear fog lamp is switched on.
Standing lamps
!If the battery charge is very low, the stand-
ing lamps will switch off automatically to ena-
ble the next engine start. Always park your
vehicle in accordance with legal regulations,
in a secure and adequately lit location. Avoid leaving the Tparking lamps on for several
hours. If possible, switch on the right Xor
left W standing lamp.
Switching on the standing lamps ensures that
the corresponding side of the vehicle is illumi-
nated.
Exterior lighting95
Lights and windshield wipers
Z
Page 99 of 318
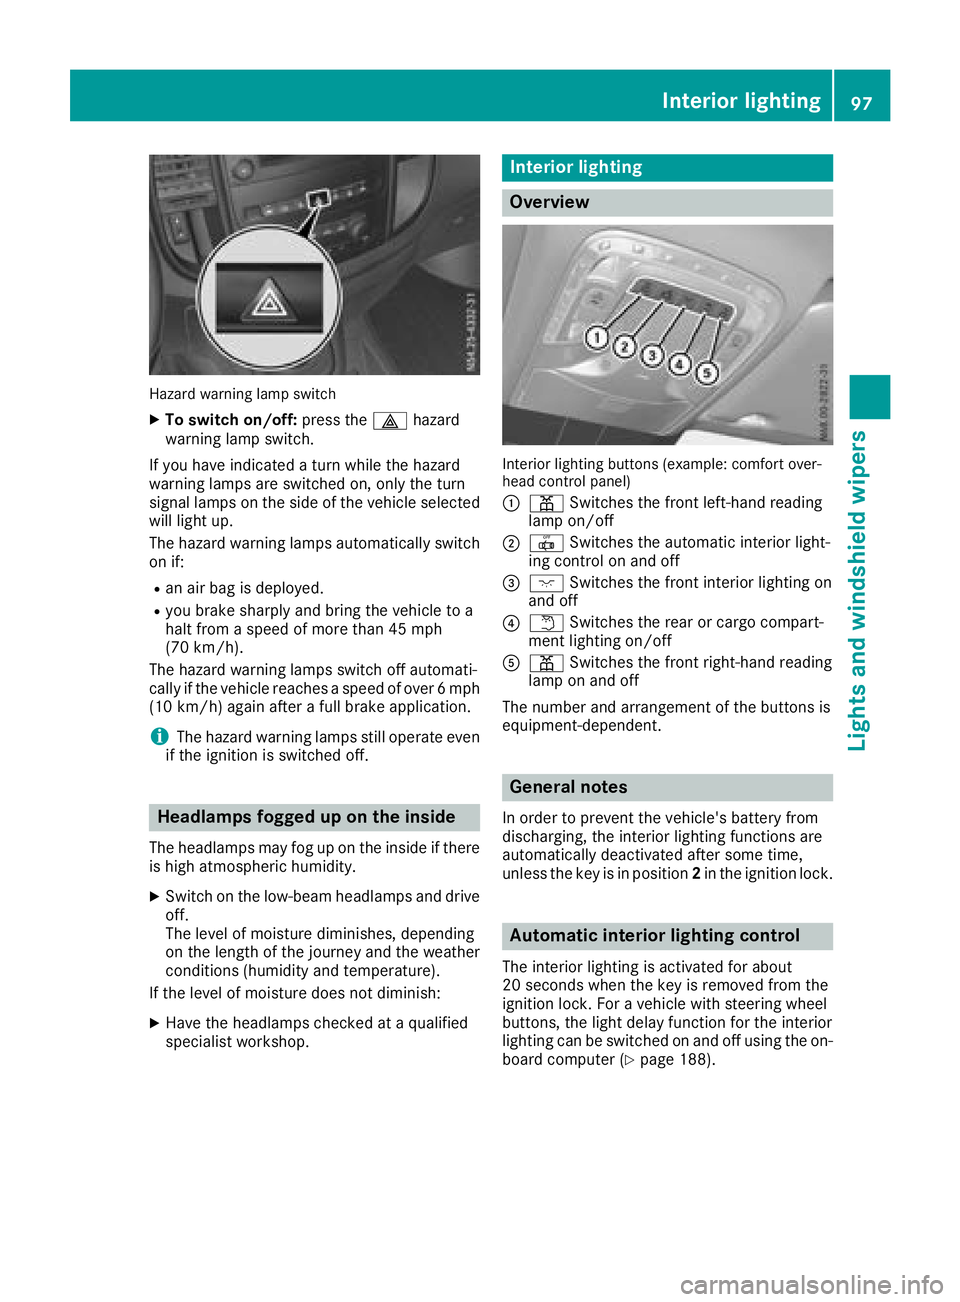
Hazard warning lamp switch
XTo switch on/off:press the£hazard
warning lamp switch.
If you have indicated a turn while the hazard
warning lamps are switched on, only the turn
signal lamps on the side of the vehicle selected
will light up.
The hazard warning lamps automatically switch
on if:
Ran air bag is deployed.
Ryou brake sharply and bring the vehicle to a
halt from a speed of more than 45 mph
(70 km/h).
The hazard warning lamps switch off automati-
cally if the vehicle reaches a speed of over 6 mph
(10 km/h) again after a full brake application.
iThe hazard warning lamps still operate even
if the ignition is switched off.
Headlamps fogged up on the inside
The headlamps may fog up on the inside if there
is high atmospheric humidity.
XSwitch on the low-beam headlamps and drive off.
The level of moisture diminishes, depending
on the length of the journey and the weather
conditions (humidity and temperature).
If the level of moisture does not diminish:
XHave the headlamps checked at a qualified
specialist workshop.
Interior lighting
Overview
Interior lighting buttons (example: comfort over-
head control panel)
:
p Switches the front left-hand reading
lamp on/off
;| Switches the automatic interior light-
ing control on and off
=c Switches the front interior lighting on
and off
?w Switches the rear or cargo compart-
ment lighting on/off
Ap Switches the front right-hand reading
lamp on and off
The number and arrangement of the buttons is
equipment-dependent.
General notes
In order to prevent the vehicle's battery from
discharging, the interior lighting functions are
automatically deactivated after some time,
unless the key is in position 2in the ignition lock.
Automatic interior lighting control
The interior lighting is activated for about
20 seconds whenthe key is removed from the
ignition lock. For a vehicle with steering wheel
buttons, the light delay function for the interior
lighting can be switched on and off using the on-
board computer (
Ypage 188).
Interior lighting97
Lights and windshield wiper s
Z
Page 118 of 318
settings are reactivated with the exception of
air-recirculation mode. Air-recirculation mode
remains deactivated.
Clearing condensation from the win-
dows
Windows fogged up on the inside
Air-conditioning system
You should only select this setting until the win-
dows are clear again.
XSwitch on the rear window defroster if nec-
essary (Ypage 116).
XSwitch on climate control (Ypage 111).
XSwitch off air-recirculation mode
(Ypage 116).
XTurn temperature control :clockwise to a
higher temperature and air flow control Ato
a blower speed between 3and 6
(
Ypage 109).
XIf possible, only select the ¯setting of the
air distribution (Ypage 114).
Only the indicator lamp in the ¯button
lights up.
XSwitch on the cooling with air dehumidifica-
tion function (Ypage 112).
XIf the windows still fog up, set the climate
control functions as described for defrosting
of the windshield (
Ypage 115).
Dual-zone automatic climate control
You should only select this setting until the win- dows are clear again.
XSwitch on the rear window defroster if nec-
essary (Ypage 116).
XSwitch on climate control (Ypage 111).
XSwitch off air-recirculation mode
(Ypage 116).
XSwitch on the cooling with air dehumidifica-
tion function (Ypage 112).
XSwitch on automatic mode (Ypage 113).
XIf the windows continue to fog up, switch on
the windshield defrosting function
(
Ypage 115).
Windows fogged up on the outside
You should only select this setting until the
windshield is clear again.
XSwitch on the windshield wipers
(Ypage 104).
XSwitch on climate control (Ypage 111).
XIn warm and damp weather, do not allow cold
air to flow onto the windows. Close the side
air vents if required (
Ypage 118).
Switching the rear window defroster
on/off
General notes
The rear window defroster consumes a lot of
power. You should therefore switch off the rear
window defroster as soon as the rear window is
clear.
XTurn the key to position 2in the ignition lock.
XPress the ¤button on the control panel.
If the indicator lamp in the ¤button lights
up, the rear window defroster is switched on.
The rear window defroster switches off auto-
matically after a few minutes.
Problems with the rear window
defroster
The rear window defroster has switched off pre-
maturely or cannot be activated.
The vehicle starter battery is not sufficiently
charged.
XSwitch off any consumers that are not
required, e.g. reading lamps, interior lighting
or seat heating.
When the battery is sufficiently charged, the
rear window defroster can be activated again.
Switching air-recirculation mode
on/off
Important safety notes
You can deactivate the intake of fresh air if
unpleasant odors enter the vehicle from out-
side. The air inside the vehicle is then circulated.
When you switch on air-recirculation mode, the side windows and windows could fog up more
116Operating the climate control system
Climate control
Page 119 of 318
quickly, in particular at low outside tempera-
tures. Only switch on air-recirculation mode for
a short time.
Air-conditioning system or dual-zone
automatic climate control
XSwitch on climate control (Ypage 111).
XPress thehbutton.
If the indicator lamp in the hbutton lights
up, air-recirculation mode is activated.
Air-recirculation mode switches on automati-
cally:
Rat high outside temperatures.
Rwhile driving in a tunnel (only vehicles with a
navigation system).
The indicator lamp in the hbutton is then not
lit up. Outside air is added automatically after
about 30 minutes.
Air-recirculation mode is deactivated automati-
cally:
Rafter approximately five minutes at outside
temperatures below about 45 ‡ (7 †)
Rafter approximately five minutes when the
cooling with air-dehumidification function is
deactivated
Rafter approximately 30 minutes at outside
temperatures above about 45 ‡ (7 †) and
when the cooling with air-dehumidification
function is active
Convenience opening/pre-entry cli-
mate control
GWARNING
During convenience opening, body parts
could be drawn in or become trapped
between the side window and the door frame.
There is a risk of injury.
Monitor the entire opening procedure when
using convenience opening. When opening,
make sure that nobody touches the side win- dow. Release the %switch immediately if
somebody becomes trapped, to interrupt the
opening procedure.
XPre-entry climate control and conveni-
ence opening with the key: press and hold
the % button on the key.
The side windows open automatically and the
blower of the climate control system is acti-
vated.
XRelease the %button.
iAt high interior temperatures, the blower is
also switched on when a door is opened. This
means that slightly cooled air enters the vehi-
cle interior after the engine is started, to cool
the vehicle more rapidly.
Switching the residual heat function
on/off
General notes
Only vehicles with dual-zone automatic climate
control have the residual heat function.
Once the engine is switched off, it is possible to
make use of the residual heat of the engine to
continue heating or ventilating the front com-
partment of the vehicle for approximately
30 minutes. The heating or ventilation time
depends on the set interior temperature.
Switching the function on/off
XTurn the key to position 0in the ignition lock
or remove it.
XPress the Ìbutton.
If the residual heat function is activated, the
indicator lamp in the Ìbutton comes on.
The blower will run at a low speed regardless
of the airflow setting.
If you activate the residual heat function at
high temperatures, only the auxiliary ventila-
tion will be activated. The blower then runs at
medium speed.
The residual heat function switches off auto-
matically
Rafter approximately 30 minutes
Rif the starter battery's condition of charge is
too low
Rwhen you switch on the ignition
Operating the climate control system117
Climate control
Z
Page 126 of 318
Important safety notes
GWARNING
If th eengin eis switched off automatically and
you exit th evehicle, th eengin eis restarte d
automatically. The vehicl emay begi nmoving .
Ther eis aris kof acciden tand injury.
If you wish to exit th evehicle, always tur noff
th eignition and secure th evehicl eagainst
rollin gaway.
Automatic engine switch-off
Gene ral notes
The ECO start/sto pfunction is operational
when th eè ECO symbol is shown in th esta-
tus bar of th edisplay.
Fo rthis to happen, various conditions, includin g
th efollowing, must be met :
RtheECO start/sto pfunction is switched on .
The indicator lamp in th eè ECO butto nis
lit (
Ypage 125).
Rtheoutside temperature is abov e32 ‡(0 †).
Rthe engine has reached its operating temper-
ature.
Rthe set temperature for the vehicle interior
has been reached.
Rthe condition of charge of the starter battery
is sufficient.
Rthe system detects that the windshield is not
fogged up when the air-conditioning system
or automatic climate control is switched on.
Rthe hood is closed.
Rthe driver's seat belt is fastened.
Rthe driver's door is closed.
Rthere is no danger of immediately rolling
backwards, e.g. when stopped on a steep gra-dient.
If a trailer is attached and/or a rear carrier
system is installed and connected electri-
cally, this danger is detected on less steep
gradients.
Only if all the conditions for automatic engine
switch-off are fulfilled, does the display show
the è ECO symbol.
All of the vehicle's systems remain active when
the engine is switched off automatically.
The engine can be switched off automatically a
maximum of four times (initial stop, then three subsequent stops) in succession. After that, the
display hides the èECO symbol. Automatic
engine switch-off is not possible again until the
è ECO symbol is shown again.
If you open the hood after an a
utomatic engine
switch-off, the automatic engine start is deacti-
vated. Once the hood is closed, you have to start
the engine manually.
If the vehicle is stopped in Dor N, the ECO start/
stop function switches off the engine automat-
ically once the vehicle is stationary.
Automatic engine start
General notes
The engine is started automatically if:
Ryou switch off the ECO start/stop function by
pressing the èECO button The indicator
lamp in the èECO button then goes out.
(
Ypage 125)
Ryou depress the accelerator pedal.
Ryou engage reverse gear R.
Ryou unfasten your seat belt.
Ryou open the driver's door.
Rthe vehicle begins to roll away.
Rthe brake system requires this.
Rthe temperature in the vehicle interior
increasingly deviates from the set value.
Rthe system detects moisture on the wind-
shield when the air-conditioning system is
switched on.
Rthe battery's condition of charge is too low.
The engine is started automatically if you:
Rswitch to drive program M(Ypage 129)
Rrelease the brake pedal when in transmission
position Dor N
Rswitch to transmission position P
After shifting from transmission position Rto D,
the ECO start/stop function is not available until
the è ECO symbol is shown in the display.
124Driving
Driving and parking
Page 127 of 318
Activating and deactivating the ECO
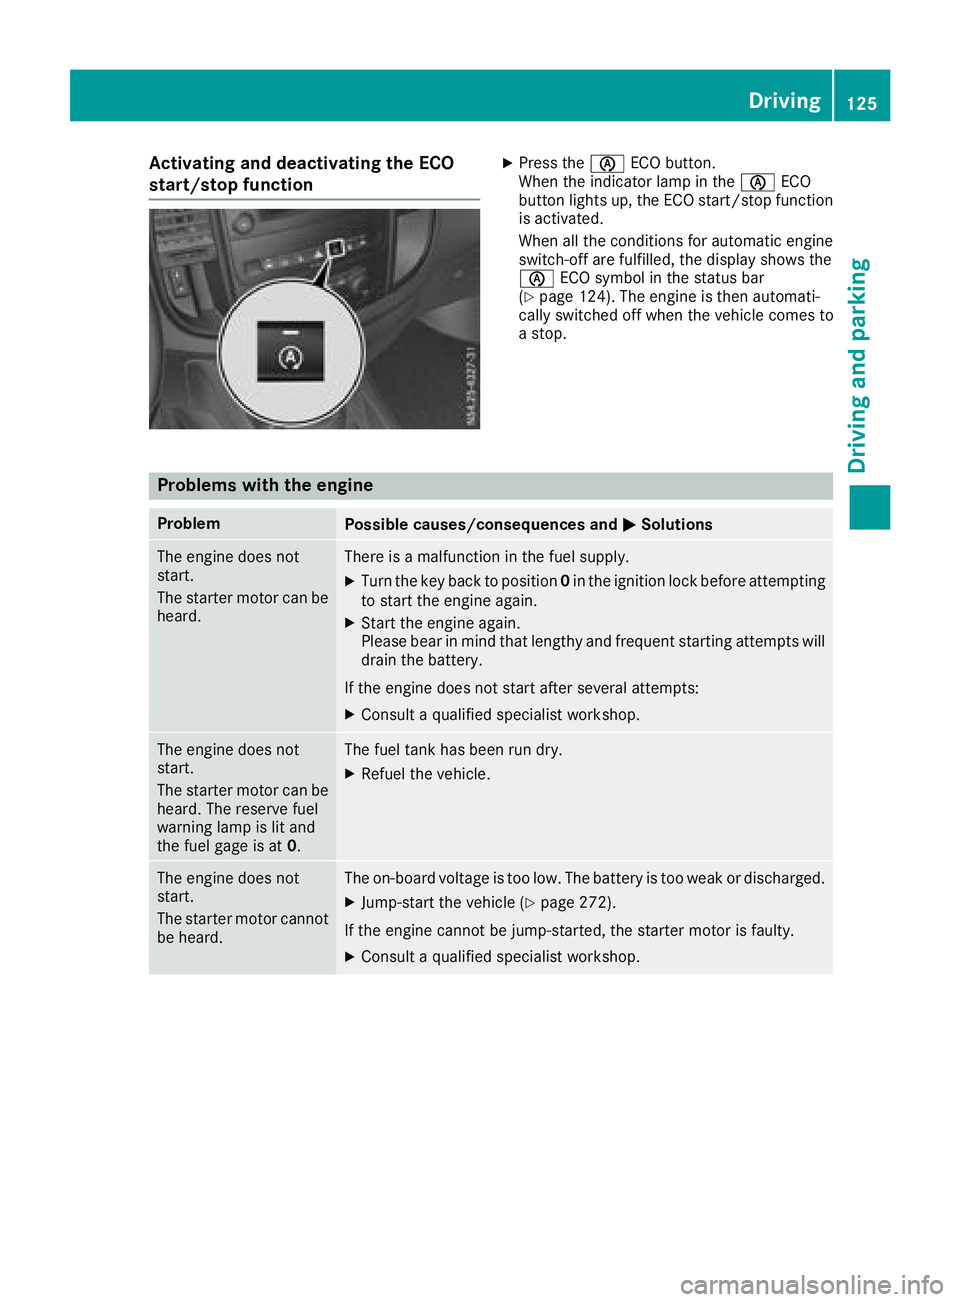
start/stop functionXPress theè ECO button.
When th eindicator lamp in th eè ECO
butto nlights up, th eECO start/sto pfunction
is activated.
When all th econdition sfor automatic engin e
switch-off are fulfilled ,th edisplay shows th e
è ECO symbol in th estatus bar
(
Ypage 124). The engin eis then automati-
call yswitched off when th evehicl ecomes to
a stop.
Problems with the engine
ProblemPossible causes/consequences and MSolutions
The enginedoes no t
start .
The starter motor can be
heard.There is amalfunction in th efuel supply.
XTurn th eke ybac kto position 0in th eignition loc kbefore attempting
to start th eengin eagain .
XStart th eengin eagain .
Pleas ebear in min dthat lengthy and frequen tstarting attempts will
drai nth ebattery.
If th eengin edoes no tstart after several attempts :
XConsultaqualified specialist workshop .
The enginedoes no t
start .
The starter motor can be
heard. The reserv efuel
warning lamp is lit and
th efuel gage is at 0.The fuel tankhas been run dry.
XRefue lth evehicle.
The engin edoes no t
start .
The starter motor canno t
be heard.The on-board voltag eis to olow. The battery is to oweak or discharged.
XJump-start th evehicl e (Ypage 272).
If th eengin ecanno tbe jump-started, th estarter motor is faulty.
XConsult aqualified specialist workshop .
Driving125
Driving and parking
Z
Page 128 of 318
ProblemPossible causes/consequences andMSolutions
The engine does not
start.
The starter motor cannot
be heard.The battery is discharged or faulty.
XCheck the battery for damage.
XCharge the battery (Ypage 262).
The engine is not running
smoothly and is misfir-
ing.There is a malfunction in the engine electronics or a mechanical com-
ponent of the engine management system.
XOnly depress the accelerator pedal slightly.
Unburnt fuel may otherwise get into the catalytic converter and
damage it.
XHave the cause rectified immediately at a qualified specialist work-
shop.
Automatic transmission
Important safety notes
GWARNING
If the engine speed is above the idling speed
and you engage transmission position Dor R,
the vehicle could pull away suddenly. There is
a risk of an accident.
When engaging transmission position Dor R,
always firmly depress the brake pedal and do not simultaneously accelerate.
GWARNING
The automatic transmission switches to neu-
tral position Nwhen you switch off the engine.
The vehicle may roll away. There is a risk of an
accident.
Before switching off the engine, always switch
to parking position P. Prevent the parked vehi-
cle from rolling away by applying the parking
brake.
!If the engine is switched off, rolling in neutral
N can damage the power transmission and
result in transmission damage.
Always observe the instructions and safety
notes under "Tow starting and towing away"
(
Ypage 274).
Bear in mind that power transmission between
the engine and the transmission is interrupted
when the engine is switched off. For this reason,
shift the automatic transmission to Pbefore the engine is switched off and with the vehicle is
stationary. Apply the parking brake to prevent
the vehicle from rolling away.
DIRECT SELECT lever
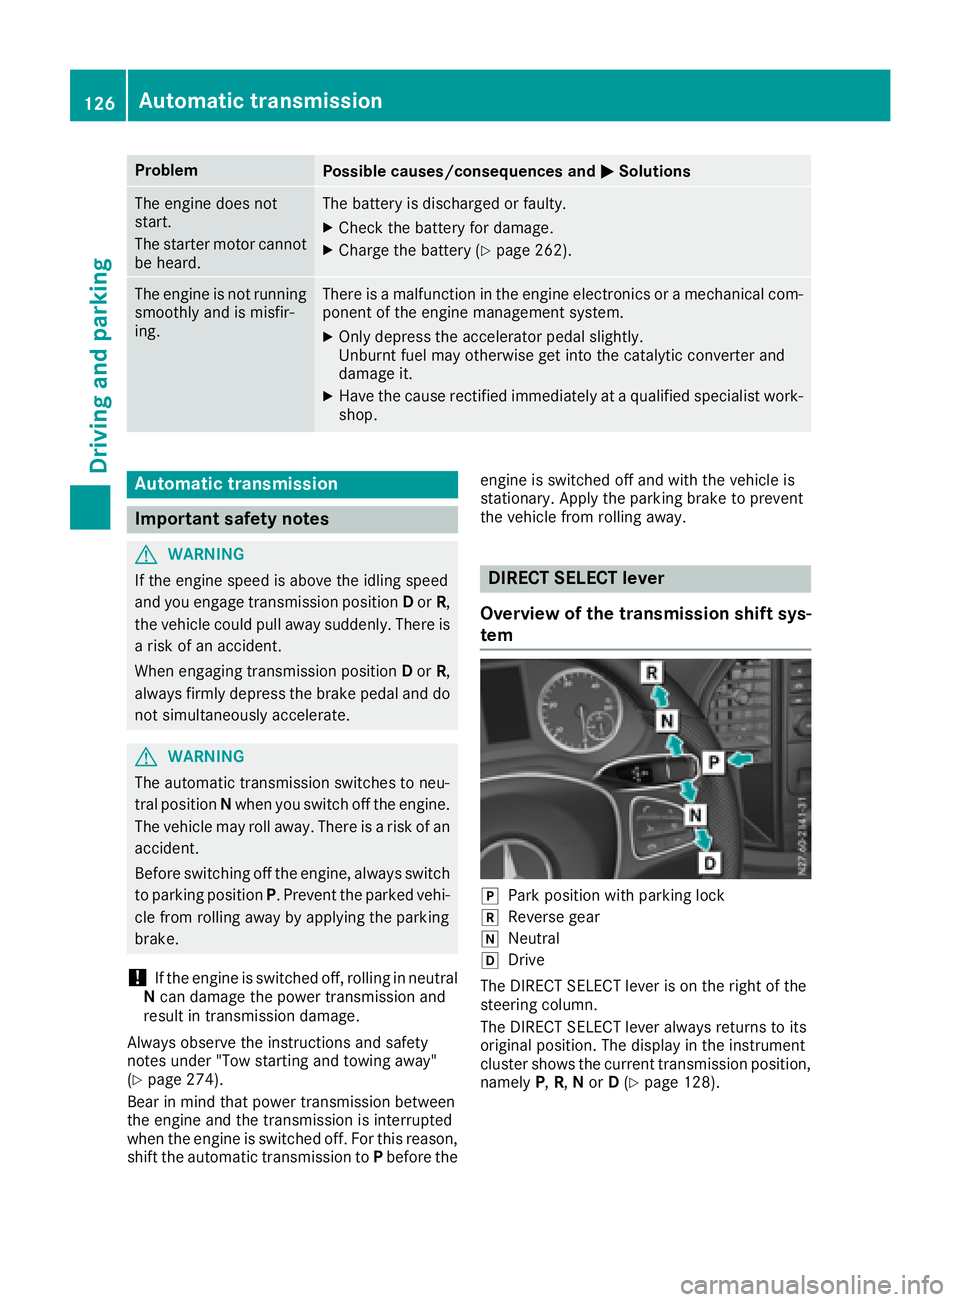
Overview of the transmission shift sys-
tem
jPark position with parking lock
kReverse gear
iNeutral
hDrive
The DIRECT SELECT lever is on the right of the
steering column.
The DIRECT SELECT lever always returns to its
original position. The display in the instrument
cluster shows the current transmission position,
namely P,R, Nor D(
Ypage 128).
126Automatic transmission
Driving and parking
Page 136 of 318
GWARNING
If you leave children unsupervised in the vehi-
cle, they could set it in motion by, for example:
Rrelease the parking brake.
Rshift the automatic transmission out of the
parking position P.
Rstart the engine.
In addition, they may operate vehicle equip-
ment and become trapped. There is a risk of
an accident and injury.
When leaving the vehicle, always take the
SmartKey with you and lock the vehicle. Never
leave children unsupervised in the vehicle.
!Always secure the vehicle correctly against
rolling away. Otherwise, the vehicle or its driv-
etrain could be damaged.
!When the vehicle is parked, always remove
the key to prevent the battery from becoming
discharged.
Always park your vehicle safely and secure it
against rolling away. When parking, observe the
legal requirements of the country in which you
are currently driving.
To ensure that the vehicle is properly secured
against rolling away unintentionally:
Rthe parking brake must be firmly applied
Rthe transmission must be in position Pand the
key must be removed from the ignition lock
Ron steep uphill or downhill gradients, the front
wheels must be turned towards the curb
Parking brake
GWARNING
If you leave children unsupervised in the vehi-
cle, they could set it in motion by, for example:
Rrelease the parking brake.
Rshift the automatic transmission out of the
parking position P.
Rstart the engine.
In addition, they may operate vehicle equip-
ment and become trapped. There is a risk of
an accident and injury.
When leaving the vehicle, always take the
SmartKey with you and lock the vehicle. Never
leave children unsupervised in the vehicle.
GWARNING
If you must brake the vehicle with the parking brake, the braking distance is considerably
longer and the wheels could lock. There is an
increased danger of skidding and accidents.
Only use the parking brake to brake the vehi-
cle when the service brake is faulty. Do not
apply the parking brake too firmly. If the
wheels lock, release the parking brake until
the wheels begin turning again.
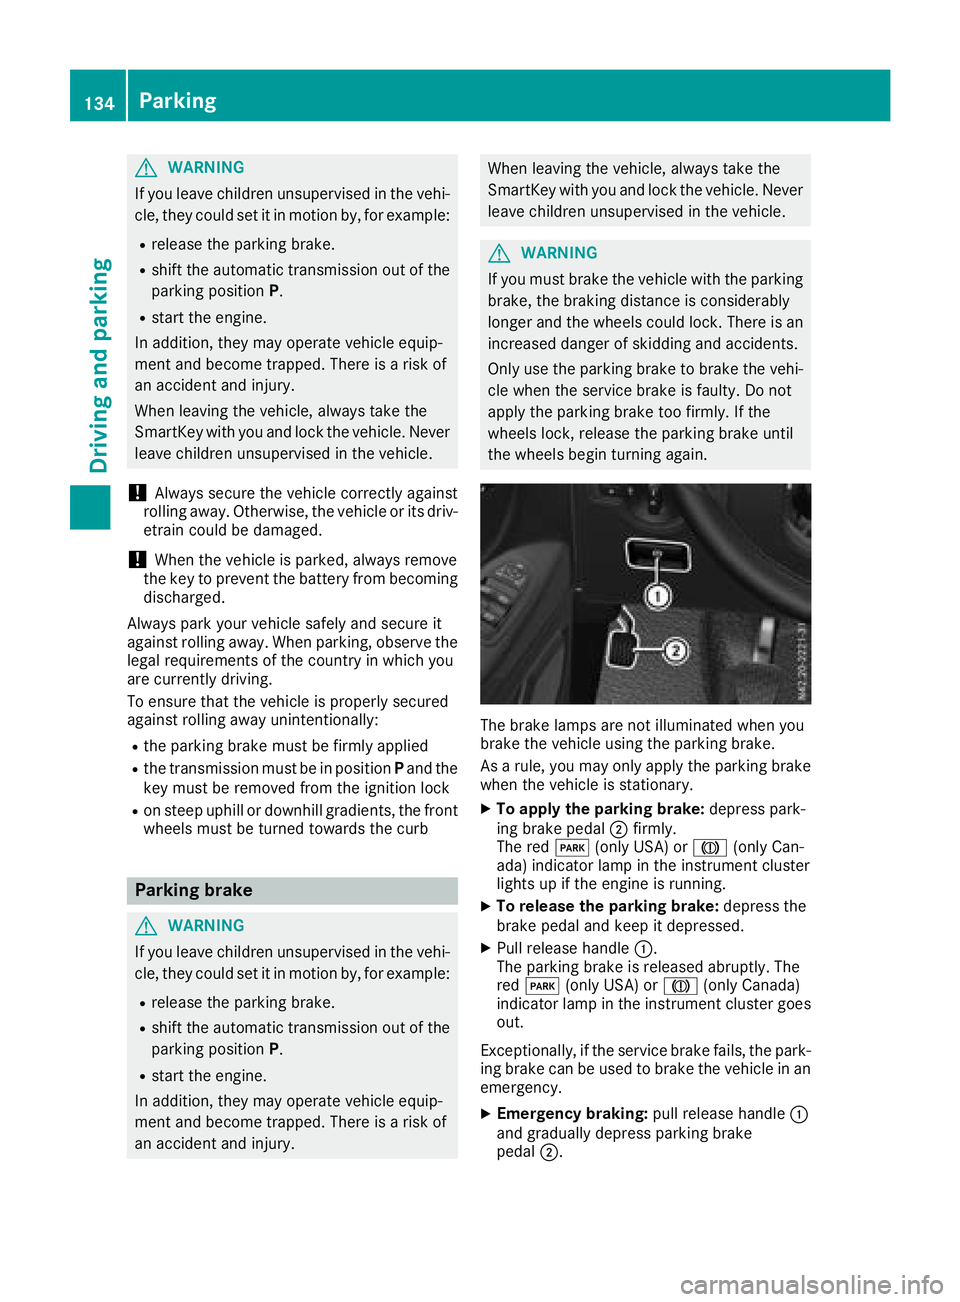
The brake lamps are not illuminated when you
brake the vehicle using the parking brake.
As a rule, you may only apply the parking brake
when the vehicle is stationary.
XTo apply the parking brake: depress park-
ing brake pedal ;firmly.
The red F(only USA) or J(only Can-
ada) indicator lamp in the instrument cluster
lights up if the engine is running.
XTo release the parking brake: depress the
brake pedal and keep it depressed.
XPull release handle :.
The parking brake is released abruptly. The
red F (only USA) or J(only Canada)
indicator lamp in the instrument cluster goes
out.
Exceptionally, if the service brake fails, the park-
ing brake can be used to brake the vehicle in an
emergency.
XEmergency braking: pull release handle:
and gradually depress parking brake
pedal ;.
134Parking
Driving and parking