brake MERCEDES-BENZ METRIS 2018 MY18 Operator’s Manual
[x] Cancel search | Manufacturer: MERCEDES-BENZ, Model Year: 2018, Model line: METRIS, Model: MERCEDES-BENZ METRIS 2018Pages: 318, PDF Size: 5.07 MB
Page 156 of 318
parking and pulling away. Make sure that there
are no persons, animals or objects in the maneu-
vering area while maneuvering and parking in/
leaving parking spaces.
!Pay particular attention to obstacles above
or below the sensors when parking, such as
flower pots or trailer towbars. PARKTRONIC
does not recognize such objects when they
are in the immediate vicinity of the vehicle.
You could damage the vehicle or objects.
PARKTRONIC can suffer interference from:
Rultrasonic sources such as a truck's
compressed-air brakes, an automatic car
wash or a pneumatic drill
Rattachments to the vehicle, e.g. rear moun-
ted racks
Rnumber plates (vehicle license plates) that
are not affixed flat against the bumper
Rdirty or icy sensors
Remove a detachable trailer coupling if it is no
longer required. PARKTRONIC measures the
minimum detection range to an obstacle from
the bumper, not the ball coupling.
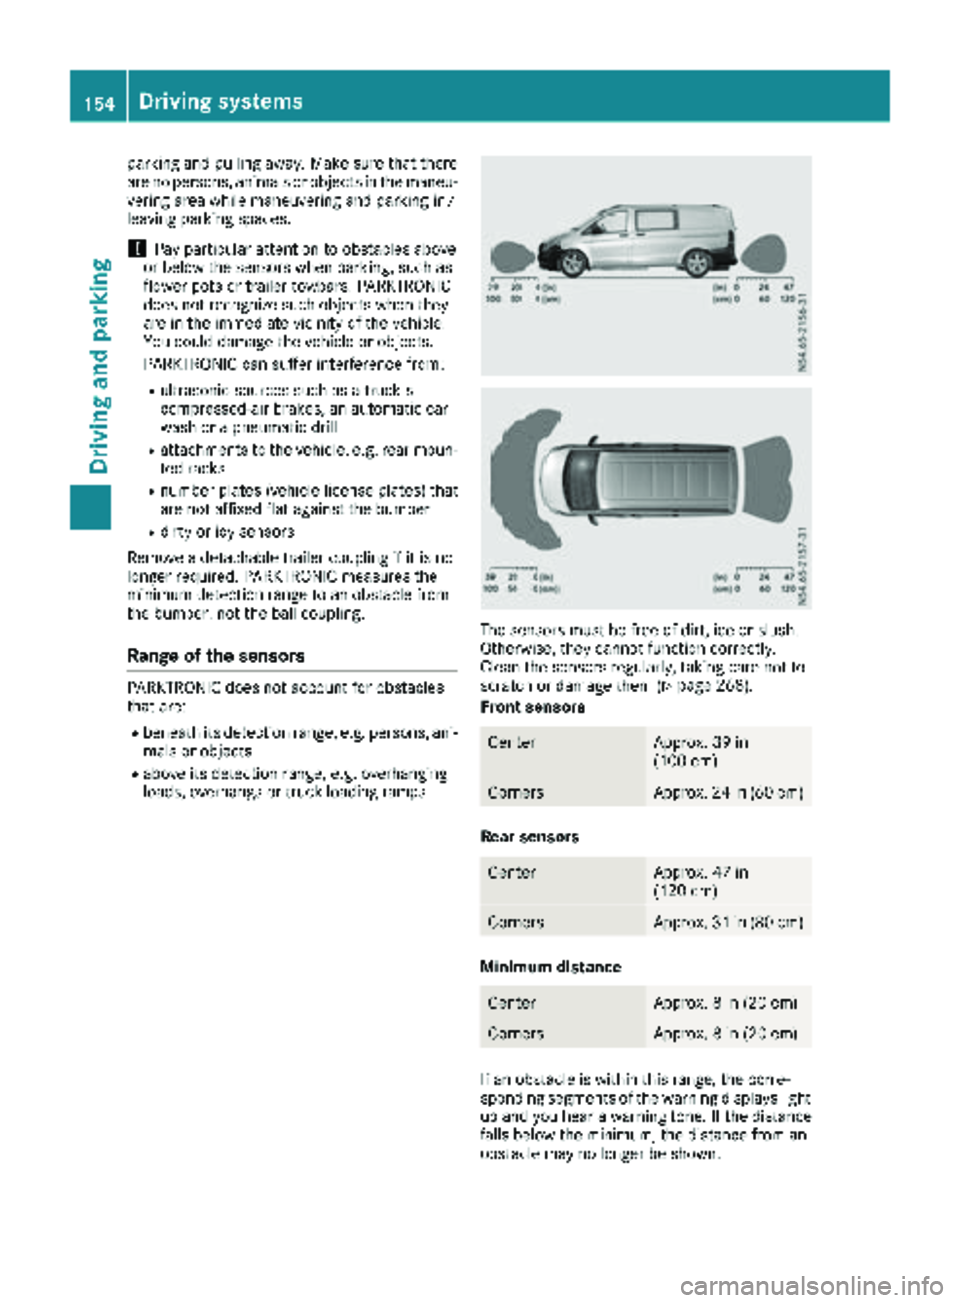
Range of the sensors
PARKTRONIC does not account for obstacles
that are:
Rbeneath its detection range, e.g. persons, ani-
mals or objects
Rabove its detection range, e.g. overhanging
loads, overhangs or truck loading ramps
The sensors must be free of dirt, ice or slush.
Otherwise, they cannot function correctly.
Clean the sensors regularly, taking care not to
scratch or damage them (
Ypage 268).
Front sensors
CenterApprox. 39 in
(100 cm)
CornersApprox. 24 in (60 cm)
Rear sensors
CenterApprox. 47 in
(120 cm)
CornersApprox. 31 in (80 cm)
Minimum distance
CenterApprox. 8 in (20 cm)
CornersApprox. 8 in (20 cm)
If an obstacle is within this range, the corre-
sponding segments of the warning displays light
up and you hear a warning tone. If the distance
falls below the minimum, the distance from an
obstacle may no longer be shown.
154Driving systems
Driving and parking
Page 158 of 318
Towing a trailer
PARKTRONIC detects a coupled trailer if your
vehicle is equipped with the corresponding elec-
trical installations for trailer towing.
PARKTRONIC is deactivated for the rear area
when you establish an electrical connectionbetween your vehicle and a trailer. If you use an
adapter for the socket, remove it from the
socket after detaching the trailer. Otherwise,
PARKTRONIC remains deactivated for the rear
area.
Problems with PARKTRONIC
ProblemPossible causes/consequences and
MSolutions
Only the red segments in
the PARKTRONIC warn-
ing displays are lit.
In addition, a warning
tone sounds for approx.
two seconds
PARKTRONIC is then
deactivated.
The indicator lamp of the
f button lights up
and the red segments in
the PARKTRONIC warn-
ing display go out.PARKTRONIC has malfunctioned and has switched itself off.
XIf problems persist, have PARKTRONIC checked at a qualified spe- cialist workshop.
The PARKTRONIC warn-
ing displays implausible
distances.
For example, all the seg-
ments may be lit even
though there is no obsta-
cle present.The PARKTRONIC sensors are dirty or iced up.
XClean the PARKTRONIC sensors (Ypage 268).
XTurn the key to position 2in the ignition lock.
The license plate or other parts attached near the sensors may not be
secured correctly.
XCheck the license plate and attachment parts near the sensors for
correct seating.
An external radio or ultrasonic source may be causing interference.
XCheck PARKTRONIC functions in a different location.
Active Parking Assist
General notes
Active Parking Assist is an electronic parking
aid. The system uses ultrasound sensors to
measure the road on both sides of the vehicle
and indicates suitable parking spaces. It can
then actively steer and brake the vehicle to help
you to park and exit the parking space.
Active Parking Assist includes the PARKTRONIC
parking aid which indicates visually and audibly the distance between your vehicle and an
obstruction. To do this, PARKTRONIC uses the ultrasonic sensors of the Active Parking Assist
(
Ypage 153).
Important safety notes
Active Parking Assist is only an aid. It is not a
substitute for your attention to the immediate
surroundings. You are responsible for safe
maneuvering, parking and pulling away. Make
sure that no persons, animals or objects are in
the maneuvering range.
When you deactivate PARKTRONIC, Active Park-
ing Assist will also be deactivated.
156Driving system
s
Driving an d parking
Page 160 of 318
Active Parking Assist does not assist you park-
ing in spaces at right angles to the direction of
travel if:
Rtwo parking spaces are located directly next
to one another
Rthe parking space is directly next to a low
obstacle such as a low curb
Ryou forward park
Active Parking Assist does not assist you park-
ing in spaces that are parallel or at right angles
to the direction of travel if:
Rthe parking space is on a curb
Rthe system reads the parking space as being
blocked, for example by foliage or grass pav-
ing blocks
Rthe area is too small for the vehicle to maneu-
ver into
Rthe parking space is bordered by an obstacle,
e.g. a tree, a post or a trailer
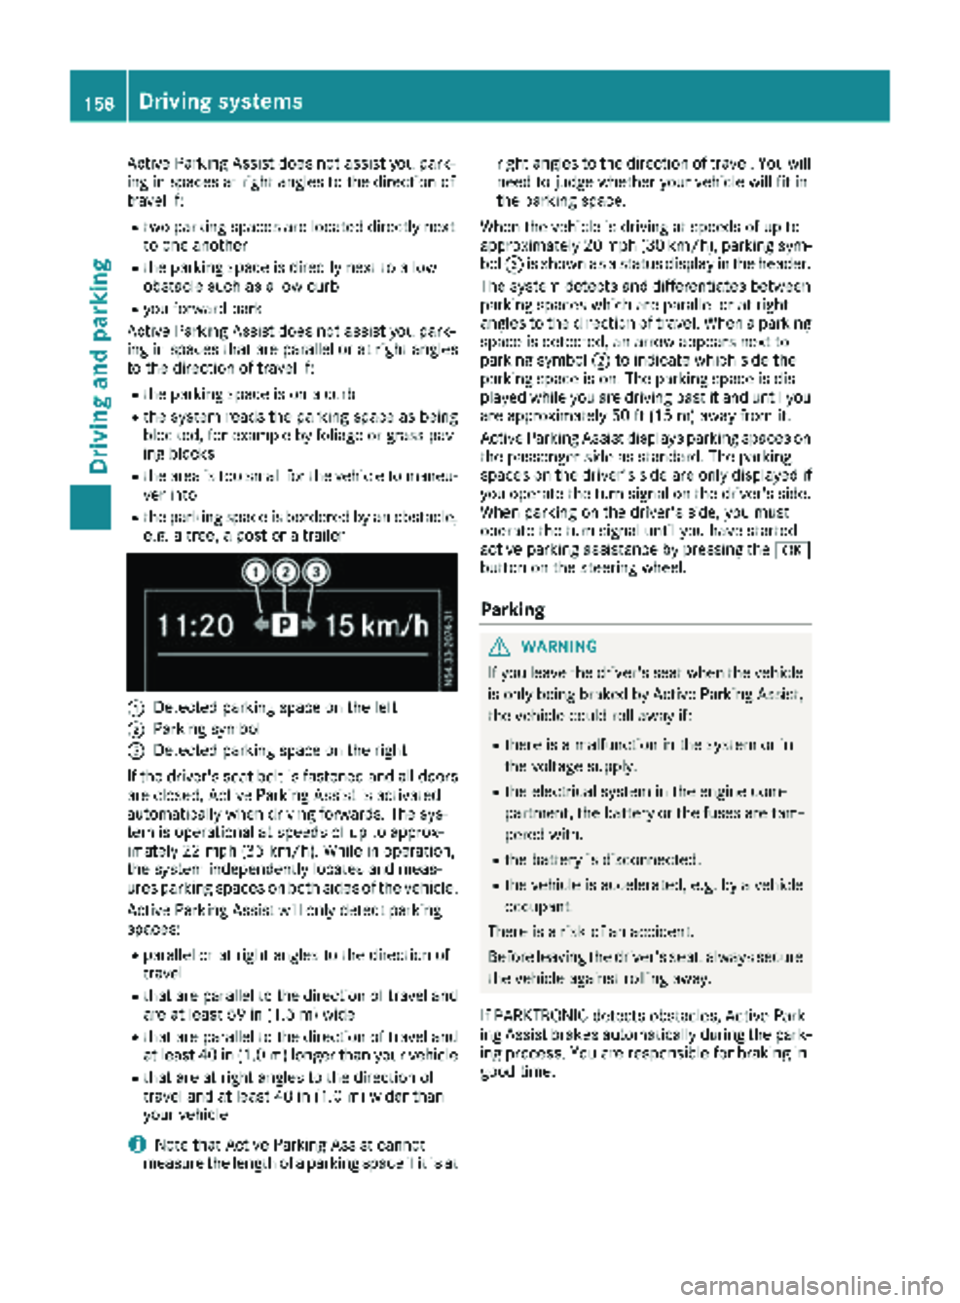
:Detected parking space on the left
;Parking symbol
=Detected parking space on the right
If the driver's seat belt is fastened and all doors
are closed, Active Parking Assist is activated
automatically when driving forwards. The sys-
tem is operational at speeds of up to approx-
imately 22 mph (35 km/h). While in operation,
the system independently locates and meas-
ures parking spaces on both sides of the vehicle.
Active Parking Assist will only detect parking
spaces:
Rparallel or at right angles to the direction of
travel
Rthat are parallel to the direction of travel and are at least 59 in (1.5 m) wide
Rthat are parallel to the direction of travel and
at least 40 in (1.0 m) longer than your vehicle
Rthat are at right angles to the direction of
travel and at least 40 in (1.0 m) widerthan
your vehicle
iNote that Active Parking Assist cannot
measure the length of a parking space if it is at right angles to the direction of travel. You will
need to judge whether your vehicle will fit in
the parking space.
When the vehicle is driving at speeds of up to
approximately 20 mph (30 km/h), parking sym-
bol ;is shown as a status display in the header.
The syste m d
etects and differentiates between
parking spaces which are parallel or at right
angles to the direction of travel. When a parking
space is detected, an arrow appears next to
parking symbol ;to indicate which side the
parking space is on. The parking space is dis-
played while you are driving past it and until you
are approximately 50 ft (15 m) away from it.
Active Parking Assist displays parking spaces on
the passenger side as standard. The parking
spaces on the driver's side are only displayed if
you operate the turn signal on the driver's side.
When parking on the driver's side, you must
operate the turn signal until you have started
active parking assistance by pressing the a
button on the steering wheel.
Parking
GWARNING
If you leave the driver's seat when the vehicle is only being braked by Active Parking Assist,
the vehicle could roll away if:
Rthere is a malfunction in the system or in
the voltage supply.
Rthe electrical system in the engine com-
partment, the battery or the fuses are tam-
pered with.
Rthe battery is disconnected.
Rthe vehicle is accelerated, e.g. by a vehicle
occupant.
There is a risk of an accident.
Before leaving the driver's seat, always secure the vehicle against rolling away.
If PARKTRONIC detects obstacles, Active Park-
ing Assist brakes automatically during the park- ing process. You are responsible for braking in
good time.
158Driving system s
Driving an d parking
Page 161 of 318
XBring the vehicle safely to a stop when the
parking symbol shows the desired parking
space in the instrument cluster.
XShift the transmission to positionR.
The display shows the Start
ParkAssist?Yes: OKNo:%message and the location
of the parking space.
XTo cancel the process: press the%but-
ton on the steering wheel or drive off.
or
XTo park using active parking assistance:
press the abutton on the steering wheel.
The display shows the Park Assist
Active: Accelerate and BrakeObs.Surroundingsmessage.
XLet go of the steering wheel.
XReverse the vehicle, being ready to brake at
all times. Exit the parking space slowly and do
not drive faster than 6 mph (10 km/h). Oth-
erwise parking assistance is canceled and
Active Parking Assist is stopped.
Active Parking Assist brakes the vehicle to a
standstill when the vehicle approaches the
rear border of the parking space.
Maneuvering may be required in tight parking
spaces. The display shows the Park Assist
Active: Select DObs. Surroundingsmes-
sage.
XWhile the vehicle is stationary, shift the trans-
mission to position D.
Active Parking Assist immediately steers in
the other direction. The display shows the
Park Assist Active: Accelerate and
BrakeObs. Surroundingsmessage.
iYou will achieve the best results by waiting
for the steering procedure to complete before
pulling away.
XDrive forwards and be ready to brake at all
times.
Active Parking Assist brakes the vehicle to a
standstill.
The display shows the Park
AssistActive:Select RObs. Surroundingsmessage.
As soon as the parking procedure is complete,
the Park Assist Finished
message appears
in the display and a tone sounds. The parking
assistance function of Active Parking Assist is
stopped. The vehicle is parked and kept station-
ary without the driver having to depress the
brake pedal. The braking effect is canceled
when you depress the accelerator pedal. Active Parking Assist no longer supports you
with steering interventions and brake applica-
tions. Once active parking assistance has been
stopped, you must steer and brake again your-
self. PARKTRONIC is still available.
Parking tips:
RThe way your vehicle is positioned in the park-
ing space after parking is dependent on vari-
ous factors. These include the position and
shape of the vehicles parked in front and
behind it and the conditions of the location. It
may be the case that Active Parking Assist
guides you too far into a parking space, or not
far enough into it. In some cases, it may also
lead you across or onto the curb. In this case, cancel the active parking assistance.
RYou can also select transmission position D
prematurely. The vehicle redirects and does
not drive as far into the parking space. If you
change direction too early, parking assis-
tance is canceled and Active Parking Assist is
stopped. It is then not possible to achieve a
sensible parking position from the current
position.
Exiting a parking space
In order that Active Parking Assist can assist you
when exiting the parking space:
Rthe border of the parking space must be high enough at the front and the rear. A curb stone
is too small, for example.
Rthe border of the parking space must not be
too wide. Your vehicle can be maneuvered
into a position at a maximum of 45° to the
starting position in the parking space.
Ra maneuvering distance of at least 3.3 ft
(1.0 m) must be available .
Active Parking Assist can only assist you with
exiting a parking space if you have parked the
vehicle parallel to the direction of travel using
Active Parking Assist.
If PARKTRONIC detects obstacles, Active Park-
ing Assist brakes automatically when exiting
from the parking space. You are responsible for braking in good time.
XStart the engine.
XSwitch on the turn signal in the direction in
which you are pulling away.
XShift the transmission to position hork.
The display shows the StartParkAssist?Yes: OKNo:%message.
Driving systems159
Driving an d parking
Z
Page 162 of 318
XTo cancel the process:press the%but-
ton on the steering wheel or drive off.
or
XTo exit the parking space using active
parking assistance: press theabutton
on the steering wheel.
The display shows the Park Assist
Active: Accelerate and BrakeObs.Surroundingsmessage.
XLet go of the steering wheel.
XPull away, being ready to brake at all times.
Exit the parking space slowly and do not drive
faster than 6 mph (10 km/h). Otherwise park-
ing assistance is canceled and Active Parking
Assist is stopped.
Active Parking Assist brakes the vehicle to a
standstill when the vehicle approaches a bor-
der of the parking space.
XWhile the vehicle is stationary, shift the trans-
mission to position hork as required or
according to the message.
Active Parking Assist immediately steers in
the other direction. The display shows the
Park Assist Active: Accelerate and
BrakeObs. Surroundingsmessage.
iYou will achieve the best results by waiting
for the steering procedure to complete before
pulling away.
If you back up after activation, the steering
wheel is moved to the straight-ahead posi-
tion.
XDrive forwards and reverse as prompted by
the PARKTRONIC warning displays, several
times if necessary.
Once you have exited the parking space com-
pletely:
RThe display shows the Park Assist Fin‐ishedmessage.
RA tone sounds.
RThe steering wheel is moved to the straight-
ahead position
The parking assistance function of Active Park-
ing Assist is stopped. You will then have to steer
and merge into traffic on your own.
PARKTRONIC is still available.
You can take over the steering before the vehi-
cle has exited the parking space completely.
This is useful, for example when you recognize
that it is already possible to pull out of the park-
ing space.
Canceling active parking assistance
XStop the movement of the steering wheel or
steer yourself.
or
XPress the fbutton and deactivate
PARKTRONIC (Ypage 155).
Parking assistance is canceled immediately
and Active Parking Assist is stopped. The dis-
play shows the Park
AssistCanceledmes-
sage.
Active parking assistance is canceled automat-
ically if:
Ryou apply the parking brake.
Rparking using Active Parking Assist is no lon-
ger possible.
Ryou are driving faster than 6 mph (10 km/h).
Ra wheel spins and ESP®intervenes or fails.
The ÷ warning lamp in the instrument
cluster then lights up.
Ryou unfasten your seat belt.
Ryou open a door or the tailgate/rear door.
Ryou shift the automatic transmission to posi-
tion P.
A warning tone sounds, the parking symbol in
the display goes out and the Park Assist
Canceledmessage appears.
Once active Parking Assist has been canceled,
you must steer and brake again yourself.
If a system malfunction occurs, vehicles are
automatically braked down to a standstill. To
continue driving, you must depress the acceler-
ator pedal again.
Rear view camera
General notes
On vehicles with a tailgate, the rear view camera
is next to the tailgate handle (Ypage 269).
On vehicles with rear doors, the rear view cam-
era is in the top of the license plate molding
(
Ypage 269).
The rear view camera is a visual parking aid. It
shows you the area behind the vehicle in the
audio display.
The area behind the vehicle is displayed in a
mirrored fashion, as in the rear-view mirror or
the exterior mirrors. The guide lines displayed
assist you in backing up.
160Driving systems
Driving an d parking
Page 167 of 318
Information on the audio system control knob
can be found in the separate operating
instructions.
Symbol=is highlighted. The distance spec-
ifications now only apply to objects that are at
the same level as the ball coupling.
XBack up carefully, making sure that trailer
drawbar locating aid ;points approximately
in the direction of trailer drawbar :.
XBack up carefully until trailer drawbar :rea-
ches red guide line A.
The distance between trailer drawbar :and
ball coupling ?is now approximately 12 in
(0.30 m).
XCouple the trailer (Ypage 165).
Towing a trailer
Notes on trailer towing
Important safety notes
GWARNING
Installing an unsuitable ball coupling may
result in overloading of the trailer tow hitch
and the rear axle. This applies especially if the ball coupling in question is longer or angled
differently. This could seriously impair the
driving characteristics and the trailer can
come loose. There is a risk of an accident.
You should only ever install a ball coupling
that has the permissible dimensions and that
is designed to meet your trailer-towing
requirements. Do not modify the ball coupling
or the trailer tow hitch.
GWARNING
If you install a ball coupling other than the one
delivered with the vehicle, the trailer tow hitch
and the rear axle may be overloaded. This
applies especially if the ball coupling in ques-
tion is longer or angled differently. This could
seriously impair the driving characteristics
and the trailer can come loose. There is a risk
of an accident.
Only install the ball coupling delivered with
the vehicle or a ball coupling that is designed
to meet your trailer towing requirements. Do
not modify the ball coupling or the trailer tow
hitch.
GWARNING
If the ball coupling is not correctly installed
and secured, it could come loose while driving and endanger other road users. There is a risk
of an accident and injury.
Install and secure the ball coupling as descri-
bed in the ball coupling manufacturer's instal-
lation instructions. Make sure that the ball
coupling is correctly installed and secured
before every journey.
GWARNING
When the vehicle/trailer combination begins
to lurch, you could lose control of it. The vehi- cle/trailer combination could even rollover.
There is a risk of an accident.
On no account should you attempt to
straighten up the vehicle/trailer combination
by increasing the speed. Reduce vehicle
speed and do not countersteer. Apply the
brake as necessary.
You can attach carrier systems such as bicycle
racks or load-bearing implements on the ball
coupling. The maximum load-bearing capacity
of 165 lb (75 kg) applies when using carrier sys-
tems on the ball coupling.
Always observe the operating instructions pro-
vided by the manufacturers of the trailer cou-
pling and the ball coupling.
Couple and decouple the trailer carefully. When
backing up the towing vehicle, make sure
nobody is standing between the vehicle and the trailer.
A trailer which is incorrectly coupled to the tow-
ing vehicle could break away. A correctly cou-
pled trailer must be positioned horizontally
behind the towing vehicle.
Ensure that the following weights are not excee-
ded:
Rthe permissible noseweight
Rthe permissible trailer load
Rthe permissible rear axle load of the towing
vehicle
Towing a trailer165
Driving and parking
Z
Page 168 of 318
Rthe maximum permissible gross vehicle
weight of both the towing vehicle and the
trailer
Rthe maximum permissible gross weight of
vehicle/trailer combination
The applicable permissible values that may not
be exceeded can be found:
Rin your vehicle documents
Ron the type plates for the trailer tow hitch
Ron the type plates for the trailer
Ron the vehicle identification plate
(Ypage 305)
Where the values differ, the lowest is valid.
You will find the values approved by the manu-
facturer on the vehicle identification plates and
those for the towing vehicle in the "Technical
data" section (
Ypage 316).
Your vehicle behaves differently with a trailer
than without one.
The vehicle/trailer combination:
Ris heavier
Ris restricted in its acceleration and gradient-
climbing capability
Rhas an increased braking distance
Ris more susceptible to strong crosswinds
Rrequires more sensitive steering
Rhas a larger turning circle
This may impair the handling characteristics.
When towing a trailer, always adjust your speed
to suit the road and weather conditions. Drive
carefully. Maintain a safe dista nce.
If y
ou require any further explanation regarding
the information contained in the Operating
Instructions, please contact a Mercedes-Benz
Commercial Van Center.
General notes
RObserve the legally permitted maximum
speed for vehicle/trailer combinations in the
relevant country, state or Canadian province.
Before beginning the journey, check the trail-
er's documents for the maximum permitted
speed of your trailer.
This reduces the risk of accidents.
RInstall only an approved trailer coupling on
your vehicle. Only use a ball coupling for your Metris trailer tow hitch if it has been approved
for your vehicle. More information on the
availability, mounting and installation of the trailer electrics is available at any qualified
specialist workshop.
RThe trailer coupling is one of the most impor-
tant vehicle parts with regard to road safety.
Observe the notes on operation, care and
maintenance of the trailer tow hitch (see the
manufacturer's operating instructions).
RThe bumpers of your vehicle are not suitable
for installing detachable trailer couplings.
RDo not attach rented trailer tow hitches or
other detachable trailer tow hitches to the
bumper.
RMinimize the risk of damage to the ball cou-
pling. If you do not require the ball coupling,
remove it from the ball coupling recess.
Yo u w
ill find weight information under "Techni-
cal data" (Ypage 316).
The height of the ball neck changes according to
the load on the vehicle. If this is case, use a
trailer with a height-adjustable trailer drawbar.
Driving tips
The maximum permissible speed for vehicle/
trailer combination depends on the type of
trailer. Before beginning the journey, check the
trailer's documents for the maximum permitted
speed of your trailer. Observe the legally per-
mitted maximum speed in the relevant country, state or Canadian province.
When towing a trailer, your vehicle's handling
characteristics will be different in comparison to
when driving without a trailer and it will con-
sume more fuel.
On long and steep downhill gradients, select a
lower gear.
iThis also applies if cruise control is activa-
ted.
This enables you to utilize the engine's braking
effect and you do not need to brake so heavily to keep the correct speed. This relieves the load on
the brake system and prevents the brakes from overheating and wearing too quickly. If you need
to brake additionally, to not depress the brake
pedal constantly, but periodically.
Observe the notes on ESP
®trailer stabilization
(Ypage 67).
166Towing a trailer
Driving an d parking
Page 169 of 318
Drivingtips
If th etrailer begin sto swin gfrom sid eto side:
XDo no taccelerate.
XDo no tcounter-steer .
XBrakeif necessary.
iYou can reduce th eris kof th etrailer swing-
in gand rockin gby retrofitting anti-roll bar sor
trailer stability programs .Further information
is available at your authorized Mercedes-Ben z
Van Dealer .
RMaintainagreater distanc ethan you would
when drivin gwithout towin g atrailer .
RAvoid sudden braking .Apply th ebrake sgen -
tl y at first to allow th etrailer brake to overrun.
Then, increase th ebrake forc equickly.
RThe figure sfo rth egradient climbin gcapabil-
ities from astandstill refer to sea level. Whe n
drivin gin mountainous areas, note that th e
powe routput of th eengine, and wit hit it s
gradient climbin gcapability, decrease wit h
increasing altitude.
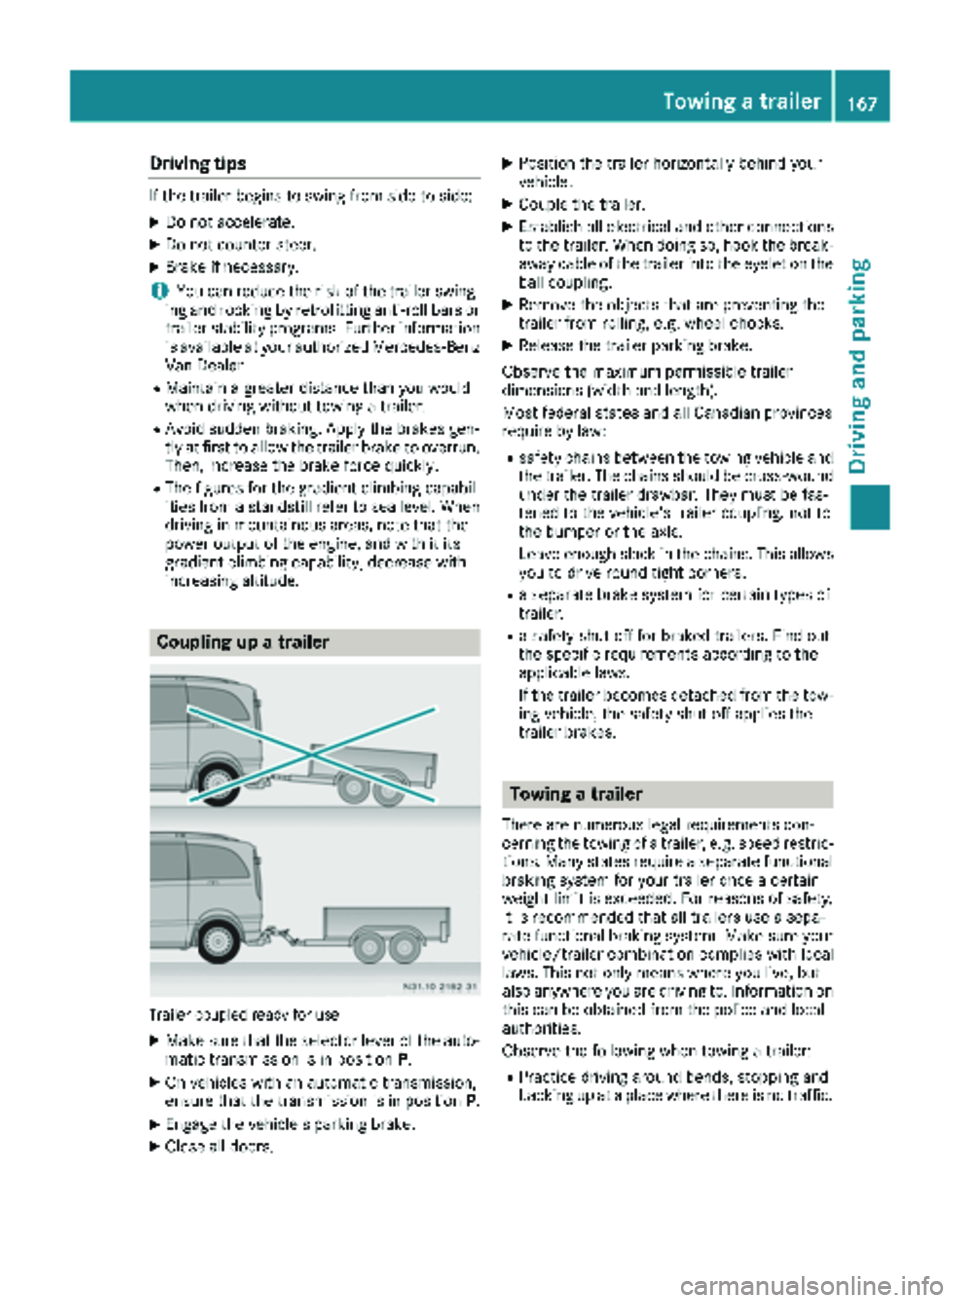
Coupling up atrailer
Trailer couple dready fo ruse
XMak esur ethat th eselecto rlever of th eauto-
matic transmissio nis in position P.
XOn vehicles wit han automatic transmission,
ensur ethat th etransmissio nis in position P.
XEngage thevehicle' sparking brake .
XCloseall doors .
XPosition th etrailer horizontally behin dyour
vehicle.
XCoupl eth etrailer .
XEstablis hall electrical and other connection s
to th etrailer .Whe ndoin gso, hoo kth ebreak -
away cable of th etrailer into th eeyele ton th e
ball coupling.
XRemov eth eobjects that are preventing th e
trailer from rolling, e.g. whee lchocks .
XRelease th etrailer parking brake .
Observ eth emaximum permissible trailer
dimensions (widt hand length).
Mos tfederal states and all Canadian province s
require by law:
Rsafet ychain sbetween th etowin gvehicle and
th etrailer .The chain sshould be cross-woun d
under th etrailer drawbar .The ymus tbe fas -
tene dto th evehicle' strailer coupling, no tto
th ebumper or th eaxle.
Leave enough slac kin th echains. Thi sallow s
you to drive round tight corners .
Raseparat ebrake syste mforcertain types of
tra
iler .
Rasafet yshut-of ffo rbrake dtrailers. Fin dout
th especific requirements accordin gto th e
applicable laws.
If th etrailer becomes detached from th etow-
in g vehicle, th esafet yshut-of fapplies th e
trailer brakes.
Towing atrailer
There are numerous lega lrequirements con-
cernin gth etowin gof atrailer ,e.g. speed restric -
tions. Man ystates require aseparat efunctional
braking system fo ryour trailer once acertain
weight limit is exceeded. Fo rreason sof safety,
it is recommended that all trailer suse asepa-
rat efunctional braking system. Mak esur eyour
vehicle/trailer combination complies wit hlocal
laws. Thi sno tonly means wher eyou live, but
also anywher eyou are drivin gto .Information on
this can be obtained from th epolice and local
authorities .
Observ eth efollowin gwhen towin g atrailer :
RPractic edrivin garound bends, stoppin gand
backing up at aplac ewher ethere is no traffic .
Towing a trailer167
Driving and parking
Z
Page 170 of 318
This enables you to gain experience and get
used to the new handling characteristics.
RBefore driving, check:
-that the trailer tow hitch and ball coupling
are secure
-that the safety switch for a braked trailer is
functioning properly
-that the safety chains are secure and not
damaged
-that the electrical connections are secure
-that the lights are working
-that the wheels are in good order and the
tire pressure is correct
RAdjust the exterior mirrors to provide an
unobstructed view of the rear section of the
trailer.
RIf the trailer is equipped with a separate func-
tional braking system, check before each
journey whether the brakes are functioning
correctly.
RSecure the load on the trailer according to the
applicable specifications and current stand-
ards on securing loads (
Ypage 246).
RWhen driving with a trailer, check at regular
intervals that the load is secured and that the
brakes and lights are working.
RBear in mind that the handling will be less
stable when towing a trailer than when driving
without one. Avoid sudden steering move-
ments.
RThe vehicle/trailer combination is heavier,
accelerates more slowly and has a decreased
gradient climbing capability and a longer
braking distance.
It is more susceptible to crosswinds and
requires cautious steering.
RIf possible, do not brake suddenly, but rather
moderately at first so that the trailer can acti-
vate its brakes. Then increase the force on the
brake pedal.
RIf the automatic transmission repeatedly
shifts between gears when driving on inclines,
restrict the shift range. Select shift range 4,3,
2 or 1.
Driving in a low gear and at a low speed
reduces the risk of damaging the engine.
RWhen driving on a downhill gradient, shift to a
low gear and take advantage of the engine's
braking effect. Avoid continuous brake application as this
may overheat the vehicle brakes and, if instal-
led, the trailer brakes.
RIf the coolant temperature increases dramat-
ically while the air-conditioning system is
switched on, switch off the air-conditioning
system.
Coolant heat can also be dissipated by
switching the airflow and the temperature of
the air conditioning to the
maximum level.
Open t
he windows if necessary.
RWhen overtaking, pay particular attention to
the extended length of your vehicle/trailer
combination.
Due to the length of your vehicle/trailer com-
bination you need an additional distance
before you can return to your original lane.
Uncoupling a trailer
GWARNING
If you uncouple a trailer with the overrun
brake engaged, you could trap your hand
between the vehicle and the trailer drawbar.
There is a risk of injury.
Do not uncouple a trailer if the overrun brake
is engaged.
!Do not disconnect a trailer with an engaged
overrun brake. Otherwise, your vehicle could
be damaged by the rebounding of the overrun
brake.
XMake sure that the selector lever of the auto-
matic transmission is in position P.
XEngage the vehicle's parking brake.
XClose all doors.
XApply the parking brake of the trailer.
XIn addition, secure the trailer against rolling
away with a wheel chock or similar object.
XRemove the trailer cable and safety chains
and decouple the trailer.
168Towing a trailer
Driving and parking
Page 171 of 318
Permissible trailer loads and trailer
drawbar noseweights
Weight information
!For vehicles with a permissible gross vehicle
weight of 6724 lbs (3050 kg), the permissible gross combination weight is less than the sum
of the permissible gross vehicle weight plus
the permissible trailer load. Exceeding the
permitted gross combination weight could
damage the powertrain, transmission or
trailer tow hitch.
If either the vehicle or the trailer is fully laden,
the permitted gross vehicle weight or the per- mitted trailer load values are reduced accord-
ingly. In this case, you may only partially load
the trailer or the vehicle.
The gross trailer weight (GTW) is calculated by
adding the weight of the trailer to the weight of
the load and equipment. If the trailer is installed
with a separate functional braking system, then
the maximum gross trailer weight is 5000 lbs
(2268 kg).
GWARNING
If you tow a trailer without a separate func-
tional braking system and a gross trailer
weight (GTW) of more than 1635 lbs (750 kg),
then the vehicle brake system may overheat.
This increases the braking distance and the
brake system may even fail. There is an
increased risk of accident and injury, possibly
even fatal.
Always use a trailer with a separate functional
braking system when towing a trailer with a
gross trailer weight (GTW) of more than
1635 lbs (750 kg).
The maximum noseweight of the trailer drawbar
on the ball coupling is 500 lbs (227 kg). The
actual noseweight may not exceed the value
given on the identification plates of the trailer
tow hitch or the trailer. If the values vary, the
lowest value always applies.
The gross combination weight rating (GCWR) is
calculated by adding the gross weight of the
trailer to the gross vehicle weight including a
driver's weight of approximately 150 lbs (68 kg).
The permissible Gross Combination Weight Rat-
ing is vehicle-specific and depends on the equip-
ment level. When driving with a trailer, you should not
exceed the permitted Gross Combination
Weight Rating (GCWR).
The permissible values, which must not be
exceeded, can be found in your vehicle docu-
ments and on the trailer tow hitch type plates for
the trailer and the vehicle (
Ypage 305). The
basic values approved by the manufacturer can
also be found in the "Technical data" section
(
Ypage 315). If the values vary, the lowest
value always applies.
Loading a trailer
!Utilize the maximum permissible nose-
weight as fully as possible. Do not allow the
weight to fall below the minimum permissible
noseweight, otherwise the trailer may come
loose.
RThe load must be distributed over the vehicle
and the trailer so as not to exceed either the
maximum permissible values for the gross
vehicle weight rating (GVWR) and gross trailer
weight (GTW), the gross combination weight
rating (GCWR), nor the maximum permissible
gross axle weight rating (GAWR) and trailer
drawbar noseweight rating of your vehicle.
RAdd the drawbar noseweight on the ball cou-
pling (TWR) to the rear axle load. This will pre- vent you from exceeding the permissible
gross axle weight (GAWR).
RAdd the drawbar noseweight on the ball cou-
pling (TWR) to the vehicle payload. This will
ensure that you do not exceed the permissi-
ble gross vehicle weight rating (GVWR).
Checking the vehicle and trailer weight
RMake sure the weights of the towing vehicle
and the trailer comply with the maximum per-
missible values. Have the vehicle/trailer com-
bination weighed on a calibrated weigh-
bridge. The vehicle/trailer combination con-
sists of the towing vehicle including the driver,
passengers and load, as well as the loaded
trailer.
RCheck the maximum permissible gross axle
weight rating of the front and rear axles
(GAWR), the gross trailer weight (GTW), the
gross combination weight rating (GCWR) and the noseweight of the trailer drawbar (TWR).
Towing a trailer169
Driving and parking
Z