stop start MERCEDES-BENZ METRIS 2019 MY19 Operator’s Manual
[x] Cancel search | Manufacturer: MERCEDES-BENZ, Model Year: 2019, Model line: METRIS, Model: MERCEDES-BENZ METRIS 2019Pages: 318, PDF Size: 5.07 MB
Page 93 of 318
There is a risk of an accident.
Adjust the driver's seat, head restraint, steer-ing wheel and mirror and fasten your seat belt
before starting the engine.
GWARNING
If the head restraints are not installed or not
adjusted correctly, they cannot provide pro-
tection as intended. There is an increased risk
of injury in the head and neck area, e.g. in the event of an accident or when braking.
Always drive with the head restraints instal-
led. Before driving off, make sure for every
vehicle occupant that the center of the head
restraint supports the back of the head at
about eye level.
Adjust the head restraint so that:
Rthe center of the head restraint supports the
back of the head at eye level and the head
restraint is engaged
Rwhen your head is relaxed the back of your
head rests as close as possible to the head
restraint
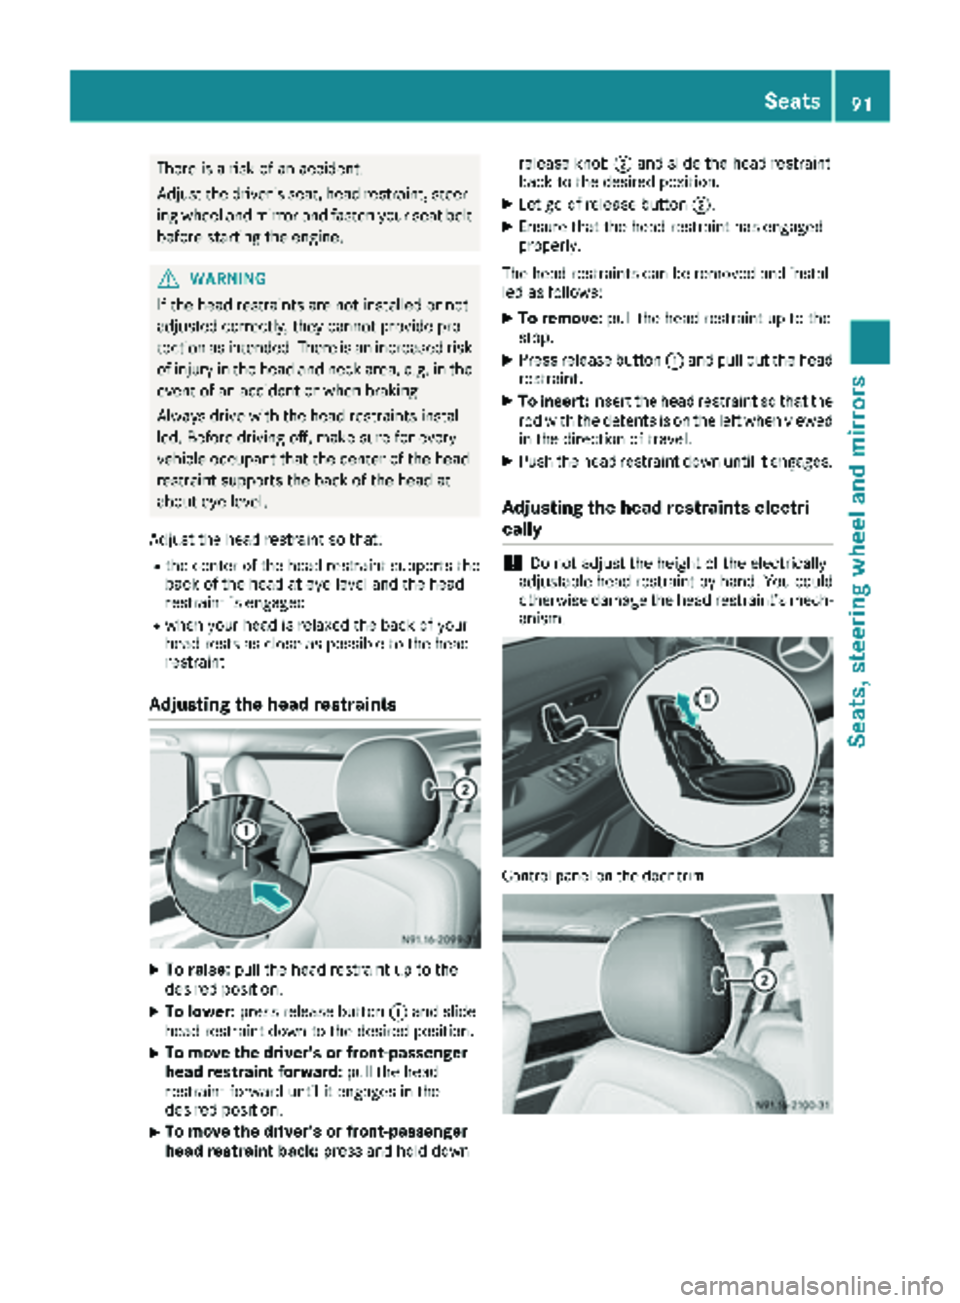
Adjusting the head restraints
XTo raise: pull the head restraint up to the
desired position.
XTo lower: press release button :and slide
head restraint down to the desired position.
XTo move the driver's or front-passenger
head restraint forward: pull the head
restraint forward until it engages in the
desired position.
XTo move the driver's or front-passenger
head restraint back: press and hold down release knob
;and slide the head restraint
back to the desired position.
XLet go of release button ;.
XEnsure that the head restraint has engaged
properly.
The head restraints can be removed and instal-
led as follows:
XTo remove: pull the head restraint up to the
stop.
XPress release button :and pull out the head
restraint.
XTo insert: insert the head restraint so that the
rod with the detents is on the left when viewed in the direction of travel.
XPush the head restraint down until it engages.
Adjusting the head restraints electri-
cally
!Do not adjust the height of the electrically
adjustable head restraint by hand. You could
otherwise damage the head restraint’s mech- anism.
Control panel on the door trim
Seats91
Seats, steering wheel and mirrors
Z
Page 113 of 318
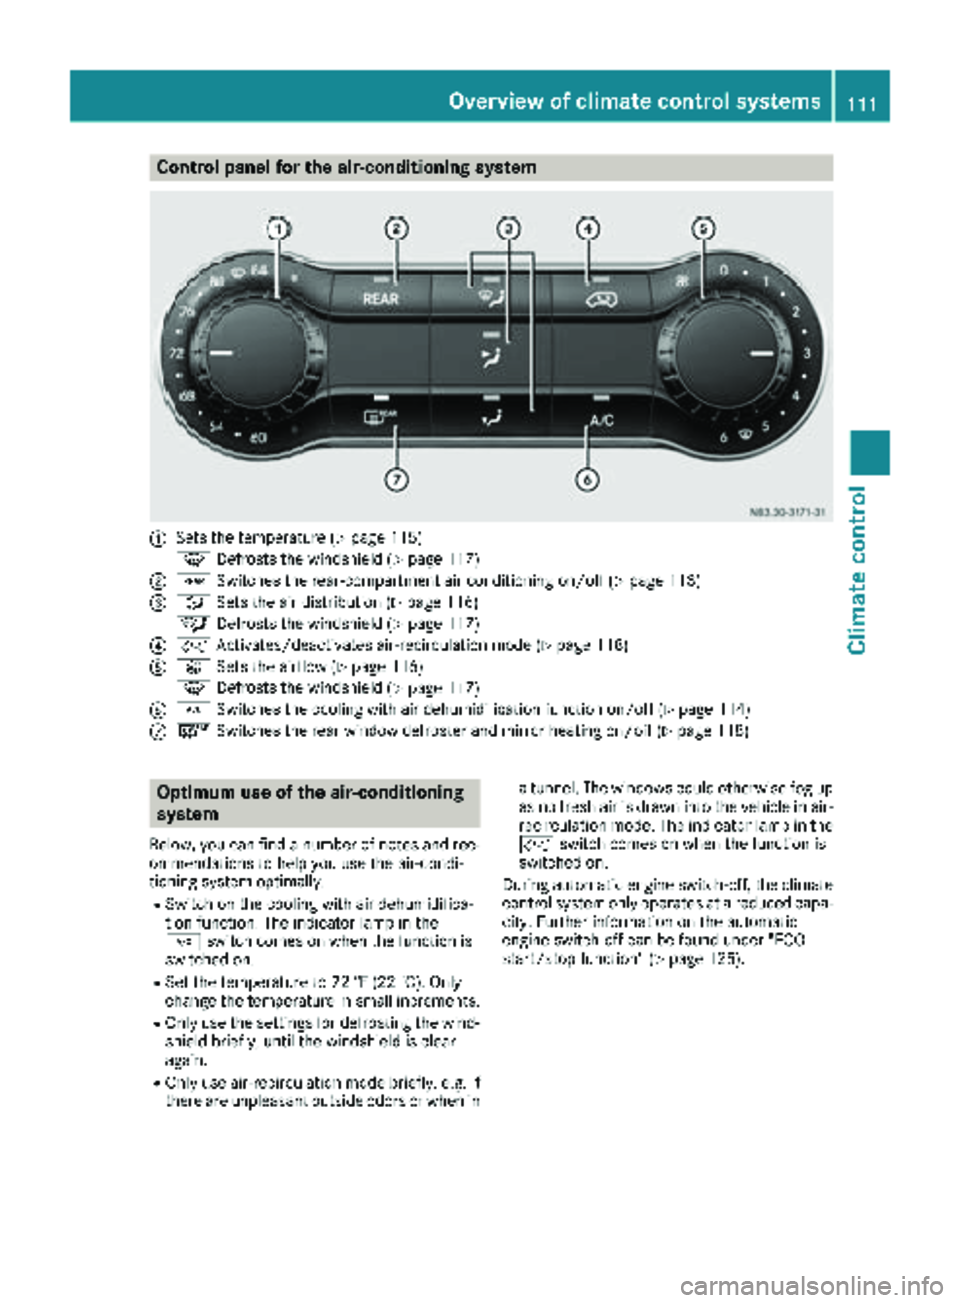
Control panel for the air-conditioning system
:Sets the temperature (Ypage 115)
z Defrosts the windshield (
Ypage 117)
;/Switches the rear-compartment air conditioning on/off (Ypage 113)
=_Sets the air distribution (Ypage 116)
¯ Defrosts the windshield (
Ypage 117)
?hActivates/deactivates air-recirculation mode (Ypage 118)
AKSets the airflow (Ypage 116)
z Defrosts the windshield (
Ypage 117)
B¿Switches the cooling with air dehumidification function on/off (Ypage 114)
C¤Switches the rear window defroster and mirror heating on/off (Ypage 118)
Optimum use of the air-conditioning
system
Below, you can find a number of notes and rec-
ommendations to help you use the air-condi-
tioning system optimally.
RSwitch on the cooling with air dehumidifica-
tion function. The indicator lamp in the
¿ switch comes on when the function is
switched on.
RSet the temperature to 72 ‡ (22 †).Only
ch ange the temperature in small increments.
ROnly use the settings for defrosting the wind-
shield briefly, until the windshield is clear
again.
ROnly use air-recirculation mode briefly, e.g. if
there are unpleasant outside odors or when in a tunnel. The windows could otherwise fog up
as no fresh air is drawn into the vehicle in air-
recirculation mode. The indicator lamp in the
h
switch comes on when the function is
switched on.
During automatic engine switch-off, the climate
control system only operates at a reduced capa-
city. Further information on the automatic
engine switch-off can be found under "ECO
start/stop function" (
Ypage 125).
Overview of climate control systems111
Climate control
Page 115 of 318
RIf you wish to use the driver's side settings on
the front-passenger side and, for vehicles
with rear-compartment air conditioning, for
the rear compartment as well, use the "Syn-
chronization" function. The indicator lamp in
the0 button comes on when the function
is switched on.
RAfter long journeys, you can use the residual
heat of the engine to heat the stationary vehi-
cle. The residual heat utilization can only be
switched on or off while the ignition is
switched off. The indicator lamp in the Ì
button comes on when the function is
switched on.
Approximately 60 minutes after parking the
vehicle, dual-zone automatic climate control
can switch on automatically, depending on the
outside temperature. The vehicle is then venti-
lated for about 30 minutes at low fan setting and
dual-zone automatic climate control is dried out.
During automatic engine switch-off, the climate
control system only operates at a reduced capa-
city. Further information on the automatic
engine switch-off can be found under "ECO
start/stop function" (
Ypage 125).
Optimum use of rear-compartment air
conditioning
Vehicles with air-conditioning system
Switch the rear-compartment air-conditioning
system on and off using the air-conditioning sys-
tem control panel. When you switch on the rear-
compartment air conditioning, your settings for
temperature, airflow and air distribution are
automatically adopted on the control panel for
the rear-compartment air conditioning.
The indicator lamp in the /button comes on
when the rear-compartment air-conditioning is
switched on (
Ypage 111).
Vehicles with dual-zone automatic climate
control
To operate the rear-compartment air condition-
ing, use the control panel of the dual-zone auto-
matic climate control system. When you switch
on the rear-compartment air conditioning, you
can set the temperature and airflow separately
on the control panel. The airflow setting is auto-
matically adopted for the rear-compartment air
conditioning. When dual-zone automatic cli-
mate control is in Ãautomatic mode, the air
distribution of the rear-compartment air condi-
tioning is also automatically adjusted. When you set the temperature and airflow of the
rear-compartment air conditioning, the indica-
tor lamp of the
/button (
Ypage 112)
flashes. When the rear-compartment air condi-
tioning is switched on, the indicator lamp on
the / button lights up.
For optimum climate control, set the tempera-
ture to 72 ‡ (22 †) and switch on Ãauto-
matic mode. Only change the temperature in
small increments.
Operating the climate control system
Switching the climate control on/off
Important safety notes
When the climate control is switched off, air
intake and air circulation also stop. Only use this
setting for a brief period. Otherwise, the win-
dows could fog up.
Air-conditioning system
XTurn the key to position 2in the ignition lock.
XTo switch on: turn airflow control Aclock-
wise to at least level 1– (Ypage 111).
XTo switch off: turn airflow control Acoun-
ter-clockwise to position 0.
Dual-zone automatic climate control
XTurn the key to position2in the ignition lock.
XTo switch on: press theÃbutton.
The indicator lamp in the Ãbutton and the
display are switched on. The climate control is
automatically adjusted depending on the set
temperature (
Ypage 115).
or
XPress the Kbutton and set blower setting
1 or above.
The blower settings are shown in the display
as a bar graph.
XTo switch off: press theIbutton and,
after reaching the lowest blower speed, press
it again.
The control panel display goes off.
Preferably switch on climate control using the
à button.
Operating the climate control system113
Climate control
Page 127 of 318
Hill start assist
Hill start assist helps you when pulling away for-
wards or in reverse on an uphill gradient. Hill
start assist automatically maintains the brake
pressure for about another second, after you
have taken your foot off the brake pedal. This
gives you enough time to move your foot from
the brake pedal to the accelerator pedal and
depress it before the vehicle begins to roll.
GWARNING
After a short time, hill start assist will no lon-
ger brake your vehicle and it could roll away.
There is a risk of an accident and injury.
Therefore, quickly move your foot from the
brake pedal to the accelerator pedal. Never
leave the vehicle when it is held by hill start
assist.
Hill start assist is not active if:
Ryou are pulling away on a level road or a
downhill gradient
Rthe transmission is in position N
Rthe parking brake is applied
RESP®is malfunctioning
Reverse warning device
GWARNING
Other road users may ignore or fail to hear the warning tone of the reverse warning feature.
There is a risk of injury if you fail to ensure that
the area in which you are maneuvering is
clear.
Make sure that there are no persons or
objects in the area in which you are maneu-
vering. It may be necessary to enlist the help
of a second person when maneuvering.
The reverse warning feature is a system
designed to assist you in ensuring the safety of
other road users.
A warning signal sounds to alert other road
users when reverse gear is engaged. The volume
of the warning tone can be reduced for night-
time driving.
XTo reduce the volume of the warning tone:
engage reverse gear twice in quick succes-
sion.
The warning tone is now quieter.
iThe warning tone sounds at a normal vol-
ume by default. The volume of the warning
tone has to be reduced each time you engage
reverse gear if necessary.
ECO start/stop function
General notes
When the ECO start/stop function is opera-
tional, it switches the engine off automatically if
the vehicle is slowed to a stop under certain
conditions.
When pulling away again, it starts the engine
automatically. The ECO start/stop function
thereby helps you to reduce the fuel consump-
tion and emissions of your vehicle.
The stop/start function is automatically activa-
ted each time you start the engine with the key.
In drive program Mthe ECO start/stop function
is automatically deactivated. You can manually
activate the ECO start/stop function if required.
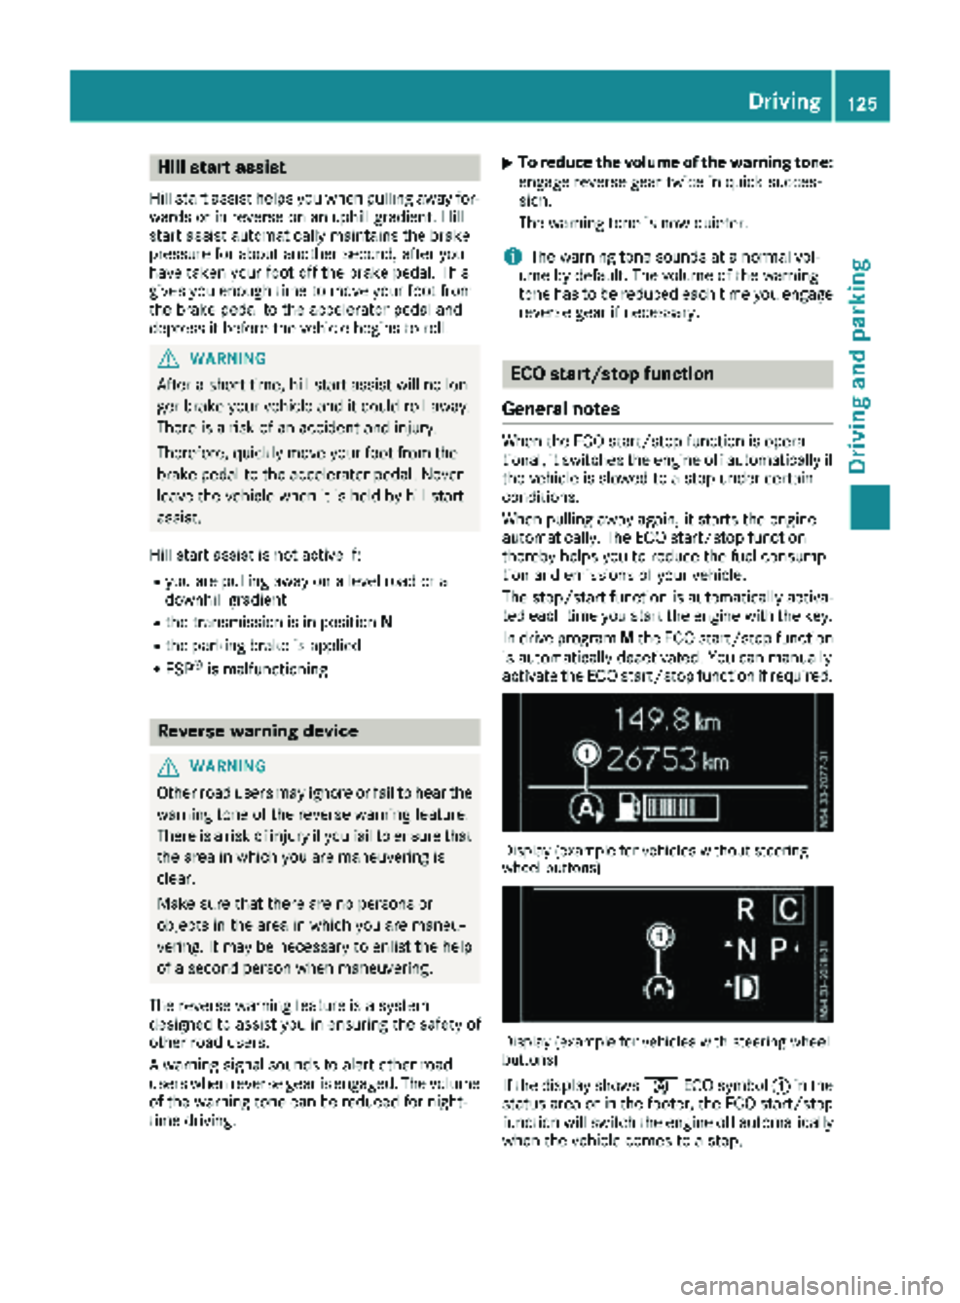
Display (example for vehicles without steering
wheel buttons)
Display (example for vehicles with steering wheel
buttons)
If the display shows èECO symbol :in the
status area or in the footer, the ECO start/stop
function will switch the engine off automatically
when the vehicle comes to a stop.
Driving125
Driving and parking
Z
Page 128 of 318
Important safety notes
GWARNING
If th eengin eis switched off automatically and
you exit th evehicle, th eengin eis restarte d
automatically. The vehicl emay begi nmoving .
Ther eis aris kof acciden tand injury.
If you wish to exit th evehicle, always tur noff
th eignition and secure th evehicl eagainst
rollin gaway.
Automatic engine switch-off
Gene ral notes
The ECO start/sto pfunction is operational
when th eè ECO symbol is shown in th esta-
tus bar of th edisplay.
Fo rthis to happen, various conditions, includin g
th efollowing, must be met :
RtheECO start/sto pfunction is switched on .
The indicator lamp in th eè ECO butto nis
lit (
Ypage 127).
Rtheoutside temperature is abov e32 ‡(0 †).
Rthe engine has reached its operating temper-
ature.
Rthe set temperature for the vehicle interior
has been reached.
Rthe condition of charge of the starter battery
is sufficient.
Rthe system detects that the windshield is not
fogged up when the air-conditioning system
or automatic climate control is switched on.
Rthe hood is closed.
Rthe driver's seat belt is fastened.
Rthe driver's door is closed.
Rthere is no danger of immediately rolling
backwards, e.g. when stopped on a steep gra-dient.
If a trailer is attached and/or a rear carrier
system is installed and connected electri-
cally, this danger is detected on less steep
gradients.
Only if all the conditions for automatic engine
switch-off are fulfilled, does the display show
the è ECO symbol.
All of the vehicle's systems remain active when
the engine is switched off automatically.
The engine can be switched off automatically a
maximum of four times (initial stop, then three subsequent stops) in succession. After that, the
display hides the èECO symbol. Automatic
engine switch-off is not possible again until the
è ECO symbol is shown again.
If you open the hood after an a
utomatic engine
switch-off, the automatic engine start is deacti-
vated. Once the hood is closed, you have to start
the engine manually.
If the vehicle is stopped in transmission position
h ori, the ECO start/stop function switches
off the engine automatically once the vehicle is
stationary.
Automatic engine start
General notes
The engine is started automatically if:
Ryou switch off the ECO start/stop function by pressing the èECO button The indicator
lamp in the èECO button then goes out.
(
Ypage 127)
Ryou depress the accelerator pedal.
Ryou engage reverse gear k
Ryou unfasten your seat belt.
Ryou open the driver's door.
Rthe vehicle begins to roll away.
Rthe brake system requires this.
Rthe temperature in the vehicle interior
increasingly deviates from the set value.
Rthe system detects moisture on the wind-
shield when the air-conditioning system is
switched on.
Rthe battery's condition of charge is too low.
The engine is started automatically if you:
Rswitch to drive program M(Ypage 131)
Rrelease the brake pedal when in transmission
position hori
Rswitch to transmission position j
After shifting from transmission position kto
h, the ECO start/stop function is not available
until the èECO symbol is shown in the dis-
play.
126Driving
Driving and parking
Page 129 of 318
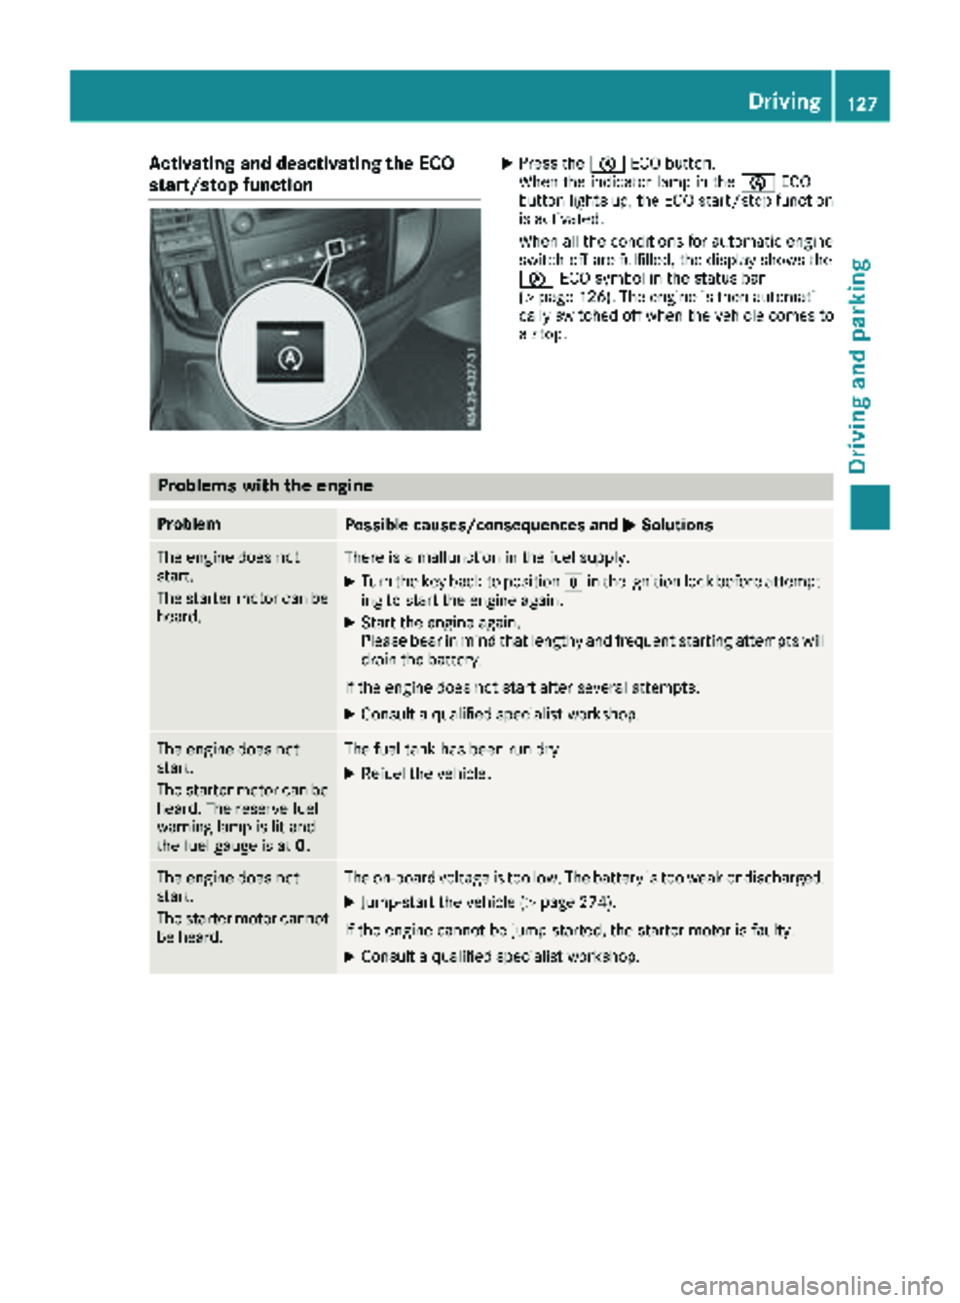
Activating and deactivating the ECO
start/stop functionXPress theè ECO button.
When th eindicator lamp in th eè ECO
butto nlights up, th eECO start/sto pfunction
is activated.
When all th econdition sfor automatic engin e
switch-off are fulfilled ,th edisplay shows th e
è ECO symbol in th estatus bar
(
Ypage 126). The engin eis then automati-
call yswitched off when th evehicl ecomes to
a stop.
Problems with the engine
ProblemPossible causes/consequences and MSolutions
The enginedoes no t
start .
The starter motor can be
heard.There is amalfunction in th efuel supply.
XTurn th eke ybac kto position gin th eignition loc kbefore attempt-
ing to start th eengin eagain .
XStart th eengin eagain .
Pleas ebear in min dthat lengthy and frequen tstarting attempts will
drai nth ebattery.
If th eengin edoes no tstart after several attempts :
XConsultaqualified specialist workshop .
The enginedoes no t
start .
The starter motor can be
heard. The reserv efuel
warning lamp is lit and
th efuel gauge is at 0.The fuel tankhas been run dry.
XRefue lth evehicle.
The engin edoes no t
start .
The starter motor canno t
be heard.The on-board voltag eis to olow. The battery is to oweak or discharged.
XJump-start th evehicl e (Ypage 274).
If th eengin ecanno tbe jump-started, th estarter motor is faulty.
XConsult aqualified specialist workshop .
Driving127
Driving and parking
Z
Page 131 of 318
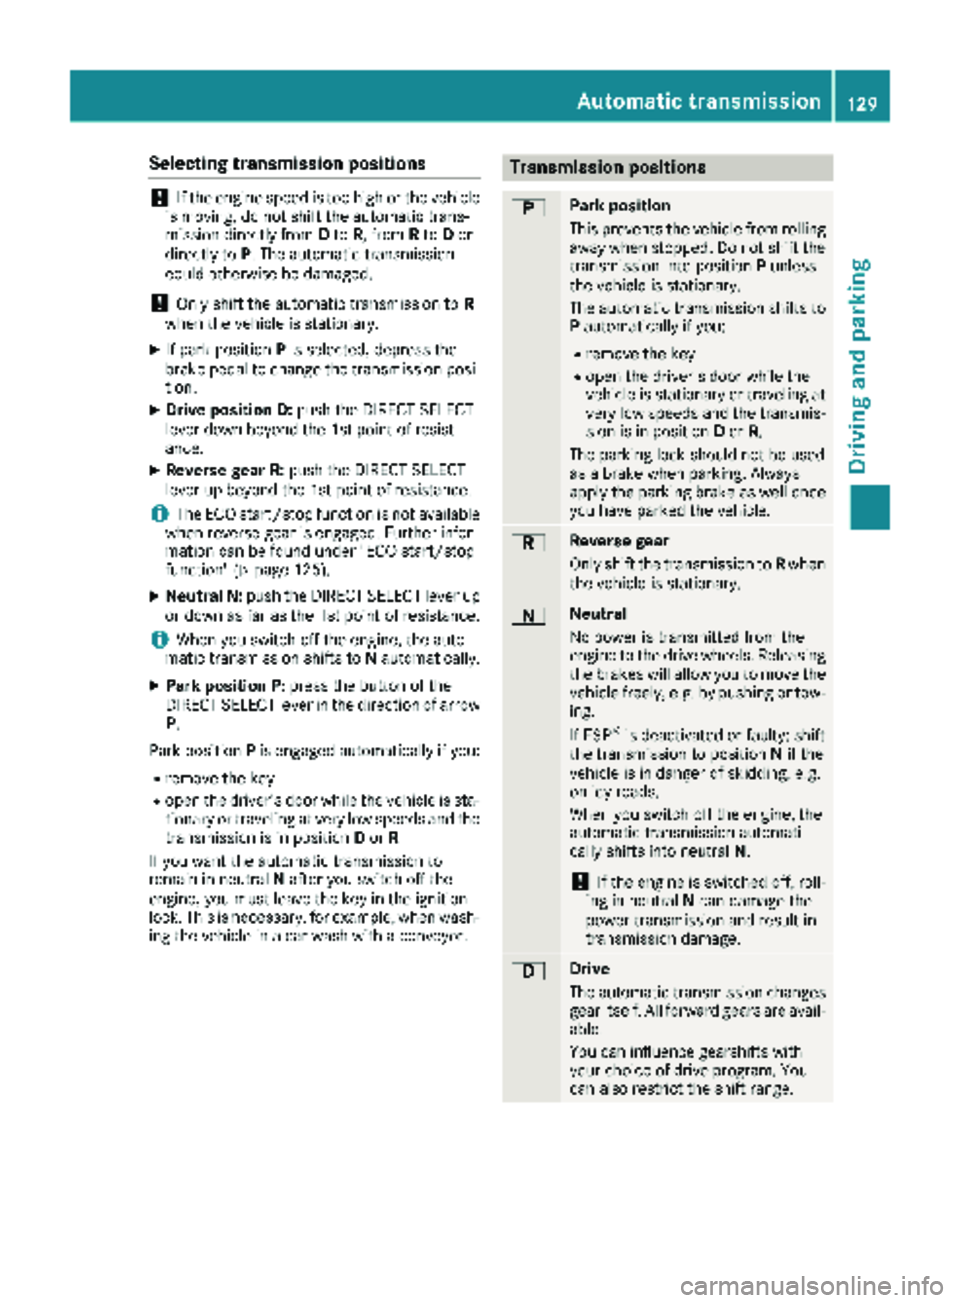
Selecting transmission positions
!If the engine speed is too high or the vehicle
is moving, do not shift the automatic trans-
mission directly from Dto R, from Rto Dor
directly to P. The automatic transmission
could otherwise be damaged.
!Only shift the automatic transmission to R
when the vehicle is stationary.
XIf park position Pis selected, depress the
brake pedal to change the transmission posi-
tion.
XDrive position D: push the DIRECT SELECT
lever down beyond the 1st point of resist-
ance.
XReverse gear R: push the DIRECT SELECT
lever up beyond the 1st point of resistance.
iThe ECO start/stop function is not available
when reverse gear is engaged. Further infor-
mation can be found under "ECO start/stop
function" (
Ypage 125).
XNeutral N: push the DIRECT SELECT lever up
or down as far as the 1st point of resistance.
iWhen you switch off the engine, the auto-
matic transmission shifts to Nautomatically.
XPark position P: press the button of the
DIRECT SELECT lever in the direction of arrow
P.
Park position Pis engaged automatically if you:
Rremove the key
Ropen the driver's door while the vehicle is sta-
tionary or traveling at very low speeds and the
transmission is in position Dor R
If you want the automatic transmission to
remain in neutral Nafter you switch off the
engine, you must leave the key in the ignition
lock. This is necessary, for example, when wash-
ing the vehicle in a car wash with a conveyor.
Transmission positions
BPark position
This prevents the vehicle from rolling
away when stopped. Do not shift the
transmission into position Punless
the vehicle is stationary.
The automatic transmission shifts to P automatically if you:
Rremove the key
Ropen the driver's door while the
vehicle is stationary or traveling at
very low speeds and the transmis-
sion is in position Dor R.
The parking lock should not be used
as a brake when parking. Always
apply the parking brake as well once
you have parked the vehicle.
CReverse gear
Only shift the transmission to Rwhen
the vehicle is stationary.
ANeutral
No power is transmitted from the
engine to the drive wheels. Releasing
the brakes will allow you to move the
vehicle freely, e.g. by pushing or tow-
ing.
If ESP
®is deactivated or faulty: shift
the transmission to position Nif the
vehicle is in danger of skidding, e.g.
on icy roads.
When you switch off the engine, the
automatic transmission automati-
cally shifts into neutral N.
!If the engine is switched off, roll-
ing in neutral Ncan damage the
power transmission and result in
transmission damage.
7Drive
The automatic transmission changes
gear itself. All forward gears are avail-
able.
You can influence gearshifts with
your choice of drive program. You
can also restrict the shift range.
Automatic transmission129
Driving and parking
Z
Page 133 of 318
XTo shift up and extend the shift range:
briefly pull right steering wheel paddle
shifter;.
The automatic transmission shifts to the next gear up, depending on the gear currently
engaged. This derestricts the shift range at
the same time.
If the display shows only transmission posi-
tion D, the shift range restriction is canceled.
XTo derestrict the shift range: pull and hold
right steering wheel paddle shifter ;.
The automatic transmission shifts up one or
more gears depending on the gear currently
engaged. At the same time, the shift range
restriction is canceled and the display shows
transmission position D.
Shift ranges and driving situations
=Use the engine's braking effect.
5Use the braking effect of the engine
on steep downhill gradients and for
driving:
Ron steep mountain roads
Rin mountainous terrain
Rin arduous conditions
4Use the braking effect of the engine
on extremely steep downhill gradi-
ents and long downhill stretches.
Drive programs
General notes
You can use the program selector button to
choose between different drive programs for the
automatic transmission. Engine management
and the gearshifting characteristics of the auto-
matic transmission change depending on which
drive program is selected. Thus, a more comfort-
oriented or a more economical driving style is
supported, depending on the wish of the driver.
Selecting drive program Mdeactivates auto-
matic gearshifting, requiring that you change
gear manually.
After the engine is started, the automatic trans-
mission automatically switches to drive pro-
gram C(Comfort) for a comfortable and eco-
nomical driving style.
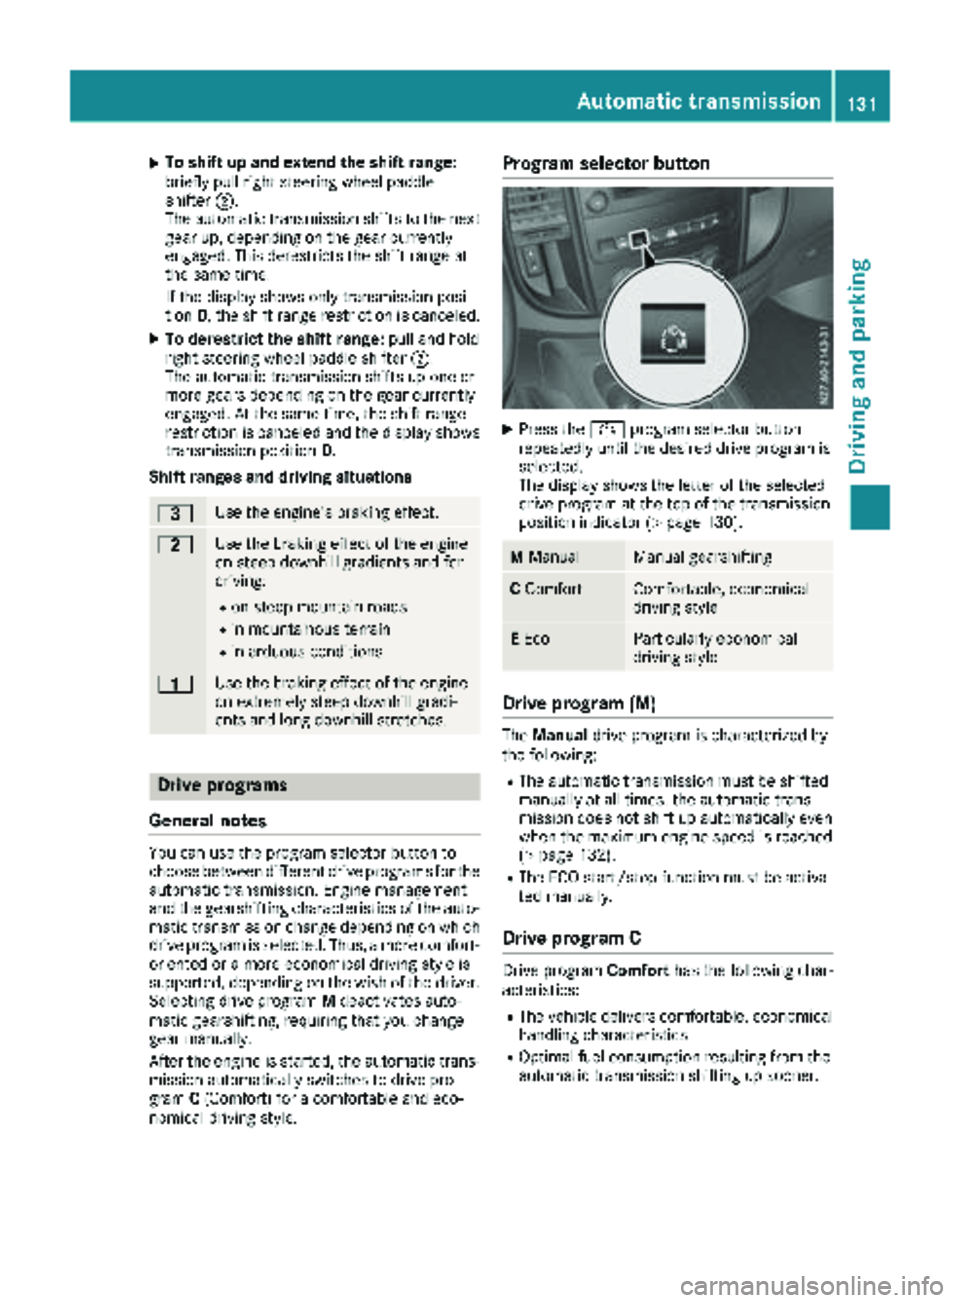
Program selector button
XPress the Éprogram selector button
repeatedly until the desired drive program is
selected.
The display shows the letter of the selected
drive program at the top of the transmission
position indicator (
Ypage 130).
M ManualManual gearshifting
CComfortComfortable, economical
driving style
EEcoParticularly economical
driving style
Drive program (M)
The Manual drive program is characterized by
the following:
RThe automatic transmission must be shifted
manually at all times. the automatic trans-
mission does not shift up automatically even
when the maximum engine speed is reached
(
Ypage 132).
RThe ECO start/stop function must be activa-
ted manually.
Drive program C
Drive program Comforthas the following char-
acteristics:
RThe vehicle delivers comfortable, economical handling characteristics.
ROptimal fuel consumption resulting from the
automatic transmission shifting up sooner.
Automatic transmission131
Driving an d parking
Z
Page 136 of 318
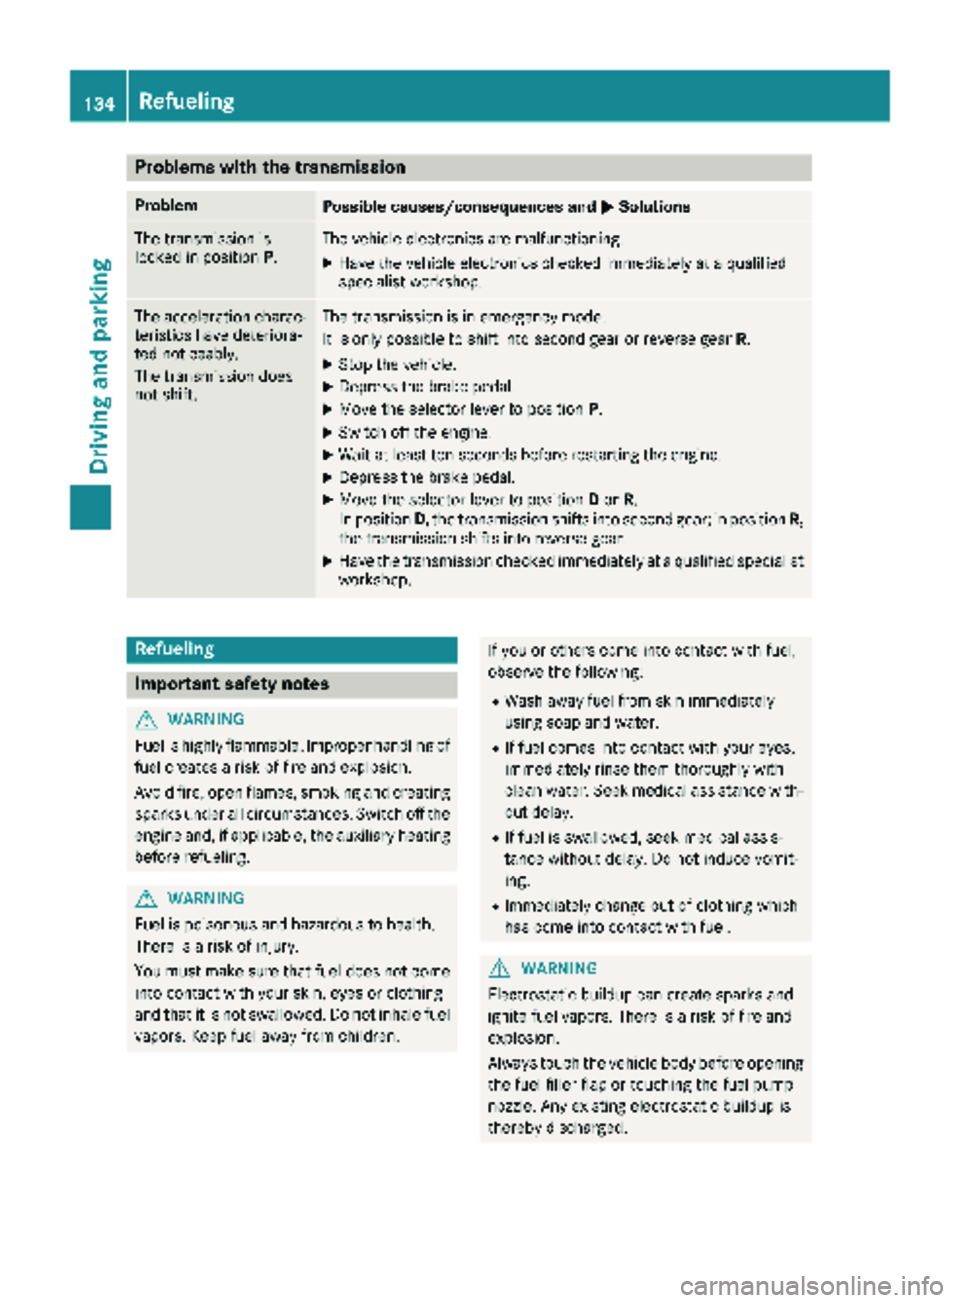
Problems with the transmission
ProblemPossible causes/consequences andMSolutions
The transmission is
locked in positionP.The vehicle electronics are malfunctioning.
XHave the vehicle electronics checked immediately at a qualified
specialist workshop.
The acceleration charac-
teristics have deteriora-
ted noticeably.
The transmission does
not shift.The transmission is in emergency mode.
It is only possible to shift into second gear or reverse gear R.
XStop the vehicle.
XDepress the brake pedal.
XMove the selector lever to positionP.
XSwitch off the engine.
XWait at least ten seconds before restarting the engine.
XDepress the brake pedal.
XMove the selector lever to positionDor R.
In position D, the transmission shifts into second gear; in position R,
the transmission shifts into reverse gear.
XHave the transmission checked immediately at a qualified specialist
workshop.
Refueling
Important safety notes
GWARNING
Fuel is highly flammable. Improper handling of
fuel creates a risk of fire and explosion.
Avoid fire, open flames, smoking and creating
sparks under all circumstances. Switch off the
engine and, if applicable, the auxiliary heating
before refueling.
GWARNING
Fuel is poisonous and hazardous to health.
There is a risk of injury.
You must make sure that fuel does not come into contact with your skin, eyes or clothing
and that it is not swallowed. Do not inhale fuel
vapors. Keep fuel away from children.
If you or others come into contact with fuel,
observe the following:
RWash away fuel from skin immediately
using soap and water.
RIf fuel comes into contact with your eyes,
immediately rinse them thoroughly with
clean water. Seek medical assistance with-
out delay.
RIf fuel is swallowed, seek medical assis-
tance without delay. Do not induce vomit-
ing.
RImmediately change out of clothing which
has come into contact with fuel.
GWARNING
Electrostatic buildup can create sparks and
ignite fuel vapors. There is a risk of fire and
explosion.
Always touch the vehicle body before opening
the fuel filler flap or touching the fuel pump
nozzle. Any existing electrostatic buildup is
thereby discharged.
134Refueling
Driving and parking
Page 140 of 318
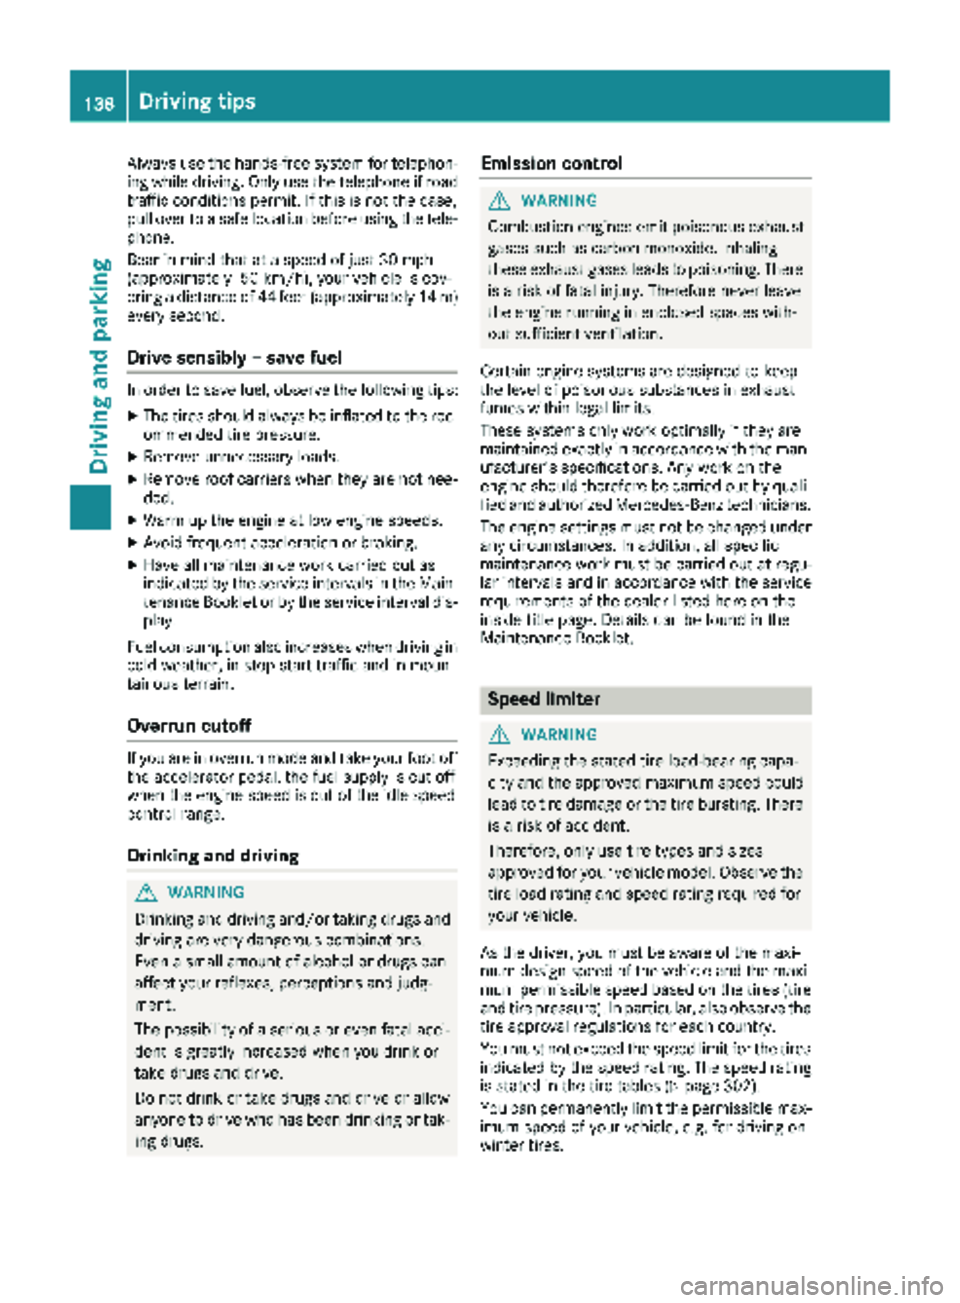
Always use the hands-free system for telephon-
ing while driving. Only use the telephone if road
traffic conditions permit. If this is not the case,
pull over to a safe location before using the tele-
phone.
Bear in mind that at a speed of just 30 mph
(approximately 50 km/h), your vehicle is cov-
ering a distance of 44 fee t(approximately 14 m)
every second.
Drive sensibly – save fuel
In order to save fuel, observe the following tips:
XThe tires should always be inflated to the rec-
ommended tire pressure.
XRemove unnecessary loads.
XRemove roof carriers when they are not nee-
ded.
XWarm up the engine at low engine speeds.
XAvoid frequent acceleration or braking.
XHave all maintenance work carried out as
indicated by the service intervals in the Main-
tenance Booklet or by the service interval dis-
play.
Fuel consumption also increases when driving in cold weather, in stop-start traffic and in moun-
tainous terrain.
Overrun cutoff
If you are in overrun mode and take your foot off
the accelerator pedal, the fuel supply is cut off
when the engine speed is out of the idle speed
control range.
Drinking and driving
GWARNING
Drinking and driving and/or taking drugs and driving are very dangerous combinations.
Even a small amount of alcohol or drugs can
affect your reflexes, perceptions and judg-
ment.
The possibility of a serious or even fatal acci-
dent is greatly increased when you drink or
take drugs and drive.
Do not drink or take drugs and drive or allow
anyone to drive who has been drinking or tak-
ing drugs.
Emission control
GWARNING
Combustion engines emit poisonous exhaust
gases such as carbon monoxide. Inhaling
these exhaust gases leads to poisoning. There
is a risk of fatal injury. Therefore never leave
the engine running in enclosed spaces with-
out sufficient ventilation.
Certain engine systems are designed to keep
the level of poisonous substances in exhaust
fumes within legal limits.
These systems only work optimally if they are
maintained exactly in accordance with the man-
ufacturer's specifications. Any work on the
engine should therefore be carried out by quali-
fied and authorized Mercedes-Benz technicians.
The engine settings must not be changed under
any circumstances. In addition, all specific
maintenance work must be carried out at regu-
lar intervals and in accordance with the service
requirements of the dealer listed here on the
inside title page. Details can be found in the
Maintenance Booklet.
Speed limiter
GWARNING
Exceeding the stated tire load-bearing capa-
city and the approved maximum speed could
lead to tire damage or the tire bursting. There is a risk of accident.
Therefore, only use tire types and sizes
approved for your vehicle model. Observe the
tire load rating and speed rating required for
your vehicle.
As the driver, you must be aware of the maxi-
mum design speed of the vehicle and the maxi- mum permissible speed based on the tires (tire
and tire pressure). In particular, also observe the tire approval regulations for each country.
You must not exceed the speed limit for the tires
indicated by the speed rating. The speed rating
is stated in the tire tables (
Ypage 302).
You can permanently limit the permissible max-
imum speed of your vehicle, e.g. for driving on
winter tires.
138Driving tips
Driving and parking