buttons MERCEDES-BENZ METRIS 2020 MY20 Operator’s Manual
[x] Cancel search | Manufacturer: MERCEDES-BENZ, Model Year: 2020, Model line: METRIS, Model: MERCEDES-BENZ METRIS 2020Pages: 320, PDF Size: 26.38 MB
Page 227 of 320

Display messages
Possible causes/consequences and
M SolutionsTire Pressure Moni‐
tor Currently
Unavailable Due to a source of radio interference, no signals can be received
from the wheel sensors. The tire pressure monitor is temporarily
malfunctioning.
The tire pressure monitor restarts automatically as soon as the
problem has been solved. Wheel Sensor(s)
Missing There is no signal from the tire pressure sensor of one or several
wheels. The pressure of the affected tire is not shown in the display.
X Have the faulty tire pressure sensor replaced at a qualified spe-
cialist workshop. Tire Pressure Moni‐
tor Inoperative No
Wheel Sensors The wheels installed do not have suitable tire pressure sensors. The
tire pressure monitor is deactivated.
X Install wheels with suitable tire pressure sensors.
The tire pressure monitor is activated automatically after driving
for a few minutes. Tire Press. Moni‐
tor Inoperative The tire pressure monitor is malfunctioning.
X Visit a qualified specialist workshop. Vehicle
Display messages
Possible causes/consequences and
M SolutionsShift to 'P' or
'N' to Start Engine You have attempted to start the engine in transmission position
k
or h.
X Shift the transmission to position j or i.Auxiliary Battery
Malfunction The auxiliary battery for the transmission is no longer being
charged.
X Visit a qualified specialist workshop. Apply Brake to
Shift from 'P' You attempted to shift the transmission to position
h, k or i
without depressing the brake pedal.
X Depress the brake pedal. Perm. N Activated
Risk of Rolling An additional warning tone sounds. The transmission has been shif-
ted to position i when the vehicle is coasting or being driven.
X Stop the vehicle by depressing the brake pedal and when the
vehicle is stationary shift the transmission to position j.
X Continue driving by shifting the transmission to position h or
k. Risk of Rolling:
Transmission Not
in P An additional warning tone sounds. The driver's door is open and
the transmission is in position k, i or h.
X Shift the transmission to position j.
X Secure the vehicle to prevent it from rolling away ( Y page 138).Display messages (vehicles with steering wheel buttons)
225
On-board computer and displays Z
Page 228 of 320
Display messages
Possible causes/consequences and
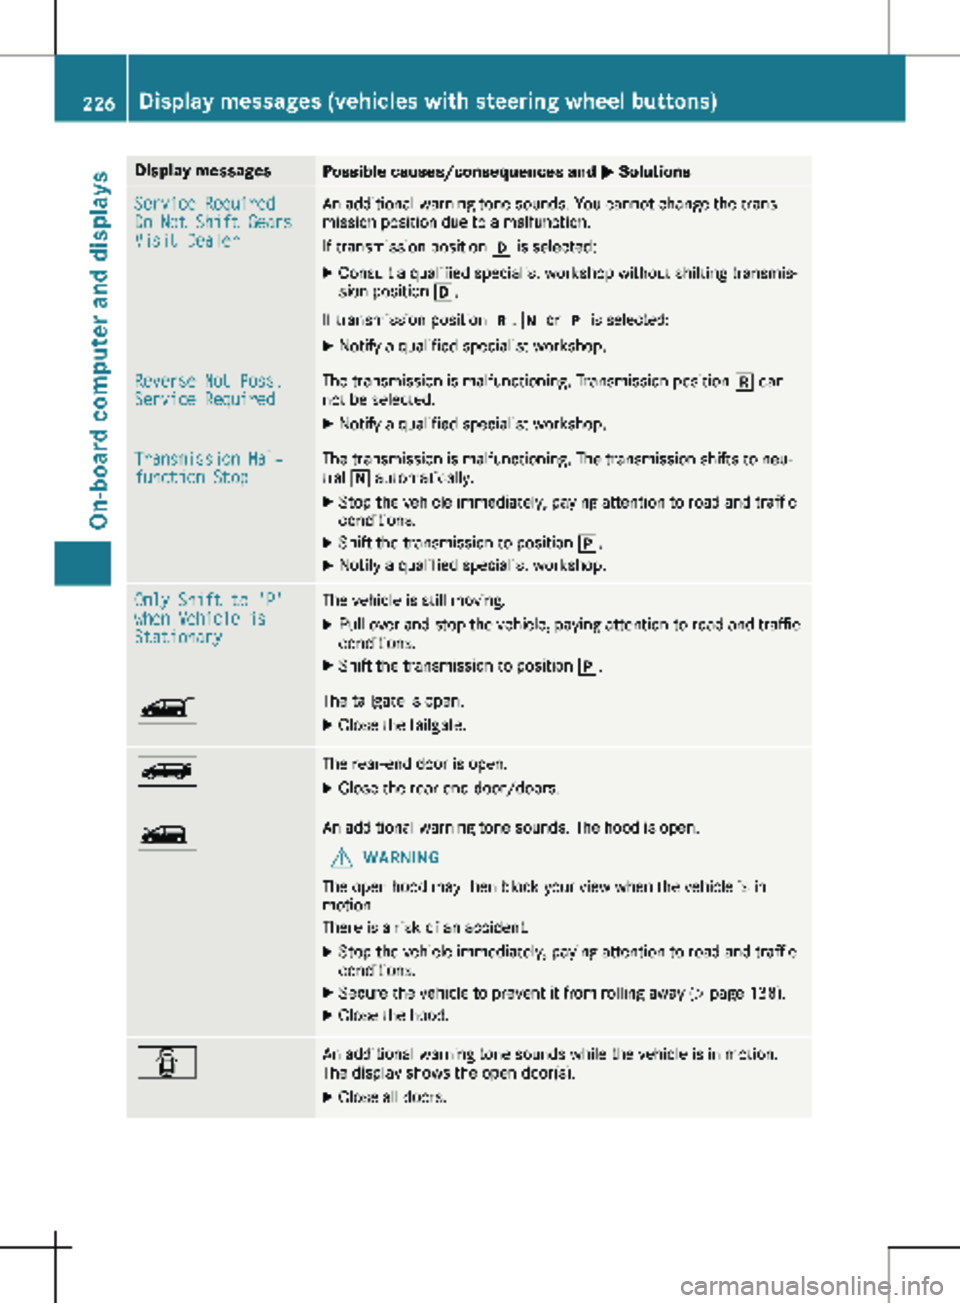
M SolutionsService Required
Do Not Shift Gears
Visit Dealer An additional warning tone sounds. You cannot change the trans-
mission position due to a malfunction.
If transmission position h is selected:
X Consult a qualified specialist workshop without shifting transmis-
sion position h.
If transmission position k, i or j is selected:
X Notify a qualified specialist workshop. Reverse Not Poss.
Service Required The transmission is malfunctioning. Transmission position k can-
not be selected.
X Notify a qualified specialist workshop. Transmission Mal‐
function Stop The transmission is malfunctioning. The transmission shifts to neu-
tral i automatically.
X Stop the vehicle immediately, paying attention to road and traffic
conditions.
X Shift the transmission to position j.
X Notify a qualified specialist workshop. Only Shift to 'P'
when Vehicle is
Stationary The vehicle is still moving.
X Pull over and stop the vehicle, paying attention to road and traffic
conditions.
X Shift the transmission to position j.Ò The tailgate is open.
X Close the tailgate. Ñ The rear-end door is open.
X Close the rear-end door/doors. Ó An additional warning tone sounds. The hood is open.
G WARNING
The open hood may then block your view when the vehicle is in
motion.
There is a risk of an accident.
X Stop the vehicle immediately, paying attention to road and traffic
conditions.
X Secure the vehicle to prevent it from rolling away (Y page 138).
X Close the hood. C An additional warning tone sounds while the vehicle is in motion.
The display shows the open door(s).
X Close all doors.226
Display messages (vehicles with steering wheel buttons)
On-board computer and displays
Page 235 of 320

Engine
Warning/
indicator
lamp
N Signal type
Possible causes/consequences and
M Solutions;
N The yellow Check Engine warning lamp lights up while the engine is running.
There may be a malfunction in the following vehicle systems:
R in the engine management
R in the transmission management
R in the fuel injection system
R in the exhaust system
R in the ignition system (for vehicles with a gasoline engine)
R in the fuel system
The emission limit values may be exceeded and the engine may be running in
emergency mode.
X Have the vehicle checked as soon as possible at a qualified specialist work-
shop. 6
N The yellow reserve fuel warning lamp is on while the engine is running.
The fuel level has dropped to the reserve range.
X Refuel at the nearest gas station. ?
N The red coolant warning lamp comes on while the engine is running.
On vehicles without steering wheel buttons, the coolant temperature gauge is at
the start of the bar display
(Y page 178).
On vehicles with steering wheel buttons, the coolant temperature gauge is at
the start of the scale in the instrument cluster ( Y page 40).
The temperature sensor for the coolant temperature gauge is faulty.
The coolant temperature is no longer being monitored. There is a risk of engine
damage if the coolant temperature is too high.
X Stop the vehicle immediately, paying attention to road and traffic conditions,
and switch off the engine. Do not continue driving under any circumstances.
X Secure the vehicle to prevent it from rolling away (Y page
138).
X Consult a qualified specialist workshop. Indicator and warning lamps in the instrument cluster
233
On-board computer and displays Z
Page 236 of 320
Warning/
indicator
lamp
N Signal type
Possible causes/consequences and
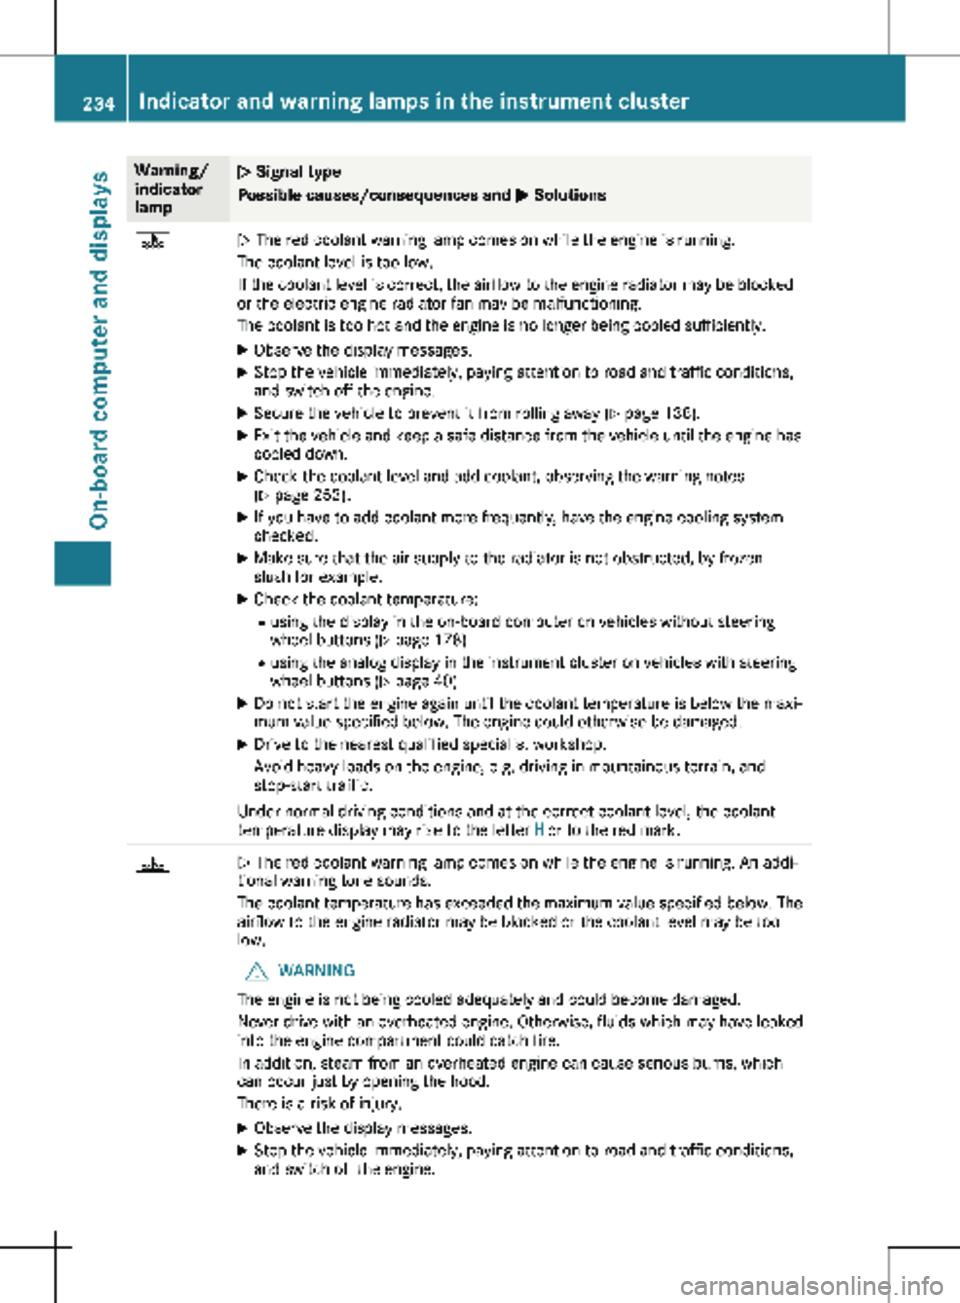
M Solutions?
N The red coolant warning lamp comes on while the engine is running.
The coolant level is too low.
If the coolant level is correct, the airflow to the engine radiator may be blocked
or the electric engine radiator fan may be malfunctioning.
The coolant is too hot and the engine is no longer being cooled sufficiently.
X Observe the display messages.
X Stop the vehicle immediately, paying attention to road and traffic conditions,
and switch off the engine.
X Secure the vehicle to prevent it from rolling away (Y page 138).
X Exit the vehicle and keep a safe distance from the vehicle until the engine has
cooled down.
X Check the coolant level and add coolant, observing the warning notes
(Y page
253).
X If you have to add coolant more frequently, have the engine cooling system
checked.
X Make sure that the air supply to the radiator is not obstructed, by frozen
slush for example.
X Check the coolant temperature:
R using the display in the on-board computer on vehicles without steering
wheel buttons ( Y page
178)
R using the analog display in the instrument cluster on vehicles with steering
wheel buttons ( Y page 40)
X Do not start the engine again until the coolant temperature is below the maxi-
mum value specified below. The engine could otherwise be damaged.
X Drive to the nearest qualified specialist workshop.
Avoid heavy loads on the engine, e.g. driving in mountainous terrain, and
stop-start traffic.
Under normal driving conditions and at the correct coolant level, the coolant
temperature display may rise to the letter H or to the red mark.?
N The red coolant warning lamp comes on while the engine is running. An addi-
tional warning tone sounds.
The coolant temperature has exceeded the maximum value specified below. The
airflow to the engine radiator may be blocked or the coolant level may be too
low.
G WARNING
The engine is not being cooled adequately and could become damaged.
Never drive with an overheated engine. Otherwise, fluids which may have leaked
into the engine compartment could catch fire.
In addition, steam from an overheated engine can cause serious burns, which
can occur just by opening the hood.
There is a risk of injury.
X Observe the display messages.
X Stop the vehicle immediately, paying attention to road and traffic conditions,
and switch off the engine. 234
Indicator and warning lamps in the instrument cluster
On-board computer and displays
Page 237 of 320
Warning/
indicator
lamp
N Signal type
Possible causes/consequences and
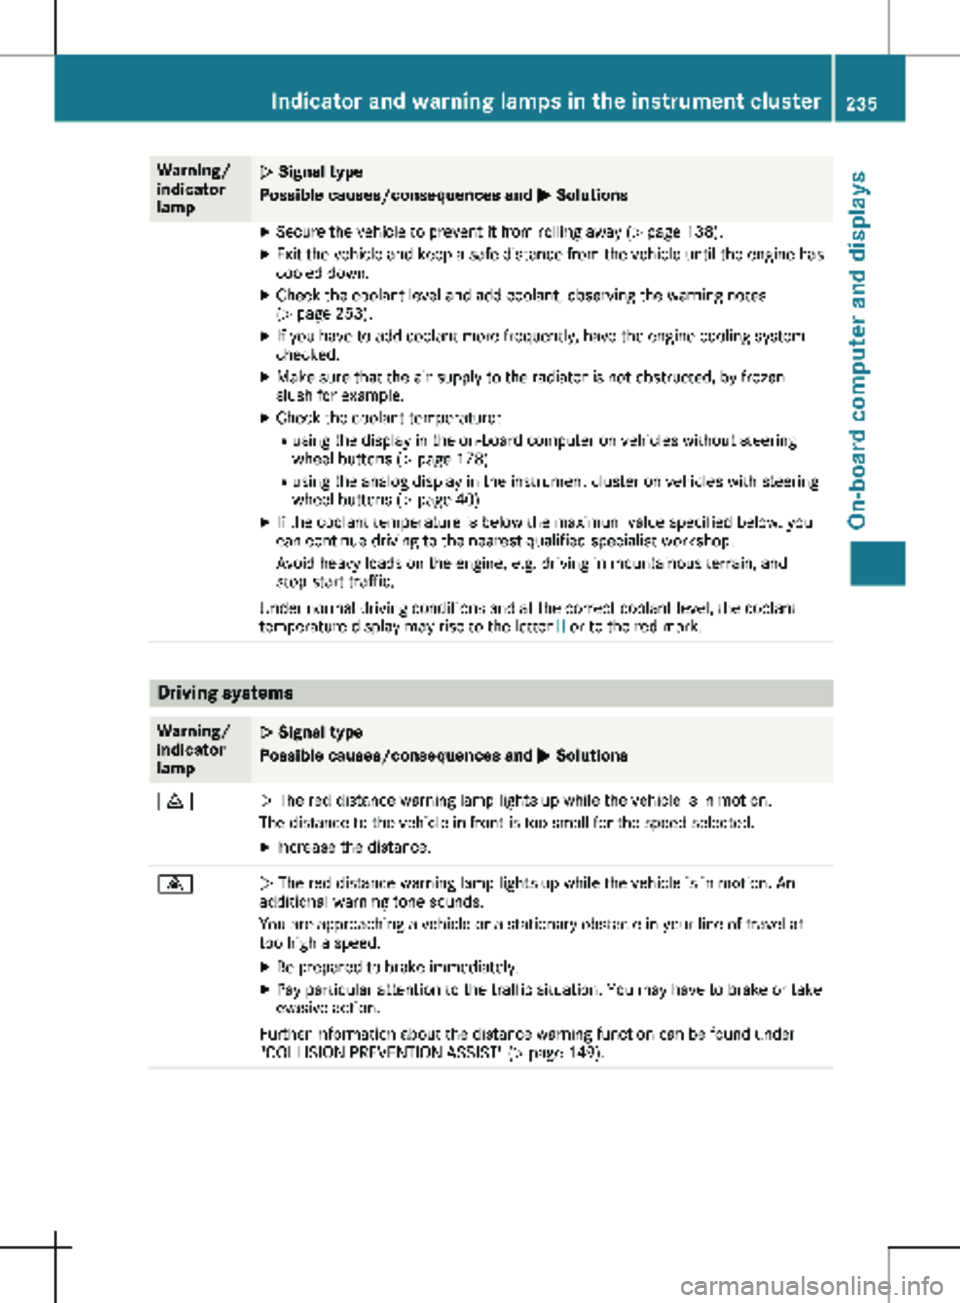
M SolutionsX
Secure the vehicle to prevent it from rolling away ( Y page 138).
X Exit the vehicle and keep a safe distance from the vehicle until the engine has
cooled down.
X Check the coolant level and add coolant, observing the warning notes
(Y page
253).
X If you have to add coolant more frequently, have the engine cooling system
checked.
X Make sure that the air supply to the radiator is not obstructed, by frozen
slush for example.
X Check the coolant temperature:
R using the display in the on-board computer on vehicles without steering
wheel buttons ( Y page
178)
R using the analog display in the instrument cluster on vehicles with steering
wheel buttons ( Y page 40)
X If the coolant temperature is below the maximum value specified below, you
can continue driving to the nearest qualified specialist workshop.
Avoid heavy loads on the engine, e.g. driving in mountainous terrain, and
stop-start traffic.
Under normal driving conditions and at the correct coolant level, the coolant
temperature display may rise to the letter H or to the red mark.Driving systems
Warning/
indicator
lamp
N Signal type
Possible causes/consequences and
M Solutions·
N The red distance warning lamp lights up while the vehicle is in motion.
The distance to the vehicle in front is too small for the speed selected.
X Increase the distance. ·
N The red distance warning lamp lights up while the vehicle is in motion. An
additional warning tone sounds.
You are approaching a vehicle or a stationary obstacle in your line of travel at
too high a speed.
X Be prepared to brake immediately.
X Pay particular attention to the traffic situation. You may have to brake or take
evasive action.
Further information about the distance warning function can be found under
"COLLISION PREVENTION ASSIST"
(Y page 149). Indicator and warning lamps in the instrument cluster
235
On-board computer and displays Z
Page 238 of 320
Tires
Warning/
indicator
lamp
N Signal type
Possible causes/consequences and
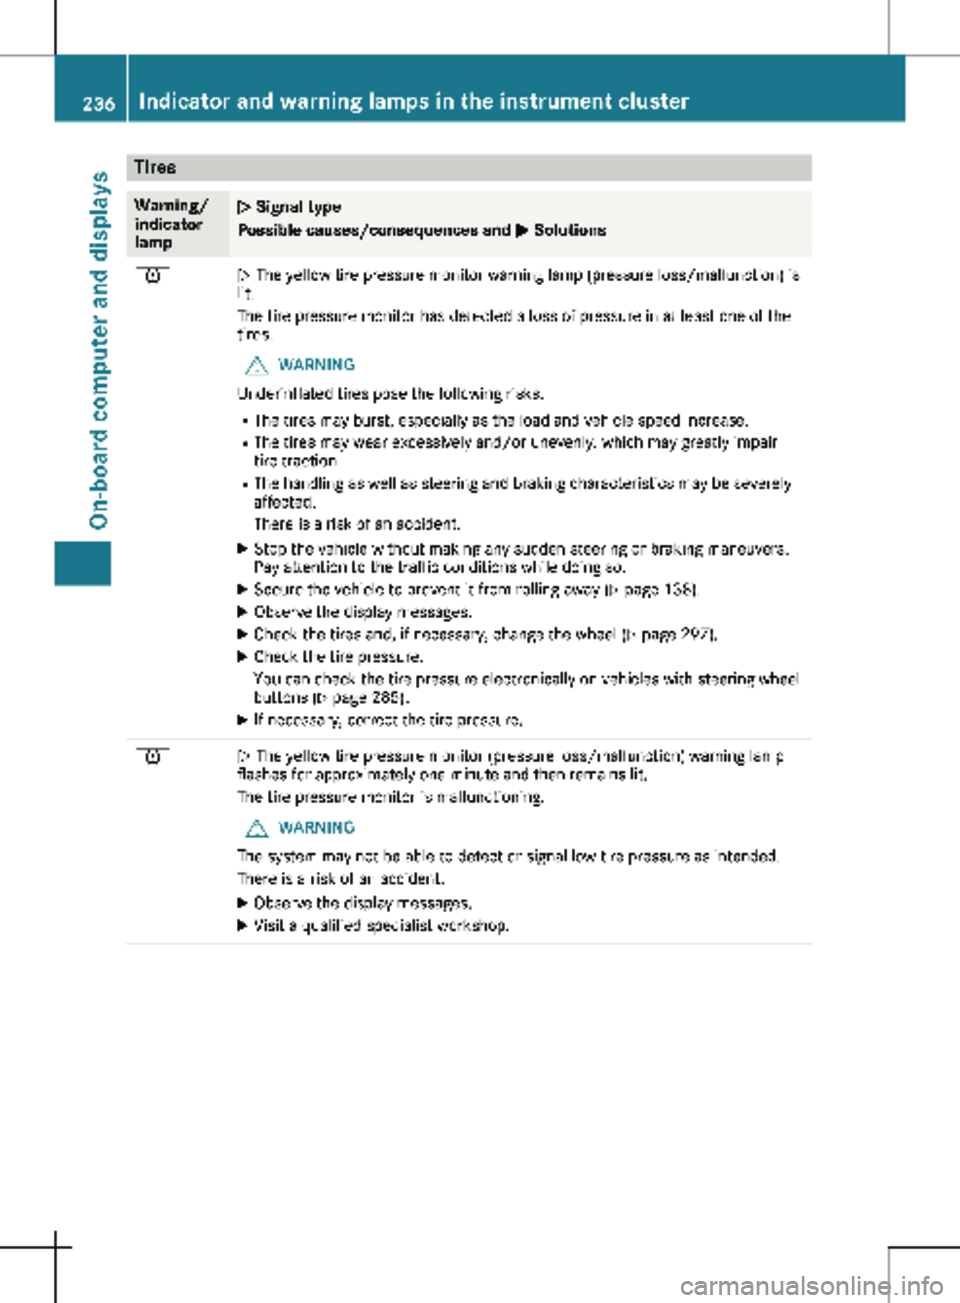
M Solutionsh
N The yellow tire pressure monitor warning lamp (pressure loss/malfunction) is
lit.
The tire pressure monitor has detected a loss of pressure in at least one of the
tires.
G WARNING
Underinflated tires pose the following risks:
R The tires may burst, especially as the load and vehicle speed increase.
R The tires may wear excessively and/or unevenly, which may greatly impair
tire traction.
R The handling as well as steering and braking characteristics may be severely
affected.
There is a risk of an accident.
X Stop the vehicle without making any sudden steering or braking maneuvers.
Pay attention to the traffic conditions while doing so.
X Secure the vehicle to prevent it from rolling away (Y page 138).
X Observe the display messages.
X Check the tires and, if necessary, change the wheel (Y page
297).
X Check the tire pressure.
You can check the tire pressure electronically on vehicles with steering wheel
buttons
(Y page 285).
X If necessary, correct the tire pressure. h
N The yellow tire pressure monitor (pressure loss/malfunction) warning lamp
flashes for approximately one minute and then remains lit.
The tire pressure monitor is malfunctioning.
G WARNING
The system may not be able to detect or signal low tire pressure as intended.
There is a risk of an accident.
X Observe the display messages.
X Visit a qualified specialist workshop.236
Indicator and warning lamps in the instrument cluster
On-board computer and displays
Page 260 of 320
The prescribed service interval is based on
normal vehicle use. Service work will need to
be performed more frequently than prescribed
if the vehicle is operated under more arduous
conditions or with higher loads. Such arduous
conditions include:
R regular city driving with frequent intermedi-
ate stops
R driving predominantly short distances
R frequent operation in mountainous terrain or
on poor road surfaces
R leaving the engine idling for long periods on
a frequent basis
In these or similar operating conditions, have
the air filter, engine oil and oil filter, for exam-
ple, replaced more frequently. Under more
arduous operating conditions, the tires must
be checked more often. Further information
can be obtained at a qualified specialist work-
shop, e.g. an authorized Mercedes-Benz Com-
mercial Van Center.
Hiding service messages Vehicles without steering wheel buttons
X Press the 3 button on the instrument clus-
ter.
Vehicles with steering wheel buttons
X Press the a or % button on the steer-
ing wheel.
Calling up the service due date Vehicles without steering wheel buttons
The vehicle must be stationary. Use the but-
tons in the instrument cluster.
X Turn the key to position 2 in the ignition
lock.
X Press È to select the service display.
The display shows a possible service mes-
sage.
Vehicles with steering wheel buttons
Using the steering wheel buttons
X Turn the key to position 2 in the ignition
lock.
X Press = or ; to select the Service
menu.
X Press 9 or : to select the ASSYST
PLUS submenu and press a to confirm.
The display shows the service due date. Battery
Important safety notes
Work on the battery, e.g. removing or instal-
ling, requires specialist knowledge and the use
of special tools. Therefore, always have work
on the battery carried out at a qualified spe-
cialist workshop. G
WARNING
Work carried out incorrectly on the battery
can lead, for example, to a short circuit and
thus damage the vehicle electronics. This
can lead to function restrictions applying to
safety-relevant systems, e.g. the lighting
system, the ABS (anti-lock braking system)
or the ESP ®
(Electronic Stability Program).
The operating safety of your vehicle may be
restricted.
You could lose control of the vehicle, for
example:
R when braking
R in the event of abrupt steering maneuvers
and/or when the vehicle's speed is not
adapted to the road conditions
There is a risk of an accident.
In the event of a short circuit or a similar
incident, contact a qualified specialist work-
shop immediately. Do not drive any further.
You should have all work involving the bat-
tery carried out at a qualified specialist
workshop.
Further information can be found under "ABS"
(Y page
67) and under "ESP ®
" (Y page 68). G
WARNING
Electrostatic build-up can lead to the crea-
tion of sparks, which could ignite the highly
explosive gases of a battery. There is a risk
of an explosion.
Before handling the battery, touch the vehi-
cle body to remove any existing electrostatic
build-up.
The flammable gas mix is produced when the
battery is charged or when the vehicle is jump-
started. 258
Battery
Maintenance and care
Page 287 of 320

Maximum tire pressures
:
Maximum permitted tire pressure (exam-
ple)
Never exceed the maximum permissible tire
inflation pressure. When adjusting the tire
pressures always observe the recommended
tire pressure for your vehicle
(Y page 282).
i The actual values for tires are specific to
each vehicle and may deviate from the val-
ues in the illustration. Tire valve (snap-in valve)
Important safety notes G
WARNING
Tire valve that are not approved for your
vehicle by the distributor named on the
inside cover page may result in a loss of tire
pressure. This may affect road safety. There
is a risk of an accident.
Only use tire valve that are approved for
your vehicle by the distributor named on the
inside cover page. Always make sure you
have the correct tire valve type for the tires
on your vehicle.
! Do not screw additional weights (check
valves, etc.) onto the tire valves. The elec-
tronic components could thus be damaged.
i For safety reasons, Mercedes-Benz recom-
mends that you only use tire valves that
have been tested for use on your vehicle. Checking the tire pressure manually
In order to determine and adjust the tire pres-
sures, proceed as follows: X Remove the valve cap of the tire you wish to
check.
X Press the tire pressure gauge securely onto
the valve.
X Read the tire pressure and compare it with
the recommended value on the loading
information table or the tire pressure table
( Y page
282).
X If the tire pressure is too low, increase it to
the recommended value.
X If the tire pressure is too high, release air by
pressing down the metal pin in the valve.
Use the tip of a pen, for example. Then,
check the tire pressure again using the tire
pressure gauge.
X Screw the valve cap onto the valve.
X Repeat the steps for the other tires. Tire pressure monitor
General notes In vehicles with a tire pressure monitor sys-
tem, the vehicle's wheels have sensors instal-
led which monitor the tire pressure in all four
tires. The tire pressure monitor warns you if
the pressure drops in one or more of the tires.
The tire pressure monitor only functions if the
corresponding sensors are installed on all
wheels.
Tire pressure display (only on vehicles with steer-
ing wheel buttons)
On vehicles with steering-wheel buttons, the
current pressure of the individual wheels in the
display can be shown via the Service menu. Tire pressure
285
Wheels and tires Z
Page 289 of 320

nificantly too low. The tire pressure monitor
is not malfunctioning.
R USA only: if the h warning lamp flashes
for
60 seconds and then remains lit con-
stantly, the tire pressure monitor is malfunc-
tioning.
The display also shows a message:
R on vehicles without steering wheel buttons
(Y page 207)
R on vehicles with steering wheel buttons
(Y page 224)
USA only: if the tire pressure monitor is mal-
functioning, it may be more than ten minutes
before the malfunction is shown. The h tire
pressure warning lamp flashes for 60 seconds
and then remains lit. When the malfunction
has been rectified, the h tire pressure
warning lamp goes out after a few minutes of
driving.
The tire pressure values indicated by the on-
board computer may differ from those meas-
ured at a gas station with a pressure gauge.
The tire pressures shown by the on-board
computer refer to those measured at sea level.
At high altitudes, the tire pressure values indi-
cated by a pressure gauge are higher than
those shown by the on-board computer. In this
case, do not reduce the tire pressures.
If radio transmitting equipment (e.g. wireless
headphones, two-way radios) is operated
inside the vehicle or in the vicinity of the vehi-
cle, this can interfere with the operation of the
tire pressure monitor.
Checking the tire pressure electroni-
cally on vehicles with steering wheel
buttons You can only check the tire pressure electroni-
cally on vehicles with steering wheel buttons.
Using the steering wheel buttons
X Turn the key to position 2 in the ignition
lock.
X Press the = or ; button to select the
Service menu.
X Use the 9 or : button to select
Tire Pressure.
X Press a to confirm.
The current tire pressure of each wheel is
shown in the display. If the vehicle has been parked for over
20 minutes
, the Tire pressure will be
displayed after driving a few minutes
message appears.
After a teach-in period, the tire pressure moni-
tor automatically detects new wheels or new
sensors. As long as a clear allocation of the
tire pressure value to the individual wheels is
not possible, the Tire Pressure Monitor
Active message is shown instead of the tire
pressure display. The tire pressures are
already being monitored.
Tire pressure monitor warning mes-
sages If the tire pressure monitor detects a loss in
pressure in one or more tires, a warning mes-
sage is shown in the display. The h warn-
ing lamp lights up.
Vehicles without steering wheel buttons
R If the Correct Tire Pressure message is
shown in the display, the tire pressure in at
least one tire is too low. The tire pressure
must be corrected at the next opportunity.
R If the Check Tire Pressure Soon mes-
sage is shown in the display, the tire pres-
sure in one or more tires has dropped signif-
icantly. The tires must be checked.
R If the Warning Tire Malfunc. message is
shown in the display, the tire pressure in
one or more tires has dropped suddenly.
The tires must be checked.
Vehicles with steering wheel buttons
R If the Adjust Tire Pressure message is
shown in the display, the tire pressure in at
least one tire is too low. The tire pressure
must be corrected at the next opportunity.
R If the Check Tires message is shown in the
display, the tire pressure in one or more
tires has dropped significantly. The tires
must be checked.
R If the Warning Tire Malfunction mes-
sage is shown in the display, the tire pres-
sure in one or more tires has dropped sud-
denly. The tires must be checked. Tire pressure
287
Wheels and tires Z
Page 290 of 320
Always read and follow the instructions and
safety notes related to the display messages,
which can be found in the "Tires" section.
R for vehicles without steering wheel buttons
(Y page
207)
R for vehicles with steering wheel buttons
(Y page 224)
Vehicles with steering wheel buttons: if the
wheel positions on the vehicle are rotated, the
tire pressures may be displayed for the wrong
positions for a short time. This is rectified after
a few minutes of driving; the tire pressures are
then displayed for the correct positions.
Restarting the tire pressure monitor General notes
When you restart the tire pressure monitor, all
existing warning messages are deleted and the
warning lamp goes out. The monitor uses the
currently set tire pressures as the reference
values for monitoring. In most cases, the tire
pressure monitor will automatically detect the
new reference values after you have changed
the tire pressure. However, you can also set
reference values manually as described here.
The tire pressure monitor then monitors the
new tire pressure values.
Vehicles without steering wheel buttons
The vehicle must be stationary. Use the but-
tons in the instrument cluster.
X Turn the key to position 2 in the ignition
lock.
X Using È select the Tire Pressure menu.
X Press 3 to confirm.
The display shows the Monitoring Active
message.
X Press 3 to confirm.
The display shows the Tire Pressure OK?
message.
If you wish to confirm the restart: X Press the f button.
The display shows the distance menu.
After you have driven for a few minutes, the
system checks whether the current tire pressures are within the specified range.
The new tire pressure levels are then accep-
ted as reference values and monitored.
If you wish to cancel the restart:
X Press the g button.
The display shows the tire pressure menu.
The tire pressure values stored at the last
restart will continue to be monitored.
Vehicles with steering wheel buttons Using the steering wheel buttons
X Make sure that the tire pressure of all four
wheels is set correctly for the current oper-
ating conditions. When doing so, observe
the notes under "Tire pressure"
(Y page
282).
X Turn the key to position 2 in the ignition
lock.
X Press the = or ; button to select the
Service menu.
X Select the Tire Pressure submenu with
9 or :.
X Press a to confirm.
The display shows either the current tire
pressure for the individual tires, or the
Tire pressure will be displayed
after driving a few minutes message.
X Press the : button.
The display shows the Use Current Pres‐
sures as New Reference Values: mes-
sage.
If you wish to confirm the restart: X Press the a button.
The display shows the Tire Press. Moni‐
tor Restarted message.
After you have driven for a few minutes, the
system checks whether the current tire
pressures are within the specified range.
The new tire pressure levels are then accep-
ted as reference values and monitored.
If you wish to cancel the restart: X Press the % button.
The tire pressure values stored at the last
restart will continue to be monitored.288
Tire pressure
Wheels and tires