tailgate MERCEDES-BENZ METRIS 2020 MY20 Operator’s Manual
[x] Cancel search | Manufacturer: MERCEDES-BENZ, Model Year: 2020, Model line: METRIS, Model: MERCEDES-BENZ METRIS 2020Pages: 320, PDF Size: 26.38 MB
Page 84 of 320
Problems with the tailgate
The tailgate cannot be opened.
The voltage supply has been interrupted or the
battery charge is insufficient.
Consult a qualified specialist workshop which
has the necessary specialist knowledge and
tools to carry out the work required.
In an emergency, you can open the tailgate
using the release catch for service purposes.
X Pry off the cover on the lower part of the
tailgate with a suitable tool, e.g. the screw-
driver from the vehicle tool kit.
X Insert the screwdriver into the opening and
move the release lever until the tailgate
unlocks and opens.
X Swing the tailgate upwards. Rear-end doors
Important safety notes
G
DANGER
Combustion engines emit poisonous
exhaust gases, such as carbon monoxide.
Exhaust gases can enter the vehicle interior
if the rear-end door is open when the engine
is running, especially if the vehicle is in
motion. There is a risk of poisoning.
Always switch off the engine before opening
the rear-end door. Never drive with the rear-
end door open. G
WARNING
If you open a rear door, you could:
R endanger other people or road users
R be caught by oncoming traffic
This is particularly the case if you open the
rear door more than 90°. There is a risk of
an accident and injury.
Only open the rear doors when traffic condi-
tions permit. Always make sure that the rear
doors are properly locked. G
WARNING
If you open the rear-end doors 90°, the rear
lighting systems are no longer visible. The
vehicle will then be difficult for other road
users to see or will not be seen by them at
all, particularly if it is dark or visibility is
poor. There is a risk of an accident.
You should therefore ensure in this and simi-
lar situations that the vehicle is visible from
the rear in accordance with the relevant
national regulations, by using the warning
triangle, for instance.
! Make sure that there is sufficient clear-
ance when opening the rear doors. You
could otherwise damage the vehicle and
objects in close range of the rear doors.
You can lock the rear-end doors at an angle of
approx. 90° and, if necessary,
180° or 270°.
Always make sure that the open rear-end door
is correctly engaged in the detent. Opening and closing from the out-
side
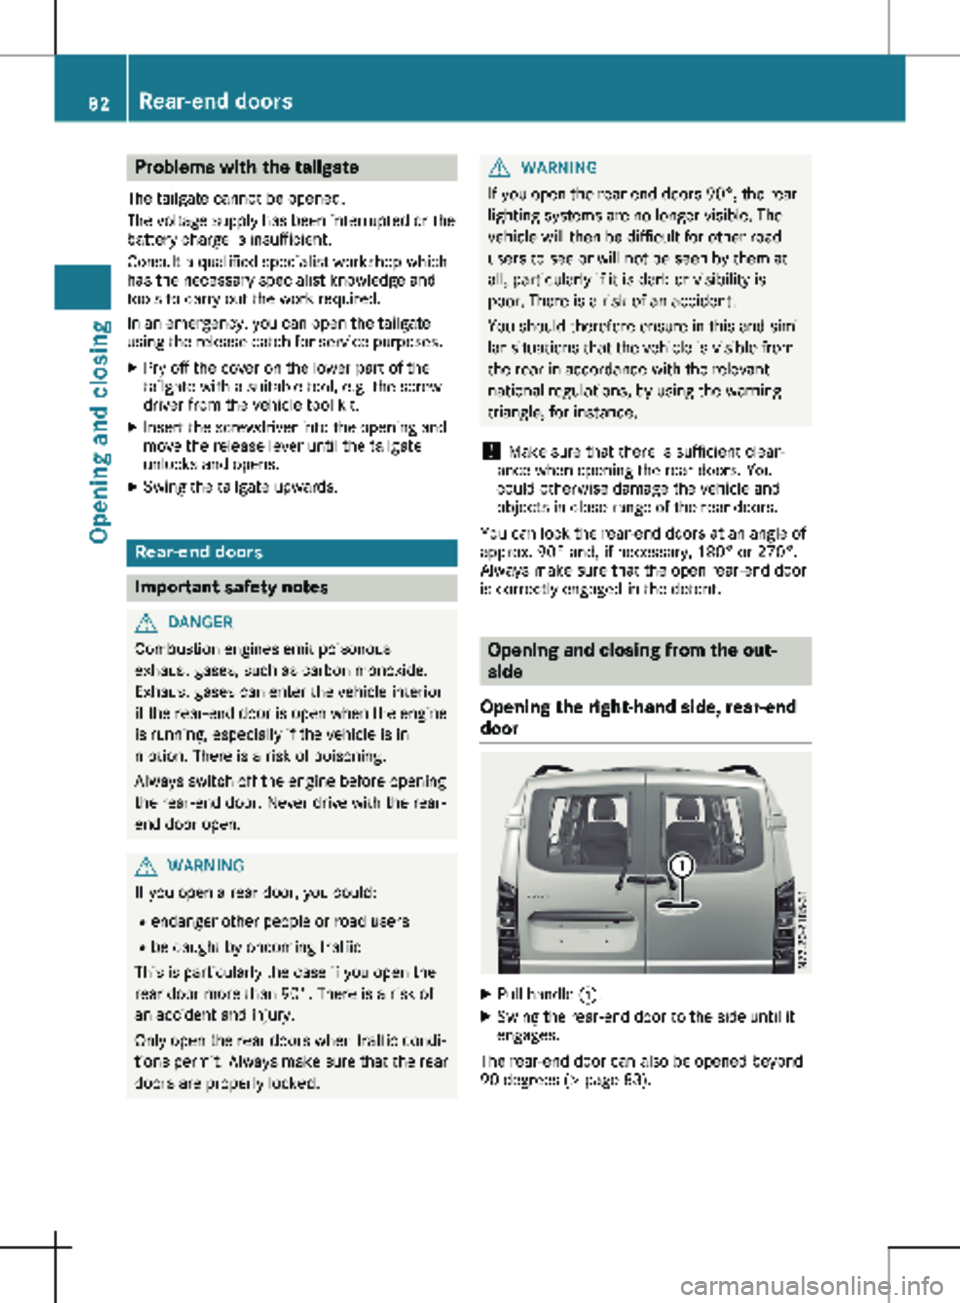
Opening the right-hand side, rear-end
door X
Pull handle :.
X Swing the rear-end door to the side until it
engages.
The rear-end door can also be opened beyond
90 degrees (Y page
83).82
Rear-end doors
Opening and closing
Page 105 of 320
X
To switch on or off: press the | button.
When the automatic interior lighting control
is activated, the button is flush with the
overhead control panel.
The interior lighting switches on automatically
if you:
R unlock the vehicle
R open a door
R remove the key from the ignition lock
The cargo compartment lamp switches on
automatically if you:
R unlock the vehicle
R open the tailgate or rear-end door
R open a sliding door
The trunk lamp always switches on automati-
cally when the tailgate is opened. Manual interior lighting control
X To switch the front interior lighting on/
off:
press the c button.
X To switch the rear compartment or
cargo compartment lighting on/off: press
the
w button.
X To switch the front reading lamps on/
off: press the
p button.Rear compartment interior light with
reading lamp in the handles
:
Rear compartment interior light and read-
ing lamp
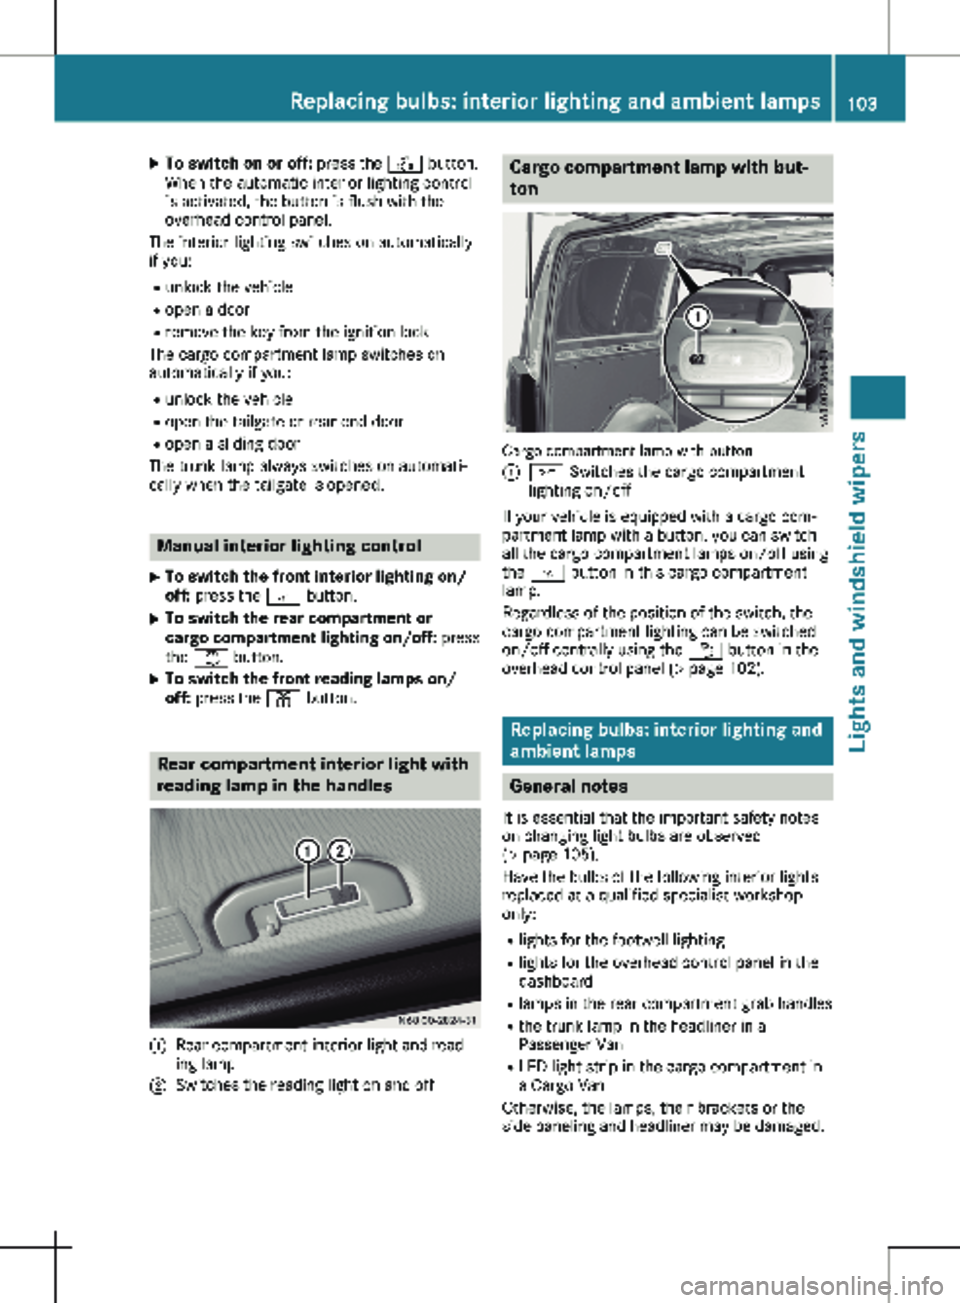
; Switches the reading light on and off Cargo compartment lamp with but-
ton
Cargo compartment lamp with button
:
c Switches the cargo compartment
lighting on/off
If your vehicle is equipped with a cargo com-
partment lamp with a button, you can switch
all the cargo compartment lamps on/off using
the c button in this cargo compartment
lamp.
Regardless of the position of the switch, the
cargo compartment lighting can be switched
on/off centrally using the w button in the
overhead control panel ( Y page
102). Replacing bulbs: interior lighting and
ambient lamps General notes
It is essential that the important safety notes
on changing light bulbs are observed
(Y page
105).
Have the bulbs of the following interior lights
replaced at a qualified specialist workshop
only:
R lights for the footwell lighting
R lights for the overhead control panel in the
dashboard
R lamps in the rear compartment grab handles
R the trunk lamp in the headliner in a
Passenger Van
R LED light strip in the cargo compartment in
a Cargo Van
Otherwise, the lamps, their brackets or the
side paneling and headliner may be damaged. Replacing bulbs: interior lighting and ambient lamps
103
Lights and windshield wipers Z
Page 106 of 320
If you require help when changing bulbs of
other interior lights, please visit a qualified
specialist workshop.
Rear compartment and cargo com-
partment lamps
You cannot change the following bulbs your-
self:
R in a Passenger Van, the bulbs in the trunk
lamp and those of the rear compartment
interior lights in the grab handles
R in a Cargo Van with an LED light strip in the
cargo compartment, the LED light strip
Have these bulbs or the LED light strip
changed in a qualified specialist workshop
only.
Information on changing the trunk lamp light
source in the side trim panel of vehicles with a
cargo compartment shelf can be found under
"Additional interior and surround lighting"
(Y page
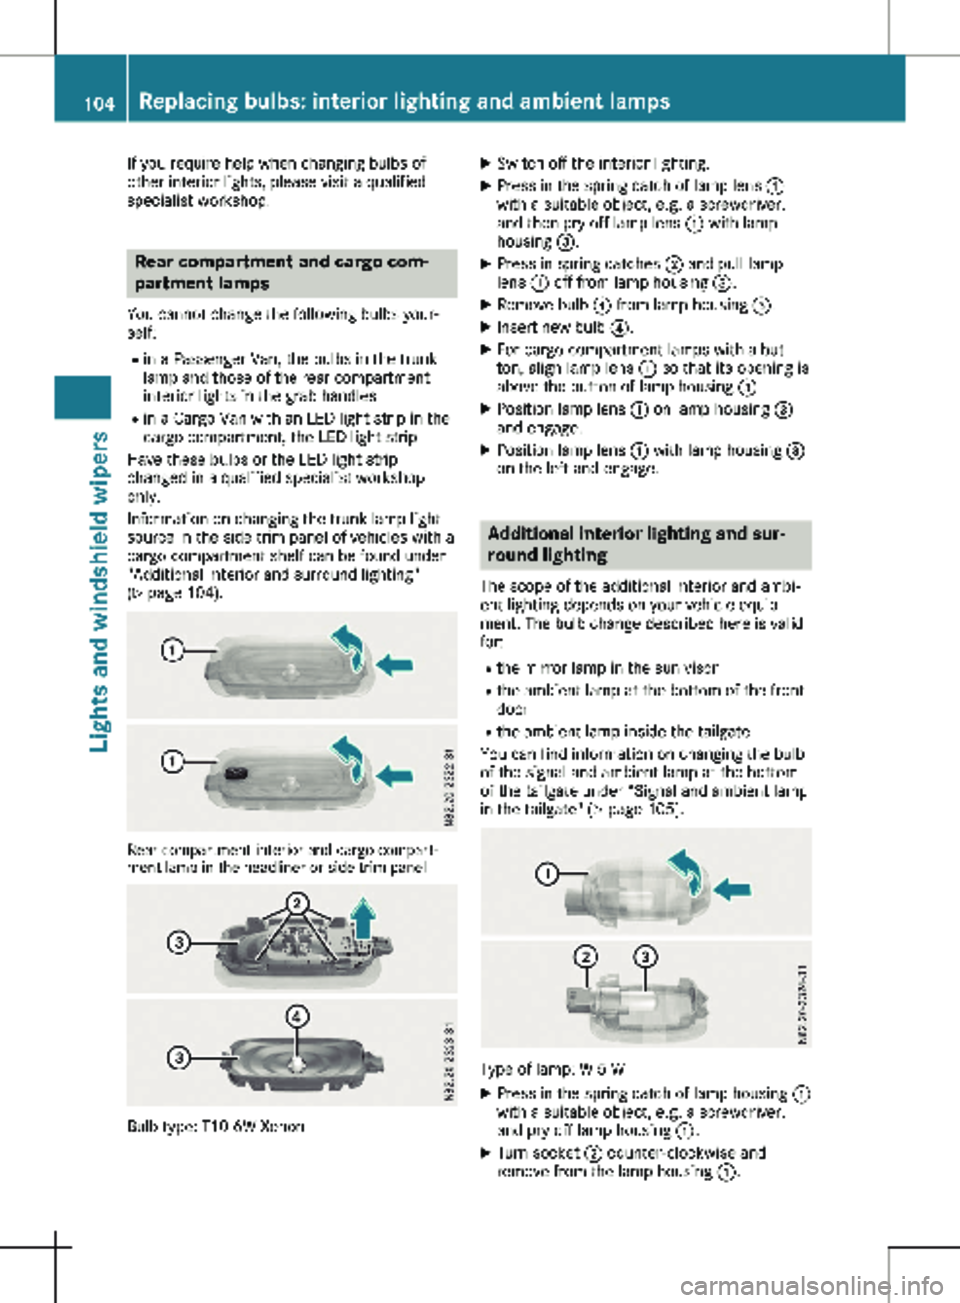
104). Rear compartment interior and cargo compart-
ment lamp in the headliner or side trim panel Bulb type: T10 6W Xenon X
Switch off the interior lighting.
X Press in the spring catch of lamp lens :
with a suitable object, e.g. a screwdriver,
and then pry off lamp lens : with lamp
housing =.
X Press in spring catches ; and pull lamp
lens : off from lamp housing =.
X Remove bulb ? from lamp housing =.
X Insert new bulb ?.
X For cargo compartment lamps with a but-
ton, align lamp lens : so that its opening is
above the button of lamp housing =.
X Position lamp lens : on lamp housing =
and engage.
X Position lamp lens : with lamp housing =
on the left and engage. Additional interior lighting and sur-
round lighting
The scope of the additional interior and ambi-
ent lighting depends on your vehicle equip-
ment. The bulb change described here is valid
for:
R the mirror lamp in the sun visor
R the ambient lamp at the bottom of the front
door
R the ambient lamp inside the tailgate
You can find information on changing the bulb
of the signal and ambient lamp at the bottom
of the tailgate under “Signal and ambient lamp
in the tailgate"
(Y page 105). Type of lamp: W 5 W
X Press in the spring catch of lamp housing :
with a suitable object, e.g. a screwdriver,
and pry off lamp housing :.
X Turn socket ; counter-clockwise and
remove from the lamp housing :. 104
Replacing bulbs: interior lighting and ambient lamps
Lights and windshield wipers
Page 110 of 320

X
Press the new bulb into the socket and
screw it in clockwise.
X Attach additional turn signal : at the front
and engage. Replacing the rear lamp clusters
Overview of bulb types Tail lamps
Lights Bulb type
:
High-mounted brake
lamp LED
;
License plate lamp LED
=
Rear fog lamp (driver's
side) P 21 W
?
Backup lamp P 21 W
A
Brake lamp/tail lamp/
standing lamp/turn sig-
nal P 21 W
Side marker lamp LED
Tail lamps
Installing/removing the tail lamp
! Remove the tail lamps with care so as not
to damage the paintwork.
Because of the installation position,
Mercedes-Benz recommends that you have
the tail lamp bulbs changed at a qualified
specialist workshop. Tail lamps
X To remove: switch off the lighting system.
X Open the tailgate/rear-end door.
i The vehicle tool kit contains a screwdriver
( Y page
270).
X Unscrew two side screws :.
X Press tail lamp ; out as far as bolts =.
X Remove tail lamp ; out from bolts =.
X Pull the connector off the bulb holder of the
tail lamp.
X To install: press the connector into the bulb
holder of the tail lamp.
X Press the tail lamp sideways onto bolts =
and slide onto the vehicle.
X Tighten two side screws :.
Standard tail lamp X
Remove the tail lamp ( Y page
108).
X Unscrew three screws : and remove bulb
holder ; from the tail lamp.108
Replacing bulbs
Lights and windshield wipers
Page 112 of 320

Switching the rear window wiper
on/off
1
b To wipe with washer fluid
2 ° Intermittent wipe
3 $ Rear window wiper off
4 b To wipe with washer fluid
X Turn the key to position 1 or 2 in the igni-
tion lock.
X Move the è switch to the corresponding
position.
If the rear window wiper is activated, the
è symbol is shown in the status area of
the display.
The Status Overview in the Assist.
menu then also shows the è symbol for
vehicles with steering wheel buttons
(Y page
189).
X To wipe with washer fluid: press the è
switch beyond the current position as far as
it will go to 1 or press and hold 4.
When you release the è switch, the rear
window wiper continues to wipe for about
another five seconds. The rear window
wiper then wipes according to the original
position 2 or 3.
The rear window wiper switches on automati-
cally if you engage reverse gear and the wind-
shield wipers are on.
If the vehicle is stationary and you open the
tailgate or rear-end door, the rear window
wiper will stop automatically. The rear window
wiper will only resume wiping again when the
tailgate and rear-end door are closed and you
pull away again.
The rear window will no longer be wiped prop-
erly if the wiper blade is worn. This may pre-
vent you from observing the traffic conditions.
Information on replacing the wiper blade can be found under "Replacing wiper blades"
(
Y page
110). Replacing the wiper blades
Important safety notes G
WARNING
If the windshield wipers begin to move while
you are changing the wiper blades, you
could be trapped by the wiper arm. There is
a risk of injury.
Always switch off the windshield wipers and
ignition before changing the wiper blades.
! Never open the hood/tailgate or rear
doors if a windshield wiper arm has been
folded away from the windshield/rear win-
dow.
Never fold a windshield wiper arm without a
wiper blade back onto the windshield/rear
window.
Hold the windshield wiper arm firmly when
you change the wiper blade. If you release
the windshield wiper arm without a wiper
blade and it falls onto the windshield/rear
window, the windshield/rear window may
be damaged by the force of the impact.
Mercedes-Benz recommends that you have
the wiper blades changed at a qualified spe-
cialist workshop.
! Only hold the wiper blade by the wiper
arm. You could otherwise damage the wiper
rubber.
Wiper blades are wear parts. The windshield
will no longer be wiped properly if the wiper
blades are worn. This may prevent you from
observing the traffic conditions.
Please observe the service indicator after
changing the wiper blades of the windshield
wiper.
Service indicator Replacement wiper blades for the windshield
wiper have a service indicator on the tip of the
wiper blade.
Depending on the amount of use, the service
indicator will change color from black to yel-
low.110
Windshield wipers
Lights and windshield wipers
Page 114 of 320
Rear window wiper
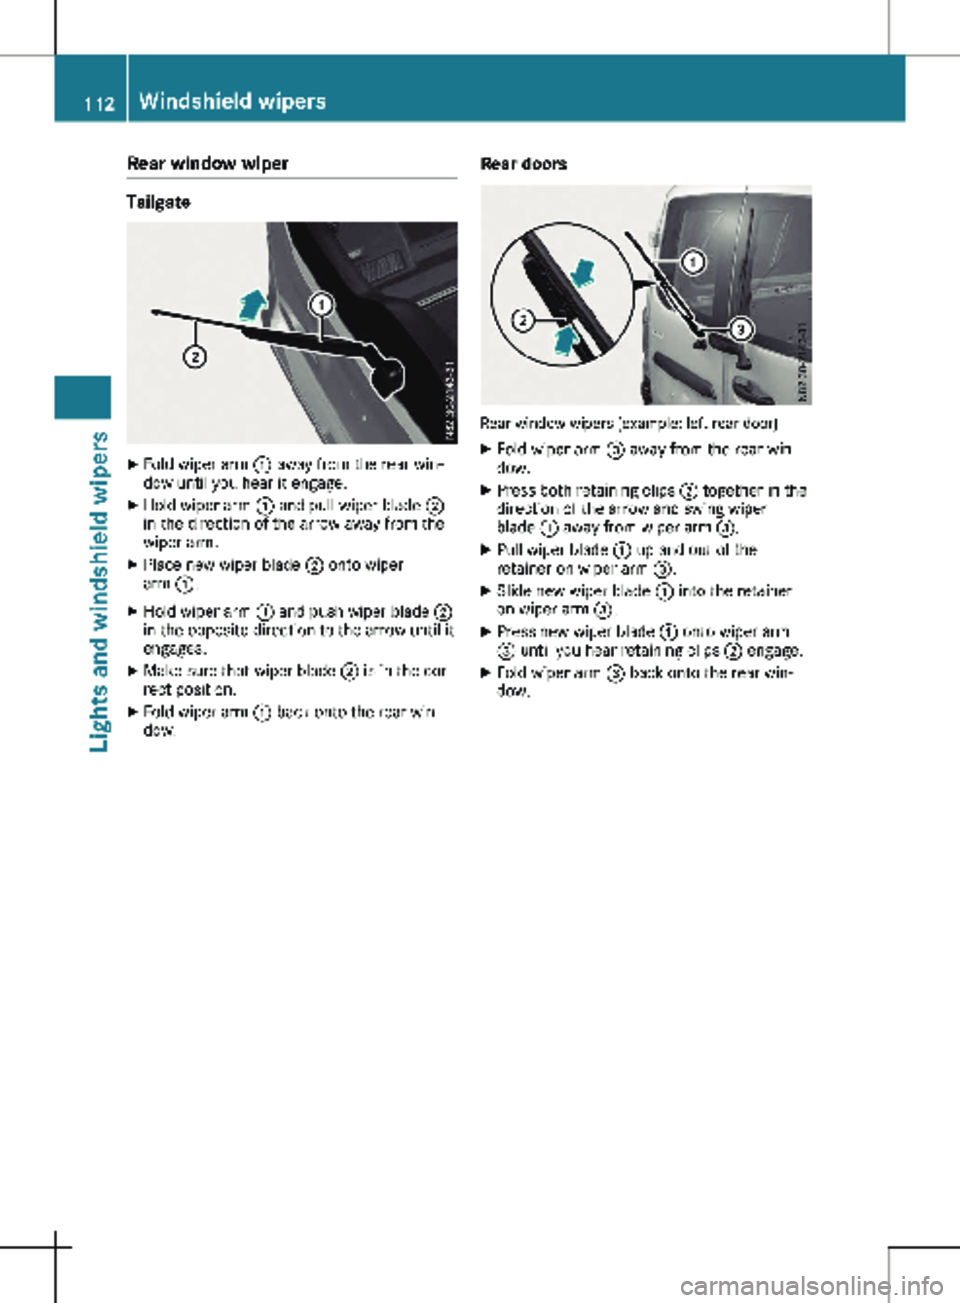
Tailgate
X
Fold wiper arm : away from the rear win-
dow until you hear it engage.
X Hold wiper arm : and pull wiper blade ;
in the direction of the arrow away from the
wiper arm.
X Place new wiper blade ; onto wiper
arm :.
X Hold wiper arm : and push wiper blade ;
in the opposite direction to the arrow until it
engages.
X Make sure that wiper blade ; is in the cor-
rect position.
X Fold wiper arm : back onto the rear win-
dow. Rear doors Rear window wipers (example: left rear door)
X Fold wiper arm = away from the rear win-
dow.
X Press both retaining clips ; together in the
direction of the arrow and swing wiper
blade : away from wiper arm =.
X Pull wiper blade : up and out of the
retainer on wiper arm =.
X Slide new wiper blade : into the retainer
on wiper arm =.
X Press new wiper blade : onto wiper arm
= until you hear retaining clips ; engage.
X Fold wiper arm = back onto the rear win-
dow. 112
Windshield wipersLights and windshield wipers
Page 165 of 320

X
Start the engine.
X Switch on the turn signal in the direction in
which you are pulling away.
X Shift the transmission to position h or k.
The display shows the message Start
Park Assist? Yes: OK No: %.
X To cancel the process: press the % but-
ton on the steering wheel or drive off.
or
X To exit the parking space using active
parking assistance: press the a button
on the steering wheel.
The display shows the message Park
Assist Active: Accelerate and Brake
Obs. Surroundings.
X Let go of the steering wheel.
X Pull away, being ready to brake at all times.
Exit the parking space slowly and do not
drive faster than
6 mph (10 km/h). Other-
wise parking assistance is canceled and
Active Parking Assist is stopped.
Active Parking Assist brakes the vehicle to a
standstill when the vehicle approaches a
border of the parking space.
X While the vehicle is stationary, shift the
transmission to position h or k as
required or according to the message.
Active Parking Assist immediately steers in
the other direction. The display shows the
message Park Assist Active: Acceler‐
ate and Brake Obs. Surroundings.
i You will achieve the best results by waiting
for the steering procedure to complete
before pulling away.
If you back up after activation, the steering
wheel is moved to the straight-ahead posi-
tion.
X Drive forwards and reverse as prompted by
the PARKTRONIC warning displays, several
times if necessary.
Once you have exited the parking space com-
pletely:
R The display shows the Park Assist Fin‐
ished message.
R A tone sounds.
R The steering wheel is moved to the straight-
ahead position
The parking assistance function of Active Park-
ing Assist is stopped. You will then have to
steer and merge into traffic on your own.
PARKTRONIC is still available. You can take over the steering before the vehi-
cle has exited the parking space completely.
This is useful, for example when you recognize
that it is already possible to pull out of the
parking space.
Canceling active parking assistance X
Stop the movement of the steering wheel or
steer yourself.
or X Press the f button and deactivate
PARKTRONIC
(Y page 158).
Parking assistance is canceled immediately
and Active Parking Assist is stopped. The
display shows the Park Assist Canceled
message.
Active parking assistance is canceled automat-
ically in the following cases:
R you apply the parking brake.
R parking using Active Parking Assist is no
longer possible.
R you are driving faster than
6 mph
(10 km/h).
R a wheel spins and ESP ®
intervenes or fails.
The ÷ warning lamp in the instrument
cluster then lights up.
R you unfasten your seat belt.
R you open a door or the tailgate/rear-end
door.
R you shift the transmission to position j.
A warning tone sounds, the parking symbol in
the display goes out and the Park Assist
Canceled message appears.
Once active Parking Assist has been canceled,
you must steer and brake again yourself.
If a system malfunction occurs, vehicles are
automatically braked down to a standstill. To
continue driving, you must depress the accel-
erator pedal again. Rear view camera
General notes On vehicles with a tailgate, the rear view cam-
era is next to the tailgate handle
(
Y page
267).
On vehicles with rear-end doors, the rear view
camera is in the top of the license plate mold-
ing ( Y page 267). Driving systems
163
Driving and parking Z
Page 166 of 320
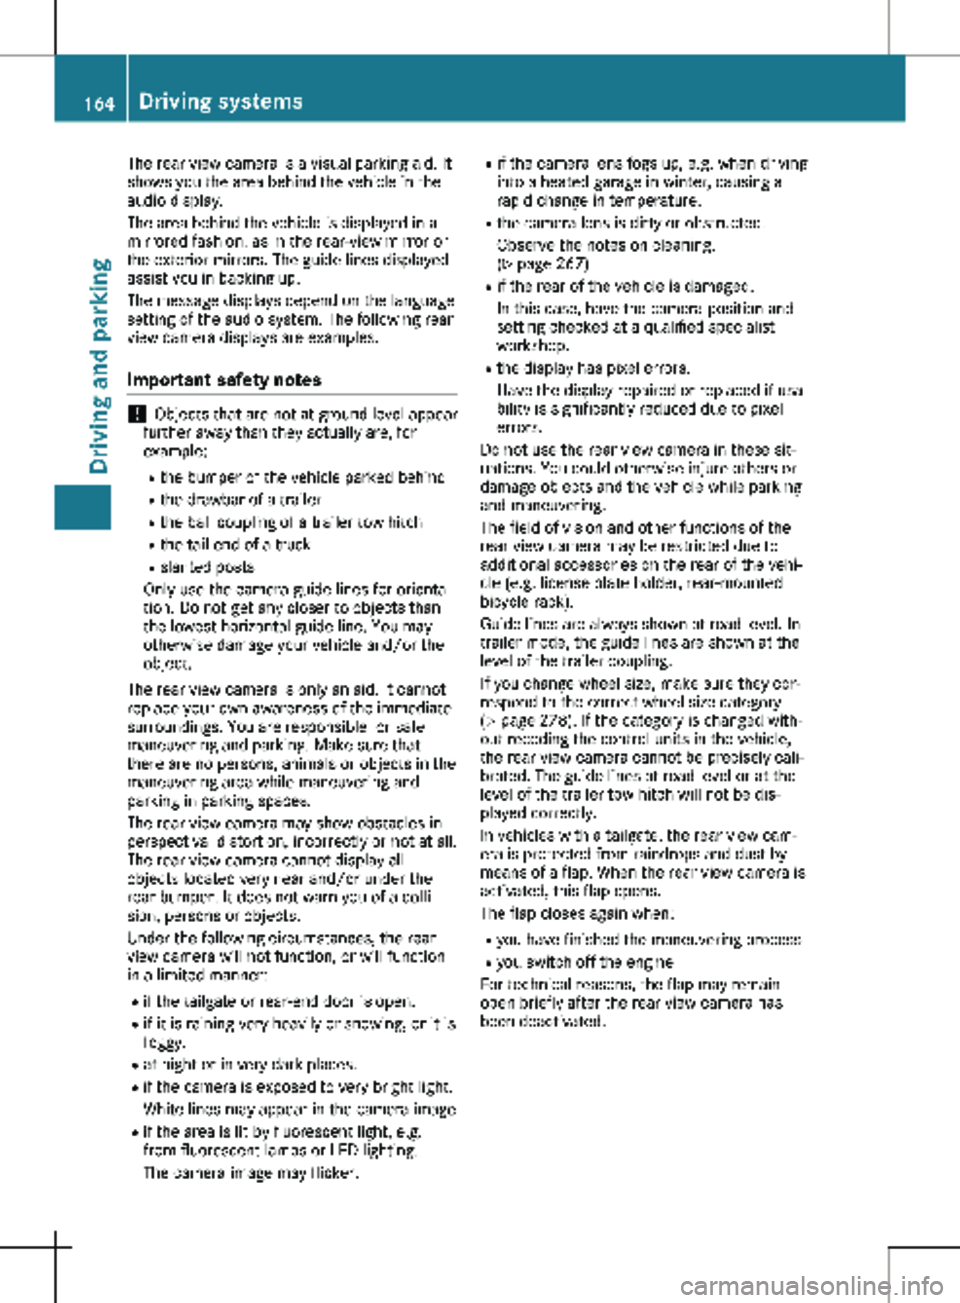
The rear view camera is a visual parking aid. It
shows you the area behind the vehicle in the
audio display.
The area behind the vehicle is displayed in a
mirrored fashion, as in the rear-view mirror or
the exterior mirrors. The guide lines displayed
assist you in backing up.
The message displays depend on the language
setting of the audio system. The following rear
view camera displays are examples.
Important safety notes !
Objects that are not at ground level appear
further away than they actually are, for
example:
R the bumper of the vehicle parked behind
R the drawbar of a trailer
R the ball coupling of a trailer tow hitch
R the tail-end of a truck
R slanted posts
Only use the camera guide lines for orienta-
tion. Do not get any closer to objects than
the lowest horizontal guide line. You may
otherwise damage your vehicle and/or the
object.
The rear view camera is only an aid. It cannot
replace your own awareness of the immediate
surroundings. You are responsible for safe
maneuvering and parking. Make sure that
there are no persons, animals or objects in the
maneuvering area while maneuvering and
parking in parking spaces.
The rear view camera may show obstacles in
perspectival distortion, incorrectly or not at all.
The rear view camera cannot display all
objects located very near and/or under the
rear bumper. It does not warn you of a colli-
sion, persons or objects.
Under the following circumstances, the rear
view camera will not function, or will function
in a limited manner:
R if the tailgate or rear-end door is open.
R if it is raining very heavily or snowing, or it is
foggy.
R at night or in very dark places.
R if the camera is exposed to very bright light.
White lines may appear in the camera image
R if the area is lit by fluorescent light, e.g.
from fluorescent lamps or LED lighting.
The camera image may flicker. R
if the camera lens fogs up, e.g. when driving
into a heated garage in winter, causing a
rapid change in temperature.
R the camera lens is dirty or obstructed.
Observe the notes on cleaning.
(Y page
267)
R if the rear of the vehicle is damaged.
In this case, have the camera position and
setting checked at a qualified specialist
workshop.
R the display has pixel errors.
Have the display repaired or replaced if usa-
bility is significantly reduced due to pixel
errors.
Do not use the rear view camera in these sit-
uations. You could otherwise injure others or
damage objects and the vehicle while parking
and maneuvering.
The field of vision and other functions of the
rear view camera may be restricted due to
additional accessories on the rear of the vehi-
cle (e.g. license plate holder, rear-mounted
bicycle rack).
Guide lines are always shown at road level. In
trailer mode, the guide lines are shown at the
level of the trailer coupling.
If you change wheel size, make sure they cor-
respond to the correct wheel size category
( Y page 278). If the category is changed with-
out recoding the control units in the vehicle,
the rear view camera cannot be precisely cali-
brated. The guide lines at road level or at the
level of the trailer tow hitch will not be dis-
played correctly.
In vehicles with a tailgate, the rear view cam-
era is protected from raindrops and dust by
means of a flap. When the rear view camera is
activated, this flap opens.
The flap closes again when:
R you have finished the maneuvering process
R you switch off the engine
For technical reasons, the flap may remain
open briefly after the rear view camera has
been deactivated. 164
Driving systems
Driving and parking
Page 167 of 320
Switching the rear view camera on or
off
X
To activate: make sure that the key is in
position 2 in the ignition lock.
X Shift the transmission to position k.
On vehicles with a tailgate, the rear view
camera flap opens. The audio display shows
the area behind the vehicle. The rear area
shown is divided by guide lines.
In vehicles with a trailer coupling installed, the
function mode of the rear view camera can be
switched over when the trailer is reached. The
rear view camera then changes the viewing
angle and shows a locating aid for the ball cou-
pling of the trailer tow hitch to help reach the
drawbar.
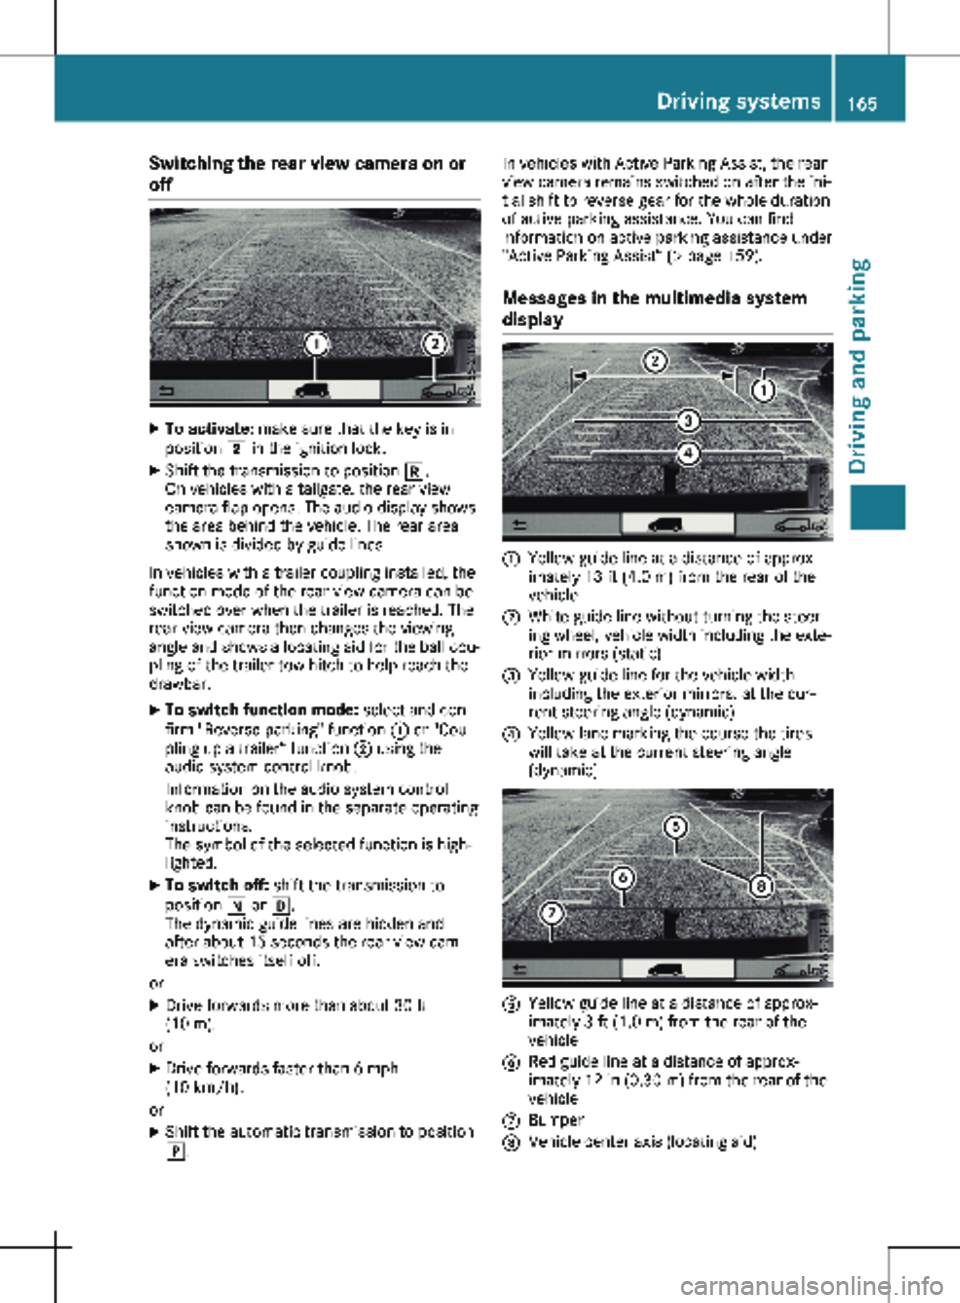
X To switch function mode: select and con-
firm "Reverse parking" function : or "Cou-
pling up a trailer“ function ; using the
audio system control knob.
Information on the audio system control
knob can be found in the separate operating
instructions.
The symbol of the selected function is high-
lighted.
X To switch off: shift the transmission to
position i or h.
The dynamic guide lines are hidden and
after about 15 seconds the rear view cam-
era switches itself off.
or X Drive forwards more than about 30 ft
(10 m).
or X Drive forwards faster than 6 mph
(10 km/h
).
or X Shift the automatic transmission to position
j. In vehicles with Active Parking Assist, the rear
view camera remains switched on after the ini-
tial shift to reverse gear for the whole duration
of active parking assistance. You can find
information on active parking assistance under
"Active Parking Assist“
(Y page 159).
Messages in the multimedia system
display :
Yellow guide line at a distance of approx-
imately
13 ft (4.0 m) from the rear of the
vehicle
; White guide line without turning the steer-
ing wheel, vehicle width including the exte-
rior mirrors (static)
= Yellow guide line for the vehicle width
including the exterior mirrors, at the cur-
rent steering angle (dynamic)
? Yellow lane marking the course the tires
will take at the current steering angle
(dynamic) A
Yellow guide line at a distance of approx-
imately
3 ft (1.0 m) from the rear of the
vehicle
B Red guide line at a distance of approx-
imately
12 in (0.30 m) from the rear of the
vehicle
C Bumper
D Vehicle center axis (locating aid) Driving systems
165
Driving and parking Z
Page 195 of 320

X
Press : or 9 to select the Date:
function.
The display shows the current date.
X To set the date: press a again.
X Press = or ; to switch between day,
month and year.
X Press : or 9 to set the day, month or
year.
X Then press a to confirm.
The display shows the updated date.
Lights submenu Activating/deactivating the surround
lighting and exterior lighting delayed
switch-off
If you activate the Locator Lighting func-
tion and the light switch is turned to the Ã
position, the following functions are activated
when it is dark:
R surround lighting: the exterior lighting
remains on for
40 seconds after the doors
are unlocked. When you start the engine,
the surround lighting is deactivated and the
automatic headlamp feature is activated
(Y page 100).
R exterior lighting delayed switch-off: the
exterior lighting remains lit for 60 seconds
after the engine is switched off. When you
close all the doors and the tailgate/rear
doors, the exterior lighting switches off after
15 seconds.
Using the steering wheel buttons
X Use the = or ; button to select the
Settings. menu.
X Use : or 9 to select Lights.
X Press a to confirm.
X Use : or 9 to select the Locator
Lighting function.
The current status appears.
X To switch on/off: press a again.
If you change the setting, conversion does
not take place until the next time the vehicle
is stationary. Deactivating exterior lighting delayed switch-
off temporarily:
X Before leaving the vehicle, turn the key to
position g in the ignition lock.
X Turn the key to position 2 in the ignition
lock.
The exterior lighting delayed switch-off is
deactivated until the next time the engine is
started.
With surround lighting and exterior lighting
delayed switch-off, the following light up
depending on the vehicle's equipment:
R Parking lamps
R Fog lamps
R Low-beam headlamps
R Daytime running lamps
Activating/deactivating interior lighting
delayed switch-off If you activate the Interior Lighting
Delay: function, the interior lighting remains
lit for a further 20 seconds.
Using the steering wheel buttons
X Use the = or ; button to select the
Settings. menu.
X Use : or 9 to select Lights.
X Press a to confirm.
X Use : or 9 to select the Interior
Lighting Delay function.
The current status appears.
X To switch on/off: press a again.
Vehicle submenu Setting the sensitivity of the rain sensor
Using the steering wheel buttons
X Press = or ; to select the Settings
menu.
X Press : or 9 to select Vehicle.
X Press a to confirm.
X Press : or 9 to select the Rain
Sensor Sensitivity function.
The display shows the current setting.
X Press a to change the setting.
X Press : or 9 to select the High,
Standard or Low setting. This setting con-
trols the rain sensor's sensitivity to precipi-
tation. The windshield wiper then wipes On-board computer (vehicles with steering wheel buttons)
193
On-board computer and displays Z