check engine light MERCEDES-BENZ METRIS 2020 MY20 Operator’s Manual
[x] Cancel search | Manufacturer: MERCEDES-BENZ, Model Year: 2020, Model line: METRIS, Model: MERCEDES-BENZ METRIS 2020Pages: 320, PDF Size: 26.38 MB
Page 7 of 320
Function/notes ............................. 155
Attention Assist
see ATTENTION ASSIST
ATTENTION ASSIST
see ATTENTION ASSIST
Authorized workshop
see Qualified specialist workshop
AUTO lamp
Display messages (vehicle with-
out steering wheel buttons) ...........
202
AUTO lights
Display messages (vehicle with
steering wheel buttons) ................. 216
see Lights
Automatic car wash (care) ............... 264
Automatic headlamp mode .............. 100
Automatic locking ............................... 76
Automatic transmission
Accelerator pedal position ............. 134
Changing gear ............................... 132
DIRECT SELECT lever ..................... 131
Display message ............................ 225
Drive program display .................... 132
Driving tips .................................... 134
Emergency running mode .............. 136
Engaging drive position .................. 131
Engaging neutral ............................ 131
Engaging reverse gear ................... 131
Engaging the park position ............ 131
Gearshift recommendation ............ 136
Important safety notes .................. 130
Kickdown ....................................... 135
Manual shifting .............................. 135
Overview ........................................ 130
Problem (malfunction) ................... 136
Program selector button ................ 134
Rocking the vehicle free ................ 135
Shift ranges ................................... 133
Starting the engine ........................ 128
Steering wheel paddle shifters ...... 135
Trailer towing ................................. 135
Transmission oil change ................ 310
Transmission position display
(DIRECT SELECT lever) ................... 132
Transmission positions .................. 132
Automatic transmission emer-
gency mode ....................................... 136 Axle load, permissible (trailer
towing) ...............................................
315 B
Back support see Lumbar support
Backup lamp
Display messages (vehicle with
steering wheel buttons) .................
217
Backup lamps
Display messages (vehicle with-
out steering wheel buttons) ........... 203
Replacing bulbs ............................. 108
BAS (Brake Assist System)
Function/notes ................................ 67
Basic settings
see Settings
Battery (SmartKey)
Checking .......................................... 73
Important safety notes .................... 73
Replacing ......................................... 73
Battery (vehicle)
Care ............................................... 263
Charging ........................................ 262
Connecting and installing .............. 261
Disconnecting and removing ......... 260
Display messages (vehicle with
steering wheel buttons) ................. 219
Display messages (vehicle with-
out steering wheel buttons) ........... 204
Important safety notes .................. 258
Jump starting ................................. 272
Location ......................................... 259
Before driving off
Important safety notes .................. 127
Belt
see Seat belts
Belt warning ......................................... 50
Blind Spot Assist
Activating ....................................... 153
Activating/deactivating (vehicle
with steering wheel buttons) ......... 191
Collision warning ........................... 153
Display message ............................ 223
Important safety notes .................. 152
Monitoring range of the sensors .... 152
Notes/function .............................. 151 Index
5
Page 8 of 320
Trailer towing ................................. 153
Warning display
............................. 153
Blower
see Climate control
Bluetooth ®
Audio ............................... 187
Brake
Display message (vehicle without
steering wheel buttons) ................. 196
Downhill slopes .............................. 142
Heavy and light loads ..................... 142
New brake discs ............................ 143
Wet road surfaces .......................... 142
Brake Assist
see BAS (Brake Assist System)
Brake assistance
see BAS (Brake Assist System)
Brake fluid
Checking the level ......................... 255
Display message (vehicle with
steering wheel buttons) ................. 213
Display message (vehicle without
steering wheel buttons) ................. 199
Notes ............................................. 310
Brake force distribution
see EBD (electronic brake force
distribution)
Brake lamps
Display messages (vehicle with
steering wheel buttons) ................. 217
Display messages (vehicle with-
out steering wheel buttons) ........... 202
Replacing bulbs ............................. 108
Trailer display messages (vehicle
with steering wheel buttons) ......... 216
Trailer display messages (vehicle
without steering wheel buttons) .... 202
Brake pads/linings
New ............................................... 143
Brakes
ABS .................................................. 67
Adaptive Brake Assist .................... 150
Applying the parking brake ............ 138
BAS .................................................. 67
Brake fluid (notes) ......................... 310
Checking brake fluid level .............. 255
Display message (vehicle with
steering wheel buttons) ................. 210
EBD .................................................. 68 Hill start assist ............................... 129
Important safety notes
.................. 142
New brake pads/linings ................ 143
Parking brake (notes) ..................... 143
Riding tips ...................................... 142
Warning lamp ................................. 229
Breakdown
Mercedes-Benz Service24h ........... 272
Vehicle tool kit ............................... 270
Breakdown assistance
see Towing away
Buttons
On the instrument cluster .............. 176
On the steering wheel .................... 181 C
California Important notice for retail cus-
tomers and lessees ..........................
27
Camera
see Rear view camera
Car wash
see Care
Care
Car wash ........................................ 264
Carpets .......................................... 269
Display ........................................... 268
Exterior lights ................................ 266
Interior ........................................... 268
Notes ............................................. 263
Paint .............................................. 265
Plastic trim .................................... 268
Power washer ................................ 265
Rear view camera .......................... 267
Roof lining ...................................... 269
Seat belt ........................................ 269
Seat cover ..................................... 269
Sensors ......................................... 267
Sliding door ................................... 267
Steering wheel ............................... 269
Trim pieces .................................... 269
Washing by hand ........................... 264
Washing the engine ....................... 265
Wheels ........................................... 266
Windows ........................................ 265
Wiper blades .................................. 266 6
Index
Page 18 of 320
Important safety notes .................... 46
Introduction to the restraint sys-
tem ..................................................
46
Occupant Classification System
(OCS) ............................................... 54
PASSENGER AIR BAG OFF indica-
tor lamp ........................................... 47
Pets in the vehicle ........................... 66
Restraint system warning lamp ........ 46
Seat belt .......................................... 47
OCS
Faults ............................................... 57
Operation ......................................... 54
Self-test ........................................... 56
Odometer
Displaying (vehicle with steering
wheel buttons) ............................... 183
Displaying (vehicle without steer-
ing wheel buttons) ......................... 177
Setting the display unit (vehicle
with steering wheel buttons) ......... 192
Setting the display unit (vehicle
without steering wheel buttons) .... 180
Off-road driving
Checklist after driving off-road ...... 146
Important safety notes .................. 144
Rules for driving off-road ............... 145
Oil
see Engine oil
On-board computer (vehicle with
steering wheel buttons)
Assistance menu ........................... 189
Audio menu ................................... 187
Date menu ..................................... 192
Display messages .......................... 209
Factory settings ............................. 194
Important safety notes .................. 174
Instrument cluster menu ............... 192
Lights menu ................................... 193
Menu overview .............................. 183
Message memory .......................... 209
Navigation menu ............................ 185
Operating ....................................... 181
Permanent display ......................... 192
Service menu ................................. 191
Setting the date ............................. 192
Setting the display ......................... 192
Setting the display language .......... 192 Setting the language ...................... 192
Setting the time ............................. 192
Settings menu ............................... 191
Standard display ............................ 183
Telephone menu ............................ 188
Time menu ..................................... 192
Trip menu ...................................... 183
Vehicle menu ................................. 193
On-board computer (vehicle with-
out steering wheel buttons)
Coolant temperature display
menu ............................................. 178
Current fuel consumption menu .... 178
Date menu ..................................... 181
Digital speedometer menu ............. 178
Display messages .......................... 194
Distance menu ............................... 177
Factory settings ............................. 179
Important safety notes .................. 174
Menu overview .............................. 177
Message memory .......................... 195
Operating ....................................... 176
Permanent display ......................... 180
Range menu ................................... 178
Setting the date ............................. 181
Setting the display ......................... 180
Setting the display language .......... 179
Setting the language ...................... 179
Setting the time ............................. 181
Settings menu ............................... 179
Standard display menu .................. 177
Time menu ..................................... 181
Trip computer menu ...................... 177
On-board computer (vehicles
with steering wheel buttons)
Displaying the service message ..... 258
On-board computer (vehicles
without steering wheel buttons)
Displaying the service message ..... 258
On-board diagnostic interface
see Diagnostics connection
Operating Instructions
Before the first journey .................... 27
Limited Warranty ............................. 27
Operating safety
Limited Warranty ............................. 2716
Index
Page 48 of 320
Useful information
This Operator's Manual describes all models
as well as standard and optional equipment of
your vehicle that were available at the time of
going to print. Country-specific variations are
possible. Note that your vehicle may not be
equipped with all of the described functions.
This also applies to systems and functions rel-
evant to safety.
Read the information on qualified specialist
workshops (Y page
32).Occupant safety
Restraint system introduction
The restraint system can reduce the risk of
vehicle occupants coming into contact with
parts of the vehicle's interior in the event of an
accident. In the event of an accident, the
restraint system can also reduce the forces to
which the vehicle occupants are subjected.
The restraint system includes the following
components:
R Seat belt system
R Air bags
R Child restraint system
R Child seat securing system
The various components of the restraint sys-
tem work complementary to one another. They
can only perform their intended protective
function if all vehicle occupants:
R have correctly fastened their seat belt
( Y page
49)
R have correctly adjusted their seat and head
restraint ( Y page 87)
As the driver, you must also ensure that the
driver's seat is in the correct position in rela-
tion to the pedals and the steering wheel.
Depending on your vehicle's equipment, you
can also adjust the steering wheel. Observe
the information relating to the correct driver's
seat position (Y page 87).
Additionally, you must ensure that an air bag
can deploy freely ( Y page 51).
The air bag is supplementary to a correctly fas-
tened seat belt. As an additional safety device,
the air bag increases the level of protection for
vehicle occupants in the event of an accident.
If the protection provided by the seat belt is sufficient, the air bags do not deploy. Further-
more, in the event of an accident, only air bags
which provide greater protection in the given
accident situation deploy. However, seat belts
and air bags generally do not protect against
objects penetrating the vehicle from the out-
side.
Information on how the restraint system oper-
ates can be found in "Deployment of the Emer-
gency Tensioning Devices and air bags"
( Y page
58).
See "Children in the vehicle" for information
on infants and children traveling with you in
the vehicle restraint systems for infants and
children ( Y page 60). Important safety notes
G
WARNING
Modifications to the restraint system may
cause it to no longer work as intended. The
restraint system may then not perform its
intended protective function and may fail in
an accident or trigger unexpectedly, for
example. This poses an increased risk of
injury or even fatal injury.
Never modify parts of the restraint system.
Never tamper with the wiring, the electronic
components or their software.
If it is necessary to modify components of the
restraint system for a person with physical dis-
abilities, contact a Mercedes-Benz Commercial
Van Centerfor details. USA only: contact our
Mercedes-Benz Customer Assistance Center
for details at 1‑877 ‑762‑8267. Restraint system warning lamp
The functions of the restraint system are
checked after the ignition is switched on and
at regular intervals while the engine is running.
Therefore, malfunctions can be detected in
good time.
The 6 restraint system warning lamp on
the instrument cluster lights up when the igni-
tion is switched on. It goes out no later than a
few seconds after the vehicle is started. The
restraint system is operational. 46
Occupant safety
Safety
Page 49 of 320
A malfunction has occurred if the
6
restraint system warning lamp:
R does not light up after the ignition is
switched on
R does not go out after a few seconds with the
engine running
R lights up again while the engine is running G
WARNING
If the restraint system is malfunctioning,
restraint system components may be trig-
gered unintentionally or may not be trig-
gered as intended in the event of an acci-
dent. This may affect the Emergency Ten-
sioning Devices or air bags, for example.
There is a risk of injury.
Have the restraint system checked and
repaired immediately at a qualified specialist
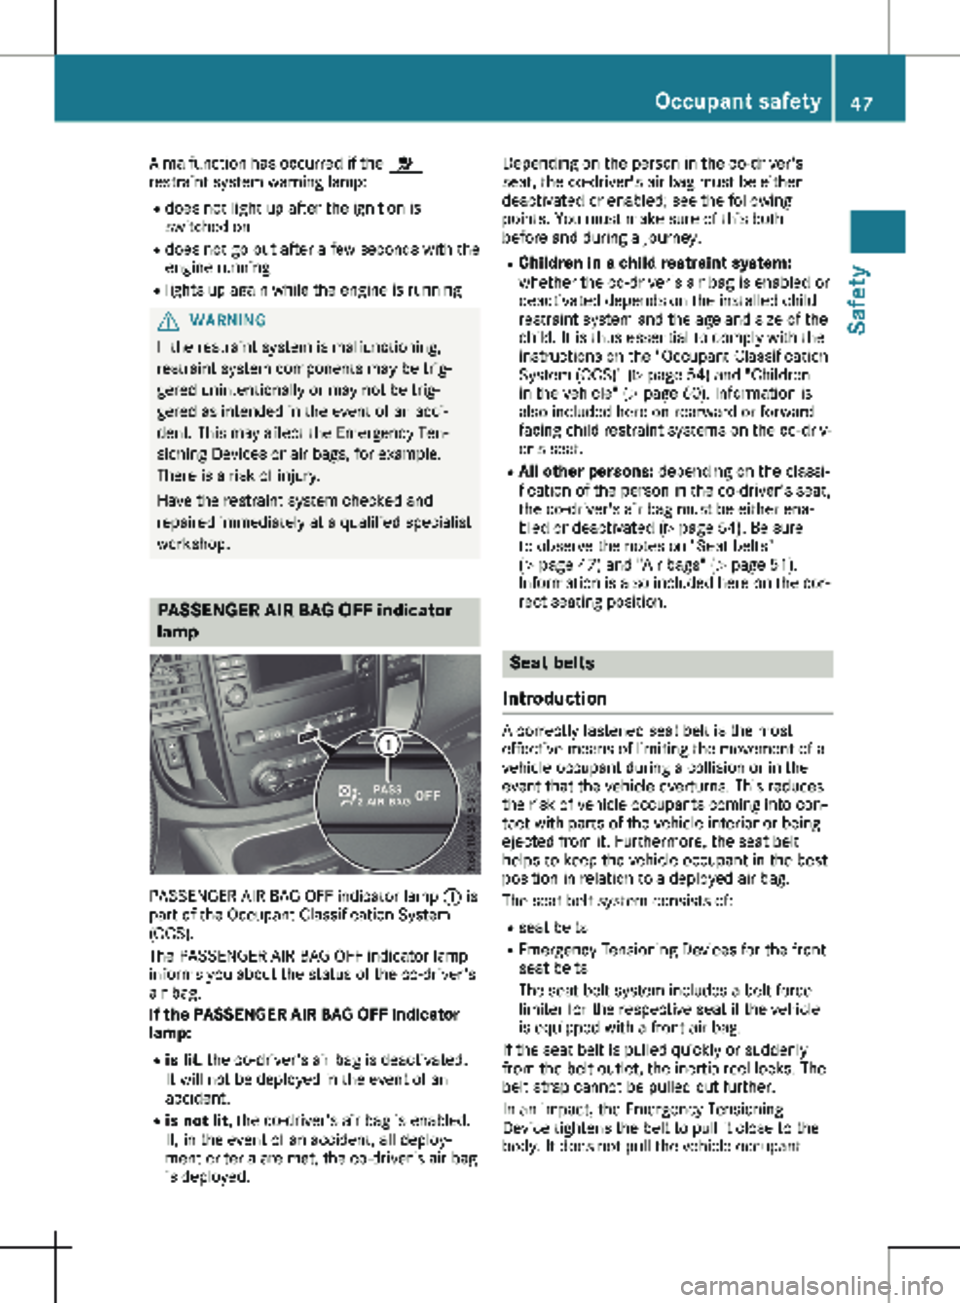
workshop. PASSENGER AIR BAG OFF indicator
lamp
PASSENGER AIR BAG OFF indicator lamp
: is
part of the Occupant Classification System
(OCS).
The PASSENGER AIR BAG OFF indicator lamp
informs you about the status of the co-driver's
air bag.
If the PASSENGER AIR BAG OFF indicator
lamp:
R is lit, the co-driver's air bag is deactivated.
It will not be deployed in the event of an
accident.
R is not lit , the co-driver's air bag is enabled.
If, in the event of an accident, all deploy-
ment criteria are met, the co-driver's air bag
is deployed. Depending on the person in the co-driver's
seat, the co-driver's air bag must be either
deactivated or enabled; see the following
points. You must make sure of this both
before and during a journey.
R Children in a child restraint system:
whether the co-driver's air bag is enabled or
deactivated depends on the installed child
restraint system and the age and size of the
child. It is thus essential to comply with the
instructions on the "Occupant Classification
System (OCS)" ( Y page
54) and "Children
in the vehicle" ( Y page 60). Information is
also included here on rearward or forward-
facing child restraint systems on the co-driv-
er's seat.
R All other persons: depending on the classi-
fication of the person in the co-driver's seat,
the co-driver's air bag must be either ena-
bled or deactivated (Y page 54). Be sure to observe the notes on "Seat belts"
( Y page 47) and "Air bags" (Y page 51).
Information is also included here on the cor-
rect seating position. Seat belts
Introduction A correctly fastened seat belt is the most
effective means of limiting the movement of a
vehicle occupant during a collision or in the
event that the vehicle overturns. This reduces
the risk of vehicle occupants coming into con-
tact with parts of the vehicle interior or being
ejected from it. Furthermore, the seat belt
helps to keep the vehicle occupant in the best
position in relation to a deployed air bag.
The seat belt system consists of:
R seat belts
R Emergency Tensioning Devices for the front
seat belts
The seat belt system includes a belt force
limiter for the respective seat if the vehicle
is equipped with a front air bag.
If the seat belt is pulled quickly or suddenly
from the belt outlet, the inertia reel locks. The
belt strap cannot be pulled out further.
In an impact, the Emergency Tensioning
Device tightens the belt to pull it close to the
body. It does not pull the vehicle occupant Occupant safety
47
Safety Z
Page 69 of 320
ABS (Anti-lock Braking System)
General notes ABS regulates brake pressure in such a way
that the wheels do not lock when you brake.
This allows you to continue steering the vehi-
cle when braking.
The ò warning lamp in the instrument clus-
ter lights up when the ignition is switched on.
The lamp goes out when the engine starts run-
ning.
Important safety notes Observe the important safety guidelines for
the driving safety system (
Y page
66).
ABS works from a speed of about 5 mph
(8 km/h), regardless of road-surface condi-
tions. ABS works on slippery surfaces, even
when you only brake gently. G
WARNING
If ABS is faulty, the wheels could lock when
braking. The steerability and braking charac-
teristics may be severely impaired. Addition-
ally, further driving safety systems are deac-
tivated. There is an increased danger of
skidding and accidents.
Drive on carefully. Have ABS checked imme-
diately at a qualified specialist workshop.
If ABS is malfunctioning, the ò warning
lamp
(Y page 230) lights up while the engine
is running and the display shows a message:
R on vehicles without steering wheel buttons
(Y page 196)
R on vehicles with steering wheel buttons
(Y page 210)
BAS, Hill Start Assist and ESP ®
and its driving
safety systems and other driving systems also
fail. Observe the notes on the ò warning
lamp and the display messages.
Braking If ABS intervenes when braking, you will feel a
pulsating in the brake pedal.
The pulsating brake pedal can be an indication
of hazardous road conditions and functions as
a reminder to take extra care while driving. X
If ABS intervenes: continue to depress the
brake pedal with force until the braking sit-
uation is over.
X To make a full brake application: depress
the brake pedal with full force. BAS (Brake Assist System)
General notes BAS operates in emergency braking situations.
If you depress the brake pedal quickly, BAS
automatically boosts the braking force, thus
shortening the stopping distance.
Important safety notes Observe the important safety guidelines for
the driving safety system
(Y page 66). G
WARNING
If BAS is malfunctioning, the braking dis-
tance in an emergency braking situation is
increased. There is a risk of an accident.
In an emergency braking situation, depress
the brake pedal with full force. ABS prevents
the wheels from locking.
If BAS is malfunctioning, the ÷ warning
lamp lights up while the engine is running
(Y page
230) and the display shows a mes-
sage:
R on vehicles without steering wheel buttons
(Y page 200)
R on vehicles with steering wheel buttons
(Y page 214)
Braking X
Keep the brake pedal firmly depressed until
the emergency braking situation is over.
ABS prevents the wheels from locking.
The brakes will function as usual once you
release the brake pedal. BAS is deactivated. Driving safety systems
67
Safety Z
Page 70 of 320
EBD (electronic brake force distribu-
tion)
General notes EBD monitors and controls the brake pressure
to the rear wheels. This enables EBD to
improve handling during braking.
Important safety notes Observe the important safety guidelines for
the driving safety system
(Y page 66).G
WARNING
If EBD is malfunctioning, the rear wheels can
lock, e.g. under full braking. This increases
the risk of skidding and an accident.
You should therefore adapt your driving
style to the different handling characteris-
tics. Have the brake system checked at a
qualified specialist workshop.
If EBD is malfunctioning, the $ warning
lamp
(Y page 229) lights up while the engine
is running and the display shows a message:
R on vehicles without steering wheel buttons
(Y page 199)
R on vehicles with steering wheel buttons
(Y page 213)
Other driving systems and driving safety sys-
tems then also fail. ESP
®
(Electronic Stability Program)
General notes ESP
®
monitors driving stability and detects a
tendency of the vehicle to understeer or over-
steer (skidding) in good time. If ESP ®
detects
that the vehicle is deviating from the direction
desired by the driver, one or more wheels are
braked to stabilize the vehicle. The engine out-
put is also modified to keep the vehicle on the
desired course within physical limits. ESP ®
can
also stabilize the vehicle during braking.
ESP ®
also monitors traction, i.e. power trans-
mission between the tires and the road sur-
face. The integrated traction control supports
you when pulling away or accelerating on wet,
slippery or slick roads. Should the drive
wheels spin, traction control brakes them indi- vidually. In addition, greater drive torque is
transmitted to the wheel or wheels with trac-
tion. If traction on the road surface is not suffi-
cient, even ESP
®
will not allow you to pull
away without difficulty. The type of tires and
total weight of the vehicle as well as the gradi-
ent of the road also play a crucial role. Trac-
tion control remains active if you deactivate
ESP ®
.
If the h warning lamp in the instrument
cluster goes out before beginning the journey,
ESP ®
is automatically active.
The h warning lamp in the instrument clus-
ter flashes when ESP ®
intervenes:
X do not deactivate ESP ®
under any circum-
stances.
X when driving off, apply as little throttle as
possible.
X adapt your speed and driving style to the
prevailing road conditions.
Important safety notes Observe the important safety guidelines for
the driving safety system (
Y page
66). G
WARNING
If ESP ®
is malfunctioning it will not provide
any vehicle stabilization. There is an
increased risk of skidding or of an accident.
Exercise caution when continuing to drive.
Have ESP ®
checked at a qualified specialist
workshop.
! Do not run the vehicle on a roller dyna-
mometer (e.g. for performance tests). If you
must operate the vehicle on a roller dyna-
mometer, please consult a qualified special-
ist workshop in advance. You could other-
wise damage the drive train or the brake
system.
If ESP ®
is malfunctioning, the h warning
lamp
(Y page 230) lights up continuously
while the engine is running and the display
shows a message.
R on vehicles without steering wheel buttons
(Y page 200)
R on vehicles with steering wheel buttons
(Y page 214) 68
Driving safety systems
Safety
Page 73 of 320
Useful information
This Operator's Manual describes all models
as well as standard and optional equipment of
your vehicle that were available at the time of
going to print. Country-specific variations are
possible. Note that your vehicle may not be
equipped with all of the described functions.
This also applies to systems and functions rel-
evant to safety.
Read the information on qualified specialist
workshops (Y page
32).Key
Important safety notes
G
WARNING
If children are left unsupervised in the vehi-
cle, they could:
R open the doors, thus endangering other
people or road users.
R get out and disrupt traffic.
R operate the vehicle's equipment.
Additionally, children could set the vehicle in
motion if, for example, they:
R release the parking brake.
R shift the automatic transmission out of
park position P.
R start the engine.
There is a risk of an accident and injury.
When leaving the vehicle, always take the
SmartKey with you and lock the vehicle.
Never leave children or animals unattended
in the vehicle. Always keep the SmartKey
out of reach of children. G
WARNING
If you attach heavy or large objects to the
SmartKey, the SmartKey could be uninten-
tionally turned in the ignition lock. This
could cause the engine to be switched off.
There is a risk of an accident.
Do not attach any heavy or large objects to
the SmartKey. Remove any bulky key rings before inserting the SmartKey into the igni-
tion lock.
! Keep the key away from strong magnetic
fields. The remote control function may oth-
erwise be damaged.
Strong magnetic fields can occur in the
vicinity of powerful electrical installations.
Do not keep the key:
R with electronic devices, e.g. a mobile phone
or another key
R with metallic objects, e.g. coins or metal foil
R in metallic objects, e.g. metal cases
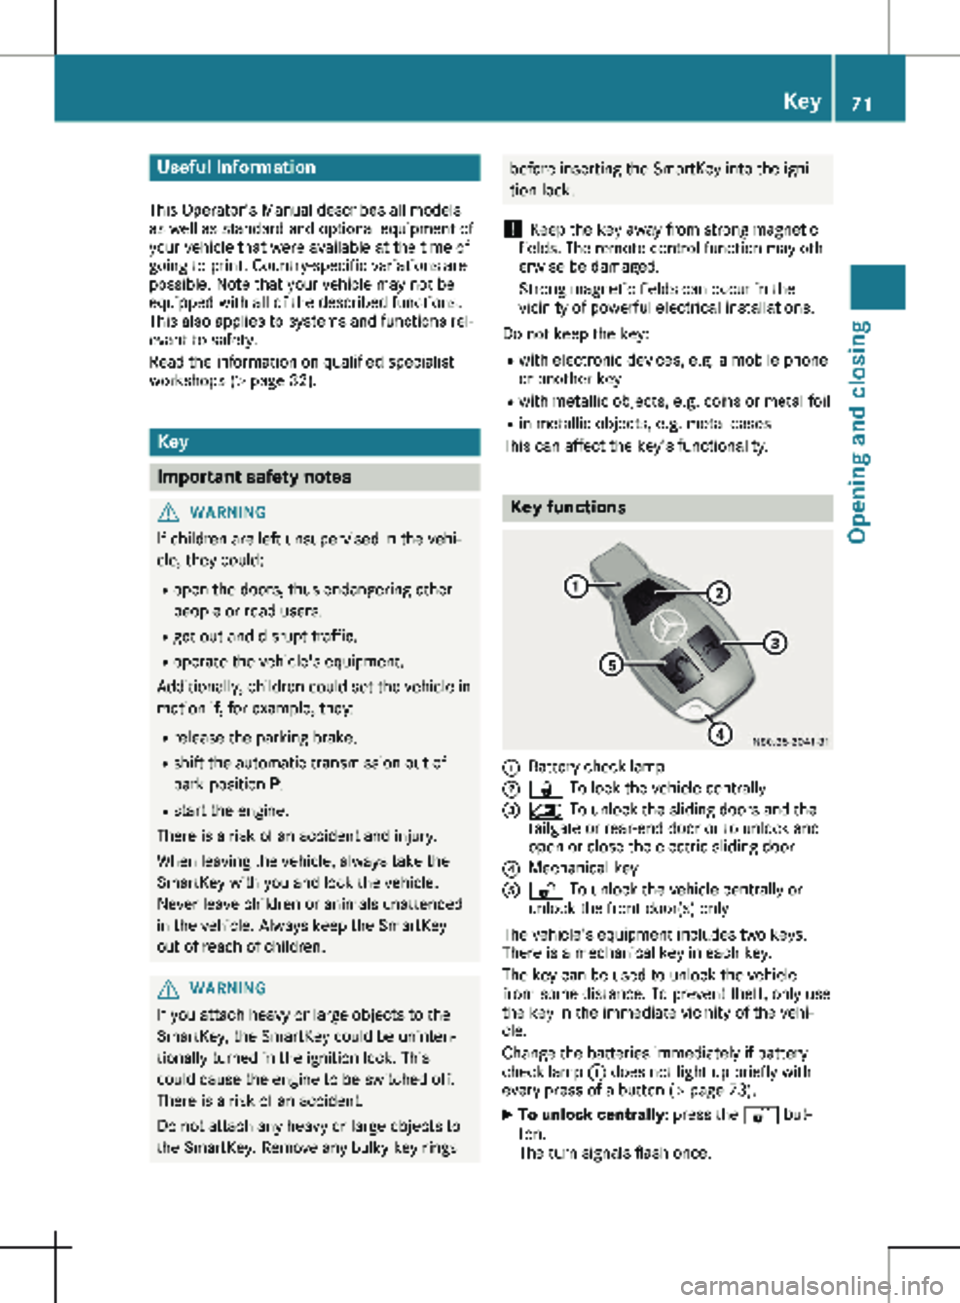
This can affect the key's functionality. Key functions
:
Battery check lamp
; & To lock the vehicle centrally
= 5 To unlock the sliding doors and the
tailgate or rear-end door or to unlock and
open or close the electric sliding door
? Mechanical key
A % To unlock the vehicle centrally or
unlock the front door(s) only
The vehicle's equipment includes two keys.
There is a mechanical key in each key.
The key can be used to unlock the vehicle
from some distance. To prevent theft, only use
the key in the immediate vicinity of the vehi-
cle.
Change the batteries immediately if battery
check lamp : does not light up briefly with
every press of a button (Y page
73).
X To unlock centrally: press the % but-
ton.
The turn signals flash once. Key
71
Opening and closing Z
Page 77 of 320
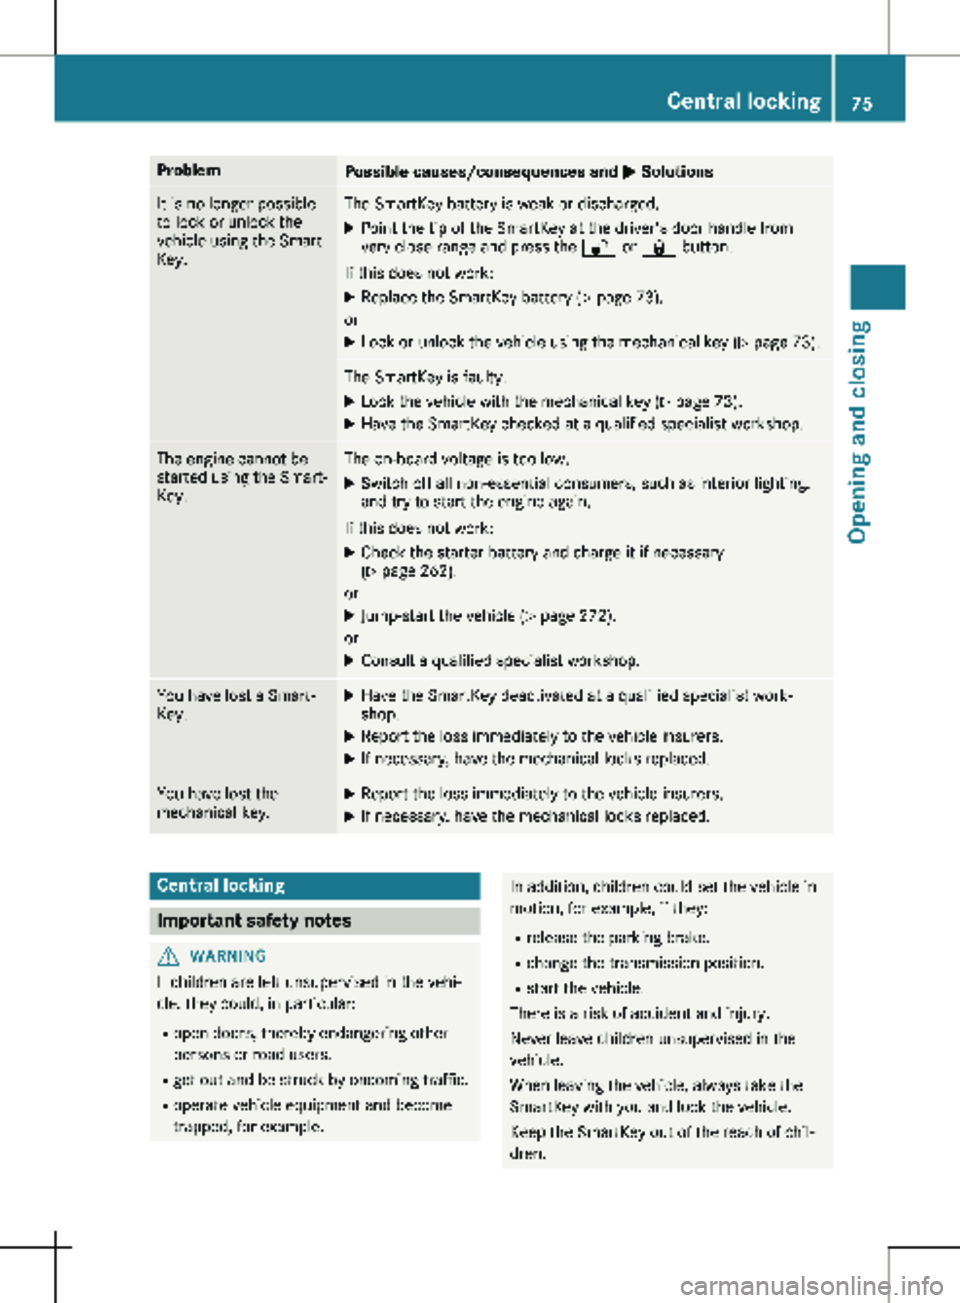
Problem
Possible causes/consequences and
M SolutionsIt is no longer possible
to lock or unlock the
vehicle using the Smart-
Key. The SmartKey battery is weak or discharged.
X Point the tip of the SmartKey at the driver's door handle from
very close range and press the % or & button.
If this does not work:
X Replace the SmartKey battery ( Y page 73).
or
X Lock or unlock the vehicle using the mechanical key ( Y page
73).The SmartKey is faulty.
X Lock the vehicle with the mechanical key (Y page
73).
X Have the SmartKey checked at a qualified specialist workshop. The engine cannot be
started using the Smart-
Key. The on-board voltage is too low.
X Switch off all non-essential consumers, such as interior lighting,
and try to start the engine again.
If this does not work:
X Check the starter battery and charge it if necessary
(Y page
262).
or
X Jump-start the vehicle ( Y page
272).
or
X Consult a qualified specialist workshop. You have lost a Smart-
Key. X
Have the SmartKey deactivated at a qualified specialist work-
shop.
X Report the loss immediately to the vehicle insurers.
X If necessary, have the mechanical locks replaced. You have lost the
mechanical key. X
Report the loss immediately to the vehicle insurers.
X If necessary, have the mechanical locks replaced. Central locking
Important safety notes
G
WARNING
If children are left unsupervised in the vehi-
cle, they could, in particular:
R open doors, thereby endangering other
persons or road users.
R get out and be struck by oncoming traffic.
R operate vehicle equipment and become
trapped, for example. In addition, children could set the vehicle in
motion, for example, if they:
R release the parking brake.
R change the transmission position.
R start the vehicle.
There is a risk of accident and injury.
Never leave children unsupervised in the
vehicle.
When leaving the vehicle, always take the
SmartKey with you and lock the vehicle.
Keep the SmartKey out of the reach of chil-
dren. Central locking
75
Opening and closing Z
Page 129 of 320
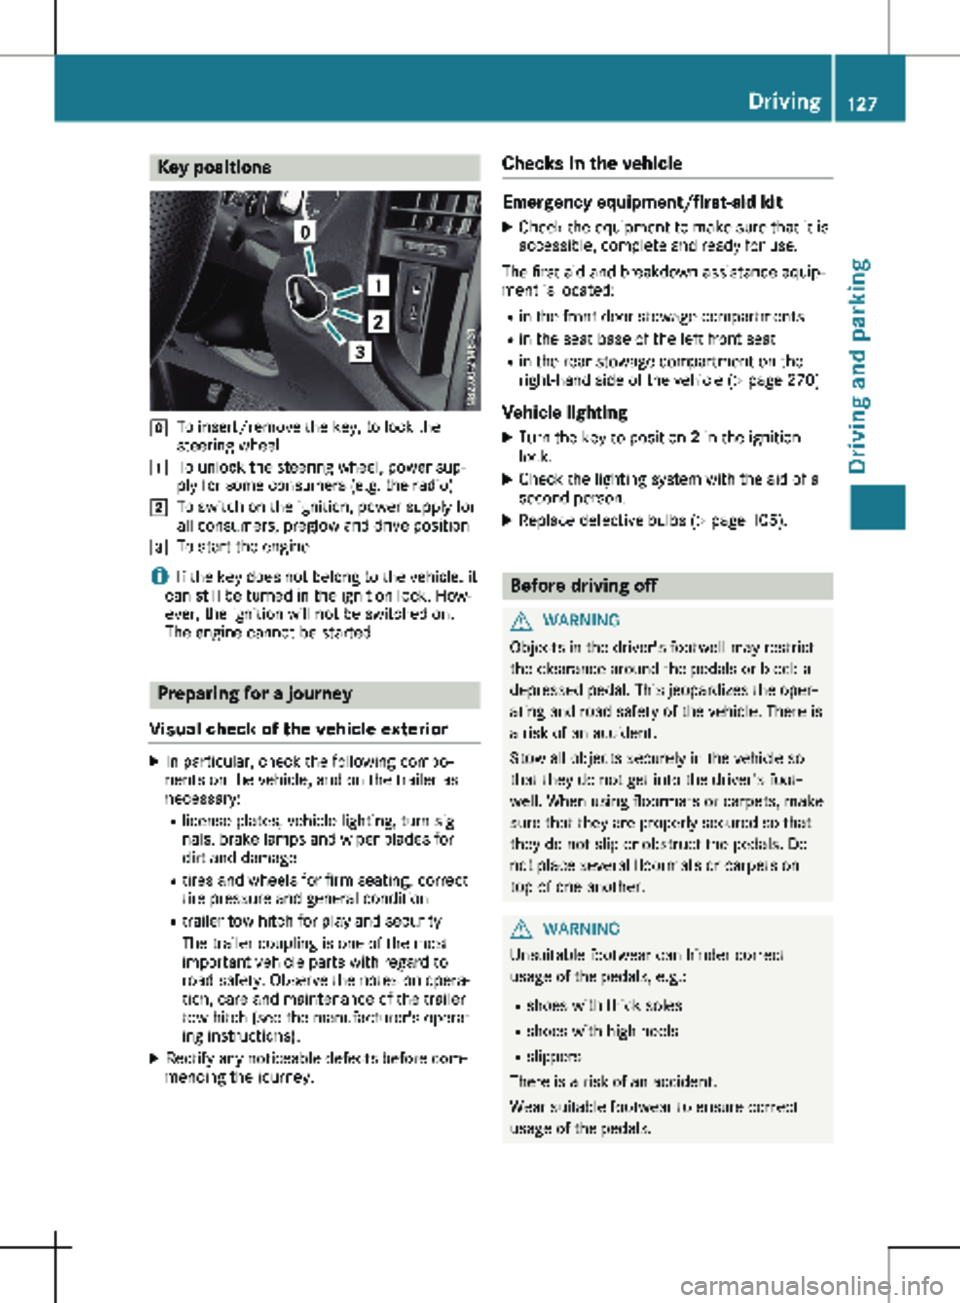
Key positions
g
To insert/remove the key, to lock the
steering wheel
1 To unlock the steering wheel, power sup-
ply for some consumers (e.g. the radio)
2 To switch on the ignition, power supply for
all consumers, preglow and drive position
3 To start the engine
i If the key does not belong to the vehicle, it
can still be turned in the ignition lock. How-
ever, the ignition will not be switched on.
The engine cannot be started. Preparing for a journey
Visual check of the vehicle exterior X
In particular, check the following compo-
nents on the vehicle, and on the trailer as
necessary:
R
license plates, vehicle lighting, turn sig-
nals, brake lamps and wiper blades for
dirt and damage
R tires and wheels for firm seating, correct
tire pressure and general condition
R trailer tow hitch for play and security
The trailer coupling is one of the most
important vehicle parts with regard to
road safety. Observe the notes on opera-
tion, care and maintenance of the trailer
tow hitch (see the manufacturer's operat-
ing instructions).
X Rectify any noticeable defects before com-
mencing the journey. Checks in the vehicle Emergency equipment/first-aid kit
X Check the equipment to make sure that it is
accessible, complete and ready for use.
The first aid and breakdown assistance equip-
ment is located:
R in the front door stowage compartments
R in the seat base of the left front seat
R in the rear stowage compartment on the
right-hand side of the vehicle
(Y page 270)
Vehicle lighting
X Turn the key to position 2 in the ignition
lock.
X Check the lighting system with the aid of a
second person.
X Replace defective bulbs (Y page
105). Before driving off
G
WARNING
Objects in the driver's footwell may restrict
the clearance around the pedals or block a
depressed pedal. This jeopardizes the oper-
ating and road safety of the vehicle. There is
a risk of an accident.
Stow all objects securely in the vehicle so
that they do not get into the driver's foot-
well. When using floormats or carpets, make
sure that they are properly secured so that
they do not slip or obstruct the pedals. Do
not place several floormats or carpets on
top of one another. G
WARNING
Unsuitable footwear can hinder correct
usage of the pedals, e.g.:
R shoes with thick soles
R shoes with high heels
R slippers
There is a risk of an accident.
Wear suitable footwear to ensure correct
usage of the pedals. Driving
127
Driving and parking Z