high beam MERCEDES-BENZ METRIS 2020 MY20 Operator’s Manual
[x] Cancel search | Manufacturer: MERCEDES-BENZ, Model Year: 2020, Model line: METRIS, Model: MERCEDES-BENZ METRIS 2020Pages: 320, PDF Size: 26.38 MB
Page 9 of 320
Cargo compartment
Options .......................................... 244
Seating ............................................ 90
Cargo compartment lamp
Changing bulbs .............................. 104
Cargo compartment lighting
Switching on centrally ................... 103
Switching on locally ....................... 103
Cargo tie-down points and tie
downs
Important safety notes .................. 244
Cargo tie-down rings
Permissible tensile load ................. 314
Center console
Controls ........................................... 43
Central locking
Activating/deactivating the
acoustic locking confirmation
(on-board computer) ...................... 194
Automatic locking ............................ 76
Automatic locking (on-board
computer) ...................................... 194
Locking/unlocking (buttons) ........... 75
Locking/unlocking (emergency
key element) .................................... 72
Locking/unlocking (SmartKey) ........ 71
Central locking system
see Central locking
Change of address .............................. 28
Change of ownership .......................... 28
Changing a bulb
Ambient lamp in the front door ...... 104
Halogen headlamps ....................... 105
Mirror lamp in the headliner .......... 104
Signal and ambient light in the
tailgate .......................................... 105
Trunk lamp in the side trim panel .. 104
Changing bulbs
Additional turn signals ................... 107
Ambient lamp in tailgate ................ 104
Backup lamps ................................ 108
Brake lamps ................................... 108
Cargo compartment lamp .............. 104
Daytime running lamps .................. 107
High-beam headlamps ................... 107
Installing/removing a rear lamp
cluster ........................................... 108 Installing/removing the cover in
the wheel arch
............................... 106
Installing/removing the tail lamp ... 108
Interior light ................................... 103
Interior lighting .............................. 103
Low-beam headlamps .................... 106
Overview of lamp types (front
bulbs) ............................................. 106
Overview of lamp types (rear
bulbs) ............................................. 108
Parking lamps ................................ 107
Rear fog lamp ................................ 108
Rear interior light in the head-
liner ............................................... 104
Standing lamps (front) ................... 107
Standing lamps (rear) .................... 108
Tail lamps ...................................... 108
Trunk lamp in the headliner ........... 103
Turn signals (front) ......................... 107
Turn signals (rear) .......................... 108
see Changing light bulbs
Child
Restraint system .............................. 62
Child seat
Forward-facing restraint system ...... 64
LATCH-type (ISOFIX) child seat
anchors ............................................ 63
On the front-passenger seat ............ 64
Rearward-facing restraint system .... 64
Top Tether ....................................... 63
Child-proof locks
Important safety notes .................... 65
Sliding door ..................................... 66
Children
Special seat belt retractor ............... 61
Children in the vehicle
Important safety notes .................... 60
Cigarette lighter ................................ 240
Cleaning
Trailer tow hitch ............................. 268
Cleaning
see Care
Climate control
Air conditioning in the rear com-
partment ........................................ 117
Control panel for dual-zone auto-
matic climate control ..................... 116
Controlling automatically ............... 119 Index
7
Page 15 of 320
Guide rail
Maximum tensile strength ............. 314
Problems ......................................... 89 H
Handbrake see Parking brake
Handling control system
see ESP ®
(Electronic Stability Program)
Hands-free system
see Mobile phone
Harmful substances
Information
................................ 29, 33
Hazard warning lamps ...................... 101
Head restraints
Adjusting (electrically) ..................... 94
Adjusting (manually) ........................ 93
Important safety notes .................... 93
Removing/installing ........................ 93
Headlamps
Changing bulbs (halogen head-
lamps) ............................................ 105
Fogging up ..................................... 102
see Automatic headlamp mode
Heating
see Climate control
High-beam headlamps
Display messages (vehicle with
steering wheel buttons) ................. 217
Display messages (vehicle with-
out steering wheel buttons) ........... 203
Replacing bulbs ............................. 107
Switching on/off ........................... 101
Hill start assist .................................. 129
Hood
Closing ........................................... 251
Display messages (vehicle with
steering wheel buttons) ................. 226
Display messages (vehicle with-
out steering wheel buttons) ........... 208
Important safety notes .................. 250
Opening ......................................... 251
Hydroplaning ..................................... 143 I
Ignition lock see SmartKey positions (ignition lock)
Immobilizer ..........................................
70
Indicator lamps
see Warning and indicator lamps
Insect protection on the radiator ...... 34
Installations and conversions
see Vehicle bodies
Instrument cluster
Buttons (vehicle without steering
wheel buttons) ............................... 176
Overview (vehicle with steering
wheel buttons) ................................. 40
Overview (vehicle without steer-
ing wheel buttons) ........................... 38
Warning and indicator lamps
(vehicle with steering wheel but-
tons) ................................................ 41
Warning and indicator lamps
(vehicle without steering wheel
buttons) ........................................... 39
Instrument cluster lighting .............. 174
Interior lighting
Automatic control .......................... 102
Delayed switch-off (on-board
computer) ...................................... 193
General notes ................................ 102
Manual control ............................... 103
Notes on changing bulbs ............... 103
Overview ........................................ 102
Reading lamp ................................. 102
Rear interior light in the grab
handle ............................................ 103
Replacing bulbs ............................. 103
Switching the cargo compart-
ment lighting on/off (cargo com-
partment) ....................................... 103
Switching the cargo compart-
ment lighting on/off (dashboard) .. 103
Switching the rear compartment
lighting on centrally ....................... 103 J
Jack Holder in the cargo compartment
.. 272 Index
13
Page 16 of 320
Jacking points ................................ 298
Scope of tire-changing tools
.......... 270
Storage location ............................ 270
Stowage compartment in the
rear ................................................ 271
Stowage space in the cargo com-
partment ........................................ 272
Using ............................................. 298
Jump starting (engine) ...................... 272
Jump-start (engine)
see Jump starting (engine) K
Key Display messages (vehicle with
steering wheel buttons)
................. 227
Display messages (vehicle with-
out steering wheel buttons) ........... 209
Position in the ignition lock ............ 127
Kickdown ........................................... 135L
Lamps Display messages (vehicle with-
out steering wheel buttons) ...........
202
see Warning and indicator lamps
Lane detection (automatic)
see Lane Keeping Assist
Lane Keeping Assist
Activating/deactivating ................. 154
Display message ............................ 222
Function/information .................... 153
Important safety notes .................. 154
Setting sensitivity (on-board
computer) ...................................... 191
Setting the sensitivity .................... 155
Language
Display (vehicle with steering
wheel buttons) ............................... 192
Display (vehicle without steering
wheel buttons) ............................... 179
Lashing points and tie downs
Permissible tensile load ................. 313
Lashing strap
Important safety notes .................. 246
Tensioning strap ............................ 247 LATCH-type (ISOFIX) child seat
anchors
................................................
63
License plate lamp
Changing bulbs .............................. 105
License plate lamps
Display messages (vehicle with
steering wheel buttons) ................. 217
Display messages (vehicle with-
out steering wheel buttons) ........... 203
Light sensor
Display messages (vehicle with
steering wheel buttons) ................. 216
Display messages (vehicle with-
out steering wheel buttons) ........... 202
Lighting
see Lights
Lights
Activating/deactivating the inte-
rior lighting delayed switch-off ....... 193
Automatic headlamp mode ............ 100
Changing bulbs (halogen head-
lamps) ............................................ 105
Changing bulbs (interior lights) ...... 103
Display messages (vehicle with
steering wheel buttons) ................. 216
Driving abroad ............................... 141
Fog lamps ...................................... 100
Hazard warning lamps ................... 101
High beam flasher .......................... 101
High-beam headlamps ................... 101
Important safety notes .................... 99
Light switch ..................................... 99
Low-beam headlamps .................... 100
Parking lamps .................................. 99
Rear fog lamp ................................ 100
Replacing bulbs (halogen head-
lamps) ............................................ 105
Standing lamps ................................ 99
Switching the daytime running
lamps on/off (switch) .................... 100
Switching the exterior lighting
delayed switch-off on/off (on-
board computer) ............................ 193
Switching the surround lighting
on/off (on-board computer) .......... 193
Turn signals ................................... 101
Limited Warranty ................................ 27
Load distribution ............................... 243 14
Index
Page 41 of 320
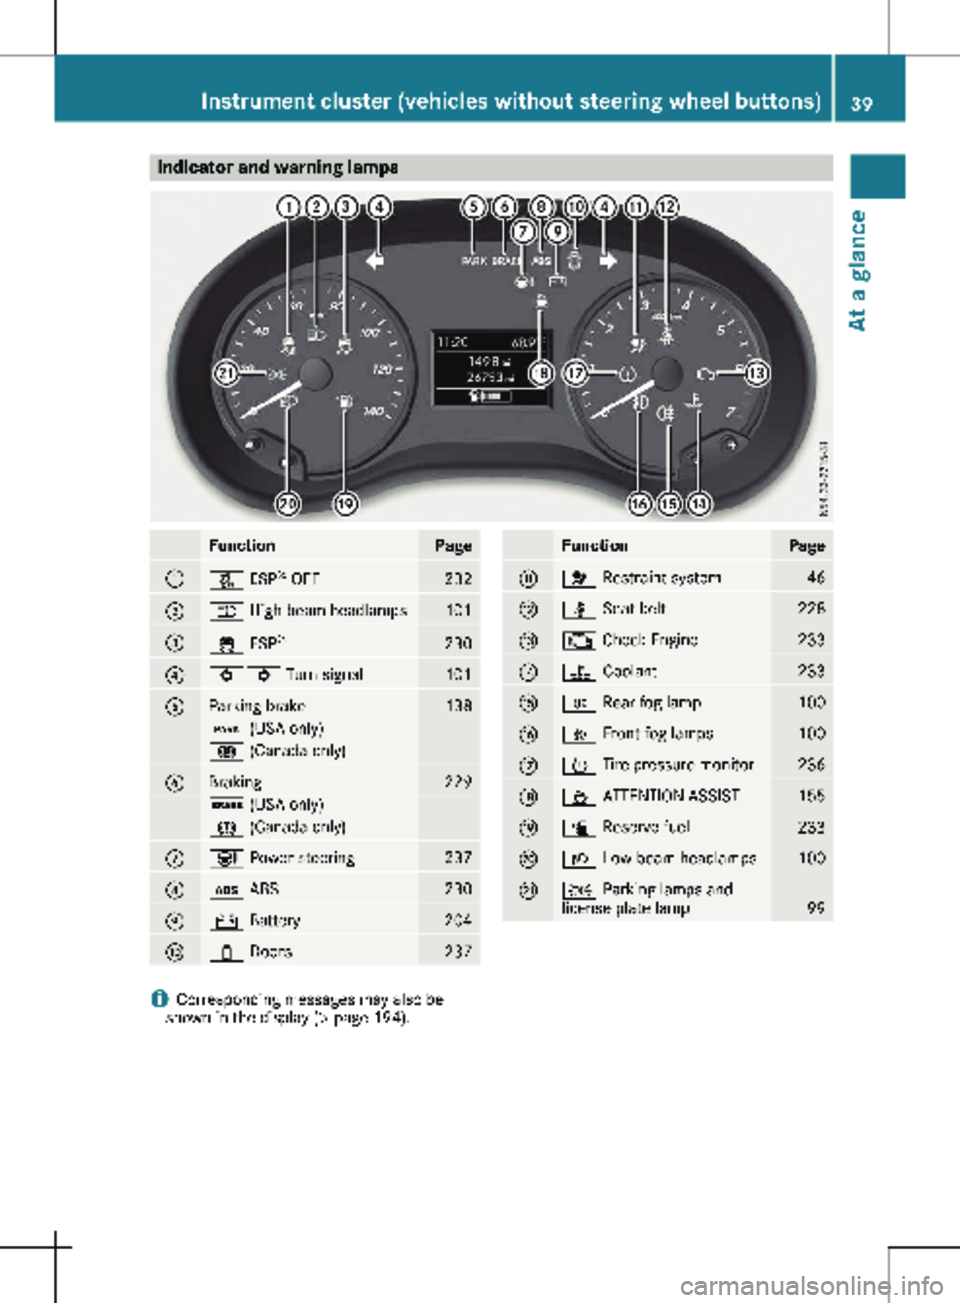
Indicator and warning lamps
Function Page
:
å ESP
®
OFF 232
;
K High-beam headlamps
101
=
÷ ESP
® 230
?
#! Turn signal
101
A
Parking brake 138
F (USA only)
! (Canada only)
B
Braking 229
$ (USA only)
J (Canada only)
C
Ð Power steering
237
D
ò ABS
230
E
# Battery
204
F
1 Doors
237 Function Page
G
6 Restraint system
46
H
ü Seat belt
228
I
; Check Engine
233
J
? Coolant
233
K
R Rear fog lamp
100
L
O Front fog lamps
100
M
h Tire pressure monitor
236
N
À ATTENTION ASSIST
155
O
æ Reserve fuel
233
P
L Low-beam headlamps
100
Q
T Parking lamps and
license plate lamp
99
i
Corresponding messages may also be
shown in the display (Y page 194).Instrument cluster (vehicles without steering wheel buttons)
39
At a glance
Page 43 of 320
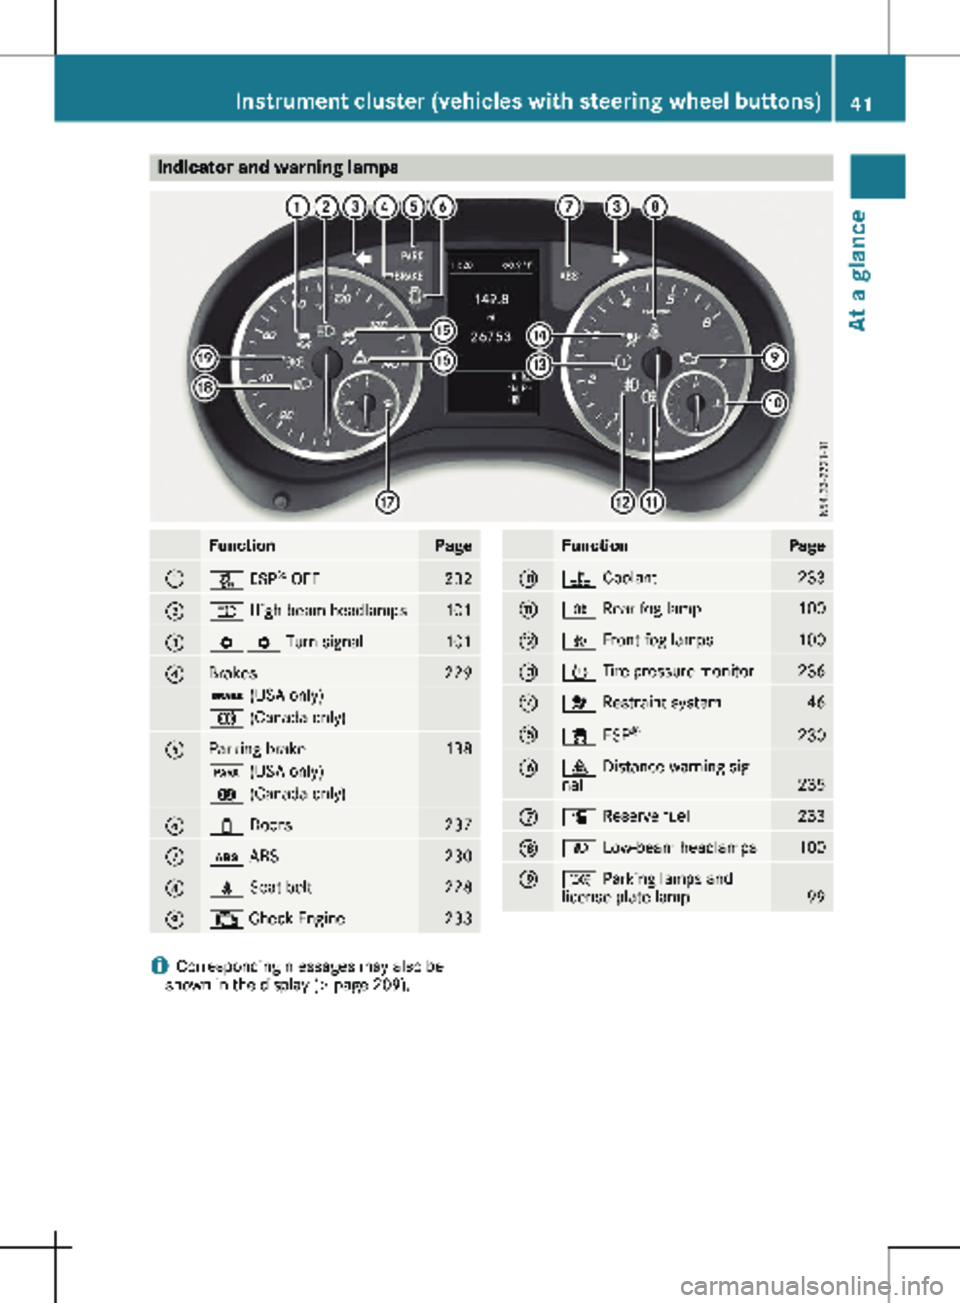
Indicator and warning lamps
Function Page
:
å ESP
®
OFF 232
;
K High-beam headlamps
101
=
#! Turn signal
101
?
Brakes 229
$ (USA only)
J (Canada only)
A
Parking brake 138
F (USA only)
! (Canada only)
B
1 Doors
237
C
ò ABS
230
D
ü Seat belt
228
E
; Check Engine
233 Function Page
F
? Coolant
233
G
R Rear fog lamp
100
H
O Front fog lamps
100
I
h Tire pressure monitor
236
J
6 Restraint system
46
K
÷ ESP
® 230
L
· Distance warning sig-
nal
235
M
æ Reserve fuel
233
N
L Low-beam headlamps
100
O
T Parking lamps and
license plate lamp
99
i
Corresponding messages may also be
shown in the display (Y page 209).Instrument cluster (vehicles with steering wheel buttons)
41
At a glance
Page 101 of 320

Useful information
This Operator's Manual describes all models
as well as standard and optional equipment of
your vehicle that were available at the time of
going to print. Country-specific variations are
possible. Note that your vehicle may not be
equipped with all of the described functions.
This also applies to systems and functions rel-
evant to safety.
Read the information on qualified specialist
workshops (Y page
32).Exterior lighting
Important safety notes
For reasons of safety, Mercedes-Benz recom-
mends that you drive with the lights switched
on even during the daytime. There may be dif-
ferences in operation due to legal require-
ments and voluntary recommendations in
some countries. Light switch
Operation 1W
Left-hand standing lamp
2X Right-hand standing lamp
3T Parking lamps, license plate and
instrument cluster lighting
4$ Lights off and daytime running lamps
à With light sensor: automatic driving
lights, controlled by the light sensor
5L Low-beam or high-beam headlamps
BN Fog lamps
CR Rear fog lamp
If you hear a warning tone when you leave the
vehicle, the lights may still be switched on.
X Turn the light switch to the $ or Ã
position.
The exterior lighting (except the parking/
standing lamps) switches off automatically in
the following situations:
R if you remove the key from the ignition lock.
R if you open the driver's door with the key in
position g in the ignition lock. Exterior lighting
99
Lights and windshield wipers
Page 103 of 320
Switching on the standing lamps:
X Turn the key to position 0 (Y page 127) in
the ignition lock or remove the key.
X Right-hand standing lamp: turn the light
switch to position X.
X Left-hand standing lamp: turn the light
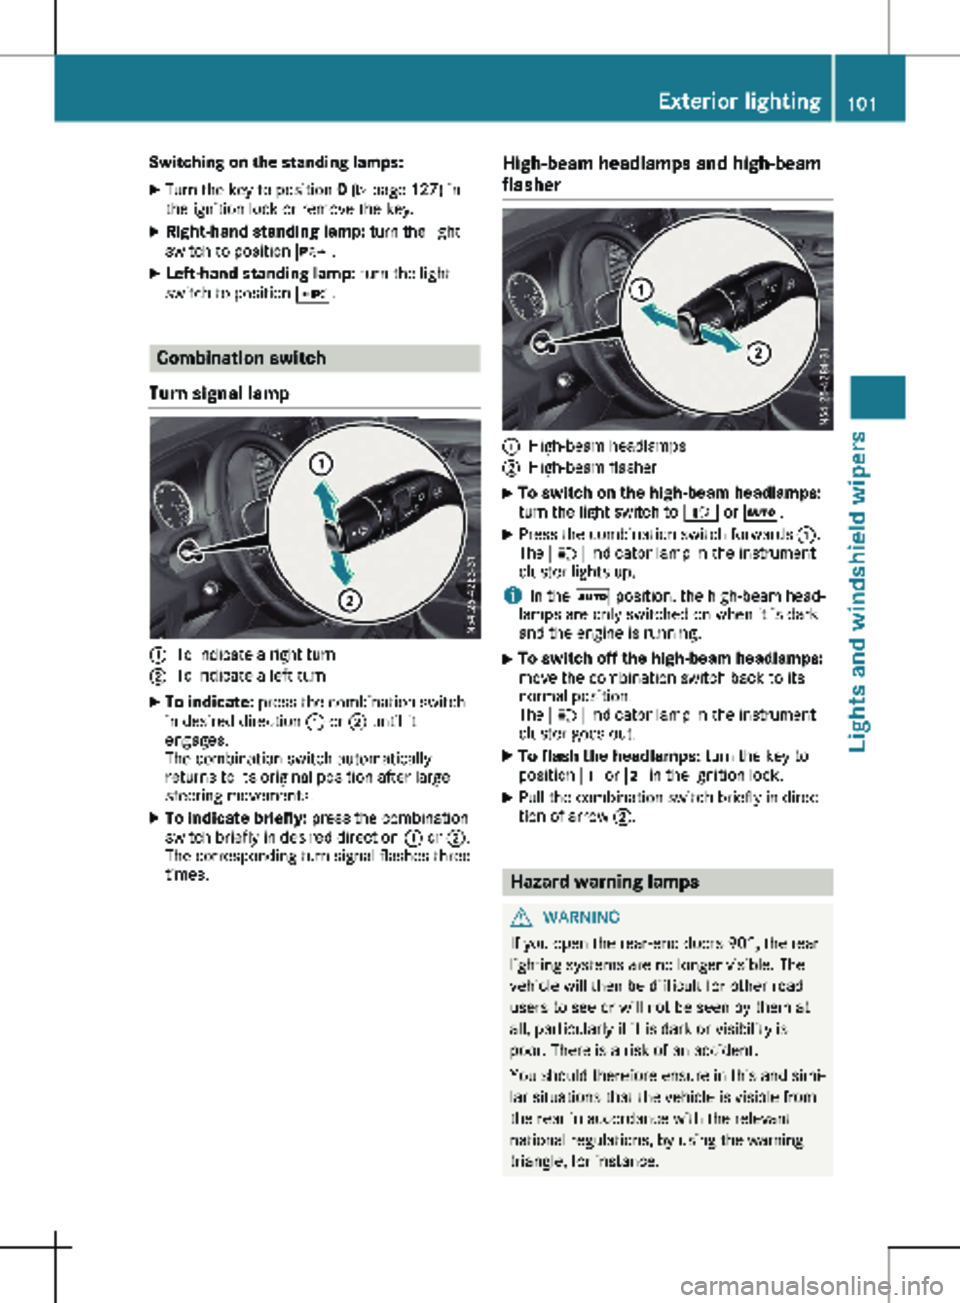
switch to position W.Combination switch
Turn signal lamp :
To indicate a right turn
; To indicate a left turn
X To indicate: press the combination switch
in desired direction : or ; until it
engages.
The combination switch automatically
returns to its original position after large
steering movements.
X To indicate briefly: press the combination
switch briefly in desired direction : or ;.
The corresponding turn signal flashes three
times. High-beam headlamps and high-beam
flasher :
High-beam headlamps
; High-beam flasher
X To switch on the high-beam headlamps:
turn the light switch to
L or Ã.
X Press the combination switch forwards :.
The K indicator lamp in the instrument
cluster lights up.
i In the à position, the high-beam head-
lamps are only switched on when it is dark
and the engine is running.
X To switch off the high-beam headlamps:
move the combination switch back to its
normal position.
The K indicator lamp in the instrument
cluster goes out.
X To flash the headlamps: turn the key to
position 1 or 2 in the ignition lock.
X Pull the combination switch briefly in direc-
tion of arrow ;. Hazard warning lamps
G
WARNING
If you open the rear-end doors 90°, the rear
lighting systems are no longer visible. The
vehicle will then be difficult for other road
users to see or will not be seen by them at
all, particularly if it is dark or visibility is
poor. There is a risk of an accident.
You should therefore ensure in this and simi-
lar situations that the vehicle is visible from
the rear in accordance with the relevant
national regulations, by using the warning
triangle, for instance. Exterior lighting
101
Lights and windshield wipers Z
Page 104 of 320
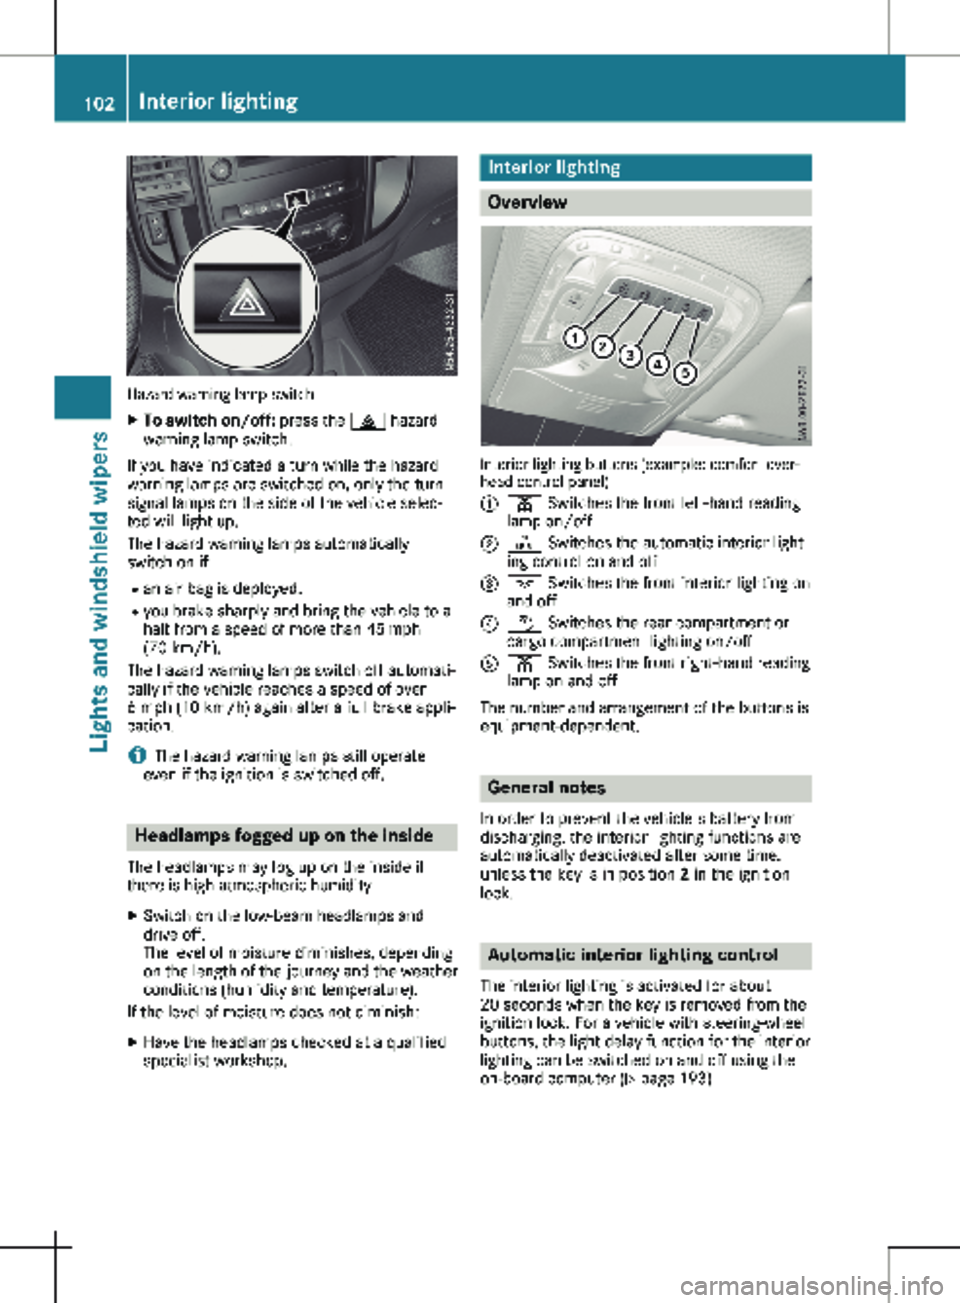
Hazard warning lamp switch
X
To switch on/off: press the £ hazard
warning lamp switch.
If you have indicated a turn while the hazard
warning lamps are switched on, only the turn
signal lamps on the side of the vehicle selec-
ted will light up.
The hazard warning lamps automatically
switch on if: R an air bag is deployed.
R you brake sharply and bring the vehicle to a
halt from a speed of more than 45 mph
(70 km/h
).
The hazard warning lamps switch off automati-
cally if the vehicle reaches a speed of over
6 mph (10 km/h) again after a full brake appli-
cation.
i The hazard warning lamps still operate
even if the ignition is switched off. Headlamps fogged up on the inside
The headlamps may fog up on the inside if
there is high atmospheric humidity.
X Switch on the low-beam headlamps and
drive off.
The level of moisture diminishes, depending
on the length of the journey and the weather
conditions (humidity and temperature).
If the level of moisture does not diminish:
X Have the headlamps checked at a qualified
specialist workshop. Interior lighting
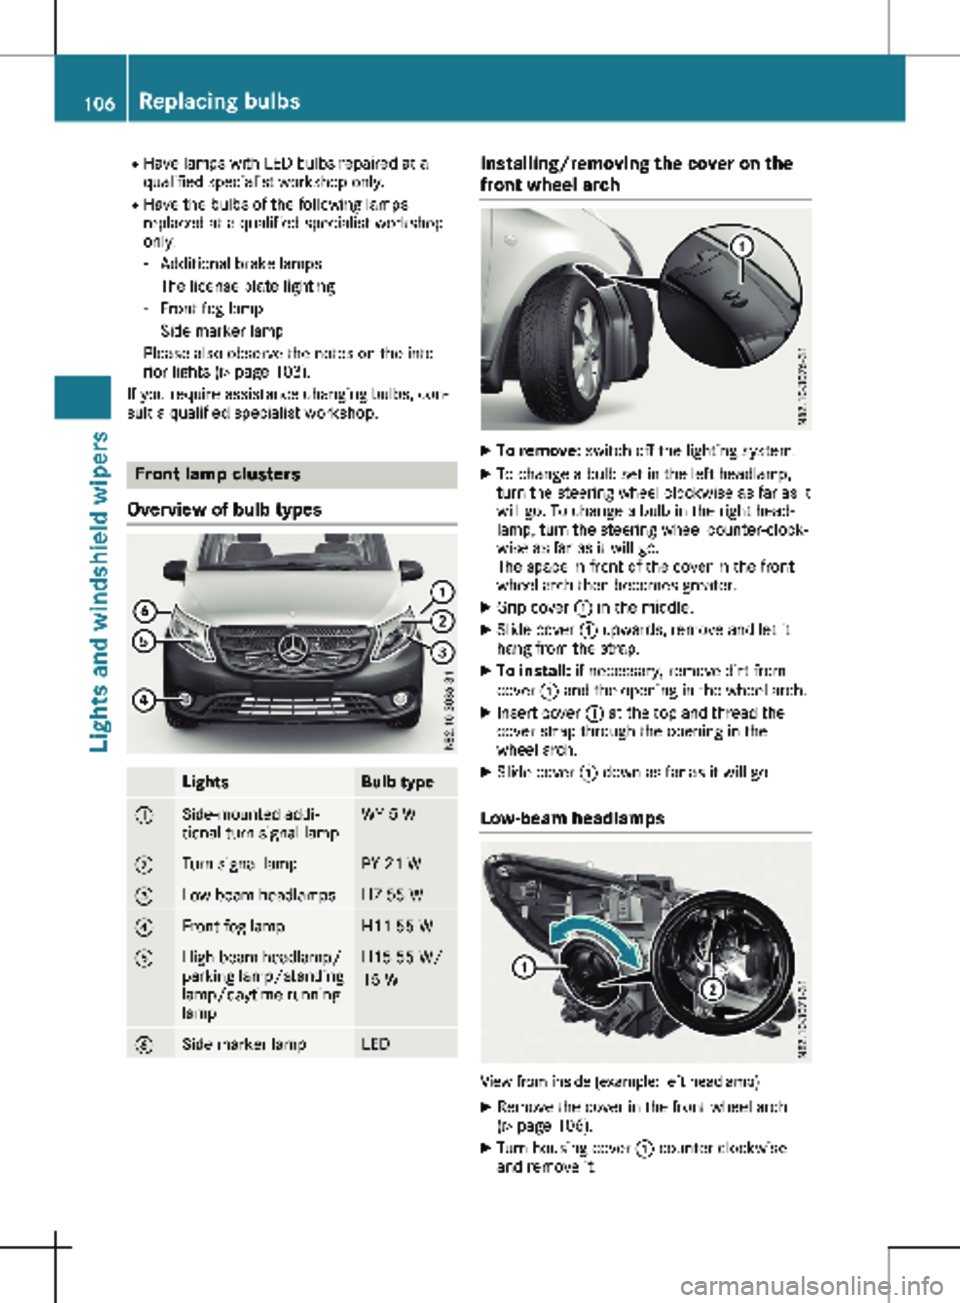
Overview
Interior lighting buttons (example: comfort over-
head control panel)
:
p Switches the front left-hand reading
lamp on/off
; | Switches the automatic interior light-
ing control on and off
= c Switches the front interior lighting on
and off
? w Switches the rear compartment or
cargo compartment lighting on/off
A p Switches the front right-hand reading
lamp on and off
The number and arrangement of the buttons is
equipment-dependent. General notes
In order to prevent the vehicle's battery from
discharging, the interior lighting functions are
automatically deactivated after some time,
unless the key is in position 2 in the ignition
lock. Automatic interior lighting control
The interior lighting is activated for about
20 seconds
when the key is removed from the
ignition lock. For a vehicle with steering-wheel
buttons, the light delay function for the interior
lighting can be switched on and off using the
on-board computer ( Y page 193)102
Interior lighting
Lights and windshield wipers
Page 108 of 320
R
Have lamps with LED bulbs repaired at a
qualified specialist workshop only.
R Have the bulbs of the following lamps
replaced at a qualified specialist workshop
only:
- Additional brake lamps
- The license plate lighting
- Front fog lamp
- Side marker lamp
Please also observe the notes on the inte-
rior lights
(Y page 103).
If you require assistance changing bulbs, con-
sult a qualified specialist workshop. Front lamp clusters
Overview of bulb types Lights Bulb type
:
Side-mounted addi-
tional turn signal lamp WY 5 W
;
Turn signal lamp PY 21 W
=
Low-beam headlamps H7 55 W
?
Front fog lamp H11 55 W
A
High-beam headlamp/
parking lamp/standing
lamp/daytime running
lamp H15 55 W/
15 W
B
Side marker lamp LED Installing/removing the cover on the
front wheel arch
X
To remove: switch off the lighting system.
X To change a bulb set in the left headlamp,
turn the steering wheel clockwise as far as it
will go. To change a bulb in the right head-
lamp, turn the steering wheel counter-clock-
wise as far as it will go.
The space in front of the cover in the front
wheel arch then becomes greater.
X Grip cover : in the middle.
X Slide cover : upwards, remove and let it
hang from the strap.
X To install: if necessary, remove dirt from
cover : and the opening in the wheel arch.
X Insert cover : at the top and thread the
cover strap through the opening in the
wheel arch.
X Slide cover : down as far as it will go.
Low-beam headlamps View from inside (example: left headlamp)
X Remove the cover in the front wheel arch
(Y page
106).
X Turn housing cover : counter-clockwise
and remove it. 106
Replacing bulbs
Lights and windshield wipers
Page 109 of 320
X
Turn socket ; for low-beam headlamps
counter-clockwise and remove it.
X Remove the bulb from socket ;.
X Insert a new bulb into socket ;.
X Insert socket ; and tighten by turning
clockwise.
X Press on housing cover : and tighten by
turning clockwise.
X Replace the cover in the front wheel arch
(Y page
106).
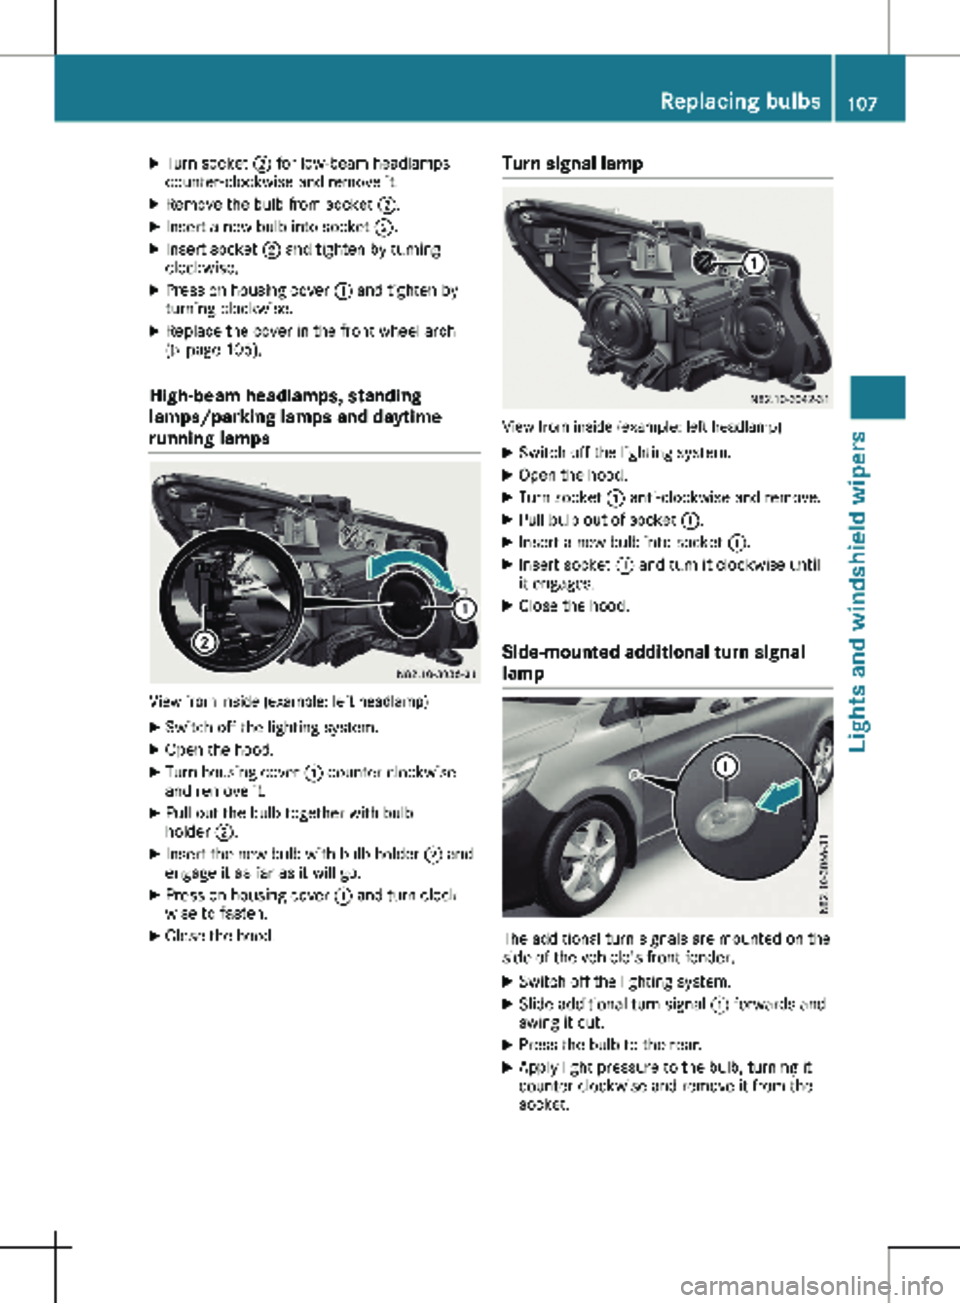
High-beam headlamps, standing
lamps/parking lamps and daytime
running lamps View from inside (example: left headlamp)
X Switch off the lighting system.
X Open the hood.
X Turn housing cover : counter-clockwise
and remove it.
X Pull out the bulb together with bulb
holder ;.
X Insert the new bulb with bulb holder ; and
engage it as far as it will go.
X Press on housing cover : and turn clock-
wise to fasten.
X Close the hood. Turn signal lamp View from inside (example: left headlamp)
X Switch off the lighting system.
X Open the hood.
X Turn socket : anti-clockwise and remove.
X Pull bulb out of socket :.
X Insert a new bulb into socket :.
X Insert socket : and turn it clockwise until
it engages.
X Close the hood.
Side-mounted additional turn signal
lamp The additional turn signals are mounted on the
side of the vehicle's front fender.
X Switch off the lighting system.
X Slide additional turn signal : forwards and
swing it out.
X Press the bulb to the rear.
X Apply light pressure to the bulb, turning it
counter-clockwise and remove it from the
socket. Replacing bulbs
107
Lights and windshield wipers Z