MERCEDES-BENZ ML350 1997 Complete Repair Manual
ML350 1997
MERCEDES-BENZ
MERCEDES-BENZ
https://www.carmanualsonline.info/img/4/57306/w960_57306-0.png
MERCEDES-BENZ ML350 1997 Complete Repair Manual
Trending: four wheel drive, interior lights, dimensions, fuel type, washer fluid, 4WD, rear view mirror
Page 2611 of 4133
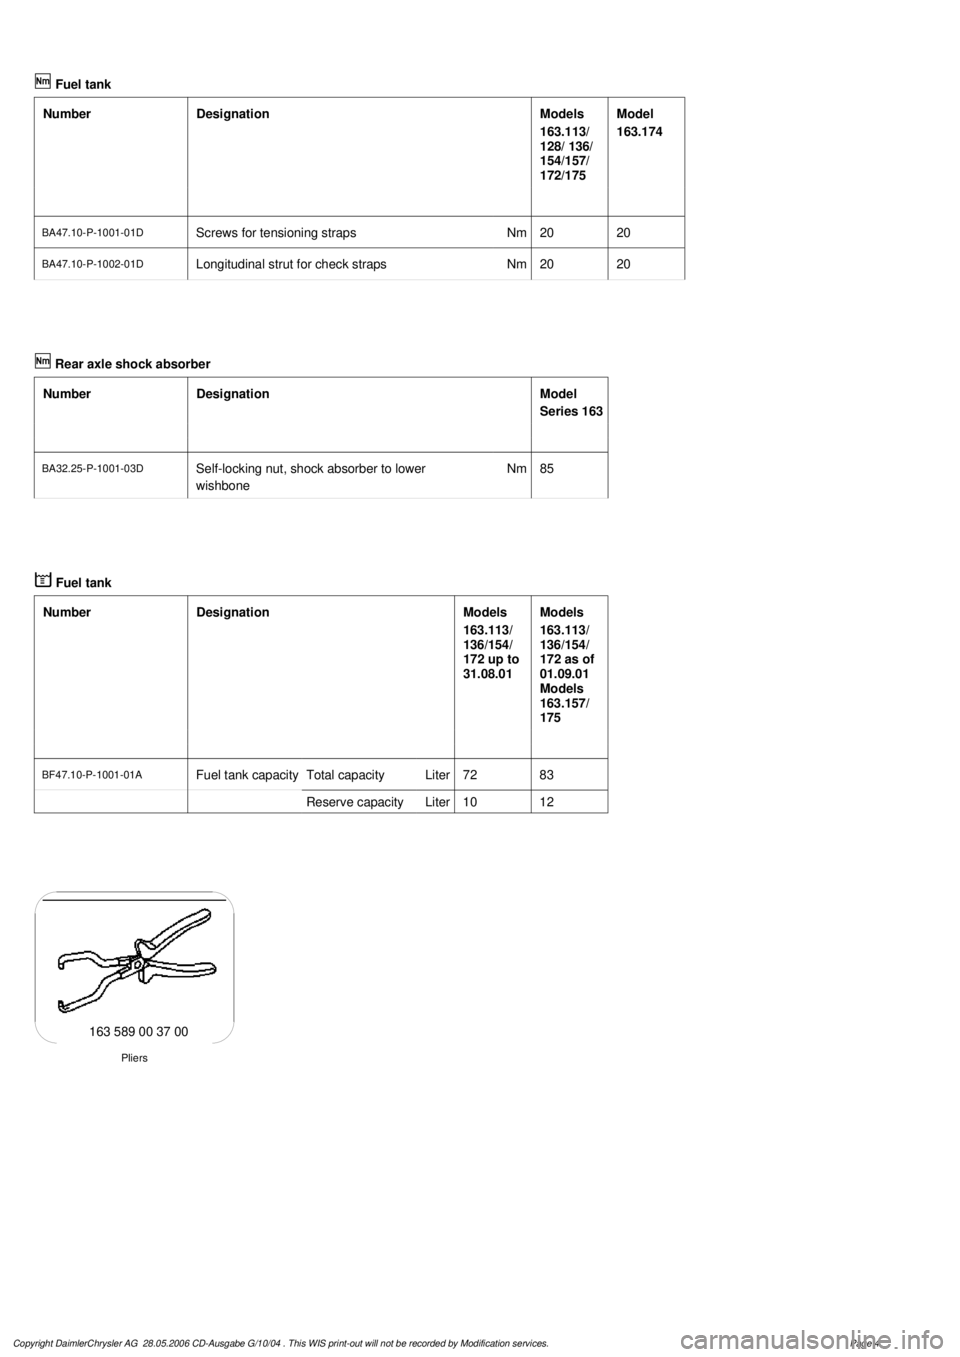
Fuel tank
Number
Designation
Models
163.113/
128/ 136/
154/157/
172/175
Model
163.174
BA47.10-P-1001-01D
Screws for tensioning straps
Nm
2020
BA47.10-P-1002-01D
Longitudinal strut for check straps
Nm
2020
Rear axle shock absorber
Number
Designation
Model
Series 163
BA32.25-P-1001-03D
Self-locking nut, shock absorber to lower
wishbone
Nm
85
Fuel tank
Number
Designation
Models
163.113/
136/154/
172 up to
31.08.01
Models
163.113/
136/154/
172 as of
01.09.01
Models
163.157/
175
BF47.10-P-1001-01A
Fuel tank capacity
Total capacity
Liter
7283
Reserve capacity
Liter
1012
Pliers
163 589 00 37 00
Copyright DaimlerChrysler AG 28.05.2006 CD-Ausgabe G/10/04 . This WIS print-out will not be recorde
d by Modification services.
Page 4
Page 2612 of 4133
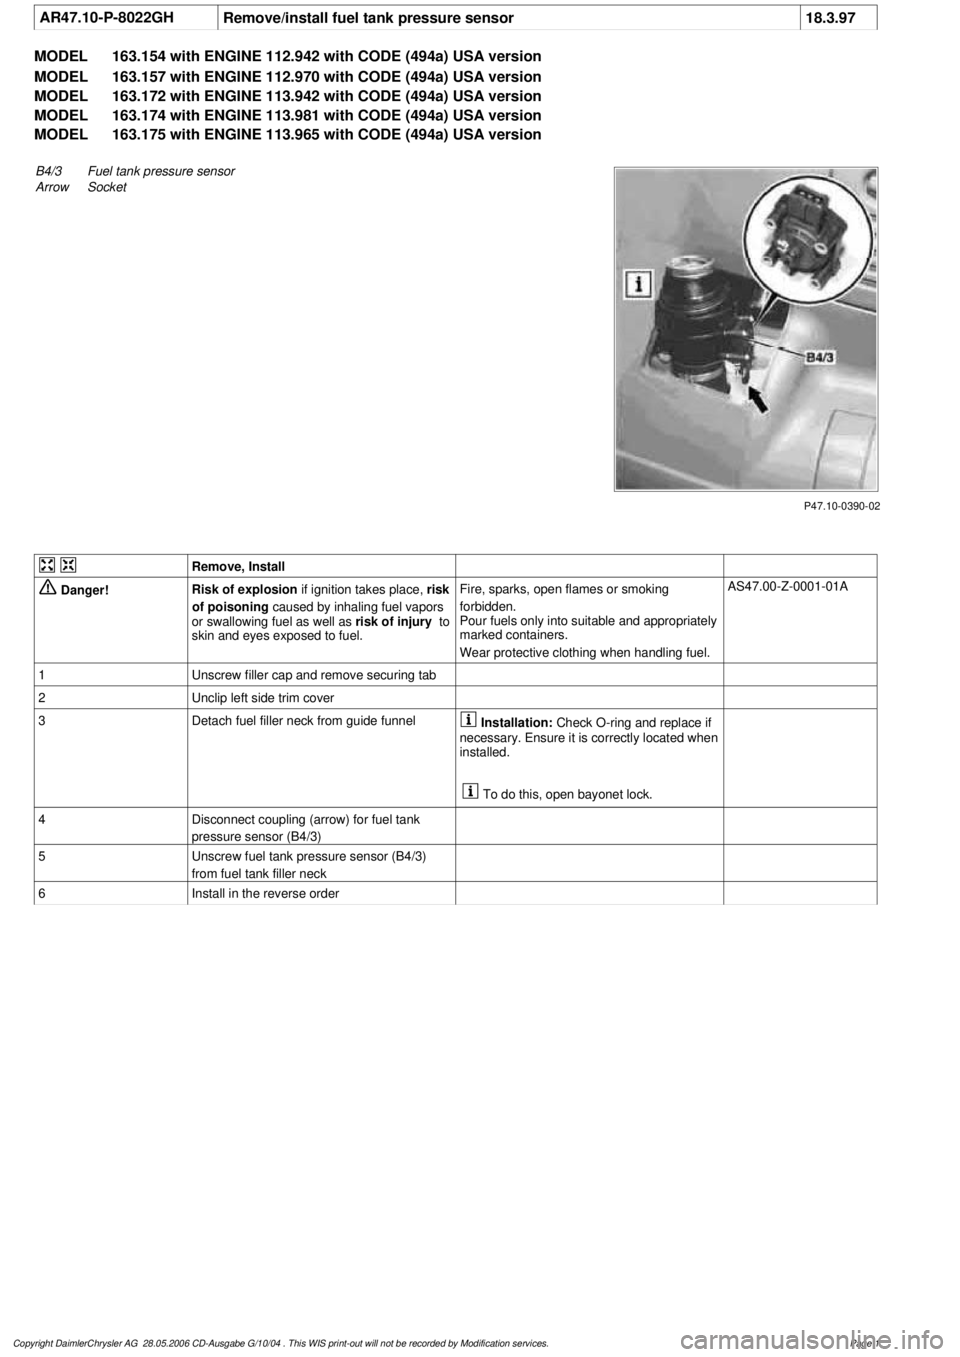
AR47.10-P-8022GH
Remove/install fuel tank pressure sensor
18.3.97
MODEL
163.154 with ENGINE 112.942 with CODE (494a) USA version
MODEL
163.157 with ENGINE 112.970 with CODE (494a) USA version
MODEL
163.172 with ENGINE 113.942 with CODE (494a) USA version
MODEL
163.174 with ENGINE 113.981 with CODE (494a) USA version
MODEL
163.175 with ENGINE 113.965 with CODE (494a) USA version
P47.10-0390-02
B4/3Fuel tank pressure sensor
Arrow
Socket
Remove, Install
Danger!
Risk of explosion
if ignition takes place,
risk
of poisoning
caused by inhaling fuel vapors
or swallowing fuel as well as
risk of injury
to
skin and eyes exposed to fuel.
Fire, sparks, open flames or smoking
forbidden.
Pour fuels only into suitable and appropriately
marked containers.
Wear protective clothing when handling fuel.
AS47.00-Z-0001-01A
1
Unscrew filler cap and remove securing tab
2
Unclip left side trim cover
3
Detach fuel filler neck from guide funnel
Installation:
Check O-ring and replace if
necessary. Ensure it is correctly located when
installed.
To do this, open bayonet lock.
4
Disconnect coupling (arrow) for fuel tank
pressure sensor (B4/3)
5
Unscrew fuel tank pressure sensor (B4/3)
from fuel tank filler neck
6
Install in the reverse order
Copyright DaimlerChrysler AG 28.05.2006 CD-Ausgabe G/10/04 . This WIS print-out will not be recorde
d by Modification services.
Page 1
Page 2613 of 4133
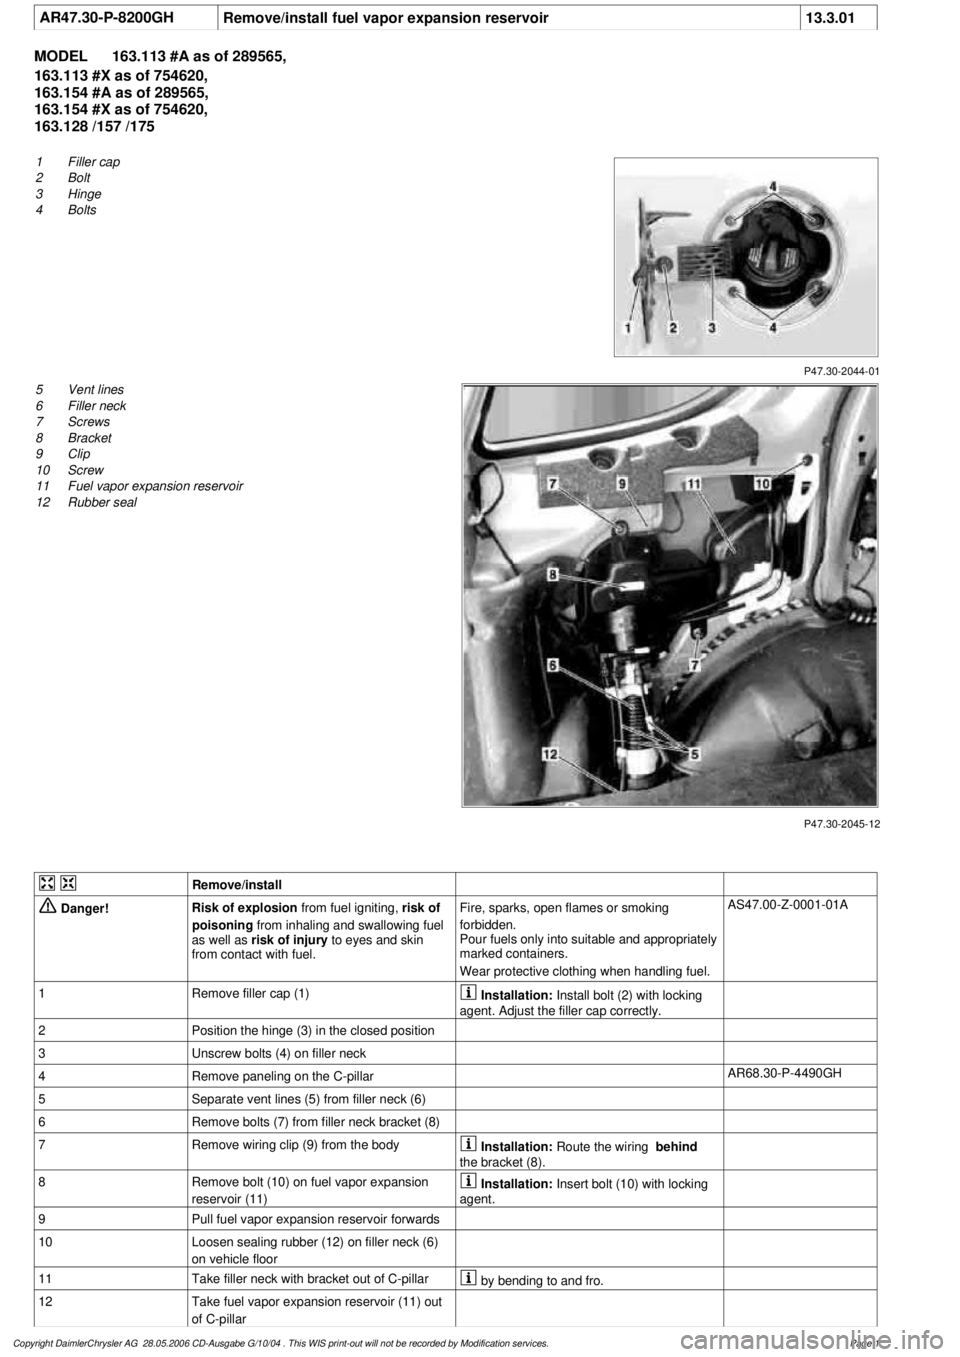
AR47.30-P-8200GH
Remove/install fuel vapor expansion reservoir
13.3.01
MODEL
163.113 #A as of 289565,
163.113 #X as of 754620,
163.154 #A as of 289565,
163.154 #X as of 754620,
163.128 /157 /175
P47.30-2044-01
1
Filler cap
2
Bolt
3
Hinge
4
Bolts
P47.30-2045-12
5
Vent lines
6
Filler neck
7
Screws
8
Bracket
9
Clip
10
Screw
11
Fuel vapor expansion reservoir
12
Rubber seal
Remove/install
Danger!
Risk of explosion
from fuel igniting,
risk of
poisoning
from inhaling and swallowing fuel
as well as
risk of injury
to eyes and skin
from contact with fuel.
Fire, sparks, open flames or smoking
forbidden.
Pour fuels only into suitable and appropriately
marked containers.
Wear protective clothing when handling fuel.
AS47.00-Z-0001-01A
1
Remove filler cap (1)
Installation:
Install bolt (2) with locking
agent. Adjust the filler cap correctly.
2
Position the hinge (3) in the closed position
3
Unscrew bolts (4) on filler neck
4
Remove paneling on the C-pillar
AR68.30-P-4490GH
5
Separate vent lines (5) from filler neck (6)
6
Remove bolts (7) from filler neck bracket (8)
7
Remove wiring clip (9) from the body
Installation:
Route the wiring
behind
the bracket (8).
8
Remove bolt (10) on fuel vapor expansion
reservoir (11)
Installation:
Insert bolt (10) with locking
agent.
9
Pull fuel vapor expansion reservoir forwards
10
Loosen sealing rubber (12) on filler neck (6)
on vehicle floor
11
Take filler neck with bracket out of C-pillar
by bending to and fro.
12
Take fuel vapor expansion reservoir (11) out
of C-pillar
Copyright DaimlerChrysler AG 28.05.2006 CD-Ausgabe G/10/04 . This WIS print-out will not be recorde
d by Modification services.
Page 1
Page 2614 of 4133
13
Install in the reverse order
Copyright DaimlerChrysler AG 28.05.2006 CD-Ausgabe G/10/04 . This WIS print-out will not be recorde
d by Modification services.
Page 2
Page 2615 of 4133
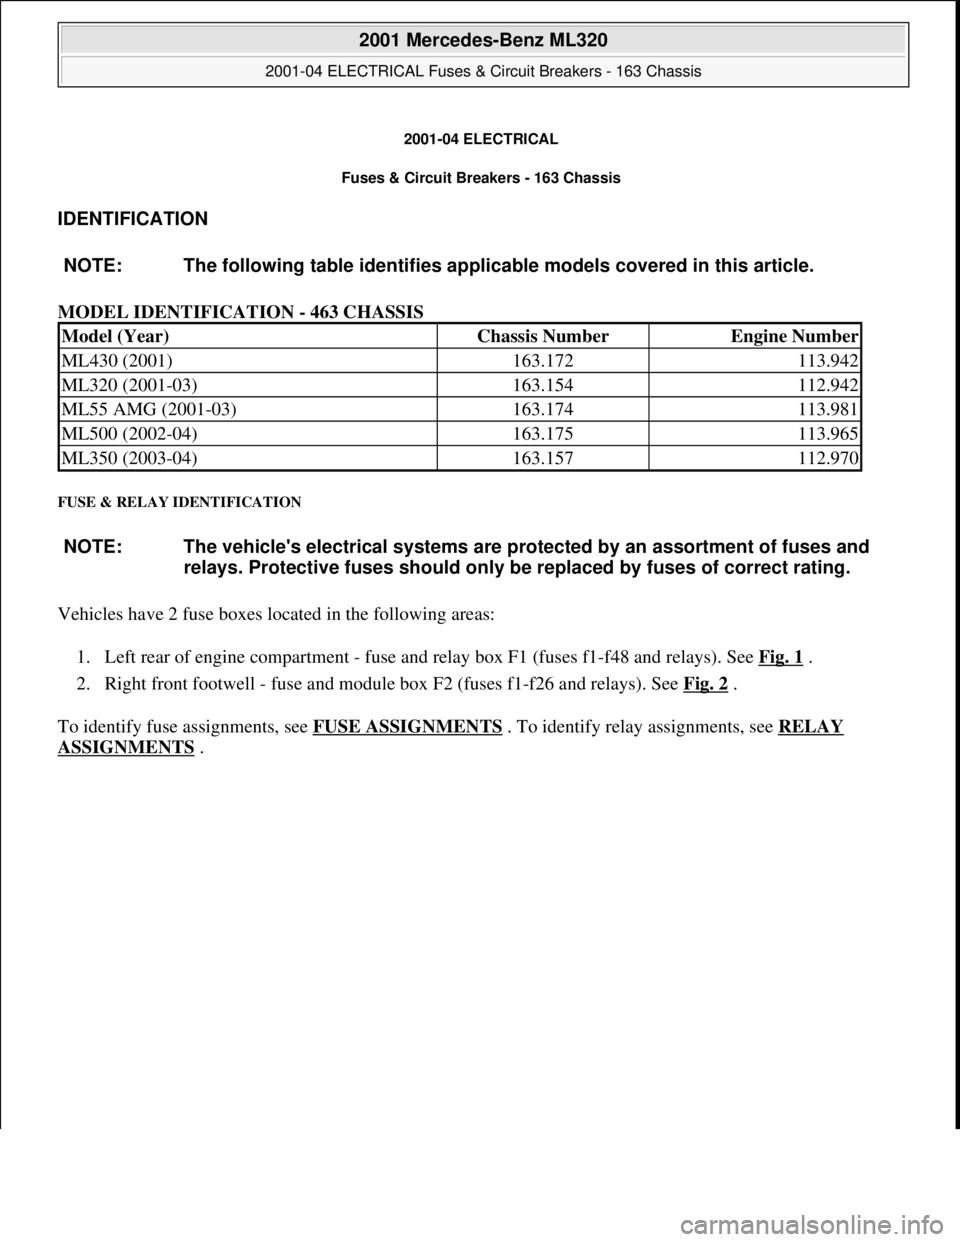
2001-04 ELECTRICAL
Fuses & Circuit Breakers - 163 Chassis
IDENTIFICATION
MODEL IDENTIFICATION - 463 CHASSIS
FUSE & RELAY IDENTIFICATION
Vehicles have 2 fuse boxes located in the following areas:
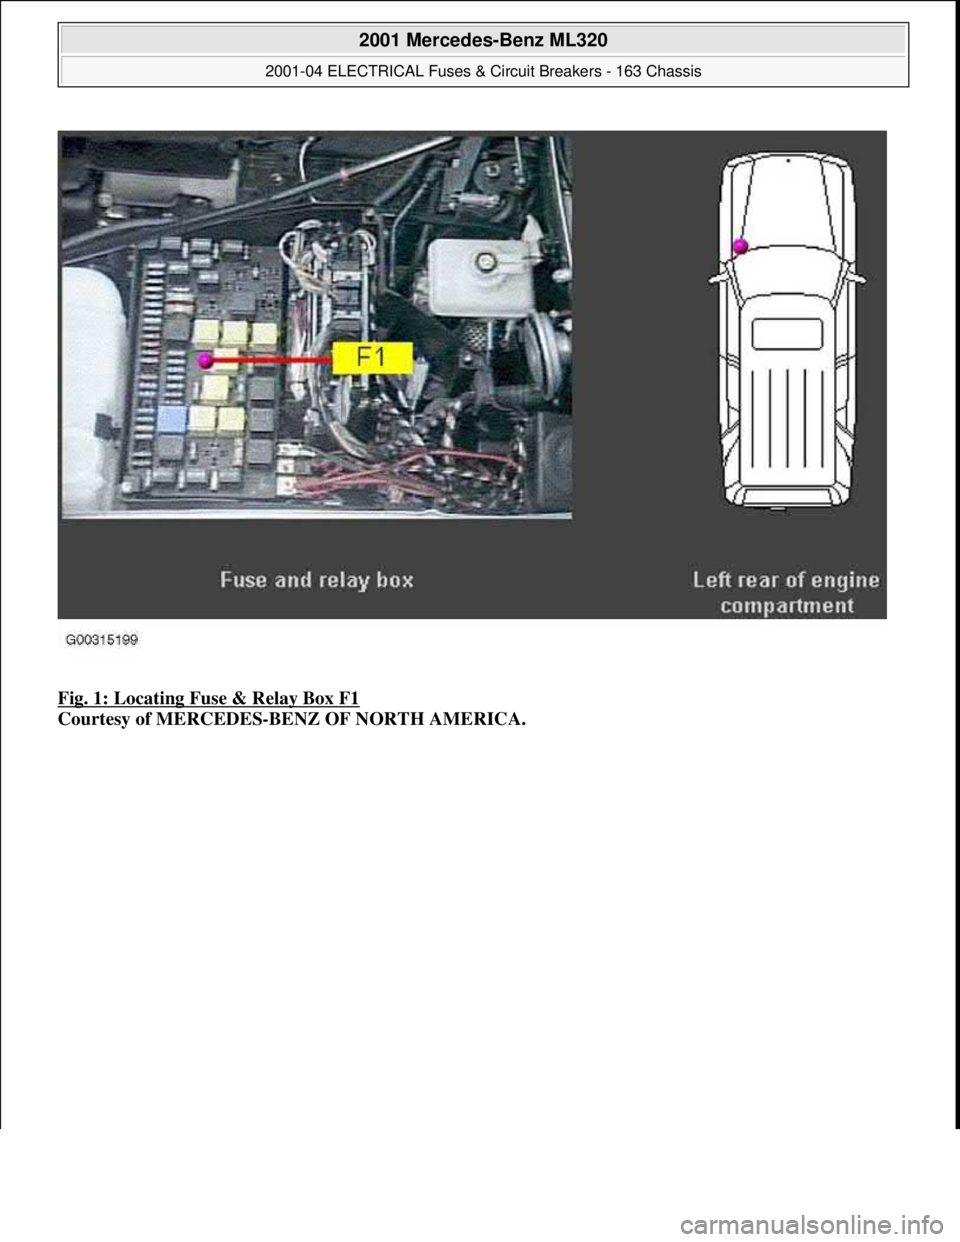
1. Left rear of engine compartment - fuse and relay box F1 (fuses f1-f48 and relays). See Fig. 1
.
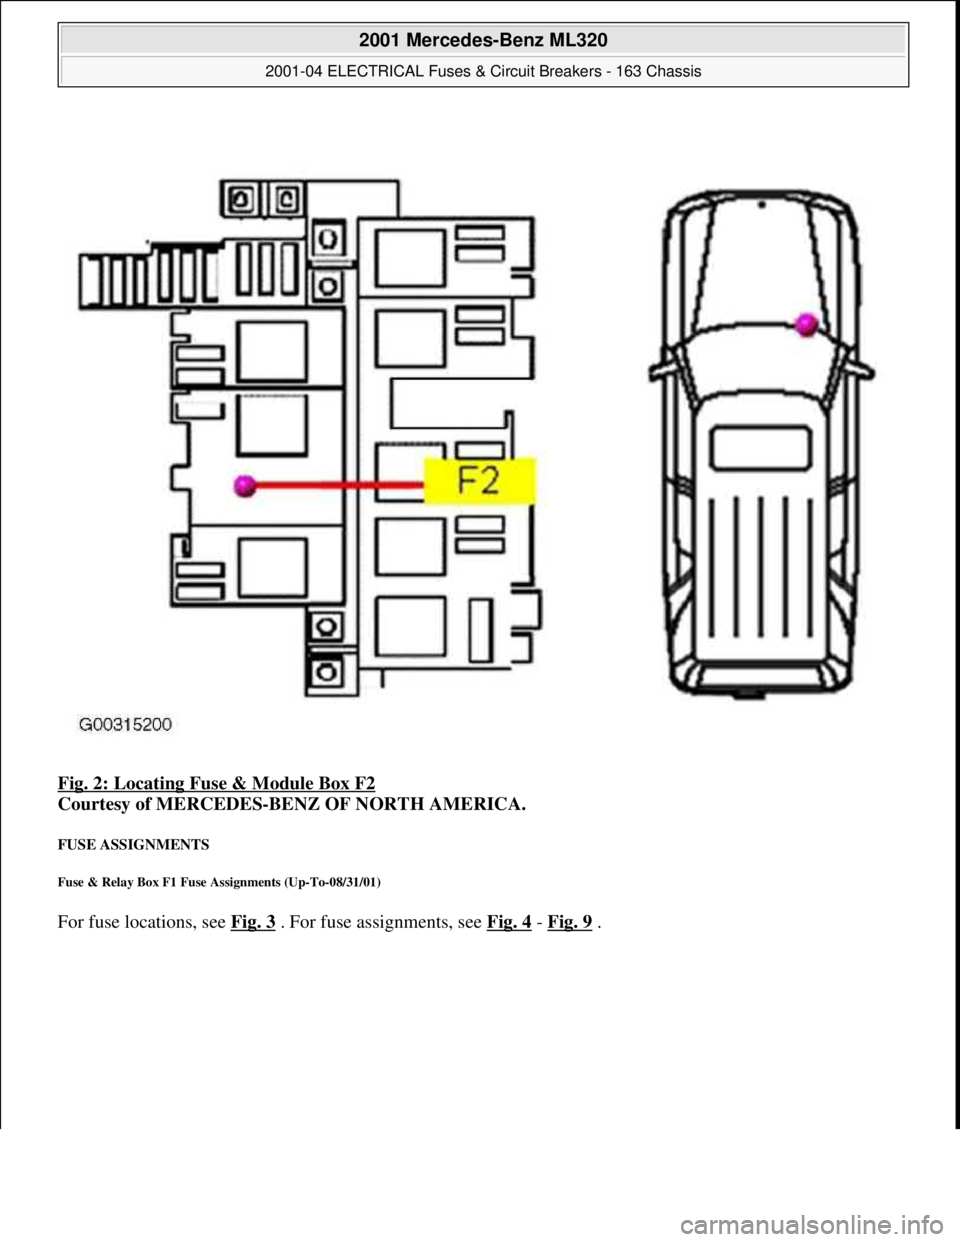
2. Right front footwell - fuse and module box F2 (fuses f1-f26 and relays). See Fig. 2
.
To identify fuse assignments, see FUSE ASSIGNMENTS
. To identify relay assignments, see RELAY
ASSIGNMENTS . NOTE: The following table identifies applicable models covered in this article.
Model (Year)Chassis NumberEngine Number
ML430 (2001)163.172113.942
ML320 (2001-03)163.154112.942
ML55 AMG (2001-03)163.174113.981
ML500 (2002-04)163.175113.965
ML350 (2003-04)163.157112.970
NOTE: The vehicle's electrical systems are protected by an assortment of fuses and
relays. Protective fuses should only be replaced by fuses of correct rating.
2001 Mercedes-Benz ML320
2001-04 ELECTRICAL Fuses & Circuit Breakers - 163 Chassis
2001 Mercedes-Benz ML320
2001-04 ELECTRICAL Fuses & Circuit Breakers - 163 Chassis
me
Saturday, October 02, 2010 3:22:06 PMPage 1 © 2006 Mitchell Repair Information Company, LLC.
me
Saturday, October 02, 2010 3:22:09 PMPage 1 © 2006 Mitchell Repair Information Company, LLC.
Page 2616 of 4133
Fig. 1: Locating Fuse & Relay Box F1
Courtesy of MERCEDES-BENZ OF NORTH AMERICA.
2001 Mercedes-Benz ML320
2001-04 ELECTRICAL Fuses & Circuit Breakers - 163 Chassis
me
Saturday, October 02, 2010 3:22:06 PMPage 2 © 2006 Mitchell Repair Information Company, LLC.
Page 2617 of 4133
Fig. 2: Locating Fuse & Module Box F2
Courtesy of MERCEDES-BENZ OF NORTH AMERICA.
FUSE ASSIGNMENTS
Fuse & Relay Box F1 Fuse Assignments (Up-To-08/31/01)
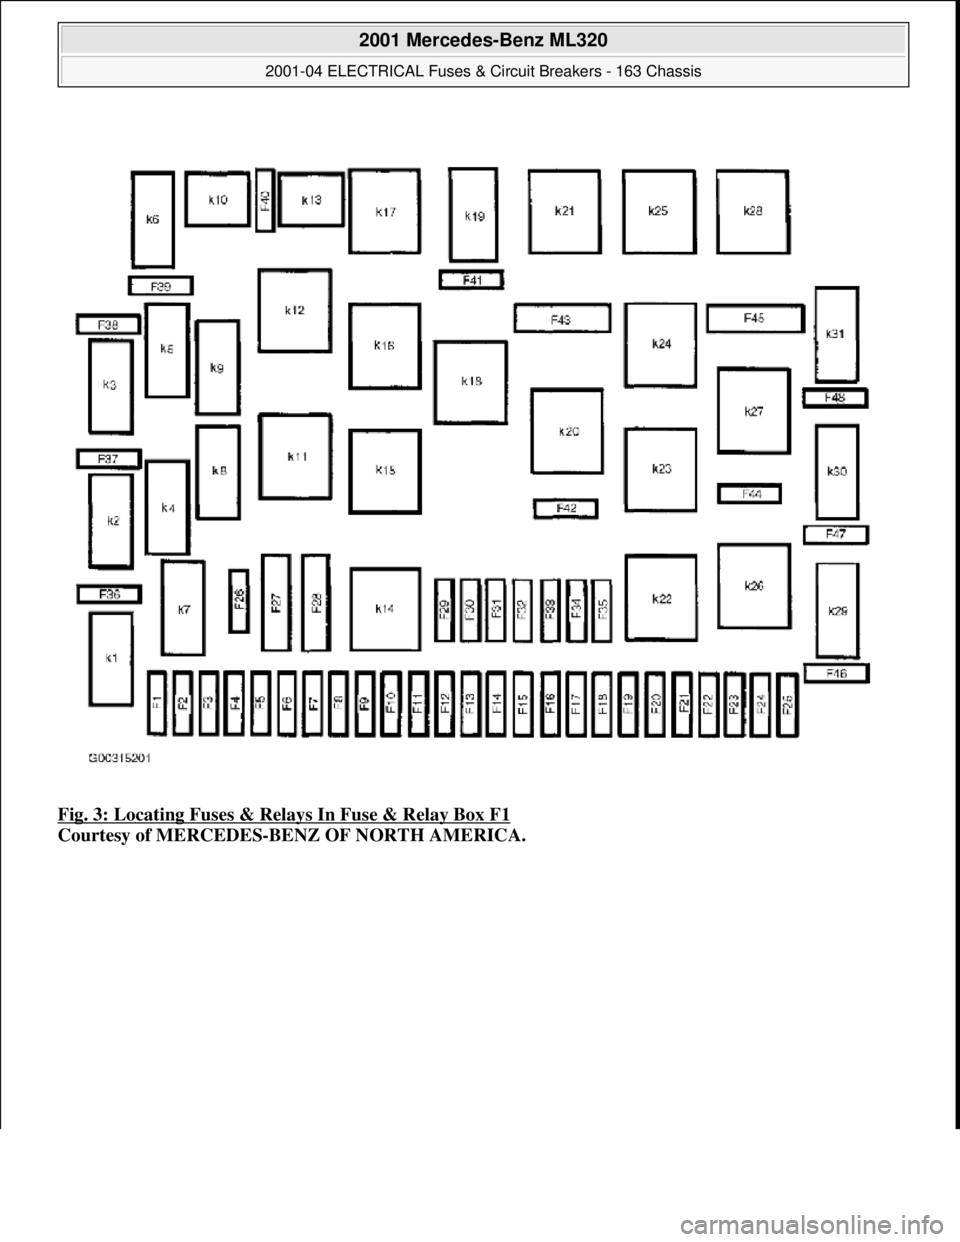
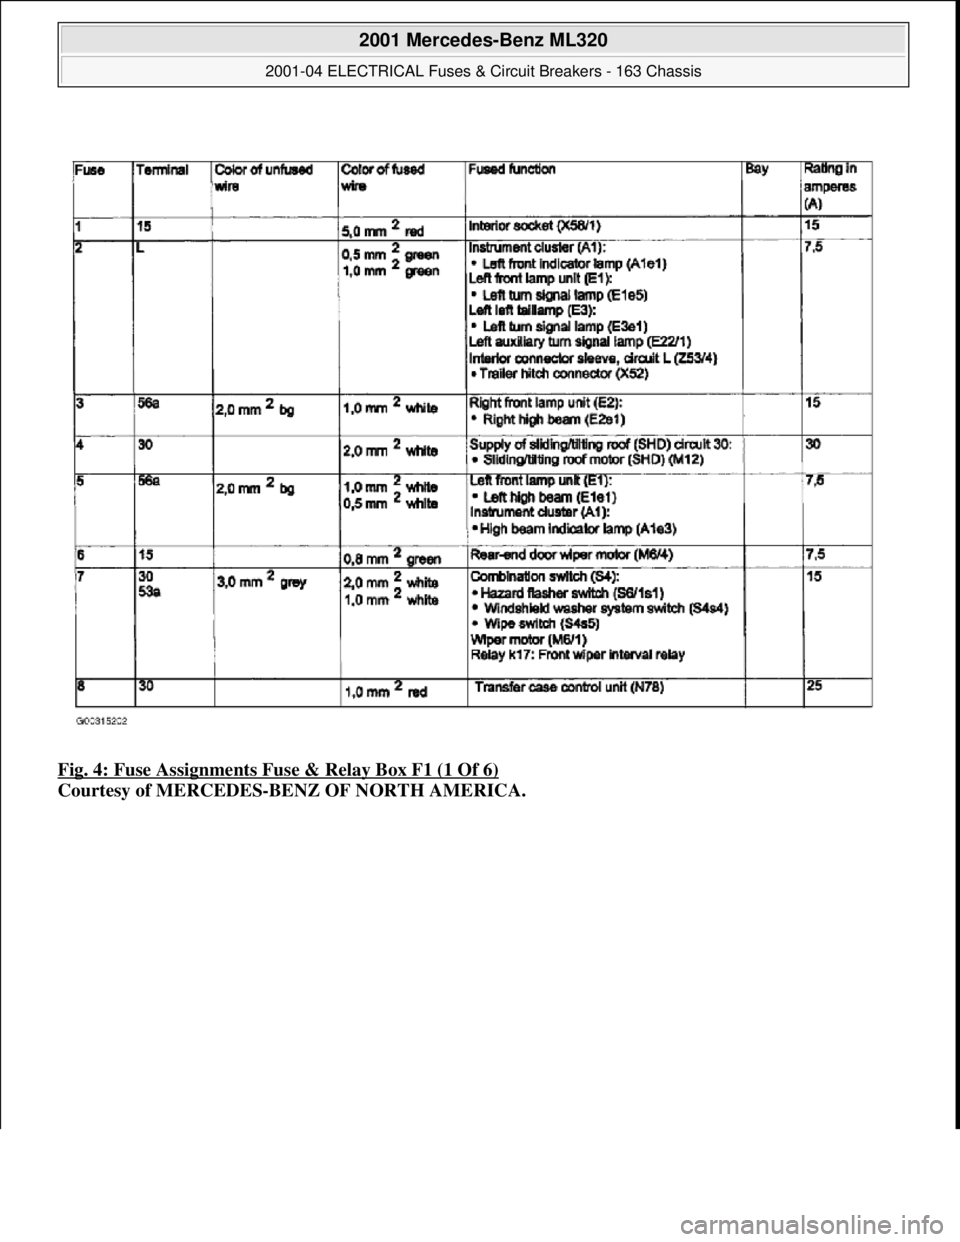
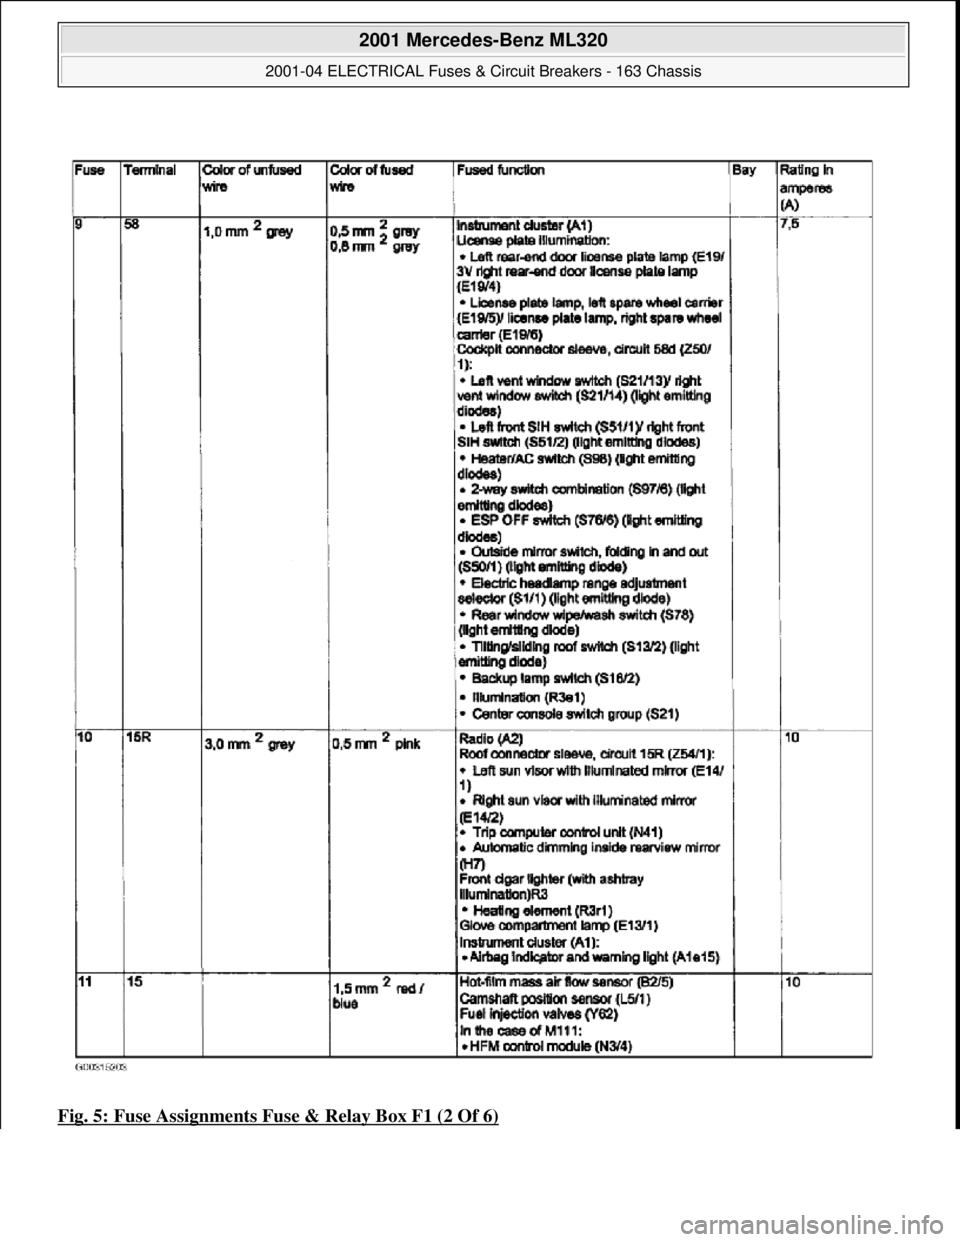
For fuse locations, see Fig. 3 . For fuse assignments, see Fig. 4-Fig. 9.
2001 Mercedes-Benz ML320
2001-04 ELECTRICAL Fuses & Circuit Breakers - 163 Chassis
me
Saturday, October 02, 2010 3:22:06 PMPage 3 © 2006 Mitchell Repair Information Company, LLC.
Page 2618 of 4133
Fig. 3: Locating Fuses & Relays In Fuse & Relay Box F1
Courtesy of MERCEDES-BENZ OF NORTH AMERICA.
2001 Mercedes-Benz ML320
2001-04 ELECTRICAL Fuses & Circuit Breakers - 163 Chassis
me
Saturday, October 02, 2010 3:22:06 PMPage 4 © 2006 Mitchell Repair Information Company, LLC.
Page 2619 of 4133
Fig. 4: Fuse Assignments Fuse & Relay Box F1 (1 Of 6)
Courtesy of MERCEDES-BENZ OF NORTH AMERICA.
2001 Mercedes-Benz ML320
2001-04 ELECTRICAL Fuses & Circuit Breakers - 163 Chassis
me
Saturday, October 02, 2010 3:22:06 PMPage 5 © 2006 Mitchell Repair Information Company, LLC.
Page 2620 of 4133
Fig. 5: Fuse Assignments Fuse & Relay Box F1 (2 Of 6)
2001 Mercedes-Benz ML320
2001-04 ELECTRICAL Fuses & Circuit Breakers - 163 Chassis
me
Saturday, October 02, 2010 3:22:06 PMPage 6 © 2006 Mitchell Repair Information Company, LLC.
Trending: radio, wheel alignment, service schedule, key, MPG, tire type, jump start terminals
