MERCEDES-BENZ ML430 1997 Complete Repair Manual
Manufacturer: MERCEDES-BENZ, Model Year: 1997, Model line: ML430, Model: MERCEDES-BENZ ML430 1997Pages: 4133, PDF Size: 88.89 MB
Page 2661 of 4133
NOTES ON REPLACING SAFETY - RELEVANT COMPONENTS - AH00.19-P-1000-02A
General
With the approval of repair solutions for wiring harnesses (in particular airbag, side airbag, window airbag,
emergency tensioning retractor wiring harness), it is necessary to introduce a modified ordering routine for
procuring safety-relevant components. The order formalities are by and large the same as those which are
already familiar from theft-relevant components.
Procedure
It is only possible to order safety-relevant components by stating the vehicle ident number (refer parts order
note on the parts microfiche).
The repair orders and invoices should be filed in the usual way.
All orders received for safety-relevant components are additionally automatically documented in Fdok.
ADVANTAGES OF REPAIRING WIRING HARNESSES - AH00.19-P-1000-03A
Model 124, 126, 129, 140, 163, 164, 168, 169, 170, 171, 199, 202, 203, 208, 209, 210, 211, 215, 216, 219, 220,
221, 230, 240, 245, 251, 414, 461, 463
Advantages of repairing wiring harnesses
Wiring harnesses are essentially repaired to reduce repair costs.
If repairs are carried out properly, there is no difference in function or quality between the repaired wiring
harness and a brand new wiring harness.
Repairing wiring harnesses helps to save resources.
This also complies with the "Technical Alliance Center" requirements for less dismantling and
installation cost.
REPAIR METHODS FOR WIRING HARNESSES - AH00.19-P-1000-04A
Model 124, 126, 129, 140, 163, 164, 168, 169, 170, 171, 199, 202, 203, 208, 209, 210, 211, 215, 216, 219, 220,
221, 230, 240, 245, 251, 414, 461, 463
Repair method summary
The following methods have been approved by DaimlerChrysler for repairing wiring harnesses in Mercedes-
Benz passenger cars:
Repair methods:
1.20711.21811.22901.23981.25051.302811.27171.229011.29251.30281.3130
7801.21481.22591.23691.24781.25851.23691.21.27981.29041.30081.32141.3214
2004 Mercedes-Benz ML350
1998-2005 GENINFO Overall vehicle - 163 Chassis
me
Saturday, October 02, 2010 3:47:44 PMPage 16 © 2006 Mitchell Repair Information Company, LLC.
Page 2662 of 4133
Crimping
Solder connection (Raychem)
Axial solder connection (Raychem)
Combination of Raychem and cable tail
Soldering
Insulation displacement method
Flat conductor pliers
Application
Individual cases must be analyzed in detail to decide which method can and cannot be used to repair wiring
harnesses (wires, contacts and connectors).
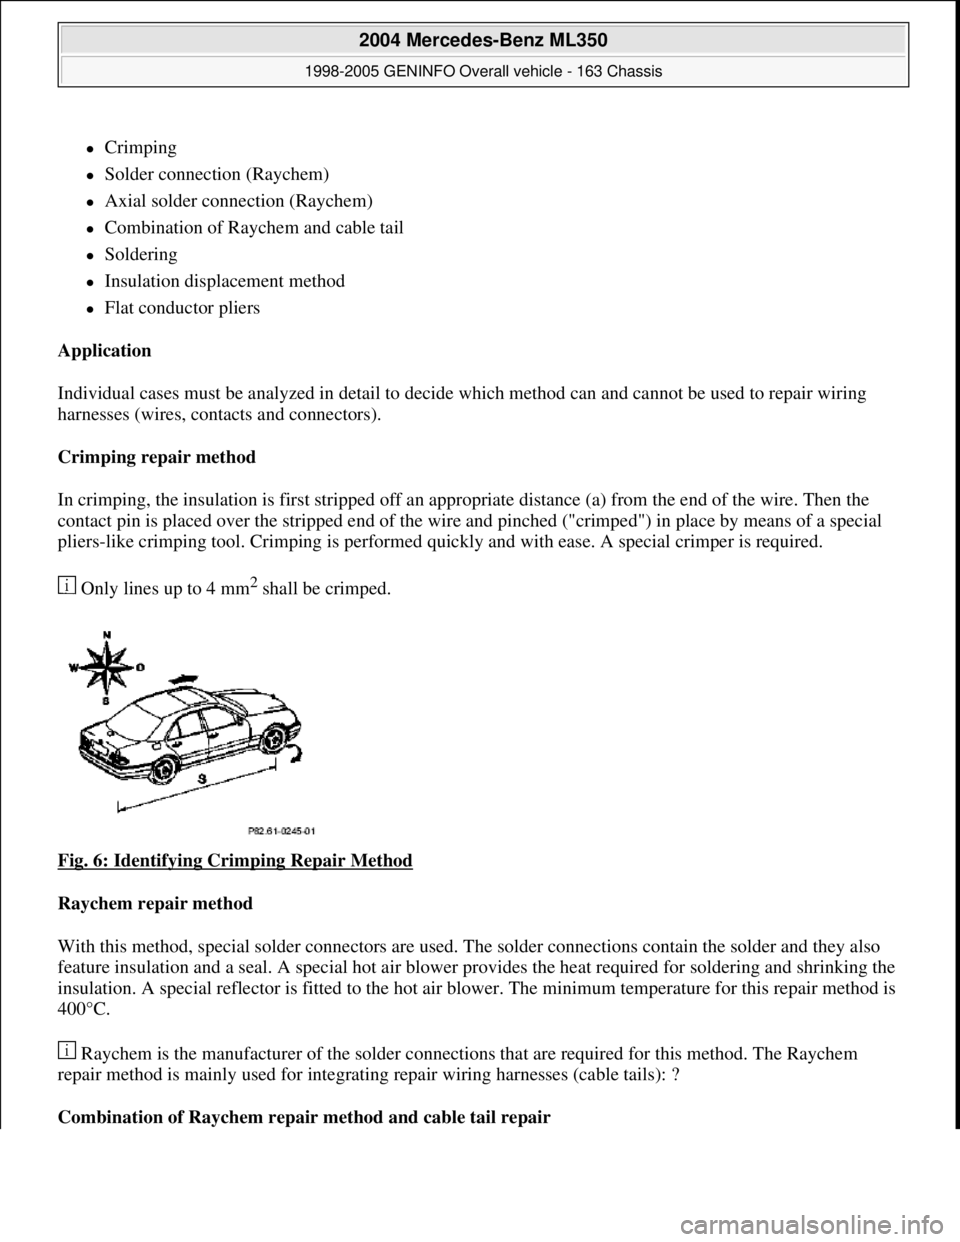
Crimping repair method
In crimping, the insulation is first stripped off an appropriate distance (a) from the end of the wire. Then the
contact pin is placed over the stripped end of the wire and pinched ("crimped") in place by means of a special
pliers-like crimping tool. Crimping is performed quickly and with ease. A special crimper is required.
Only lines up to 4 mm
2 shall be crimped.
Fig. 6: Identifying Crimping Repair Method
Raychem repair method
With this method, special solder connectors are used. The solder connections contain the solder and they also
feature insulation and a seal. A special hot air blower provides the heat required for soldering and shrinking the
insulation. A special reflector is fitted to the hot air blower. The minimum temperature for this repair method is
400°C.
Raychem is the manufacturer of the solder connections that are required for this method. The Raychem
repair method is mainly used for integrating repair wiring harnesses (cable tails): ?
Combination of Raychem repair method and cable tail repair
2004 Mercedes-Benz ML350
1998-2005 GENINFO Overall vehicle - 163 Chassis
me
Saturday, October 02, 2010 3:47:44 PMPage 17 © 2006 Mitchell Repair Information Company, LLC.
Page 2663 of 4133
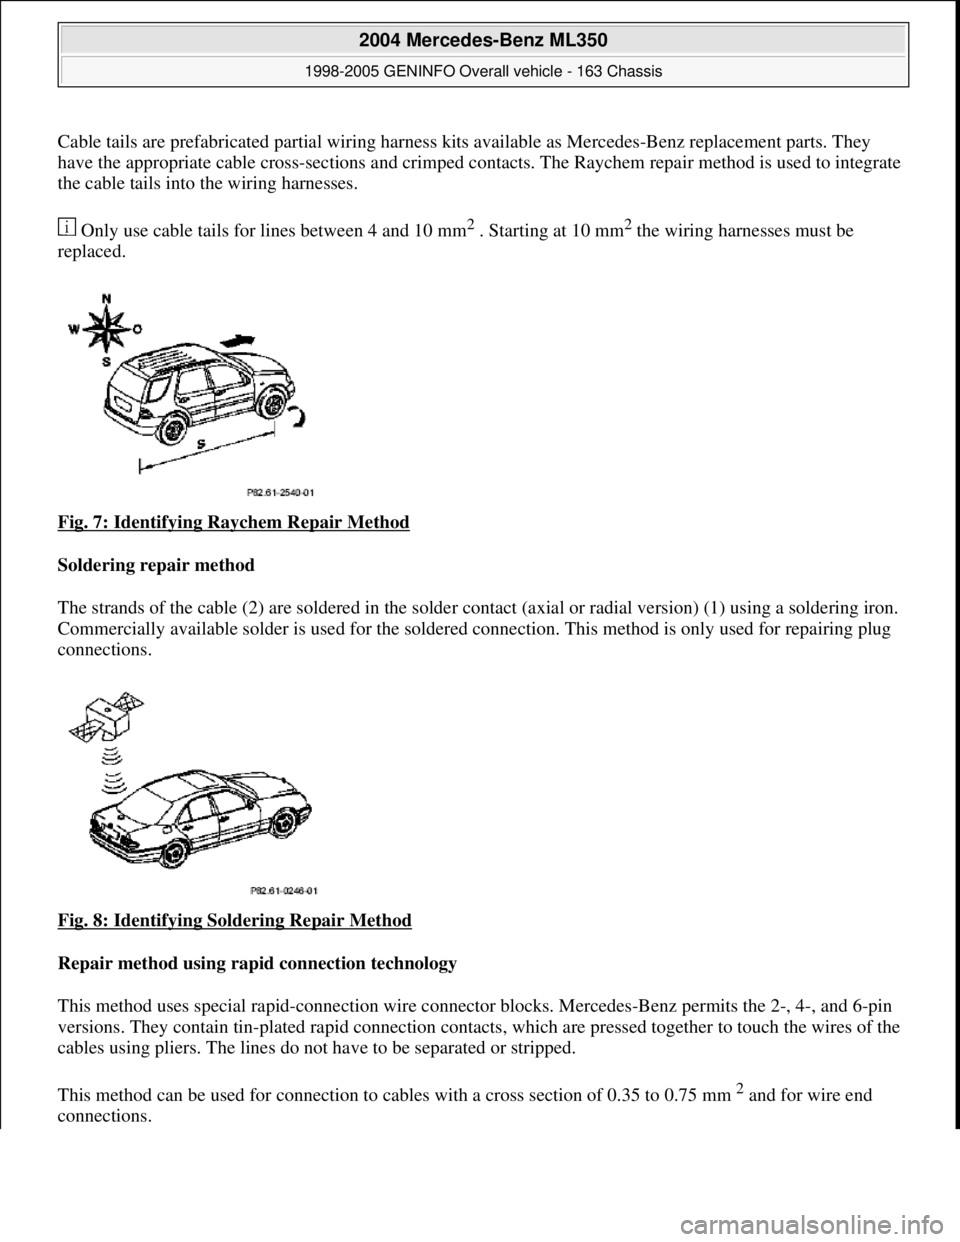
Cable tails are prefabricated partial wiring harness kits available as Mercedes-Benz replacement parts. They
have the appropriate cable cr oss-sections and crimped contacts. The Rayc hem repair method is used to integrate
the cable tails into the wiring harnesses.
Only use cable tails for lines between 4 and 10 mm
2 . Starting at 10 mm2 the wiring harnesses must be
replaced.
Fig. 7: Identifying Raychem Repair Method
Soldering repair method
The strands of the cable (2) are soldered in the solder c ontact (axial or radial version) (1) using a soldering iron.
Commercially available solder is used for the soldered connection. This method is only used for repairing plug
connections.
Fig. 8: Identifying Soldering Repair Method
Repair method using rapid connection technology
This method uses special rapid-connect ion wire connector blocks. Mercedes-Benz permits the 2-, 4-, and 6-pin
versions. They contain tin-plated rapi d connection contacts, which are pressed together to touch the wires of the
cables using pliers. The lines do not ha ve to be separated or stripped.
This method can be used for connection to ca bles with a cross section of 0.35 to 0.75 mm
2 and for wire end
connections.
2004 Mercedes-Benz ML350
1998-2005 GENINFO Overall vehicle - 163 Chassis
me
Saturday, October 02, 2010 3:47:44 PMPage 18 © 2006 Mitchell Repair Information Company, LLC.
Page 2664 of 4133
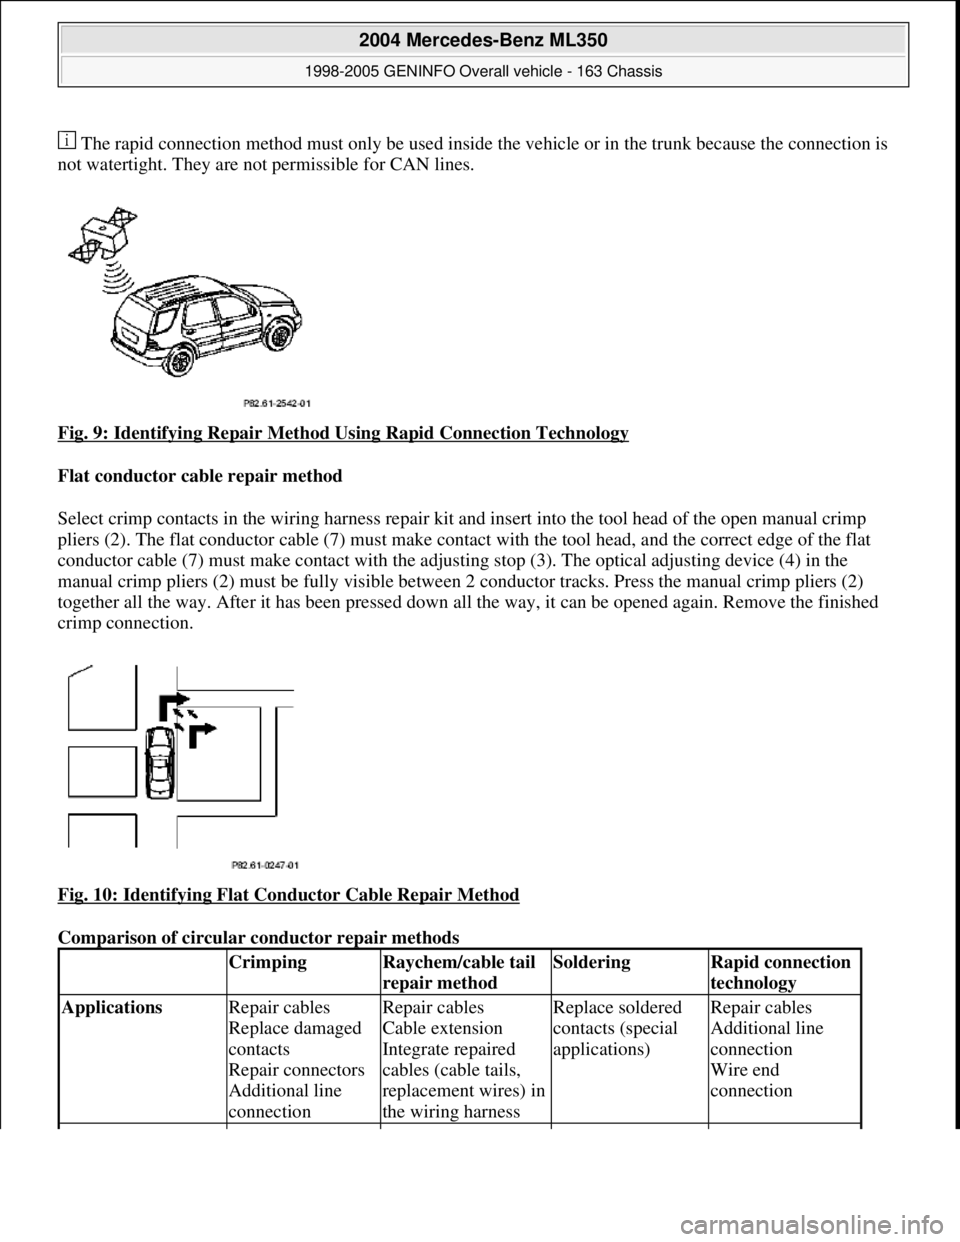
The rapid connection method must only be used inside the vehicle or in the trunk because the connection is
not watertight. They are not permissible for CAN lines.
Fig. 9: Identifying Repair Method Using Rapid Connection Technology
Flat conductor cable repair method
Select crimp contacts in the wiring harness repair kit an d insert into the tool head of the open manual crimp
pliers (2). The flat conductor cable (7) must make contact with the tool head, and the correct edge of the flat
conductor cable (7) must make contac t with the adjusting stop (3). The optical adjusting device (4) in the
manual crimp pliers (2) must be fully visible between 2 conductor tracks. Press the manual crimp pliers (2)
together all the way. After it has been pressed down al l the way, it can be opened again. Remove the finished
crimp connection.
Fig. 10: Identifying Flat Conductor Cable Repair Method
Comparison of circular conductor repair methods
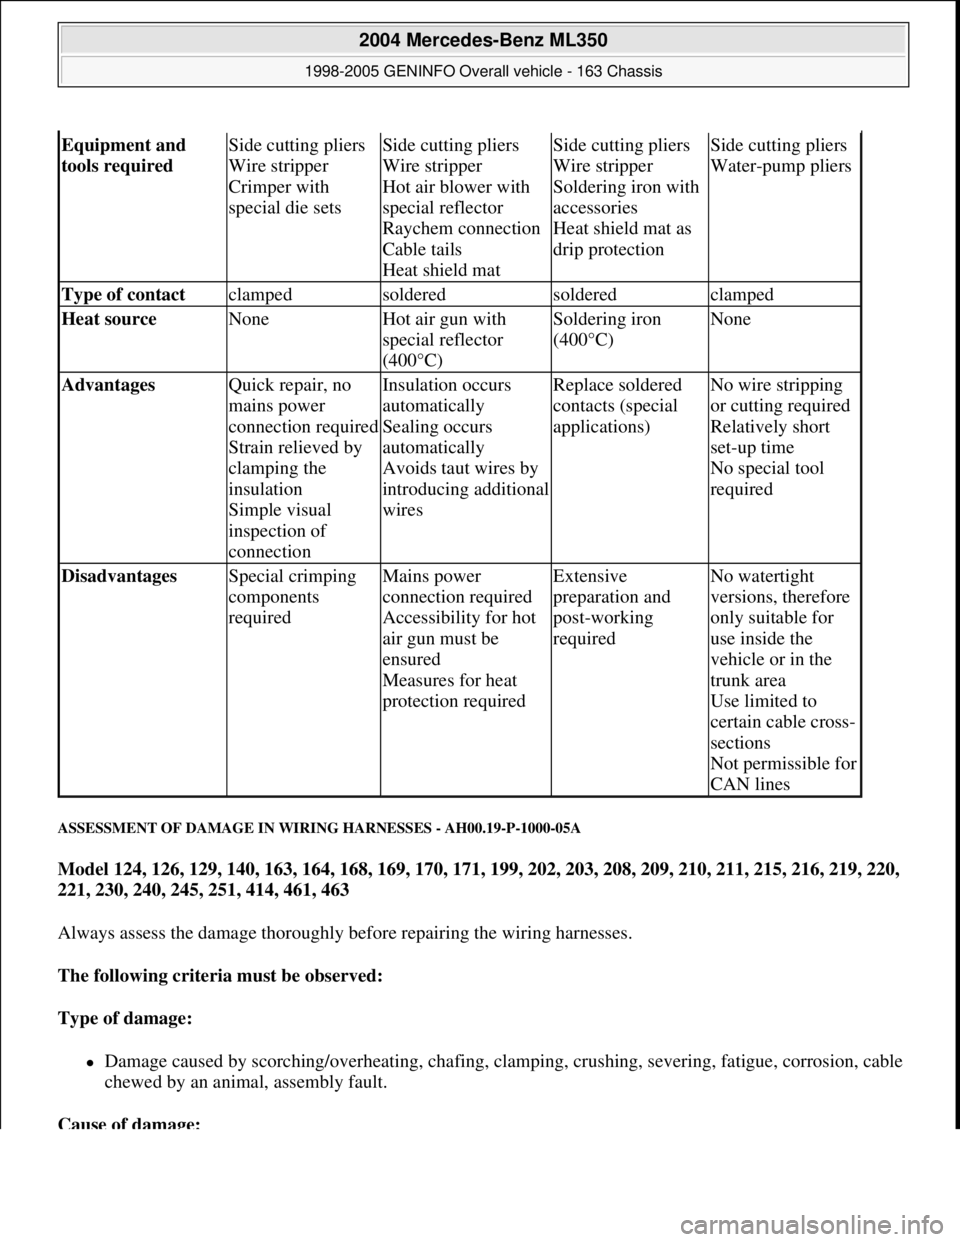
CrimpingRaychem/cable tail
repair methodSolderingRapid connection
technology
Applications Repair cables
Replace damaged
contacts
Repair connectors
Additional line
connectionRepair cables
Cable extension
Integrate repaired
cables (cable tails,
replacement wires) in
the wiring harnessReplace soldered
contacts (special
applications)Repair cables
Additional line
connection
Wire end
connection
2004 Mercedes-Benz ML350
1998-2005 GENINFO Overall vehicle - 163 Chassis
me
Saturday, October 02, 2010 3:47:44 PMPage 19 © 2006 Mitchell Repair Information Company, LLC.
Page 2665 of 4133
ASSESSMENT OF DAMAGE IN WIRING HARNESSES - AH00.19-P-1000-05A
Model 124, 126, 129, 140, 163, 164, 168, 169, 170, 171, 199, 202, 203, 208, 209, 210, 211, 215, 216, 219, 220,
221, 230, 240, 245, 251, 414, 461, 463
Always assess the damage thoroughly before repairing the wiring harnesses.
The following criteria must be observed:
Type of damage:
Damage caused by scorching/overheating, chafing, clamping, crushing, severing, fatigue, corrosion, cable
chewed by an animal, assembly fault.
Cause of damage:
Equipment and
tools required Side cutting pliers
Wire stripper
Crimper with
special die setsSide cutting pliers
Wire stripper
Hot air blower with
special reflector
Raychem connection
Cable tails
Heat shield matSide cutting pliers
Wire stripper
Soldering iron with
accessories
Heat shield mat as
drip protectionSide cutting pliers
Water-pump pliers
Type of contact clampedsolderedsolderedclamped
Heat source NoneHot air gun with
special reflector
(400°C)Soldering iron
(400°C)None
Advantages Quick repair, no
mains power
connection required
Strain relieved by
clamping the
insulation
Simple visual
inspection of
connectionInsulation occurs
automatically
Sealing occurs
automatically
Avoids taut wires by
introducing additional
wiresReplace soldered
contacts (special
applications)No wire stripping
or cutting required
Relatively short
set-up time
No special tool
required
Disadvantages Special crimping
components
requiredMains power
connection required
Accessibility for hot
air gun must be
ensured
Measures for heat
protection requiredExtensive
preparation and
post-working
requiredNo watertight
versions, therefore
only suitable for
use inside the
vehicle or in the
trunk area
Use limited to
certain cable cross-
sections
Not permissible for
CAN lines
2004 Mercedes-Benz ML350
1998-2005 GENINFO Overall vehicle - 163 Chassis
me
Saturday, October 02, 2010 3:47:44 PMPage 20 © 2006 Mitchell Repair Information Company, LLC.
Page 2666 of 4133
The cause for the damage must be determined to ensure that the damage does not reoccur after the wiring
harness has been repaired.
Scope of the damage:
Which components are damaged, can the damage be identified exactly?
Can you be sure that no other components are damaged?
Repair options:
What are the options for repair?
Which replacement parts are available?
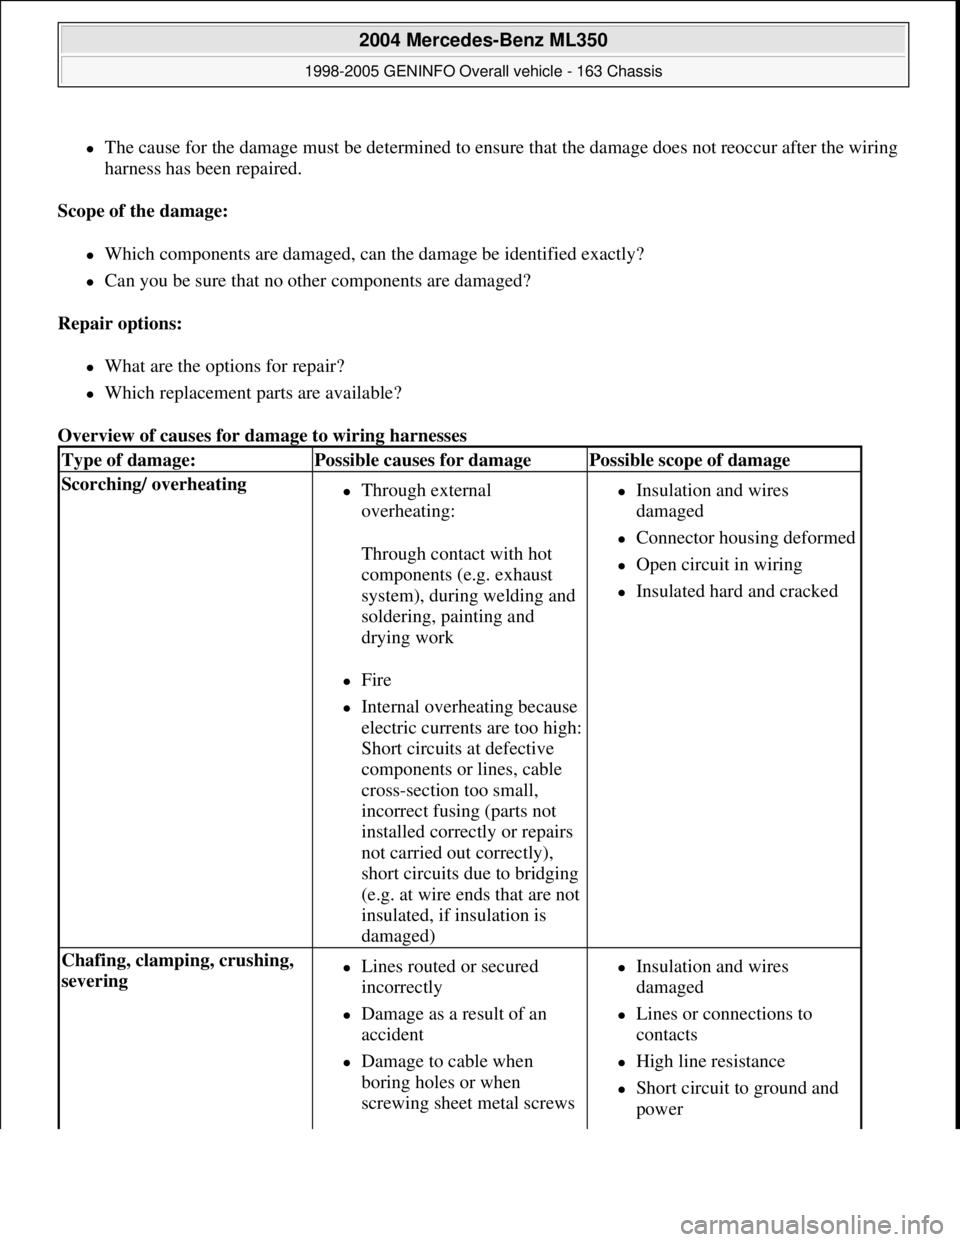
Overview of causes for damage to wiring harnesses
Type of damage:Possible causes for damagePossible scope of damage
Scorching/ overheating Through external
overheating:
Through contact with hot
components (e.g. exhaust
system), during welding and
soldering, painting and
drying work
Fire
Internal overheating because
electric currents are too high:
Short circuits at defective
components or lines, cable
cross-section too small,
incorrect fusing (parts not
installed correctly or repairs
not carried out correctly),
short circuits due to bridging
(e.g. at wire ends that are not
insulated, if insulation is
damaged)
Insulation and wires
damaged
Connector housing deformed
Open circuit in wiring
Insulated hard and cracked
Chafing, clamping, crushing,
severing Lines routed or secured
incorrectly
Damage as a result of an
accident
Damage to cable when
boring holes or when
screwing sheet metal screws
Insulation and wires
damaged
Lines or connections to
contacts
High line resistance
Short circuit to ground and
power
2004 Mercedes-Benz ML350
1998-2005 GENINFO Overall vehicle - 163 Chassis
me
Saturday, October 02, 2010 3:47:44 PMPage 21 © 2006 Mitchell Repair Information Company, LLC.
Page 2667 of 4133
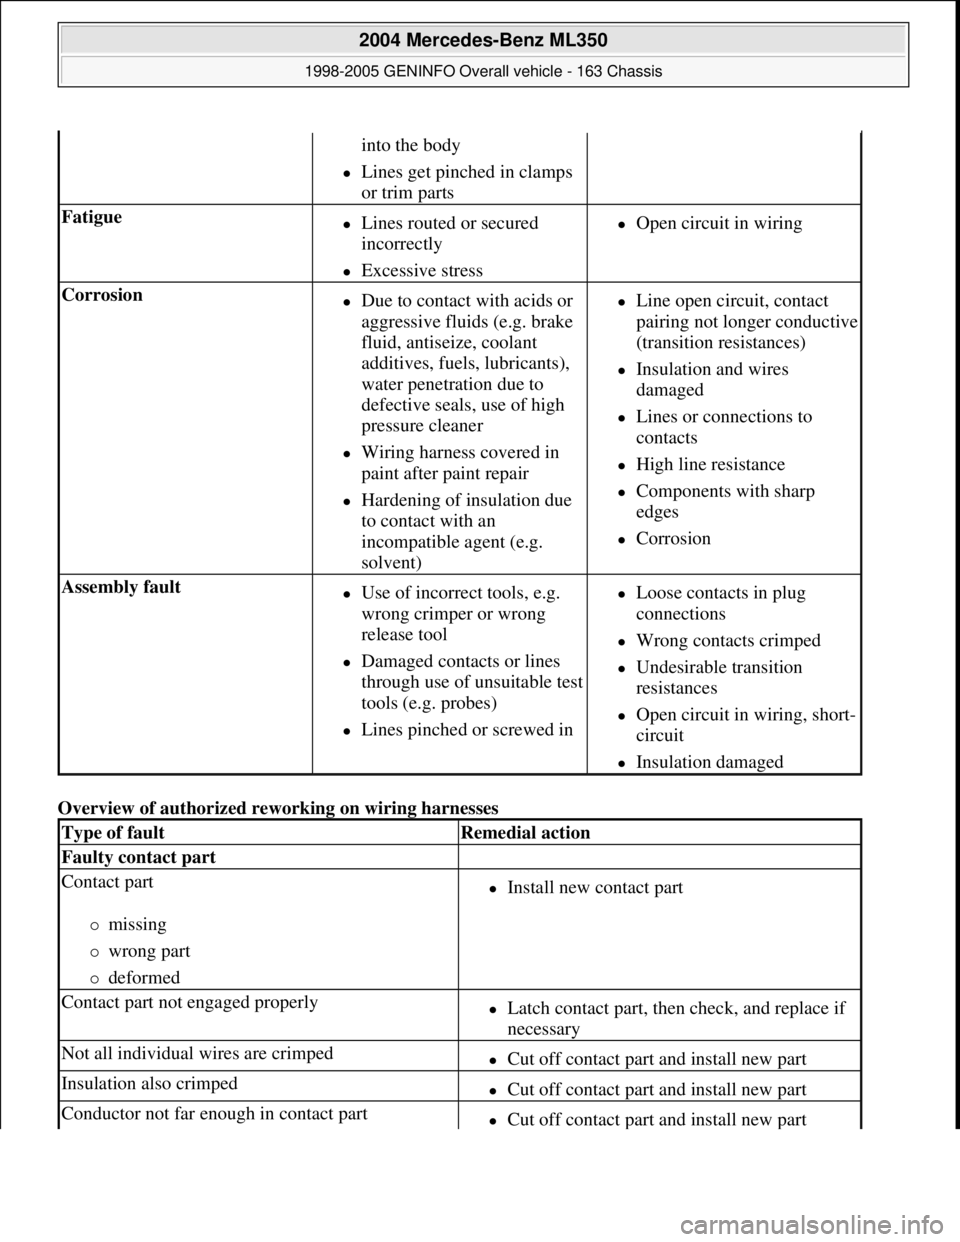
Overview of authorized reworking on wiring harnesses
into the body
Lines get pinched in clamps
or trim parts
Fatigue Lines routed or secured
incorrectly
Excessive stress
Open circuit in wiring
Corrosion Due to contact with acids or
aggressive fluids (e.g. brake
fluid, antiseize, coolant
additives, fuels, lubricants),
water penetration due to
defective seals, use of high
pressure cleaner
Wiring harness covered in
paint after paint repair
Hardening of insulation due
to contact with an
incompatible agent (e.g.
solvent)
Line open circuit, contact
pairing not longer conductive
(transition resistances)
Insulation and wires
damaged
Lines or connections to
contacts
High line resistance
Components with sharp
edges
Corrosion
Assembly fault Use of incorrect tools, e.g.
wrong crimper or wrong
release tool
Damaged contacts or lines
through use of unsuitable test
tools (e.g. probes)
Lines pinched or screwed in
Loose contacts in plug
connections
Wrong contacts crimped
Undesirable transition
resistances
Open circuit in wiring, short-
circuit
Insulation damaged
Type of faultRemedial action
Faulty contact part
Contact part
missing
wrong part
deformed
Install new contact part
Contact part not engaged properlyLatch contact part, then check, and replace if
necessary
Not all individual wires are crimpedCut off contact part and install new part
Insulation also crimpedCut off contact part and install new part
Conductor not far enough in contact partCut off contact part and install new part
2004 Mercedes-Benz ML350
1998-2005 GENINFO Overall vehicle - 163 Chassis
me
Saturday, October 02, 2010 3:47:44 PMPage 22 © 2006 Mitchell Repair Information Company, LLC.
Page 2668 of 4133
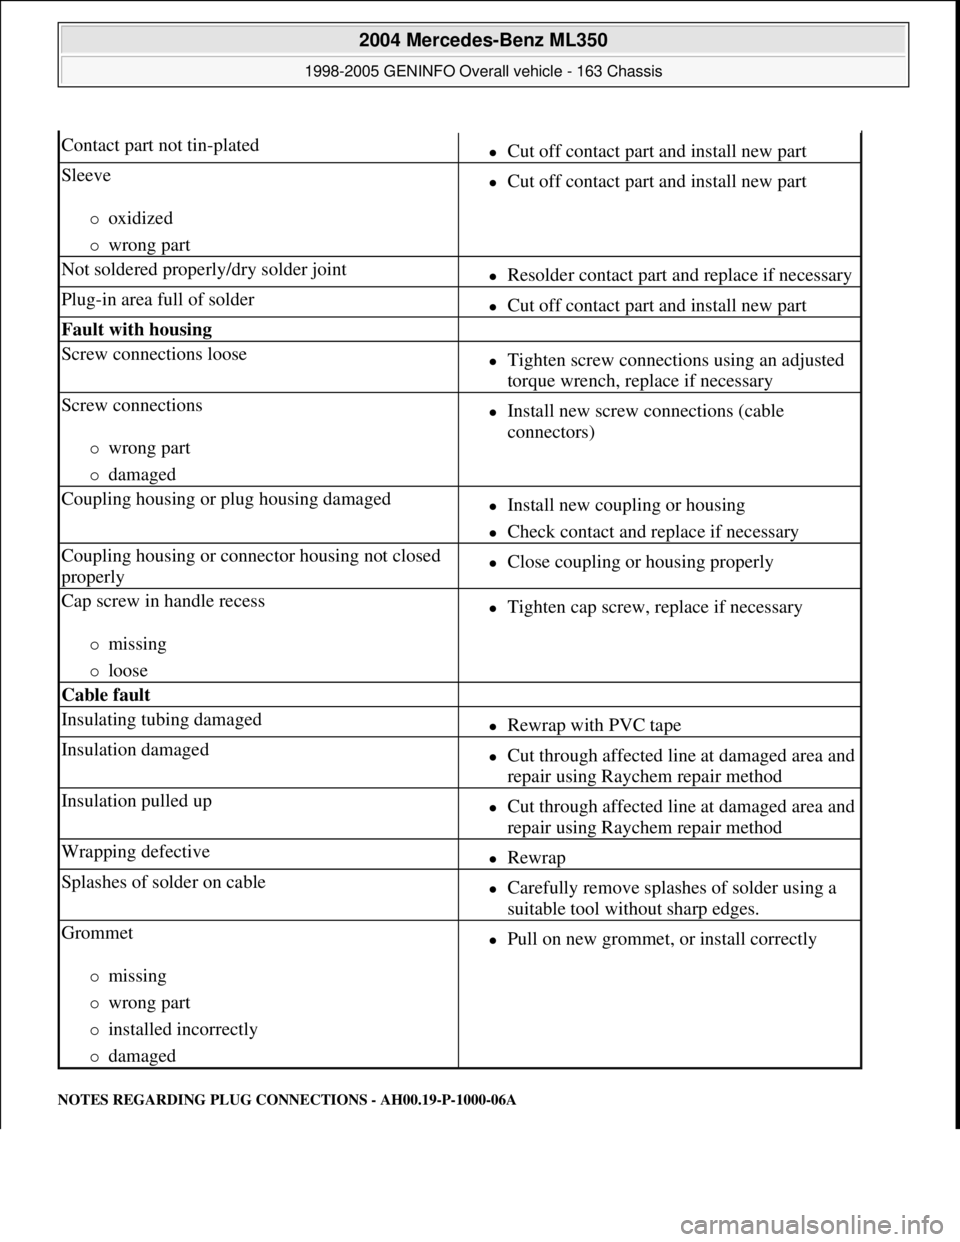
NOTES REGARDING PLUG CONNECTIONS - AH00.19-P-1000-06A
Contact part not tin-platedCut off contact part and install new part
Sleeve
oxidized
wrong part
Cut off contact part and install new part
Not soldered properly/dry solder jointResolder contact part and replace if necessary
Plug-in area full of solderCut off contact part and install new part
Fault with housing
Screw connections looseTighten screw connections using an adjusted
torque wrench, replace if necessary
Screw connections
wrong part
damaged
Install new screw connections (cable
connectors)
Coupling housing or plug housing damagedInstall new coupling or housing
Check contact and replace if necessary
Coupling housing or connector housing not closed
properlyClose coupling or housing properly
Cap screw in handle recess
missing
loose
Tighten cap screw, replace if necessary
Cable fault
Insulating tubing damagedRewrap with PVC tape
Insulation damagedCut through affected line at damaged area and
repair using Raychem repair method
Insulation pulled upCut through affected line at damaged area and
repair using Raychem repair method
Wrapping defectiveRewrap
Splashes of solder on cableCarefully remove splashes of solder using a
suitable tool without sharp edges.
Grommet
missing
wrong part
installed incorrectly
damaged
Pull on new grommet, or install correctly
2004 Mercedes-Benz ML350
1998-2005 GENINFO Overall vehicle - 163 Chassis
me
Saturday, October 02, 2010 3:47:44 PMPage 23 © 2006 Mitchell Repair Information Company, LLC.
Page 2669 of 4133
Model 124, 126, 129, 140, 163, 164, 168, 169, 170, 171, 199, 202, 203, 208, 209, 210, 211, 215, 216, 219, 220,
221, 230, 240, 245, 251, 414, 461, 463
Terminology of plug connections:
The coupling and the plug form a plug connection. The female contact and the contact pin form the contact pair.
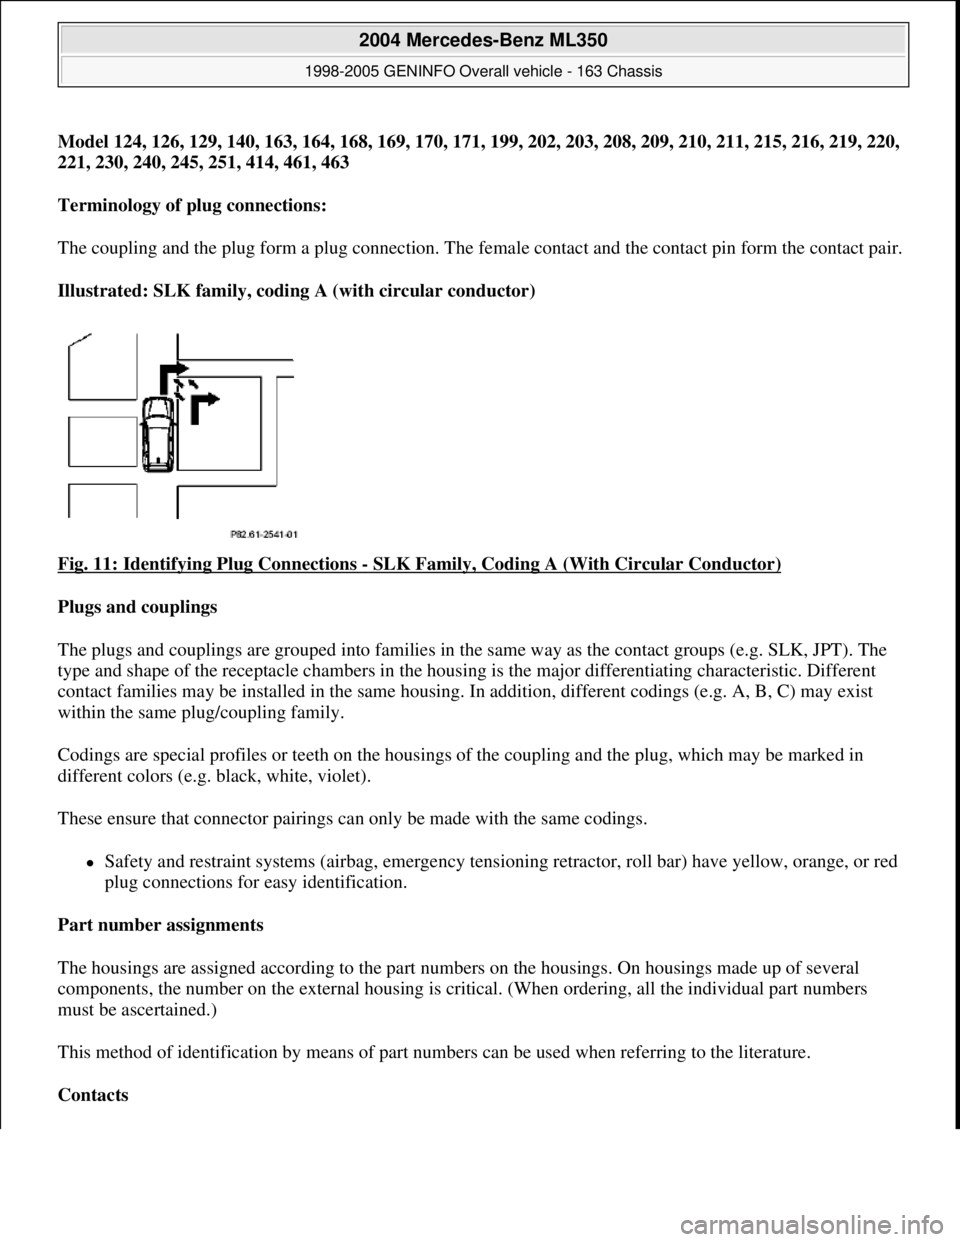
Illustrated: SLK family, coding A (with circular conductor)
Fig. 11: Identifying Plug Connections
- SLK Family, Coding A (With Circular Conductor)
Plugs and couplings
The plugs and couplings are grouped into families in the same way as the contact groups (e.g. SLK, JPT). The
type and shape of the receptacle chambers in the housing is the major differentiating characteristic. Different
contact families may be installed in the same housing. In addition, different codings (e.g. A, B, C) may exist
within the same plug/coupling family.
Codings are special profiles or teeth on the housings of the coupling and the plug, which may be marked in
different colors (e.g. black, white, violet).
These ensure that connector pairings can only be made with the same codings.
Safety and restraint systems (airbag, emergency tensioning retractor, roll bar) have yellow, orange, or red
plug connections for easy identification.
Part number assignments
The housings are assigned according to the part numbers on the housings. On housings made up of several
components, the number on the external housing is critical. (When ordering, all the individual part numbers
must be ascertained.)
This method of identification by means of part numbers can be used when referring to the literature.
Contacts
2004 Mercedes-Benz ML350
1998-2005 GENINFO Overall vehicle - 163 Chassis
me
Saturday, October 02, 2010 3:47:44 PMPage 24 © 2006 Mitchell Repair Information Company, LLC.
Page 2670 of 4133
A distinction is made between the contact pin and the female contact. Each contact pin and each female contact
can be clearly assigned to one group or "family" (e.g. SLK, JPT). Within these families distinctions are made
according to the cable cross section and whether there is single-strand insulation for watertight connections. The
contacts are also distinguished by their coating (tin, gold or silver).
The contacts are fastened to the cables by means of crimping. ?
Crimp connections
These are used to attach the female contacts or contact pins to the cable. Each contact type must be crimped
with the aid of specifically assigned die sets using a pair of pliers. Determining factors: contact family, size of
cable cross section, with or without single-strand insulation.
Only lines up to 4 mm shall be crimped.
Unpinning
This requires a release tool appropriate to the contact family in order to remove female contacts and contact pins
from plugs and couplings.
On some plugs and couplings the housings must first be disassembled and unlocked (secondary release)
according to the instructions before the actual unpinning.
Contact materials
The contacts used in the interior of the vehicle are primarily tin/tin combinations. Those used on the exterior
and in the splash zone are generally silver/silver. Safety systems (particularly the airbag) are equipped with
gold/gold contacts.
Only "identical" contact pairings are permitted for repair work.
NOTES ON SOFT SOLDERING - AH00.19-P-1000-07A
Model 124, 126, 129, 140, 163, 164, 168, 169, 170, 171, 199, 202, 203, 208, 209, 210, 211, 215, 216, 219, 220,
221, 230, 240, 245, 251, 414, 461, 463
General information
Soft-soldering is a process for creating an inseparable join between two or more metal parts using additional
metals (e.g. soldering tin). The solder melting temperature lies below the melting temperature of the metals to
be joined and is lower than 450°C.
The connection is created by wetting the joint locations with hot liquid solder, without melting the parts to be
joined.
The joining procedure is assisted by using a flux, which releases surface oxides on the parts to be joined,
eliminatin
g and preventing surface films (e.g. greases).
2004 Mercedes-Benz ML350
1998-2005 GENINFO Overall vehicle - 163 Chassis
me
Saturday, October 02, 2010 3:47:44 PMPage 25 © 2006 Mitchell Repair Information Company, LLC.