MERCEDES-BENZ ML430 1997 Complete Repair Manual
Manufacturer: MERCEDES-BENZ, Model Year: 1997, Model line: ML430, Model: MERCEDES-BENZ ML430 1997Pages: 4133, PDF Size: 88.89 MB
Page 281 of 4133
231 Engine compartment
Te ch n ica l
data Instruments
and controlsOperation DrivingInstrument
cluster displayPractical hintsCar care Index Hood
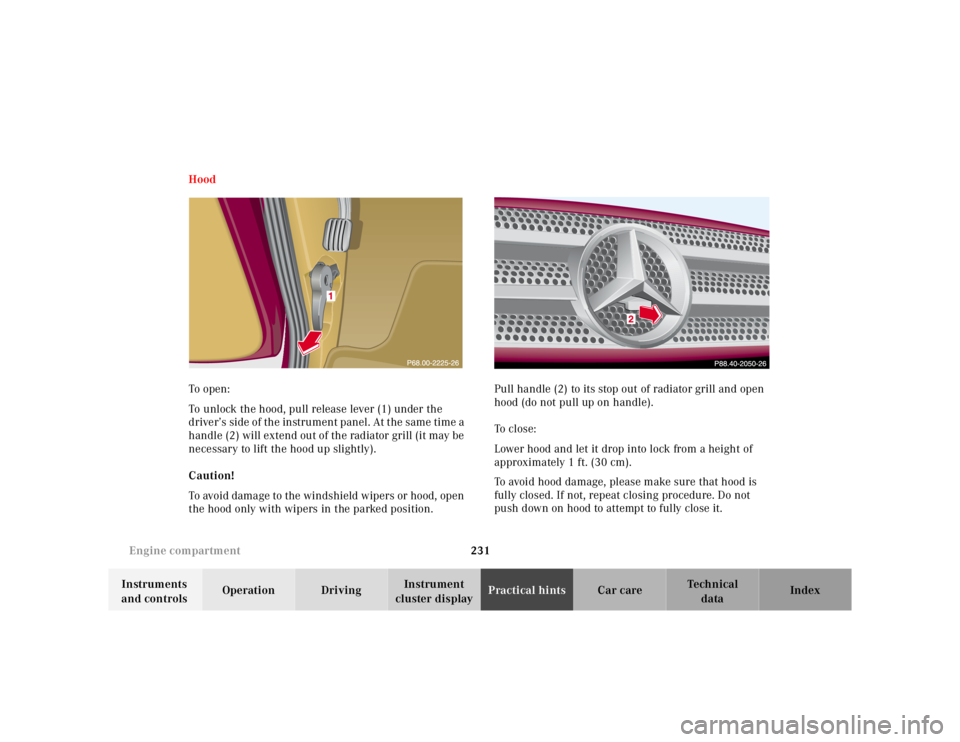
To o pen :
To unlock the hood, pull release lever (1) under the
driver’s side of the instrument panel. At the same time a
handle (2) will extend out of the radiator grill (it may be
necessary to lift the hood up slightly).
Caution!
To avoid damage to the windshield wipers or hood, open
the hood only with wipers in the parked position.Pull handle (2) to its stop out of radiator grill and open
hood (do not pull up on handle).
To c l o s e :
Lower hood and let it drop into lock from a height of
approximately 1 ft. (30 cm).
To avoid hood damage, please make sure that hood is
fully closed. If not, repeat closing procedure. Do not
push down on hood to attempt to fully close it.
Page 282 of 4133
232 Engine compartment
Te ch n ica l
data Instruments
and controlsOperation DrivingInstrument
cluster displayPractical hintsCar care Index
Wa r n i n g !
To help prevent personal injury, stay clear of
moving parts when the hood is open and the engine
is running. Be sure the hood is properly closed
before driving. When closing hood, use extreme
caution not to catch hands or fingers.The radiator fan may continue to run for
approximately 30 seconds or even restart after the
engine has been turned off. Stay clear from fan
blades.
The engine is equipped with a transistorized
ignition system. Because of the high voltage it is
dangerous to touch any components (ignition coils,
spark plug sockets, diagnostic socket) of the
ignition system
• with the engine running,
• while starting the engine,
• if ignition is “on” and the engine is turned
manually.If you see flames, steam or smoke coming from the
engine compartment, or if the coolant temperature
gauge indicates that the engine is overheated, do
not open the hood. Move away from vehicle and do
not open the hood until the engine has cooled. If
necessary, call a fire department.
Page 283 of 4133
233 Engine compartment
Te ch n ica l
data Instruments
and controlsOperation DrivingInstrument
cluster displayPractical hintsCar care Index Checking engine oil level
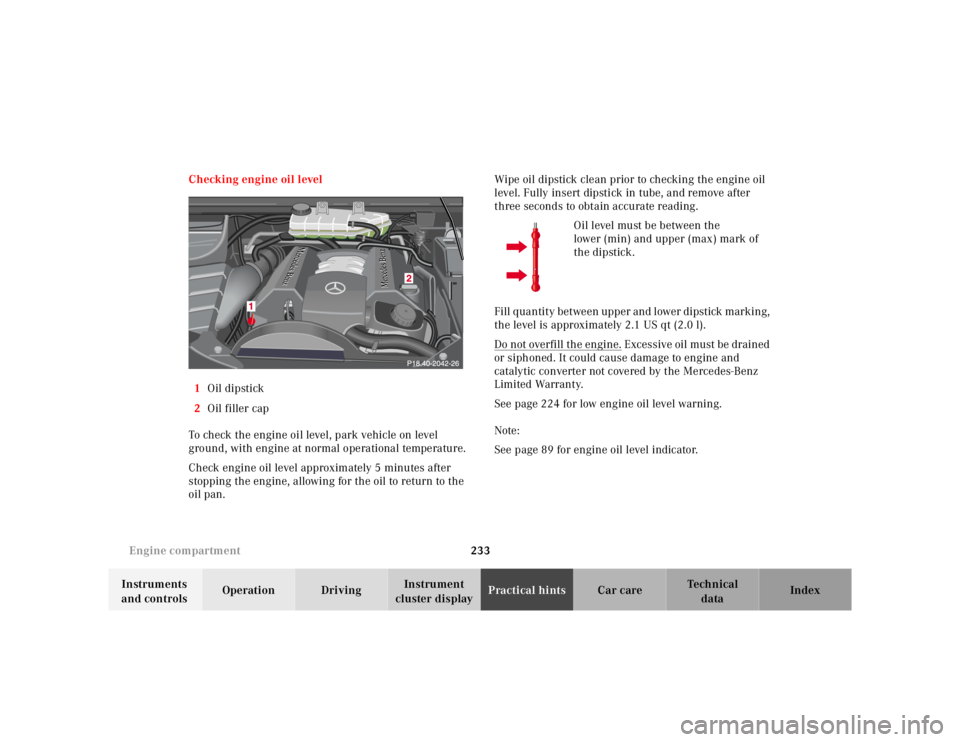
1Oil dipstick
2Oil filler cap
To check the engine oil level, park vehicle on level
ground, with engine at normal operational temperature.
Check engine oil level approximately 5 minutes after
stopping the engine, allowing for the oil to return to the
oil pan.Wipe oil dipstick clean prior to checking the engine oil
level. Fully insert dipstick in tube, and remove after
three seconds to obtain accurate reading.
Oil level must be between the
lower (min) and upper (max) mark of
the dipstick.
Fill quantity between upper and lower dipstick marking,
the level is approximately 2.1 US qt (2.0 l).
Do not overfill the engine.
Excessive oil must be drained
or siphoned. It could cause damage to engine and
catalytic converter not covered by the Mercedes-Benz
Limited Warranty.
See page 224 for low engine oil level warning.
Note:
See page 89 for engine oil level indicator.
Page 284 of 4133
234 Engine compartment
Te ch n ica l
data Instruments
and controlsOperation DrivingInstrument
cluster displayPractical hintsCar care Index
Automatic transmission fluid level
The transmission has a permanent fill of automatic
transmission fluid.
Regular automatic transmission fluid level checks and
changes are not required. For this reason the dipstick is
omitted.
If you notice fluid leaks or gear shifting malfunctions,
have your authorized Mercedes-Benz Light Truck Center
check the transmission fluid level.
Engine oil consumption
Engine oil consumption checks should only be made
after the break-in period. During the break-in period,
higher oil consumption may be noticed and is normal.
Frequent driving at high engine speeds results in
increased consumption.Coolant level
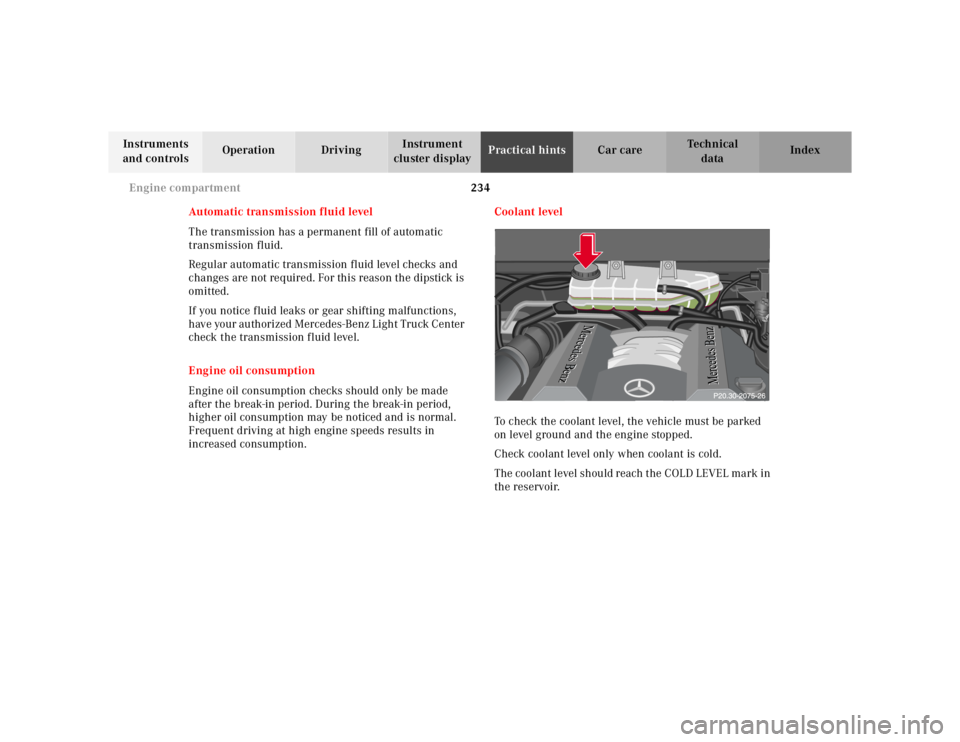
To check the coolant level, the vehicle must be parked
on level ground and the engine stopped.
Check coolant level only when coolant is cold.
The coolant level should reach the COLD LEVEL mark in
the reservoir.P20.30-0241-20
Page 285 of 4133
235 Engine compartment
Te ch n ica l
data Instruments
and controlsOperation DrivingInstrument
cluster displayPractical hintsCar care Index Adding coolant
If coolant has to be added, a 50 / 50 mixture of water and
MB anticorrosion / antifreeze should be added.
After adding coolant, close cap until you hear it click a
few times.
The drain plugs for the cooling system are located on
the left and right side of the engine block directly above
the engine mounts and at the bottom of the radiator.
Anticorrosion / antifreeze mixture, see page 297.
Wa r n i n g !
In order to avoid possible serious burns or injury:
• Use extreme caution when opening the hood if
there are any signs of steam or coolant leaking
from the cooling system, or if the coolant
temperature gauge indicates that the coolant is
overheated.
• Do not remove pressure cap on coolant
reservoir if engine temperature is above 194°F
(90°C). Allow engine to cool down before
removing cap. The coolant reservoir contains
hot fluid and is under pressure.• Using a rag, slowly open cap approximately
1/2 turn to relieve excess pressure. If opened
immediately, scalding hot fluid and steam will
be blown out under pressure.• Do not spill antifreeze on hot engine parts.
Antifreeze contains ethylene glycol which may
burn if it comes into contact with hot engine
parts.
Page 286 of 4133
236 Engine compartment
Te ch n ica l
data Instruments
and controlsOperation DrivingInstrument
cluster displayPractical hintsCar care Index
Windshield washer/headlamp cleaning system
The reservoir should be refilled with MB Windshield
washer concentrate and water (or commercially
available premixed windshield washer solvent/
antifreeze, depending on ambient temperatures).
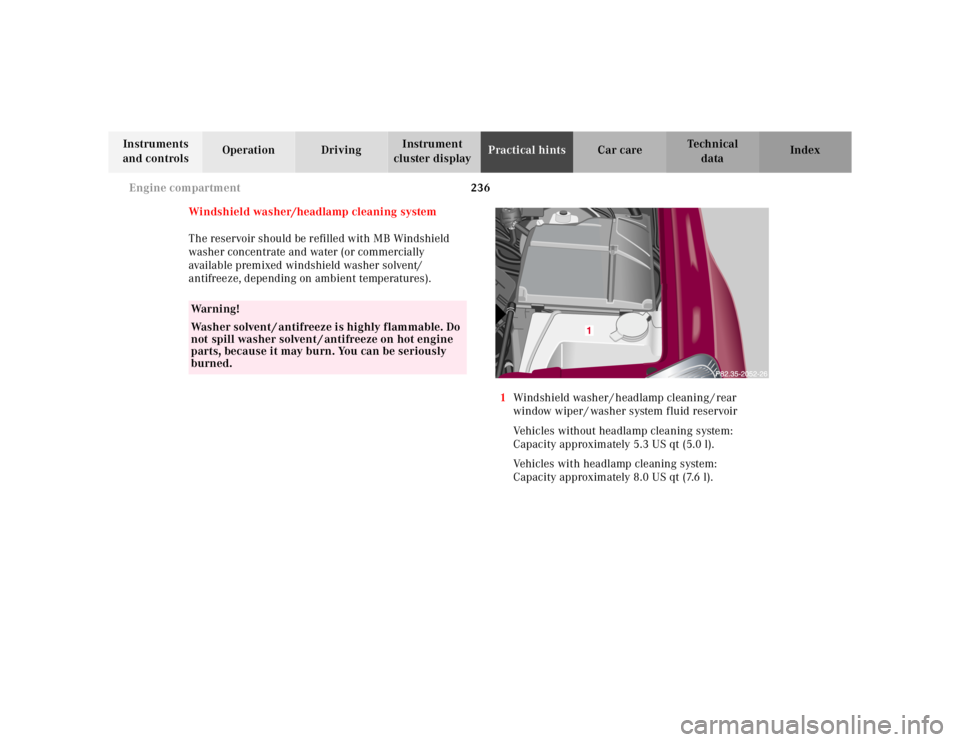
1Windshield washer / headlamp cleaning / rear
window wiper / washer system fluid reservoir
Vehicles without headlamp cleaning system:
Capacity approximately 5.3 US qt (5.0 l).
Vehicles with headlamp cleaning system:
Capacity approximately 8.0 US qt (7.6 l).
Wa r n i n g !
Washer solvent / antifreeze is highly flammable. Do
not spill washer solvent / antifreeze on hot engine
parts, because it may burn. You can be seriously
burned.
Page 287 of 4133
237 Windshield wiper
Te ch n ica l
data Instruments
and controlsOperation DrivingInstrument
cluster displayPractical hintsCar care Index Windshield and headlamp washer
fluid mixing ratio
For temperatures above freezing:
MB Windshield Washer Concentrate “S” and water
1 part “S” to 100 parts water
(40 ml “S” to 1 gallon water).
For temperature below freezing:
MB Windshield Washer Concentrate “S” and
commercially available premixed windshield washer
solvent / antifreeze
1 part “S” to 100 parts solvent
(40 ml “S” to 1 gallon solvent).Vehicle jack, wheel bolt wrench and screwdriver
Wa r n i n g !
The jack is designed exclusively for jacking up the
vehicle at the jack take-up brackets built into either
side of the vehicle. To help avoid personal injury,
use the jack only to lift the vehicle during a wheel
change. Never get beneath the vehicle while it is
supported by the jack. Keep hands and feet away
from the area under the lifted vehicle. Always
firmly set parking brake and block wheels before
raising vehicle with jack.Do not disengage parking brake while the vehicle is
raised. Be certain that the jack is always vertical
when in use, especially on hills. Always try to use
the jack on level surface. Be sure that the jack arm
end is fully seated in the jack take-up bracket.
Always lower the vehicle onto sufficient capacity
jackstands before working under the vehicle.
Page 288 of 4133
238 Spare wheel, vehicle jack
Te ch n ica l
data Instruments
and controlsOperation DrivingInstrument
cluster displayPractical hintsCar care Index
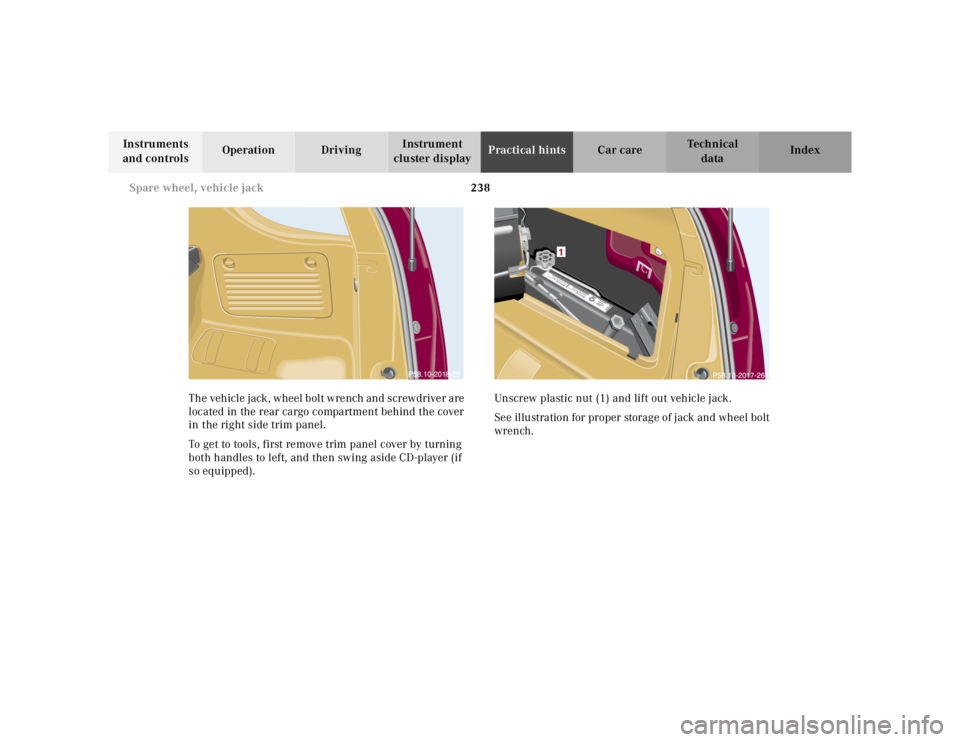
The vehicle jack, wheel bolt wrench and screwdriver are
located in the rear cargo compartment behind the cover
in the right side trim panel.
To get to tools, first remove trim panel cover by turning
both handles to left, and then swing aside CD-player (if
so equipped).Unscrew plastic nut (1) and lift out vehicle jack.
See illustration for proper storage of jack and wheel bolt
wrench.
Warnung!Sich nicht unter
das nur mit dem W
agenheber
aufgebockte Fahrzeug begeben!Warnung!Sich nicht unter
das nur mit dem W
agenheber
aufgebockte Fahrzeug begeben!
Page 289 of 4133
239 Spare wheel, vehicle jack
Te ch n ica l
data Instruments
and controlsOperation DrivingInstrument
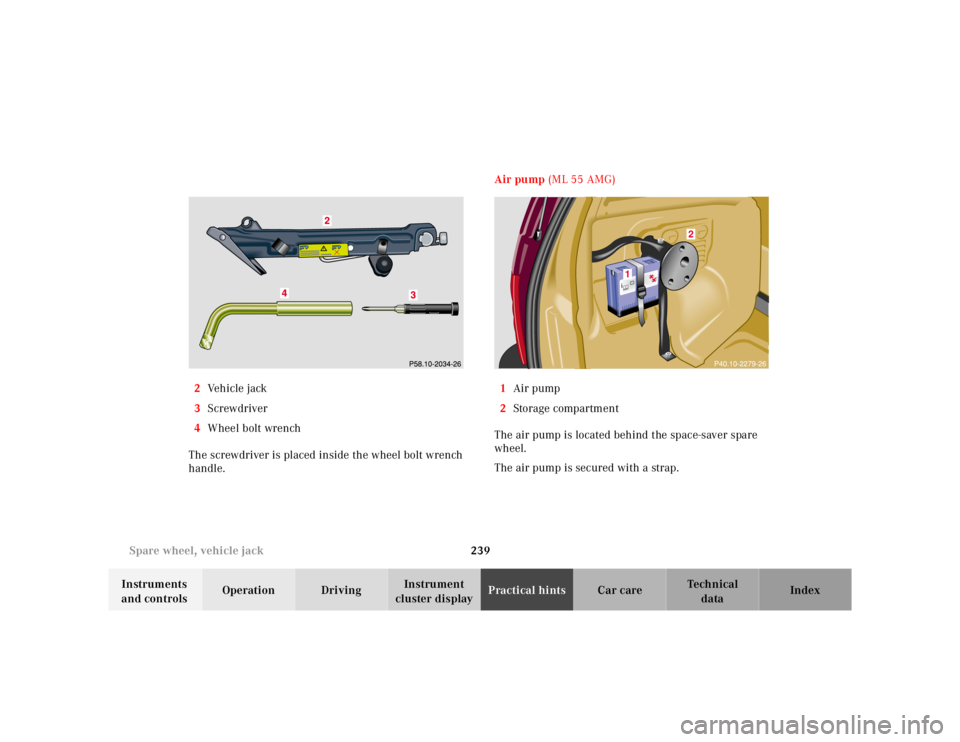
cluster displayPractical hintsCar care Index 2Ve h i c l e j a c k
3Screwdriver
4Wheel bolt wrench
The screwdriver is placed inside the wheel bolt wrench
handle.Air pump (ML 55 AMG)
1Air pump
2Storage compartment
The air pump is located behind the space-saver spare
wheel.
The air pump is secured with a strap.
1
2
Page 290 of 4133
240 Tires, Wheels
Te ch n ica l
data Instruments
and controlsOperation DrivingInstrument
cluster displayPractical hintsCar care Index
Wheels
Replace rims or tires with the same designation,
manufacturer and type as shown on the original part.
See your authorized Mercedes-Benz Light Truck Center
for further information.
See your authorized Mercedes-Benz Light Truck Center
for information on tested and recommended rims and
tires for summer and winter operation. They can also
offer advice concerning tire service and purchase.Tire replacement
Front and rear tires should be replaced in sets.
Furthermore – in the event of tire replacement – the
optional regular size spare wheel should be used on the
rear axle. Rims and tires must be of the correct size and
type. For dimensions, see technical data on page 288.
We recommend that you break in new tires for
approximately 60 miles (100 km) at moderate speed.
It is imperative that the wheel mounting bolts be
fastened to a tightening torq ue of 110 ft.lb. (150 Nm)
whenever wheels are mounted.
For rim and tire specifications, refer to technical data on
page 288.
Wa r n i n g !
Do not mix different tire construction types (i.e.
radial, bias, bias-belted) on your vehicle because
handling may be adversely affected and may result
in loss of control.
Wa r n i n g !
Worn, old tires can cause accidents. If the tire tread
is badly worn, or if the tires have sustained
damage, replace them.When replacing rims, use only genuine
Mercedes-Benz wheel bolts specified for the
particular rim type. Failure to do so can result in
the bolts loosening and possibly an accident.