MERCEDES-BENZ ML430 1997 Complete Repair Manual
Manufacturer: MERCEDES-BENZ, Model Year: 1997, Model line: ML430, Model: MERCEDES-BENZ ML430 1997Pages: 4133, PDF Size: 88.89 MB
Page 311 of 4133
261 Exterior lamps
Te ch n ica l
data Instruments
and controlsOperation DrivingInstrument
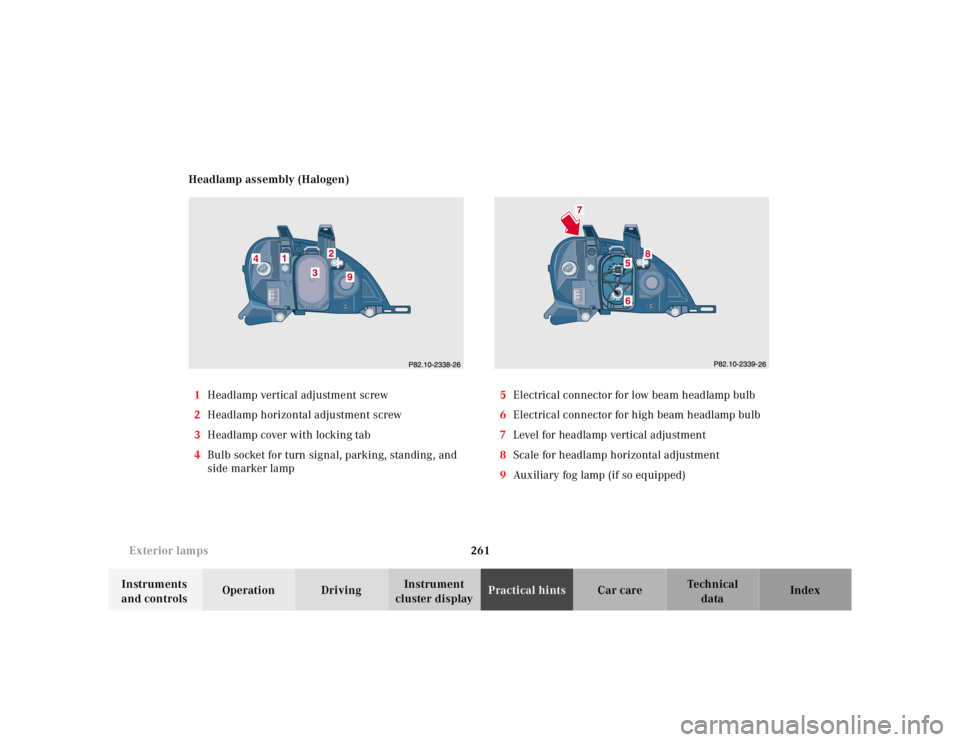
cluster displayPractical hintsCar care Index Headlamp assembly (Halogen)
1Headlamp vertical adjustment screw
2Headlamp horizontal adjustment screw
3Headlamp cover with locking tab
4Bulb socket for turn signal, parking, standing, and
side marker lamp5Electrical connector for low beam headlamp bulb
6Electrical connector for high beam headlamp bulb
7Level for headlamp vertical adjustment
8Scale for headlamp horizontal adjustment
9Auxiliary fog lamp (if so equipped)
Page 312 of 4133
262 Exterior lamps
Te ch n ica l
data Instruments
and controlsOperation DrivingInstrument
cluster displayPractical hintsCar care Index
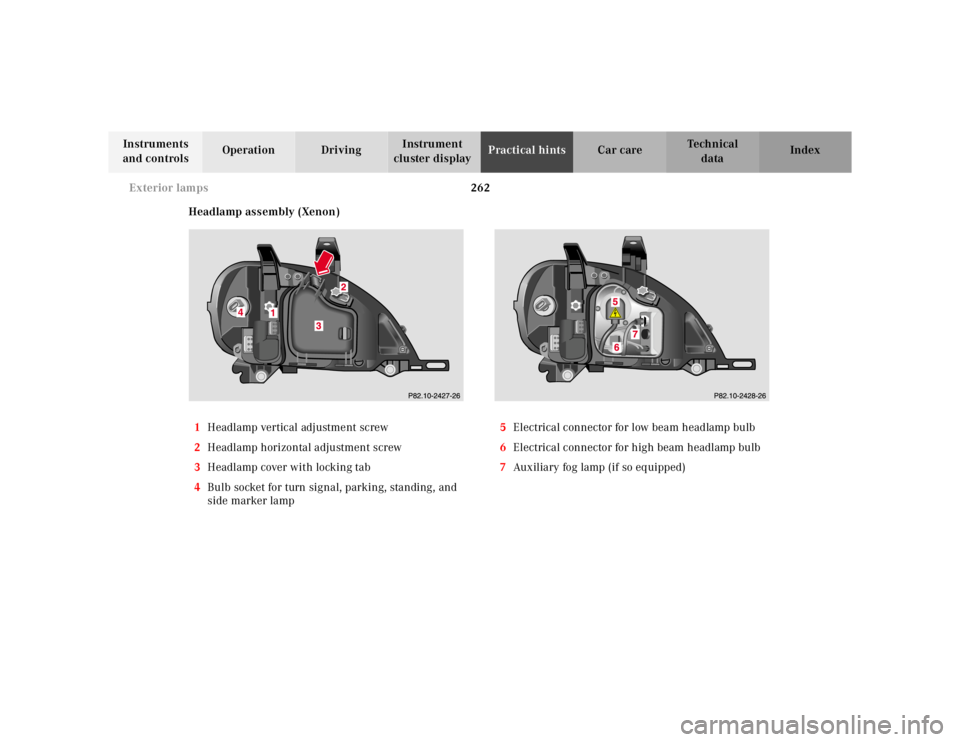
Headlamp assembly (Xenon)
1Headlamp vertical adjustment screw
2Headlamp horizontal adjustment screw
3Headlamp cover with locking tab
4Bulb socket for turn signal, parking, standing, and
side marker lamp5Electrical connector for low beam headlamp bulb
6Electrical connector for high beam headlamp bulb
7Auxiliary fog lamp (if so equipped)
Page 313 of 4133
263 Exterior lamps
Te ch n ica l
data Instruments
and controlsOperation DrivingInstrument
cluster displayPractical hintsCar care Index Bulbs for high beam (only Halogen headlamps)
H1 U (55 W)
Bulbs for low beam
H7 (55 W)
Open hood.
Push down tab at top end of cover (3) and remove. Pull
off electrical connector (5 or 6). Unhook and move aside
clamping ring. Remove bulb.
Insert new bulb (seating properly in cutouts of bulb
socket), mount clamping ring. Reinstall and push
electrical connector on securely. Reinstall cover (3).Xenon (optional)
Bulb for low beam
Xenon (optional)
Bulb for high beam
Note:
Vehicles with Xenon headlamps:
We recommend that you have changed the bulb for the
high beam by a qualified technician.
Wa r n i n g !
Because of high voltage in Xenon lamps, it is
dangerous to replace the bulb or repair the lamp
and its components. We recommend that you have
such work done by a qualified technician.
Page 314 of 4133
264 Exterior lamps
Te ch n ica l
data Instruments
and controlsOperation DrivingInstrument
cluster displayPractical hintsCar care Index
Parking, standing, side marker and turn signal lamp
115 6 N A ( 3 2 / 4 c p b u l b )
Open hood.
Twist bulb socket (4) counterclockwise and pull out.
Push bulb into socket, turn counterclockwise and
remove.
Insert new bulb in socket, push in and twist clockwise.
Reinstall bulb socket.Bulbs for auxiliary fog lamp (optional)
H3 U (55 W)
Open hood.
Remove cover (9). Unhook clamping ring and remove
bulb. Pull off electrical connector.
Insert new bulb in socket (seating properly in cutouts of
bulb socket), and mount clamping ring. Reinstall and
push electrical connector on securely.
Reinstall cover (9).
Page 315 of 4133
![MERCEDES-BENZ ML430 1997 Complete Repair Manual 265 Exterior lamps
Te ch n ica l
data Instruments
and controlsOperation DrivingInstrument
cluster displayPractical hintsCar care Index Taillamp assemblies
1Stop lamp (1073 [32 cp bulb])
2Backup lamp MERCEDES-BENZ ML430 1997 Complete Repair Manual 265 Exterior lamps
Te ch n ica l
data Instruments
and controlsOperation DrivingInstrument
cluster displayPractical hintsCar care Index Taillamp assemblies
1Stop lamp (1073 [32 cp bulb])
2Backup lamp](/img/4/57307/w960_57307-314.png)
265 Exterior lamps
Te ch n ica l
data Instruments
and controlsOperation DrivingInstrument
cluster displayPractical hintsCar care Index Taillamp assemblies
1Stop lamp (1073 [32 cp bulb])
2Backup lamp (1073 [32 cp bulb])
3Turn signal lamp (P Y 21 W bulb)
4Tail, parking, standing and side marker lamp,
driver’s side rear fog lamp (P 21 / 4 W bulb)Open liftgate.
Remove nuts (1).
Remove taillamp.
P82.10-2342-26
P82.10-2343-26
Page 316 of 4133
266 Exterior lamps
Te ch n ica l
data Instruments
and controlsOperation DrivingInstrument
cluster displayPractical hintsCar care Index
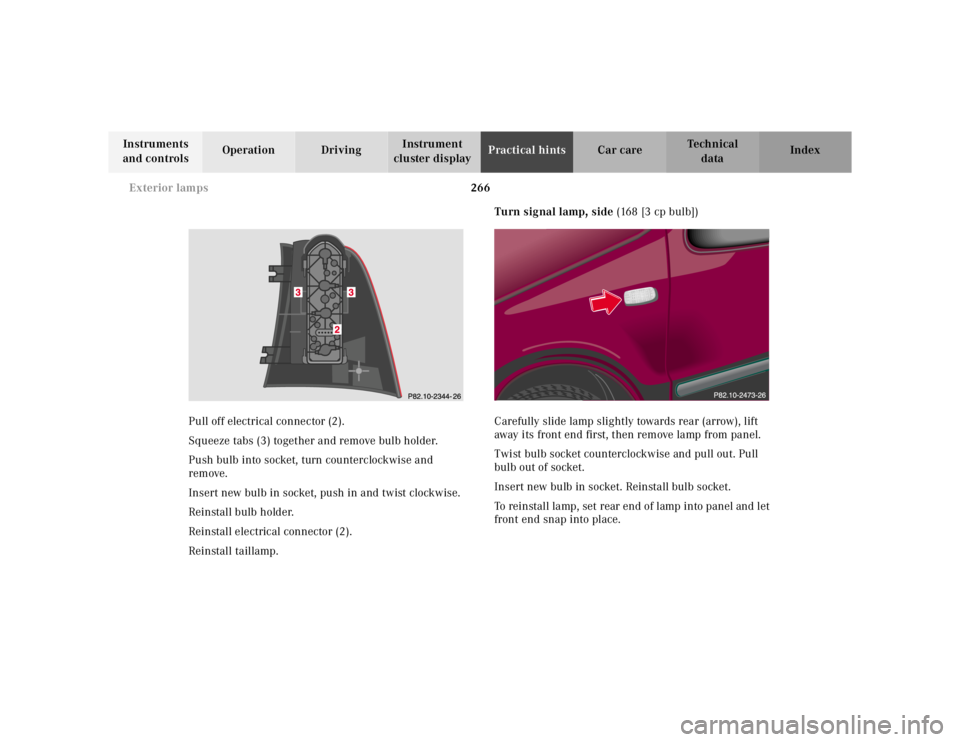
Pull off electrical connector (2).
Squeeze tabs (3) together and remove bulb holder.
Push bulb into socket, turn counterclockwise and
remove.
Insert new bulb in socket, push in and twist clockwise.
Reinstall bulb holder.
Reinstall electrical connector (2).
Reinstall taillamp.Turn signal lamp, side (168 [3 cp bulb])
Carefully slide lamp slightly towards rear (arrow), lift
away its front end first, then remove lamp from panel.
Twist bulb socket counterclockwise and pull out. Pull
bulb out of socket.
Insert new bulb in socket. Reinstall bulb socket.
To reinstall lamp, set rear end of lamp into panel and let
front end snap into place.
Page 317 of 4133
![MERCEDES-BENZ ML430 1997 Complete Repair Manual 267 Exterior lamps
Te ch n ica l
data Instruments
and controlsOperation DrivingInstrument
cluster displayPractical hintsCar care Index License plate lamps (C 5 W [tubular] bulb)
Remove both securing MERCEDES-BENZ ML430 1997 Complete Repair Manual 267 Exterior lamps
Te ch n ica l
data Instruments
and controlsOperation DrivingInstrument
cluster displayPractical hintsCar care Index License plate lamps (C 5 W [tubular] bulb)
Remove both securing](/img/4/57307/w960_57307-316.png)
267 Exterior lamps
Te ch n ica l
data Instruments
and controlsOperation DrivingInstrument
cluster displayPractical hintsCar care Index License plate lamps (C 5 W [tubular] bulb)
Remove both securing screws, remove lamp and take
out bulb.High mounted stop lamp (1073 [32 cp bulb])
To replace bulb, squeeze both sides (1, arrows) of cover,
fold forward and remove.
Press tab (2, arrow) on reflector and remove reflector.
Press bulb down, turn counterclockwise and remove.
Insert new bulb in socket, push in and twist clockwise.
Reinstall reflector.
Position tabs of cover in slots (3, arrows) and reinstall
cover until properly seated.
P82.10-2347-26
P82.10-2346-26
Page 318 of 4133
268 Exterior lamps
Te ch n ica l
data Instruments
and controlsOperation DrivingInstrument
cluster displayPractical hintsCar care Index
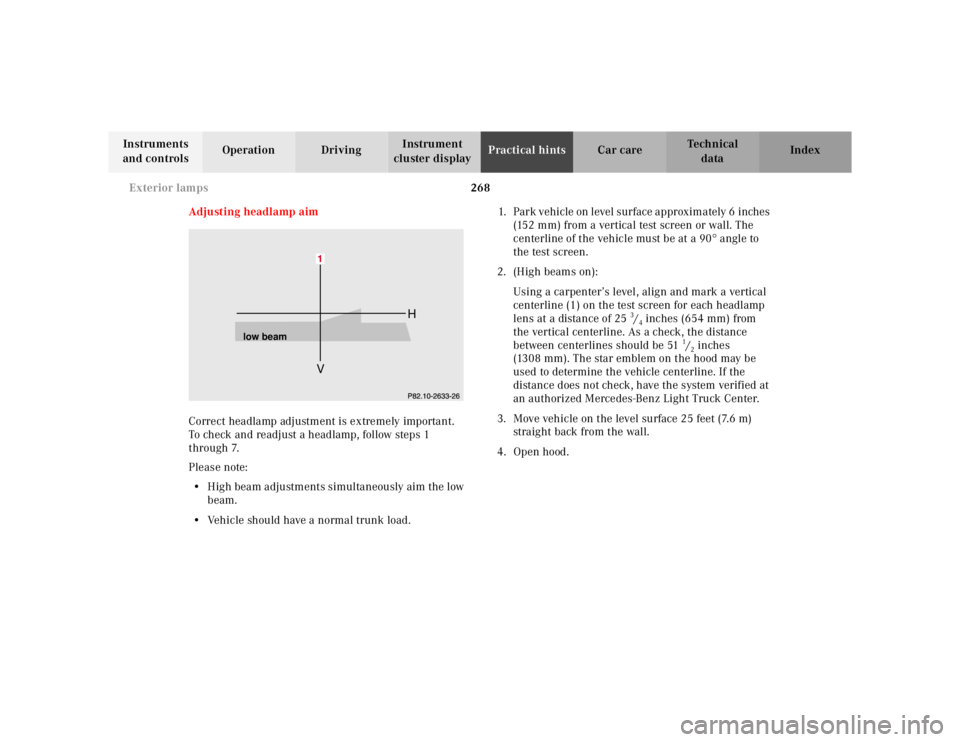
Adjusting headlamp aim
Correct headlamp adjustment is extremely important.
To check and readjust a headlamp, follow steps 1
through 7.
Please note:
•High beam adjustments simultaneously aim the low
beam.
•Vehicle should have a normal trunk load.1. Park vehicle on level surface approximately 6 inches
(152 mm) from a vertical test screen or wall. The
centerline of the vehicle must be at a 90° angle to
the test screen.
2. (High beams on):
Using a carpenter’s level, align and mark a vertical
centerline (1) on the test screen for each headlamp
lens at a distance of 25
3/4inches (654 mm) from
the vertical centerline. As a check, the distance
between centerlines should be 51
1/2inches
(1308 mm). The star emblem on the hood may be
used to determine the vehicle centerline. If the
distance does not check, have the system verified at
an authorized Mercedes-Benz Light Truck Center.
3. Move vehicle on the level surface 25 feet (7.6 m)
straight back from the wall.
4. Open hood.
VH
low beam
Page 319 of 4133
269 Exterior lamps
Te ch n ica l
data Instruments
and controlsOperation DrivingInstrument
cluster displayPractical hintsCar care Index 5. (High beams on):
Simultaneously turn adjusting screws (1 and 2 on
page 261 or 262) counterclockwise to adjust
headlamp downward, clockwise upward) equally
until bubble in the level (7 on page 261) is centered
on the “0” mark.
Graduations:
screw 1: 0.50° pitch,
screw 2: 0.67° pitch.
6. Horizontal headlamp aim (High beams on):
Turn adjusting screw (2) (left headlamp:
counterclockwise to adjust to the left, clockwise to
the right [right headlamp in opposite direction])
until the headlamp (high beam pattern) is centered
about the vertical centerline (1) as shown.
The left and right headlamps must be adjusted
individually.7. For proper aim, the indicator (8 on page 261) should
align with the “0” mark after horizontal adjustment.
Graduations: 0.33° pitch.
Note:
If it is not possible to obtain a proper headlamp
adjustment, have the system checked at your authorized
Mercedes-Benz Light Truck Center.
Page 320 of 4133
270 Remote control
Te ch n ica l
data Instruments
and controlsOperation DrivingInstrument
cluster displayPractical hintsCar care Index
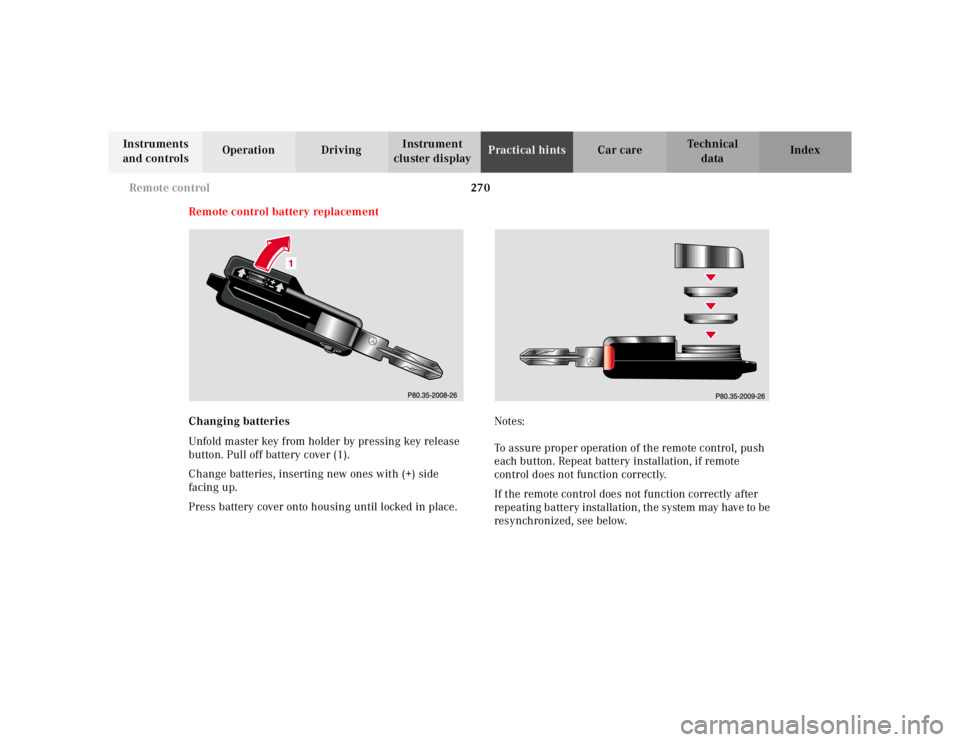
Remote control battery replacement
Changing batteries
Unfold master key from holder by pressing key release
button. Pull off battery cover (1).
Change batteries, inserting new ones with (+) side
facing up.
Press battery cover onto housing until locked in place.Notes:
To assure proper operation of the remote control, push
each button. Repeat battery installation, if remote
control does not function correctly.
If the remote control does not function correctly after
repeating battery installation, the system may have to be
resynchronized, see below.