display MERCEDES-BENZ R-Class 2010 R171 Comand Manual
[x] Cancel search | Manufacturer: MERCEDES-BENZ, Model Year: 2010, Model line: R-Class, Model: MERCEDES-BENZ R-Class 2010 R171Pages: 224, PDF Size: 7 MB
Page 30 of 224
Press ; or = .XTo confirm selection: Press 9.
You will see the main display for the
selected audio mode.XTo switch back to the main function
line 1 :
Press 9 and 9.
The Audio menu appears.
Selecting Menu Item
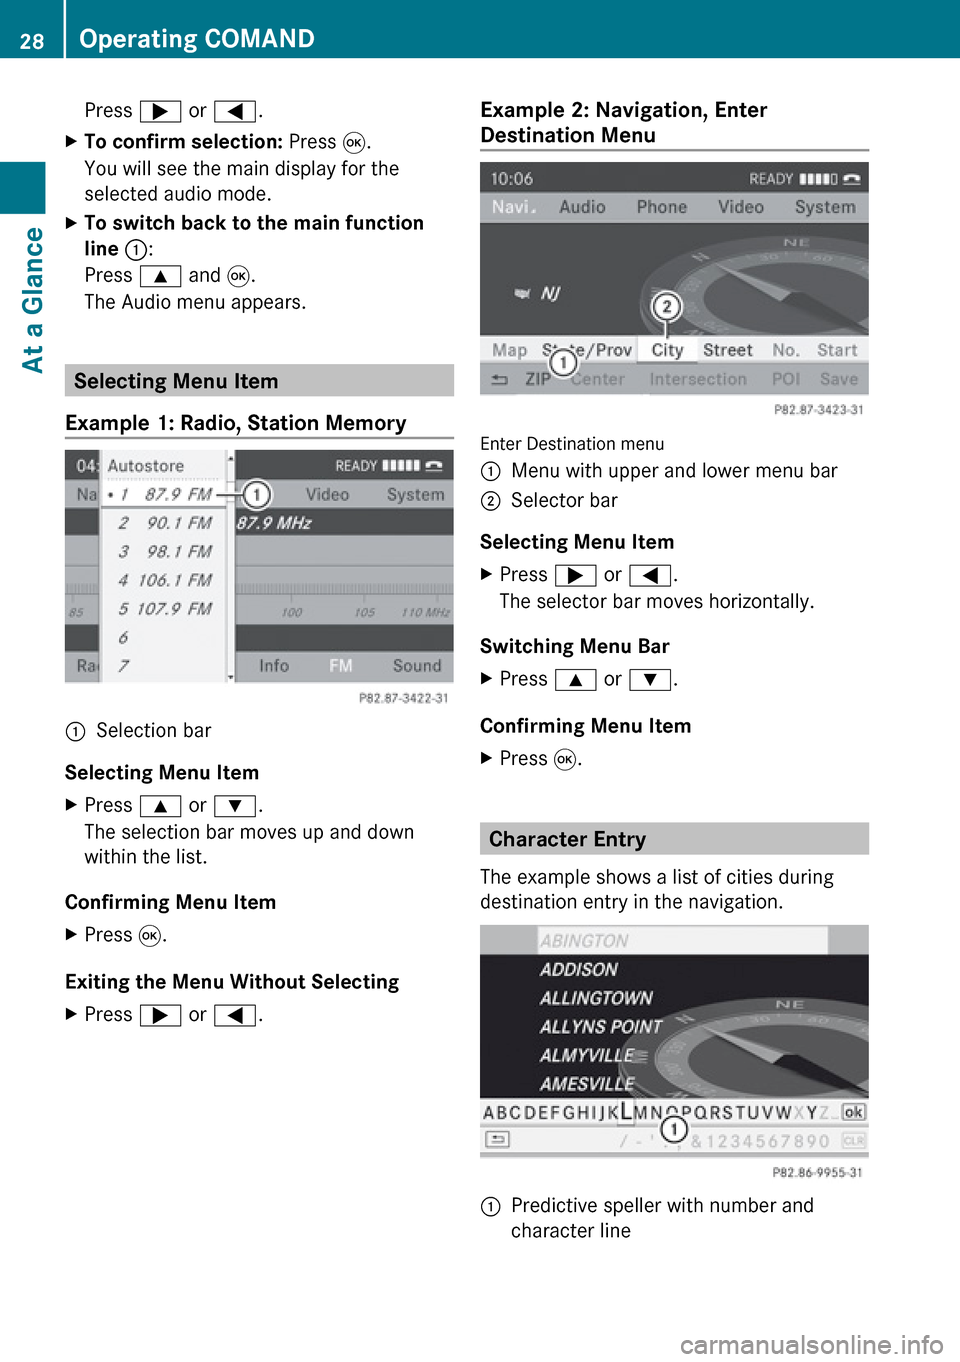
Example 1: Radio, Station Memory
1Selection bar
Selecting Menu Item
XPress 9 or : .
The selection bar moves up and down
within the list.
Confirming Menu Item
XPress 9.
Exiting the Menu Without Selecting
XPress ; or = .Example 2: Navigation, Enter
Destination Menu
Enter Destination menu
1Menu with upper and lower menu bar2Selector bar
Selecting Menu Item
XPress ; or = .
The selector bar moves horizontally.
Switching Menu Bar
XPress 9 or : .
Confirming Menu Item
XPress 9.
Character Entry
The example shows a list of cities during
destination entry in the navigation.
1Predictive speller with number and
character line28Operating COMANDAt a Glance
Page 31 of 224
iIn the predictive speller 1 you can only
select the characters that are currently
available. The set of characters that is
available depends on those already entered
and the data included in the digital map.
When entering characters, the list entry at the
top always displays the entry that best
matches the characters already entered.
COMAND automatically adds matching
letters to those already entered by the user.
Entering Characters
Using the Speller
XTo select characters: Press ; or
= .XPress 9 or : to switch between the
lines in the speller.XTo confirm character selection: Press
9 .
A possible option:
XTo switch predictive speller language
(character set): Select !.
With Number Keypad
Alternatively, you can enter characters using
the number keypad (direct input).
Example:
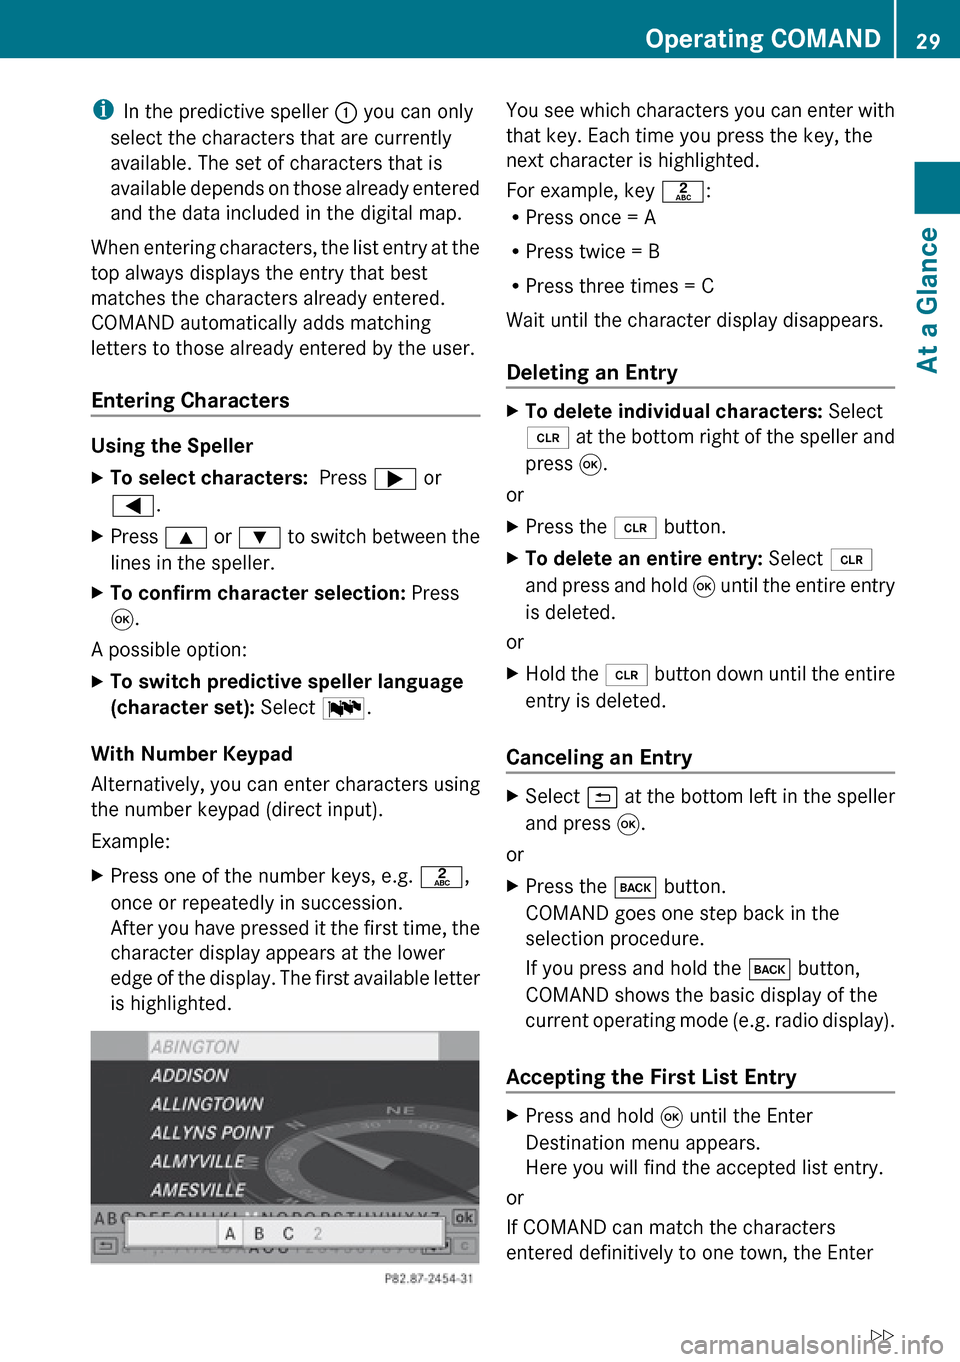
XPress one of the number keys, e.g. l,
once or repeatedly in succession.
After you have pressed it the first time, the
character display appears at the lower
edge of the display. The first available letter
is highlighted.You see which characters you can enter with
that key. Each time you press the key, the
next character is highlighted.
For example, key l:
R Press once = A
R Press twice = B
R Press three times = C
Wait until the character display disappears.
Deleting an EntryXTo delete individual characters: Select
õ at the bottom right of the speller and
press 9.
or
XPress the 2 button.XTo delete an entire entry: Select õ
and press and hold 9 until the entire entry
is deleted.
or
XHold the 2 button down until the entire
entry is deleted.
Canceling an Entry
XSelect á at the bottom left in the speller
and press 9.
or
XPress the k button.
COMAND goes one step back in the
selection procedure.
If you press and hold the k button,
COMAND shows the basic display of the
current operating mode (e.g. radio display).
Accepting the First List Entry
XPress and hold 9 until the Enter
Destination menu appears.
Here you will find the accepted list entry.
or
If COMAND can match the characters
entered definitively to one town, the Enter
Operating COMAND29At a GlanceZ
Page 32 of 224
Destination menu appears automatically with
the selected list entry.
Switching to the List Without Predictive
Speller
If other entries for a town exist, or the name
exists more than once in the system, then
d is highlighted in the speller.XPress 9.
You can switch to the list at any point while
entering characters.
XPress 9 repeatedly until the list appears
without the speller.
or
XSelect d and press 9.
COMAND will complete your entry if the
name is unambiguous. In this case it is not
necessary to switch to the list, the Enter
Destination menu will appear.
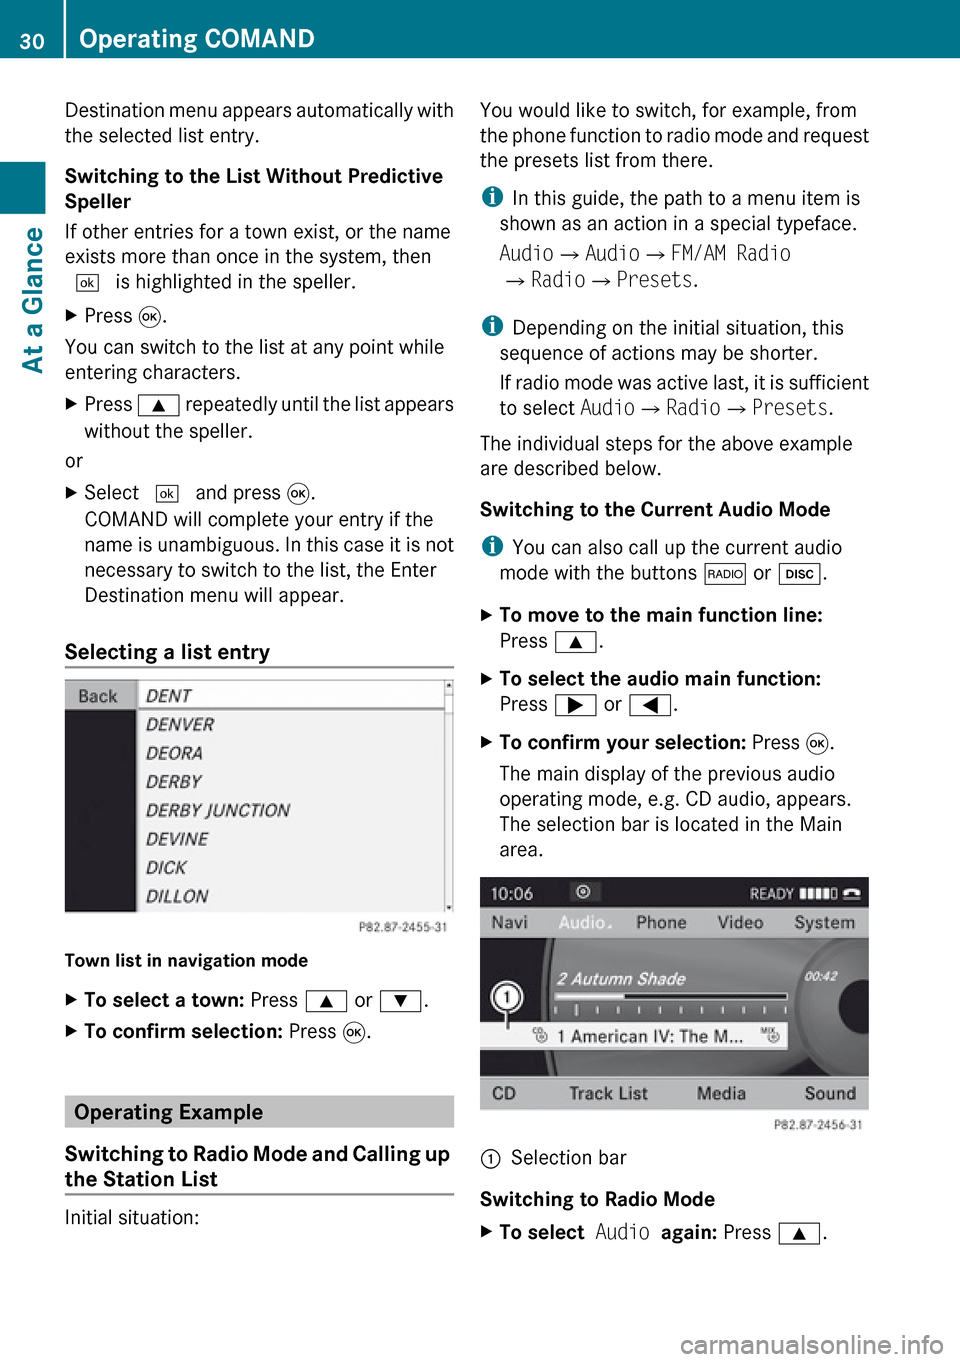
Selecting a list entry
Town list in navigation mode
XTo select a town: Press 9 or : .XTo confirm selection: Press 9.
Operating Example
Switching to Radio Mode and Calling up
the Station List
Initial situation:
You would like to switch, for example, from
the phone function to radio mode and request
the presets list from there.
i In this guide, the path to a menu item is
shown as an action in a special typeface.
Audio £Audio £FM/AM Radio
£ Radio £Presets .
i Depending on the initial situation, this
sequence of actions may be shorter.
If radio mode was active last, it is sufficient
to select Audio£Radio £Presets .
The individual steps for the above example
are described below.
Switching to the Current Audio Mode
i You can also call up the current audio
mode with the buttons $ or h .XTo move to the main function line:
Press 9.XTo select the audio main function:
Press ; or = .XTo confirm your selection: Press 9.
The main display of the previous audio
operating mode, e.g. CD audio, appears.
The selection bar is located in the Main
area.1Selection bar
Switching to Radio Mode
XTo select Audio again: Press 9.30Operating COMANDAt a Glance
Page 33 of 224
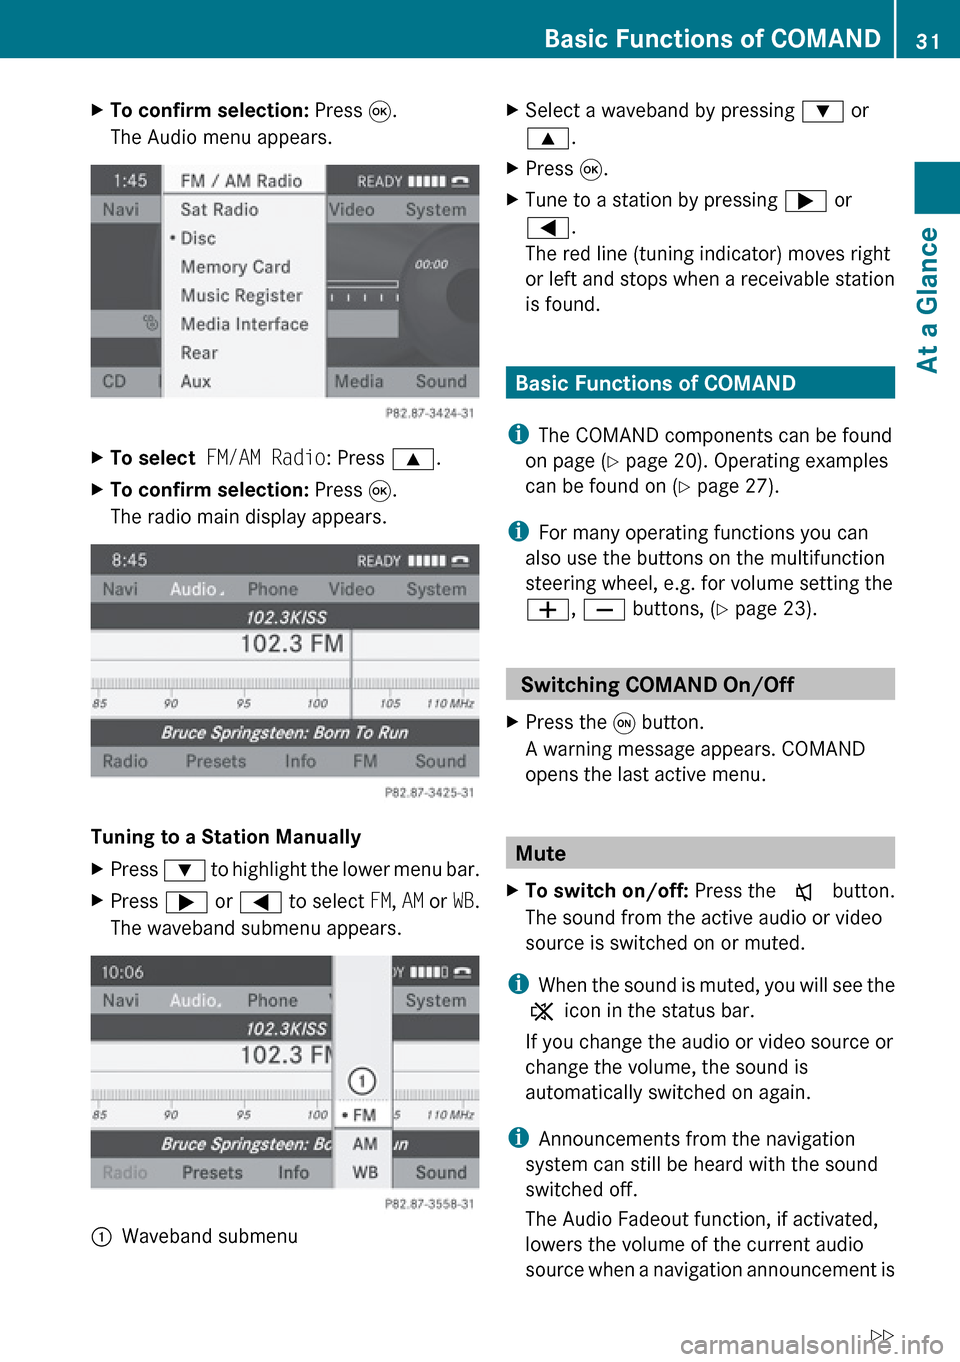
XTo confirm selection: Press 9.
The Audio menu appears.XTo select FM/AM Radio : Press 9.XTo confirm selection: Press 9.
The radio main display appears.
Tuning to a Station Manually
XPress : to highlight the lower menu bar.XPress ; or = to select FM, AM or WB.
The waveband submenu appears.:Waveband submenuXSelect a waveband by pressing : or
9 .XPress 9.XTune to a station by pressing ; or
= .
The red line (tuning indicator) moves right
or left and stops when a receivable station
is found.
Basic Functions of COMAND
i The COMAND components can be found
on page ( Y page 20). Operating examples
can be found on ( Y page 27).
i For many operating functions you can
also use the buttons on the multifunction
steering wheel, e.g. for volume setting the
W , X buttons, ( Y page 23).
Switching COMAND On/Off
XPress the q button.
A warning message appears. COMAND
opens the last active menu.
Mute
XTo switch on/off: Press the x button.
The sound from the active audio or video
source is switched on or muted.
i When the sound is muted, you will see the
X icon in the status bar.
If you change the audio or video source or
change the volume, the sound is
automatically switched on again.
i Announcements from the navigation
system can still be heard with the sound
switched off.
The Audio Fadeout function, if activated,
lowers the volume of the current audio
source when a navigation announcement is
Basic Functions of COMAND31At a GlanceZ
Page 35 of 224
XTo change the setting: Press 9
or : until the desired treble and bass
levels are set.XTo save setting: Press 9.
The setting is stored and the menu is
exited.XTo exit the menu without changes: Press
the k ; or = button.
Setting Balance and Fader
The balance determines whether the sound
intensity is higher on the driver’s side or on
the front passenger’s side.
The fader determines whether the sound
intensity is higher in the front or in the rear of
the vehicle.
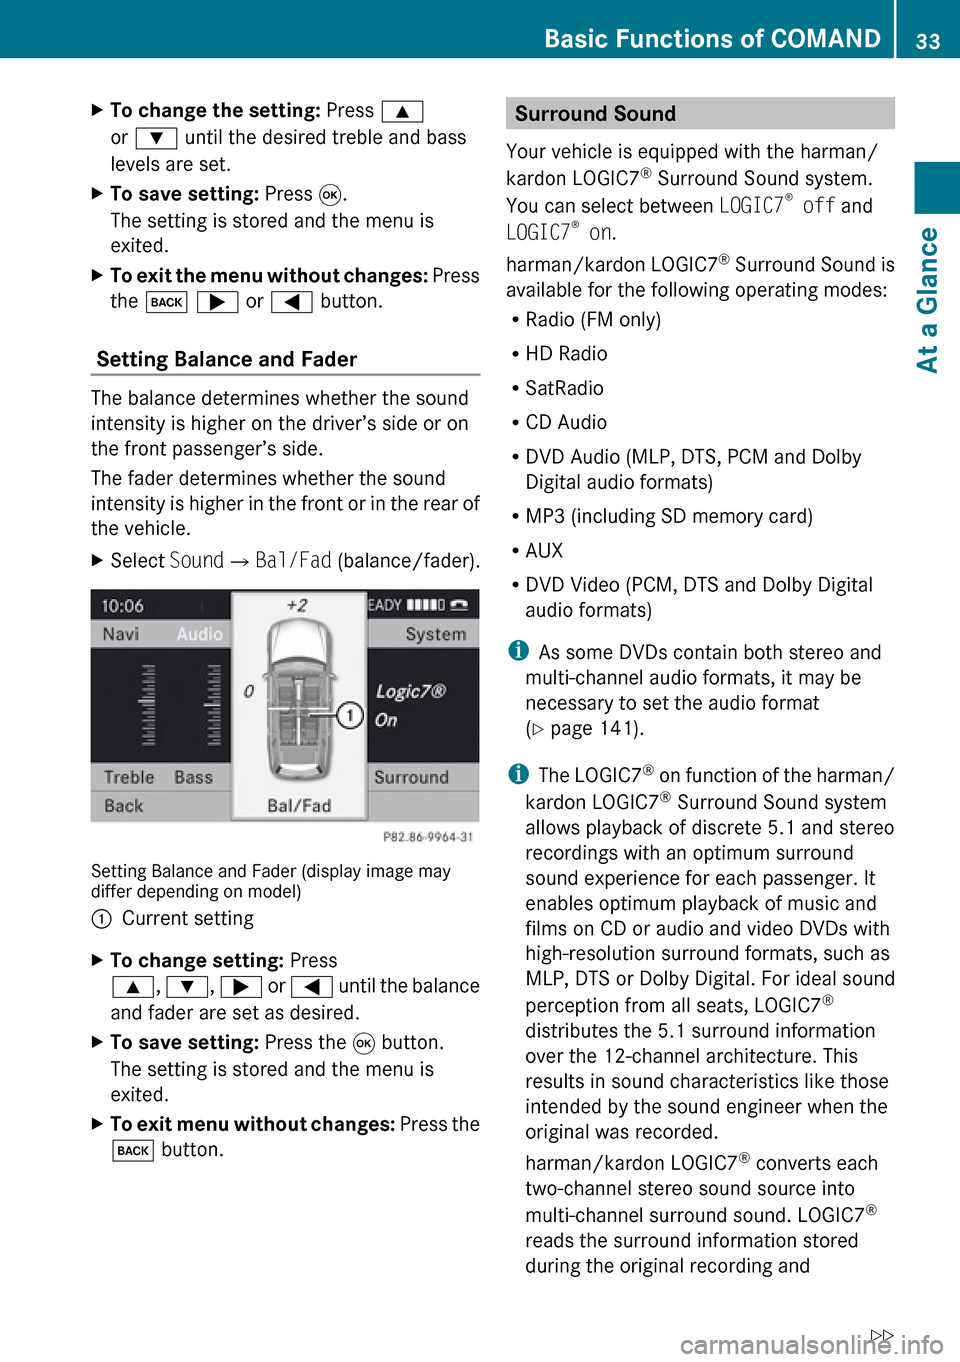
XSelect Sound£Bal/Fad (balance/fader).
Setting Balance and Fader (display image may
differ depending on model)
1Current settingXTo change setting: Press
9 , : , ; or = until the balance
and fader are set as desired.XTo save setting: Press the 9 button.
The setting is stored and the menu is
exited.XTo exit menu without changes: Press the
k button.Surround Sound
Your vehicle is equipped with the harman/
kardon LOGIC7 ®
Surround Sound system.
You can select between LOGIC7®
off and
LOGIC7 ®
on .
harman/kardon LOGIC7 ®
Surround Sound is
available for the following operating modes:
R Radio (FM only)
R HD Radio
R SatRadio
R CD Audio
R DVD Audio (MLP, DTS, PCM and Dolby
Digital audio formats)
R MP3 (including SD memory card)
R AUX
R DVD Video (PCM, DTS and Dolby Digital
audio formats)
i As some DVDs contain both stereo and
multi-channel audio formats, it may be
necessary to set the audio format
( Y page 141).
i The LOGIC7 ®
on function of the harman/
kardon LOGIC7 ®
Surround Sound system
allows playback of discrete 5.1 and stereo
recordings with an optimum surround
sound experience for each passenger. It
enables optimum playback of music and
films on CD or audio and video DVDs with
high-resolution surround formats, such as
MLP, DTS or Dolby Digital. For ideal sound
perception from all seats, LOGIC7 ®
distributes the 5.1 surround information
over the 12-channel architecture. This
results in sound characteristics like those
intended by the sound engineer when the
original was recorded.
harman/kardon LOGIC7 ®
converts each
two-channel stereo sound source into
multi-channel surround sound. LOGIC7 ®
reads the surround information stored
during the original recording andBasic Functions of COMAND33At a GlanceZ
Page 36 of 224
distributes it over the 12 channels. No
effects are created during the process,
anything that was always on the recording
is just made audible again. In addition,
harman/kardon LOGIC7 ®
moves the
perceived sound source away from the
loudspeakers and thereby generates a
natural 360° sound experience for every
passenger.
i If you select LOGIC7 ®
off, playback of all
recognized formats is as it is on the
medium. Due to the design of the
passenger compartment, an optimum
audio experience cannot be guaranteed for
all passengers.
i Discs which support the audio formats
mentioned have the following logos:
Dolby Digital
DTS
MLP
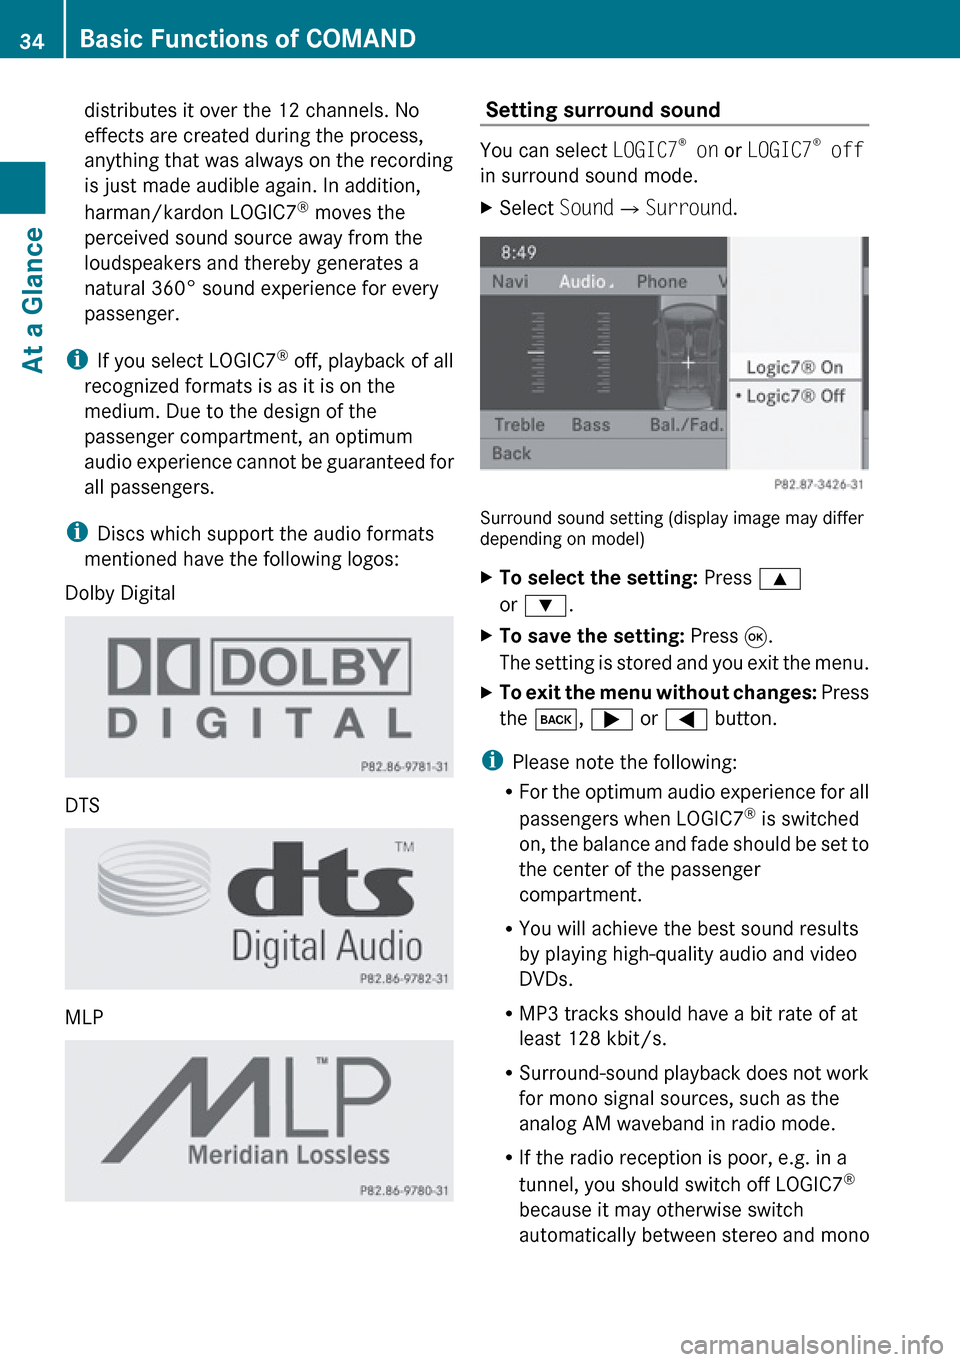
Setting surround sound
You can select LOGIC7®
on or LOGIC7 ®
off
in surround sound mode.
XSelect Sound£Surround .
Surround sound setting (display image may differ
depending on model)
XTo select the setting: Press 9
or : .XTo save the setting: Press 9.
The setting is stored and you exit the menu.XTo exit the menu without changes: Press
the k , ; or = button.
i
Please note the following:
R For the optimum audio experience for all
passengers when LOGIC7 ®
is switched
on, the balance and fade should be set to
the center of the passenger
compartment.
R You will achieve the best sound results
by playing high-quality audio and video
DVDs.
R MP3 tracks should have a bit rate of at
least 128 kbit/s.
R Surround-sound playback does not work
for mono signal sources, such as the
analog AM waveband in radio mode.
R If the radio reception is poor, e.g. in a
tunnel, you should switch off LOGIC7 ®
because it may otherwise switch
automatically between stereo and mono
34Basic Functions of COMANDAt a Glance
Page 39 of 224
System Menu Overview ......................38
Switching the Display On/Off ............39
Time ...................................................... 39
Language Setting ................................ 40
Display Settings .................................. 40
Read-Out .............................................. 40
Voice Control ....................................... 41
Rear View Camera ............................... 42
Bluetooth ............................................. 42
Reset .................................................... 4537System Settings
Page 40 of 224
System Menu Overview
Vehicle Equipment
i This Operator’s manual describes all
features, standard or optional, potentially
available for your vehicle at the time of
purchase. Please be aware that your
vehicle might not be equipped with all
features described in this manual.
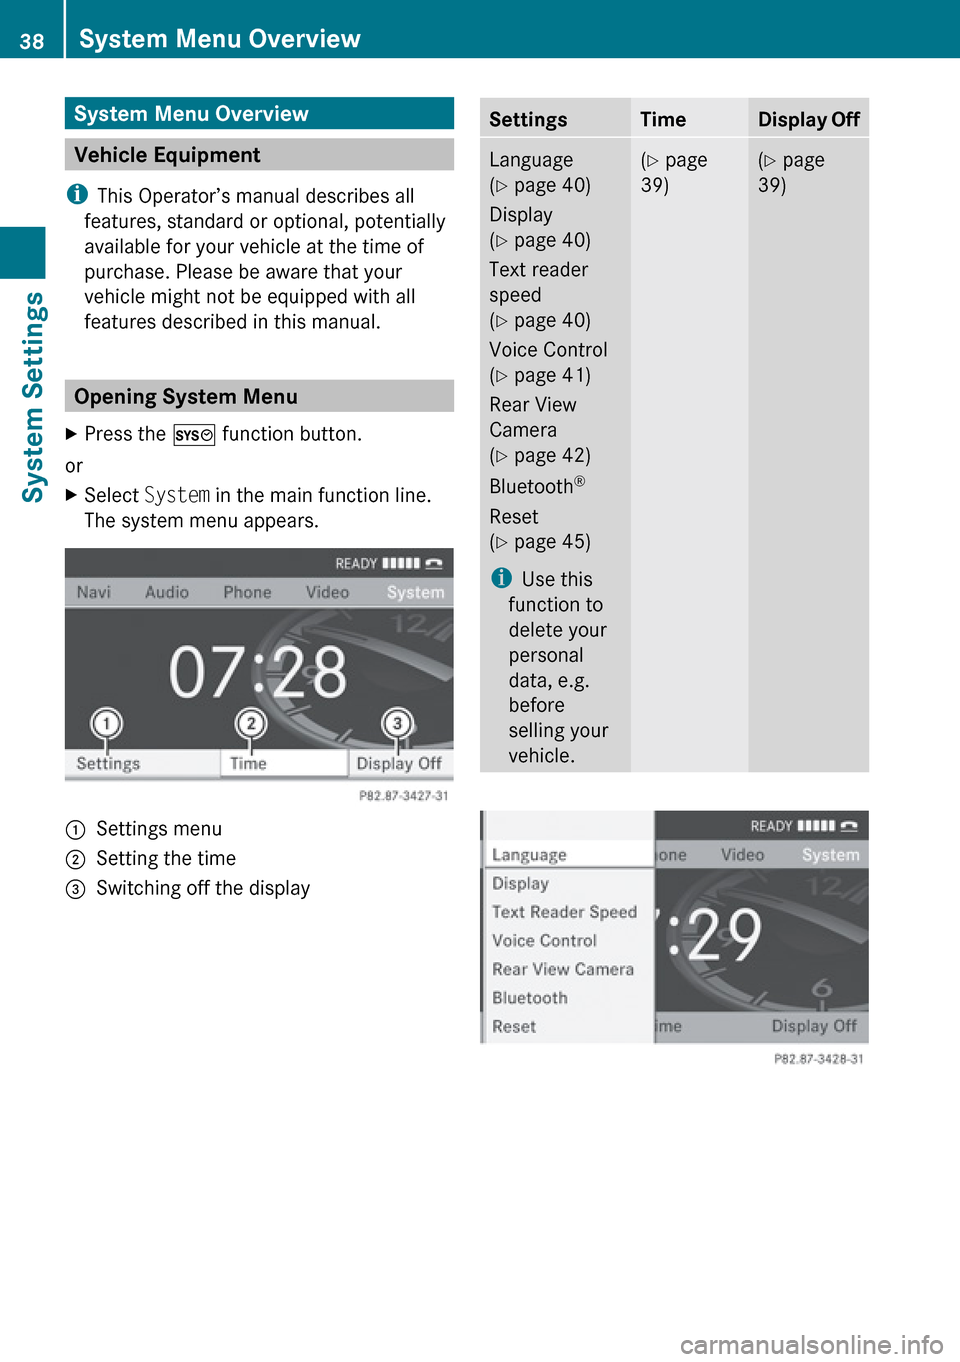
Opening System Menu
XPress the W function button.
or
XSelect System in the main function line.
The system menu appears.1Settings menu2Setting the time=Switching off the displaySettingsTimeDisplay OffLanguage
( Y page 40)
Display
( Y page 40)
Text reader
speed
( Y page 40)
Voice Control
( Y page 41)
Rear View
Camera
( Y page 42)
Bluetooth ®
Reset
( Y page 45)
i Use this
function to
delete your
personal
data, e.g.
before
selling your
vehicle.( Y page
39)( Y page
39)38System Menu OverviewSystem Settings
Page 41 of 224
Switching the Display On/OffXTo switch the display off: Select System
£ Display Off .
The display is switched off.XTo switch on the display: Press the 9
button, the k button or one of the
= , ; , : or 9 buttons.
or
XPress the q button.
The system menu appears.
i You can also press one of the function
buttons, e.g. the h button. This turns on
the display and switches to the
corresponding function.
Time
Setting the Time
i The correct time must be set for the
following functions to operate correctly:
R Calculation of expected time of arrival
R Time stamps for calls received and calls
dialed
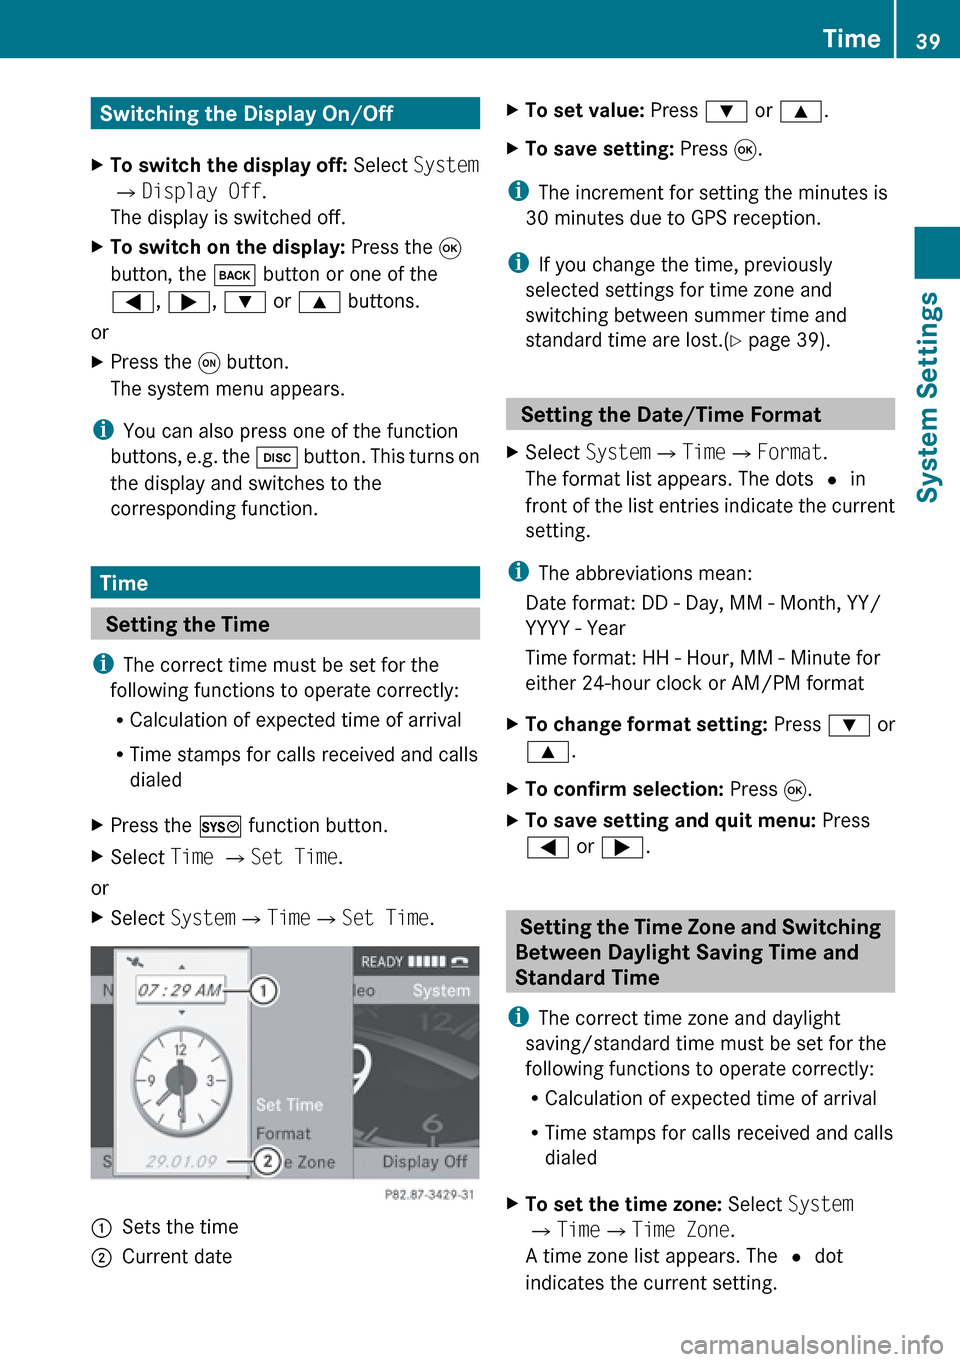
XPress the W function button.XSelect Time £ Set Time .
or
XSelect System £Time £Set Time .1Sets the time2Current dateXTo set value: Press : or 9 .XTo save setting: Press 9.
i
The increment for setting the minutes is
30 minutes due to GPS reception.
i If you change the time, previously
selected settings for time zone and
switching between summer time and
standard time are lost.( Y page 39).
Setting the Date/Time Format
XSelect System £Time £Format .
The format list appears. The dots R in
front of the list entries indicate the current
setting.
i The abbreviations mean:
Date format: DD - Day, MM - Month, YY/
YYYY - Year
Time format: HH - Hour, MM - Minute for
either 24-hour clock or AM/PM format
XTo change format setting: Press : or
9 .XTo confirm selection: Press 9.XTo save setting and quit menu: Press
= or ; .
Setting the Time Zone and Switching
Between Daylight Saving Time and
Standard Time
i The correct time zone and daylight
saving/standard time must be set for the
following functions to operate correctly:
R Calculation of expected time of arrival
R Time stamps for calls received and calls
dialed
XTo set the time zone: Select System
£ Time £Time Zone .
A time zone list appears. The R dot
indicates the current setting.Time39System SettingsZ
Page 42 of 224
XPress : or 9 to select the
appropriate time zone.XTo switch between Daylight Saving and
Standard Time: Select Daylight
Saving Time (Summer) or Standard
Time (Winter).
The R dot indicates the current setting.XTo save setting and exit menu:
Press = or ; .
Language Setting
This function allows you to determine the
language for the menu displays and the
navigation messages. The language selection
affects the input options in the editing and
smart speller.
XSelect System £Settings £Language .
The language list appears. The R dot
indicates the current setting.XTo change setting: Press : or 9 to
select the desired language.XTo confirm the language selection:
Press 9.
COMAND loads the selected language and
sets it.
Display Settings
Adjusting Brightness
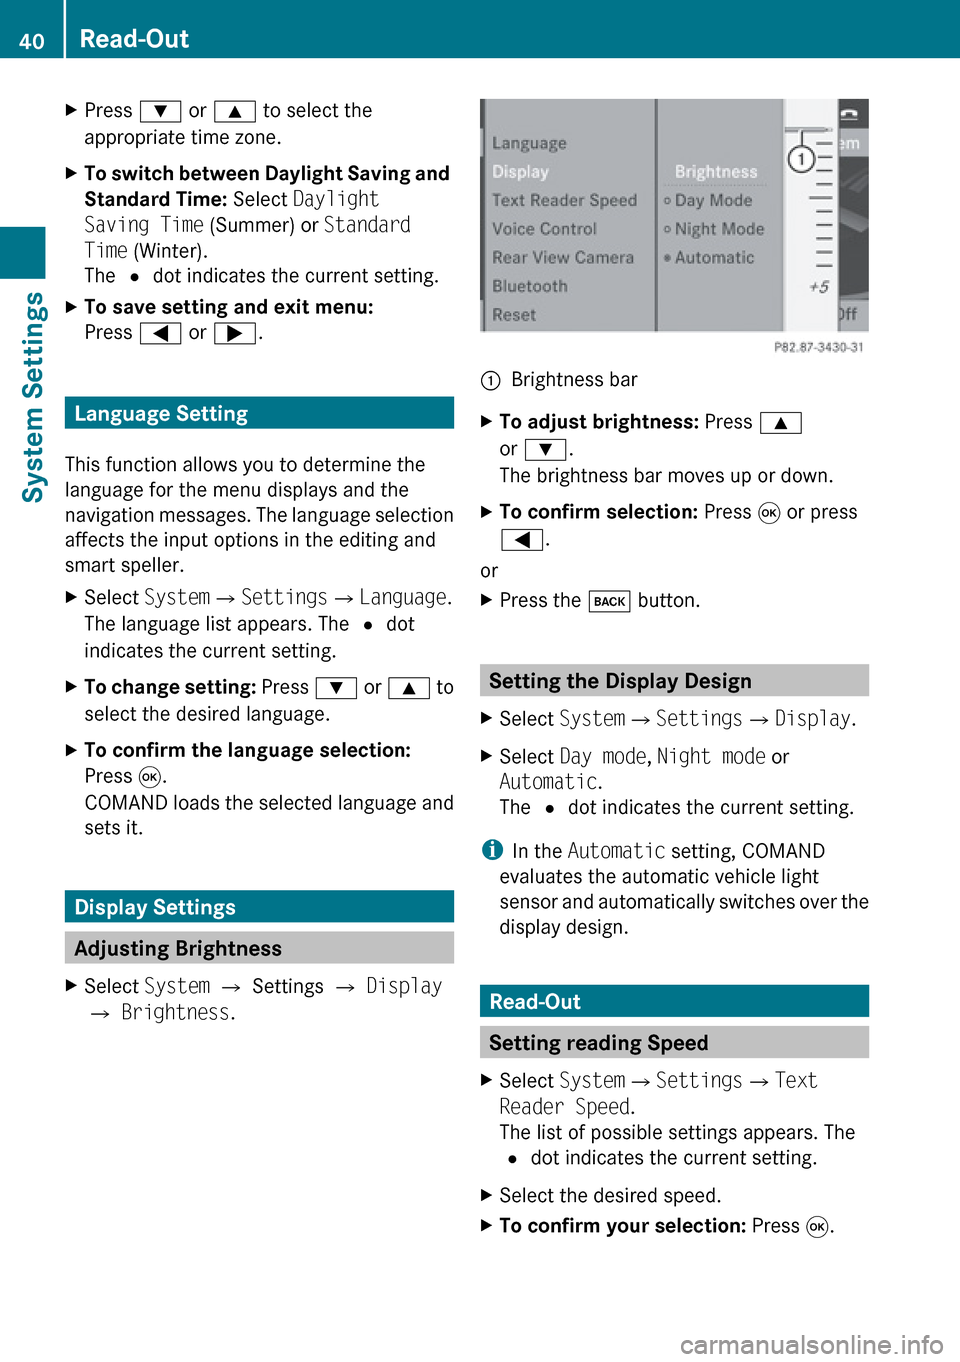
XSelect System £ Settings £ Display
£ Brightness .1Brightness barXTo adjust brightness: Press 9
or : .
The brightness bar moves up or down.XTo confirm selection: Press 9 or press
= .
or
XPress the k button.
Setting the Display Design
XSelect System £Settings £Display .XSelect Day mode , Night mode or
Automatic .
The R dot indicates the current setting.
i
In the Automatic setting, COMAND
evaluates the automatic vehicle light
sensor and automatically switches over the
display design.
Read-Out
Setting reading Speed
XSelect System £Settings £Text
Reader Speed .
The list of possible settings appears. The
R dot indicates the current setting.XSelect the desired speed.XTo confirm your selection: Press 9.40Read-OutSystem Settings