page 98 MERCEDES-BENZ R-Class 2012 W251 Owner's Guide
[x] Cancel search | Manufacturer: MERCEDES-BENZ, Model Year: 2012, Model line: R-Class, Model: MERCEDES-BENZ R-Class 2012 W251Pages: 368, PDF Size: 15.19 MB
Page 61 of 368
seat belt lies properly across their bodies
without the need for a booster seat.
Install the child restraint system according to
the manufacturer's instructions.
The child restraint system must be installed
firmly on both brackets.
An incorrectly installed child restraint system
can come loose in the event of an accident,
causing the child to be severely or fatally
injured.
Child restraint systems/child restraint
retaining brackets that are damaged or have
suffered damage due to an impact must be
replaced.
LATCH-type (ISOFIX) is a standardized
securing system for specially designed child
restraint systems on the rear seats.
Securing rings for two LATCH-type (ISOFIX)
child restraint systems are installed on the
left and right:
R on the seat cushions of the outer seats in
the second row
R on the backrests of the seats in the third
row of seats
Secure non LATCH-type (ISOFIX) child
restraint systems using the vehicle's seat belt
system. Always install child restraint systems
according to the manufacturer's instructions.XMove the rear seat backrests in the second
row to an upright position ( Y page 101).
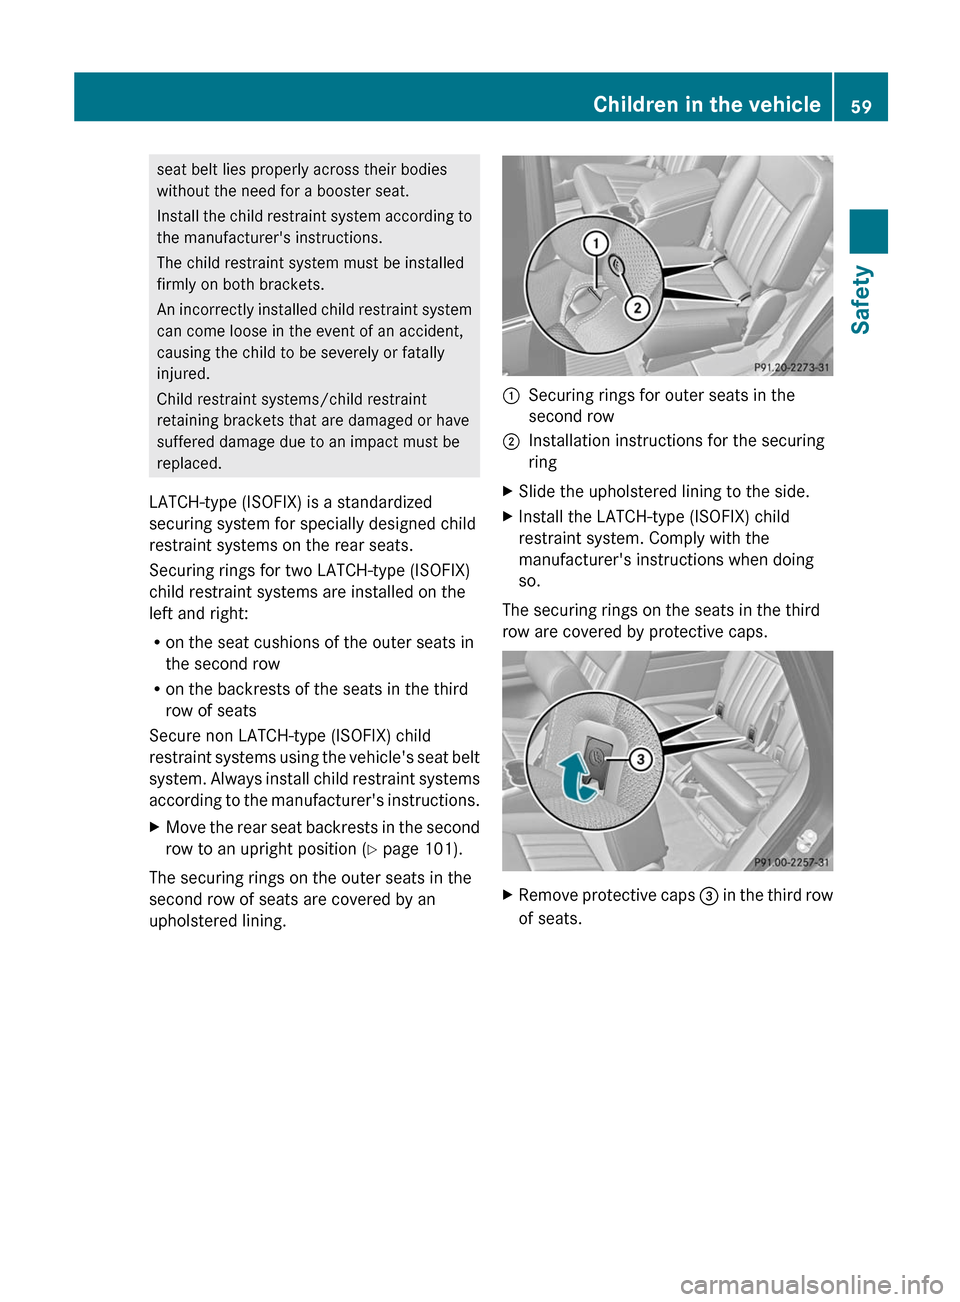
The securing rings on the outer seats in the
second row of seats are covered by an
upholstered lining.
:Securing rings for outer seats in the
second row;Installation instructions for the securing
ringXSlide the upholstered lining to the side.XInstall the LATCH-type (ISOFIX) child
restraint system. Comply with the
manufacturer's instructions when doing
so.
The securing rings on the seats in the third
row are covered by protective caps.
XRemove protective caps = in the third row
of seats.Children in the vehicle59SafetyZ
Page 62 of 368
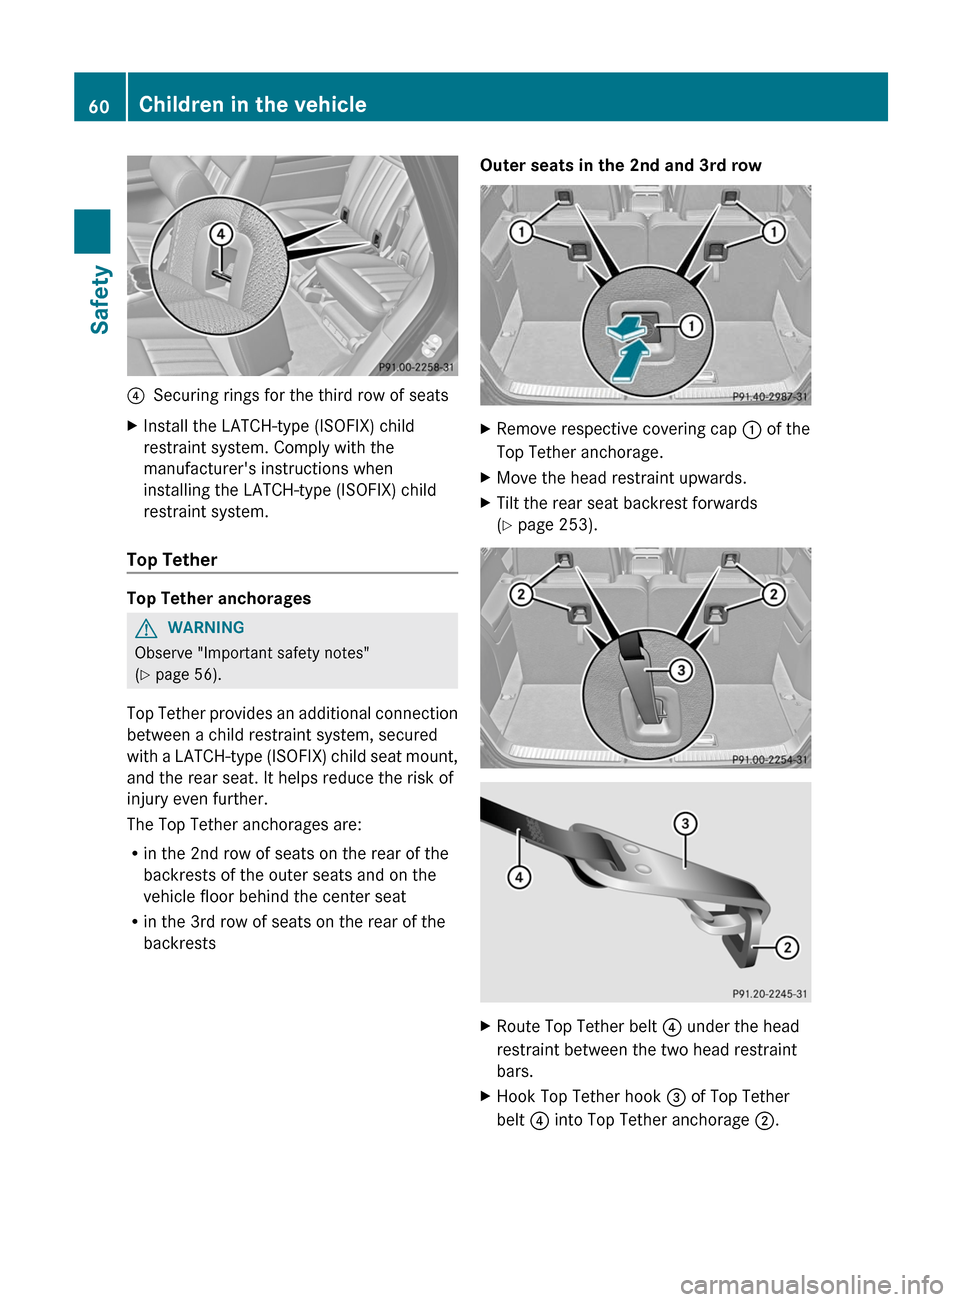
?Securing rings for the third row of seatsXInstall the LATCH-type (ISOFIX) child
restraint system. Comply with the
manufacturer's instructions when
installing the LATCH-type (ISOFIX) child
restraint system.
Top Tether
Top Tether anchorages
GWARNING
Observe "Important safety notes"
( Y page 56).
Top Tether provides an additional connection
between a child restraint system, secured
with a LATCH-type (ISOFIX) child seat mount,
and the rear seat. It helps reduce the risk of
injury even further.
The Top Tether anchorages are:
R in the 2nd row of seats on the rear of the
backrests of the outer seats and on the
vehicle floor behind the center seat
R in the 3rd row of seats on the rear of the
backrests
Outer seats in the 2nd and 3rd rowXRemove respective covering cap : of the
Top Tether anchorage.XMove the head restraint upwards.XTilt the rear seat backrest forwards
( Y page 253).XRoute Top Tether belt ? under the head
restraint between the two head restraint
bars.XHook Top Tether hook = of Top Tether
belt ? into Top Tether anchorage ;.60Children in the vehicleSafety
Page 63 of 368
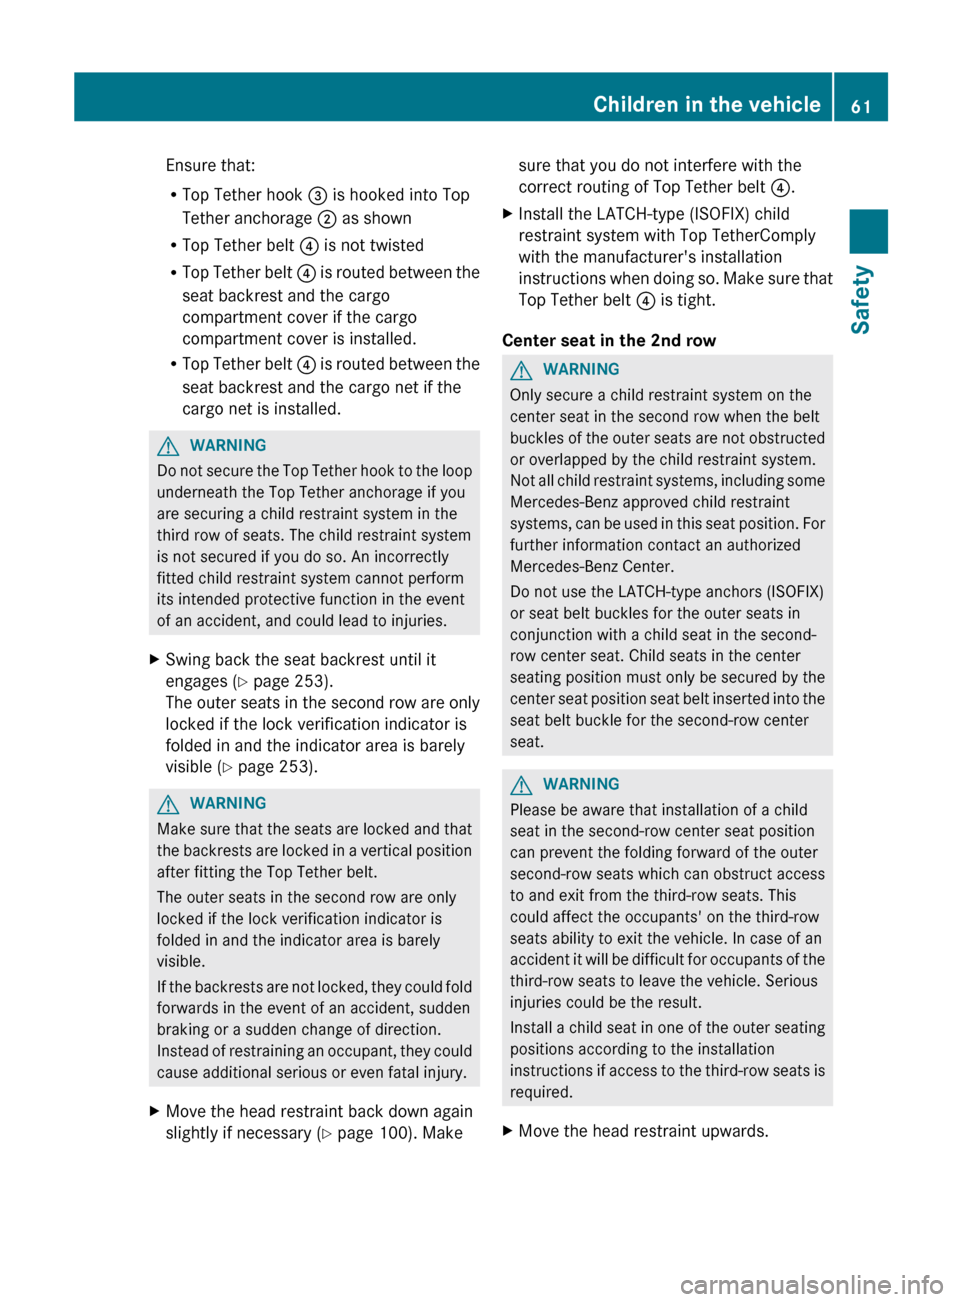
Ensure that:
R Top Tether hook = is hooked into Top
Tether anchorage ; as shown
R Top Tether belt ? is not twisted
R Top Tether belt ? is routed between the
seat backrest and the cargo
compartment cover if the cargo
compartment cover is installed.
R Top Tether belt ? is routed between the
seat backrest and the cargo net if the
cargo net is installed.GWARNING
Do not secure the Top Tether hook to the loop
underneath the Top Tether anchorage if you
are securing a child restraint system in the
third row of seats. The child restraint system
is not secured if you do so. An incorrectly
fitted child restraint system cannot perform
its intended protective function in the event
of an accident, and could lead to injuries.
XSwing back the seat backrest until it
engages ( Y page 253).
The outer seats in the second row are only
locked if the lock verification indicator is
folded in and the indicator area is barely
visible ( Y page 253).GWARNING
Make sure that the seats are locked and that
the backrests are locked in a vertical position
after fitting the Top Tether belt.
The outer seats in the second row are only
locked if the lock verification indicator is
folded in and the indicator area is barely
visible.
If the backrests are not locked, they could fold
forwards in the event of an accident, sudden
braking or a sudden change of direction.
Instead of restraining an occupant, they could
cause additional serious or even fatal injury.
XMove the head restraint back down again
slightly if necessary ( Y page 100). Makesure that you do not interfere with the
correct routing of Top Tether belt ?.XInstall the LATCH-type (ISOFIX) child
restraint system with Top TetherComply
with the manufacturer's installation
instructions when doing so. Make sure that
Top Tether belt ? is tight.
Center seat in the 2nd row
GWARNING
Only secure a child restraint system on the
center seat in the second row when the belt
buckles of the outer seats are not obstructed
or overlapped by the child restraint system.
Not all child restraint systems, including some
Mercedes-Benz approved child restraint
systems, can be used in this seat position. For
further information contact an authorized
Mercedes-Benz Center.
Do not use the LATCH-type anchors (ISOFIX)
or seat belt buckles for the outer seats in
conjunction with a child seat in the second-
row center seat. Child seats in the center
seating position must only be secured by the
center seat position seat belt inserted into the
seat belt buckle for the second-row center
seat.
GWARNING
Please be aware that installation of a child
seat in the second-row center seat position
can prevent the folding forward of the outer
second-row seats which can obstruct access
to and exit from the third-row seats. This
could affect the occupants' on the third-row
seats ability to exit the vehicle. In case of an
accident it will be difficult for occupants of the
third-row seats to leave the vehicle. Serious
injuries could be the result.
Install a child seat in one of the outer seating
positions according to the installation
instructions if access to the third-row seats is
required.
XMove the head restraint upwards.Children in the vehicle61SafetyZ
Page 64 of 368
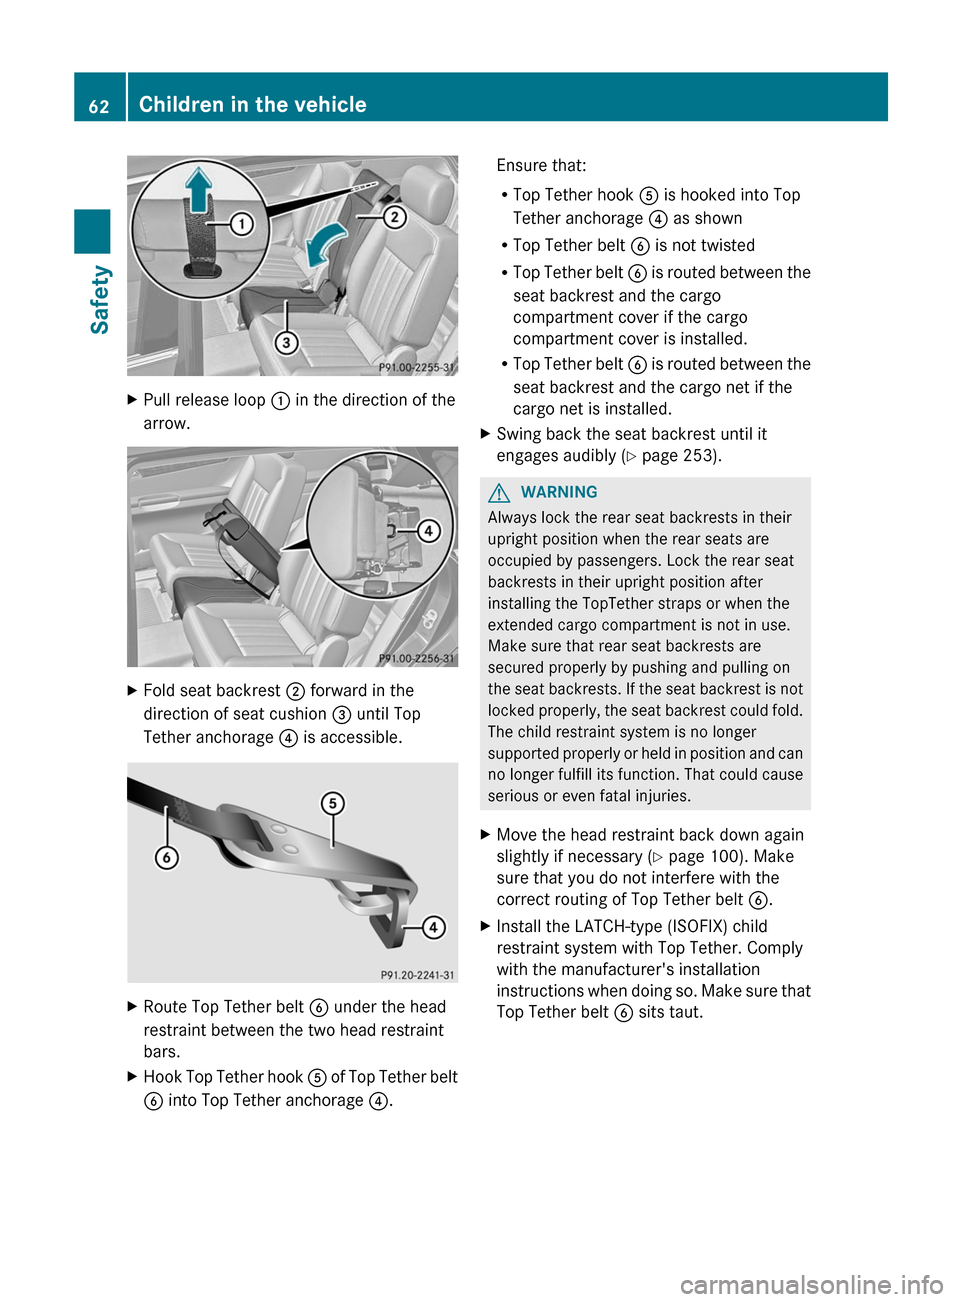
XPull release loop : in the direction of the
arrow.XFold seat backrest ; forward in the
direction of seat cushion = until Top
Tether anchorage ? is accessible.XRoute Top Tether belt B under the head
restraint between the two head restraint
bars.XHook Top Tether hook A of Top Tether belt
B into Top Tether anchorage ?.Ensure that:
R Top Tether hook A is hooked into Top
Tether anchorage ? as shown
R Top Tether belt B is not twisted
R Top Tether belt B is routed between the
seat backrest and the cargo
compartment cover if the cargo
compartment cover is installed.
R Top Tether belt B is routed between the
seat backrest and the cargo net if the
cargo net is installed.XSwing back the seat backrest until it
engages audibly ( Y page 253).GWARNING
Always lock the rear seat backrests in their
upright position when the rear seats are
occupied by passengers. Lock the rear seat
backrests in their upright position after
installing the TopTether straps or when the
extended cargo compartment is not in use.
Make sure that rear seat backrests are
secured properly by pushing and pulling on
the seat backrests. If the seat backrest is not
locked properly, the seat backrest could fold.
The child restraint system is no longer
supported properly or held in position and can
no longer fulfill its function. That could cause
serious or even fatal injuries.
XMove the head restraint back down again
slightly if necessary ( Y page 100). Make
sure that you do not interfere with the
correct routing of Top Tether belt B.XInstall the LATCH-type (ISOFIX) child
restraint system with Top Tether. Comply
with the manufacturer's installation
instructions when doing so. Make sure that
Top Tether belt B sits taut.62Children in the vehicleSafety
Page 67 of 368
section must never be exploited in a reckless
or dangerous manner which could jeopardize
the user's safety or the safety of others.
Always adjust your driving style to the
prevailing road and weather conditions and
keep a safe distance to other road users and
objects on the street.
If a driving system malfunctions, other driving
safety systems may also switch off. Observe
indicator and warning lamps that may come
on as well as messages in the multifunction
display that may appear.
i Please note that the driving safety
systems described only work as effectively
as possible when there is adequate contact
between the tires and the road surface. Pay
particular attention to the information
regarding tires, recommended minimum
tire tread depths etc. in the "Wheels and
tires" section ( Y page 322).
In wintry driving conditions, always use
winter tires (M+S tires) and if necessary,
snow chains. Only in this way will the
driving safety systems described in this
section work as effectively as possible.
ABS (Anti-lock Braking System)
Important safety notes
i Observe the "Important safety notes"
section ( Y page 64).
ABS regulates brake pressure in such a way
that the wheels do not lock when you brake.
This allows you to continue steering the
vehicle when braking.
ABS works from a speed of about
5 mph(8 km/h) upwards, regardless of road-
surface conditions. ABS works on slippery
surfaces, even when you only brake gently.
GWARNING
If the ABS malfunctions, other driving systems
such as the BAS or the ESP ®
are also switched
off. Observe indicator and warning lamps that
may come on as well as messages in the
multifunction display that may appear.
If the ABS malfunctions, the wheels may lock
during hard braking, reducing the steering
capability and extending the braking distance.
The ! warning lamp in the instrument
cluster lights up when the ignition is switched
on. It goes out when the engine is running.
Braking
If ABS intervenes when braking, you will feel
a pulsing in the brake pedal.
XIf ABS intervenes: continue to depress the
brake pedal with force until the braking
situation is over.XTo make a full brake application:
depress the brake pedal with full force.
The pulsating brake pedal can be an
indication of hazardous road conditions, and
functions as a reminder to take extra care
while driving.
GWARNING
Do not pump the brake pedal. Use firm, steady
brake pedal pressure instead. Pumping the
brake pedal defeats the purpose of the ABS
and significantly reduces braking
effectiveness.
BAS (Brake Assist System)
i Observe the "Important safety notes"
section ( Y page 64).
BAS operates in emergency braking
situations. If you depress the brake pedal
quickly, BAS automatically boosts the braking
force, thus shortening the stopping distance.
XKeep the brake pedal firmly depressed until
the emergency braking situation is over.
ABS prevents the wheels from locking.
The brakes will function as usual once you
release the brake pedal. BAS is deactivated.
Driving safety systems65SafetyZ
Page 68 of 368
GWARNING
If the BAS malfunctions, the brake system still
functions, but without the additional brake
boost available that the BAS would normally
provide in an emergency braking maneuver.
Therefore, the braking distance may increase.
ESP ®
(Electronic Stability Program)
Important safety notes
i See the "Important safety notes" section
( Y page 64).
If ESP ®
detects that the vehicle is deviating
from the direction desired by the driver, one
or more wheels are braked to stabilize the
vehicle. If necessary, the engine output is also
modified to keep the vehicle on the desired
course within physical limits. ESP ®
assists
the driver when pulling away on wet or
slippery roads. ESP ®
can also stabilize the
vehicle during braking.
If ESP ®
intervenes, the ÷ ESP®
warning
lamp flashes in the instrument cluster.
GWARNING
Under no circumstances should you
deactivate ESP ®
when the ÷ ESP®
warning lamp in the instrument cluster
flashes. Proceed as follows:
R when driving off, apply as little throttle as
possible.
R while driving, ease up on the accelerator
pedal.
R adapt your speed to suit the prevailing road
and weather conditions.
Failure to observe these guidelines could
cause the vehicle to skid. ESP ®
cannot
prevent accidents resulting from excessive
speed.
! Only operate the vehicle for a maximum
of ten seconds on a brake test
dynamometer. Switch off the ignition.
Application of the brakes by ESP ®
may
otherwise destroy the brake system.
! Function or performance tests may only
be performed on a 2-axle dynamometer. If
you wish to operate the vehicle on such a
dynamometer, please consult an
authorized Mercedes-Benz Center
beforehand. You could otherwise damage
the drive train or the brake system.
i Only use wheels with the recommended
tire sizes. Only then will ESP ®
function
properly.
4ETS (Electronic Traction System)
i Observe the "Important safety notes"
section ( Y page 64).
Traction control is part of ESP ®
.
Traction control brakes the drive wheels
individually if they spin. This enables you to
pull away and accelerate on slippery surfaces,
for example if the road surface is slippery on
one side. In addition, more drive torque is
transferred to the wheel or wheels with
traction.
Traction control remains active if you
deactivate ESP ®
.
GWARNING
Traction control cannot reduce the risk of an
accident if you drive too fast. Traction control
cannot override the laws of physics.
Deactivating/activating ESP ®
i
Observe the "Important safety notes"
section ( Y page 64).
GWARNING
ESP ®
should not be deactivated during
normal driving other than in the
circumstances described below. Disabling
the system will reduce vehicle stability in
driving maneuvers.
Do not deactivate ESP ®
when the emergency
or spare wheel is mounted.
66Driving safety systemsSafety
Page 70 of 368
Trailers with a high center of gravity may tip
over before the system recognizes swaying of
the trailer.
Trailer stabilization does not work if ESP ®
is
deactivated or disengaged because of a
malfunction.
EBD (electronic brake force
distribution)
i Observe the "Important safety notes"
section ( Y page 64).
EBD monitors and controls the brake
pressure on the rear wheels to improve
driving stability while braking.
GWARNING
If EBD has malfunctioned, the braking system
remains available with full brake boosting
effect. However, the rear wheels can still lock,
e.g. under full braking. This could cause you
to lose control of your vehicle and cause an
accident. You should therefore adapt your
driving style to the different handling
characteristics.
XObserve the notes on warning and indicator
lamps ( Y page 240) as well as display
messages ( Y page 216).
Distance warning function (vehicles
with DISTRONIC)
This function provides a warning from a speed
of approximately 20 mph(30 km/h), if:
R for a period of several seconds, the
distance to the vehicle in front is too short
for the speed at which you are traveling.
The · distance warning lamp in the
instrument cluster will light up.
R you are rapidly approaching the vehicle in
front. An intermittent warning tone will
then sound and the · distance warning
lamp will light up in the instrument cluster.
You must apply the brakes yourself in order
to maintain the appropriate distance to the
vehicle in front and prevent a collision.GWARNING
If the distance warning lamp · in the
instrument cluster comes on while driving
and/or an intermittent warning sounds,
immediate attention on the part of the driver
is required. As required by the traffic
situation, apply the brakes and navigate
around a possible obstacle. However, do not
drive by relying on the distance warning
function, as this will result in an emergency
braking application. This will not always
enable you to avoid a collision, especially
when traveling on varying road surface
conditions and with varying driver reaction.
Complex driving situations are not always
fully recognized by the distance warning
function. This could result in wrong or missing
distance warnings.
XTo activate/deactivate: activate or
deactivate the distance warning function in
the on-board computer ( Y page 210).
After activation, the Ä symbol is
displayed in the lower multifunction
display.
Theft deterrent locking systems
Immobilizer
The immobilizer prevents your vehicle from
being started without the correct SmartKey.
When leaving the vehicle, always take the
SmartKey with you and lock the vehicle. The
engine can be started by anyone with a valid
SmartKey that is left inside the vehicle.
XTo activate with the SmartKey: remove
the SmartKey from the ignition lock.XTo activate with KEYLESS-GO: switch the
ignition off and open the driver's door.XTo deactivate: switch on the ignition.68Theft deterrent locking systemsSafety
Page 74 of 368
Useful information
i This Operator's Manual describes all
models and all standard and optional
equipment of your vehicle available at the
time of publication of the Operator's
Manual. Country-specific differences are
possible. Please note that your vehicle may
not be equipped with all features
described. This also applies to safety-
related systems and functions.
i Please read the information on qualified
specialist workshops ( Y page 24).
SmartKey
Important safety notes
GWARNING
When leaving the vehicle, always remove the
SmartKey from the ignition lock. Always take
the SmartKey with you and lock the vehicle.
Do not leave children unsupervised in the
vehicle, even if they are secured in a child
restraint system, and do not give them access
to an unlocked vehicle. A child's unsupervised
access to a vehicle could result in an accident
and/or serious personal injury. They could:
R injure themselves on vehicle parts
R be seriously or fatally injured by extreme
heat or cold
R injure themselves or have an accident with
vehicle equipment that may still be in
operation even after the SmartKey has
been removed from the ignition, such as the
seat adjustment, steering wheel
adjustment or memory function.
If children open a door, they could cause
severe or even fatal injury to other persons; if
they get out of the vehicle, they could injure
themselves when doing so or be seriously or
even fatally injured by any passing traffic.
Do not expose the child restraint system to
direct sunlight. The child restraint system's
metal parts, for example, could become very
hot, and a child could be burned on these
parts.GWARNING
If a key ring is too heavy or too large, the
weight acting on the key could cause it to turn
in the ignition lock or catch on the steering
wheel. This could cause the engine to be
switched off suddenly. You could lose control
of the vehicle and cause an accident. Do not
attach any heavy or large key rings to the key
that is inserted in the ignition.
General information
If you cannot lock or unlock the vehicle with
the SmartKey, either the battery in the
SmartKey is discharged, the SmartKey is
faulty or the starter battery is discharged.
XCheck the battery in the SmartKey and
replace it if necessary ( Y page 76).XUnlock the driver's door using the
mechanical key ( Y page 81).XLock the vehicle ( Y page 81).XHave the starter battery and battery
contacts checked at an authorized
Mercedes-Benz Center.
If the SmartKey is faulty, contact Roadside
Assistance or an authorized Mercedes-Benz
Center.
SmartKey functions
General notes
i USA only:
This device complies with Part 15 of the
FCC Rules. Operation is subject to the
following two conditions:
1. This device may not cause harmful
interference, and
2. this device must accept any interference
received, including interference that may
cause undesired operation.
72SmartKeyOpening/closing
Page 75 of 368
Any unauthorized modification to this
device could void the user’s authority to
operate the equipment.
The product label with FCC ID and IC
certification number can be found in the
battery case of the SmartKey.
i Canada only:
This device complies with RSS-210 of
Industry Canada. Operation is subject to
the following two conditions:
1. This device may not cause interference,
and
2. this device must accept any interference
received, including interference that may
cause undesired operation of the device.
Any unauthorized modification to this
device could void the user’s authority to
operate the equipment.
The product label with FCC ID and IC
certification number can be found in the
battery case of the SmartKey.
Locking and unlocking centrally
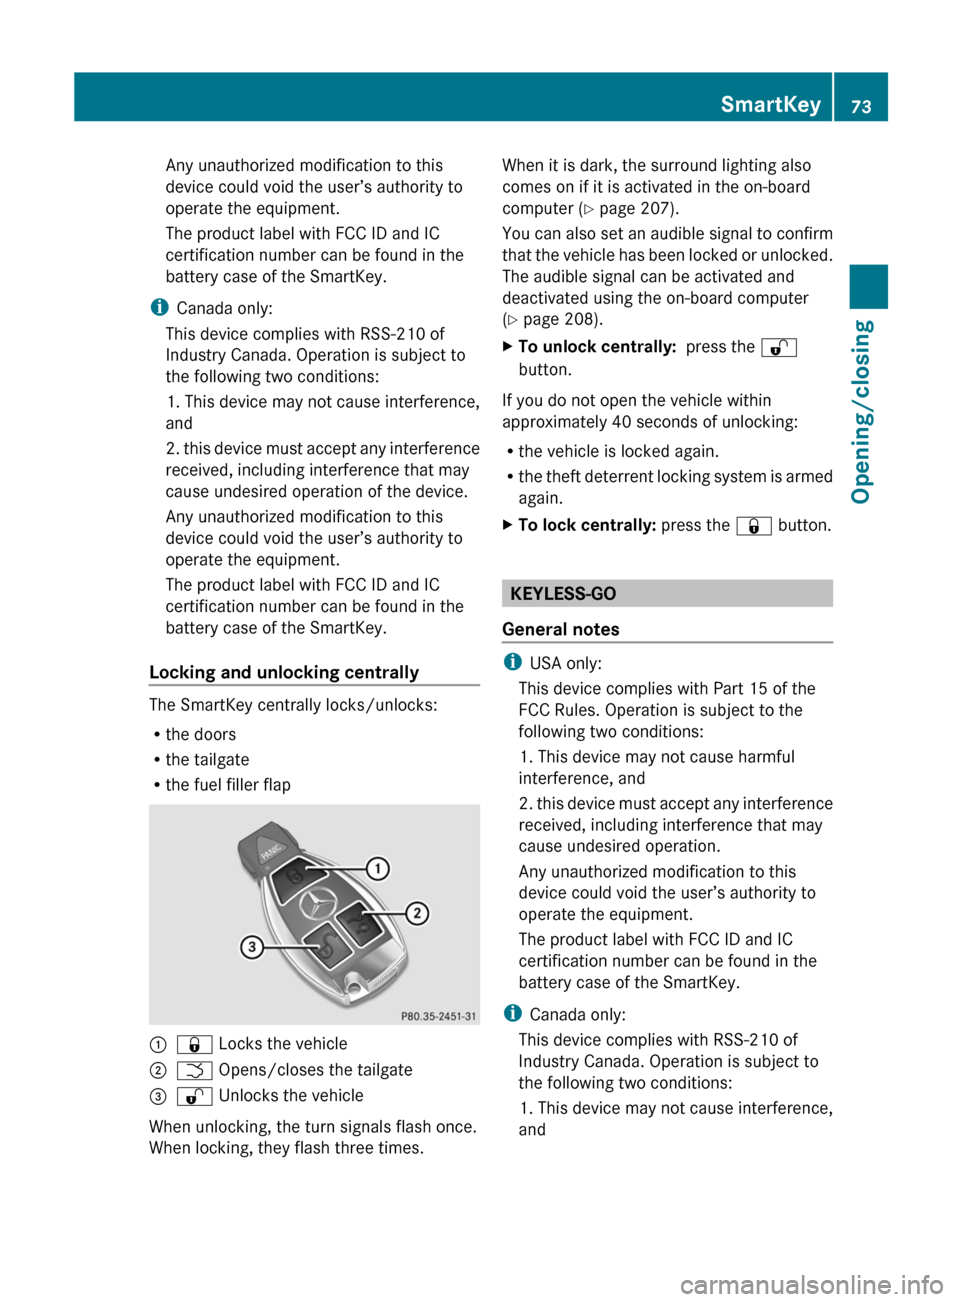
The SmartKey centrally locks/unlocks:
R the doors
R the tailgate
R the fuel filler flap
:& Locks the vehicle;F Opens/closes the tailgate=% Unlocks the vehicle
When unlocking, the turn signals flash once.
When locking, they flash three times.
When it is dark, the surround lighting also
comes on if it is activated in the on-board
computer ( Y page 207).
You can also set an audible signal to confirm
that the vehicle has been locked or unlocked.
The audible signal can be activated and
deactivated using the on-board computer
( Y page 208).XTo unlock centrally: press the %
button.
If you do not open the vehicle within
approximately 40 seconds of unlocking:
R the vehicle is locked again.
R the theft deterrent locking system is armed
again.
XTo lock centrally: press the & button.
KEYLESS-GO
General notes
i USA only:
This device complies with Part 15 of the
FCC Rules. Operation is subject to the
following two conditions:
1. This device may not cause harmful
interference, and
2. this device must accept any interference
received, including interference that may
cause undesired operation.
Any unauthorized modification to this
device could void the user’s authority to
operate the equipment.
The product label with FCC ID and IC
certification number can be found in the
battery case of the SmartKey.
i Canada only:
This device complies with RSS-210 of
Industry Canada. Operation is subject to
the following two conditions:
1. This device may not cause interference,
and
SmartKey73Opening/closingZ
Page 77 of 368
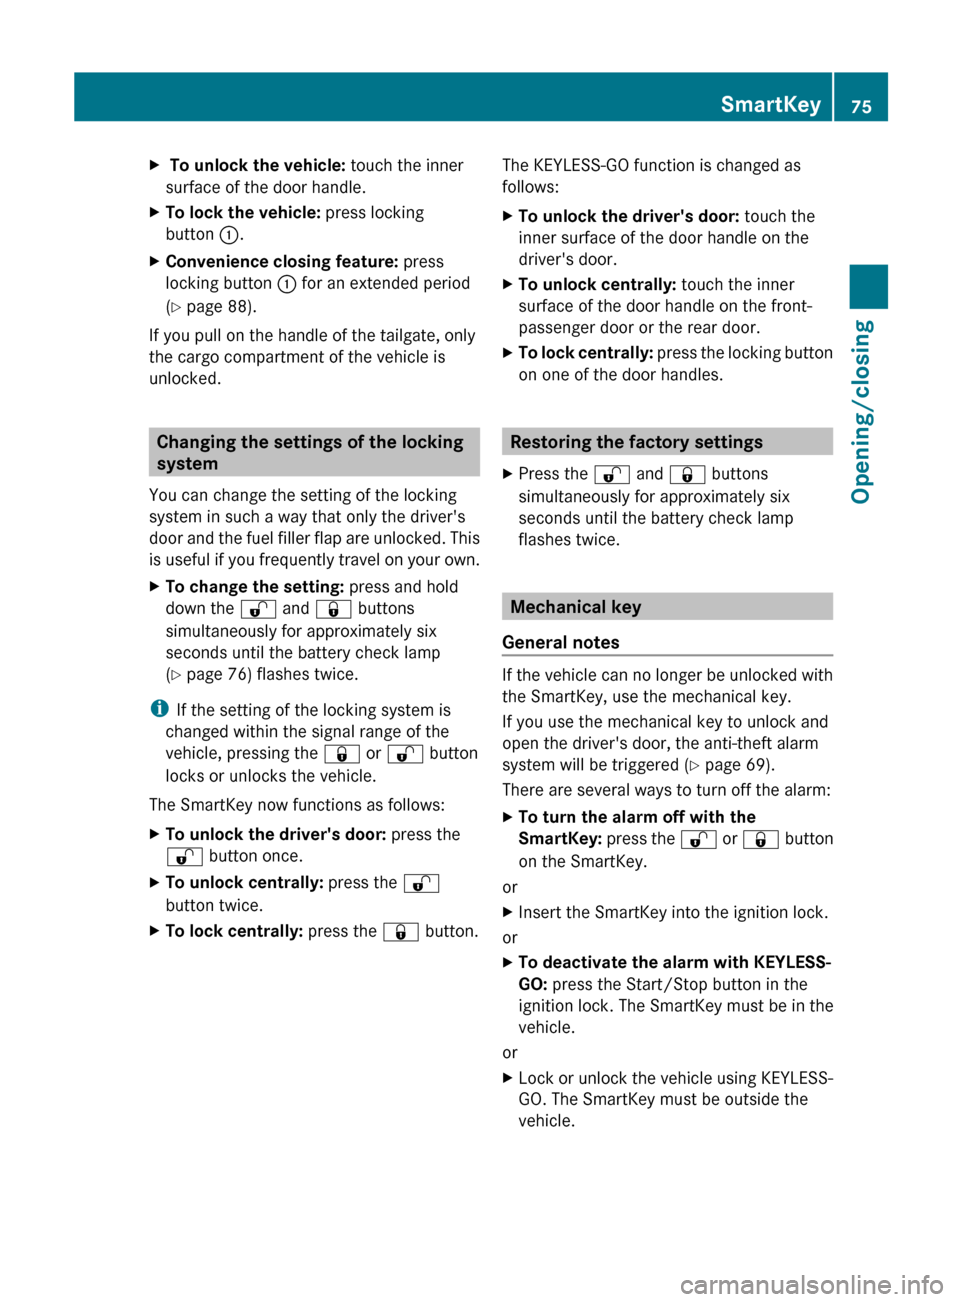
X To unlock the vehicle: touch the inner
surface of the door handle.XTo lock the vehicle: press locking
button :.XConvenience closing feature: press
locking button : for an extended period
( Y page 88).
If you pull on the handle of the tailgate, only
the cargo compartment of the vehicle is
unlocked.
Changing the settings of the locking
system
You can change the setting of the locking
system in such a way that only the driver's
door and the fuel filler flap are unlocked. This
is useful if you frequently travel on your own.
XTo change the setting: press and hold
down the % and & buttons
simultaneously for approximately six
seconds until the battery check lamp
( Y page 76) flashes twice.
i
If the setting of the locking system is
changed within the signal range of the
vehicle, pressing the & or % button
locks or unlocks the vehicle.
The SmartKey now functions as follows:
XTo unlock the driver's door: press the
% button once.XTo unlock centrally: press the %
button twice.XTo lock centrally: press the & button.The KEYLESS-GO function is changed as
follows:XTo unlock the driver's door: touch the
inner surface of the door handle on the
driver's door.XTo unlock centrally: touch the inner
surface of the door handle on the front-
passenger door or the rear door.XTo lock centrally: press the locking button
on one of the door handles.
Restoring the factory settings
XPress the % and & buttons
simultaneously for approximately six
seconds until the battery check lamp
flashes twice.
Mechanical key
General notes
If the vehicle can no longer be unlocked with
the SmartKey, use the mechanical key.
If you use the mechanical key to unlock and
open the driver's door, the anti-theft alarm
system will be triggered ( Y page 69).
There are several ways to turn off the alarm:
XTo turn the alarm off with the
SmartKey: press the % or & button
on the SmartKey.
or
XInsert the SmartKey into the ignition lock.
or
XTo deactivate the alarm with KEYLESS-
GO: press the Start/Stop button in the
ignition lock. The SmartKey must be in the
vehicle.
or
XLock or unlock the vehicle using KEYLESS-
GO. The SmartKey must be outside the
vehicle.SmartKey75Opening/closingZ