turn signal bulb MERCEDES-BENZ R-CLASS FAMILY TOURER 2013 Owners Manual
[x] Cancel search | Manufacturer: MERCEDES-BENZ, Model Year: 2013, Model line: R-CLASS FAMILY TOURER, Model: MERCEDES-BENZ R-CLASS FAMILY TOURER 2013Pages: 364, PDF Size: 28.68 MB
Page 9 of 364
Cargo compartment enlargement
Full ................................................ .255
Important safety notes ..................254
Partial ............................................ 255
Cargo compartment floor .................298
Cargo net Attaching ....................................... 263
Important safety information .........262
Cargo tie down rings .........................259
Car keys see SmartKey
Car wash (care) ................................. 290
CD player/CD changer (on-board
computer) .......................................... 204
Center console 2nd row of seats ............................ 253
Lowe rsection .................................. 35
Uppe rsection .................................. 34
Central locking
Automatic locking (on-board
computer) ...................................... 209
Locking/unlocking (SmartKey) ........77
Changing bulbs
High-beam headlamps ...................128
Important safety notes ..................125
License plate lighting .....................130
Low-beam headlamps ....................127
Overview of bul btypes .................. 126
Parking lamps ................................ 128
Removing/replacing the cover
(front wheel arch) .......................... 127
Reversing lamps ............................ 129
Side marker lamps .........................128
Standing lamps (front) ...................128
Turn signals (front) ......................... 128
Child-proof locks
Important safety notes ....................66
Rea rdoors ....................................... 67
Children
In the vehicle ................................... 60
Restraint systems ............................ 60
Specia lseat belt retractor ...............62
Child seat
LATCH-type (ISOFIX) child seat
anchors ............................................ 63
Top Tether ....................................... 64
Cigarette lighter ................................ 268Cleaning
Mirro rturn signal ........................... 293
Trailer tow hitch ............................. 294
Climate control
Automatic climate control (3-
zone) .............................................. 136
Controlling automatically ...............139
Cooling with aird ehumidification..138
Defrosting the windows .................142
Defrosting the windshield ..............142
Dual-zone automatic climate
control ........................................... 135
Important safety notes ..................134
Indicator lamp ................................ 139
Information on using 3-zone
automatic climate control ..............137
Notes on using automatic climate
control ........................................... 135
Overview of systems ......................134
Problems with cooling with air
dehumidification ............................ 139
Problem with the rear window
defroster ........................................ 143
Rea rcontrol panel ......................... 136
Setting the aird istribution.............141
Setting the airflow .........................141
Setting the airv ents...................... 144
Setting the temperature ................140
Switching air-recirculation mode
on/off ............................................ 143
Switching on/off ........................... 137
Switching residual hea ton/off ......143
Switching the MONO function on/
off .................................................. 141
Switching the rear window
defroster on/off ............................ 142
Clock (on-board computer) ...............207
Cockpit Overview .......................................... 30
see Instrument cluster
Collapsible spare wheel
Inflating ......................................... 343
see Emergency spare wheel
COMAND
see separate operating instructions
COMAND display
Cleaning ......................................... 294
Combination switch ..........................1236
Index
Page 14 of 364
Instrumen
tcluster
Overview .......................................... 31
Selecting the language (on-board
computer) ...................................... 207
Settings ......................................... 206
Warning and indicator lamps ...........32
Instrument cluster lighting ..............200
Interior lighting ................................. 124
Automatic control ..........................125
Delayed switch-off (on-board
computer) ...................................... 209
Emergency lighting ........................125
Manual control ............................... 125
Overview ........................................ 124
Reading lamp ................................. 124J
Jack Storage location ............................ 298
Using ............................................. 336
Jump-start (engine)
see Jump starting (engine)
Jump starting (engine) ......................304 K
KEYLESS-GO Convenience closing feature ............91
Display message ............................ 237
Locking ............................................ 77
Start/Stop button .......................... 149
Starting the engine ........................151
Unlocking ......................................... 77
Keyp ositions
KEYLESS-GO .................................. 149
SmartKey ....................................... 149
Kickdown
Driving tips .................................... 157L
Lamps see Warning and indicator lamps
Language (on-board computer) ........207
LATCH-type (ISOFIX) child seat
anchors ................................................ 63
Level control (display message) ......228 Level control (vehicle with
AIRMATIC package)
Basi csettings ................................ 184
Function/notes ............................. 183
Important safety notes ..................183
License plate lamp
Changing bulbs .............................. 130
Display message ............................ 223
Lights
Activating/deactivating the
exterio rlighting delayed switch-
off .................................................. 208
Activating/deactivating the
interio rlighting delayed switch-off .209
Automatic headlamp mode ............121
Driving abroad ............................... 120
Fog lamps ...................................... 122
Hazard warning lamps ...................124
High beam flasher .......................... 123
High-beam headlamps ...................123
Ligh tswitc h................................... 120
Low-beam headlamps ....................121
Parking lamps ................................ 121
Rea rfog lamp ................................ 122
Standing lamps .............................. 121
Switching the daytime running
lamps on/off (on-board
computer) ...................................... 207
Switching the daytime running
lamps on/off (switch) ....................121
Switching the surround lighting
on/off (on-board computer) ..........208
Turn signals ................................... 123
see Changing bulbs
see Interior lighting
Light sensor (display message) .......224
Loading guidelines ............................250
Locking see Centra llocking
Locking (doors)
Automatic ........................................ 83
Emergency locking ........................... 84
From inside (central locking
button) ............................................. 83
Locking centrally
see Centra llocking
Locking verification signal (on-
board computer) ............................... 209 Index
11
Page 21 of 364
TIN (Tire Identification Number)
(definition
)..................................... 333
Tire bead( definition) ...................... 333
Tire pressure (definition) ................333
Tire pressures (recommended )...... 332
Tire size (data) ............................... 339
Tire size designation, load-bearing
capacity, speed rating .................... 328
Tire tread ....................................... 313
Tire tread (definition) .....................333
Total load limit (definition) .............334
Traction ......................................... 327
Traction (definition) .......................334
Trea dwear ..................................... 327
TWR (permissible trailer drawbar
noseweight) (definition) .................334
Uniform Tire Quality Grading
Standard s...................................... 326
Uniform Tire Quality Grading
Standard s(definition) .................... 332
Unladen weight (definition) ............333
Wea rindicato r(definition) .............334
Whee lrim (definition ).................... 332
see Flat tire
Top Tether ............................................ 64
Towing Important safety guidelines ...........306
Installing the towing eye ................307
Removing the towing eye. ..............307
Towing atrailer
Cleaning the trailer tow hitch ......... 294
Coupling up atrailer ...................... 194
Decoupling atrailer ....................... 196
Driving tips .................................... 193
ESP ®
(Electronic Stability
Program) .......................................... 70
Important safety notes ..................193
Lights displaym essage.................. 221
Power supply ................................. 197
Shift range ..................................... 157
Towing away
With both axles on the ground .......307
Tow-starting
Emergency engine starting ............308
Important safety notes ..................306
Trailer coupling
see Towing atrailer Trailer loads and drawbar
noseweights
...................................... 196
Trailer towing Blind Spot Assist ............................ 193
PARKTRONI C................................. 188
Permissible trailer loads and
drawbarn oseweights ..................... 196
Transfer case ..................................... 160
Transmission see Automatic transmission
Transporting the vehicle ..................308
Trim pieces (cleaning instructions) .295
Trip computer (on-board
computer) .......................................... 211
Trip odometer Calling up ....................................... 203
Resetting (on-board computer) ......212
Trunk
see Tailgate
Turn signals
Changing bulbs (front) ...................128
Display message ............................ 222
Switching on/off ........................... 123
TWR (Tongue Weight Rating)
(definition) ......................................... 334
Type identification plate see Vehicle identification plate U
Unlocking Emergency unlocking .......................84
From inside the vehicle (central
unlocking button) ............................. 83 V
Vanity mirror (in the sun visor) ........267
Vehicle Correct use ...................................... 24
Data acquisition ............................... 25
Display message ............................ 234
Equipment ....................................... 21
Individua lsettings .......................... 206
Limited Warranty ............................. 25
Loading .......................................... 323
Locking (in an emergency) ...............84
Locking (SmartKey) .......................... 77 18
Index
Page 129 of 364
If yourv
ehicle is equipped with Xenon bulbs,
you can recognize this by the following: the
cone of light from the Xenon bulbs moves
from the top to the bottom and back again
when you start the engine. For this to be
observed, the lights must be switched on
before starting the engine.
Bulbs and lamps are an important aspect of
vehicle safety. You must therefore make sure
that these function correctly at all times.
Have the headlamp setting checked regularly.
Other bulbs G
WARNING
Bulbs and lamps can become very hot. For
this reason, allow them to cool down before
changing them. Otherwise, you could burn
yourself when you touch them.
Keep bulbs out of the reach of children.
Otherwise, they could, for example, damage
the bulbs and injure themselves.
Never use a bulb which has been dropped.
Such a bulb may explode and injure you.
Halogen bulbs are pressurized and could
explode when you change them, especially if
they are very hot. You should therefore wear
eye protection and gloves when you are
changing them.
There are bulbs other than the Xenon bulbs
that you cannot replace. Replace only the
bulbs listed (Y page 126). Have the bulbs that
you cannot replace yourself changed at a
qualified specialist workshop.
If you require assistance changing bulbs,
consult a qualified specialist workshop.
Do not touch the glass tube of new bulbs with
your bare hands. Even minor contamination
can burn into the glass surface and reduce
the service life of the bulbs. Always use a lint-
free cloth or only touch the base of the bulb
when installing.
Only use bulbs of the correct type.
If the new bulb still does not light up, consult
a qualified specialist workshop. Bulbs and lamps are an important aspect of
vehicle safety. You must therefore make sure
that these function correctly at all times.
Have the headlamp setting checked regularly. Overview: changing bulbs/bulb types
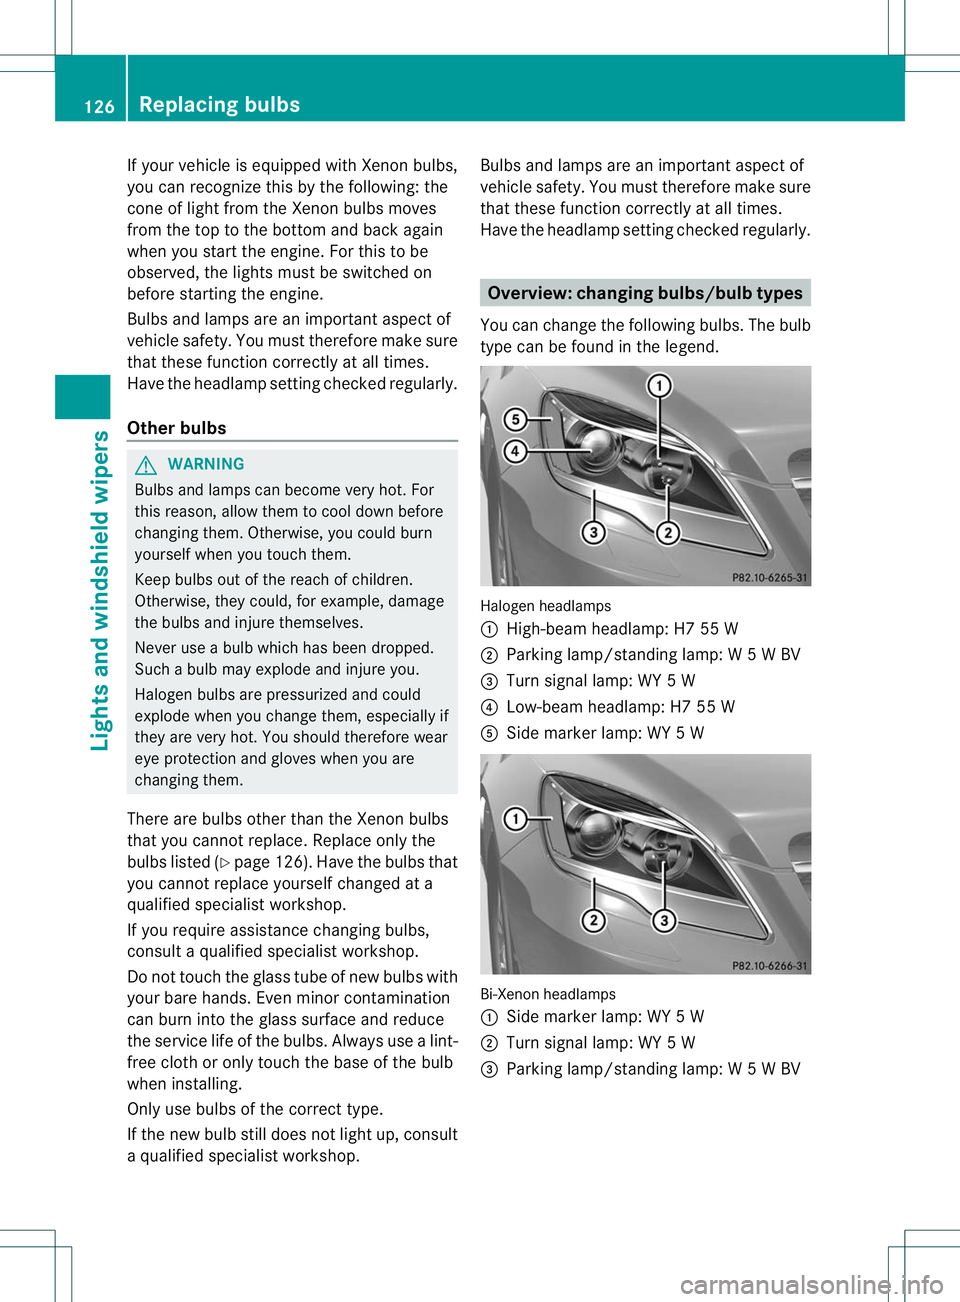
You can change the following bulbs. The bulb
type can be found in the legend. Halogen headlamps
:
High-beam headlamp: H7 55 W
; Parking lamp/standing lamp: W 5 W BV
= Turn signal lamp: WY 5W
? Low-beam headlamp: H7 55 W
A Side marker lamp: WY 5 W Bi-Xenon headlamps
:
Side marker lamp: WY 5 W
; Turn signal lamp:W Y5W
= Parking lamp/standing lamp: W 5 W BV 126
Replacing bulbsLights and windshield wipers
Page 131 of 364
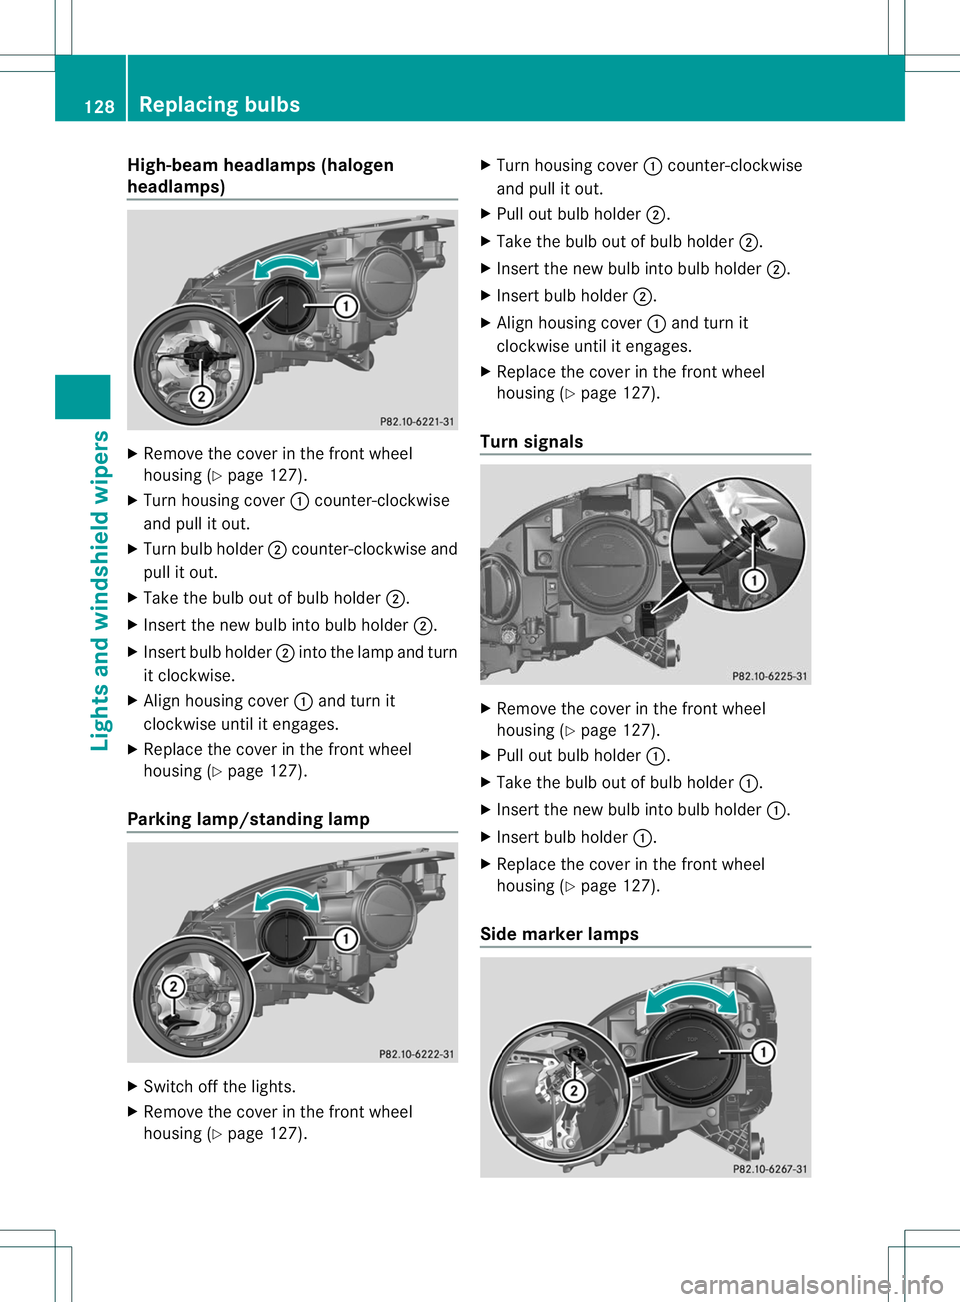
High-beam headlamps (halogen
headlamps)
X
Remove the cover in the front wheel
housing (Y page 127).
X Turn housing cover :counter-clockwise
and pull it out.
X Turn bulb holder ;counter-clockwise and
pull it out.
X Take the bulb out of bulb holder ;.
X Insert the new bulb into bulb holder ;.
X Insert bulb holder ;into the lamp and turn
it clockwise.
X Align housing cover :and turn it
clockwise until it engages.
X Replace the cover in the front wheel
housing (Y page 127).
Parking lamp/standin glamp X
Switch off the lights.
X Remove the cover in the front wheel
housing (Y page 127). X
Tur nhousing cover :counter-clockwise
and pull it out.
X Pull out bulb holder ;.
X Take the bulb out of bulb holder ;.
X Insert the new bulb into bulb holder ;.
X Insert bulb holder ;.
X Align housing cover :and turn it
clockwise until it engages.
X Replace the cover in the front wheel
housing (Y page 127).
Turn signals X
Remove the cover in the front wheel
housing (Y page 127).
X Pull out bulb holder :.
X Take the bulb out of bulb holder :.
X Insert the new bulb into bulb holder :.
X Insert bulb holder :.
X Replace the cover in the front wheel
housing (Y page 127).
Side marker lamps 128
Replacing bulbsLights and windshiel
dwipers
Page 224 of 364
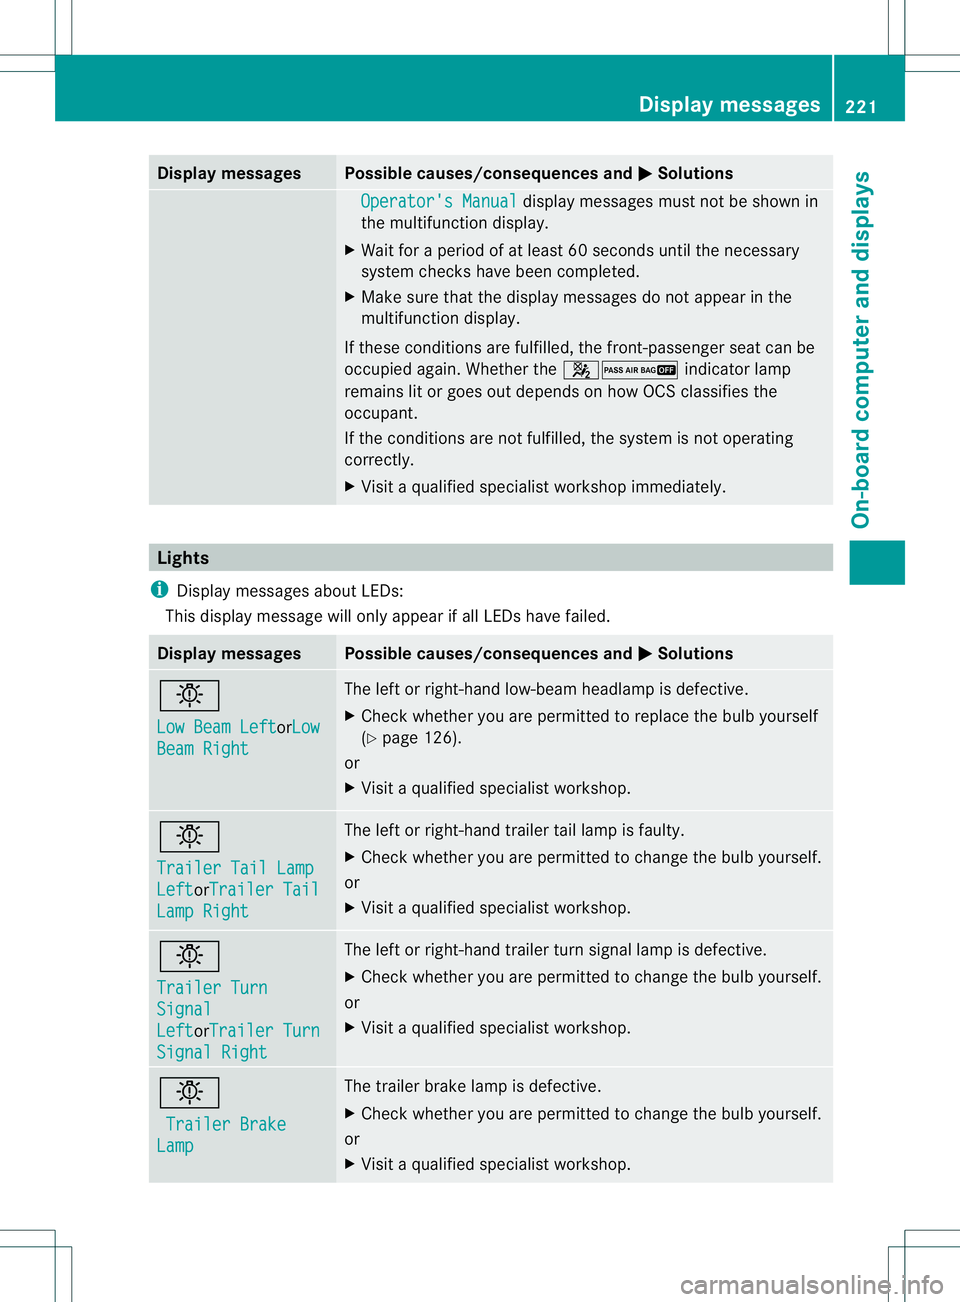
Display messages Possible causes/consequences and
M Solutions
Operator's Manual display messages mus
tnot be shown in
the multifunction display.
X Wait for a period of at least 60 seconds until the necessary
system checks have been completed.
X Make sure that the display messages do not appear in the
multifunction display.
If these conditions are fulfilled, the front-passenger seat can be
occupied again. Whether the 42indicator lamp
remains lit or goes out depends on how OCS classifies the
occupant.
If the conditions are not fulfilled, the system is not operating
correctly.
X Visit a qualified specialist workshop immediately. Lights
i Display messages about LEDs:
This display message will only appear if all LEDs have failed. Display messages Possible causes/consequences and
M Solutions
b
Low Beam Left
orLow
Beam Right The left or right-hand low-beam headlamp is defective.
X
Check whether you are permitted to replace the bulb yourself
(Y page 126).
or
X Visit a qualified specialist workshop. b
Trailer Tail Lamp
Left orTrailer Tail
Lamp Right The left or right-hand trailer tail lamp is faulty.
X
Check whether you are permitted to change the bulb yourself.
or
X Visit a qualified specialist workshop. b
Trailer Turn
Signal
Left orTrailer Turn
Signal Right The left or right-hand trailer turn signal lamp is defective.
X
Check whether you are permitted to change the bulb yourself.
or
X Visit a qualified specialist workshop. b
Trailer Brake Lamp The trailer brake lamp is defective.
X
Check whether you are permitted to change the bulb yourself.
or
X Visit a qualified specialist workshop. Display messages
221On-board computer and displays Z
Page 225 of 364
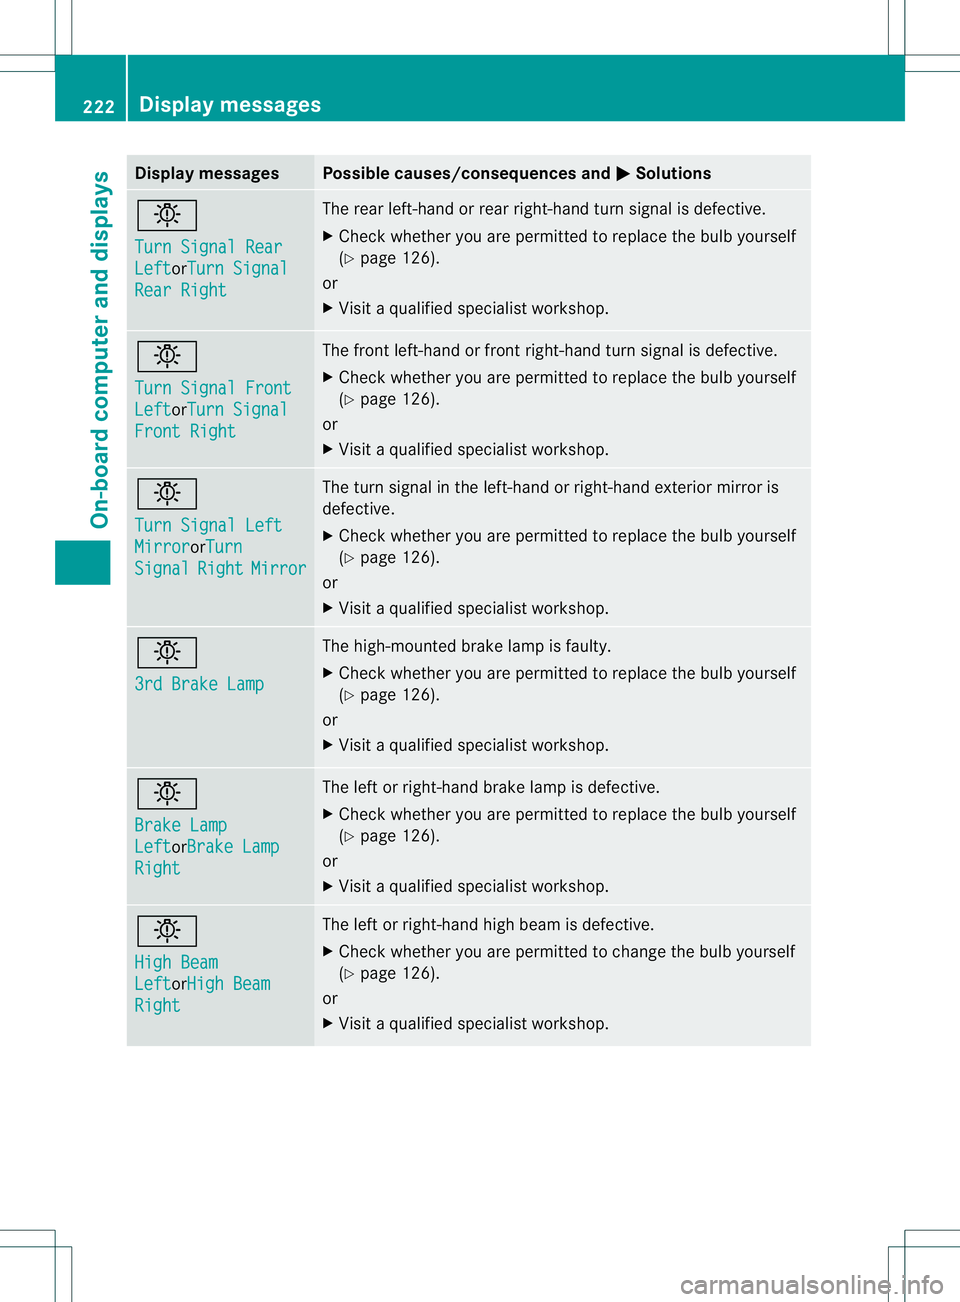
Display messages Possible causes/consequences and
M Solutions
b
Turn Signal Rear
Left orTurn Signal
Rear Right The rear left-hand or rear right-hand tur
nsignal is defective.
X Check whether you are permitted to replace the bulb yourself
(Y page 126).
or
X Visit a qualified specialist workshop. b
Turn Signal Front
Left orTurn Signal
Front Right The front left-hand or front right-hand turn signal is defective.
X
Check whether you are permitted to replace the bulb yourself
(Y page 126).
or
X Visit a qualified specialist workshop. b
Turn Signal Left
Mirror orTurn
Signal Right Mirror The turn signal in the left-hand or right-hand exterior mirror is
defective.
X
Check whether you are permitted to replace the bulb yourself
(Y page 126).
or
X Visit a qualified specialist workshop. b
3rd Brake Lamp The high-mounted brake lamp is faulty.
X
Check whether you are permitted to replace the bulb yourself
(Y page 126).
or
X Visit a qualified specialist workshop. b
Brake Lamp
Left orBrake Lamp
Right The left or right-hand brake lamp is defective.
X
Check whether you are permitted to replace the bulb yourself
(Y page 126).
or
X Visit a qualified specialist workshop. b
High Beam
Left orHigh Beam
Right The left or right-hand high beam is defective.
X
Check whether you are permitted to change the bulb yourself
(Y page 126).
or
X Visit a qualified specialist workshop. 222
Display messagesOn-board computer and displays